Zack the Mack's Content
There have been 313 items by Zack the Mack (Search limited from 21-January 97)
#267081 The Grid Code Indoor Arena War
 Posted by
on 26 February 2010 - 07:39 PM
in
Nerf Wars
Posted by
on 26 February 2010 - 07:39 PM
in
Nerf Wars
#262879 The First Look At The Tetrastrike
Posted by
on 24 January 2010 - 12:34 AM
in
General Nerf
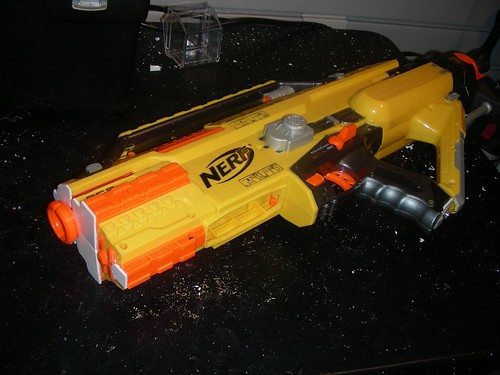
#291535 The Compleat Stampede Mod
Posted by
on 26 December 2010 - 01:34 AM
in
Modifications
That's caused by the plunger assembly not returning fast enough. It's happened as low as 14 volts for me.Maybe I misunderstood a few other threads, but concerning the voltage: Weren't people having problems with the blaster just continually shooting above a certain voltage? What is that 'ceiling voltage' where the blaster is maxed out per say?
I solved this problem by upgrading the spring (hence the BBB spring), which slows the mechanism.
You could also upgrade the thin black return spring by stretching it, annealing it in an oven, or replacing it, but this will put a lot more stress on the blaster.
#291529 The Compleat Stampede Mod
Posted by
on 26 December 2010 - 01:04 AM
in
Modifications
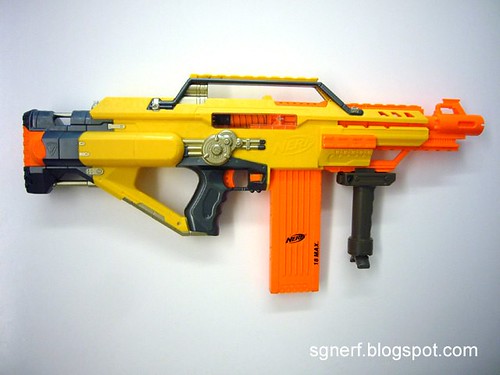
New hotness.
I'll start with the basics and move on to the good stuff.
Disassemble your blaster and remove the plunger assembly.
Let's fuck shit up.
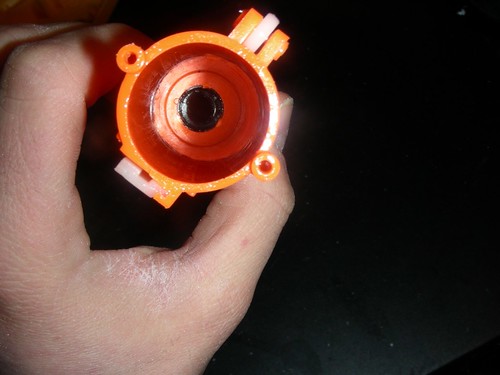
Mod 0: Air restrictors. There's a knack to killing this blaster's notoriously difficult floating restrictor.
To get this thing out, you need to enlarge the hole in the ridge between the plunger tube and barrel and push it out through the plunger tube. I used a long, thin screwdriver to scramble the ridge and knock it out. A thin needle file could work too.
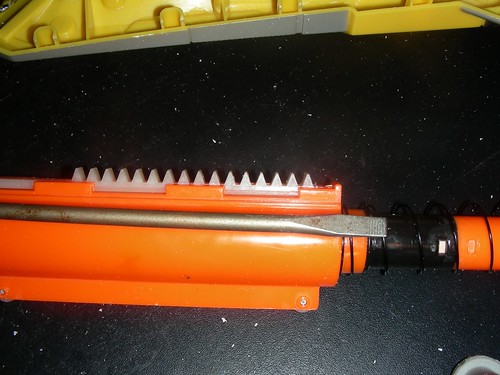
Here's the hole, post-enlargement.
Mod 1: Basic upgrades.
Two wraps of tape is OK, but you want to keep it loose. It's more important for the plunger to move quickly than make a perfect seal.
Padding the plunger head is critical if you removed the AR's, since this blaster will dry-fire at high speed.
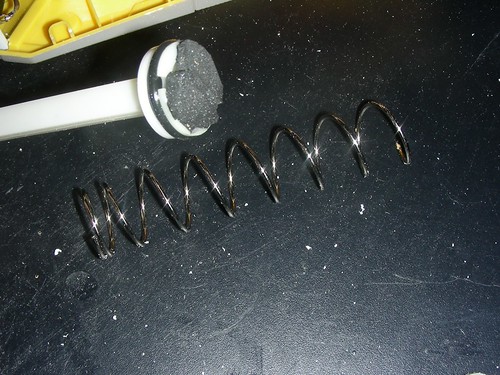
Upgrading the spring is a must, especially if you up the voltage. A BBB spring fits perfectly if you cut off one coil.
Mod 2: Minimization! AKA, how to shove your Stampede into the wall!
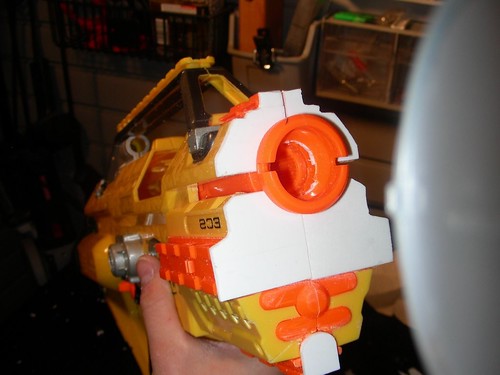
Cut your Stampede directly in front of the side rails. The best way to do this is in two passes - start at the inside and cut out. Here's the post-cut Stampede:
Patch the holes. I'll post some measurements soon.
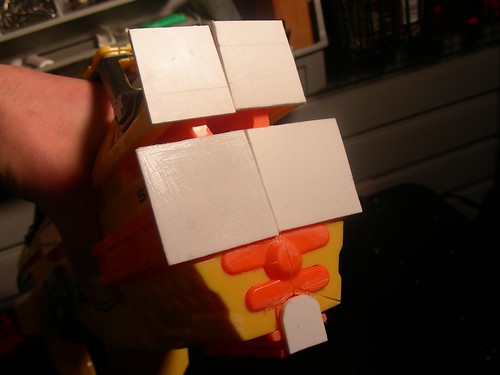
Cut it down and add a segment of the faux barrel for the ladies.
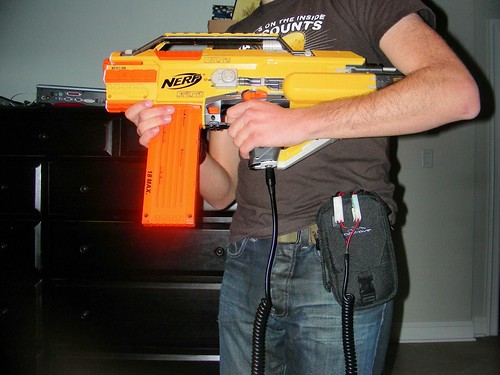
Mod 3: External power pack.
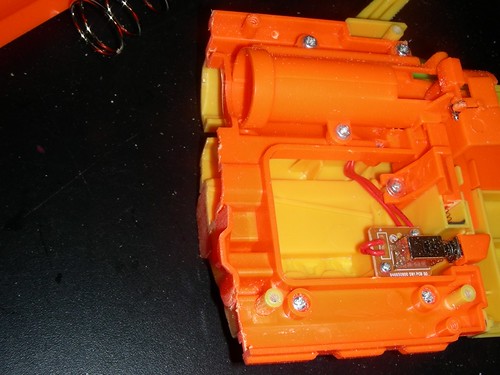
The objective here was to divert the ludicrous weight of the batteries off the blaster and onto the belt. I took a belt pouch from an old Palm Pilot and loaded it with two RadioShack 7.2V NiCd batteries:
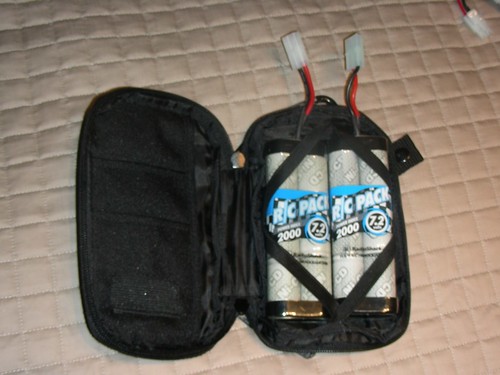
Oddly, this produces 16.7V when read with a multimeter. Maybe an electrical engineer here can explain why. I soldered two battery pack connectors in series (black to red) and soldered it to a coiled guitar cable.
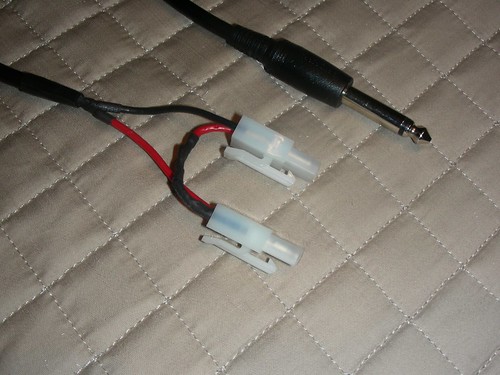
In retrospect, this was not a good choice, since the ground is just wrapped around the other wire, not sheathed. Remember to use lots of heatshrink.
Now, desolder the wire and capacitor from the battery terminals and solder them to a panel-mount jack.
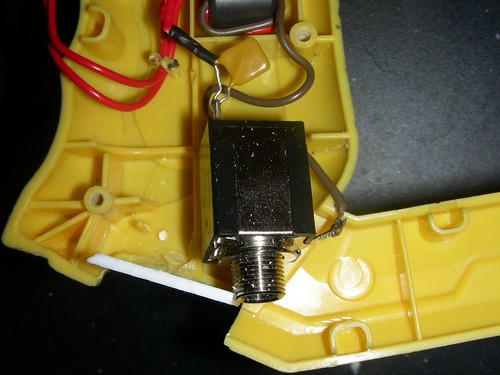
Cut a hole in the bottom of the grip, cut a piece of styrene large enough to cover it, drill a hole for the jack, and glue to ONE SIDE OF THE SHELL.
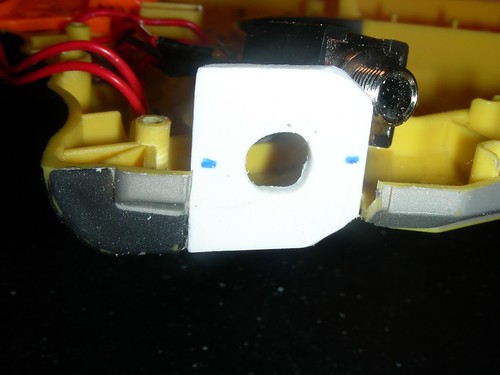
Finally, mount that shit.
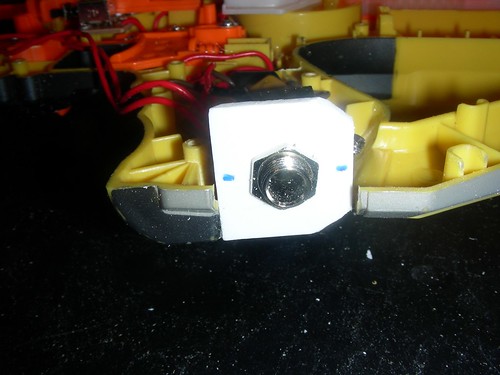
And there you go!
Ranges: 50-75 (It still uses CS darts, after all)
Cyclic Rate: 3.1 darts per second
HvZ diddle Rating: 9001
#291605 The Compleat Stampede Mod
Posted by
on 26 December 2010 - 09:45 PM
in
Modifications
Unfortunately, this one only goes to about 8.5. I'm working on another addition that will bring it up there.Does your Stampede go up to 11?
Thanks bra. I wouldn't recommend it, since it's not designed to solder. In retrospect, a 1/8" cord would have been a better choice, since both wires are sheathed.I never would have thought to use a patch cord as an electrical cable! Great mod.

It's not foam, it's 1/8" styrene plastic. It's flexible, really cheap, easy to cut, and holds adhesives well. You can get it at hobby stores. Popatachi clued me in to this material, although he prefers the thinner 1/16".Once again nice job Zack. I love the use of the foam stuff in the front to cover up all the gaps.
What went wrong? I was thinking of doing an Angel-Breech-like design in the future.GREAT JOB MAN! I like the power pack idea. Note: do NOT try to brass your stampede! Learned that the hard way today.
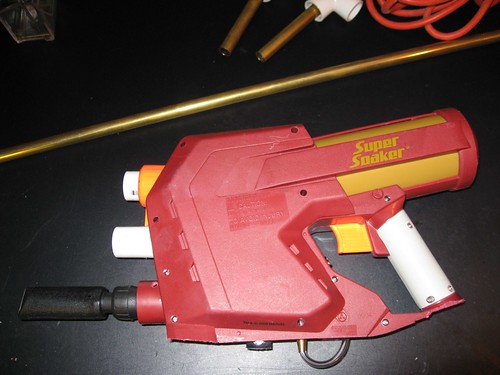
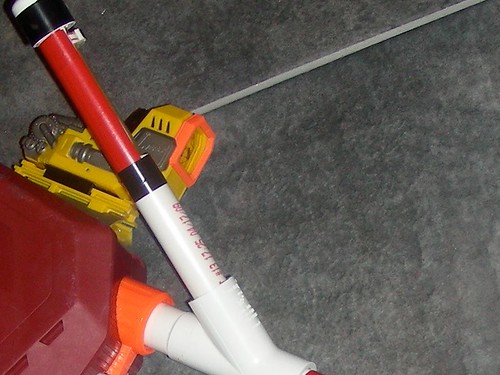
#282938 Super Soaker Iron Man Overhaul
Posted by
on 12 August 2010 - 02:27 PM
in
Modifications
It's got a big bladder made of thick rubber, so it stores a lot of air and releases it quickly. I vaguely remember hearing that bladders release air more evenly than hard tanks, which might help as well.
- To what do you attribute this blaster's extraordinary power? Higher pressure or larger reservoir + longer barrel?
- Would adding some 'filler' in the tank reduce the number of pumps w/o costing (too much) range/speed/danger/damage?
- How is the barrel supported? I've found that long PVC barrels tend to put a lot of strain at the coupler.
The bladder is solvent-welded into the tank-like cylinder. I'm not planning on cracking it open. I don't think reducing the capacity would help.
The barrel's just held in the coupler by friction. The valve's face is nice and flat, plenty of surface area for Zap-a-Gapping. Combined with the nozzle protector, it's pretty solid. The barrel sometimes loosens after a lot of vigorous pumping.
I bought it at Toys r Us. I still see them all over the place. Now's the time to get them, when they're being discounted.So, where'd you find one?
One question I have: Maybe I just read the write-up wrong, but can the bladder actually fill the 3K tank after you shoot it, if you aren't firing out of the main barrel at all? I know they're on the same pump, but I'm not sure if the check valves prevent that.
The check valves keep air from flowing between the tank and bladder. I've never trusted the bladder-to-tank "semi-auto" thing...
#282925 Super Soaker Iron Man Overhaul
Posted by
on 12 August 2010 - 01:17 PM
in
Modifications
The core of this mod is the Iron Man Super Soaker, aka the Arctic Blast. Internal shots are located on iSoaker's page. This is a CPS derivative, meaning that it uses a Magstrike-like bladder, sealed in a solvent-welded cylinder, to store pressure. Basic mods to this blaster are easy - Jerm did it years ago - but some TLC is necessary to make it war-ready.
Below are my blaster's internals. The water tank's not necessary, so I removed it immediately.
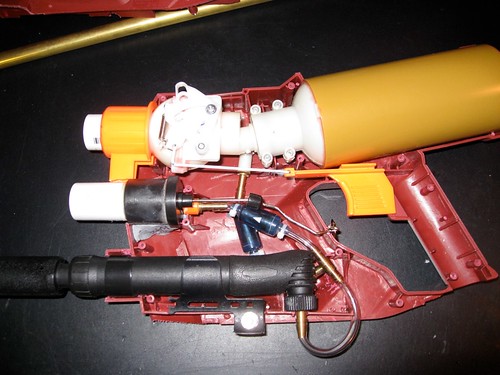
Mod 1: Link the Top Valve
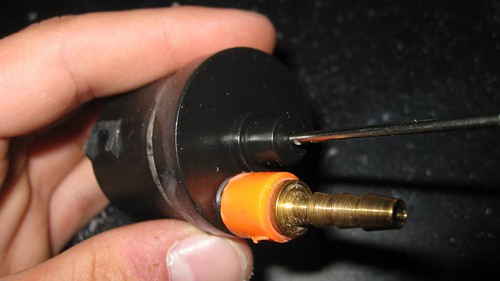
The bread and butter of this mod is linking the massive top valve to the trigger. If you're ballsy and/or want an integration, you can saw off that useless bottom valve altogether. Cut it off where it meets the top valve and securely attach a hose barb to the pipe. I embedded a brass mender with Goop and reinforced it with Zap-a-Gap, but solvent-welding a plastic barb would be a superior option.

Remove the spring from the bottom valve, then deconstruct the top valve's "snapping" mechanism. Glue a small bit of plastic to the valve to limit the lever's range of motion so it won't be open at rest. I don't have a pic of that yet. Replace the white bit over the lever, but don't include the black wire or the top handle. Use the bottom valve's extension spring instead of the original one for an easier trigger pull. Expand the hole on the top valve's lever and reinforce it with some scrap plastic or aluminum.
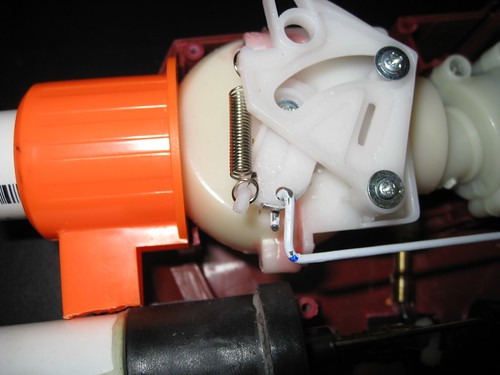
Connect the valve arm to the trigger using coat hanger or music wire. Note the 90-degree bend in the wire I used, which gets around the valve's screw posts. To make sure your trigger is stable, use pliers to make sharp bends and don't leave any wiggle room on the trigger.
Now, add a coupler on the top valve. If you're as neurotic as I am, fire up a Dremel or hole saw and expand the orange nozzle protector to fit. If you left the bottom nozzle intact, add a coupler and a new spring, and rig up a keyring trigger.
Mod 2: Pump Replacement
The stock pump takes 30 strokes to fill the bladder to a usable level, so replace that shit! You'll have an easier time getting everything in the shell if your pump valve is at a right angle. I used a Schwinn bike frame pump from K-mart with a Slime hose barb from Ace.

If you remove the tank and put a nice, big nut and bolt through the clip that comes with the pump, you can hold it in place without adhesives. I drilled a hole in the bottom of the blaster to lead the hose through. This locks the pump in place and makes setting up the internals easier.
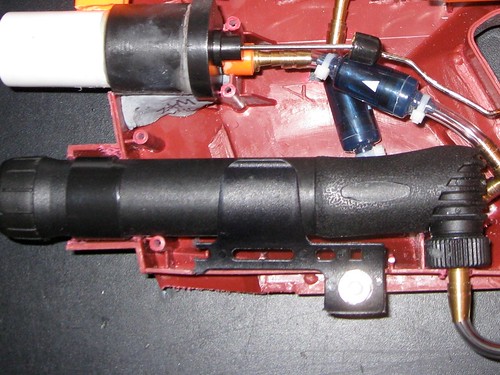
Mod 3: Integration
Even with that bitchin' new pump, it still takes a while to pressurize a shot. Why not use that shell space for an integration and save your ass from rushing? An AT3K tank is perfect integration material for this blaster. Add a coupler and hose barb…
...then bend the firing pin, add a keyring trigger, and connect it all together.
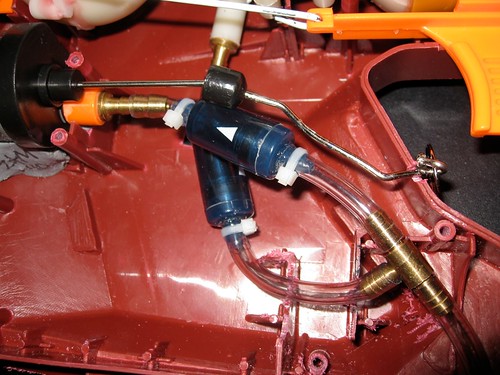
The tee and check valves were bought at Petco. Lucian says the check valves are only rated to 5psi, so use them at your own risk. Jamming this all in is a little tricky, so cut notches in the ribs to hold the tubing in place.
Make sure everything fits, then use epoxy putty or hot glue to attach your integration. I put 2' PVC dummy barrels in both couplers to help line them up - this is much easier when someone helps you!
Finally, reassemble the blaster, let the glue dry, and test-fire.
Mod 4: Uber-1337 Tactical Rails!!
There's another problem left to fix - that weirdly-angled tank prevents you from aiming down the barrel. An easy fix*: Attach an N-Strike rail on top so you can use optics! Tacticool! You'll need to support one end of the rail with hot glue or epoxy putty, since none of the top panels are parallel with the barrels.
Why not add another rail on the side?
Appendix: Using the Blaster, Barrels, and the Risk of Personal Injury
The tank holds a LOT of air, and moves it quickly, so long barrels are a must. I use an 8" hopper and a 14" brass barrel. The top barrel fires Slugs 120', their maximum range. This blaster is unsafe when loaded with heavyweight Stefans - don't use them!
I pump the bladder 9-13 times, and the 3K gets two strokes. 10 strokes is enough for normal use, and 12 will make up for the extra dead-space if the hopper is almost empty. The bladder can probably withstand 20 or more pumps, but I doubt that the integration and tubing can.
A word about safety: This blaster is REALLY POWERFUL. It can fire Titan missiles. When using any strong blaster in a war, you need to be considerate and responsible. Limit your range by using an RSCB or hopper, and always use Slugs or stock darts. This blaster will fire on as little as 5 pumps, so under-pump when you can.
*OK, so the easiest way to aim down the barrel is to use a tall Chopper or RSCB. However, N-Strike accessories are more awesome. Your choice.
#357219 Strayven Mod
Posted by
on 18 December 2016 - 11:28 PM
in
Modifications
1) Yes. The easiest way is buying 12V LED tape, which you can just run right off the batteries. You could also wire bunches of LED's in series so the forward voltage adds up to 12V or less, and use a resistor to limit the current. Or, you could add a DC-DC step-down converter (also called a buck regulator or switching regulator) to create a low-voltage line that can drive your LEDs.
2) Yes. You will need to regulate the battery voltage to a more manageable level, probably 5V for the Arduino. I would use a switching regulator to do this, because using a linear regulator to drop 12V to 5V will produce a lot of heat and waste a lot of battery.
3) The Tenergy TB6B is a well-designed multi-purpose battery charger, discharger, and balancer. It's well-priced and very popular. It has algorithms that monitor the battery and limit the amount of current it can draw.
#263094 Stock Berserker With Tiny Tank...?
Posted by
on 25 January 2010 - 10:53 AM
in
Modifications
The design of the Berserker Fusion! Daikaiju! introduces a lot of dead space, so moving more air is definitely a plus. Mine has a terrible turret seal, so I need the big-ass tank to get acceptable ranges, but your mileage will vary.
In terms of constructing a Berserker Fusion! Daikaiju!, the new valve looks like it could be even better than the original. It's bigger and flatter, which means more contact area for the CPVC tee.
As for the pump, the pump tube does look longer, but if I know BuzzBee, they're using the same pump as the original, so you're not gaining anything. The smaller tank will let you set your basketball pump (which you're using, of course!) further inside the shell.
If I had the time, money, and miles of PETG, I'd make another Berserker Fusion! Daikaiju! and compare, but til then, you're on your own! Worst-case scenario, crack open an SGSL and replace the internals.
#258636 Stefan Compatible Raider Drum Clip
Posted by
on 11 December 2009 - 02:26 PM
in
Modifications
The main problem I see is that the darts advance from the back of the clip. This is a problem for Angel Breeches, which load darts from the front. [EDIT: In Step 8, k9turret cut a notch in the other side of the magazine so it can be inserted backwards and load darts correctly] I suppose it would be easy to fix - just glue the FBR spacers on the other side of the drum - but then you'd lose the ability to check your ammo.
I've been working on an Angel Breeched LS to test this out since I read it on NerfRevolution, and when I finish the drum over the weekend I'll post my results.
#258711 Stefan Compatible Raider Drum Clip
Posted by
on 12 December 2009 - 12:32 PM
in
Modifications
The directions were a little unclear. Putting the drum in backwards still doesn't solve the problem of being able to see your ammo supply.The main problem I see is that the darts advance from the back of the clip. This is a problem for Angel Breeches, which load darts from the front.
Thank you and read step 8, dumbass
#245811 Star Wars Rebel Trooper Blaster Mk. 2
Posted by
on 06 August 2009 - 03:31 PM
in
Modifications
Nerf-o-sphere, if you've never seen this thing in action before, it has absolutely insane plunger draw. That thing goes back about two feet. It'll give you nightmares.
EDIT: God dammit, it's a Rebel Trooper Blaster, not a Rebel Trooper.
#292059 Stampede Shield In Wars
Posted by
on 02 January 2011 - 02:50 AM
in
General Nerf
Right?
#291843 Stampede Jam Problem (please Help!)
Posted by
on 30 December 2010 - 02:44 AM
in
Modifications
#275426 Spring Bcno
Posted by
on 20 May 2010 - 11:57 PM
in
Nerf Wars
Seoul, did you send out the BS tanks? If I had known you'd be coming, we would have just made our deal in person!
#275427 Spring Bcno
Posted by
on 21 May 2010 - 12:37 AM
in
Nerf Wars
I REALLY need 7" of [k26] spring and a 1/2" PVC wye. Can anyone bring a pre-cut spring of this length or a wye for me to buy?
#275482 Spring Bcno
Posted by
on 21 May 2010 - 05:06 PM
in
Nerf Wars
You're the man, LT.Yay for double post. I'll be there. I'm makin shit happen for this.
Oh, and Zack, I got ya with those materials.
#275503 Spring Bcno
Posted by
on 21 May 2010 - 07:06 PM
in
Nerf Wars
You're the man, LT.
Er...LT?
Heh heh... you're the man, DB.
LT, you're also the man.

DX - The Mag7 and many other hosts have been banning all non-CS darts from their wars. The idea is to limit range and prevent the poor widdle nerfers from having to suffer through the agony of welts.
I'm glad we're all macho here and don't restrict darts.
#278180 Splitfire/2k Turret Modification!
Posted by
on 21 June 2010 - 08:36 AM
in
Modifications
Anyways, I've got a Splitfire and I'd love to rip this off, so now all I need is a 2K turret!
#258638 Specific Nightfinder Question
Posted by
on 11 December 2009 - 02:33 PM
in
Modifications
#354122 Solder: Lead vs Lead Free
Posted by
on 11 June 2016 - 12:45 PM
in
Modifications
Pro product developer here.
If you're new to soldering, remember:
- Flux fumes, from leaded or lead-free solder, will burn your lungs and dry your skin.
- Use a fan to suck the fumes away from you. Don't blow the fumes away - the fan will also blow the heat away.
- Don't apply solder directly to the tip of the iron! Hold the tip against both soldering surfaces until the wires or pads are hot. Apply solder directly to the surfaces and they will melt the solder. Then remove the iron. If you melt solder right onto the iron, the flux burns off too quickly to work.
- If you're soldering wires together, first coat each stripped end with solder. Then, thread some heatshrink onto the wire. Then, twist the stripped ends tightly together. Then solder, then shrink the heatshrink.
- Use heatshrink for crissake.
- Don't solder electronics while they're still in the blaster! The heat will deform the plastic.
- Stranded wires are easier to tuck into place than solid wires.
#261058 Skype Group Chat
Posted by
on 07 January 2010 - 12:24 AM
in
Off Topic
Real Name: Zack
Call me: Your Royal Highness
#242065 Silencing A Crossfire
Posted by
on 15 July 2009 - 02:09 PM
in
Modifications
Anyways, if you want to get the blaster silent in a hurry, wrapping a pillow around it isn't a bad idea. Stuffing the voids with foam works to a degree, but I've never found it to be worth the trouble.
Your real best bet is adhering a large, soft disk onto the inside end of the plunger chamber, the sealed tube that the plunger slides around in. Most of the noise generated by a spring blaster is caused when the plunger head impacts the end of the chamber, and a soft cushion will prevent the noise. The best material for the disk is sponge rubber, since it holds its shape, but a few layers of neoprene or even dart foam will work. A side bonus is that this can extend your plunger's life. You can find this mod in most advanced X-bow, Doomsayer, NiteFinder, etc threads.
#357589 Shields: Do you love them? Hate them? Ban them? Permit them?
Posted by
on 16 January 2017 - 04:02 PM
in
General Nerf
The key rule is that breaking the shield kills the shieldbearer:
- It amps up the risk factor in running a shield
- It provides a bigger target for the jankier "shield breaker" projectiles
- It cuts out bookkeeping and makes rules enforcement easier
- Many players don't like throwing their equipment on the ground
- People will step on the shield, and we don't want anyone getting lacerated on broken plastic
#357561 Shields: Do you love them? Hate them? Ban them? Permit them?
Posted by
on 14 January 2017 - 05:57 PM
in
General Nerf
I've done some casual wars that allow shields. They do slow the game, but they encourage tactical play. Shields counter high-powered blasters that outrange opponents - if you want to get more diversity than homemades, I highly recommend them.
Here are the rules we used to govern shields:
- Shooter still calls hits. If the shooter says the round hit the shieldbearer and not the shield, it counts as usual.
- Shields must be held in one hand. Players must hold the shield in a hand to use it. This prevents players from strapping shields all over themselves, makes it easier for the shieldbearer to call shield hits, restricts the blasters the shieldbearer can use, and makes the shieldbearer vulnerable while reloading. It also implicitly bans shield-blaster combos, since the shield is held by the blaster.
- Melee kills the shieldbearer. If the shield touches an opponent's body or any of his or her equipment, the shieldbearer dies as if he or she were hit. This allows any player to kill a shielded player, and punishes the shieldbearer for striking a player with it.
- Exotic projectiles kill the shieldbearer. If a missile, sock, Mega dart, Vortex disc, etc hits the shield, the shieldbearer dies as if he or she were hit. The war organizer might want to allow Rival balls, Boomco darts, stock Streamlines, etc to penetrate shields as well. As usual, the shooter calls hits.
- Shieldbearers have an extended respawn time. We used double time - if the game is 3-15, you wait 30 seconds instead of 15. You might even extend this further if the battlefield is large. This allows players to rush opponents when they kill their shielded teammates.
- Shields don't work during sudden death. If the opposing team has only one surviving player, shield hits kill the shieldbearer. That player is responsible for calling sudden death.
Setup and safety rules:
- Defenders can't use shields. This is only for asymmetrical games with an attacking and defending team.
- Shieldbearers can't use melee weapons. This is a safety rule that prevents players from accidentally swinging a shield at someone.
- Shields can't have sharp edges. Shields must have rounded edges that are unlikely to cut a player. Cracked or broken shields can't be used.
Some other pointers for using shields in wars:
- Shields are the most fun when there's a lot of cover. In an open battlefield, the shields are the only cover on the battlefield and the game grinds to a halt.
- Shields are best when the teams are large. I wouldn't allow shields unless there are at least six players on each team.
- Shields force a change in the metagame. One shieldbearer can shut down an entire team of long-range single-shot blasters.
#357631 Shields: Do you love them? Hate them? Ban them? Permit them?
Posted by
on 20 January 2017 - 07:32 PM
in
General Nerf
But does breaking the shield and killing the user make the shield null for the rest of the battle?
My post was saying ok the disc hits your shield it's broken for the rest of the rouND and you can go place it back at your base and grab a full size blaster or continue to carry it and wield a smaller one.
Oh, you can continue to use the shield. Creating counterplays to shields is important, but It's more important to keep the rules manageable.
#261470 Selective Longshot Clip Removal Idea
Posted by
on 11 January 2010 - 03:00 AM
in
Modifications
Not really. In standard brass longshots you have to load mags in that fashion and brass is much less resistance to deforming pressures than plastic.
Angel-breeched Longshots' barrels are significantly smaller in diameter than the stock barrel. While it's easy to pull out a clip from a brassed LS, it's not as safe to do so with a stock blaster.
In addition, a closed Angel breech is supported on both sides, whereas a stock breech is only supported on one side and thus the bolt-sled bears the load.
I wish mags in Angel Breeches could be swapped while the bolt is back. I can't imagine it's good for the clips.
#261448 Selective Longshot Clip Removal Idea
Posted by
on 10 January 2010 - 11:31 PM
in
Modifications
Also, you can just remove the clip-tooth [is that what it's called?] and the clip release switch to pull it out any time, although it's not a good idea to put that kind of pressure on the barrel and bolt.
#251140 Rscb Help Anyone?
Posted by
on 21 September 2009 - 10:38 AM
in
Darts and Barrels
If your darts aren't leaving the barrel, you need a shorter barrel, a shorter RSCB, or a looser fit. Remember that even though a +bow can push a dart through 16" of barrel when it's singled, the massive dead space created by an RSCB will prevent the dart from going that far in the RSCB setup. I use a 12" barrel on my +bow, but a shorter barrel could be more reliable when the clip's empty. You can also reduce the length of the RSCB for less dead space, which lets you use a longer barrel. I try to use a fairly loose barrel on my RSCB's - if your barrel is tight and a dart does get stuck inside, it's a pain in the ass to get it out.
If your darts aren't even making it into the barrel, do what Carbon suggested and ream the inner rim of the barrel (That sounded kind of perverted). You want the barrel's inner end to essentially look like a funnel, so darts get sent right into the center and hopefully lodged inside. You might also want to use more brass, not e-tape, to nest the barrel in the PVC. The exposed sticky side of the tape sometimes snags darts.
If you're firing multiple darts at the same time, your barrel could be too loose or you could be whipping the setup too quickly and forcing the dart too far into the barrel. Double-firing does happen about 5% of the time with a fully-functional RSCB, it just comes with the territory.
EDIT: Speeling misteak
#263569 Reverse Plungers
Posted by
on 28 January 2010 - 06:27 PM
in
General Nerf
Now, let's all get back to talking about how reverse plungers are awesome.
#263288 Reverse Plungers
Posted by
on 26 January 2010 - 04:37 PM
in
General Nerf
Zack, you're about half a rung down the never-touching-cleavage ladder from penning a nintendo themed nerf fanfic. Turn back now!
If you really want to encourage rof over range, though, the simplest solution would be to try some rounds with the long since abandoned "east coast rules". "East Coast rules" has always been a lame way of saying that there is no countdown after a hit. If someone pelts you with 4 shots from a mantaray (teehee) you take 4 hits. If someone unloads a magstrike on you, count the darts and take the hits.
In this way someone with a ranged blaster that lacks rof might be successful in getting the first hit, but will struggle to keep up with someone packing a clip and a little closing speed. Be warned, however, that this rule set was abandoned by most because rounds are over incredibly quickly, and fairly counting hits from high rof nerf guns is difficult in the heat of the moment. Other things that become difficult in the heat of the moment; reloading anything, iambic pentameter, your mom saying no to me.
VACC
Ha ha, I figured Nerfers would be geeky enough to instantly recognize the names. I was originally going to use Edward and Jacob, but the last thing we need on this forum are people who Google that combination. Not to mention my post looked about 9001% gayer.
Anyways, I think the general consensus lately is that the standard 3-15 game rules don't match up to what players find enjoyable, and aren't compatible with the currently-available Nerf products. I'd say that the subject definitely deserves some attention, but this particular topic isn't the place to do it.
#263342 Reverse Plungers
Posted by
on 26 January 2010 - 09:04 PM
in
General Nerf
This is a little out there, but bringing back megas would solve several common complaints people have with Nerf.
None of the reverse-plunger blasters take Megas, so this is out of place.
Oh, I realize what you're saying - Everyone who's NOT using a high-ROF blaster can only use Megas, which both limits range and makes close-range shots less painful. That's actually a really interesting idea.
#263274 Reverse Plungers
Posted by
on 26 January 2010 - 02:35 PM
in
General Nerf
Pretend we have two Nerfers, Mario and Luigi. Mario has a Big Blast with a speedloader, and Luigi has a Raider with a full drum.
If Mario spots Luigi at, say 100 feet, he'll have many opportunities to take him down before Luigi closes the gap. Even with the (overestimated) difficulty of landing a long-range shot, Mario will probably be able to take Luigi down before he can close the gap.
If Luigi gets within, say 50 feet of Mario, Mario can run from Luigi, move out of range, or dodge his shots. As long as Mario can outrun Luigi, he has a tactical advantage.
Even assuming Luigi gets close and rushes, Mario has another advantage in that the opponent is moving at HIM. He can dodge Luigi's shots (which is easy, since they're moving half-speed), and take a barrel tap.
If Luigi manages to really get up in Mario's grill, say 10 feet, range and rate of fire don't matter at all. It becomes a race to barrel-tap.
So what do you do about it? A possible solution is to eliminate barrel taps. If Luigi were to rush Mario and Mario couldn't barrel tap, Mario would only have one extremely risky shot before he was forced to run.
When the defender can barrel-tap, he has all the advantages in close-range. He can dodge the darts, he can run out of range, and he can still retaliate without the risk of losing his only shot.
War organizers, the ball's in your court. It's up to you to discover and implement rules that strip the advantages from long-ranged players and let participants use a wider variety of weapons.
TL;DR: Range matters. Dart speed matters, too. All of the advantages of short range blasters are nullified when a long-range player can barrel-tap.
#263120 Reverse Plungers
Posted by
on 25 January 2010 - 02:32 PM
in
General Nerf
I believe an indoor war is easily more fun than an outdoor war 9 out of 10 times. The reason being is that people don't get boners over spending 10 hours integrating 5 different 2k tanks BLAH BLAH BLAH BLAH
Indoor wars are definitely more fun, but it's REALLY GODDAMN HARD to find even a crappy indoor location.
War hosts: Try a reverse-plunger-only round.
#357053 Releasing Rapidstrike Flywheel CAD
Posted by
on 08 December 2016 - 12:28 AM
in
Modifications
If I have some spare time in the lab this week, I'll try to print one up for you in ABS.
#261573 Recon Grenade Launcher Attatchment
Posted by
on 12 January 2010 - 11:26 AM
in
Modifications
Cool idea, tho. I wonder why we don't see more Mega Missile integrations, given how compact and powerful it is.
#354169 Ravenshot (Hammershot Carbine Conversion)
Posted by
on 13 June 2016 - 06:23 PM
in
Modifications
This actually looks sick.
#356919 Rate of Fire mod for Rapidstrike?
Posted by
on 28 November 2016 - 02:21 PM
in
Modifications
Rate-of-fire is largely determined by the pusher motor. This is the biggest difference between the Rapidstrike and the Stryfe-like blasters - Pulling a Stryfe trigger manually pushes a dart into the flywheels, but pulling a Rapidstrike trigger engages a motorized gearbox that pushes a dart.
Upgrading the pusher motor will increase ROF. Make Test Battle has an excellent video in which they replace the stock Rapidstrike pusher motor with their 6V "Honey Badger" motor. It boosts ROF to about 10 darts per second.
10 darts per second, or 600rounds/min is excessive. You may want to throttle down the pusher motor to a more controllable level.
#357344 Rapidstrike FCG Microswitch Bracket
Posted by
on 29 December 2016 - 04:56 PM
in
Modifications
This is rad. I wish I had access to this when I was still modding my Rapidstrike.
When I make another Rapidstrike, I'll model custom triggers so you don't need to modify the microswitches.
tactical sensation
I see what you did there
#258637 Range Results
Posted by
on 11 December 2009 - 02:30 PM
in
General Nerf

