charlie156's Content
There have been 38 items by charlie156 (Search limited from 29-January 97)
#337832 Why do slug darts need to be made with washers?
 Posted by
on 29 March 2014 - 11:43 AM
in
Darts and Barrels
Posted by
on 29 March 2014 - 11:43 AM
in
Darts and Barrels
#339226 Whats happened with Canada?
Posted by
on 29 May 2014 - 07:28 PM
in
Nerf Wars
Forsaken Angel and his crew retired from hosting after the last Hell had about 8-10 of us show up. Basically the vets have retired and not enough young guns have stepped up to fill the void. Some of us have tried hosting wars, but being outside of the GTA has led to less than desired turnouts.
^^^ Exactly that. Canadian nerfers are to spread out, and unless people want to drive 2-3 maybe 4 hours around, its hard to really get a war going. me and MIG tried to host a war last summer, but the turn out wasn't very large, and people who said they would show didn't. since then, I've talked with a few nerfers from the US, saying if we could get a semi good turnup, they would have a really high possibility of showing up. but until MIG is no longer busy, and school is done for me, that wont be happening. Nerfing in Canada, just isnt as big as the US, brits, and Aus
#339840 What to buy from McMaster-Carr
Posted by
on 29 June 2014 - 02:03 PM
in
General Nerf
#333604 the secret oprv on the air max blasters.
Posted by
on 01 September 2013 - 06:08 AM
in
Modifications
#347687 The Mississauga Massacre
Posted by
on 05 July 2015 - 01:47 PM
in
Nerf Wars
Glue domes are a no no (in all fair understanding, just wanted to make sure)
#347352 The Mississauga Massacre
Posted by
on 22 June 2015 - 02:30 PM
in
Nerf Wars

#347326 The Mississauga Massacre
Posted by
on 21 June 2015 - 06:06 AM
in
Nerf Wars
#356387 Stuck screw
Posted by
on 23 October 2016 - 12:55 PM
in
Modifications
get a screw remover kit. if not, get blue tack or something like that, put some on your screw driver, and apply a lot of pressure and unscrew simultaneously. or glue your driver to the screw. whatever works for you
#357143 SM500/Panther?
Posted by
on 13 December 2016 - 11:47 PM
in
Modifications
You could try cutting the pump off and replacing it. Or, get a tetra strike tank. That may work.
#354264 Quickshot 12
Posted by
on 16 June 2016 - 02:42 PM
in
Modifications
Can you explain a bit more what you did and provide some better pictures? The title makes it sound like you set up a mag locked in the blaster so you can load it on the fly, but we'd all like to know more about what you did. The picture shows locks you removed, how do you load the mag though?
I believe he removed the ability to take out mags by inserting the paper into the mag release, making the clip permanent. I'm the second photo, you can see hat hes actually cut the shell top so that when he primes the top slide, there's a hole which he can load darts directly into the top of the 12 mag.
#341370 ontario nerf
Posted by
on 20 August 2014 - 12:24 AM
in
Nerf Wars
#354114 Nite Finder Rifle 2.0
Posted by
on 11 June 2016 - 12:24 AM
in
Modifications
Well done article! I do have a question though which I couldn't find in the article. What were the ranges that you were receiving with this?
First, don't necro a thread from so many years ago, and second, as the current owner, its getting 100+
#353336 New Generation NF Rifle: The FS Rifle
Posted by
on 08 May 2016 - 06:02 PM
in
Modifications
*This is my first modguide type post, please excuse my lack of experience*
** WARNING, VERY PICTURE HEAVY **
The nitefinder rifle is one of the very first NIC level blasters I'd ever used. Although nitefinders can be found online and at thrift stores; both for very cheap, they are technically obsolete. So let's take the the Elite equivalent blaster, and create a new generation of pistol rifles
~materials~
-consumables-
-- Super Glue
-- JB Weld
-- Hot Glue
-- Epoxy Putty
-- Lube
-- E-tape
-- Teflon Tape
-- Rubbing Alcohol
-Parts-
-- PVC Coupler
-- CPVC Coupler
--Replacement O-ring
-- 3/8 inch Square rod (Mines delrin)
-- Plunger Tube replacement (Mines 1' Polycarb)
-- Main Spring Placement (Mines a [k26])
-- Catch Spring Replacement
-- Assortment of Springs (I don't know what spring sizes, I just used random ones I had around that worked)
*Optional* If you intend to use your own seal (I.g a skirt seal) you'll need to appropriate materials for that
-Tools-
-- Hacksaw
-- Drill (with drill bits appropriate to screw sizes)
-- Screw taps (obviously corrasponding to your screw choices)
-- Dremel
-- Sharpie
-- Ruler
*Any took that will achieve the same results/objectives as the listed above will work.*
~Now all the boring parts, lets get to the mod~
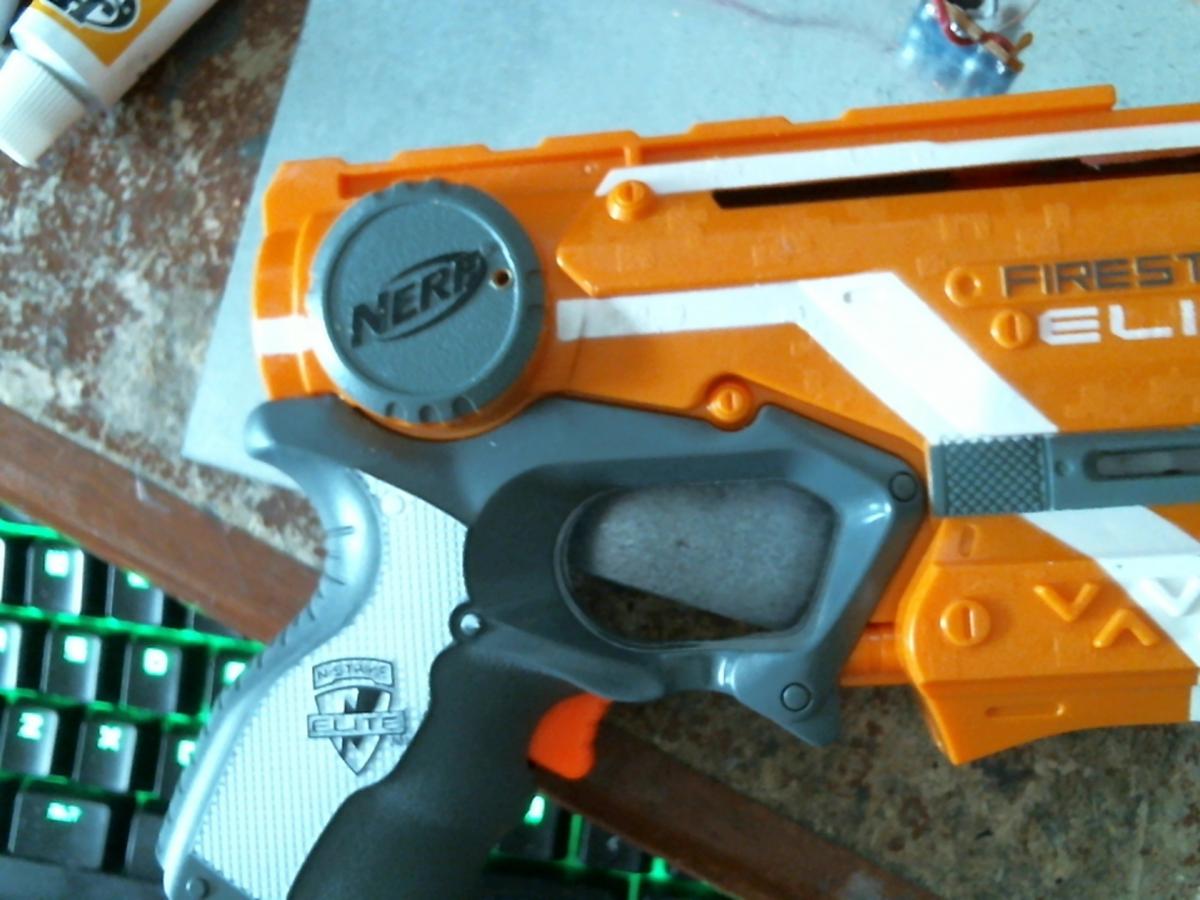
First take your FireStrike and disassemble. No hidden screws so nothing to worry about. the bottom battery cover doesn't need to be unscrewed, but can be done anyways.

If you do remove the cover, remember to just screw the nut onto the screw to keep track of it for the future

Next we will work with the plunger assembly. The plunger rod needs to be cut at two places. (only one is showed in this photo, forgot to photo graph the other)
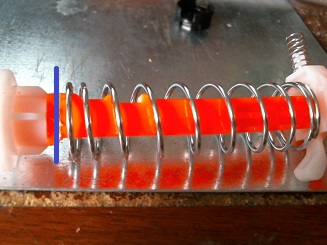
This is what we will have left

And this is all we will use
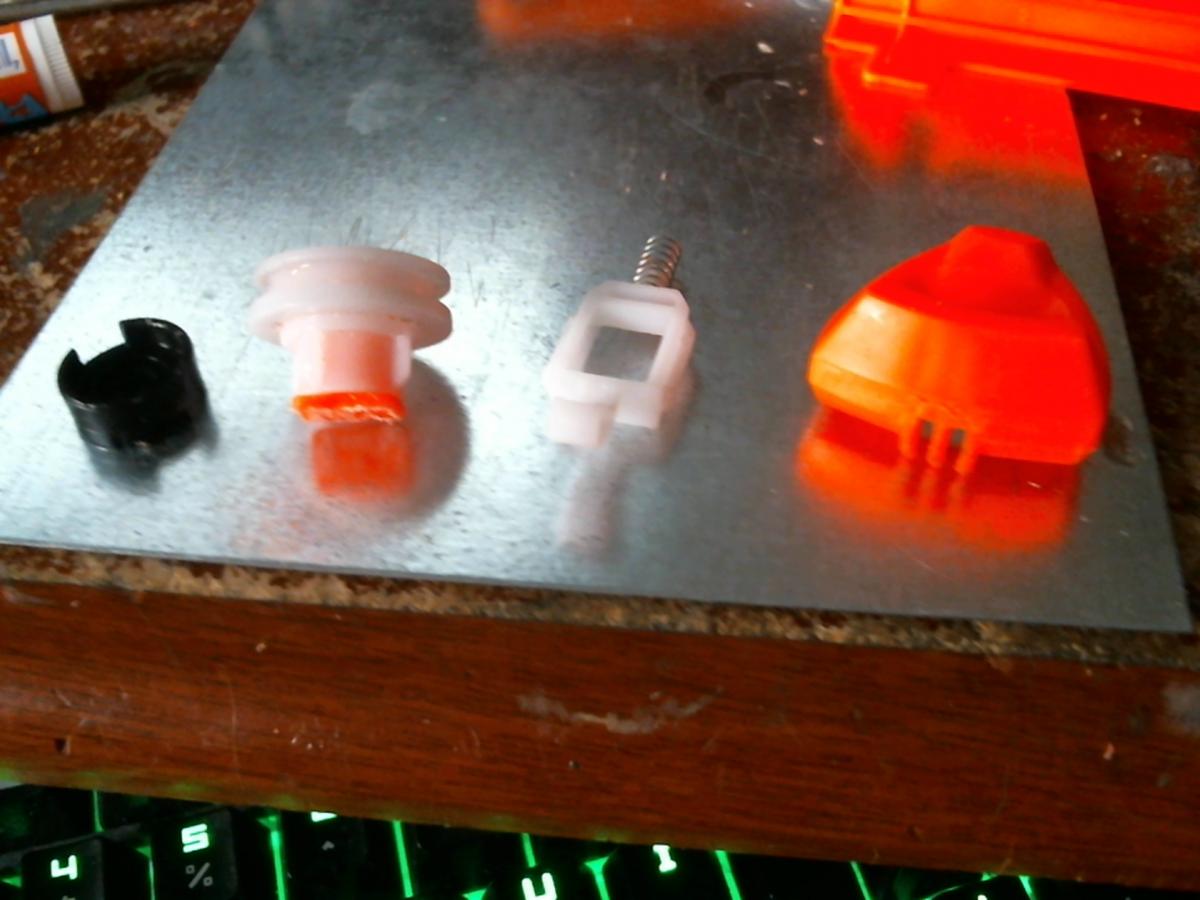
If you wish to use the first strike plunger head, the OD of the FS plunger head and ID of the 1" polycarb tube is only a few mm different, so the o-ring will be to big. You have to replace it with a thinner o-ring.
drill on the inside of the orange piece that the plunger head is attached too.

I will be using the original pull piece of the of the FS, but you can make your own with standoffs or poly carb. If you are like me, you'll need to do a few things.
It is wise to remove the middle bar as it will make drilling the hole after better.


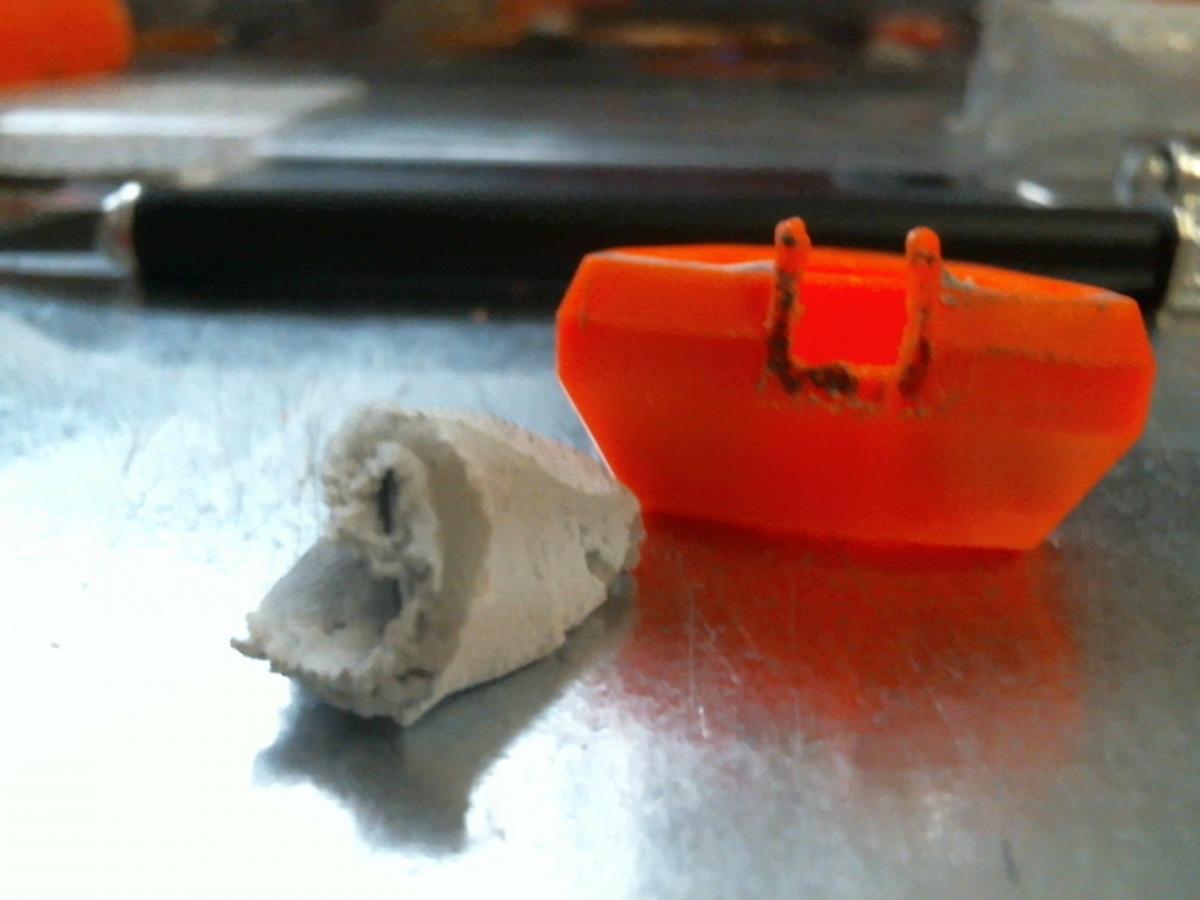
Next we reinforce it

You will need to start on your plunger tube assembly now. My polycarb plunger tube is roughly 9".

CPVC couplers fit perfectly inside PVC couplers. so using a bit of super glue, seat them together, wrap some e-tape around the remaining bit of CPVC and seat it into the polycarb tube. Glue it in place (I used JB weld).

Drill a hole, put a screw through it at the end with the e-tape, and wrap some e-tape around it to look pretty (I coated the screw opening, screw threads, and screw head and bolt with JB weld to make sure there was no leaks).

Voilà, you now have a universal couplered plunger tube.
Next measure out your plunger rod to desired length. Mine is 9" long.
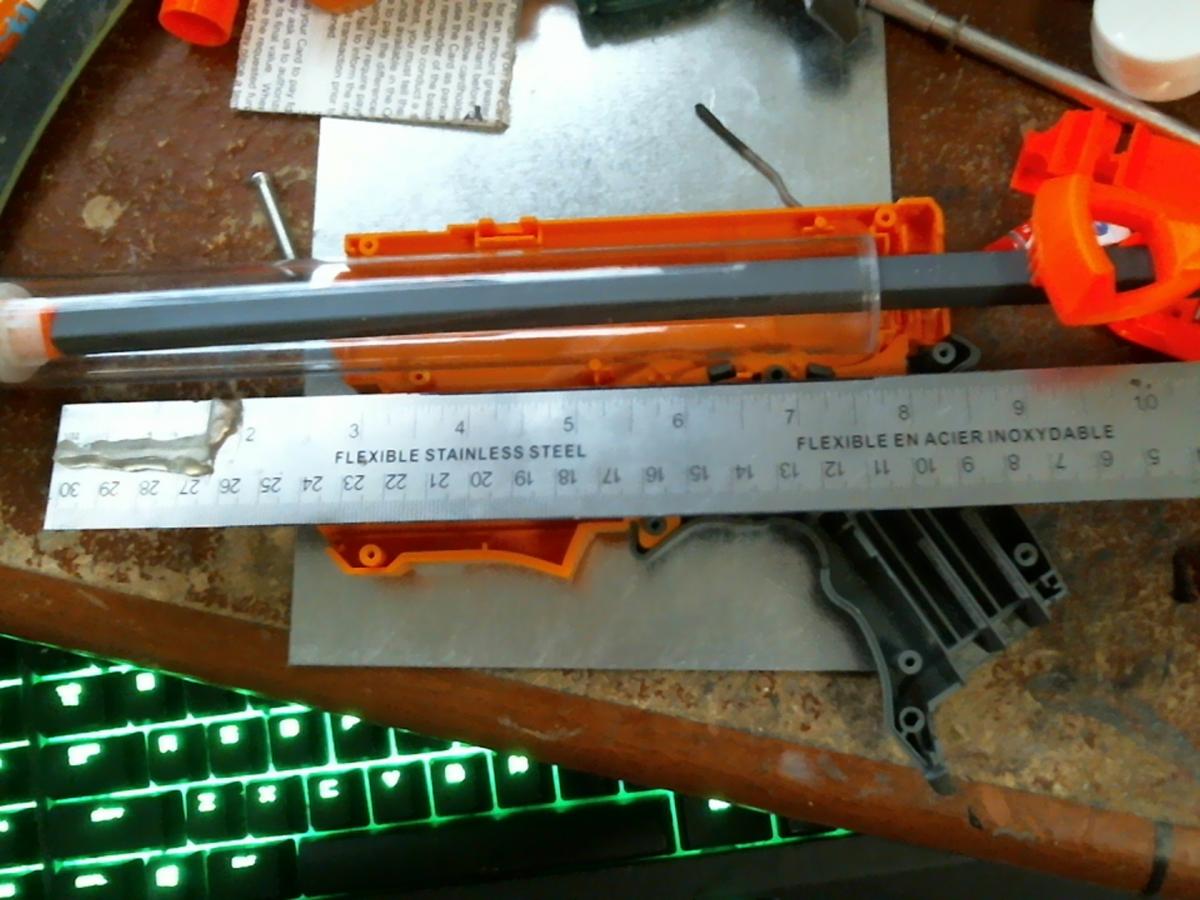
For the main Spring cut it to the desired length with a little bit on pre-compression.Mine is roughly 8 1/2" long.

You'll have to cut your catch groove. (I didn't take a picture before I started but yeah) Remember to cut the flat part facing the plunger head.

Mine catch groove (the flat part) is 2 and 7/8" from the front. The slant portion can be how ever long you want it to be.

My catch groove is no more then 3/16" deep/down.

The stock FS shell cant actually fit the 3/8" square rod because the FS rod isn't square, it's rectangular, not square, so youll need to sand the outside bits just a little. I've already done it in this photo which is why it looks square.

When you place it into the shell, you'll see/notice a few things
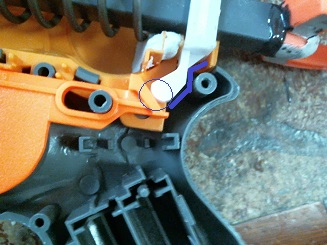
The blue lines show the stress point of the catch when you upgrade the catch spring. that will break if you do not reinforce it. you can do so by reinforcing the space behind it

The blue circle shows that the blaster wont catch since the old plunger rod had ramps going up to catch. With the new plunger rod, the groove is down into the catch (sadly forgot to take a photo of this), so you'll need to give the catch some room to move down. you can do this by sanding the trigger ramp a little.

Time to work with the shell
The plunger tube will not fit, so some sanding needs to be done


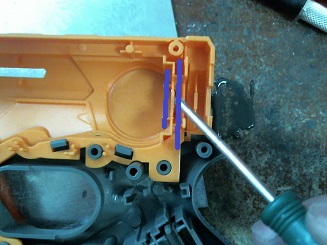
You will need to do some shell reinforcing for the new spring
On the right side half of the shell, reinforce the front bit so it's flat for the spring to press against, and the back part to reinforce the spring rest before the catch
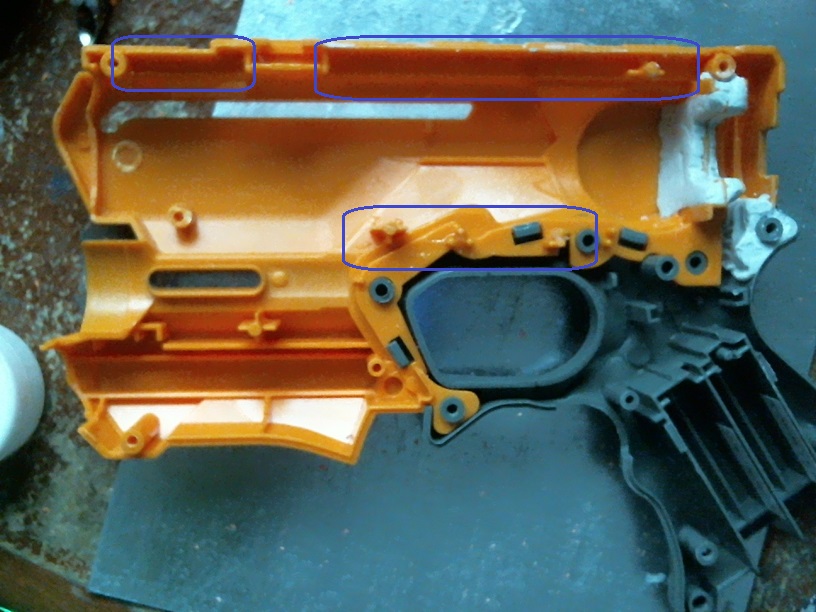
On the left side, don't go past the blue line or you'll interfere with the catch, but don't go higher then the post (being pointed at with the black arrow) or you'll interfere with the plunger rod.

It should look like this

Now let's get the plunger assembly to stay in the blaster when closed.
As you can see, with the plunger tube in, there is a giant gaping hold where the light is.
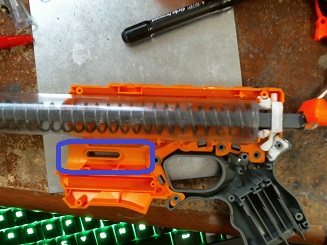
So use the original light housing to support the plunger tube up.


Next lube up these parts of the shell
Rough up the plunger Tube around those areas, place it into the shell, and fill those sections with epoxy putty. (I also placed the light housing back in and used that as a place for the e-putty to stick too)

You can take the extra precaution like I did, and go over the seem lines where the e-putty and polycarb tubes meet, with JB weld. (Not photo graphed)
Next we take it one step further, and close the shell with only the plunger tube inside. Drill two holes at the nerf logo for screws. Dont drill them to far back orelse they will be useless. Drill them towards the front of the circle. Make sure the screws you use arent to long as you dont want them to interfere with the spring. (The washer screws inside titans used to hold the lever trigger in place are really good sizing for this)

Now assemble your blaster, make sure to screw everything in, and add your screws to help keep the plunger tube in place.

~Results!~
All shots are fire with as new darts as possible darts. As parallel to the ground as possible roughly 4' 6" from the ground. (my shoulder height)
Stock FS - Elite Darts-code "K" came from a XD Retaliator (12 dart package).
~52'
~57'
~59'
~59'
~64'
FS Rifle - 16" CPVC Barrel. Twist fit on darts. Elite Darts-code "K" came from the same XD Retaliator (12 dart package). All darts fishtailed cause elites
~40'
~Forgot to take a look at the tape... opps..
~85'
~110' (estimated)
~110' (estimated)
Fs Rifle - 16" CPVC Barrel. Push fit on darts. Shmmee's Precut Hot Rod XL Foam blanks, 3/0 Fishing weights, Green mcmaster felt tips. Account that some dark skipping may happens. (besides last dart. that one landed in grass)
~84'
~93'
~95'
~99'
~120'
Nothing goes to say that 16" of CPVC is optimal, just what I had around. but overall, you can see that it is already a major improvement over stock, and a nice fun rainy day mod.
It was fun to recreate one of my first blaster.
#354650 New Generation NF Rifle: The FS Rifle
Posted by
on 28 June 2016 - 10:13 PM
in
Modifications
Hey bud, I want to help, what's your total draw and diameter of you Plunger tube?. I am very good at barrel/plunger tube volume optimizations.
Hi there, sorry for the late response, But roughly 5 1/2" and the plunger tube is 1"
#341947 nerf in ottawa ont
Posted by
on 15 September 2014 - 04:53 PM
in
Nerf Wars
#352633 More longshot questions.
Posted by
on 06 April 2016 - 05:08 PM
in
Modifications
your best bet is just to test it. we dont know much about what springs youre using so we cannot say for certain, but should be relatively ok
#337303 Modification and Paintjob Pictures
Posted by
on 26 February 2014 - 02:53 PM
in
Modifications


Finished 3B. Universal coupler, 1/2 inch conduit PVC with 1/2 inch CPVC endcap with back dremaled out nested inside to make Universal coupler, completely straight, perfect seal, industrial Canadian spring, shorter then [k26] by a bit, but about 1.5 times stronger, hole drilled into plunger rod to keep plunger head and spring rest plate on the actually plunger rod, hot glue in the "skirt" part of the original seal, re greased. stronger catch spring, and strong side... spring this... the things that keep the 3B primed until you pull trigger.


#336199 Modification and Paintjob Pictures
Posted by
on 31 December 2013 - 04:59 PM
in
Modifications


my show piece Rear-Loading Tank-Expanded CPVC/REDLINE AT2K. haven't given it a name yet, will soon. 130ft ranges. 1 foot long redline barrels, 6-8 pumps.


My NIC panther. 3 different barrel systems. both RSCB's (black barred on is redline, white one is cpvc) are 3 1inch size dart clips, all hitting 110 on the last shot at ten pumps. cpvc rscb is 9 inch barrel, redline rscb is a 10 inch barrel. Singled barrel I believe is 11 inchs. my cleanest Panther yet, I believe one of the cleanest looking one out there for what it is. (not being cocky) half inch 90* CPVC street elbow hot glued to tank. Supported by shell cut to fit it perfectly.


Berserker pistol? tank from a Buzzbee berzerker, with elastics centring lever and cut down trigger glued and epoxyed on for comfortable 1 or 2 finger pull, assortments of scarp cpvc for hand (hot glued in place) and custom tooth pick pump stopper. 1/2 PVC conduit coupler 100ft + flat 2ft redline barrel, 5 pumps.


Cleanly done quick blast recon. goal was to make as stock looking as possible, and accomplished it. quick blast tank has been reinforced EXTENSIVELY. 15 pumps. 3/4-1/2 cpvc reducer bushing. 100ft 12inch CPVC/redline barrel. flat.

AT3K pistol. just a AT3K tank with firing pin bent to contour own finger with vinyl tubing around for comfortable trigger pull. Dart tag pistol thing for handle, vinyl tubing runs through handle and pex bars which tank is attached too. 3 pumps=100ft-120 ranges flat Universal coupler. 12inch CPVC/redline barrel.

#336475 Modification and Paintjob Pictures
Posted by
on 13 January 2014 - 07:58 PM
in
Modifications


Modded Crossbow With AT2K integration. Handle has been supported to be comfier. Seal has been redone to be perfect, will repaint old crappy pain job done before me once less cold. 140 flat


Originaly an AnTheHeroIs modded Crossbow. Fixed by me. Seal been improved, O-rings at spring rest blot reinforcement replaced. 140-flat


Newest Tank Expanded AT3K. 1FT long redline barrels. Rapid Fire 20 pump replaced. Rear-loading hole. 130-140 flat


#336634 Modding the AT3k
Posted by
on 24 January 2014 - 10:21 PM
in
General Nerf
#355154 M.M 2.0
Posted by
on 22 July 2016 - 08:13 PM
in
Nerf Wars
#352598 Longshot Mod Questions
Posted by
on 03 April 2016 - 03:21 PM
in
Modifications
A piece of advice, you may want to reinforce your boltsled, the 8kg will produce a lot of stress on the sled, and it will eventually break.
for the stock clock, you don't have to use cpvc or pvc, anything that prevents it from collapsing works.
I do think youd still need to upgrade the catch spring not one hundred percent sure, but i do think so.
#357679 Koosh Vortex Tornado Scans (Now a shell replica concept thread)
Posted by
on 24 January 2017 - 07:59 PM
in
Homemades
I highly doubt that decades-old molds are just kicking around in inventory somewhere. Many of these companies likely never directly possessed the molds as well; Chinese manufacturing was a thing then as now and it's likely a Chinese manufacturer built and operated the tooling. Once the orders for the product stopped coming, the tooling was most likely recycled.
It may be possible to recommission the tooling from old files that Hasbro or some autonomous manufacturing company holds; but that's also pretty unlikely as you'd need to get someone who knew what and where they were and then who could update them to modern formats.
You must all remember that the 1995 KENNER nerf crossbow was NOT a hasbro patent. It was a Kenner patent, which was a branch company of Tonka which was a subcompany of hasbro. Not only would hasbro/"nerf" NOT have the design files of an over 2 decade, but the blaster itself was manufactured IN mexico, not china so similar to what meaker said, its unlikely the files or molds would still exists. That's also one of the reason why replicating this blaster wouldn't cause any legal issues, the issues are simply cost efficiency and actual strength of shell after production.
#358098 Koosh Vortex Tornado Scans (Now a shell replica concept thread)
Posted by
on 20 February 2017 - 08:52 PM
in
Homemades
https://www.youtube....h?v=O2thSsQrZUM
http://www.carbon3d.com/
Could these (if someone bought one *unlikely* or found someone with one or otherwise got access to one) be easier/better/stronger/easier then all the other options listed here?
As far as i can tell its better then:
3d Printing
Casting
molding (purely because price)
carving/whatever it is (CapSlug's Posts)
Please tell me what you think!
I have access to one. Not worth it. It's strength is only slightly stronger, and it's too expensive. Not worth it
#357648 How to brass breech?
Posted by
on 22 January 2017 - 03:30 PM
in
Modifications
Firstly, you don't need 1/2in brass. If you're going to get brass, 17/32 is the typical choice for stefan darts, and will sometimes be too tight for elite darts. This can be switched out for 9/16 brass which can fit for elite darts. Typically all you need is 17/32 and 9/16. For a brass breech, you have one of two options, 9/16 as your barrel, or 17/32 as your barrel. If 17/32 is your barrel, you can use the 9/16 on the bolt itself and it will sleeve over the 17/32 as a sheath, and when you prime forward, the dart will sit theoretically 50/50 in 9/16 and 17/32. If you're using 9/16 as your barrel, you have more options. you can use the 17/32 as the dart pusher, and push darts into your barrel and create a seal, or do the same thing as you would with the 17/32 barrel and 9/16 sheath, but instead with 9/16 barrel and 19/32 sheath.
So basically my suggestion is get 17/32 and 9/16 brass. don't really need anything else.
#354353 Fix for Omni-directional Plunger Rod Binding/False Catching
Posted by
on 19 June 2016 - 12:01 PM
in
Homemades
you can do the same thing backwards by putting a piece under the spring instead of over it.
#357719 EAT Mod Problem HELP
Posted by
on 28 January 2017 - 01:30 PM
in
Modifications
I'm having a problem with my EAT, while modding it, i accidentally broke the piece that stops the breech from going back so now it will not prime back. does anyone know a way to fix this or a place i can buy a new piece?
we need picture to diagnose the problem/
#341231 Do you still use Nerf brand toys?
Posted by
on 15 August 2014 - 04:48 PM
in
Site Feedback
#345818 Custom foam order from china
Posted by
on 25 March 2015 - 09:07 PM
in
Darts and Barrels
#349885 Canadain Winter War (Ontario)
Posted by
on 07 December 2015 - 06:01 PM
in
Nerf Wars
Im in for both days!
#336343 AT2K goo gauge removal
Posted by
on 05 January 2014 - 03:55 PM
in
Modifications
#340047 Anyone have an interest in Foam
Posted by
on 05 July 2014 - 05:14 PM
in
Darts and Barrels
I'm down for probably at least 20m of foam. I think a new color would be quite sweet.
There are other 5/8" OD materials that have different inner diameters. I personally really like the butyrate tubing from McMaster. Slightly looser than CPVC. For airgun purposes, I like the aluminum tubing they have.
Actually, redline polycarb that used to be sold by FMF has a SLIGHTLY bigger id.
#355399 Aluminum parts
Posted by
on 07 August 2016 - 11:34 PM
in
Modifications
I also have a design for a "half sled" for longshot plunger tube replaced alpha troopers
#356480 Aluminum parts
Posted by
on 28 October 2016 - 06:47 PM
in
Modifications
injection molded nylon? thats... im not even sure which i would rather have?
I don't pay a lot of attention to you at APOC, since i can hear you all day, so i wouldn't have noticed what you were carrying.
anyone have a link to the 3d printed sentinel lever? i can throw that right on the list of parts getting made- i could even modify it a little for comfort.
i found the link to the 4B trigger, i will move that to the "getting made" folder. due to the negative mold process, i will have to post cast some of the edges into them after production- the long side groove, the... pin slot? and clean up the bottom(?) slide bit. i may have to work with some who has current access to solidworks to make some quick changes in the file so that i can make a mold for the foundry.
*I THINK* I'm not sure. I think it is, but i know its a nylon composite. That fact is 100% sure of.
#356424 Aluminum parts
Posted by
on 25 October 2016 - 06:34 PM
in
Modifications
The ls sled was an injection molded nylon composite, nylon-6 or something like that. It was done by the JetX guys for their new x-zues
#356436 aluminium tubes
Posted by
on 26 October 2016 - 04:37 PM
in
Darts and Barrels
Personally, as a canadian nerfer, I love the barrels. they have great fit for mine/our darts. But it varies. I know the SG guys love it, but idk about the other places.
#356479 aluminium tubes
Posted by
on 28 October 2016 - 06:45 PM
in
Darts and Barrels
could I make an artifact style breech myself?
so the original breech bit pushes the dart into the barrel?
would that work effectively or is a normal brass breech better?
would it work with full length darts?
can i put the aluminium into the original breech and would that be better than the stock breech?
In theory you can. But the system works like a universal breech with a pusher, that pushes darts into the barrel, then seals it. Whether its effective or not is up to how you do it. And once again, theres no better, its just how you make it work, and how you like it. More then likely you wont be able to make it full length darts, its up to you to design and make it possible, but I haven't see it done yet. and uh... I guess, but you'll have to figure out your own way, and it may be better, but it depends on your mods.
#327169 2013 New Releases Mod Contest
Posted by
on 22 February 2013 - 12:55 AM
in
News

