Jump to content


Photo

Caliburn: Mag-fed Pump-action Springer

Mag-Fed Pump-Action Springer Homemade

252 replies to this topic

#151 CaptainSlug

CaptainSlug

    Resident Mad Scientist

  • Administrators
  • 4,763 posts

Posted 25 May 2017 - 09:26 AM

*
POPULAR

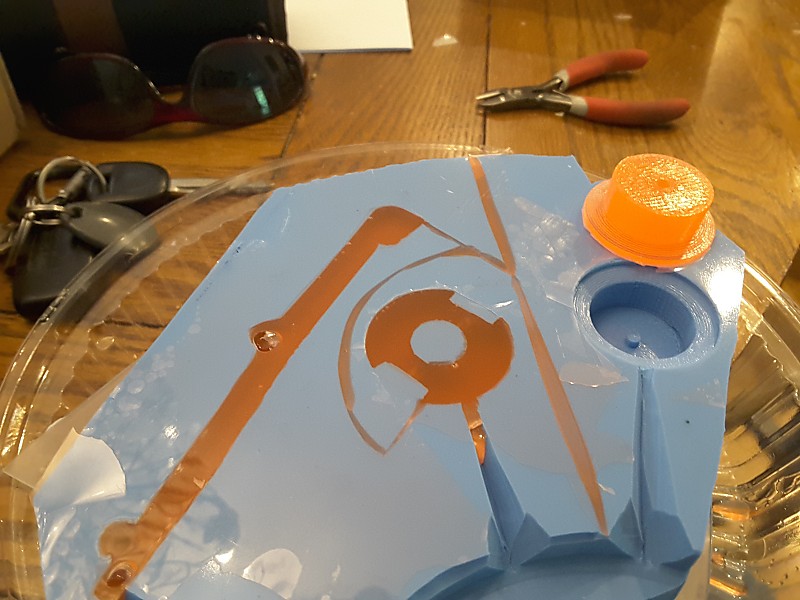
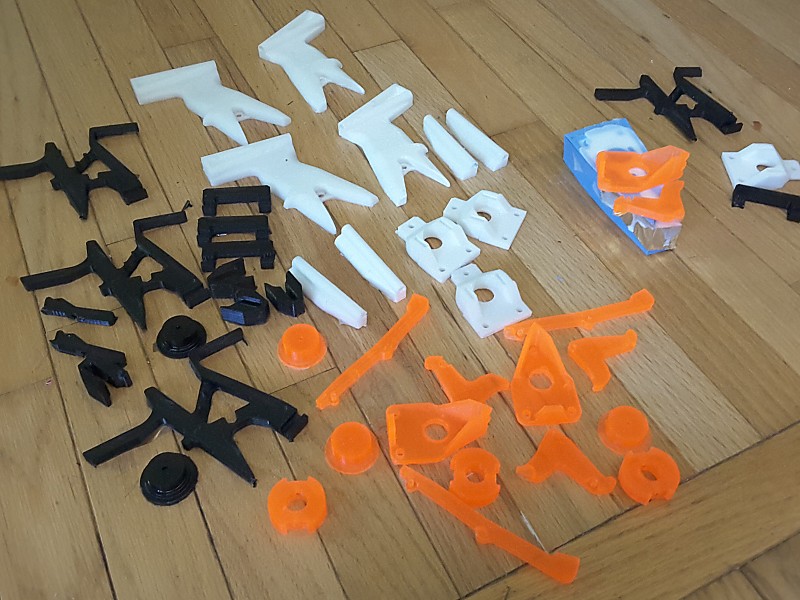
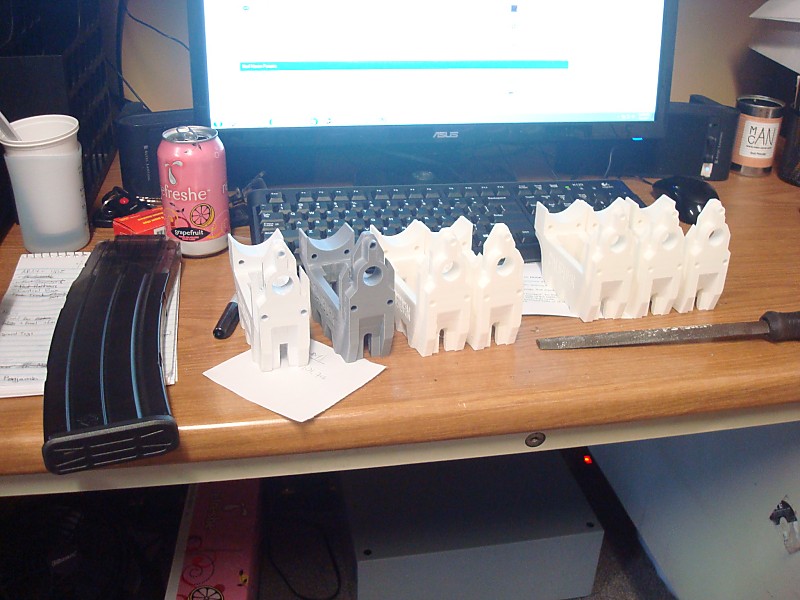
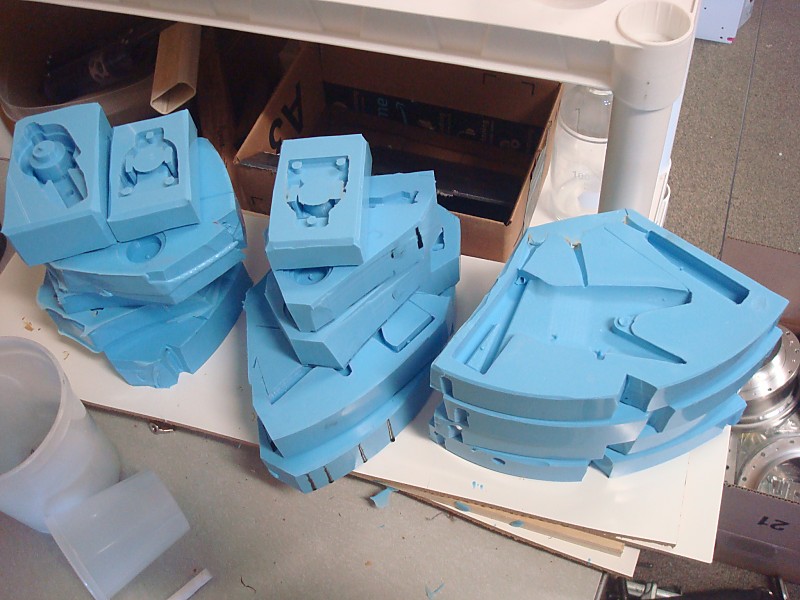
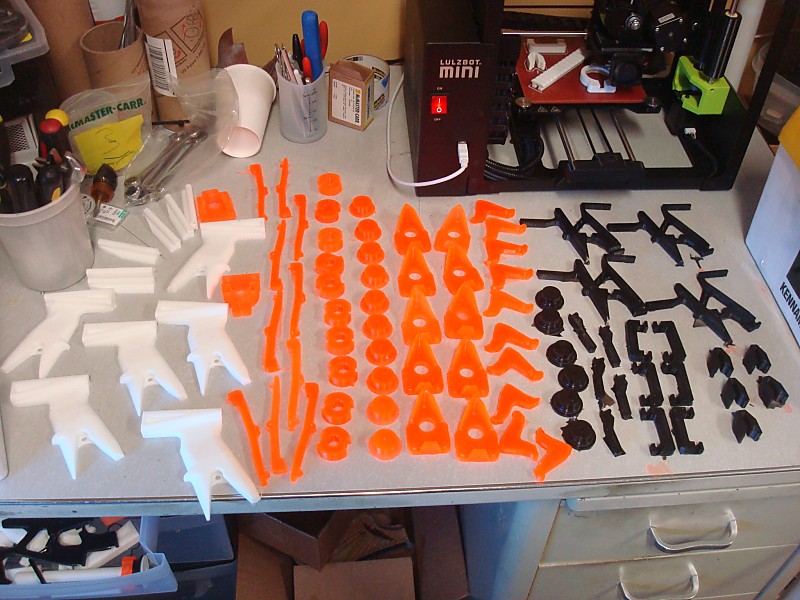
Phew. This has a hell of a learning curve. I'm still having some issues producing the orange parts at the right shade, and I may just have to give up on trying to cast them as opaque. That pigment only seems to produce clear parts with this urethane, so that may have to be how they end up since adding opaque white just weakens the orange too much.

rs3_73.jpg

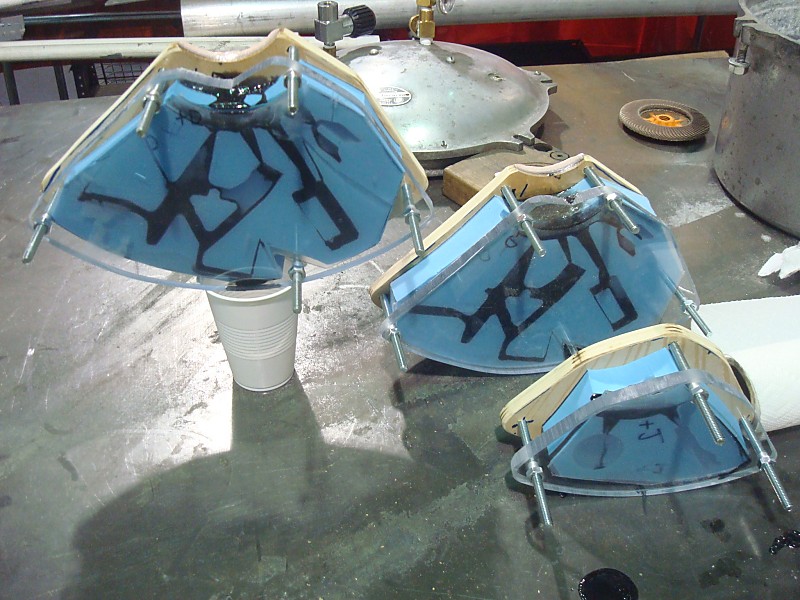
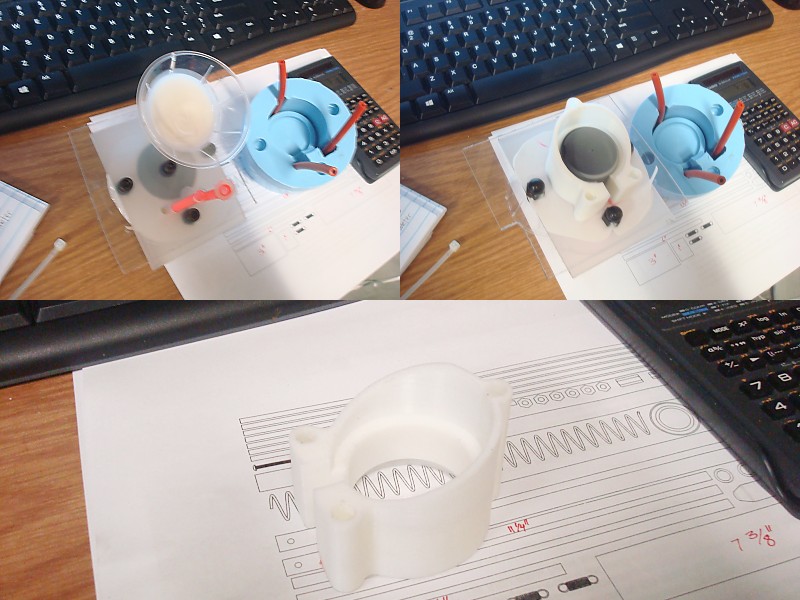
The "demold time" listed for this material is completely wrong for the kinds of parts I am making. If I want a 30 to 60 minute demold time I will have to pour into the mold, then stick the mold into a proofing oven at 150F. This urethane requires heat to cure, so if you just leave the mold to sit at ambient temperature you won't be able to demold for at least 6 hours. Doing it any earlier than that without heating and you will risk distorting your parts as you pull them out of the mold.


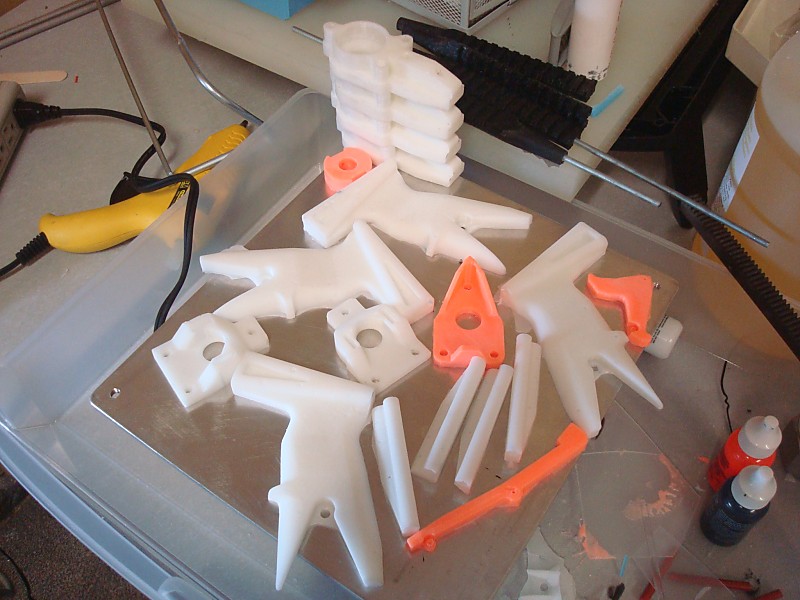
One-sided molds are also trickier than I anticipated. Half of the above parts have a bubble or two in their flat side. If I want to cast parts without bubbles they have to be poured, placed in the pressure pot for 30 minutes, then placed in the proofing oven for 30 minutes. But for the majority of these parts, some surface bubbles don't impact part performance, and are only cosmetic defects. And with the number of parts I need to produce per blaster, having to load all of them into a pressure pot would require having multiple pressure pots.


This product also has far too little pot life for vacuum to be used to de-air the poured mix. Supposedly you can de-air or just dry Part A in vacuum prior to mixing and that supposedly reduces the quantity of bubbles. I might consider just storing it in a vacuum chamber in the future, but that would require pouring it into a much larger container.


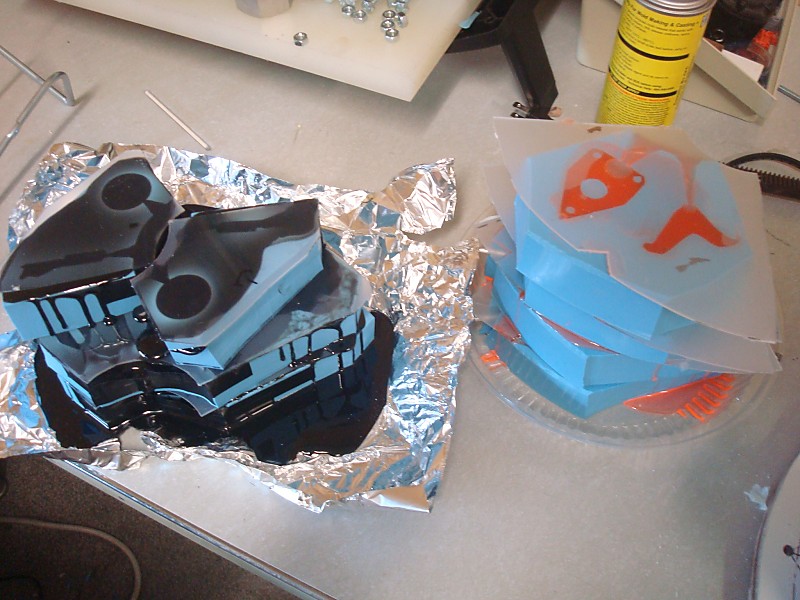
Edit: I'm going to do one further attempt at spincasting. Some of the spincasting molds may not be worth doing that way and as a result might get cut up into individual molds. This would make a set of molds much easier to fit inside of a pressure pot for curing.


  • 1
The little critters of nature, they don't know that they're ugly. That's very funny, a fly marrying a bumble bee. I told you I'd shoot, but you didn't believe me. Why didn't you believe me?

#152 Meaker VI

Meaker VI

    Member

  • Moderators
  • 1,192 posts

Posted 25 May 2017 - 03:03 PM

Those handles look great. Glad you have the tenacity to keep it up through the learning you've had to do, I don't think I'd have been able to stick to it.
  • 0

#153 Silly

Silly

    Member

  • Members
  • 244 posts

Posted 25 May 2017 - 03:09 PM

Do you plan to make any specially colored caliburns? Also, how do you think people will/should customize their caliburns?
  • 0

Co-Owner of the History of Nerf Modding research project, moderator of r/Nerf, owner of BlasterWiki, maker of 3d printed blasters (GitHub/Thingi) and Nerfy art.


#154 CaptainSlug

CaptainSlug

    Resident Mad Scientist

  • Administrators
  • 4,763 posts

Posted 25 May 2017 - 03:46 PM

Yes (if someone will pay a little extra) and yes. I'm going to offer a padded adjustable stock as standard. But given that all of the cast parts are directly replaceable with printed parts (and vice versa) anyone can modify the files in whatever way they want to once they are available.


The urethane product I am using (Alumilite Performance 80D) is very popular with people that make custom pens (and rock-climbing handholds), so you can find tons of youtube videos about it. It is compatible with metal powders, pearlescent powders, regular color pigments, glow-in-the-dark powder, and fluorescent pigments. The fluorescent pigments are proving to be a bit difficult to mix though. My safety orange parts will probably end up translucent instead of opaque from now on.


If you are direct-pouring single molds you can do swirl effects. But that's not something I would want to do over as many parts as this blaster involves.


Edit: I have decided to abandon spincasting urethane. I'm most of the way through the process of breaking the spincasting molds down into segments so that they can be used for traditional mold pouring. Doing parts in batches this way will allow me to pressure cast all of my parts so that I can eliminate the bubbles from every part I produce.


Edited by CaptainSlug, 26 May 2017 - 09:14 PM.

  • 0
The little critters of nature, they don't know that they're ugly. That's very funny, a fly marrying a bumble bee. I told you I'd shoot, but you didn't believe me. Why didn't you believe me?

#155 CaptainSlug

CaptainSlug

    Resident Mad Scientist

  • Administrators
  • 4,763 posts

Posted 27 May 2017 - 09:38 PM

Another day of failures.

rs3_74.jpg

Several things went tits-up today.

1. Sprues and runners intended for spincasting are too small for gravity pouring.

2. I tried some "Silicone" measuring cups for mixing and pouring the Urethane. They didn't work, and in fact would have been a nightmare to try cleaning up after the plastic cured. There must be some additive included in the foodsafe silicone that doesn't like the urethane. If I want silicone cups, I would probable have to make them myself. For now I'll just stick with disposable cups.

3. The urethane won't come back off of polycarbonate when cured. This will require replacing part of one of the molds I just made. The only materials I've found that it won't stick to are polypropylene, high density polyethylene, Nylon, Delrin, and pure silicone. It can be removed from smooth finish aluminum, especially if you heat it up a little.

4. The only remaining working method for me to pour these molds is open-face, then pressing down a non-stick sheet and weighing it down. This is the only way I have managed to produce usable parts.

5. PRESSURE CASTING WORKS REALLY WELL. I'm going to have to buy at least one more pressure pot, otherwise I'll be limited to doing one mold pour per hour.

6. I'm doing all of my casting at home from now on.


  • 0
The little critters of nature, they don't know that they're ugly. That's very funny, a fly marrying a bumble bee. I told you I'd shoot, but you didn't believe me. Why didn't you believe me?

#156 Meaker VI

Meaker VI

    Member

  • Moderators
  • 1,192 posts

Posted 28 May 2017 - 08:29 AM

Oh no! Is there a more user-friendly casting method you can try?

I've seen spincasting used with vulcanized-rubber molds to make pewter miniatures; could something with similar properties to pewter (tin?) be used? Is it strong enough? Would it still be relatively inexpensive?
  • 0

#157 CaptainSlug

CaptainSlug

    Resident Mad Scientist

  • Administrators
  • 4,763 posts

Posted 28 May 2017 - 09:35 AM

Zinc, Pewter, and so on have good properties and are completely recyclable, but are 7 times the price of urethane per pound. You also have more of a volume limit to your molds.


I'm just going to have to adjust my expected casting schedule. I'll spend 15 minutes to an hour after dinner each day pouring a mold set then letting them cure overnight. I will be doing semi-continuous part production instead of batch production. Which frankly might make a little more sense with my daily routine anyways.


I'm going to go buy another pressure pot today and maybe another tomorrow since there are coupons available for both days. I can get all of them hooked up to my compressor at home.


Here's how many parts I have produced. I have more than a few failed parts for varying reasons.

Name	        Qty	Color	Process
GripLeft	4	White	Cast
GripRight	4	White	Cast
GripSpacerLeft	4	White	Cast
GripSpacerRight	4	White	Cast
PlungerEnd	4	White	Cast
StockAlt2       0	White	Fix Mold
Butt	        4	White	Cast
Foregrip	6	White	3D Print (Ordered)
Magwell 	6	White	3D Print (Ordered)
Ram2    	6	White	3D Print (Ordered)
Rail_Top	4	Black	Cast
GripMiddle	2	Black	Cast
MagRelease	0	Black	Machined?
Jam      	1	Black	Cast
DartGuide	2	Black	Cast
P1      	0	Black	Cast
P2      	2	Orange	Cast
P3b      	5	White	3D Print (Ordered)
Trigger  	3	Orange	Cast
Muzzle  	3	Orange	Cast
Sear    	2	Orange	Cast
Bolt1   	2	Orange	Cast
			
Buttplate	0	Clear	Machined
Buttplate Foam	0	Grey?	Cut


Edited by CaptainSlug, 28 May 2017 - 09:20 PM.

  • 0
The little critters of nature, they don't know that they're ugly. That's very funny, a fly marrying a bumble bee. I told you I'd shoot, but you didn't believe me. Why didn't you believe me?

#158 CaptainSlug

CaptainSlug

    Resident Mad Scientist

  • Administrators
  • 4,763 posts

Posted 29 May 2017 - 03:43 PM

Pressure casting makes a huge difference in the clarity of cast parts. The orange parts in particular, which are clear, would look like garbage without pressure casting.

rs3_75.jpg

Here is how many parts I have produced this weekend while at home.The three parts on the far right are rejects. The one part still in the mold and the two on-top of it can be repair with touch-ups. Not pictured are 5 orange parts that I had to throw away because they fused to the cutting board I tried to use as a mold cover plate. It was not the right plastic and the urethane bonded to it. Only some of the parts that were in contact with cutting boards during that one run could be pried off.
rs3_76.jpg

I have one last pour in black and orange to do in order to get a minimum of 4 blasters worth of parts. I also have to finish one more mold and get 4 parts out of it before I fully reach that goal.


All of the molds I currently have can be repaired/improved later in the week by pouring silicone to plug up their sprues. Having to tape those closed and subsequently having that tape leak is what is causing most of the reject parts.

Here's where the part totals are currently.
 

Name	        Qty	Color	Process
GripLeft	4	White	Cast
GripRight	4	White	Cast
GripSpacerLeft	4	White	Cast
GripSpacerRight	4	White	Cast
Spreader	4	White	Cast
StockAlt2       0	White	Fix Mold
Butt	        4	White	Cast
Foregrip	6	White	3D Print (Ordered)
Magwell 	6	White	3D Print (Ordered)
Ram2    	6	White	3D Print (Ordered)
Rail_Top	4	Black	Cast
GripMiddle	4	Black	Cast
MagRelease	2	Black	Cast
Jam      	3	Black	Cast
DartGuide	4	Black	Cast
P1      	2	Black	Cast
P2      	3	Orange	Cast
P3b      	5	White	3D Print (Ordered)
Trigger  	4	Orange	Cast
Muzzle  	4	Orange	Cast
Sear    	4	Orange	Cast
Bolt1   	4	Orange	Cast
			
Buttplate 	0	Clear	Machined
Buttplate Foam	0	Grey?	Cut


  • 0
The little critters of nature, they don't know that they're ugly. That's very funny, a fly marrying a bumble bee. I told you I'd shoot, but you didn't believe me. Why didn't you believe me?

#159 CaptainSlug

CaptainSlug

    Resident Mad Scientist

  • Administrators
  • 4,763 posts

Posted 30 May 2017 - 01:33 PM

*
POPULAR

And here's how I'm casting part sets. Pour a mold, cover with a polypropylene sheet to squeeze off the excess, cover with another mold, then repeat. I can do 3 or 4 tiers before running out of room in either pressure pot.
rs3_77.jpg
The parts then cure inside the pressure pot at 50psi for a minimum of 30 minutes. They can be removed from the molds safely and predictably after 6 hours.

It's advisable to remove as much of the flashing from the mold prior to trying to pull the parts, and this step should be done with a tool and not with your finger nails. The broken edges of the urethane are very sharp and I cut the underside of my nails twice this weekend before deciding that is really painful. So now I use a plastic tool or a scrap of polypropylene instead.


If any of the parts get distorted they can be flattened back out by the hotplate I have set on low. I have a sheet of aluminum on the burner which helps spread out the heat and provides a flat surface for parts or molds to rest on.
 

Name	        Qty	Color	Process
GripLeft	4	White	Cast
GripRight	4	White	Cast
GripSpacerLeft	4	White	Cast
GripSpacerRight	4	White	Cast
Spreader	4	White	Cast
StockAlt2       0	White	Cast
Butt	        4	White	Cast
Foregrip	6	White	3D Print
Magwell 	6	White	3D Print
Ram2    	6	White	3D Print
Rail_Top	4	Black	Cast
GripMiddle	6	Black	Cast
MagRelease	4	Black	Cast
Jam      	6	Black	Cast
DartGuide	6	Black	Cast
P1      	4	Black	Cast
P2      	5	Orange	Cast
P3b      	5	White	3D Print
Trigger  	6	Orange	Cast
Muzzle  	6	Orange	Cast
Sear    	6	Orange	Cast
Bolt1   	6	Orange	Cast
			
Buttplate 	0	Clear	Machined
Buttplate Foam	0	Grey?	Cut

Now that I have my minimum quantities for the primary cast parts I need to finish the StockAlt2 mold and get the hardware kits put together.


EDIT: StockAlt2 Mold is fixed and in the pressure pot now.


Edited by CaptainSlug, 30 May 2017 - 08:46 PM.

  • 1
The little critters of nature, they don't know that they're ugly. That's very funny, a fly marrying a bumble bee. I told you I'd shoot, but you didn't believe me. Why didn't you believe me?

#160 CaptainSlug

CaptainSlug

    Resident Mad Scientist

  • Administrators
  • 4,763 posts

Posted 31 May 2017 - 08:03 AM

The last cast parts I need to finish before the weekend are for the Stock. It's little more than a pipe coupler with some through holes and a slot cut in one side. It does however require a 1-1/2 part mold.

The core of the mold is machined delrin. The outside is silicone. The through-holes are produced with 7/32 OD silicone tubing. The cover plate is polypropylene with a polcarbonate backing plate (to keep the ppe flat).

rs3_78.jpg

The core is attached to the backing plate and the silicone tubing is fed through holes in the backing plate and the silicone mold. Short sections of drinking straws act as the vents. A disposable funnel is use as the fill port. The funnel has to be filled up almost all the way when pouring to get enough head for the resin to fill the entire mold. The excess is allowed to travel up the vents.


This is all done inside the pressure pot, which is then closed and filled to 50 psi. 6 hours later and I can pull the part and clean all the flashing off of it. This clearly isn't time efficient for single parts compared to printing. But in the future I'll be able to run all of these single-part molds at the same time off of the same resin mix. And all of the molds I have yet to make are as or more complicated than this one.


It looks like I won't be meeting the arbitrary deadline on June 2nd I set for myself to get some of these together to sell. I'm almost there, but experience has told me that rushing things will only result in things getting screwed up. So I don't have a firm date yet, but within the next 10 days the open source file set for this blaster will be made available at the same time that I have hardware kits available for those that want to print their own.


Everything I'm working on right now is just tedious repetitive drilling, cutting, packaging, and testing.


  • 0
The little critters of nature, they don't know that they're ugly. That's very funny, a fly marrying a bumble bee. I told you I'd shoot, but you didn't believe me. Why didn't you believe me?

#161 CaptainSlug

CaptainSlug

    Resident Mad Scientist

  • Administrators
  • 4,763 posts

Posted 02 June 2017 - 10:36 AM

*
POPULAR

Okay, this is what I hate the most about 3D printing. I have 7 parts, all printed from the same file. Five of them from the same printer. But each one has slightly different inside dimensions. Some of the people I'm working with clearly weren't scaling the models consistently when sending the files to the printer.
rs3_79.jpg
1. Printed by Jacob. Inside Dimensions: 3.208" x .870"
2. Printed by gangasaur's coworker (scaled to metric): 3.188" x .874"
3. Printed by Shahram: 3.185" x .862"
4. Printed by Shahram: 3.186" x .862"
5. Printed by Shahram: 3.164" x .868"
6. Printed by Shahram: 3.162" x .868"
7. Printed by Shahram: 3.165" x .867"
 
Part 1 fits mags so easily that they drop free. It required no sanding. The only issue I had with it was support material inside the through-holes.
Parts 2 through 4 fit a mag and only needed a little filing to smooth out print scraggles.
Parts 5 through 7 will not fit a mag and are going to almost need machining to be usable.
 
Print inconsistency issues are really slowing me down at the moment. This part specifically is going to have to be cast if I don't want to have to deal with having to post-machine these parts.
 
And with all of that whining aside...
 
rs3_80.jpg
Here's a photo of 10 individually-wrapped and pre-lubricated fleshlights aluminum plunger tubes with SCH40 adapter rings for each end.
rs3_81.jpg
15 padded buttplates
rs3_82.jpg
14 Clear Stock Spacers, 14 Spring Posts, 12 aluminum barrels, 10 sets of threaded rods and spacers, 10 pairs of Bolt Arms
rs3_83.jpg
And lots of hardware. I need to punch out more silicone rings this afternoon.

Edited by CaptainSlug, 02 June 2017 - 12:54 PM.

  • 1
The little critters of nature, they don't know that they're ugly. That's very funny, a fly marrying a bumble bee. I told you I'd shoot, but you didn't believe me. Why didn't you believe me?

#162 CaptainSlug

CaptainSlug

    Resident Mad Scientist

  • Administrators
  • 4,763 posts

Posted 07 June 2017 - 04:01 PM

PHEW! What a long couple of months this has been. I still have a ton of work to do, but the primary goal is now done. I've built one blaster entirely out of printed parts, and one almost entirely out of cast parts (excluding only the magwell, ram, foregrip, and wiffle tube).

I will be making the file set public and open source on June 10th and I will have hardware kits available for sale. I may not have time to get whole blasters up for sale until the 19th because I will be out of town on business for most of next week. But we'll see.

I'm glad I didn't release the files prematurely because getting the first cast assembly together showed a few remaining areas that needed minor revisions. 
rs3_84.jpg
The grip is now held together by two screws and a standoff. This assembly won't come apart unless you remove those screws then pull the threaded rods out.
rs3_85.jpg
The rear portion of the plunger tube that acts as a spacer and doesn't interact with the skirt seal at all can be clear SCH40 PVC pipe.
rs3_86.jpg
Which allows it to act as a priming indicator.
rs3_87.jpg
The stock is padded (pad will be included in the hardware kit) and adjustable from 0 to +2-1/2 inches. This foam is the same foam that used to be used to fill +bow grips and it can be sanded on a belt sander if you want to contour it.
rs3_88.jpg
I've done preliminary testing with a K25 and will probably be able to do some chronograph tests tomorrow with that and a K26. The standard barrel will be a 14-inch length of .527" ID aluminum because it offers the widest dart compatibility.


  • 0
The little critters of nature, they don't know that they're ugly. That's very funny, a fly marrying a bumble bee. I told you I'd shoot, but you didn't believe me. Why didn't you believe me?

#163 CaptainSlug

CaptainSlug

    Resident Mad Scientist

  • Administrators
  • 4,763 posts

Posted 08 June 2017 - 08:28 AM

Data post. Will update with K26 numbers soon.

K25 - No O-Ring
180
183
180
182
174
184
179
175

K25 - with O-Ring
195
187
193
199
166
199
151
197
153
195

K25 - With O-Ring - Two darts loaded
112
125
108
118

Waffle darts have a higher deviation in fps, which is probably due to the tip being more likely to rub on the inside of the barrel.


The above numbers are higher than the machined version managed. So I'm likely getting a boost in FPS from two other changes to the design.

1. This plunger weighs a fair amount less than the machined version.

2. Aluminum plunger tubes offer way less friction.  Which is something I noticed with the Durendal project.


  • 0
The little critters of nature, they don't know that they're ugly. That's very funny, a fly marrying a bumble bee. I told you I'd shoot, but you didn't believe me. Why didn't you believe me?

#164 Speedr117

Speedr117

    Member

  • Members
  • 57 posts

Posted 08 June 2017 - 08:38 AM

Will you provide a set of printing instructions. Like Will any of the parts need supports. Wich parts need more infill. Etc.
  • 0

#165 CaptainSlug

CaptainSlug

    Resident Mad Scientist

  • Administrators
  • 4,763 posts

Posted 08 June 2017 - 08:44 AM

Will you provide a set of printing instructions. Like Will any of the parts need supports. Wich parts need more infill. Etc.

Some are included in the release notes. The parts that need 100% infill are in a sub folder. Only the magwell will require support material at one end.


Edit: I'm getting consistently better results by printing magwells WITHOUT supports. So that is how I recommend printing them. You will get pilling/feathering in one spot whether you use supports or not, but if it bothers you visually just file it away. The only way to print without that sport looking crappy is to reduce your layer height to 200 microns or less, which will greatly lengthen the print time for that part.


Edited by CaptainSlug, 02 August 2017 - 08:59 PM.

  • 0
The little critters of nature, they don't know that they're ugly. That's very funny, a fly marrying a bumble bee. I told you I'd shoot, but you didn't believe me. Why didn't you believe me?

#166 CaptainSlug

CaptainSlug

    Resident Mad Scientist

  • Administrators
  • 4,763 posts

Posted 09 June 2017 - 09:46 AM

I'm done with the Instructions and file sets a day early. Hardware Kits will be available tomorrow.


http://captainslug.c...3DPAssembly.pdf


http://captainslug.c...STEP_060817.zip


http://captainslug.c..._STL_060817.zip


Edit: Files are in INCHES. Newer file sets are now available.


Edited by CaptainSlug, 02 August 2017 - 09:00 PM.

  • 0
The little critters of nature, they don't know that they're ugly. That's very funny, a fly marrying a bumble bee. I told you I'd shoot, but you didn't believe me. Why didn't you believe me?

#167 Silly

Silly

    Member

  • Members
  • 244 posts

Posted 09 June 2017 - 12:47 PM

Glad to see that your goal of machined, printed, and cast options being possible has been completed. Is this it for the project, or should we expect to see even more progress?

Also, quick question, how long is the prime on this beast? I want to compare it to my current project.
  • 0

Co-Owner of the History of Nerf Modding research project, moderator of r/Nerf, owner of BlasterWiki, maker of 3d printed blasters (GitHub/Thingi) and Nerfy art.


#168 CaptainSlug

CaptainSlug

    Resident Mad Scientist

  • Administrators
  • 4,763 posts

Posted 09 June 2017 - 01:45 PM

Is this it? This is only the start of production. I have a ton of these I need to make in quantity and I still have two more molds to make. I also have two molds to replace and my entire library of molds to make minor adjustments to. I might even need to consider buying a third pressure pot.


The foreseeable future is other people printing their own parts and modifying them to suit their needs/wants. I'm not sure if I'm likely to sell more complete blasters or more hardware kits.


Priming distance (Plunger Stroke) is 6.25 inches.


  • 0
The little critters of nature, they don't know that they're ugly. That's very funny, a fly marrying a bumble bee. I told you I'd shoot, but you didn't believe me. Why didn't you believe me?

#169 NerfGeek416

NerfGeek416

    Member

  • Members
  • 151 posts

Posted 09 June 2017 - 06:20 PM

Are those chrony numbers full length or half length? This can feed both, just by changing the mag, right?

Awesome work as usual!! Once I get my printer back online I'll definitely be picking up a kit.
  • 0
 

#170 CaptainSlug

CaptainSlug

    Resident Mad Scientist

  • Administrators
  • 4,763 posts

Posted 09 June 2017 - 07:52 PM

Full-length. And that's correct.


  • 0
The little critters of nature, they don't know that they're ugly. That's very funny, a fly marrying a bumble bee. I told you I'd shoot, but you didn't believe me. Why didn't you believe me?

#171 CaptainSlug

CaptainSlug

    Resident Mad Scientist

  • Administrators
  • 4,763 posts

Posted 11 June 2017 - 01:49 PM

We are a happy family. There's a fourth blaster not pictured that shipped out yesterday. All of these are sold and getting packaged for shipment. I also sent out 6 hardware kits.

rs3_89.jpg


  • 0
The little critters of nature, they don't know that they're ugly. That's very funny, a fly marrying a bumble bee. I told you I'd shoot, but you didn't believe me. Why didn't you believe me?

#172 CaptainSlug

CaptainSlug

    Resident Mad Scientist

  • Administrators
  • 4,763 posts

Posted 17 June 2017 - 11:45 AM

The first customer-printed blaster is now finished. Those are some nice looking prints Jim.

rs3_90.jpg

I just got back from a business trip and seem to have picked up a cold. The only thing I'm likely to accomplish this weekend is mold repair work.


  • 0
The little critters of nature, they don't know that they're ugly. That's very funny, a fly marrying a bumble bee. I told you I'd shoot, but you didn't believe me. Why didn't you believe me?

#173 CaptainSlug

CaptainSlug

    Resident Mad Scientist

  • Administrators
  • 4,763 posts

Posted 21 June 2017 - 02:31 PM

Mold repairs/replacements are done. I'm also out of silicone and will need to buy some more in order to finish the mold set.

rs3_91.jpg

And I have a new roboslave to help with the production runs from now on. It's primarily for the black parts which are slightly more difficult to mold efficiently.

rs3_92.jpg

I have enough hardware on order for 20 more blasters (some of that quantity will be hardware kits). The past few days have been very very boring effort towards material efficiency and cost reduction studies. I shaved $10 off the material/consumable costs for each blaster/kit by finding alternate suppliers for a few things.


  • 0
The little critters of nature, they don't know that they're ugly. That's very funny, a fly marrying a bumble bee. I told you I'd shoot, but you didn't believe me. Why didn't you believe me?

#174 CaptainSlug

CaptainSlug

    Resident Mad Scientist

  • Administrators
  • 4,763 posts

Posted 26 June 2017 - 09:20 AM

PRODUCTION.

Here's how many parts I printed from 6/21 to the evening of 6/23 while getting familiar with the printer. These were all printed with the "wrong" size filament (1.75mm) at 150micron layer height.

rs3_93.jpg

These are all the parts I printed from the evening of 6/23 to this morning. I had two mishaps.


Saturday morning my son woke up way too early, went into the family room unsupervised and turned the printer OFF while it was still running "because it was noisy". He interrupted four parts that were on the bed. I printed just the remaining portion of those parts and will have to patch that added material on with super glue.


I also broke one of the ram rod prints while trying to get it off the heated bed. REALLY LONG time scale prints of multiple parts take significantly longer to cool down and require letting the bed get to a lower temperature in order to be removed. So I need to factor in that extra cooldown time when trying to schedule those prints.

rs3_94.jpg

These are all the parts I cast this weekend. Mishaps for these almost entirely were caused by not having the pressure pots on a level surface, so the resin was shifting itself to one side of the mold before I could put the cover sheets on them. This caused failure of multiple grip part sets and trigger guard sets and I need to correct this issue before casting any more of either.

rs3_95.jpg

And here's the scoreboard for production this weekend.

10 PRINTED PARTS        6/21-6/23
---------------------------------------------
RAIL_TOP                7
STOCK_ALT2              2
TGUARD2                 1

30 PRINTED PARTS	6/23-6/26
---------------------------------------------
RAM2			8	
STOCK_ALT2		8
P3b			9	
BUTT			3	
FOREGRIP		2

90 CAST PARTS	6/23-6/26
---------------------------------------------
BOLT1		10
DARTGUIDE	5
JAM		6
MAGRELEASE	5
P1		6
P2		10
TGUARD2		4
MUZZLE		10
SEAR		10
TRIGGERALT	10
GRIP3LEFT	4
GRIP3RIGHT	2
GRIPSPACERLEFT	4
GRIPSPACERRIGHT	2
SPREADER	2

If setup correctly and with enough molds, clearly casting offers significantly more production volume per hour than printing. Even with a full curing schedule of 8 hours at ambient temperature, I can produce as many parts as I have mold cavities for (and pressure pot space for) within those 8 hours.


I can increase my casting production if I were to invest a little more in some extra equipment. For $90 I could have a third pressure pot. For an unknown amount I could pre-heat my molds and heat the pressure pots to 150F to accelerate curing and get another casting run or two in each day. I think I will just go for the third pressure pot though since the scheduling of two casting runs per day works out fine at the moment. For the moment I'm out of urethane and will have to wait for the next set of bottles to come in the mail.


The next steps to take are cutting hardware and continuing to print parts non-stop.


  • 0
The little critters of nature, they don't know that they're ugly. That's very funny, a fly marrying a bumble bee. I told you I'd shoot, but you didn't believe me. Why didn't you believe me?

#175 joneill809

joneill809

    Member

  • Members
  • 17 posts

Posted 26 June 2017 - 10:29 AM

Your P3B prints look really clean. Mine was a mess requiring lots of manual cleanup. Were yours straight off the printer without cleanup? I used 2.85 mm eSun PLA filament (black), 100% infill, 150 micron, at 205C, without supports. I printed vertically with the closed side/front down. I'm wondering if it's the filament, my print orientation, or some other setting I'm overlooking. 


We both have Lulzbot mini's so that removes one variable. Which brand of filament did you use? You mentioned the "wrong" size of 1.75 mm, but was that intentional?  


  • 0


Also tagged with one or more of these keywords: Mag-Fed, Pump-Action, Springer, Homemade

0 user(s) are reading this topic

0 members, 0 guests, 0 anonymous users