Since you're 3D printing anyway...Purple Catch?

Caliburn: Mag-fed Pump-action Springer
#101

Posted 03 April 2017 - 07:31 PM
-Jwasko, STILL Sole Surviving member of Steel City Nerf and Sober Sister of the Sex Dwarves
We NERF ON all day, and FUCK OFF all night
#102

Posted 03 April 2017 - 08:00 PM
I was thinking about it over the weekend, I suspect you don't have enough spring load on the new sear.
Hearing that you don't, I started looking up airsoft sears. I don't think this is an airsoft sear (most were real-steel), but I don't think it's real-steel either (crossman IIRC, which should be pretty applicable actually).
I'll try this soon since I can modify the prints I have to try this. The first catch I had in the blaster worked, but didn't have enough leverage. This would allow me to add as much leverage as I want (within reason within the allowable space/travel).
Since you're 3D printing anyway...Purple Catch?
I modeled that into the design earlier today, but two ramped pieces sliding against each other makes for a crappy trigger feel. I have an ESLT catch thrown into the model at the moment, but in order to get the leverage needed to have the same moment angles and leverage as that design I'll have to use a cable to connect the trigger to the sear. It would make for a very very nice trigger feel at the expense of a little complexity.
The complications I'm running into all relate to having to do this with the catch way behind where the trigger needs to be.
#103

Posted 04 April 2017 - 06:59 AM
couldnt you just move the handle, and by extension the trigger back? or do a longshot style pusher arm on the trigger?
#104

Posted 04 April 2017 - 10:32 AM

POPULAR
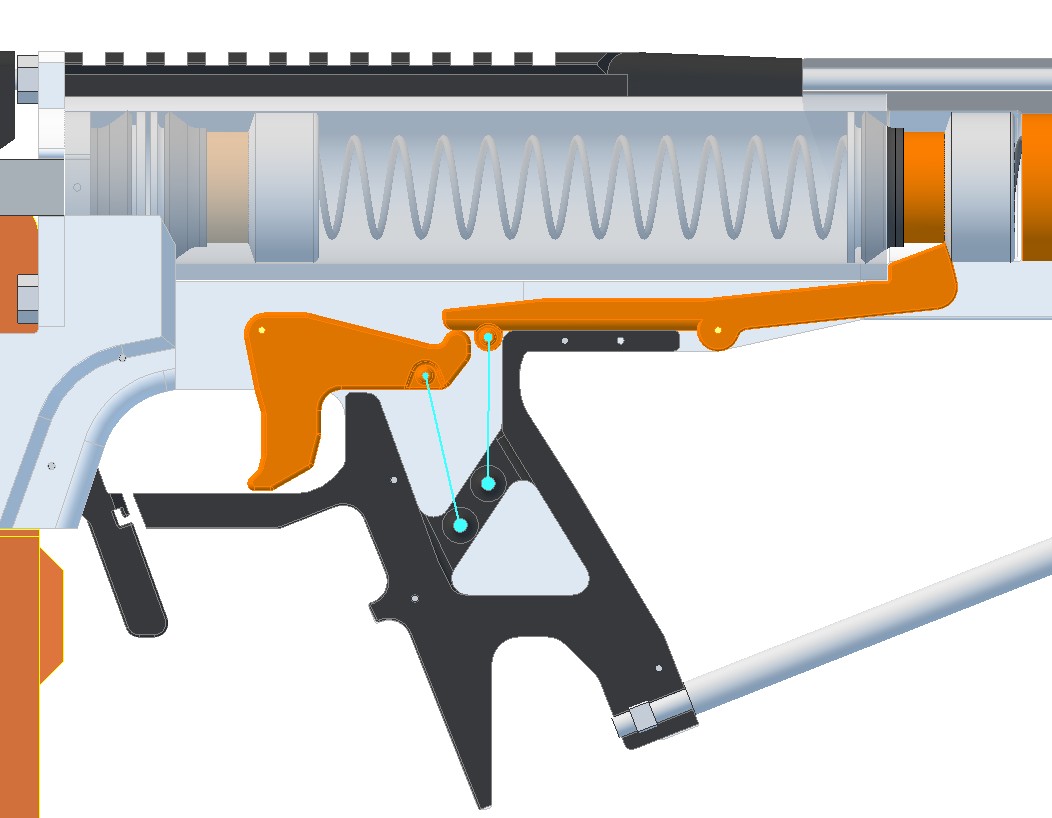
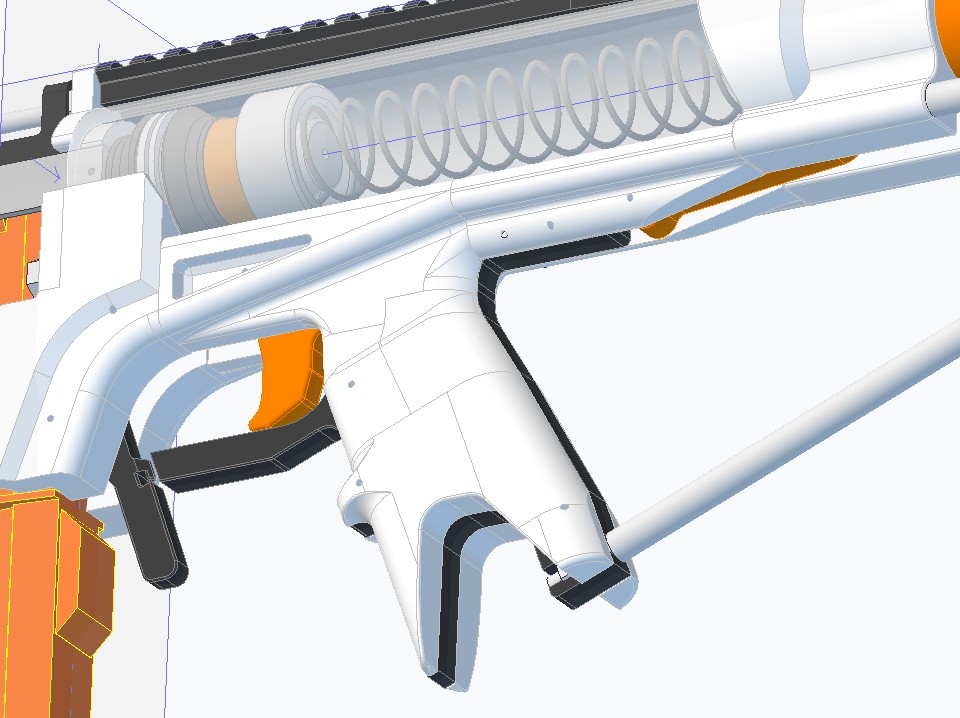
Also, another video.
#105

Posted 10 April 2017 - 09:13 AM
SUCCESS. My first two molds cured fine. The mold on the left will allow me to cast Ramrod and Boltcores as a single urethane blank. I can try to do this with a center tool, or I can just drill them out on the lathe after casting them.
The mold on the right is for buttplates, which I will be castings out of a lower durometer rubber.
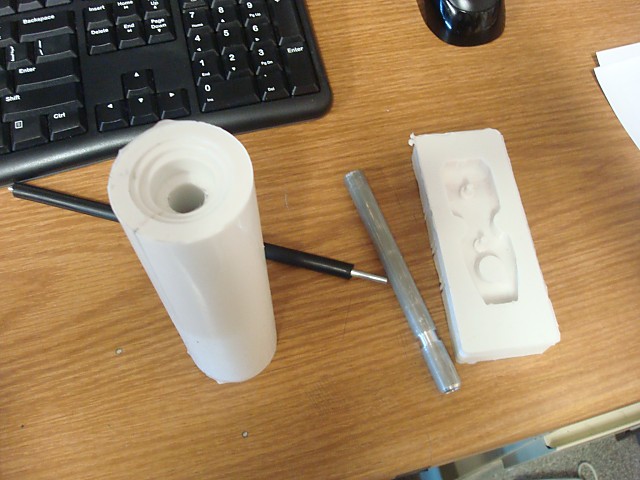
I have a 16lb tub of Smooth-Sil 95 that I can use to make more molds, and I have a plan moving forward to start producing blaster parts in bulk (two at once, among 5 molds). I'm making my own spincasting system which will allow me to make two to four whole blasters in a single weekend.
Now I'm just waiting on printed parts to show up so I can finalize the testing on the design.
#106

Posted 10 April 2017 - 06:55 PM
Darth nerf "I used to like the deploy, I ''twas but a learner, now I am the master" Obi buzz bee kenobi "only a master of nerf evil darth"
#107

Posted 10 April 2017 - 07:05 PM

POPULAR
No progress today. Didn't have time or opportunity at work to use the oven, which shares an outlet with a chiller that is tied to a vacuum weld chamber.
Do you think you could put a k14 in this?
No. You would have to make almost all of the blaster pats out of much higher grade materials. I'm not interested in entertaining springs that nobody can actually prime. Especially when this blaster already hits 210 fps.
Although, on a related note I did just find a casting epoxy that's 90% of the strength of polycarbonate when cured.
Edited by CaptainSlug, 11 April 2017 - 08:02 AM.
#108

Posted 11 April 2017 - 10:01 PM
I'll try this soon since I can modify the prints I have to try this. The first catch I had in the blaster worked, but didn't have enough leverage. This would allow me to add as much leverage as I want (within reason within the allowable space/travel).
I modeled that into the design earlier today, but two ramped pieces sliding against each other makes for a crappy trigger feel. I have an ESLT catch thrown into the model at the moment, but in order to get the leverage needed to have the same moment angles and leverage as that design I'll have to use a cable to connect the trigger to the sear. It would make for a very very nice trigger feel at the expense of a little complexity.
The complications I'm running into all relate to having to do this with the catch way behind where the trigger needs to be.
I've actually been hoping you would MACHINE a purple catch, and have much nicer sliding than what a 3d printed purple catch will usually do, and the full strength of whatever you cut it out of. It doesn't make the most sense here in the sense that the point of the purple catch was to put everything into the handle for compactness, which isn't possible anyways because you have a relocated trigger.
#109

Posted 12 April 2017 - 12:51 AM
No. You would have to make almost all of the blaster pats out of much higher grade materials. I'm not interested in entertaining springs that nobody can actually prime. Especially when this blaster already hits 210 fps.
speak for yourself, *flexes* My rainbow has more than a K14 and definitely is spammed.
A better response would have been you are going to sacrifice the fire rate it gives you that makes it key, and considering most of this hobby can't effectively prime those springs, it isn't worth it. This blaster is supposed to be spammy, meaning get close. 210 FPS is not a joke, it's going to be a higher dart output.
However I would be a bit interested in a 30 kg+ springload Caliburn, would need a really long barrel though.
I'm Van, the weird kid with a box
Triggered as fuck and ready to gun you down
#NoBarrelTapsNoMercy
#GoFastGoFurious
"Stone Cold Operator of Death" -Clownie
#110

Posted 12 April 2017 - 07:10 AM
I've actually been hoping you would MACHINE a purple catch
I have not yet gotten around to making a design that would utilize one.
If you are really interested in a machined purple catch (and maybe a mold for duplicating it) maybe we could discuss that through PMs.
However I would be a bit interested in a 30 kg+ springload Caliburn, would need a really long barrel though.
It could probably be done, but would require that some of the parts be cast out of epoxy, or machined from thick sheets of polycarbonate. So obviously that would cost more.
#111

Posted 25 April 2017 - 07:42 AM
Edited by Silly, 25 April 2017 - 08:41 AM.
Co-Owner of the History of Nerf Modding research project, moderator of r/Nerf, owner of BlasterWiki, maker of 3d printed blasters (GitHub/Thingi) and Nerfy art.
#112

Posted 25 April 2017 - 09:22 AM
My next batch of 3D-printed parts should show up this afternoon.
#113

Posted 25 April 2017 - 12:06 PM
Partslist
SpoilerMy next batch of 3D-printed parts should show up this afternoon.
Thank you very much!
Co-Owner of the History of Nerf Modding research project, moderator of r/Nerf, owner of BlasterWiki, maker of 3d printed blasters (GitHub/Thingi) and Nerfy art.
#114

Posted 25 April 2017 - 08:30 PM
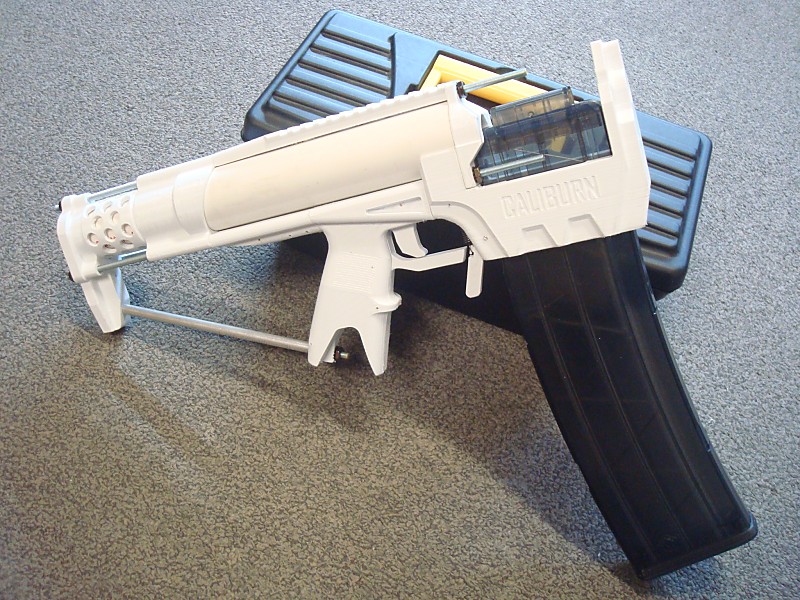
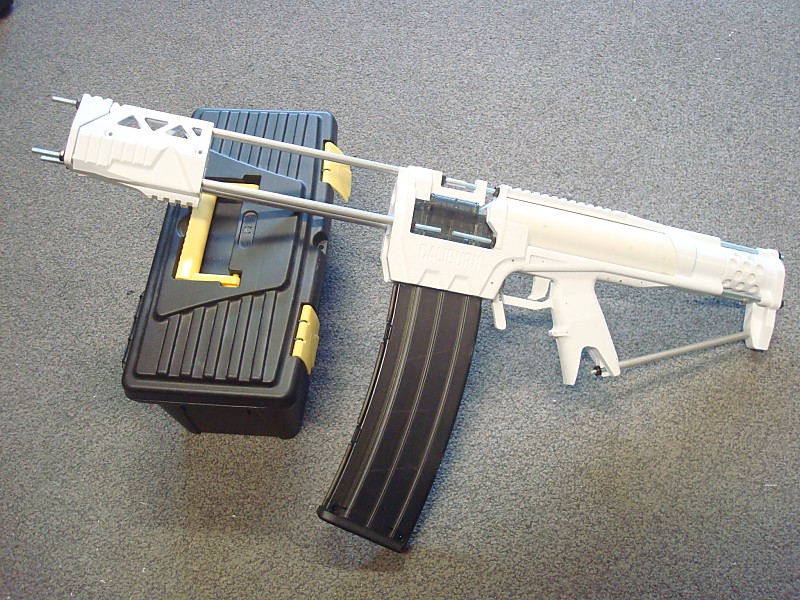
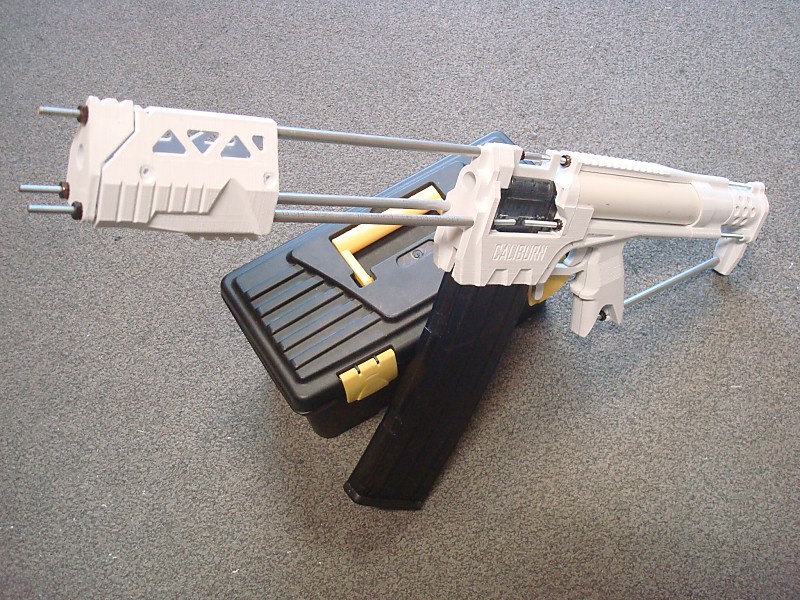
PARTS! LOTS AND LOTS OF PARTS! The updated foregrip is exactly what I wanted to accomplish with the changes.
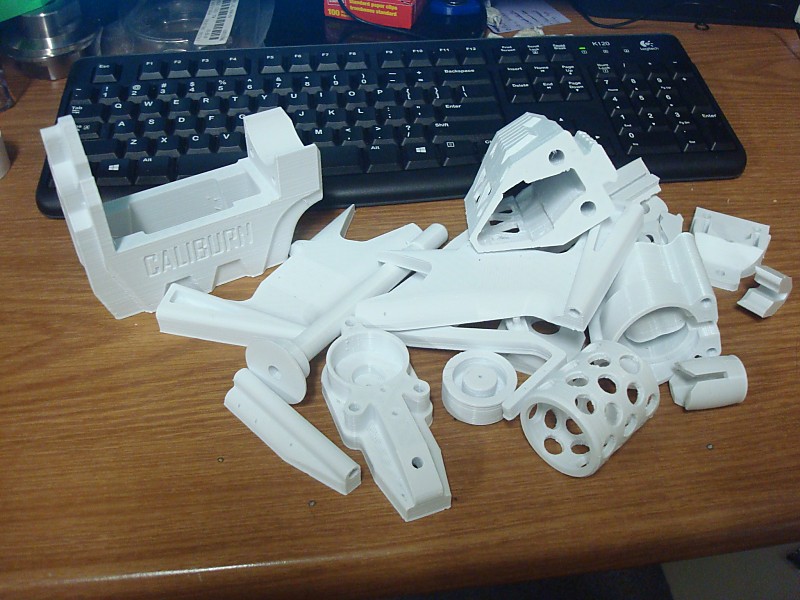
First off, the printed bolt core + ramrod worked out well in 100% infill. The o-ring undercut is within .003 of the diameter it needs to be to seal. I narrowed the ID from .360 to .320" just to make the print more reliable without hampering flow through it too much. The Bolt1 piece is now also twice as thick.
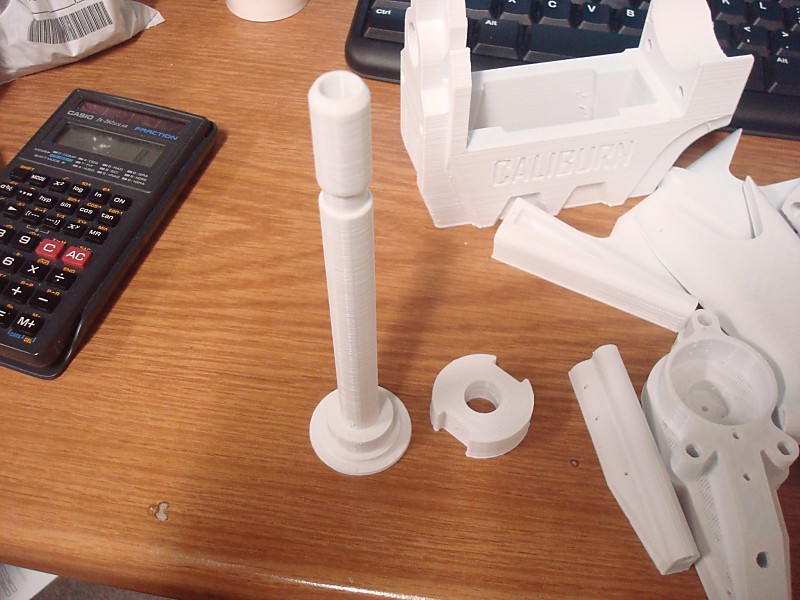
I was a little concerned about the posts for the springs. The print fugly but will still fit the springs I intend to use.
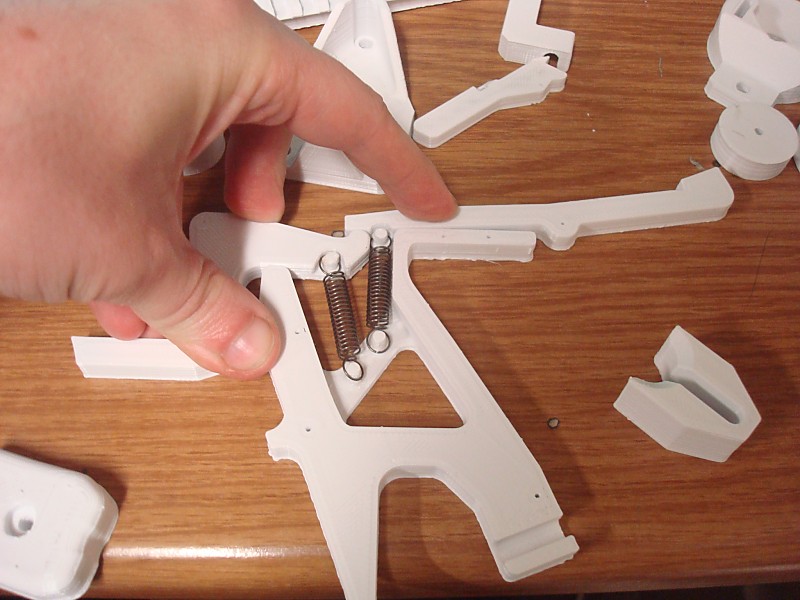
The stock and butt parts are now spaced apart by a single large spacer rather than 3 short aluminum spacers. This part can be printed, or be made out of 1-1/4 SCH40 pipe (then drilled if you want).
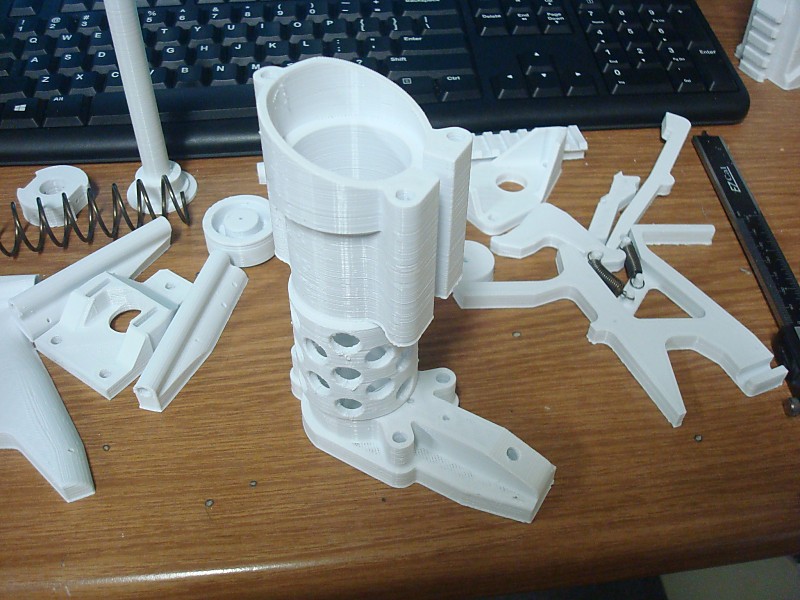
The spreader part at the end of the plunger tube is now a 100% infill part that is separate from the mag well. I beefed it up considerably.
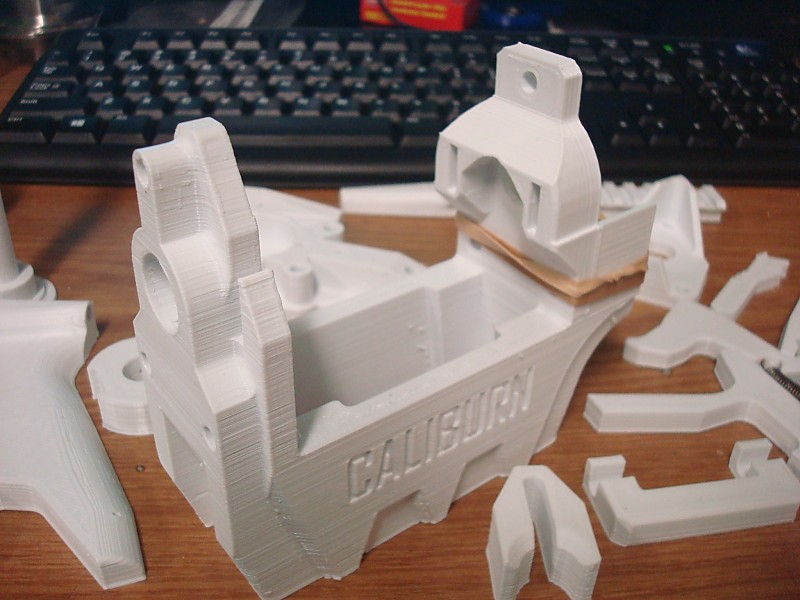
I widened the front-to-back distance of the mag well just a bit and it now fits even the Worker mags well. Boss.
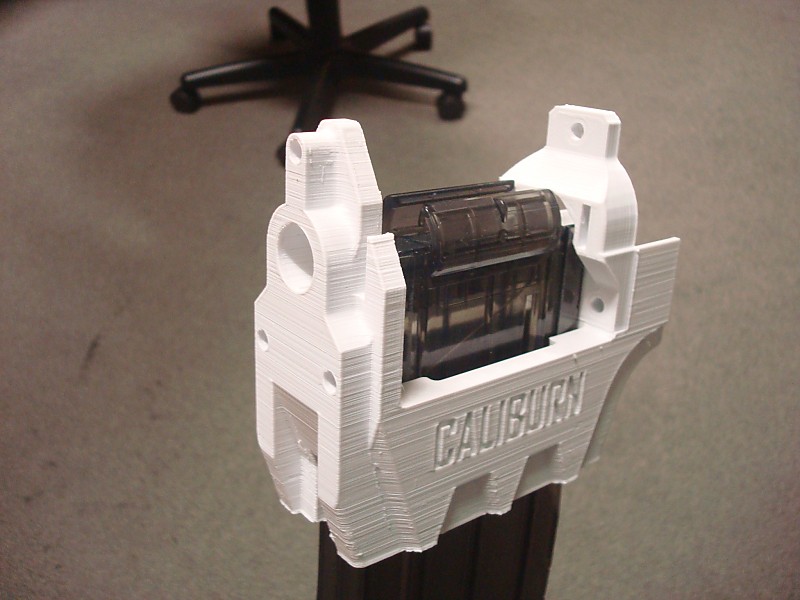
The jam door is now two parts. The front piece addresses/adopts the idea /u/RazgrizInferno came up with. It will surround the head of the dart in the top of the mag so that it won't have anything to run into when it is getting pushed by the ram rod. The rear piece is just the lip that keeps the foam of the dart inline with the chamber. Both parts can be removed easily by loosening a hex nut, then sliding them off the threaded rods.
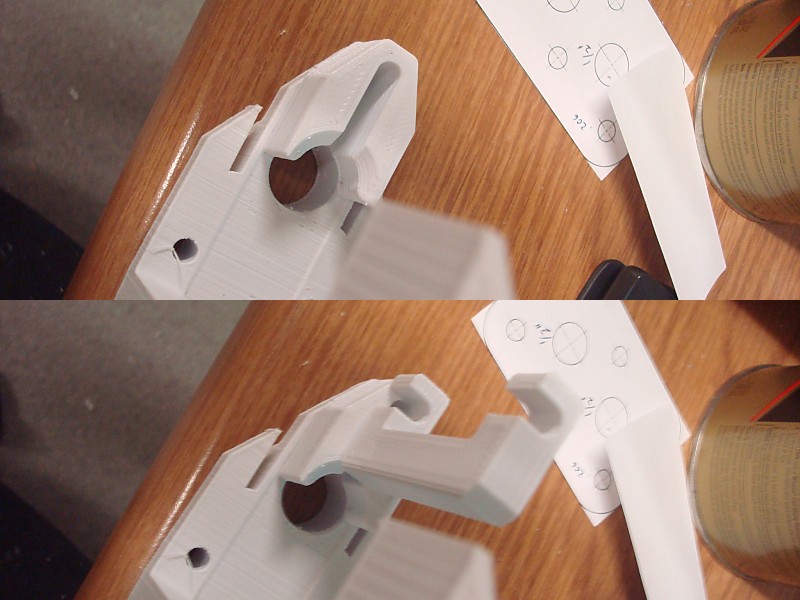
All the parts have the usual flash and surface finish cleaning needed of any printed part. But so far everything looks good. The only part I need to do touch-up machining on is the rear third of the plunger which doesn't seem to be fitting K25 springs, so the inside of it needs to be widened out just a hair to prevent binding. No biggy.
#115

Posted 25 April 2017 - 08:55 PM
PARTS! LOTS AND LOTS OF PARTS! The updated foregrip is exactly what I wanted to accomplish with the changes.
Those look great! I'm glad you pursued and are happy with the bolt, printing it will make this super approachable for new/lazy/harried builders.
Did you use a service? With my machine still down (there's hope on the horizon for a repair someday though now) I'd like to know: How much was it all in?
#116

Posted 26 April 2017 - 07:04 AM
I used https://www.3dhubs.c...s/jacobblumbergThose look great! I'm glad you pursued and are happy with the bolt, printing it will make this super approachable for new/lazy/harried builders.
Did you use a service? With my machine still down (there's hope on the horizon for a repair someday though now) I'd like to know: How much was it all in?
It ended up being $120 shipped roughly. I revised one or two parts after placing the first order and had to place a second one. I also had to upload the files in sets based on what infill percentage I wanted.
Assembly is only going to require drilling out holes for tolerance. Then pinning/screwing everything together. Bolt1 is the only part that needs to have threads added to it.
The only remaining part that and end user will have to fabricate themselves (or buy from me) are the aluminum straps that connect the bolt assembly to the foregrip. Everything else is just cut-to-length tubing or threaded rod.
I may not have time to start the mold-making process until this weekend.
#117

Posted 26 April 2017 - 02:27 PM

POPULAR
Image dump. No big issues with assembly so far. A few spots that I had to file down will be modified in the STLs before I make them available. I'll do final assembly and test the catch tomorrow.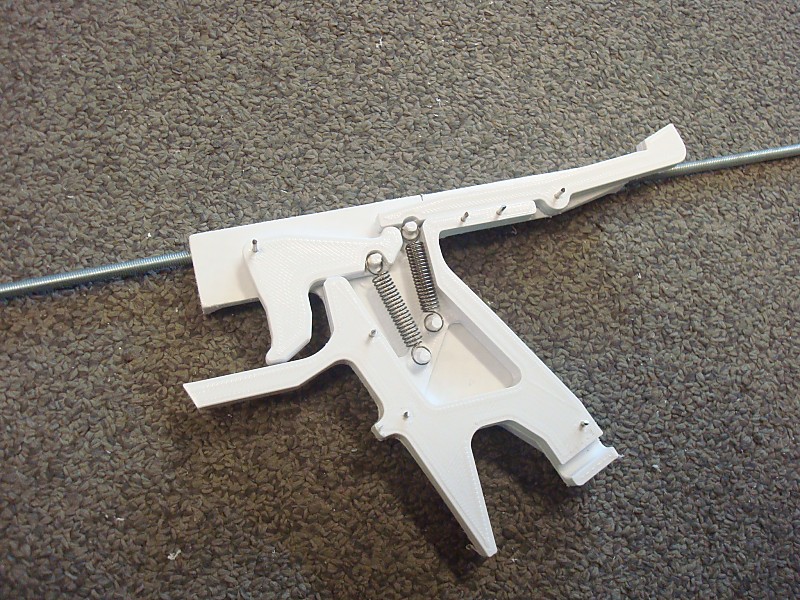
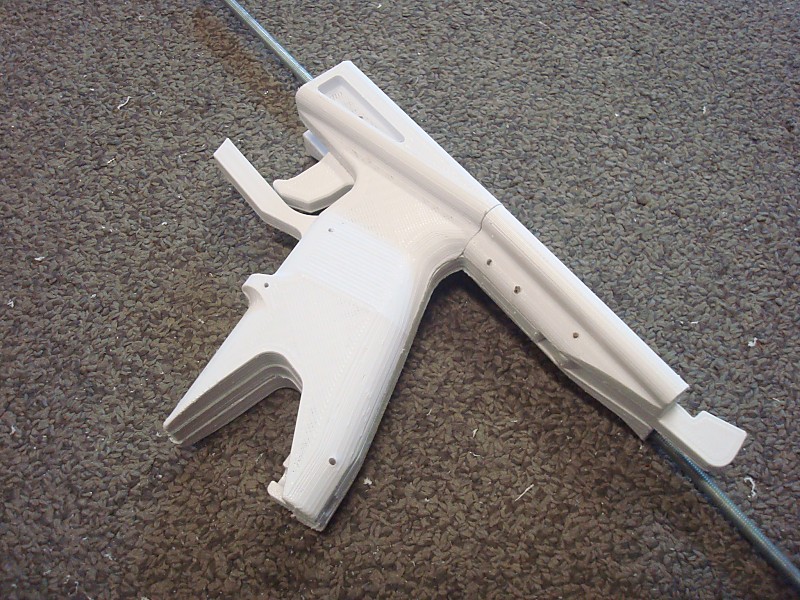
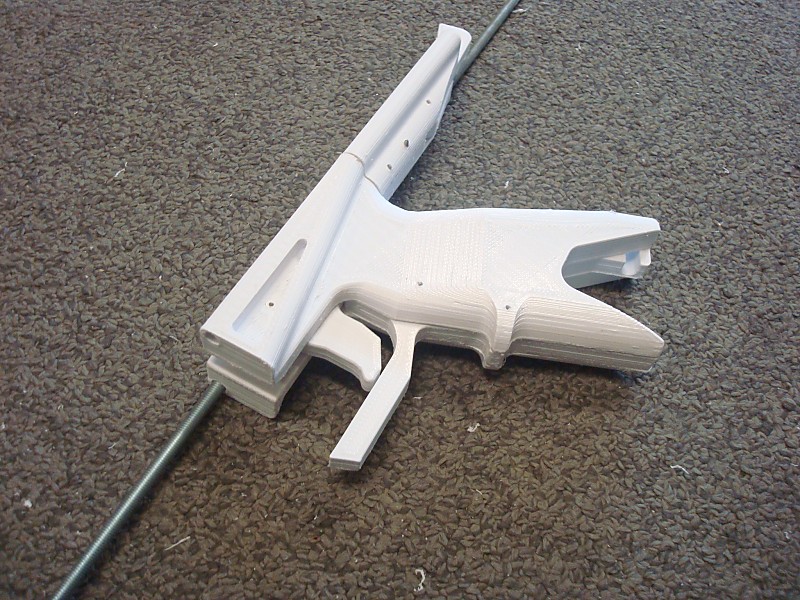
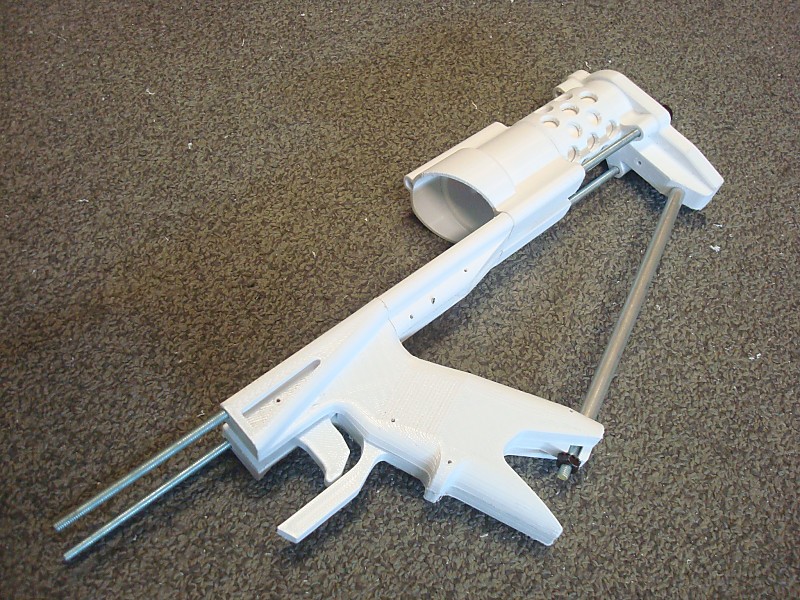
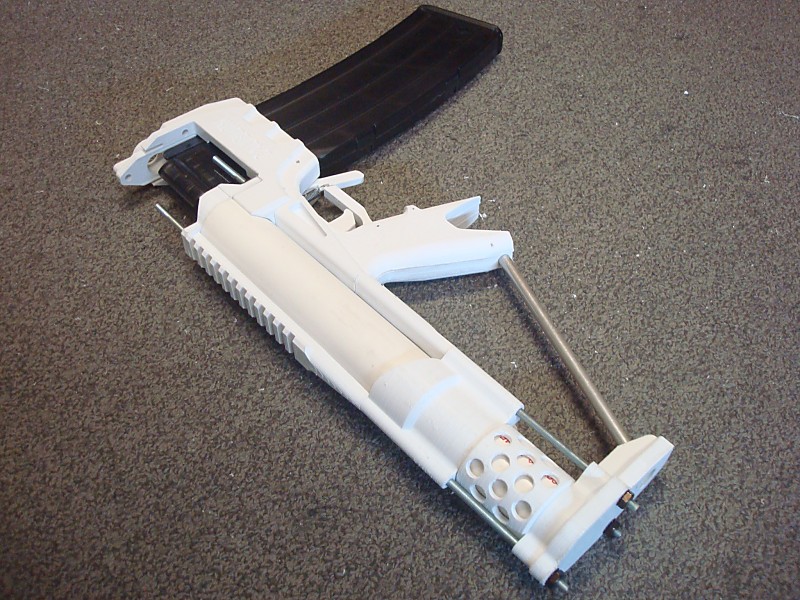
#118

Posted 27 April 2017 - 02:36 AM
How much filament do you need? (In KG) I'm getting 2 KG of ABS Soon and would like to know how much filament I need.
youtube.com/user/asean12
#119

Posted 27 April 2017 - 03:21 PM
How much filament do you need? (In KG) I'm getting 2 KG of ABS Soon and would like to know how much filament I need.
When I sliced a much older version of the files, I came up with ~400g of filament. YMMV based on your machine/settings; and also Slug has made new files. Probably still under a kg though.
#120

Posted 27 April 2017 - 07:23 PM
Co-Owner of the History of Nerf Modding research project, moderator of r/Nerf, owner of BlasterWiki, maker of 3d printed blasters (GitHub/Thingi) and Nerfy art.
#121

Posted 27 April 2017 - 10:50 PM
I've never printed before, what kind of filament do you recommend?
Depends more on you and your printer's capabilities than our recommendations. It looks like the hub Slug got the prints from operates only in PLA - which is an easy filament to use and also one of the 'weaker' filaments. If this works in PLA, it should also work in ABS, which is the other 'standard' printer filament. It'd probably work in a resin machine as well, but Slug is planning to cast resin/urethane parts and printing resin is super expensive from what I hear.
#122

Posted 28 April 2017 - 07:07 AM

There are very few companies that directly print to urethane. As far as I am aware, Stratasys is the only company that offers printers for that. The most prolific consumers of those type of prints are the medical field which uses them to directly print anatomical models.
I'm using the cheap solution of using the printed parts to directly cast duplicates.
The resin itself is $3 to $13 per pound depending upon the grade you use. Epoxies with higher impact resistance are only slightly more expensive.
I'm going to be making a spincasting machine, which will allow me to make a dozen parts per pour. Four molds will be enough to let me cast most of the parts for 2 whole blasters (with some spares) in only four pours.
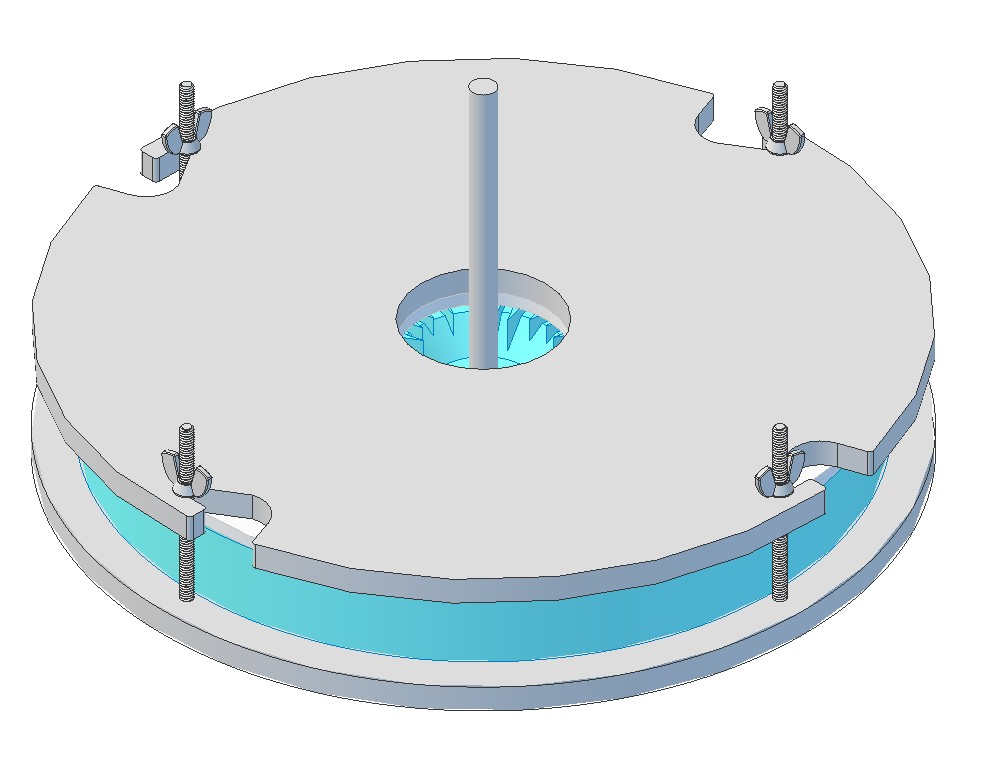
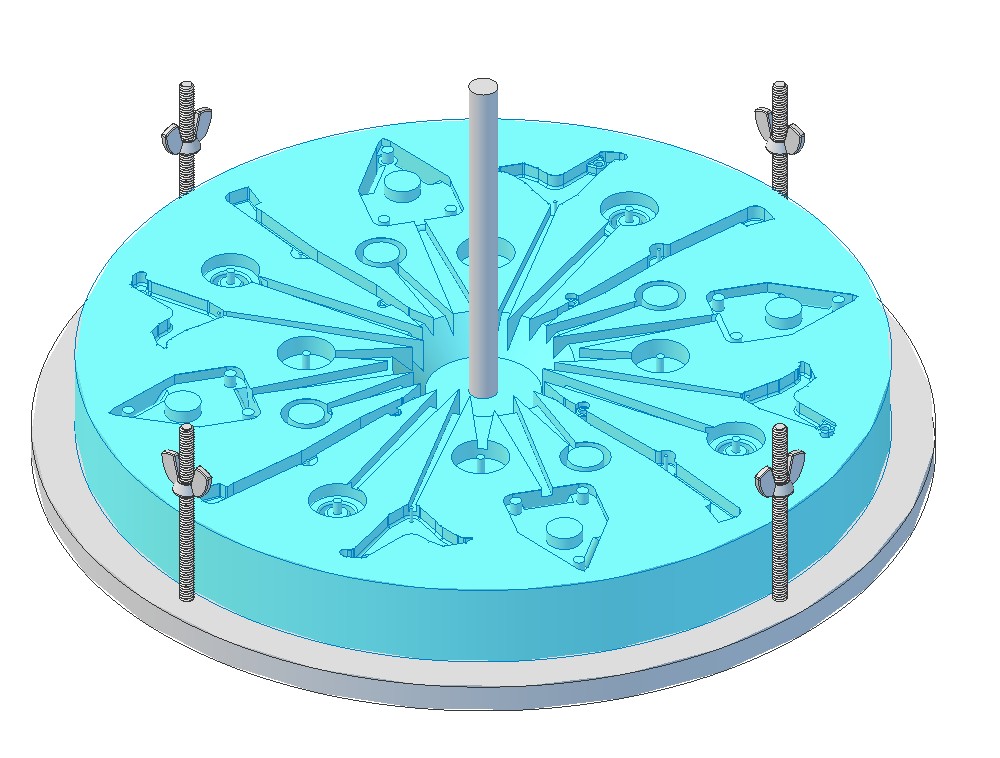
The only parts I cannot make this way are the mag well and foregrip. Those will require two and three-part molds and will be cast one at a time. In the interim they will probably continue being printed parts.
#123

Posted 28 April 2017 - 02:13 PM
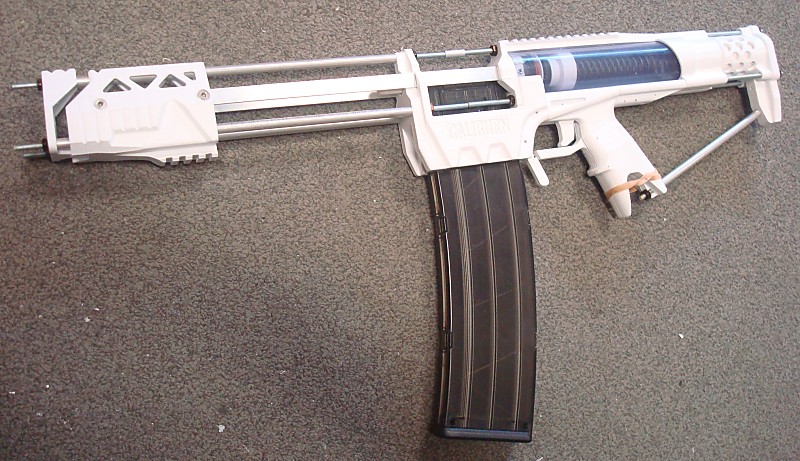
Double-post just to say that I'm extremely relieved that the new catch WORKS. So the only things I need to revise deal with how this thing gets assembled.
I can add a barrel, coupler, and chamber this weekend and fire some darts through it.
#124

Posted 28 April 2017 - 04:32 PM
#125

Posted 28 April 2017 - 05:32 PM
Yeah, I was wondering this too. For the 3D printed version, won't the PLA plastic slowly wear down from the force of a [k26]? I mean, it seems to be under a lot of stress from the full length spring. Maybe a [k25] spring would work?Has it exploded from the plunger firing? Does it show signs of exploding?
The Caliburn seems really cool, it's like a longshot, stampede, and alpha trooper mix. I might try to make one down the road
Awesome work Captain Slug!
Bubba
Edited by Bubba Longshot, 03 May 2017 - 05:50 PM.
Also tagged with one or more of these keywords: Mag-Fed, Pump-Action, Springer, Homemade
homemade
Community Forums →
Homemades →
Re-creating the Nerf SledgeFire: The SuperSledgeStarted by Silly, 27 Dec 2021 |
|

|
||
Community Forums →
Homemades →
Clarification of differences between Hoppers, RSCBs, Choppers, and BRIStarted by Silly, 17 May 2021 |
|

|
||
Community Forums →
Homemades →
Project 12: 100% brushless Vortex blasterStarted by snakerbot, 16 Aug 2020 |
|

|
||
Community Forums →
Homemades →
Project 10Started by snakerbot, 05 Jul 2019 |
|

|
||
Community Forums →
Homemades →
Nerf M-1 Garand conceptStarted by Silas4lagoon, 28 Jun 2019 |
|

|
1 user(s) are reading this topic
0 members, 1 guests, 0 anonymous users


