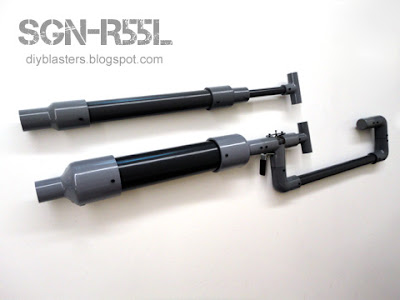
This is part of a series of DIY blasters i plan to build, so the naming conventions i will use from here on will be as follows:
"SGN" is the maker's ID (that's me)
"R" is the series name.
"3" indicates the plunger internal diameter (which is 30mm).
"L" indicates the version's length (in this case, the "Long" variant).
Development credits go to all the DIY blaster builders at the various popular Nerf forums. Majority of the R Series blaster component designs are based on and inspired by the popular blaster designs such as the +Bow design by CaptainSlug and SNAP design by Carbon.
Okay, here are the objectives of the R Series blaster design:
- Parts all made with easy-to-source DIY materials
- Minimal tool requirement and working time
- Simple to build PVC pipe frame and parts (like SNAP designs)
- Secure catch plate and trigger system (like +Bow designs)
- Modular setup (able to be customize easily and quickly)
- Maximum priming draw (as ergonomically possible)
- Reliable and consistent firing performance
- Easy to transport and carry
Lets start:
SGN-R3L - Fully Assembled
The R3L is a hybrid DIY blaster, it strives to combine the simplicity of the SNAP blaster designs with the secure catch system of the +Bow designs.
This is the result...
The R3L unit shown above is equipped with a brass barrel slide breech attachment. With suitable couplers, any barrel attachments (ie. speed-loaders, rscb clips, hopper clips etc) can also be used too.
SGN-R3L - Main Blaster Unit
The R3L main blaster unit is fully built with PVC pipes.
I used locally sourced 13mm, 16mm and 20mm spec PVC pipes (Brand: SingaPlastics) which nest perfectly within each other to create the individual components, along with joints, couplers and reducers to scale down from larger diameter pipes.
In the R3L, 30mm spec PVC pipe was used for the plunger tube (slightly narrower diameter to +Bow plungers).
SGN-R3L - Modular Setup
The majority of components in the R3L are bolted together with machine screws, no glue is used to join sections.
Since machine screws are used to secure the frame and parts, the blaster can be easily modified and customized anytime, and the parts can be swapped around quickly. This helps to facilitate easy replacement and upgrading of parts.
SGN-R3L - PVC Pipe Catch Ring Design
This is the "heart" of the R Series design.
I wanted a catch system which could emulate the catch plate design that is commonly used in blasters such as the +Bow and in most spring plunger powered Nerf blasters.
But catch plate designs have traditionally been rather time consuming to make, with popular methods so far involving the use of specialized tools to do the cutting, shaping and tapping of polycarbonate sheets to make the multiple parts, along with specific screws and bolt setups.
On the other hand, the SNAP catch design of a trimmed metal rod and a clothes pin to form the catch, trigger and return spring is the epitome of simplicity, its so easy and quick to build, and it can work well in many blaster designs too. But the trade-off is that its naturally not as strong or durable as the catch-plate system.
So i tinkered with many designs, focusing on just using PVC pipe materials... and finally arrived at the PVC pipe catch ring design.
The design is inspired by the recent "Rainbow" design by Stark and "Mod Mans End Cap Catch Plate" design by Mod Man. The difference is i utilize only PVC pipe material for the entire catch system (no polycarbonate required).
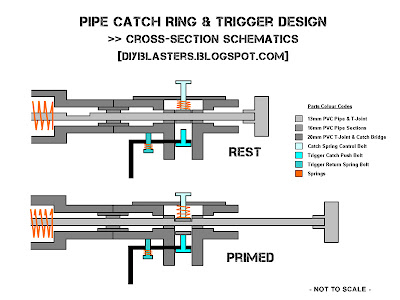
The catch mechanism consists of a spring loaded 16mm PVC catch ring (positioned between 2 additional fixed ring sections for proper alignment) which sleeves over the 13mm PVC plunger rod. The plunger rod has a notch in it which will catch when the blaster is primed.
The entire catch assembly sits inside a 20mm PVC T-joint that is hollowed out to fit the parts. As you can see, this catch and trigger assembly is a completely modular set and can be easily swapped with other plunger and shoulder stock configurations easily.
The trigger is a metal L-bracket which operates on a simple pivot system, it links with the catch system via a cut-out slot in the trigger handle (the slot acts as a fulcrum point for the trigger). There is a return spring under the trigger with a bolt to position it properly. I wrapped the metal L-bracket in a rubber sleeve for better grip and comfort.
Pull the trigger and it pivots in an upward motion to push up the spring loaded catch ring, thereby releasing the plunger rod and firing the blaster.
SGN-R3L - Maximum Priming Draw
Another feature i wanted to achieve was to build a blaster with the maximum priming draw that i could still physically use.
Longer priming draw = More air volume = More power.
I chose to use the pull-back priming rod method as it was the simplest and most common design to build, but that also means that a longer priming draw would naturally increase the overall blaster length, and result in the trigger handle being positioned further away from the user.
After much trial and error, i managed to get the priming draw to a full 9" (+Bow priming draw is 6.5").
The 9" priming draw is almost at the limits of comfortable shoulder aiming for me (and i'm 6ft tall), any longer and i might have abit of trouble reaching the trigger handle!
Further pushing my arm reach limits, i made a proper full-length shoulder stock with a cheek rest (as you can see in the photos), so the result is a very long blaster...
Plunger Draw = approx. 22 cm / 9 inches.
SGN-R3L (with slide breech) = approx. 135 cm / 53 inches.
SGN-R3L - Folding Shoulder Stock
As some of you sharp eyed readers may notice, everything is machine screwed together except for the joint between the trigger handle and the shoulder stock. That is so that i can fold the shoulder stock to the right or left for easier storage and transportation.
Yes, the blaster could also be used with the shoulder stock folded, but great care will have to be taken to avoid getting cheeks or fingers clipped when the priming handle propels forward at high velocity.
SGN-R3L - Disassemble Sections
For transportation and storage, the blaster can also be taken apart in sections to be packed flat.
Here is an example of it in a protection case with layers of foam padding.
SGN-R3L - Scale Comparison with Nerf Longshot
(Without barrel attachments)
How does the R3L compare in size to other blasters?
Well, here is a scale comparison with a Nerf Longshot.
SGN-R3L - Scale Comparison with +Bow
(Without barrel attachments)
And here is a scale comparison with a +Bow.
SGN-R3L - Catch & Trigger Comparison with +Bow
This is an interesting comparison, the R3L and +Bow catch systems compared side-by-side.
SGN-R3L - Spring Plunger Internals
Standard SNAP style plunger head and rod layout using 13mm PVC pipe, end cap and T-joint. The plunger head is a rubber gasket originally designed for plumbing works, fits the 30mm spec pipe plunger perfectly with 100% air seal.
Note that the plunger head and rod are all attached together with machine screws too, so they can be replaced or upgraded easily.
The spring i use for the R3L is a custom ordered 11.5" length 14kg load aftermarket spring.
The R3L also has air channels drilled behind the plunger tube.
This helps to counteract the vacuum that forms when the plunger head propels forward, very important for maintaining the plunger velocity, especially in large plunger tube designs.
SGN-R3L - PVC Pipe Catch Ring Internals
Here is an "exploded" view of the catch ring internals, displaying all the parts in the assembly.
SGN-R3L - Trigger & Catch Ring Assembly
The L-bracket trigger shown here is assembled outside of the trigger handle for easier reference, you can see how the parts are attached together. Notice the spring in the front bolt? Thats the return spring to keep the trigger away from the catch when at rest. Notice also that the bolt and nut on the inside of the trigger handle are installed with washers to allow for finer adjustments in trigger pivot reach.
The catch ring consists of a section of 16mm pipe connected to a half-threaded screw with a catch spring, and everything is held down by a catch "bridge" made from a section of pvc pipe. Again, washers are also installed to help fine tune the spring load for the catch.
For build reference, here is a cross-section schematics of my SGN-R Series Pipe Catch Ring & Trigger Design:

>> Click this link for a larger picture of the schematics.
SGN-R Series Blasters - R3L Demo Video
This video will provide a demonstration of how it works.
http://www.youtube.com/watch?v=em28jkh3STk
:: Sample Test Fire Data ::
PTG: Parallel-To-Ground (Shoulder height, no elevation)
ATG: Angled-To-Ground (Aimed higher, 30 degrees elevation)
Shots fired from 1ft length Brass Barrel Slide Breech.
Distance is measured at where the dart lands (Average of 6 shots).
SGN-R3L Blaster
PTG = 140 ft
ATG = 155 ft
Note: The tests were done under controlled conditions with custom calibrated foam darts.
- Notes -
Overall, i'm quite happy with how the design turned out and i'll be building more blaster variants based on the R Series design.
Stay tuned!
Edited by SgNerf, 29 April 2011 - 11:28 AM.


