I still lurk around now and then.
popatachi's Content
There have been 158 items by popatachi (Search limited from 11-December 96)
#349763 Who's still around from 2008/2009
 Posted by
on 30 November 2015 - 07:50 PM
in
Off Topic
Posted by
on 30 November 2015 - 07:50 PM
in
Off Topic
#349533 We're Back! Forum software upgraded and new features added.
Posted by
on 20 November 2015 - 09:00 PM
in
News
Wow! A whole lot of upgrades and updates to the forum. Looks great, Langley.
#282914 War Of The River 2
Posted by
on 12 August 2010 - 10:34 AM
in
Nerf Wars
Sorry, I won't be able to make it out. Have fun!
#280042 War Of The River
Posted by
on 12 July 2010 - 01:06 PM
in
Nerf Wars
Put me down as a definite.
#275853 War Of The River
Posted by
on 24 May 2010 - 07:39 PM
in
Nerf Wars
I'm in!
#273873 War In New Hampshire/maine Area *date Change Take Two
Posted by
on 02 May 2010 - 09:48 AM
in
Nerf Wars
Just wanted to confirm my attendance and let people know that I'm looking for a LS spring. If you have one that I can buy at the war, please PM me.
See y'all there.
See y'all there.
#270981 War In New Hampshire/maine Area *date Change Take Two
Posted by
on 01 April 2010 - 03:22 PM
in
Nerf Wars
Put me down as a maybe.
#274435 War In New Hampshire/maine Area *date Change Take Two
Posted by
on 10 May 2010 - 08:36 AM
in
Nerf Wars
I won't be able to make the 22nd. I'll be heading in the opposite direction to attend a couple weddings.
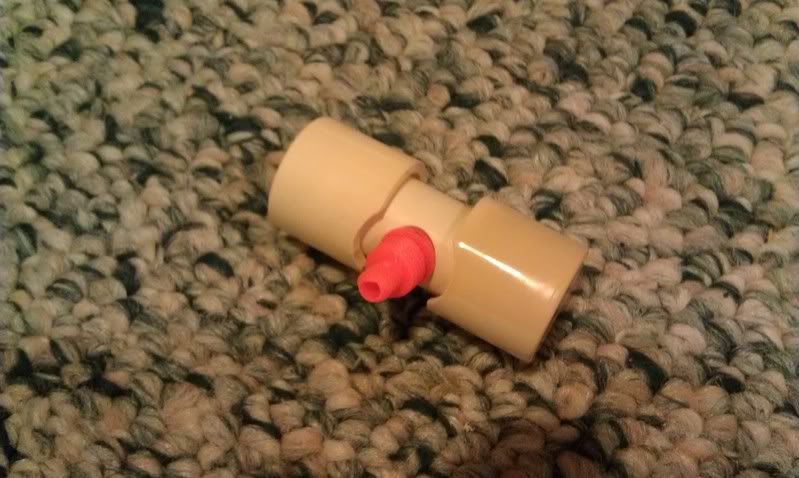
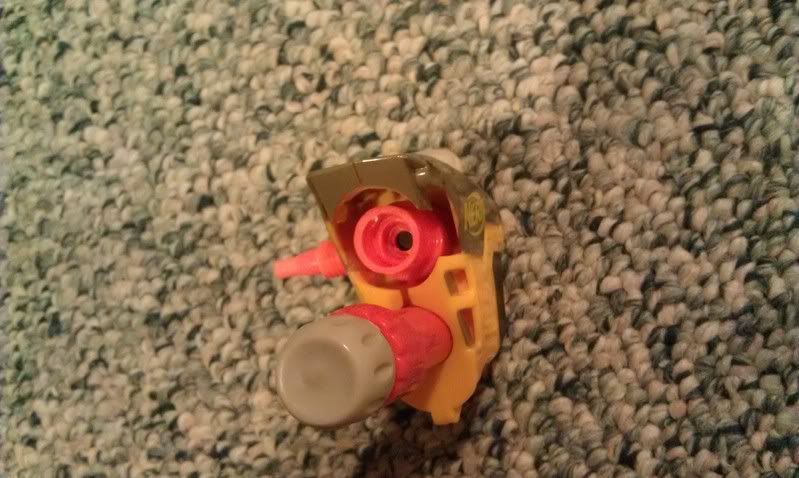
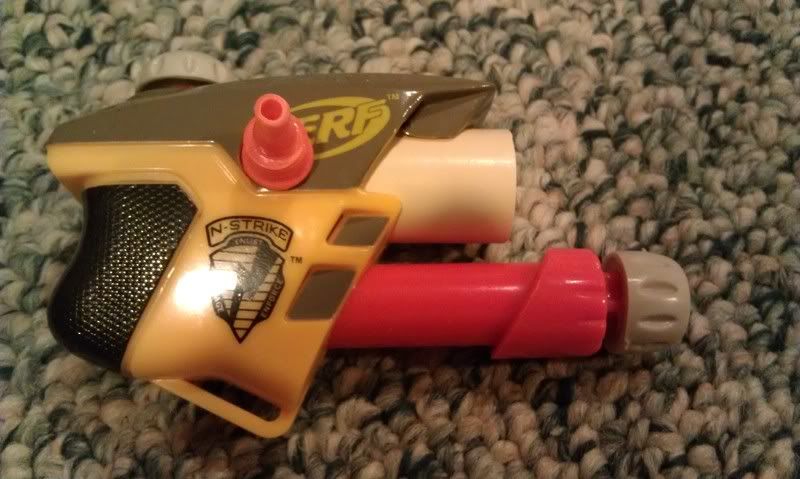
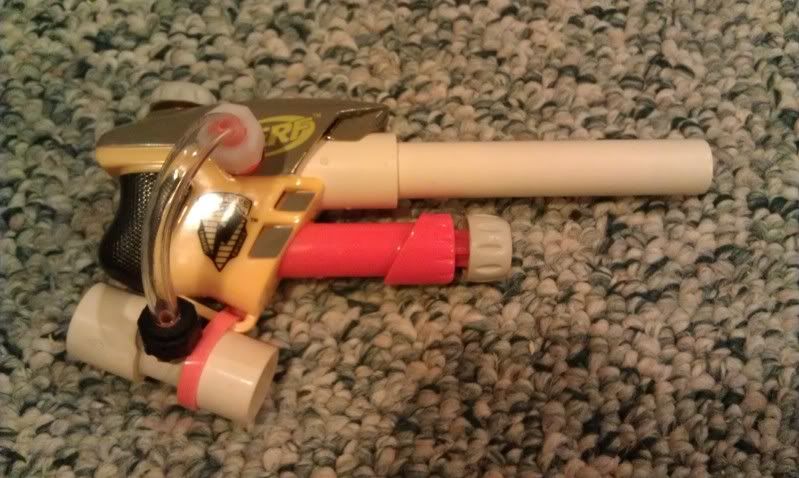
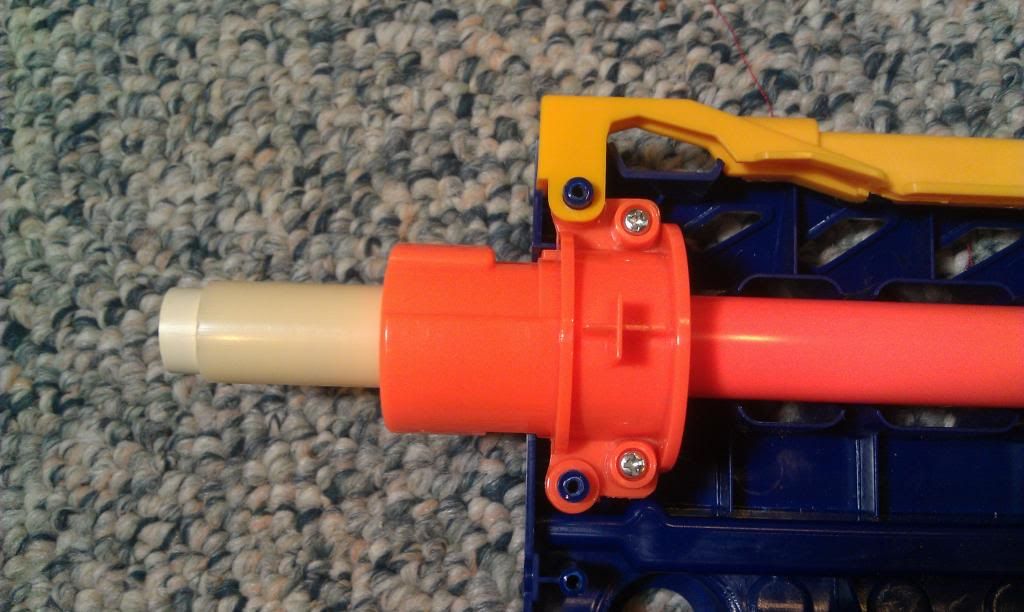
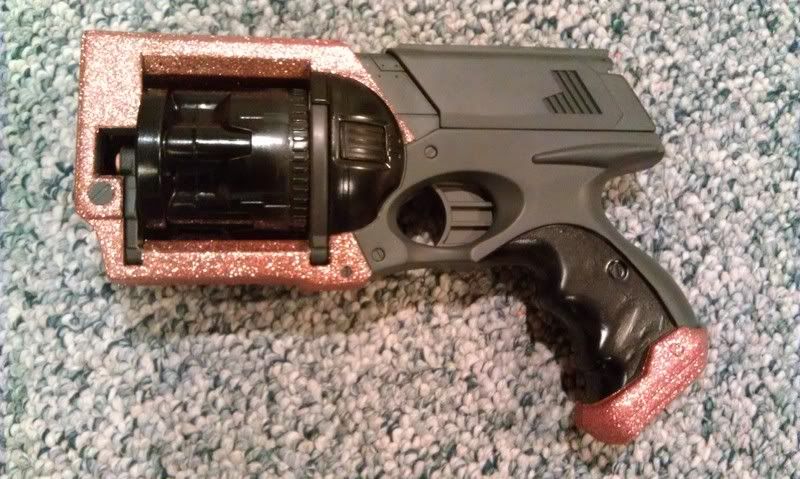
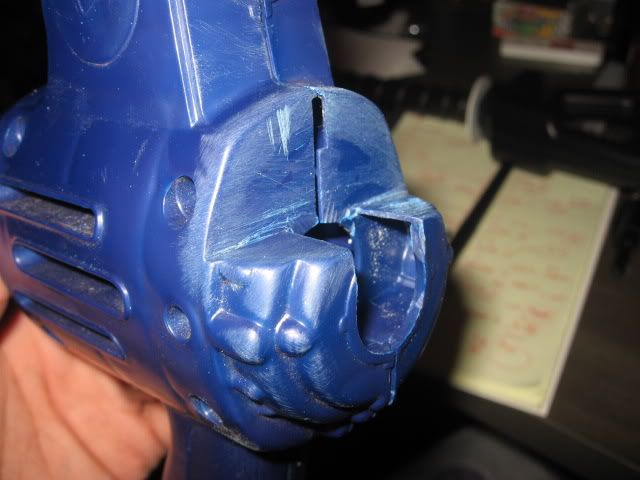
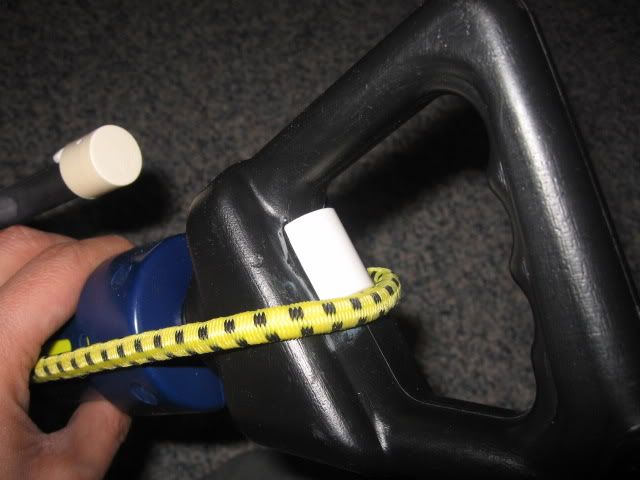
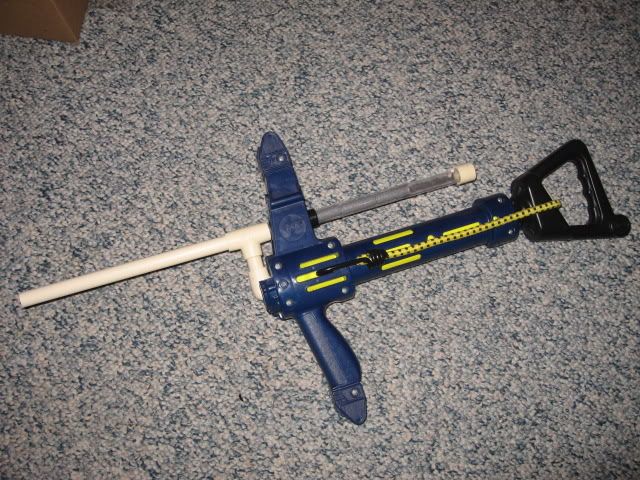
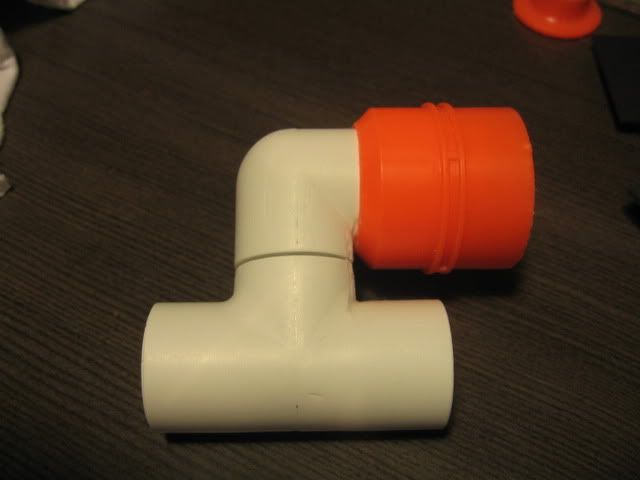
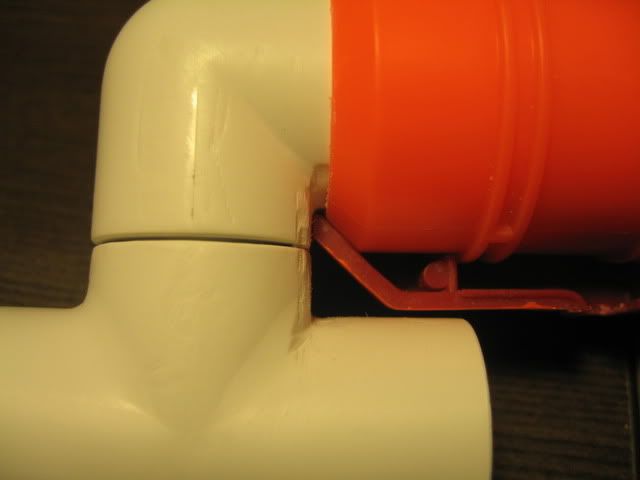
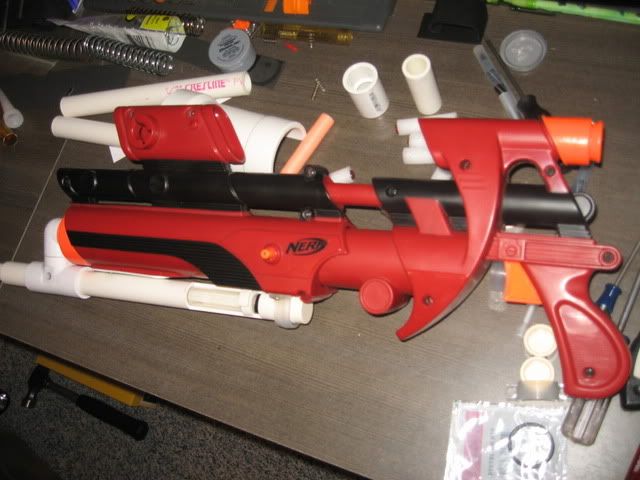
#260063 Turreted Pistol Splat
Posted by
on 29 December 2009 - 08:16 AM
in
Modifications
The the blue between the coupler and the plunger foam? You could remove that and glue/goop the coupler directly onto the plunger tube. Air might escape through that area.
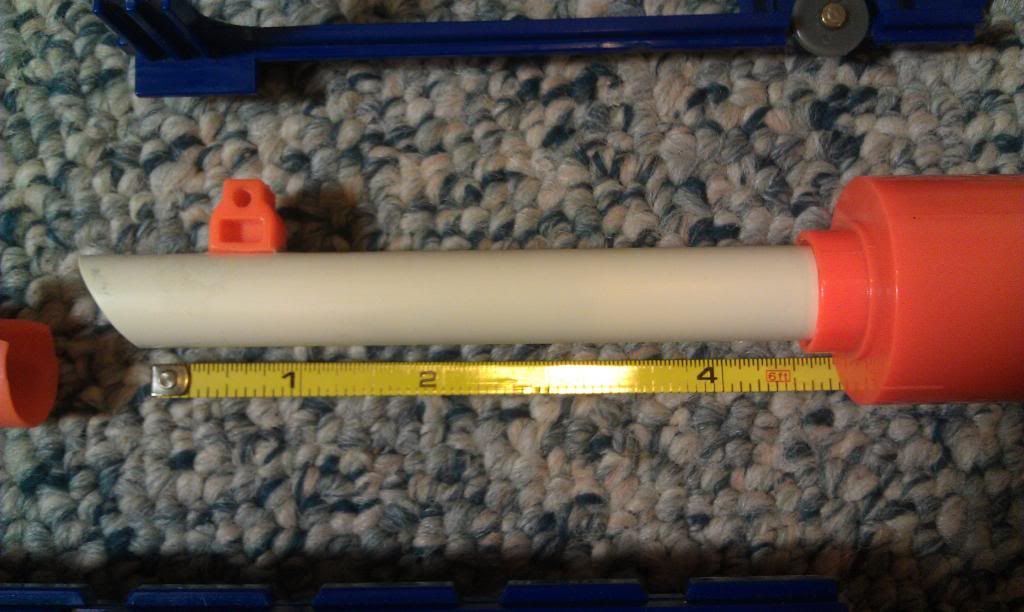
You might also try to shorten the barrel. When I tried my inline clip with a 4" barrel and a 4" clip, the darts were barely able to leave the barrel. Once I shortened the barrel to 3" and the clip to hold two darts everything worked fine.
You might also try to shorten the barrel. When I tried my inline clip with a 4" barrel and a 4" clip, the darts were barely able to leave the barrel. Once I shortened the barrel to 3" and the clip to hold two darts everything worked fine.
#293978 The Ohio Revolution
Posted by
on 06 February 2011 - 07:40 AM
in
Nerf Wars
I will be traveling from Medway, MA. If anyone would like to carpool and share in the cost of gas along the way that be helpful. I will post the general route later.
Slug darts... darn. I only have single BB darts at the moment... any chance I can use those or buy some darts at the war?
Slug darts... darn. I only have single BB darts at the moment... any chance I can use those or buy some darts at the war?
#296123 The Ohio Revolution
Posted by
on 16 March 2011 - 05:49 PM
in
Nerf Wars
Looks like I typed too soon.... I have had the worst luck lately.
I will not be able to make the war. Sorry guys.
I will not be able to make the war. Sorry guys.
#296218 The Ohio Revolution
Posted by
on 18 March 2011 - 10:21 AM
in
Nerf Wars
Home to pack and then heading out!
#296103 The Ohio Revolution
Posted by
on 16 March 2011 - 12:55 PM
in
Nerf Wars
Looks like I'll be there... sleep deprived, but I'll be there.
#294057 The Ohio Revolution
Posted by
on 07 February 2011 - 10:42 AM
in
Nerf Wars
Sorry lionhawk,
Heading down to Virgina is a bit too far out of the way.
And Brit,
I would recommend not going with the white felt pads, they unravel a bit too fast. I've heard the green and blacks ones are better.
Heading down to Virgina is a bit too far out of the way.
And Brit,
I would recommend not going with the white felt pads, they unravel a bit too fast. I've heard the green and blacks ones are better.
#296469 The Ohio Revolution
Posted by
on 22 March 2011 - 11:04 PM
in
Nerf Wars
Here's some of the video I took during the powerball round from my phone. Powerball Round
It's not the best quality, but it is what it is.
It's not the best quality, but it is what it is.
#293951 The Ohio Revolution
Posted by
on 05 February 2011 - 08:45 PM
in
Nerf Wars
Put me down as a slim maybe if I can get the funds to journey out your way.
#296327 The Ohio Revolution
Posted by
on 21 March 2011 - 08:27 AM
in
Nerf Wars
Great War!
Pros:
- Meeting a lot of new people
- Nerfing with a lot of new people
- Not having chili after the war
- I now have red and pink foam (to go along with my white and grey)!
- Red Roof Inn giving me a free night when my booking got messed up
- Rest stop, triple strength, one dollar coffee!
- Fuel efficient car (400 miles per tank)
Cons:
- Brit needs to learn how to steer that tank on the right side of the road!
I've got some footage from the power ball round, though it's not very clear. I'll try to clean it up post later.
It was a great venue and people were all awesome! Thanks again!
#279016 Tape Masking
Posted by
on 30 June 2010 - 06:50 AM
in
Modifications
@BoneRiot: The only caution I would add to doing the method of tape first and then cut is that if the base coat of paint has been put down, you would need to be sure to not cut through the paint and not tear the tape.
On one of my earlier tests I tried this method, but didn't like the results as in places the cut went too deep and near the end of the design it had ripped just enough for the paint to leak through.
On one of my earlier tests I tried this method, but didn't like the results as in places the cut went too deep and near the end of the design it had ripped just enough for the paint to leak through.
#278749 Tape Masking
Posted by
on 27 June 2010 - 07:31 PM
in
Modifications
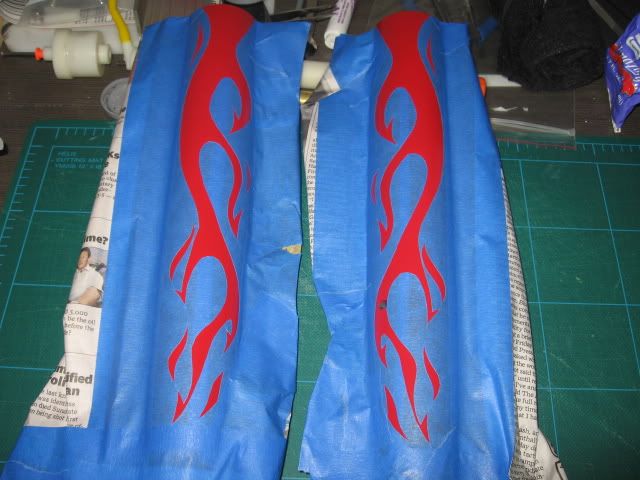
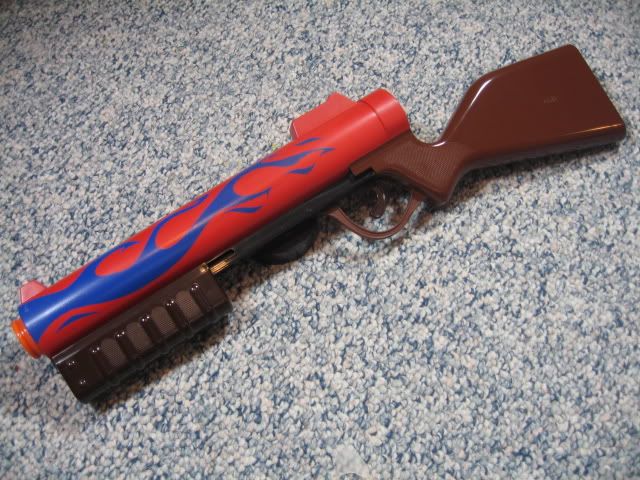
Here's a cheap way to add designs onto your blaster. This specific example is on my PAS.
Materials and ToolsPainters Tape
Wax Paper (From Zorn: subway wrappers, cookie tin liners, etc will also work, just make sure to gently wipe off any grease or oil)
X-acto Knife
Printed design
Step 1: Design Creation
Create or "borrow" the design that you want and using Photoshop or another program, get the design to the correct scale to fit your blaster. You may have to print it out a couple times to get the correct size and position if you want to duplicate it to be the same on both sides of the blaster. Once you have the design printed out put that aside.
You can download this specific design by right-clicking the link below and selecting the "Save link As..." option.
PAS Flames
Step 2: Create the mask
Take your wax paper and layout it down on a flat, smooth surface. Take a strip of painters take and put it across the wax paper. Then apply the painters tape lengthwise down the wax paper overlapping the previous strip. Take the time to flatten out each strip of tape to ensure there are no air bubbles or bumps. Use your design to make sure that you have the correct amount of space needed.
When you have enough space for the design, tape it down around the edges to the top of the mask.
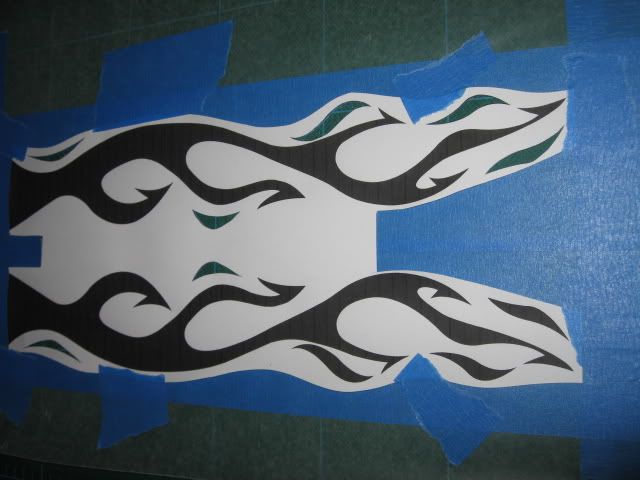
Step 3: Cut it out
Using a very sharp blade, begin to cut the design out from the mask. Take your time when cutting to make sure that you get a clean cut and aren't ripping the wax paper or tape. When you are done, you should have a positive and negative cut of your design. You can use these as two masks or in conjunction if you want.
When the design is cut, trim the outer edges so that it will fit onto your blaster.
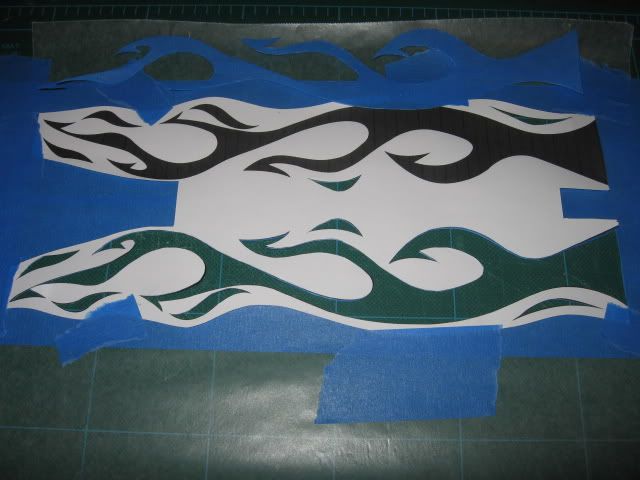
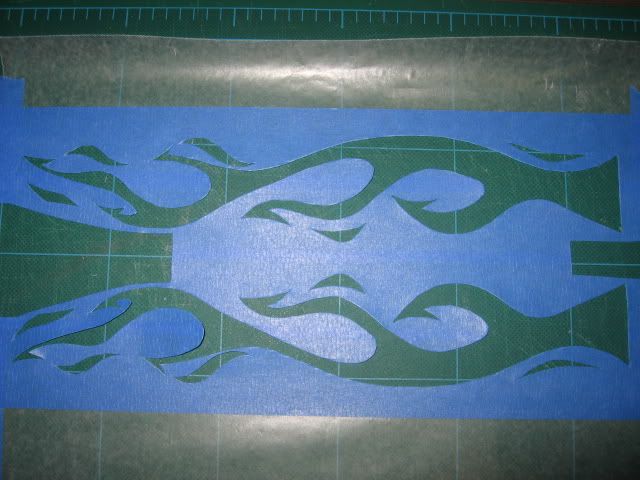
The finished negative cut
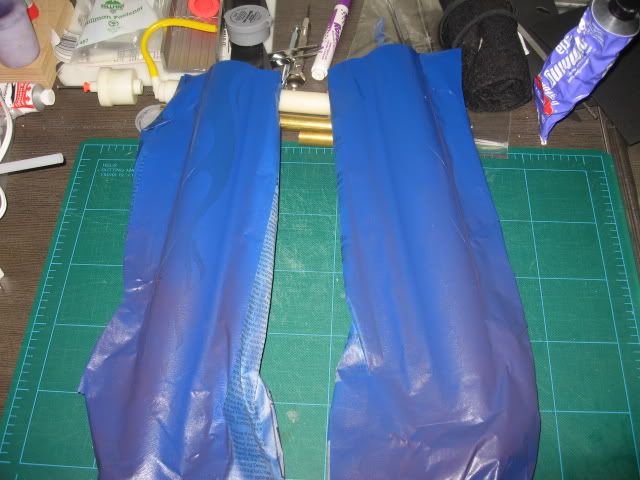
Step 4: Apply the mask
Using the positive cut: The positive cut is the actual design that you cut out. You will want to first paint the color of the design on the blaster, apply the mask, then apply the color of the blaster. You would want to use this if the design is a single color and you want the blaster to be multiple colors and shades.
Using the negative cut: The negative cut is the outer portion of the design that is left from the cut. You will want to first paint the color of the blaster, apply the mask, then apply the color of the design. You would want to use this if the design is multiple colors or shades and want the blaster to be a single color.
To apply the mask, carefully peel the wax paper away from the tape using your knife. Apply the tape of the blaster and slowly peel the wax paper away with one hand while carefully applying pressure with the other hand to ensure that the design is probably placed. Work in small areas and make sure to put pressure on the edges of the tape.
Once the entire design has been applied, use a roller to go over the tape again to flatten it to the blaster.
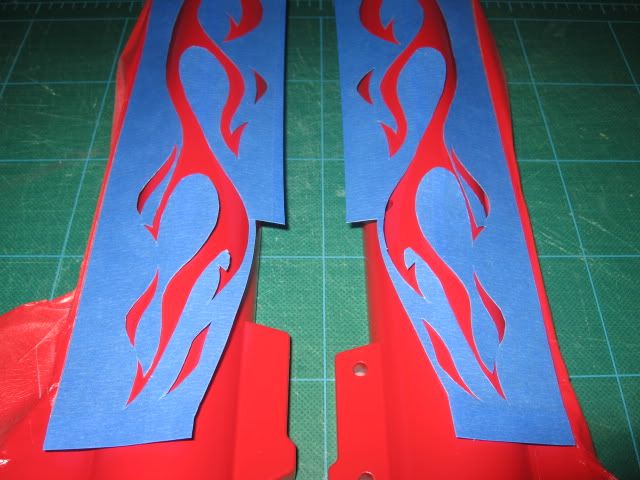
Test fit
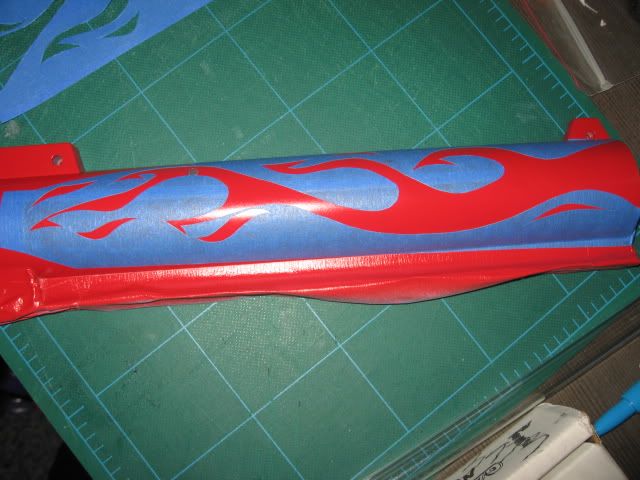
Step 5: Paint and peel
Great tip from hoshiadam (paraphrased): Before applying the color of the design, if you're able to apply the base coat color first. This should help to seal any missed leaks and keep the edges sharp.
Paint the blaster as normal with as many colors and coats as needed.
When the paint as dried, slowly peel the tape off the blaster. I suggest peeling the tape back and parallel to the blaster rather than up and away from the blaster. Go very, very slowly. If you find that some paint is lifting, flatten it down and take your knife to carefully cut the edge back down and keep going.
If you are lucky enough to have the same color paint as your design, you can go in and clean up any edges as needed.

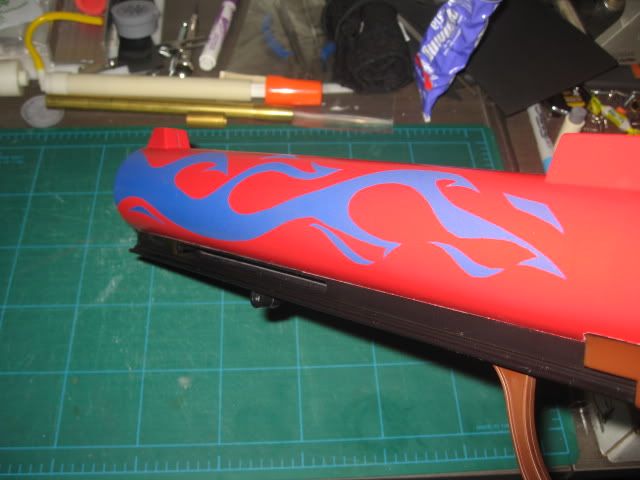
Step 6: Clear Coat
As with any paint, use a clear coat of your choice to protect the paint.
All Done
Enjoy your hard work and shoot something.
Let me know if there's anything that should be included.
Materials and ToolsPainters Tape
Wax Paper (From Zorn: subway wrappers, cookie tin liners, etc will also work, just make sure to gently wipe off any grease or oil)
X-acto Knife
Printed design
Step 1: Design Creation
Create or "borrow" the design that you want and using Photoshop or another program, get the design to the correct scale to fit your blaster. You may have to print it out a couple times to get the correct size and position if you want to duplicate it to be the same on both sides of the blaster. Once you have the design printed out put that aside.
You can download this specific design by right-clicking the link below and selecting the "Save link As..." option.
PAS Flames
Step 2: Create the mask
Take your wax paper and layout it down on a flat, smooth surface. Take a strip of painters take and put it across the wax paper. Then apply the painters tape lengthwise down the wax paper overlapping the previous strip. Take the time to flatten out each strip of tape to ensure there are no air bubbles or bumps. Use your design to make sure that you have the correct amount of space needed.
When you have enough space for the design, tape it down around the edges to the top of the mask.
Step 3: Cut it out
Using a very sharp blade, begin to cut the design out from the mask. Take your time when cutting to make sure that you get a clean cut and aren't ripping the wax paper or tape. When you are done, you should have a positive and negative cut of your design. You can use these as two masks or in conjunction if you want.
When the design is cut, trim the outer edges so that it will fit onto your blaster.
The finished negative cut
Step 4: Apply the mask
Using the positive cut: The positive cut is the actual design that you cut out. You will want to first paint the color of the design on the blaster, apply the mask, then apply the color of the blaster. You would want to use this if the design is a single color and you want the blaster to be multiple colors and shades.
Using the negative cut: The negative cut is the outer portion of the design that is left from the cut. You will want to first paint the color of the blaster, apply the mask, then apply the color of the design. You would want to use this if the design is multiple colors or shades and want the blaster to be a single color.
To apply the mask, carefully peel the wax paper away from the tape using your knife. Apply the tape of the blaster and slowly peel the wax paper away with one hand while carefully applying pressure with the other hand to ensure that the design is probably placed. Work in small areas and make sure to put pressure on the edges of the tape.
Once the entire design has been applied, use a roller to go over the tape again to flatten it to the blaster.
Test fit
Step 5: Paint and peel
Great tip from hoshiadam (paraphrased): Before applying the color of the design, if you're able to apply the base coat color first. This should help to seal any missed leaks and keep the edges sharp.
Paint the blaster as normal with as many colors and coats as needed.
When the paint as dried, slowly peel the tape off the blaster. I suggest peeling the tape back and parallel to the blaster rather than up and away from the blaster. Go very, very slowly. If you find that some paint is lifting, flatten it down and take your knife to carefully cut the edge back down and keep going.
If you are lucky enough to have the same color paint as your design, you can go in and clean up any edges as needed.
Step 6: Clear Coat
As with any paint, use a clear coat of your choice to protect the paint.
All Done
Enjoy your hard work and shoot something.
Let me know if there's anything that should be included.
#278809 Tape Masking
Posted by
on 28 June 2010 - 06:49 AM
in
Modifications
Thanks for the tips hoshiadam and zorn. Post has been updated!
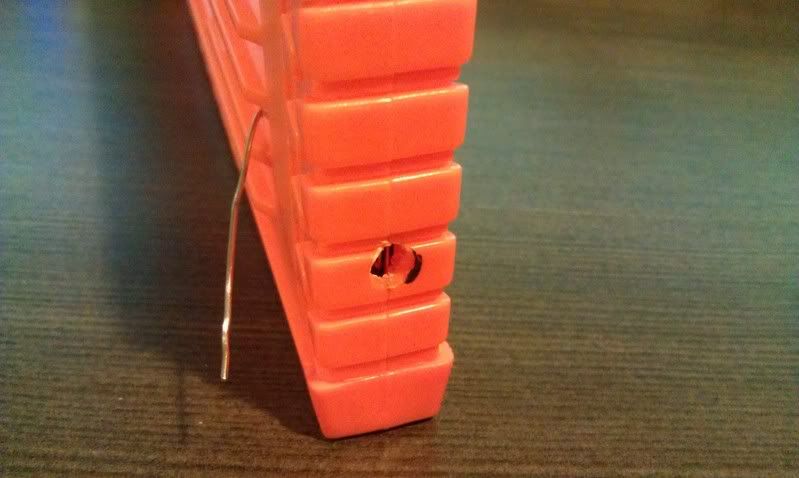
#314423 stefan stampede clip
Posted by
on 15 April 2012 - 11:16 PM
in
Modifications
The brass is not glued to the clip. The hole at the bottom of the clip is the same size as the brass so is a very tight fit and the tube doesn't move or slide out. Essentially, pressure fit.
#314433 stefan stampede clip
Posted by
on 16 April 2012 - 07:23 AM
in
Modifications
Excellent sgNerf!
And good point about tape! Although there must be a simple mechanical way to hold everything together... I'll have to think on that more.
And good point about tape! Although there must be a simple mechanical way to hold everything together... I'll have to think on that more.
#314419 stefan stampede clip
Posted by
on 15 April 2012 - 10:55 PM
in
Modifications
This may be more or less common knowledge, so excuse me if I'm late to the party. Here's how I thought about creating a stampede clip that will allow you to use stefans and still have it able to use stock darts without opening up the clip. This is essentially a slight variation on the same mod as done by WicketTheModder619.
NOTE: This method can work on a 6-dart clip, but you need to determine where the center coil is located and put the post on the other side of the clip. This may mean that you must reverse the clip (cut off the top tab and add a clip lock slot on the opposite side of the clip) in order to use the clip in your blasters.
The Youtube Video
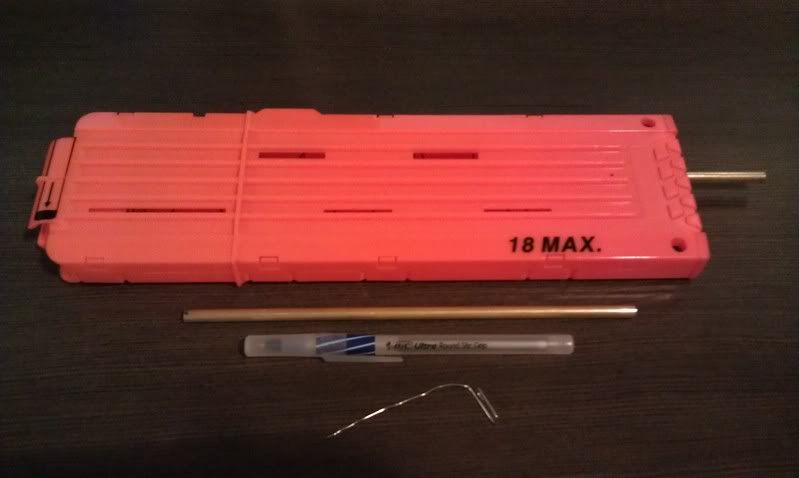
MATERIALS:
TOOLS:
ANOTHER NOTE: long ago when placing an order for brass tube, I accidentally ordered 7/32" tubes instead of 17/32". Years later, I'm glad that I kept them around.
Step 1: Prepare the clip
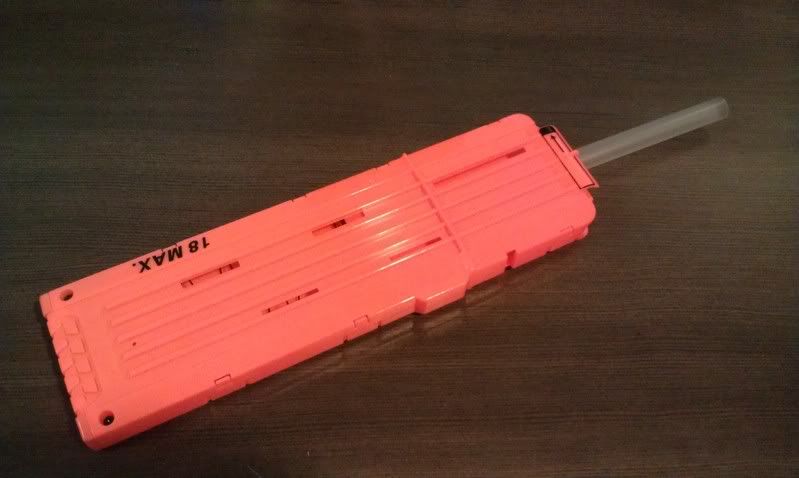
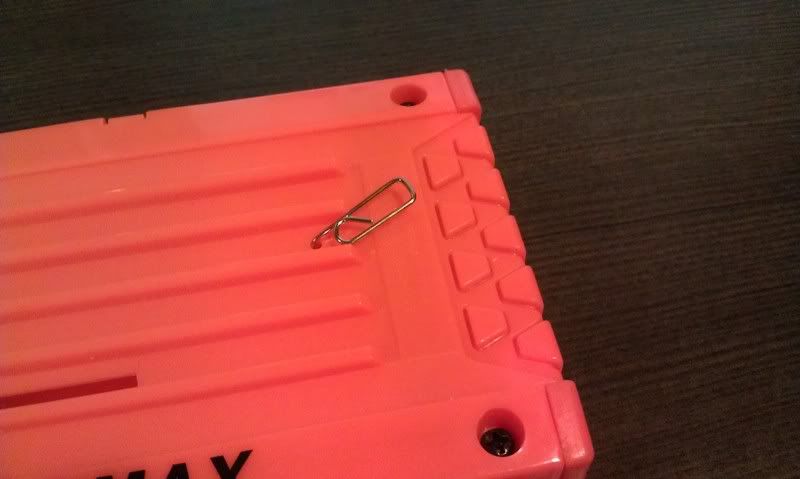
You will want something to slide and hold the dart pusher all the way down at the bottom of the clip. I had a piece of plastic tubing, but anything will do. With that securely in place, drill a tiny hole through the shell and dart pusher. For this I use a pin vice or a hobby hand-drill with a small bit. Either way, the hole should only be wide enough to allow a straightened paper clip through. This will lock the dart pusher in place.
Alternatively, if you have a method to secure the dart pusher in place without having to drill the hole, you can do that too.
Step 2: Drill it!
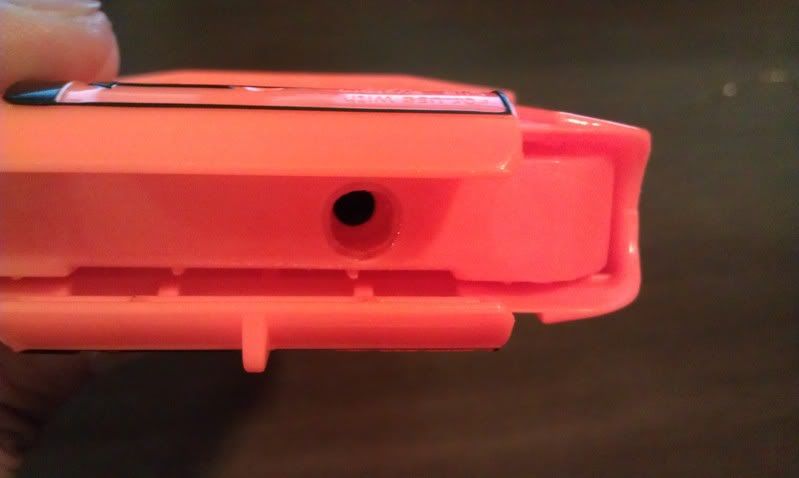
Mark the location for the post. The location would be the same spot where you would normally glue the side rails allowing for your darts to rest comfortably. Make sure to use the same diameter bit as your rod/tube. You will want the shell hole to have a snug fit where the dart pusher hole will need to be widened to accept the sleeve. Either way, drill through the shell and dart pusher.
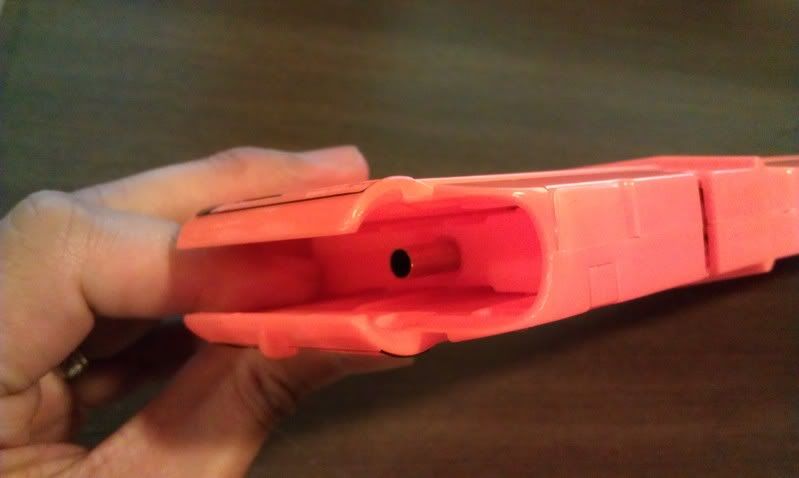
Step 3: Add a sleeve

(This sleeve is fairly clear and a little hard to make out)
Release the dart pusher and insert the rod through the bottom of the shell and prop up the dart pusher so that it cannot slip down. With this secured, widen the hole in the dart pusher to accept the sleeve. Make sure that the sleeve that you choose will allow the rod/tube to easily slide. This should not be a snug fit at all. Once the sleeve is in place, secure it will glue and file/sand the top of the dart pusher.
Step 4: Cutting of the tube
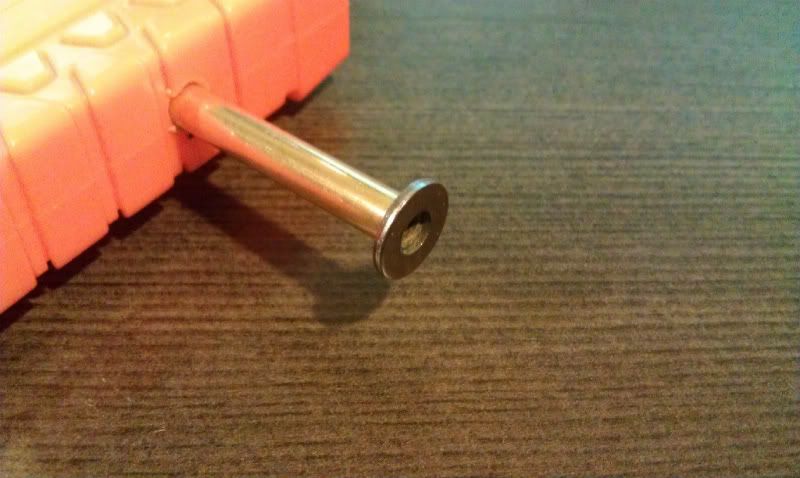
Set the dart pusher to the lowest point with the side of the clip. This is where you will want to set the top of the tube/rod. Since this is the point where the dart tooth/barrel will be resting (hence why you need the sleeve). Once that location is set, mark the tube where the excess is sticking out of the bottom of the clip. Cut this excess off and glue a washer on.
Step 5: All Done!
Insert the rod and now you have a stefan/stock stampede clip all without having to chop the clip open. Enjoy!
The Youtube Video
NOTE: This method can work on a 6-dart clip, but you need to determine where the center coil is located and put the post on the other side of the clip. This may mean that you must reverse the clip (cut off the top tab and add a clip lock slot on the opposite side of the clip) in order to use the clip in your blasters.
The Youtube Video
MATERIALS:
- 7/32" brass tube or compatible rod/tube (longer than a stampede clip ~ 11")
- ~1/2" length of a pen (this will act as a sleeve to the above tube)
- paper clip
- stampede clip
- #6 or #8 washer or something compatible
TOOLS:
- drill or drill press
- round file
- 7/32" bit or one that will fit the size you have
- pin vice or bit that is small enough for a paper clip
- glue
ANOTHER NOTE: long ago when placing an order for brass tube, I accidentally ordered 7/32" tubes instead of 17/32". Years later, I'm glad that I kept them around.
Step 1: Prepare the clip
You will want something to slide and hold the dart pusher all the way down at the bottom of the clip. I had a piece of plastic tubing, but anything will do. With that securely in place, drill a tiny hole through the shell and dart pusher. For this I use a pin vice or a hobby hand-drill with a small bit. Either way, the hole should only be wide enough to allow a straightened paper clip through. This will lock the dart pusher in place.
Alternatively, if you have a method to secure the dart pusher in place without having to drill the hole, you can do that too.
Step 2: Drill it!
Mark the location for the post. The location would be the same spot where you would normally glue the side rails allowing for your darts to rest comfortably. Make sure to use the same diameter bit as your rod/tube. You will want the shell hole to have a snug fit where the dart pusher hole will need to be widened to accept the sleeve. Either way, drill through the shell and dart pusher.
Step 3: Add a sleeve
(This sleeve is fairly clear and a little hard to make out)
Release the dart pusher and insert the rod through the bottom of the shell and prop up the dart pusher so that it cannot slip down. With this secured, widen the hole in the dart pusher to accept the sleeve. Make sure that the sleeve that you choose will allow the rod/tube to easily slide. This should not be a snug fit at all. Once the sleeve is in place, secure it will glue and file/sand the top of the dart pusher.
Step 4: Cutting of the tube
Set the dart pusher to the lowest point with the side of the clip. This is where you will want to set the top of the tube/rod. Since this is the point where the dart tooth/barrel will be resting (hence why you need the sleeve). Once that location is set, mark the tube where the excess is sticking out of the bottom of the clip. Cut this excess off and glue a washer on.
Step 5: All Done!
Insert the rod and now you have a stefan/stock stampede clip all without having to chop the clip open. Enjoy!
The Youtube Video
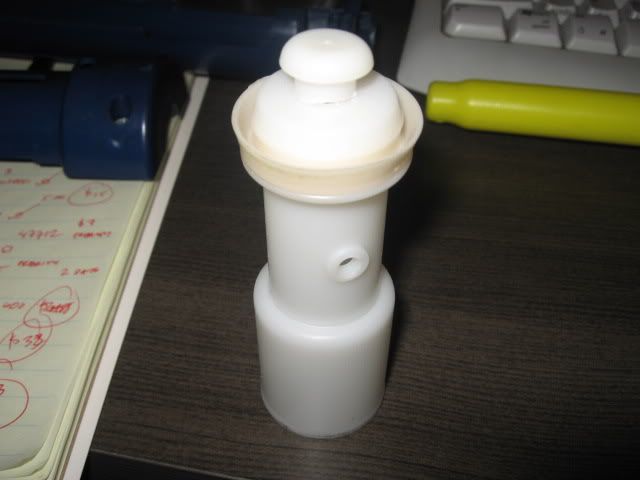
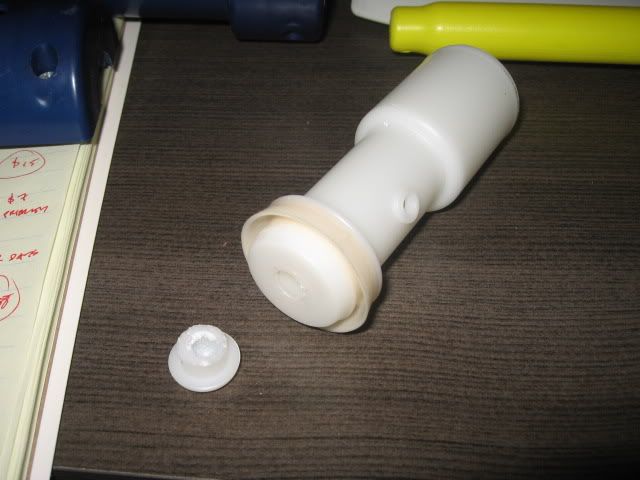
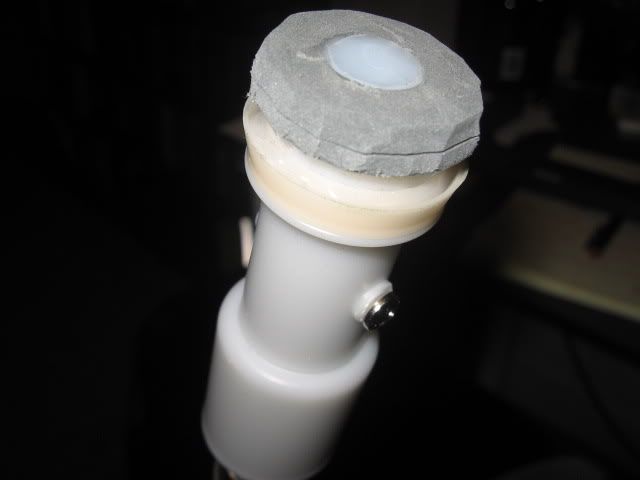
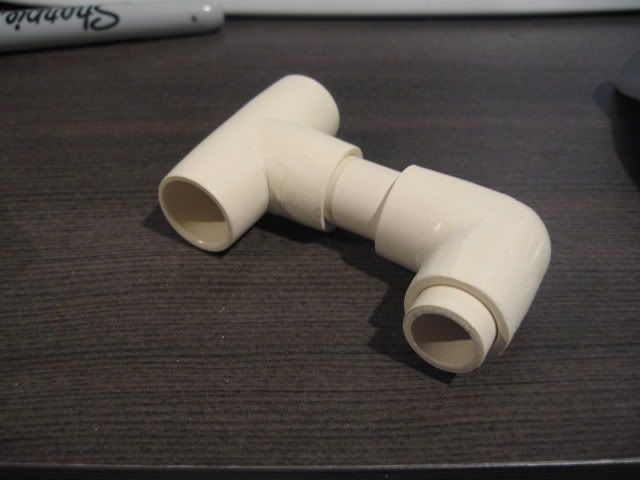
#305671 SSPB (Secret Strike Pocket Blaster) Expanded Tank
Posted by
on 10 October 2011 - 07:00 PM
in
Modifications
The tank expanded SSPB is an easy project if you're looking to fill some time or mess around.
Thanks to BrokenSVT and TaerKitty for the pictures and original mod.
Youtube Video
Materials:
- SSPB
- Optional: CPVC Coupler / Barrel
- CPVC endcaps (2) / 1/2" CPVC - 1.5" length
- 1/4" OD hose
- Optional: 2 nozzles from Titan/Hornet/Air Tech blasters
- Optional: Zip tie
Tools:
- Dremel/Drill
- Files
- Glue (Zap-a-Gap/CPVC Cement)
Step 1: External Tank
Take the 1.5" length of CPVC tube and create a hole using a dremel/drill for either your hose or nozzle in the center of the tube. If you are using a nozzle, make sure there is enough clearance for the nozzle cap when the CPVC end caps are attached. Glue the nozzle and CPVC end caps and check for any leaks.
Step 2: SSPB Cutting
Using your dremel/drill, carefully create a hole in the SSPB tank. Do not drill very deep as the check valve is in the center of the tank. Once you have an opening widen the hole for either your tubing or nozzle. Make sure to clean the tank as possible from any filings and plastic bits.
Cut down the barrel according to the barrel you are going to use. I chose to keep some of the barrel intact to help support the CPVC coupler. Your setup may differ. Once that is cut, remove the support underneath the barrel and clean it up.
Step 3: ARR
Use your dremel or needle nose pliers to remove the AR and clean it up as best as possible. Try to not touch or get too close to the front of the check value and clean it up as much as possible.
Step 4: Shell Work
Try to eyeball where the tank's opening is in the shell and create a hold that will align with the tank. If you are going to use a CPVC coupler, you will need to widen the original barrel opening. I had to cut open some of the side walls but I was able to not have to cut through the top screw port.
If you are using a nozzle, make sure that you can still remove the shell with the nozzle attached. The nozzle I used as a small ridge that I almost didn't catch.
Step 5: Glue
Glue the nozzle/hose to the SSPB tank and the coupler/barrel to the SSPB barrel. And let that dry. Check for any leaks in the SSPB tank by plugging the barrel. Air may leak out a little as the check valve doesn't fully seal until there is a bit of pressure behind it.
Step 6: All Done!
Assemble all the pieces together and zip tie the tank to the bottom of the SSPB and you're all done.
Youtube Video
Ranges: Average 85' flat.
Tank fills with about 20 - 25 pumps.
Overall, this mod is really easy and fun. Minus the drying time for glue and finding the right nozzle pieces, it was probably 4 - 5 hours to complete this mod.
If you have some time to kill or just want to have a secondary project going, I would recommend this one.
#305678 SSPB (Secret Strike Pocket Blaster) Expanded Tank
Posted by
on 10 October 2011 - 08:16 PM
in
Modifications
@taerKitty: I used my needle files to help pick out the big pieces and you can spin the inner core and gently scrape off more of the tinier bits. Other than that, just blowing into the tank will help. I'm sure these are things that you've already tried.
@KoRnEd: That would be difficult for me personally and I'm not sure about the water as it seemed the check valve was oiled and lubed but a little bit may not hurt. Good idea.
@Nate45: I can't honestly remember. I believe one was from an AT pump and possibly a hornet nozzle but it was in my parts bin for while.
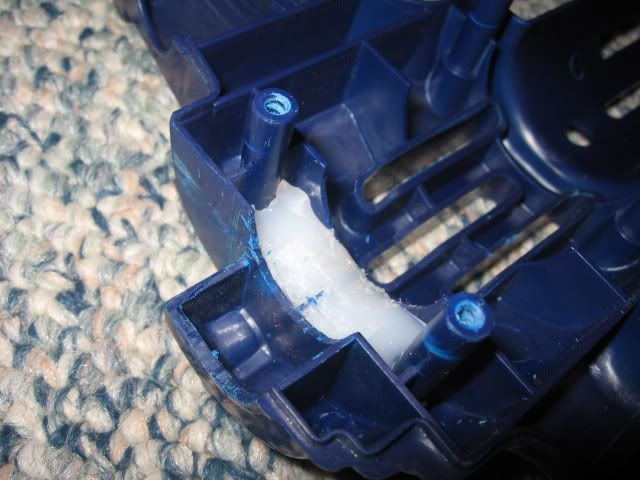
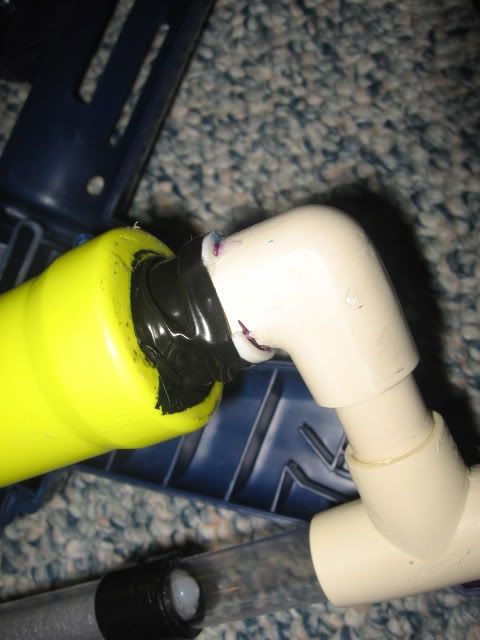
#337051 Sodizzle Longshot v2
Posted by
on 15 February 2014 - 12:02 AM
in
Modifications
A long time ago, I posted a version of the sodizzle breach. That version only worked with modded stefan clips. After that, I was able to acquire a Pak D clip where the darts are positioned in the center of the clip. That version was not able to use these center-aligned clips because the bolt wasn't able to travel far enough to clear the back of the dart.
In my cleaning, I found a longshot that I had intended to sodizzle. So I up and started in again and this time, was determined to make use of this Pak D clip. I won't go into detail about creating the sodizzle breach, but will explain what I've done specifically for this version. Please view some videos or a write-up to get more details on a sodizzle breach:
My sodizzle write-up
Sodizzle's video on his breach
Bolt
The bolt is really the tricky part. Once I got this measurement down, I adjusted the barrel to work with this length. This is really the part that you want to get working correctly before you determine the placement of your barrel. It has the usual 45 degree angle and is coned out to help with feeding. The lip of the bolt to the front of the plunger tube is 4.5" and probably another .5" that is embedded into the base of the bolt that is inside the plunger tube.
The bolt length may or may not affect the spring(s) that you are able to use as well. In my tinkering, I didn't have the plunger rod + spring when testing the length. When it was all assembled, I found the travel was off because of the spring, so keep that in mind if you are trying this out that you may have to tinker with this measurement based on your spring set up.
I am currently using a length of k18 spring.
Barrel
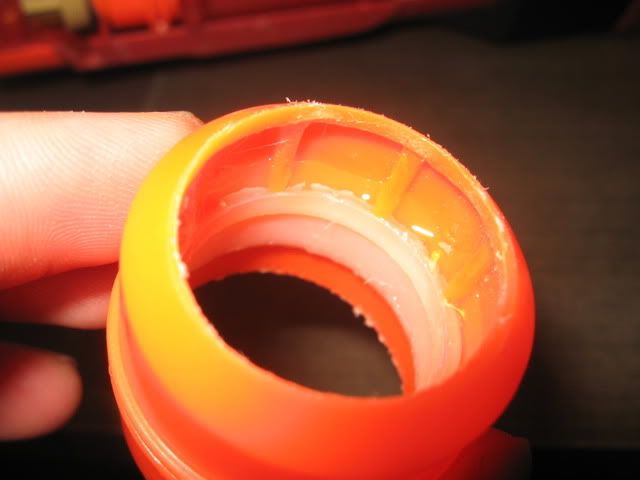
For the barrel I used a 10" length of CPVC. I wasn't able to easily use the stock dart tooth as a ramp in this version because the barrel had to be moved further back. I used Maverick AR's as spacers to get the correct placement of the coupler and used a cut down version of the stock dart tooth (ramp) to help feed darts. The ramp is glued directly to the coupler. In order to have the barrel not move backwards, a spacer will be used at the front part of the barrel. Here I am using a length of 2k pump that will be glued in place. I had to completing afix the barrel in place, so I am thinking of using another method so that the barrel can be removed if needed.
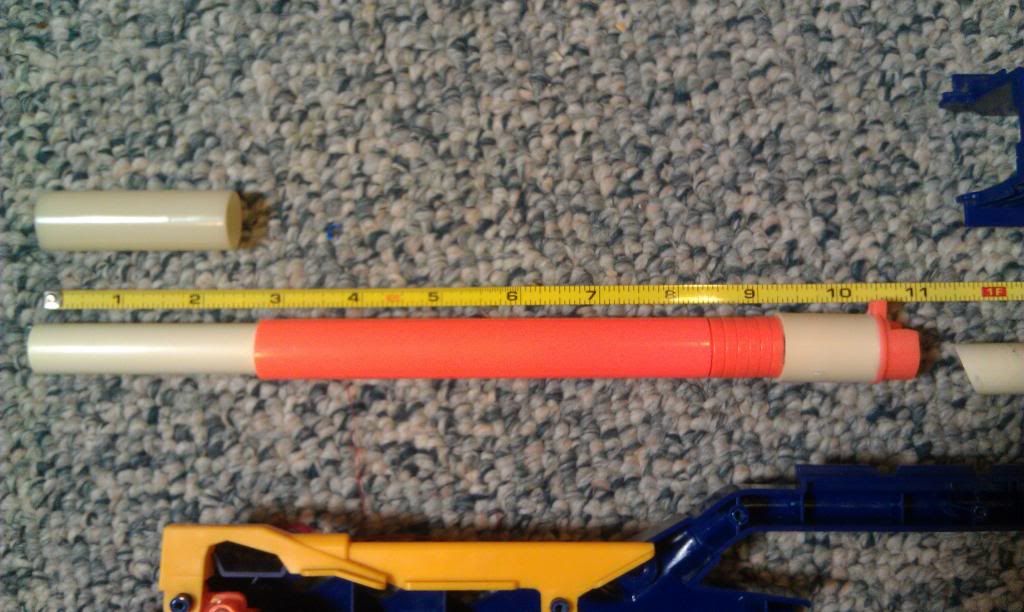
The seal of this is okay. It's not completely air tight around the coupler, but it's pretty close. I pondered attaching an o-ring within the coupler, but decided against it. Overall, this mod was to be able to work with the different clip, but I believe it will be able to work with both types of clips now. And apparently, I threw out the plunger head, so it's working with a make shift one at the moment. The seal is good, but hopefully I can find a stock replacement one soon.
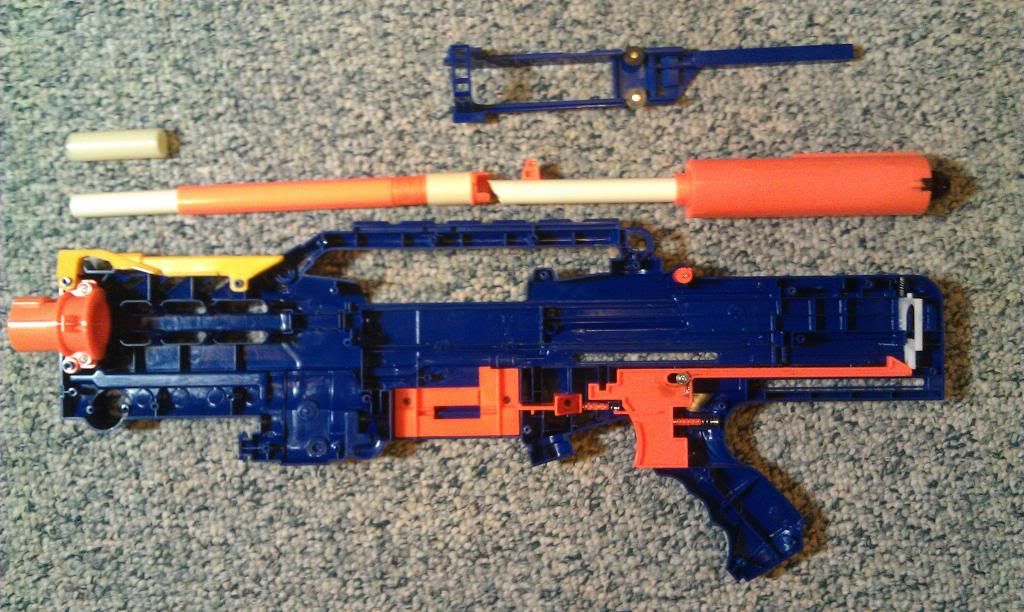
Expanded and completed views
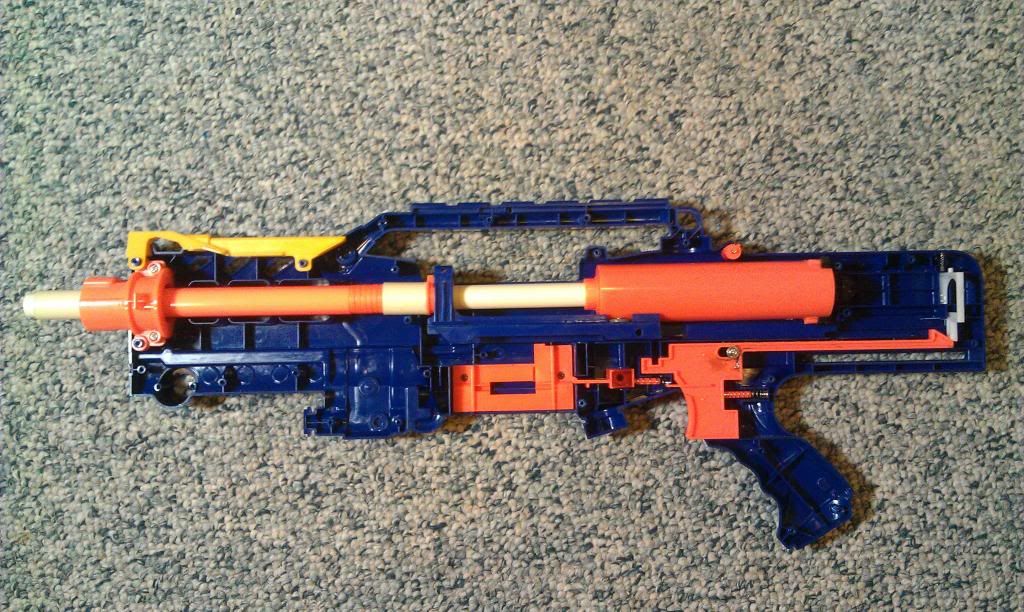
Close up of barrel and bolt
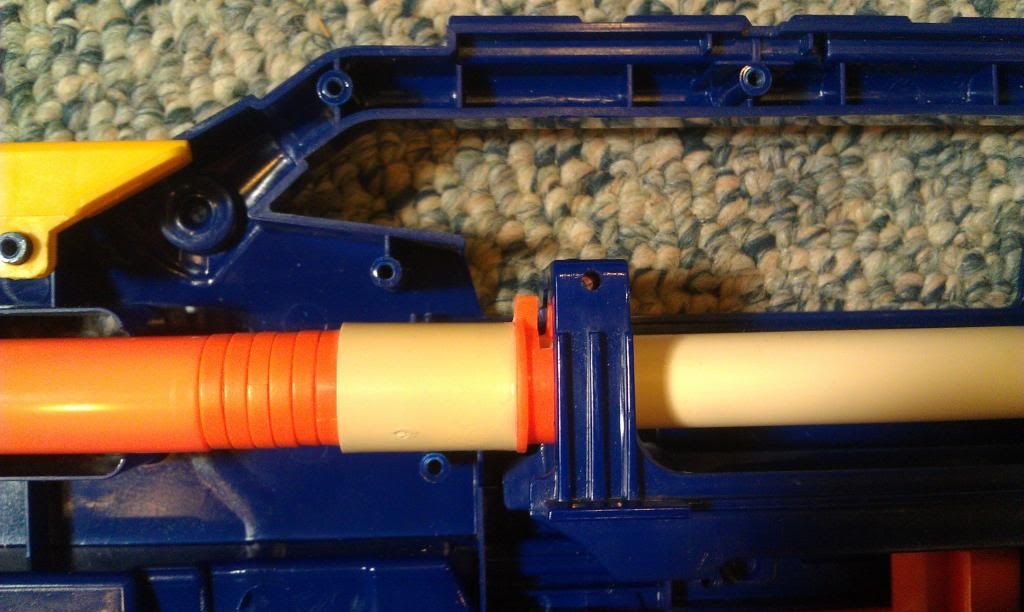
Close up of the front barrel
This is definitely not the cleanest mod, but I believe it works well and this time I had a better sense of what I needed to accomplish.
In my cleaning, I found a longshot that I had intended to sodizzle. So I up and started in again and this time, was determined to make use of this Pak D clip. I won't go into detail about creating the sodizzle breach, but will explain what I've done specifically for this version. Please view some videos or a write-up to get more details on a sodizzle breach:
My sodizzle write-up
Sodizzle's video on his breach
Bolt
The bolt is really the tricky part. Once I got this measurement down, I adjusted the barrel to work with this length. This is really the part that you want to get working correctly before you determine the placement of your barrel. It has the usual 45 degree angle and is coned out to help with feeding. The lip of the bolt to the front of the plunger tube is 4.5" and probably another .5" that is embedded into the base of the bolt that is inside the plunger tube.
The bolt length may or may not affect the spring(s) that you are able to use as well. In my tinkering, I didn't have the plunger rod + spring when testing the length. When it was all assembled, I found the travel was off because of the spring, so keep that in mind if you are trying this out that you may have to tinker with this measurement based on your spring set up.
I am currently using a length of k18 spring.
Barrel
For the barrel I used a 10" length of CPVC. I wasn't able to easily use the stock dart tooth as a ramp in this version because the barrel had to be moved further back. I used Maverick AR's as spacers to get the correct placement of the coupler and used a cut down version of the stock dart tooth (ramp) to help feed darts. The ramp is glued directly to the coupler. In order to have the barrel not move backwards, a spacer will be used at the front part of the barrel. Here I am using a length of 2k pump that will be glued in place. I had to completing afix the barrel in place, so I am thinking of using another method so that the barrel can be removed if needed.
The seal of this is okay. It's not completely air tight around the coupler, but it's pretty close. I pondered attaching an o-ring within the coupler, but decided against it. Overall, this mod was to be able to work with the different clip, but I believe it will be able to work with both types of clips now. And apparently, I threw out the plunger head, so it's working with a make shift one at the moment. The seal is good, but hopefully I can find a stock replacement one soon.
Expanded and completed views
Close up of barrel and bolt
Close up of the front barrel
This is definitely not the cleanest mod, but I believe it works well and this time I had a better sense of what I needed to accomplish.
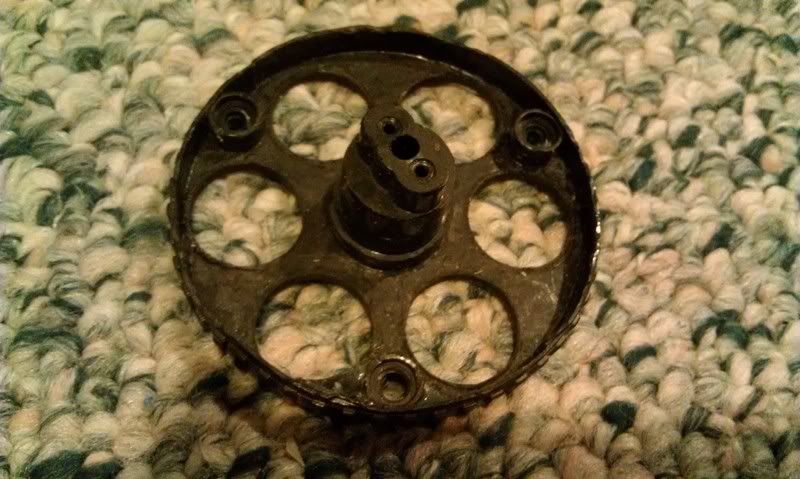
#306498 Shorty Maverick
Posted by
on 25 October 2011 - 08:01 AM
in
Modifications
@Aeromech: Thanks, but a rear-loading maverick was already done by Slowguitarman: Successful Rear-loading Maverick I would thank him for the inspiration and write-up. 
@dizzyduck: I replaced the barrels with CPVC and they are flush with the each end of the turret. In hindsight it might have been easier to do your second option and make holes in the bottom to the inner diameter of the barrel, but for some reason I decided against it. I have added a picture in the original thread of turret opened so you can see the back of the turret.
@agc2k: Thanks! It will be fun to paint!
@Beaver: I'll add that too... Thanks! I knew I was forgetting something. The seal is really good... I just need to sand down a couple of the barrels as they are sticking up a bit past the bottom.
#306484 Shorty Maverick
Posted by
on 24 October 2011 - 10:12 PM
in
Modifications
This is a quick write up on how I created the shorty Maverick. I apologize for not having better WIP pictures or measurements. Some of these were taken after the fact and props to Slowguitarman for his write-up.
1. Turret
Start with the turret. This could probably be shortened even more. I was going to cut this down to be 1.5" long (the length of a stefan) but I also wanted to keep the front orange piece. It can be done, but I wasn't sure at the time.
When you open the turret, the front is hollow until some guides in near the back.
Then cut the top of the main housing to cover the orange barrels.
In the picture below, the top ridge is resting on the guides from the back of the housing.
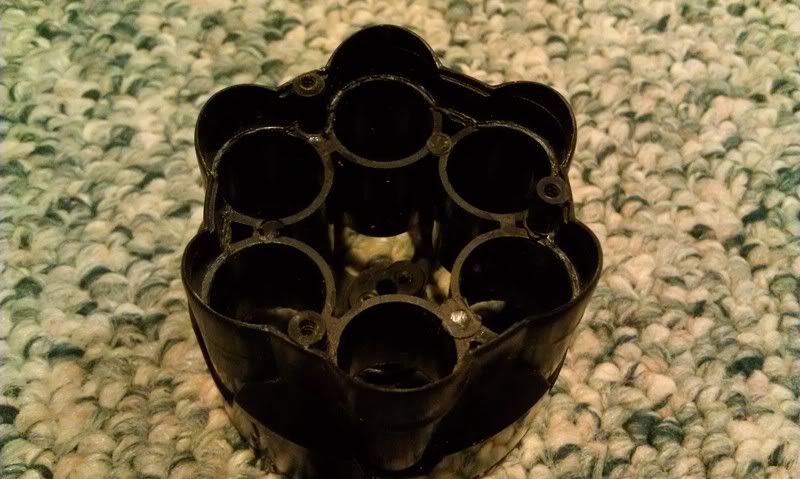
Test fit your barrels and get those to fit within the orange piece and the guides.
You will need need to open up the back piece to allow for rear-loading. And assemble everything together.
2. The Shell
I wanted to reduce as much space as I could so put the completed turret into the shell and marked where the front of the turret was on the frame and cut a little back from that mark. The front of the shell was then trimmed down to match the turret space.
I used hotglue to hold the two pieces together so that I could align the shell and glue it. When that was dry, I sanded and filed down the joining areas to make it smooth. There are still small gaps, but those can be filled pretty easily after I've done the final sanding.
The rest is just trimming off all the bits off the shell that you don't want. The styrene will help to support everything together.
3. Plunger Tube
There are two parts to get the plunger tube to work with the turret.
Trim down the back arm of the turret. There are two nubs that I needed to sand down so that the arm can pass under the new plunger tube piece and because these nubs were in the way of the new piece.
I cut a square out of a longshot jam door that was big enough to cover a barrel in the turret and cut out a matching hole in the shell. The lip of the plunger tube also needed to be trimmed down so that when pushed back, everything was flush. Make sure not to make this opening too large. The plunger tube uses that wall as a stop.
I glued the new piece in place and with everything together, I dropped a marker down the barrel to see where to drill a hole.
And all of that rambling will hopefully turn into this.
Questions? Comments?
And the youtube video
Shorty Maverick Youtube video
1. Turret
Start with the turret. This could probably be shortened even more. I was going to cut this down to be 1.5" long (the length of a stefan) but I also wanted to keep the front orange piece. It can be done, but I wasn't sure at the time.
When you open the turret, the front is hollow until some guides in near the back.
Then cut the top of the main housing to cover the orange barrels.
In the picture below, the top ridge is resting on the guides from the back of the housing.
Test fit your barrels and get those to fit within the orange piece and the guides.
You will need need to open up the back piece to allow for rear-loading. And assemble everything together.
2. The Shell
I wanted to reduce as much space as I could so put the completed turret into the shell and marked where the front of the turret was on the frame and cut a little back from that mark. The front of the shell was then trimmed down to match the turret space.
I used hotglue to hold the two pieces together so that I could align the shell and glue it. When that was dry, I sanded and filed down the joining areas to make it smooth. There are still small gaps, but those can be filled pretty easily after I've done the final sanding.
The rest is just trimming off all the bits off the shell that you don't want. The styrene will help to support everything together.
3. Plunger Tube
There are two parts to get the plunger tube to work with the turret.
Trim down the back arm of the turret. There are two nubs that I needed to sand down so that the arm can pass under the new plunger tube piece and because these nubs were in the way of the new piece.
I cut a square out of a longshot jam door that was big enough to cover a barrel in the turret and cut out a matching hole in the shell. The lip of the plunger tube also needed to be trimmed down so that when pushed back, everything was flush. Make sure not to make this opening too large. The plunger tube uses that wall as a stop.
I glued the new piece in place and with everything together, I dropped a marker down the barrel to see where to drill a hole.
And all of that rambling will hopefully turn into this.
Questions? Comments?
And the youtube video
Shorty Maverick Youtube video
#306530 Shorty Maverick
Posted by
on 25 October 2011 - 09:02 PM
in
Modifications
This was done just for fun. The number one goal was just to minimize the blaster, if it worked, that was awesome. Performance had nothing to do with the mod.
#267805 Salem State Nerf Game
Posted by
on 03 March 2010 - 01:26 PM
in
Nerf Wars
Drats, I'm not going to be able to make it. I confused the date and thought this was on Saturday and had plans for Sunday. Hopefully next time around!
#267572 Salem State Nerf Game
Posted by
on 02 March 2010 - 08:50 AM
in
Nerf Wars
Put me down as a maybe.
#267034 Salem State Nerf Game
Posted by
on 26 February 2010 - 02:43 PM
in
Nerf Wars
Do you have a date set for the event? And it sounds like only stock darts correct?
#272085 Salem State Nerf Game
Posted by
on 13 April 2010 - 02:16 PM
in
Nerf Wars
I guess this rules out all the working stiffs! Hopefully one can be scheduled on a weekend soon.
#259015 Rscb Bow And Arrow
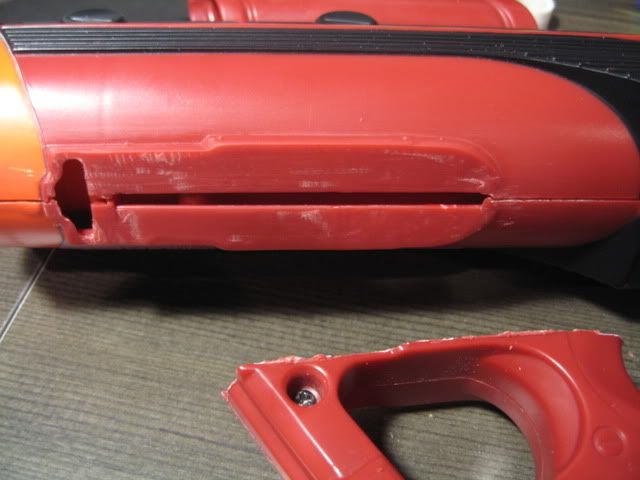
Posted by
on 14 December 2009 - 09:53 PM
in
Modifications
Simple modification to a blaster that I've wanted to try out. This Bow and Arrow has a pretty good seal until the inch or so. I'm not sure if the barrel widens or was bent, but it is what it is. I thought about replacing the plunger head, but not right now.
Credit to Fome for the original writeup.
Video Review
Materials:Bow and Arrow
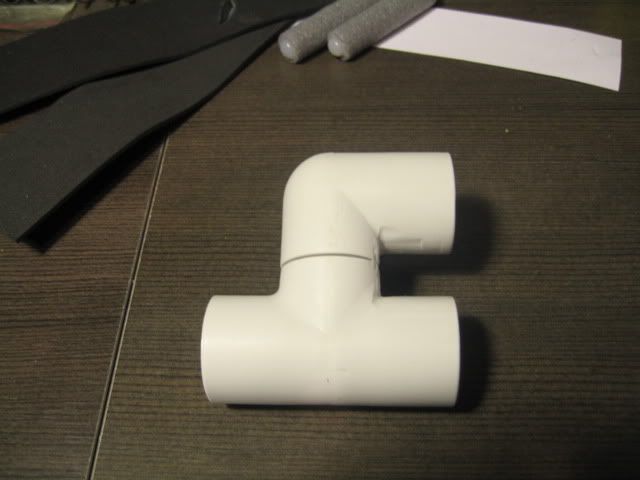
CPVC coupler
CPVC tee
1 1/2" length of CPVC
3/4" length of CPVC
9" length of CPVC
1 CPVC end cap
10" length of 5/8 PETG
2" length 1/2 PETG
1 Screw
1 Bungee cord
2 ScrewsTools:Hack saw
Dremel
Files
Sand paper
Glue (Goop and hot)Step 1: Disassemble the blaster
Remove the eight screws and open up the blaster. Take out the plunger and plunger rod and inspect everything for cracks, chips or any signs of wear.
Step 2: Modify the plunger head
Different models of the Bow and Arrow have a different plunger head. Here is mine. You have to remove two white plastic pins in order to remove the plunger head.
Flare out the plunger and add some hot glue to help increase the seal.
Saw off the small white cap at the top and glue one some foam to help pad the plunger and fill the space with hot glue.
Connect the plunger assembly. My Bow and Arrow only had one white cap, so I opted to use a screw to hold the assembly together.
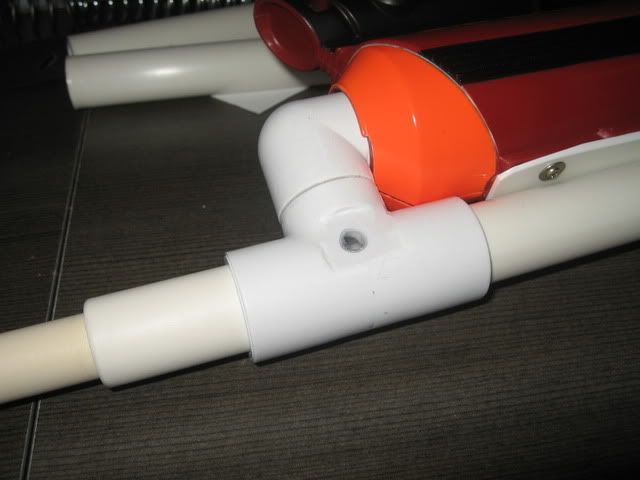
Step 3: Modify the blaster shell
In order to minimize as much dead space as possible (because there will be some already with the height) I opted to attach the RSCB as close to the plunger tube as possible. This meant cutting the shell to allow the CPVC to be closer.
Cut off the top front area of the blaster and widen the hole to the plunger tube. Use the inner walls of the blaster as your guide. Sand smooth and round the edges. Test fit your CPVC elbow to make sure it will fit properly when the blaster is closed. I also sanded the sides of the CPVC elbow to help with the fit.

Step 4: Create the RSCB assembly
Close the blaster and insert the CPVC elbow into the front opening. Take your 1 1/2" CPVC length and insert that into the elbow and attach the tee to the top. Make sure that this assembly is straight and is lined up with the hole in the top handle. Take the 3/4" length of CPVC and add that to the other end of the elbow.
When you are satisfied with the fit, put it aside.
Step 5: Cut down the existing barrel
Take the plunger tube and cut off the plunger tube that accepts the arrows. This is about 1/4" away from the plunger tube, but it may vary depending on your CPVC. I ended up cutting about 3/4" and then filed the tube down dry fitting the elbow and plunger tube into the shell to make sure of the fit.

To help stabilize the RSCB assembly, add hot glue in the shell and a couple of tabs to the elbow to keep the assembly secure.
(The tabs are partially hidden by the electrical tape.
Step 6: Dry fit, glue, re-assemble
Put everything minus the plunger rod together and turn it around and around. Make sure that everything is how you want it to look.
Now take out your glue and glue the RSCB assembly, and when that is dry, glue the assembly to the plunger tube. Because the plunger tube is a soft plastic, give it a generous amount of time to dry and use a lot of goop and then wrap in electrical tape.
Step 7: Add barrel and dart chamber
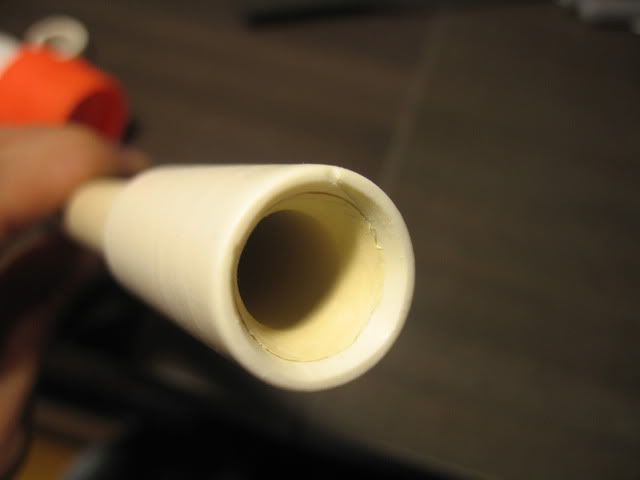
For the dart chamber I was able to find 5/8" outer diameter PETG. This is the same diameter as CPVC and it fits OMC's PETG very tight. Add this to the CPVC tee, add a cap, and make a breech in the back to be able to load darts. Once dry, glue this to the back of the tee. This particular dart chamber can hold seven 1.5" stefans.
For the barrel, make sure to cone out the back of the barrel so that darts fit about 1/4" into the barrel. Attach and glue this to the front of the tee.
Step 8: Add bungee cord
In order to add a bungee cord, some reinforcements are needed. Take the 2 screws and cut them down to fit into the slots seen in the pictures below. Cut away the middle slot, drop in the screw and add hot glue around the slot and below that one as well.
Get your bungee cord and check the fit. I had to remove the rubber from the hook in order to get the hook to sit flush with the blaster shell.
On the handle, cut some spare piece of PVC and glue it to the top of the inside of the handle. This will help to keep the bungee cord straight as you draw back the plunger.
Step 9: All done!
The picture doesn't have the pink arms, but those will get attached with no modifications.
I don't have ranges yet. I'll post them when I get to it.
I would definitely recommend reinforcing the bottom handle as it can and will break over time. I haven't done it yet, but here's link to a thread the fixes it post-break. Bottom handle fix
Credit to Fome for the original writeup.
Video Review
Materials:Bow and Arrow
CPVC coupler
CPVC tee
1 1/2" length of CPVC
3/4" length of CPVC
9" length of CPVC
1 CPVC end cap
10" length of 5/8 PETG
2" length 1/2 PETG
1 Screw
1 Bungee cord
2 ScrewsTools:Hack saw
Dremel
Files
Sand paper
Glue (Goop and hot)Step 1: Disassemble the blaster
Remove the eight screws and open up the blaster. Take out the plunger and plunger rod and inspect everything for cracks, chips or any signs of wear.
Step 2: Modify the plunger head
Different models of the Bow and Arrow have a different plunger head. Here is mine. You have to remove two white plastic pins in order to remove the plunger head.
Flare out the plunger and add some hot glue to help increase the seal.
Saw off the small white cap at the top and glue one some foam to help pad the plunger and fill the space with hot glue.
Connect the plunger assembly. My Bow and Arrow only had one white cap, so I opted to use a screw to hold the assembly together.
Step 3: Modify the blaster shell
In order to minimize as much dead space as possible (because there will be some already with the height) I opted to attach the RSCB as close to the plunger tube as possible. This meant cutting the shell to allow the CPVC to be closer.
Cut off the top front area of the blaster and widen the hole to the plunger tube. Use the inner walls of the blaster as your guide. Sand smooth and round the edges. Test fit your CPVC elbow to make sure it will fit properly when the blaster is closed. I also sanded the sides of the CPVC elbow to help with the fit.
Step 4: Create the RSCB assembly
Close the blaster and insert the CPVC elbow into the front opening. Take your 1 1/2" CPVC length and insert that into the elbow and attach the tee to the top. Make sure that this assembly is straight and is lined up with the hole in the top handle. Take the 3/4" length of CPVC and add that to the other end of the elbow.
When you are satisfied with the fit, put it aside.
Step 5: Cut down the existing barrel
Take the plunger tube and cut off the plunger tube that accepts the arrows. This is about 1/4" away from the plunger tube, but it may vary depending on your CPVC. I ended up cutting about 3/4" and then filed the tube down dry fitting the elbow and plunger tube into the shell to make sure of the fit.
To help stabilize the RSCB assembly, add hot glue in the shell and a couple of tabs to the elbow to keep the assembly secure.
(The tabs are partially hidden by the electrical tape.
Step 6: Dry fit, glue, re-assemble
Put everything minus the plunger rod together and turn it around and around. Make sure that everything is how you want it to look.
Now take out your glue and glue the RSCB assembly, and when that is dry, glue the assembly to the plunger tube. Because the plunger tube is a soft plastic, give it a generous amount of time to dry and use a lot of goop and then wrap in electrical tape.
Step 7: Add barrel and dart chamber
For the dart chamber I was able to find 5/8" outer diameter PETG. This is the same diameter as CPVC and it fits OMC's PETG very tight. Add this to the CPVC tee, add a cap, and make a breech in the back to be able to load darts. Once dry, glue this to the back of the tee. This particular dart chamber can hold seven 1.5" stefans.
For the barrel, make sure to cone out the back of the barrel so that darts fit about 1/4" into the barrel. Attach and glue this to the front of the tee.
Step 8: Add bungee cord
In order to add a bungee cord, some reinforcements are needed. Take the 2 screws and cut them down to fit into the slots seen in the pictures below. Cut away the middle slot, drop in the screw and add hot glue around the slot and below that one as well.
Get your bungee cord and check the fit. I had to remove the rubber from the hook in order to get the hook to sit flush with the blaster shell.
On the handle, cut some spare piece of PVC and glue it to the top of the inside of the handle. This will help to keep the bungee cord straight as you draw back the plunger.
Step 9: All done!
The picture doesn't have the pink arms, but those will get attached with no modifications.
I don't have ranges yet. I'll post them when I get to it.
I would definitely recommend reinforcing the bottom handle as it can and will break over time. I haven't done it yet, but here's link to a thread the fixes it post-break. Bottom handle fix
#259036 Rscb Bow And Arrow
Posted by
on 15 December 2009 - 12:26 AM
in
Modifications
@princexbuster: thanks for the information. Glad to know it's not just mine!
@Blue: thanks! This thing is a lot of fun, I can't wait to try it out doors.
@Blue: thanks! This thing is a lot of fun, I can't wait to try it out doors.
#259161 Rscb Bow And Arrow
Posted by
on 16 December 2009 - 01:11 PM
in
Modifications
@Fome: Thanks! I might try to reinforce the bottom handle. I was told from some others that that is a potential weak point and could break.
I had also thought about trying to find a replacement plunger tube out of PVC? But didn't invest too much time into looking for one.
Overall, it is a fun blaster.
I had also thought about trying to find a replacement plunger tube out of PVC? But didn't invest too much time into looking for one.
Overall, it is a fun blaster.
#255372 Rscb Bbb
Posted by
on 05 November 2009 - 11:11 AM
in
Modifications
Here's my RSCB'd BBB. I have done some previous modifications which will not be part of this write up. These include: a stronger replacement spring, reinforced catch, electrical tape and o-ring around the plunger head to help flare the plunger.
For this modification I wanted to try and reduce as much dead space as possible and still get an easy to load RSCB.
Materials:Big Bad Bow
1/2" PVC elbow
1/2" PVC Tee
1/2" PVC tube (6 3/4" for darts, 2" to nest barrel, 1" for connection)
CPVC tube (6" for barrel, 1/2" for connection)
CPVC end cap
PETG (for breech or another material)
PVC clip
Extria screws
Tools:Dremel
Zap-a-Gap
Plumber's Goop
Files
Electrical Tape
Step 1. Modify the front cap, ring, and elbow
Most modifications start with attaching a coupler to the front cap and nested CPVC into the barrel and filling the dead space with hot glue. I opted to try a different method of attaching the PVC elbow directly into the front cap. This will reduce the dead space and not require a lot of hot glue in the process.
To do this, you will need to cut off the exposed area of the front cap and widen the hole in the cap until the PVC elbow can slide through. Try to get a good fit and not widen the hole too much.
The white ring that was part of the air restrictor was used to help support the PVC elbow. The hole had to be widened just a bit to be able to accept the elbow. Once the PVC elbow can go through the ring, glue the ring to the front cap. Be sure that the ridge is facing the front to the cap.
I used goop in the front of the ring and Zap-a-Gap at the back to make sure no air can get through.
As for the PVC elbow, I had to file down the inner area to allow the elbow to reach a little further back into the cap.
In the above photo, notice on the left side of the PCV wall with trimmed straight. I did this to both the elbow and the tee just so that it matches.
Step 2. Modify the BBB Shell
There are two areas that need attention. The bottom of the barrel opening and the front handle.
I removed the bottom lip of the barrel opening to allow the PVC elbow to get even further down into the plunger tube so it can be as close to the plunger head as possible.
The front handle was removed so that the PVC that will hold the darts can be added in this area. Sand the area flat. The front handle will not be used and can be discarded or saved for future modifications. Optionally, you can move the location to the RSCB barrel to above the blaster if you want to keep the bottom for an integration.
Step 3. Create the RSCB
To remove more dead space, take the PVC elbow and cut half of the tube that will connect to the PVC tee and do the same to the middle tube on the PVC tee. Make sure to get these as straight as possible.
Take your 1" connection PVC tube and dry fit these pieces together. When you are satisfied with the fit, use goop or Zap-a-Gap to secure the assembly.

You have different options for your barrel, but I opted to use a 7" length of CPVC nested in a 2" length of PVC. The important part of the barrel is to cone out the end that will be put into the PVC tee. I used a dremel to cone out the CPVC enough to allow a dart to fit in about 1/4". Once you have your barrel, dry fit this into the PVC tee.
Now take the 7" length of PVC and attach that to the other end of the PVC tee. Take the CPVC end cap and cut it in half. You may need to dremel out the inside if there is a ridge at the back. Take the CPVC connection and glue it into the end cap. Attach this cap to the PVC dart barrel. It should have the same diameter as the PVC.
I opted to create a breech so that I wouldn't have to pull the barrel off to reload. Cut a 3" hole into the tube, nest PETG with electrical tape wrapped around the ends and glue on a tab.
In order to quickly see if there's a dart in the barrel, drill two holes through the PVC tee and cover these with plastic and secure with glue.
Take your RSCB and dry fit this into the BBB shell.
Step 4. Glue
You don't need to glue the barrel and/or the dart holder if you want to be able to remove either of these pieces.
Now take the assembly and glue the elbow to the white ring in the BBB's front cap.
Step 5. Seal it up
I added electrical tape between the front cap and plunger to keep air from escaping. I also added some glue between the elbow and front cap at the opening for a little more stability.
Attach the PVC at the end of the dart barrel to stabilize the PVC. I also used some scrap plastic from a VHS box to help secure the front of the shell as well.
Step 6. All Done!
At this point the mod is complete.

I was going to add a front grip with a 2" PVC but the connection point with the shell didn't have enough room for screws. So I'm looking into some rubber door stoppers to add to the sides of the shell to be able to grip the blaster as I'm priming it. In the meantime, you can hold the back of the front blaster to prime.
Ranges:
With a shorter barrel (6") and better plunger seal (flared out the plunger head) I am averaging 75ft with single BB stefans.
For this modification I wanted to try and reduce as much dead space as possible and still get an easy to load RSCB.
Materials:Big Bad Bow
1/2" PVC elbow
1/2" PVC Tee
1/2" PVC tube (6 3/4" for darts, 2" to nest barrel, 1" for connection)
CPVC tube (6" for barrel, 1/2" for connection)
CPVC end cap
PETG (for breech or another material)
PVC clip
Extria screws
Tools:Dremel
Zap-a-Gap
Plumber's Goop
Files
Electrical Tape
Step 1. Modify the front cap, ring, and elbow
Most modifications start with attaching a coupler to the front cap and nested CPVC into the barrel and filling the dead space with hot glue. I opted to try a different method of attaching the PVC elbow directly into the front cap. This will reduce the dead space and not require a lot of hot glue in the process.
To do this, you will need to cut off the exposed area of the front cap and widen the hole in the cap until the PVC elbow can slide through. Try to get a good fit and not widen the hole too much.
The white ring that was part of the air restrictor was used to help support the PVC elbow. The hole had to be widened just a bit to be able to accept the elbow. Once the PVC elbow can go through the ring, glue the ring to the front cap. Be sure that the ridge is facing the front to the cap.
I used goop in the front of the ring and Zap-a-Gap at the back to make sure no air can get through.
As for the PVC elbow, I had to file down the inner area to allow the elbow to reach a little further back into the cap.
In the above photo, notice on the left side of the PCV wall with trimmed straight. I did this to both the elbow and the tee just so that it matches.
Step 2. Modify the BBB Shell
There are two areas that need attention. The bottom of the barrel opening and the front handle.
I removed the bottom lip of the barrel opening to allow the PVC elbow to get even further down into the plunger tube so it can be as close to the plunger head as possible.
The front handle was removed so that the PVC that will hold the darts can be added in this area. Sand the area flat. The front handle will not be used and can be discarded or saved for future modifications. Optionally, you can move the location to the RSCB barrel to above the blaster if you want to keep the bottom for an integration.
Step 3. Create the RSCB
To remove more dead space, take the PVC elbow and cut half of the tube that will connect to the PVC tee and do the same to the middle tube on the PVC tee. Make sure to get these as straight as possible.
Take your 1" connection PVC tube and dry fit these pieces together. When you are satisfied with the fit, use goop or Zap-a-Gap to secure the assembly.
You have different options for your barrel, but I opted to use a 7" length of CPVC nested in a 2" length of PVC. The important part of the barrel is to cone out the end that will be put into the PVC tee. I used a dremel to cone out the CPVC enough to allow a dart to fit in about 1/4". Once you have your barrel, dry fit this into the PVC tee.
Now take the 7" length of PVC and attach that to the other end of the PVC tee. Take the CPVC end cap and cut it in half. You may need to dremel out the inside if there is a ridge at the back. Take the CPVC connection and glue it into the end cap. Attach this cap to the PVC dart barrel. It should have the same diameter as the PVC.
I opted to create a breech so that I wouldn't have to pull the barrel off to reload. Cut a 3" hole into the tube, nest PETG with electrical tape wrapped around the ends and glue on a tab.
In order to quickly see if there's a dart in the barrel, drill two holes through the PVC tee and cover these with plastic and secure with glue.
Take your RSCB and dry fit this into the BBB shell.
Step 4. Glue
You don't need to glue the barrel and/or the dart holder if you want to be able to remove either of these pieces.
Now take the assembly and glue the elbow to the white ring in the BBB's front cap.
Step 5. Seal it up
I added electrical tape between the front cap and plunger to keep air from escaping. I also added some glue between the elbow and front cap at the opening for a little more stability.
Attach the PVC at the end of the dart barrel to stabilize the PVC. I also used some scrap plastic from a VHS box to help secure the front of the shell as well.
Step 6. All Done!
At this point the mod is complete.
I was going to add a front grip with a 2" PVC but the connection point with the shell didn't have enough room for screws. So I'm looking into some rubber door stoppers to add to the sides of the shell to be able to grip the blaster as I'm priming it. In the meantime, you can hold the back of the front blaster to prime.
Ranges:
With a shorter barrel (6") and better plunger seal (flared out the plunger head) I am averaging 75ft with single BB stefans.
#255387 Rscb Bbb
Posted by
on 05 November 2009 - 01:07 PM
in
Modifications
@Zorn's Lemma: I had seen the clear PVC and thought about it, but $6.00 for a single PVC tee just wasn't worth it, although it would definitely be sweet to have a clear RSCB. I use Ace Hardware's 1/2" FBR with a single BB that works well with this blaster setup. I haven't tried 3/0 weights yet, so I couldn't tell you if that would help or hurt. So far so good though.
@berserker: When I first tried this out, I kept tipping the blaster up to see the barrel, but I am getting use to the idea that I don't need to see the barrel to aim. As long as the RSCB is straight, it's just a slight adjustment when aiming.
@berserker: When I first tried this out, I kept tipping the blaster up to see the barrel, but I am getting use to the idea that I don't need to see the barrel to aim. As long as the RSCB is straight, it's just a slight adjustment when aiming.
#255378 Rscb Bbb
Posted by
on 05 November 2009 - 11:53 AM
in
Modifications
@Fredo: I've been around for a bit, but haven't had anything useful to contribute until now. As long as the BBB as a better spring and plunger seal, it should work well. 60's is probably about right.
@k9turrent: I totally did! I used a combination of yours and Mr. BadWrench's write ups on RSCBs to help me work through this thing. Thanks!
@k9turrent: I totally did! I used a combination of yours and Mr. BadWrench's write ups on RSCBs to help me work through this thing. Thanks!
#312934 RFSG Help- rotation mech
Posted by
on 16 March 2012 - 07:37 AM
in
Modifications
The RFSG barrels don't fit any stock darts or stefans so the range will be horrible until you replace the barrels with a better material (petg, cpvc, brass).
You need to have a pushnut fastner or something there to keep the rotation mech and turret seated together. There is probably too much room for the mech to separate from the turret and causing it to not rotate.
Once you fix those, you might as well fix the turret/plunger tube seal and put in a better spring combo to take advantage of the other mods.

