Jump to content


Shadow 92's Content

There have been 189 items by Shadow 92 (Search limited from 03-January 97)


By content type

See this member's


Sort by                Order  

#108799 Dartsmithing Tips Archive

Posted by Shadow 92 on 01 June 2007 - 04:53 PM in Darts and Barrels

I have never tried this but putting the darts in a pillowcase and blowing with a hairdryer on warm is a method Ive heard of.


I'm pretty sure that's what the original author of the NerfHQ Stefan article does too. As for straitening my darts I tape 5' sections to my walls and tape three or four marbles to the bottom. After three days, they're usually as thin as CDTS.


#88064 Dartsmithing Tips Archive

Posted by Shadow 92 on 22 August 2006 - 03:56 PM in Darts and Barrels

Maybe try searching. Here's Falcon;s writeup:

Sam, I am really sorry. I should have clarified what the intention of my post was. I actually saw and used Falcon’s and Pat’s great write ups to making their Converted Dart Tag Stefans. But I don’t put weights in my darts and didn’t want to have to sculpt each and every dome of my dart. So, I posted the method that I used to make Tagger’s that were unweighted, had domes that didn’t need to be sculpted, and prevented hot glue from dripping all the way down to the bottom of my dart (which has happened). I don’t expect everyone to make their darts the way I do, I just wanted to let people know there is an alternative to putting weights in their CDTS’s. But anyways, thanks for friendly reminder instead of flamming. I appreciate that.

Has someone given a writeup on how to modify taggers to shoot out of a longshot? The ones I have jam in the clip and don't fire anyway.

Really? Mine shoot just fine out of my longshot and it's completley stock. Maybe some of the foam on the top melted when you made your hole and that made it shorter. This may be the cause if it's jamming in the magizine. Or is it jamming in the breech and not letting the part that slides forward (the one with the peg) slide forward? I'm stumped.

And so I'm contributing to to the thread, I reformated part of my earlier post that can be applied to all darts (Stefans or CDTS's).

When making the domes of my darts, I leave my hot glue gun on for awhile and then pour hot glue on. I then turn it over and dip it in ice water for about twenty seconds or until the tip hardens.

Pros:
The tip is reflective when done for exactly twenty seconds
You don't have scuplt the tip by hand

Cons:
Weights can become unbalanced if using splitshots or if using smaller weights

Note: I saw the first post about dipping the dart in ice water by Davis, but I found out about the reflective thing and wanted to share it.


#89782 Dartsmithing Tips Archive

Posted by Shadow 92 on 15 September 2006 - 06:46 PM in Darts and Barrels

Why is not having to shape the dome by hand a pro? I like doing it, personally...

It's easier to get somewhat of a consistency.


I've stopped making CDTS's now and just stretch my foam to the exact same width of tham instead. I plan on drilling holes in the ones that are going to be used in my airguns and not drill holes for ones in my spring guns. And to quickly tell the difference between the two during a war, I'll use the sparkley red hot glue for my air darts and and sparkley blue for my spring darts.


Thanks for clarifying that sam. B)


#115593 Dartsmithing Tips Archive

Posted by Shadow 92 on 12 July 2007 - 04:17 PM in Darts and Barrels

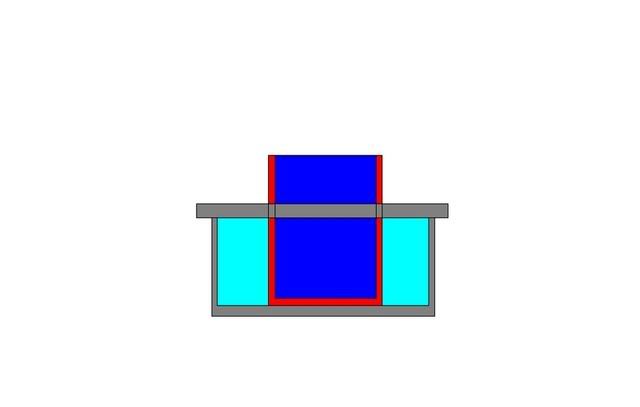
Here's a little diagram of what I use to cool my darts now.

Posted Image

The grey is a plastic container, the red is a glass or cup, the dark blue is salt water, and the light blue is crushed ice with salt sprinkled on top of it. The ice from the plastic container cools down the water inside the cup. By keeping the cooling area and the dipping area separate, but in close contact, I can dip the darts and cool them instantly without having to worry about pieces of ice floating up to the top and messing up the dome. It's anything revolutionary but it gets the job done.


#113001 Bob Ii

Posted by Shadow 92 on 25 June 2007 - 12:49 PM in Modifications

Very nice. The paint doesn't seem excessively thick in the pics that you linked to. I guess it was just the lighting in the first picture. Just one question, where did you get Styrene?


#165733 Directional Control Valve Actuated Qev

Posted by Shadow 92 on 31 July 2008 - 07:46 PM in Homemades

Nice, I love semi-auto designs. I only wish I could get off my fat (120 lb) ass and make my own. :D


#102957 Max Force: Rattler

Posted by Shadow 92 on 29 April 2007 - 11:19 AM in Modifications

I miss mods like these.


#107545 Nerf Sneakshot Modification.

Posted by Shadow 92 on 25 May 2007 - 12:22 AM in Modifications

Captain Slug: Why the Brown note?

I think it was a Mythbusters reference. They tested a myth that there was a myth so low it could make people crap in their pants.

Nice job on integrating the priming handle and the pump. Very slick.

EDIT: Captain Slug beat me to it.

EDIT 2: They actually featured a gun on future weapons that could shoot around corners like the Sneakshot. It was called the Cornershot and was basically a pistol in a rifle body with the pistol being able to move laterally.


#90453 Simple Titan Mod

Posted by Shadow 92 on 25 September 2006 - 10:33 AM in Modifications

Nice mod, the only bad part is the barrel is not removeable, so you've got to ram rod it, and you can't switch barrels around.


It is 2 barrels in 1, micro and rocket. Ramroding is easier than breech loading in my point of view.


Wait, since there isn't a barrel constiction (ie. nested brass) shouldn't you be able to just blow your darts down the barrel instead of using a ramrod?


#98887 Petg Barrel Magstrike

Posted by Shadow 92 on 28 January 2007 - 10:31 AM in Modifications

Was that PETG purchased from OMC?

Yeah what is the ID and OD of the PETG that you're using? And did you have to sand the inside of the clip at all the make room for the PETG? Anyways nice job it looks clean and effective.


#94725 Next-gen Systems

Posted by Shadow 92 on 17 November 2006 - 07:02 PM in Off Topic

Sounds like not alot of you know much about the PS3. It comes with a 60 GB harddrive (which is more than the 360), a built in Blu-Ray DVD player, a sweet new controller, is backwards compatible with prevoius playstations, and is incredibly sleek and stylish. Having a built in Blu-Ray DVD player and being $600 makes it $400 cheaper than a regular Blu-Ray DVD player. All of the games will be on Blu-Ray format too so you're getting high definition graphics (better than the 360 or the Wii). The only problem is most televisions aren't good enough to view the PS3 at it's full potential. It'll still look alot better on your tv than your PS2 though. The picture posted showed the old, PS2 controller. The new ones that come with the $600 package are winged shape, semi-motion sensitive, and have heat sensitive buttons. With it being backwards compatible, you can play all the fun, older games like Gran Turismo, Ratchet and Clank, and Jak. And about it's size, it's really about the same size as the second version of the PS2, just rounded out.

Conclusion, I'm getting the X-Box 360 soley because of it's lower price (Christmas sales + Microsoft lowering their prices for competition right now) and because I'm addicted to Halo from the two four hour gaming sessions I had last week. The PS3 is a way better value but there just isn't a game out for it that I want. The 360 fits my situation, but go for PS3 if your looking for a sweet deal on a high def. DVD player and your hooked on a game right non or one that's coming out. I'm definately not getting the Wii, it can't compete with the 360's or PS3's graphics. Sure, it looks fun to play, but not fun enough to buy. So I'm for sure getting the 360, sometime getting the PS3 and not getting the Wii.

And sorry to put down Uncle Hammer's dreams of a universal gaming system, but it just won't happen. One company would have to buy out the majority of the other's stocks and Nintendo, Microsoft and Sony are just too big for that to happen. In the unlikliness that it did happen though it would suck for us. Less competitoin means less pressure to make better products and higher prices. Just look at what happened when Lanard came out, we got the Longshot and the LBB.

Just for the reccord all that info on the PS3 was from a non-hardcore gamer. I'm pretty mild. Just ask some of the gamers that camped out about the PS3, you could write a whole book.


#89223 My Version Of The Scar-n

Posted by Shadow 92 on 06 September 2006 - 06:19 PM in Homemades

How hard is it to pull the pump back and prime the gun? If it isn't very hard, you might be able to squeeze out a couple more feet with a longer spring from Ace rather than the one and a half BBB spring. It's just a guess, because I'm not 100% positive about it, although I think I remember someone posting how a longer spring will generate more force than two springs of the same length total.

Anyways, great job! The shelless feature might actually convince me to build it.


#97215 Magstrike Hair Trigger

Posted by Shadow 92 on 26 December 2006 - 10:39 PM in Modifications

Nice mod and write up, but instead of using balsa I used the spare plastic from the plate part of the wheel mech.


#113330 Mpcp (mass Producable Combustion Pistol)

Posted by Shadow 92 on 27 June 2007 - 04:37 PM in Homemades

That is why I use Axe bodyspray it has all three of those ingredients in it. However the only mataninece I need to do to it is occasionally sand off the two metal bolts in it because the other ingerdients in Axe build up on them and then stop it from creating a spark. However what he says is true the combustion is no where near strong enough to melt it and I use thats also why I dont use fuels that are excessively explosive to stop this "explosion".
It honestly is very safe for several reasons
1. It has a very small chamber and therefore needs not alot of fuel and therefore can't have a very big combustion.
2. the PVC size is small and if you look at any chart the smaller the PVC size the higher the PSI capabilities
So with both those things in mind it is very safe. the weakest point if any iswhere the two bolts go in or the end cap both of which have never failed.

That's good to know. Thanks for the info.


#113301 Mpcp (mass Producable Combustion Pistol)

Posted by Shadow 92 on 27 June 2007 - 01:06 PM in Homemades

Wait, you're using combustion with PVC? Won't prolonged use melt /damage the firing chamber? The overall design sounds solid I just highly suggest switching to copper pipe and fittings.


#112370 My First Homemade. (i Changed The Topic Name.)

Posted by Shadow 92 on 21 June 2007 - 02:51 PM in Homemades

40 feet? Yours must have sucked. The ones they sell now shoot Titan missile-like things 100 feet. I'm getting one as soon as I see one, they're only 8 dollars.


I'm guessing that his range was flat and the current toy ramrocket's ranges are angles. Since this is the Homemade section, why not just build your own? All of the toy ramrockets that I've seen in stores have a cardboard body (cardboard = cheap).


#147267 Semi Auto Prototype

Posted by Shadow 92 on 27 March 2008 - 02:13 PM in Homemades

The barb connections on your valve look too restrictive to work. None of the passage ways should be below 1/4" ID (or equivalent area).
Unless of course your trigger valve is just a pilot valve for a larger valve.


I'm going to use 1/4" ID tube fittings. They just came out a little small because I made the trigger and the rest of the gun separately. The trigger valve is used to release the air in front of the bolt, causing the bolt to move back.

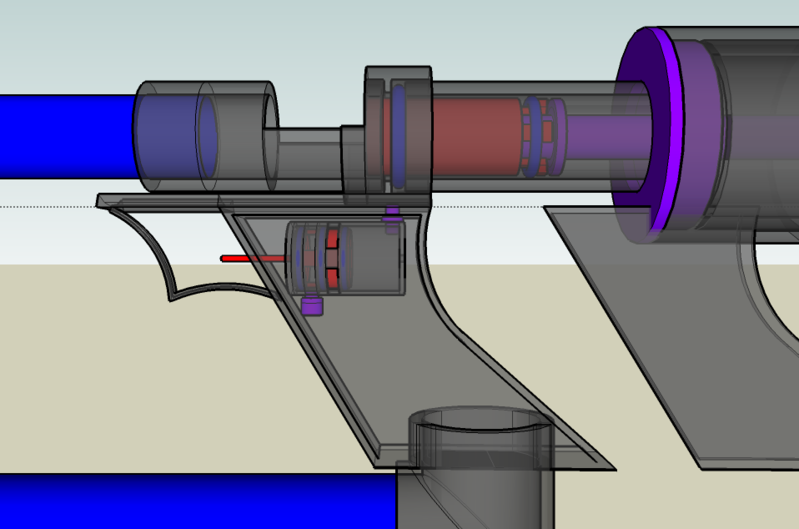
Here's a diagram I made for a while back. The prototype vents the air directly as opposed to piloting the QEV which vents the air in front of the bolt. The setup is also a little different, but it explains the general idea,

Posted Image


#147175 Semi Auto Prototype

Posted by Shadow 92 on 26 March 2008 - 08:45 PM in Homemades

Yeah, there won't be a magazine. Since the prototype isn't semi auto, I figured I would just put a small mega stefan in the breach to load it.

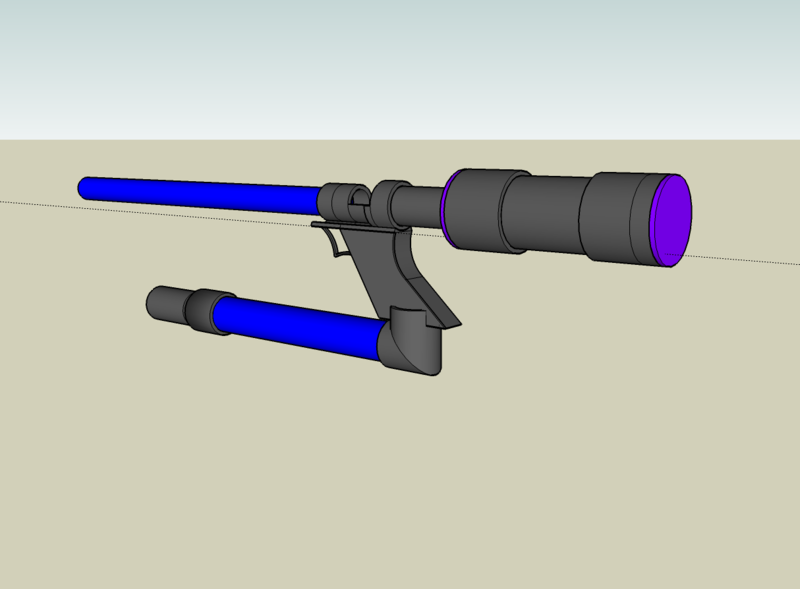
Here it is with the 3 way valve trigger. I was feeling a bit lazy so I didn't make the actual trigger or the tubing that connects the pump and the valve. But everything else is there.

Posted Image

Does everyone get how it works? I'm just asking because that's the only way I can get constructive criticism.


#147592 Semi Auto Prototype

Posted by Shadow 92 on 28 March 2008 - 09:08 PM in Homemades

Unless you're using very hard o-rings that setup is going to have A TON of friction to overcome. I hope you get it to work though.


Thanks. I was thinking about using two o-rings with a medium seal if the single o-ring didn't have a sufficent seal. Hopefully, it will mean I won't have to use a tight fitting o-ring.

Well I think you should make the breach bigger allowing clips and you could use a air regulator regulator like CS and his MS.


I want to keep the breach small so when I go to build the final design (which will fire paintballs) there won't be any huge differences. I'm perfectly fine with manually loading each .75" long dart. I actually do plan on using a homemade regulator for the final design but I decided not to incorporate it into the prototype because it would mean that cost would go up with having to build both a regulator and a LPA tank. I don't want to use an air compressor because the gun would no longer be portable, but the valve is designed so it can accept a constant supply of regulated air.


#148906 Semi Auto Prototype

Posted by Shadow 92 on 02 April 2008 - 07:17 PM in Homemades

Can we please stop thread-crapping Shadow 92's thread about this now?

No, its okay, go on. Its mildly entertaining. <_<

Thanks for all the info on pumps. I won't really need it for this project but its good to know.

You can buy 30000 psi tanks with regulators pre filled at Target, Home Depot, Lowes, Walmart and others for 40 bucks. Refill at paintball shop or scuba store.

Whoa! Looks like you got a little carried away with the zeros there.

Wow, 40 dollars. That will save me a ton latter on. Most of the tanks that I looked at were a couple hundred.

FYI: I'll buy the parts to build the prototype soon. Hopefully, the gun will be built in two weeks.


#151218 Semi Auto Prototype

Posted by Shadow 92 on 14 April 2008 - 10:32 PM in Homemades

I'm dropping this project for another more compact design, but I'd still like to see the desisgn. Can you post it?


#147805 Semi Auto Prototype

Posted by Shadow 92 on 29 March 2008 - 05:05 PM in Homemades

I don't need it to go over 1,000 psi. I just want the option to fill it up at home it runs out. Anything over 120 psi would be great.


#147619 Semi Auto Prototype

Posted by Shadow 92 on 28 March 2008 - 10:07 PM in Homemades

This is the HPA setup I use with Nerf. I don't really use the LPA setup anymore.
Made entirely with off-the-shelf parts. Total part cost is around $135.

Really, its only 135? I remember reading the original topic but I thought the 135 was the price without an HPA tank. I'll definitely look into one. Is there any way you can make it so you fill the tank up with a regular bike pump so you don't have to go to a paintball shop every time it runs out?


#147107 Semi Auto Prototype

Posted by Shadow 92 on 26 March 2008 - 01:15 PM in Homemades

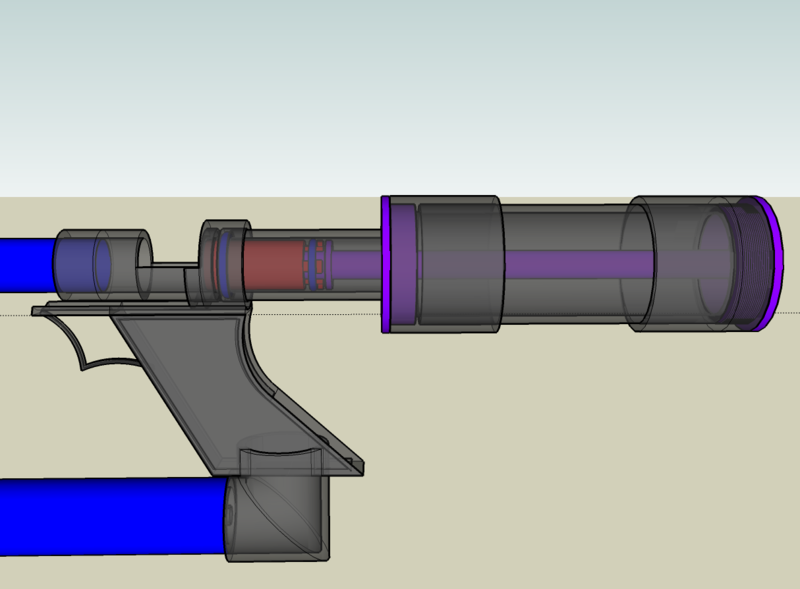
Here's a Nerf/ paintball design that I've been working on. It works by using the bolt as a piston. If you want more info on the evolution and background on the design see here. I'm building a prototype that will test the effectiveness of the piston bolt before I build the actual design which will strictly fire reballs. The prototype features the current design's bolt and and valve. A homemade pump is used to fill the chamber and will take the place of a remote airtank.

Posted Image

Posted Image

Posted Image

I know that most people don't like designs, but I have the full intention of building it. I already made an order list on Mcmaster. The only reason I will not build this is if someone can suggest and improvement to the design.


#107522 Knowledge Is Power

Posted by Shadow 92 on 24 May 2007 - 11:29 PM in News

Congratulations Forsaken_angel and CaptainSlug on the promotion. I guess your guys' names finally got picked out of the hat. Keep up the good work.


#113300 Fuckingpecan: My Take On The Volley Titan

Posted by Shadow 92 on 27 June 2007 - 12:44 PM in Modifications

Quite frankly, I doubt my Maximizer, which has the highest air volume for a spring gun besides an Ultimator, could get even half the distance the titan does.

It's kinda off topic, but why aren't there any Ultimators or Maximizers modded to fire micros?

Even after a whole week, I still can't get over how crazy the paint job turned out.


#181389 Nerf Gun Designer

Posted by Shadow 92 on 03 October 2008 - 11:26 PM in Homemades

I think he's suggesting that he can make designs of ideas that other people have so they can build it (correct me if I'm wrong.)


#153564 200+ Feet? How?

Posted by Shadow 92 on 27 April 2008 - 09:24 PM in Modifications

As for the original topic, you can always try integrating the Titan pump and tank into a Dart Tag gun. It's not quite semi-auto but it'll give you a long range gun, with a decent rate of fire. Just know that you'll have to cut off a lot of the space near DTG's turret to make room for the air tank (I know, I tried). But after that all you have to do is connect the trigger and the pump.


#161776 Double Longshot Carbine

Posted by Shadow 92 on 06 July 2008 - 10:32 PM in Modifications

Do it only if its for fun and not for actually playing.


#111849 The... Uh... C

Posted by Shadow 92 on 18 June 2007 - 12:51 PM in Homemades

The U-shaped design is an interesting concept, I like it. The trigger looks really small. Have you had any problems using it / plans to make it bigger? Oh and when you're heat pressed the PVC for the Tec-9's handle and grip, what did you do to prevent inhaling the chlorine fumes?


#83567 Searching For Kick Ass Guns (non- Nerf)

Posted by Shadow 92 on 21 June 2006 - 12:12 AM in Homemades

I'm pretty sure an airzooka can be modified into a nerf gun. If it can fire a rather large blast of air 30' away then it should be able to fire stefans a good deal away. Considering that it moves about 1,800 cubic inches (if I did my math right) of air at a speed a little slower than a BBB plunger, it would probably get SM5K ranges. Oh, and all that would be needed to be done is attach a funnel to th air output and connect a nested brass barell to it.

Airzooka Description


Megazooka Description


#107452 The Snap 1.5

Posted by Shadow 92 on 24 May 2007 - 07:19 PM in Homemades

Nice mod Carbon. I've always wondered though why you don't use 2" PVC for the pressure chamber of all of your later SNAPs. Are there certain design flaws that make the 1.5" ideal or is it just preference?

It's funny that mention a pump action SNAP Prometheus, I'm in the middle of making one.


#85892 Do You Remember?

Posted by Shadow 92 on 27 July 2006 - 07:14 PM in General Nerf

The first nerf guns I ever owned were the Airtech 4000, 2000, and 1000. My mom bought the 1K for my sister, the 2K for my cousin, and the 4K for me. Six, years later, all that I have left is the 4K (I didn't know you could modify nerf guns when I was 8.) Although if it was the first nerf gun I ever used, I would have to say the pulsater.


#102708 Where Can U Buy Petg And What Is Cpvc

Posted by Shadow 92 on 27 April 2007 - 11:32 PM in Modifications

1.You won't find PETG at any hardware stores so you'll have to go to a pet store that specializes in aquariums to find it from a store. It's normally used in wash down applications.

2. I've seen two types of CPVC. One is an off-white color and has a smaller inner diameter and wall thickness than regular PVC. The other I've seen and is at the Lowe's and Home Depot near my house is a light gray or black color. It also has a smaller ID (inner diameter) but a thicker wall size to handle higher pressures. Both types fit .53" micro darts (the standard before CDTD's)

3. CPVC is not expensive (something like $4.00 for 5') and can be found in most Home Depots and Lowe's in the sprinkler section.

EDIT: Oops sorry OMC I wrote this before you posted.


#102951 Where Can U Buy Petg And What Is Cpvc

Posted by Shadow 92 on 29 April 2007 - 11:07 AM in Modifications

Oh I guess I was a little confused too. Apparently there's schedule 80 PVC, Schedule 40 CPVC (off-white stuff), and Schedule 80 CPVC (the dark gray stuff). And I think each one can only fit in it's own fittings (I'm not 100% sure though).


#102854 Where Can U Buy Petg And What Is Cpvc

Posted by Shadow 92 on 28 April 2007 - 07:24 PM in Modifications

The grey/ black stuff is actually Schedule 80 PVC. Many people refer to it as "thin wall". It's a lot looser than CPVC, but the head of a stock micro does not slide all the way in like it would in Sch. 40 PVC (white pvc).
Just thought I should clarify that.

Mcmaster-Carr lists CPVC as Schedule 80 PVC. Captainslug aslo refers to CPVC as Schedule 80 PVC. I believe most people refer to the off-white CPVC as thin wall because the black CPVC has thicker walls and is rated for higher pressures. And all of the micro darts that I've used (with the exception of those that came with the Titan Unity set) can fit inside 1/2" schedule 40 PVC. The only reason I had regular darts that didn't fit was because the foam became too soft and wasn't stiff enough to push the head of the dart all the way into the barrel. But other than that you should be able to fit stock darts inside 1/2" PVC (I have some in it right now).


#107581 A Pump Action Snap

Posted by Shadow 92 on 25 May 2007 - 07:32 PM in Homemades

I tested my Big SNAP's ranges today. I had to replace the brushing and make a new barrel, but it was worth it. With a 12" PVC barrel and mega stefans, it shot about 75' flat with a slight breeze. With a 16" barrel, it was going 85-90 with no wind. If I were to re-lube the gasket and the plunger, glue the brushing and the coupler to the gun, and actually add weights to my darts I could probably pass the century mark.

I'll post pics of the nearly completed bolt and barrel later.

Edit: Hey I double posted! I wonder why I couldn't do that before?


#107490 A Pump Action Snap

Posted by Shadow 92 on 24 May 2007 - 10:12 PM in Homemades

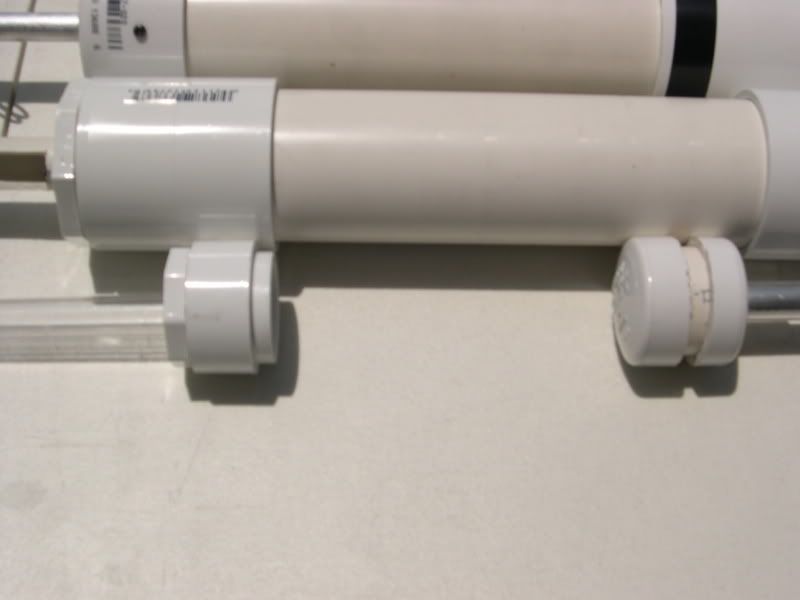
Thanks SHA. Yeah, I took the pictures outside today on a white table. Down here in SD, it was really bright so I had a hard time seeing the pictures I took when I was taking them. I'm surprised that not all of them turned out like that.

Part II

Here's how it works:
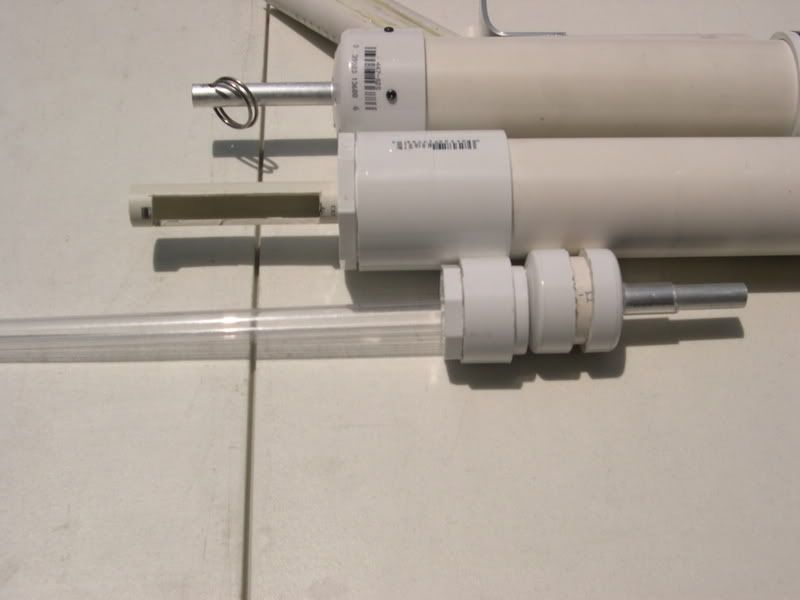
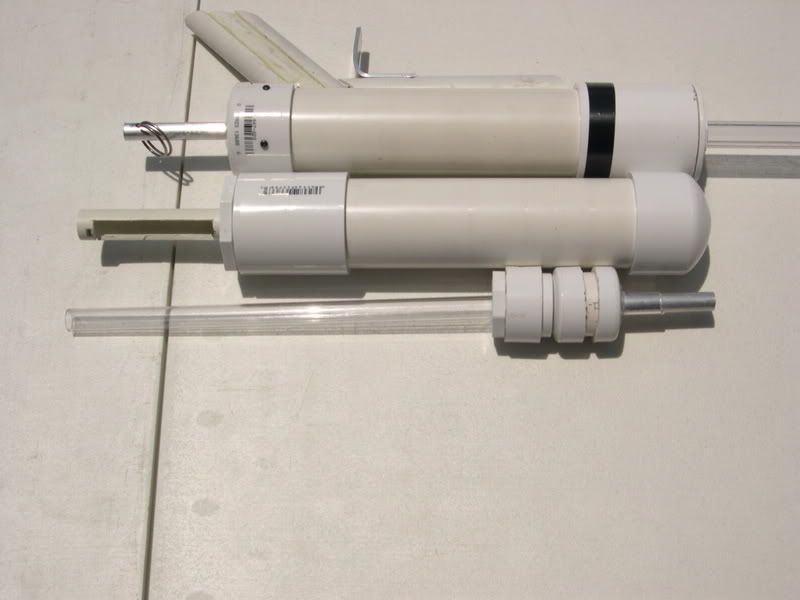
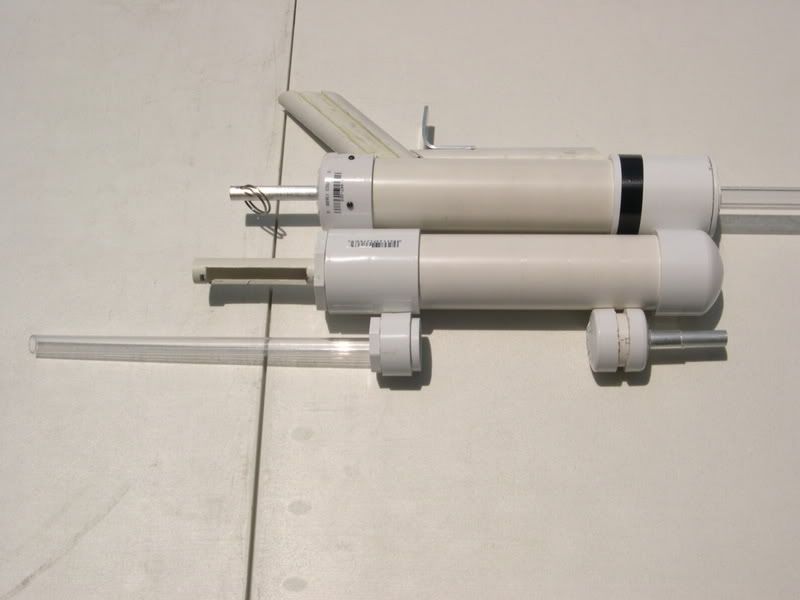
The PETG nested inside the 1/2" PVC will be able to slide freely back and forth inside the PVC, which will be secured to the gun by the 2"-1/2" reducing brushing. The PETG will act as the barrel. At the back of the barrel will be a 1 1/4"-1/2" reducing brushing with a small section of 1/2" PVC. I plan on gluing the PETG to the inside of the 1/2" PVC so the brushing is secured to the barrel. On the outside of the brushing is part of the 1 1/4" endcap I used for the plunger and an o-ring on top of that to seal the barrel and the pressure chamber. Right behind the barrel is the plunger made of 1 1/4" endcaps and tubbing. Instead of a gasket system I will be using o-rings to decrease weight. I also used a small section of 3/8 aluminum and glued that to the plunger.

Posted Image

When the barrel is pushed back, it pushed the plunger back with, similarly to the way ompa's SCAR works. It will be pushed all the way back until the plunger is locked into place by the clothespin trigger. And at sometime when the barrel is pushed back, the breach in the PETG will match the breach in the PVC opening a whole and allowing me to put a dart inside the barrel.

Posted Image

Once the plunger has caught onto the clothespin, I will move pull the barrel forward, closing the breach and
allowing the gun to be ready to fire.

Posted Image
Posted Image

Short term problems:
1. My barrel is too short (12") I will need at least a 16" barrel if I want to be able to attach a grip on the barrel to hold onto while pushing it back. I also think the air output is sufficient for a 16" barrel.
2. I don't have any o-rings on the plunger or on the barrel. This can be fixed, I just need to figure out what size o-ring to buy.
3. I don't have springs right now. I plan on using two, full length Handyman springs from Home Depot, just like in my Big SNAP.
4. I have yet to build a handle, trigger, or cover. I already have all of the materials it just takes some motivation.

Long term problems:
1. I'm not so sure on how to build the breach on the barrel. I don't know where I should put on the PETG and if it will be close enough to the back of the barrel.
2. I'm worried about the springs. Since I'm not using a full length of aluminum and I'm using two springs instead of one, I have no idea whether the springs will fold or come off the plunger.

That's about it. Questions, comments, and ideas would all be really helpful right now.


#107529 A Pump Action Snap

Posted by Shadow 92 on 24 May 2007 - 11:41 PM in Homemades

If carbon rod didn't last long on the FAR, I doubt it would last in this beast. Steel rod is the way to go, unless Carbon has something else he found to be nice and strong.

Anyways, how about a pic of the bad boy fully assembled?

Wait, are you talking about the charge/ guide rod or something for the catch face? Because if you're talking about the rod, then you don't have to worry. The way it works it just, well, guides the spring as oppose to NF style plungers that need to handle a lot of the pressure. As for it being fully assembled, the first pic is as far as I gotten so far. Right now the only thing that's stopping me from finishing it are a couple design flaws and I lost my wallet.

*runs over to my big SNAP*
*takes it apart*

Well, god damn....I did know that!

Although, I just used the endcap as a catchface, and used my compact plunger head to reduce size. Definitely looking forward to a range comparison, as it'll give a pretty direct match to the two plunger styles.

I'll try and get ranges in as soon as I can.


#107542 A Pump Action Snap

Posted by Shadow 92 on 25 May 2007 - 12:14 AM in Homemades

Yeah, I was thinking you were using it for other purposes. How big O.D. does the carbon rod come? I guess any stress applied to it would be on the end, or if the spring was a little off-center, it would rub, but not much. It seems like a more expensive method, when CPVC is cheaper, but also somewhat heavier (or so I assume).

If you're talking about carbon fiber, then it's lighter than mostly any other stable building material but five times the cost. I don't think I'll be using carbon fiver any time soon seeing as it's $55.00 for a 4" section of 1/2" tubing. The largest size that I can get carbon fiber rods from McMaster is 3/4 OD for solid rods and 1.6" for actual tubing, neither being feasible price wise.