Well it didn't actually hurt. First of all, it severed all the nerves in my thumb and I immediately went into shock so I really don't remember it hurting. But to answer your question, no, it didn't really get better. I cut straight along the bone and split my thumb like you'd split a fire log, so the thumb still moves, but its a little weaker and I have no feeling in the surface of it and I got a really nasty scar. But I got used to it and I don't even notice it anymore.I have a feeling that it hurt. Did your thumb get better?I was a stupid kid and used a utility knife cutting downward toward my hand that was gripping the pipe. The top part of the pipe snapped off and all the force I was putting down sent the knife through half of my thumb and the blade bottomed out on the bone in my index finger. I hardly need to tell you that it was an extremely gory mess.
Banshee's Content
There have been 572 items by Banshee (Search limited from 14-February 97)
#285636 Pacbow Write-up
 Posted by
on 18 September 2010 - 01:37 AM
in
Homemades
Posted by
on 18 September 2010 - 01:37 AM
in
Homemades
#231661 Longshot Scope Now Usefull!
Posted by
on 21 May 2009 - 08:42 AM
in
Modifications
Where'd you get a yellow LS? I have yet to see one in stores.
#210370 The Howler
Posted by
on 08 February 2009 - 12:48 AM
in
Modifications
Let me be the first to say nice work man! How does it prime compared to a BBB?
#182786 What's The Cheapest Place To Buy Good Spray Paint?
Posted by
on 10 October 2008 - 12:16 AM
in
Modifications
Are you serious? You couldn't have figured this out for yourself? You had to post a bulletin? And why in Modifications? Isn't there a "pointless shit" thread somewhere? Dude, you can get spray paint anywhere, and its all the same price...
#248220 Berserker Mod
Posted by
on 22 August 2009 - 10:33 PM
in
Modifications
Can anyone direct me to some decent internal pictures if there are any. I want to see the plunger size, the air tank, how it all works. I've seen pretty much nothing about these guns.
#159224 While Making Something Else, I Made....
Posted by
on 15 June 2008 - 12:03 AM
in
Modifications
You dip shit. Dude, welcome to NerfHaven, you opened a 2 year old thread!
#230885 The Soulreaper
Posted by
on 17 May 2009 - 06:44 PM
in
Modifications
Would you be willing to start selling these pre-assembled ready for installation? How much would I expect to pay for something like that?
#301649 Near-Semi-Auto Rifle
Posted by
on 16 July 2011 - 10:49 AM
in
Modifications
Exactly, it can be done, but you said you weren't getting 100 ranges with your 3K tank, right? I am, so I can't recommend any tank but the one used if I want to guarantee people 100 foot ranges.I know you were asking Kyrativ, and not myself, but I thought I should share that I pulled this off using a 3k tank, and Merzlin pulled it off using a 2k tank a while ago, but I'm not sure if Merzlin ever suck it inside a shell or anything.
#301673 Near-Semi-Auto Rifle
Posted by
on 16 July 2011 - 11:51 PM
in
Modifications
You would need a pretty strong spring. It would be uncomfortable to operate if you ask me. I like my design, I don't care for hoppers, they're cumbersome, so if you want to try it, go ahead. Tell me how it works out for you.All you need to do to make this a fully semi-auto blaster is to add a decently sized hopper (6+ darts) and make the trigger dual action, as stated previously. The trigger going forward has to push the button, the trigger pulling backward fires the gun. Add that to the hopper's removal of the need to tilt the gun down, and you've got a blaster that can fire as fast as you can pull the trigger.
I don't know how much force it takes to operate that Magstrike valve though, so you'd probably need a stronger trigger spring. A longer trigger pull would probably help too.
#301703 Near-Semi-Auto Rifle
Posted by
on 17 July 2011 - 05:59 PM
in
Modifications
Well I don't know about that hard, but it certainly wouldn't be easy. Also, the idea of the air release valve being constantly pressed in, concerns me about air leaking. You might as well just run the bladder straight into the air tank, no release valve. You'll lose a little air, but it will be true semi-auto.Also the spring would need to be so ridiculously strong, that the trigger pull to fire the tank would simply be too dificult.
#301593 Near-Semi-Auto Rifle
Posted by
on 15 July 2011 - 11:03 AM
in
Modifications
I don't own a shotblast, but from pictures I've seen, I would say they're pretty close in size. The Shotblast tank looks a little wider, but a little shorter.Very nice Banshee!
The tank functions the same way as a Super Soaker Shot Blast tank. Would you happen to know how their sizes compare?

#301644 Near-Semi-Auto Rifle
Posted by
on 16 July 2011 - 01:44 AM
in
Modifications
It will work with any air tank, but the results will depend on what tank you use. I've stated my reasons for using this tank previously, so if you use something else, let me know how it goes.Meh I've got a busted magstrike, I might scrap the piston and do this to it, does I require that super soaker or could it work with any air tank?
#301604 Near-Semi-Auto Rifle
Posted by
on 15 July 2011 - 01:34 PM
in
Modifications
I think any tank would work, but I went with that tank because I can hear it fill with air, you can hear the rod come out of the back. I tested with an AT2K tank, and I never really knew when it was full and it didn't seem to get to a very high pressure because the darts isn't go very far at all. So I'm not really sure, but I left this mod very generalized so anyone can apply their own twists, hopper clips, different tanks, breeches, etc. The possibilities are endless, and I'm excited to see what someone will do with the concept.Very nice! If only I hadn't wasted a 2k tank and a magstrike bladder on a project for a friend... I'm guessing that most/all tanks that use a pin would be compatible? If so, I have a new project.

#301550 Near-Semi-Auto Rifle
Posted by
on 14 July 2011 - 07:38 PM
in
Modifications
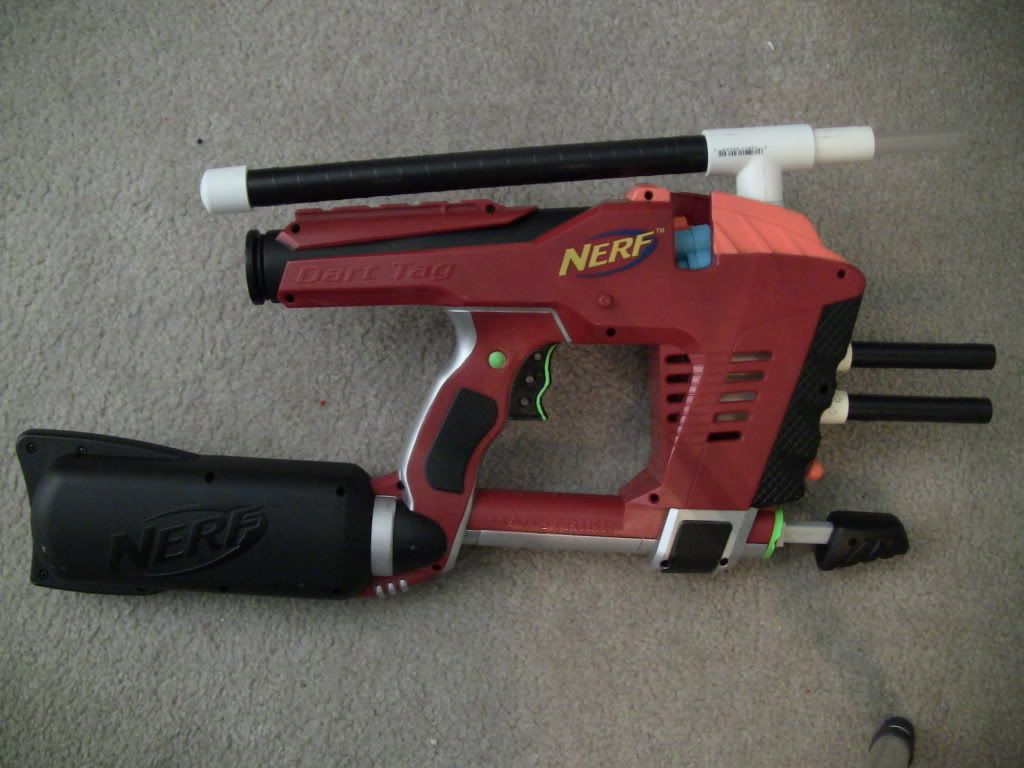
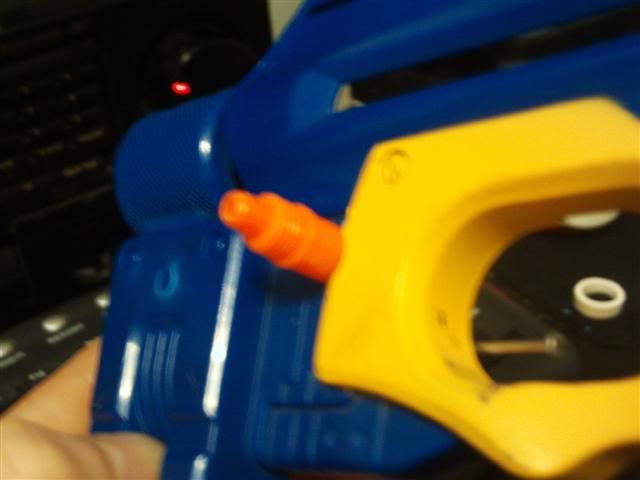
This is sort of a write up on building your own Blast-Strike. I say “sort of” because I’m going to roughly explain my process to you, but with this modification, it’s fairly easy to see what I did through a single picture. “Now, what is it?” you’re asking? It’s a sort-of-semi-automatic rifle using a Nerf Magstrike and a Super Soaker Quickblast.
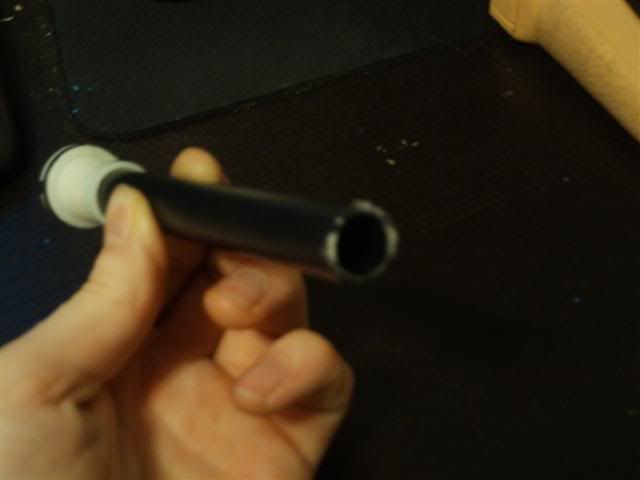
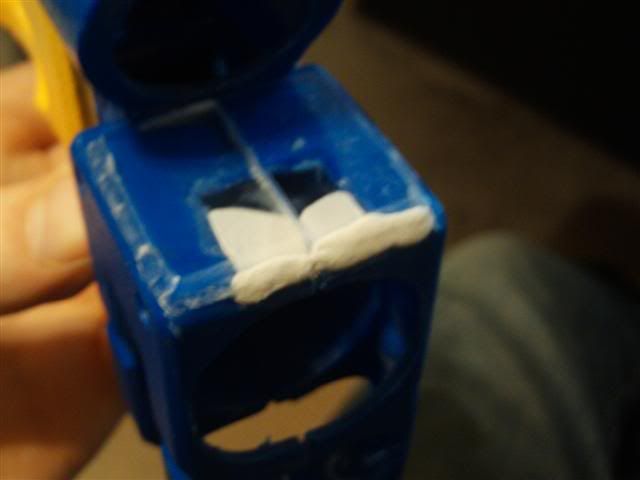
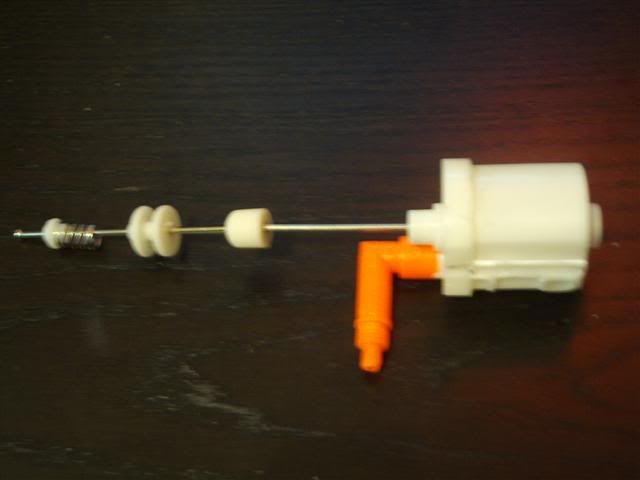
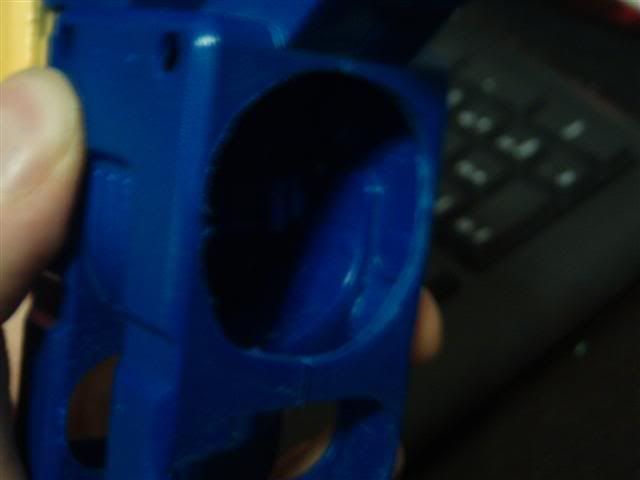
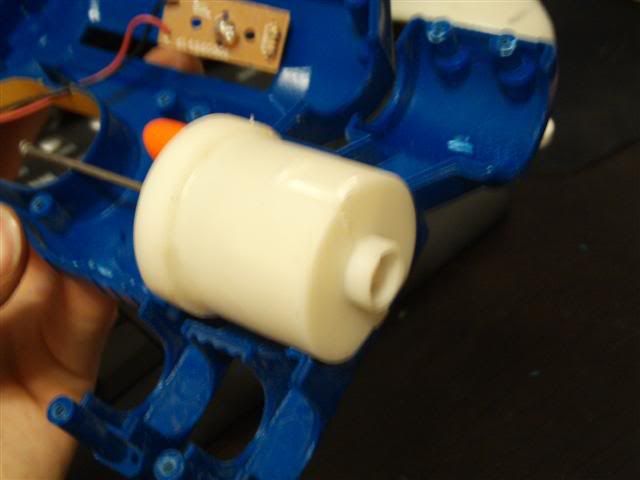
This is a Quick Blast:
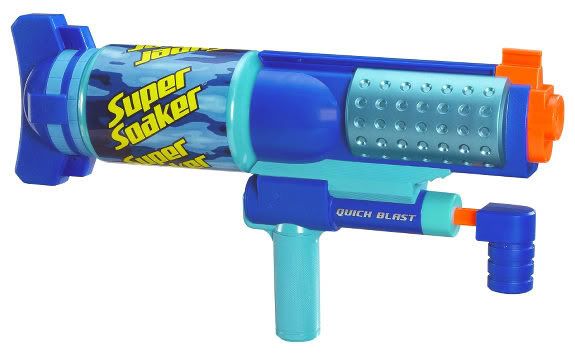
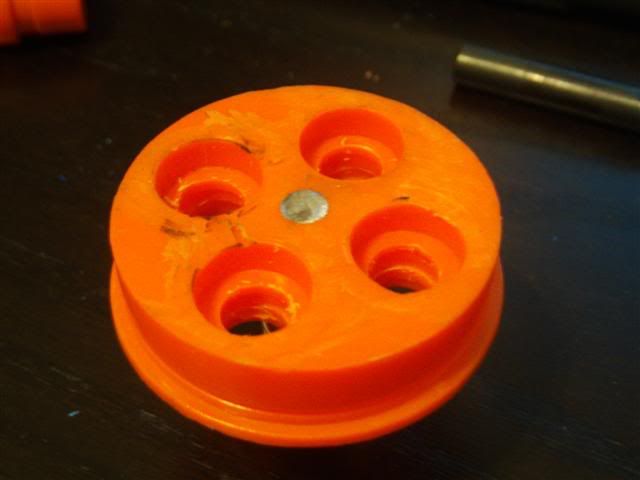
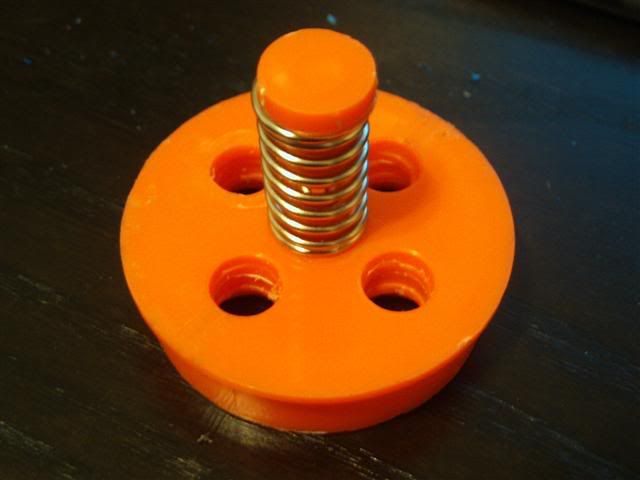
Inside the Quick Blast is a very simple air tank that functions like any air tank with a pin release. What makes this tank unique is that inside of it is a plunger with an O-ring and a spring. When you pump air into it, the pressure pushes the plunger out the back, and then when you pull the trigger, the plunger pushes all the air out the front. It’s quite interesting, it’s like a springer/tank hybrid. I’m sure you could achieve higher performance by adding a spring or replacing it, but I’m not doing that for now.
The reason I use this tank is because the plunger coming out of the back keeps the air pressure coming from the Magstrike bladder perfectly consistent. Testing with other tanks didn’t yield as nice results as this tank.
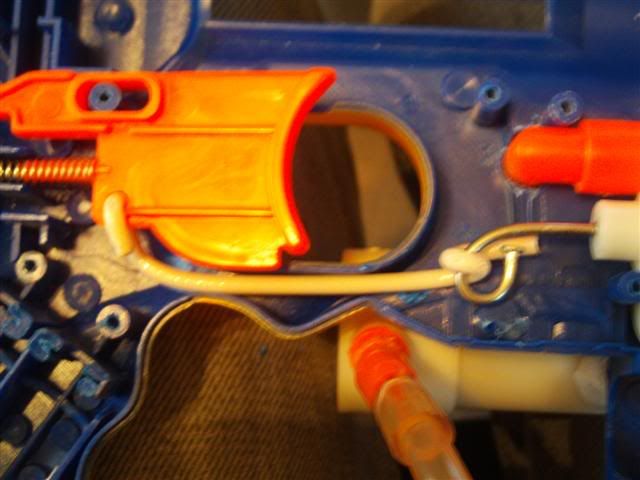
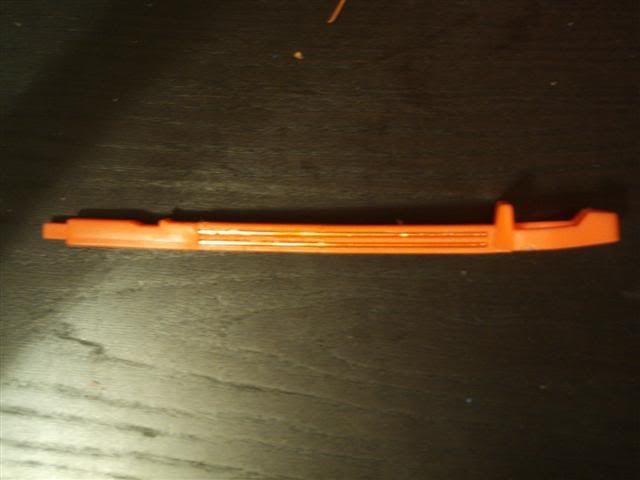
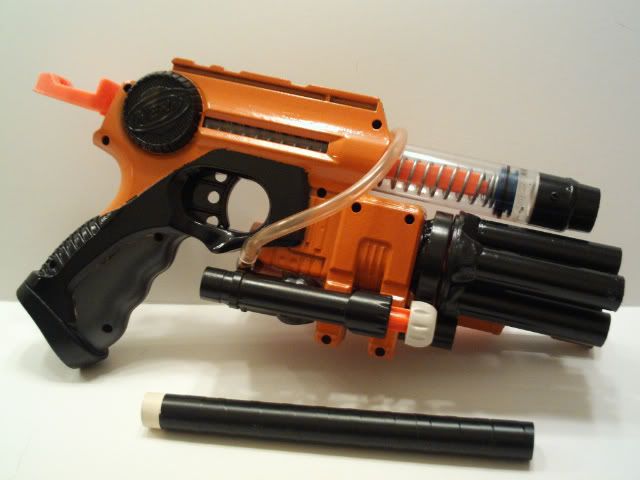
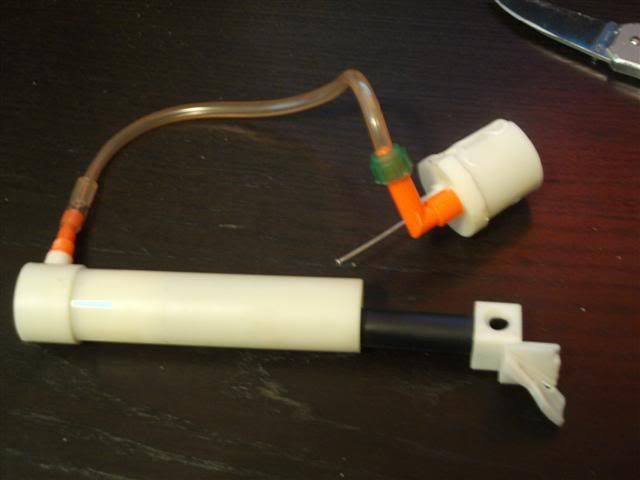
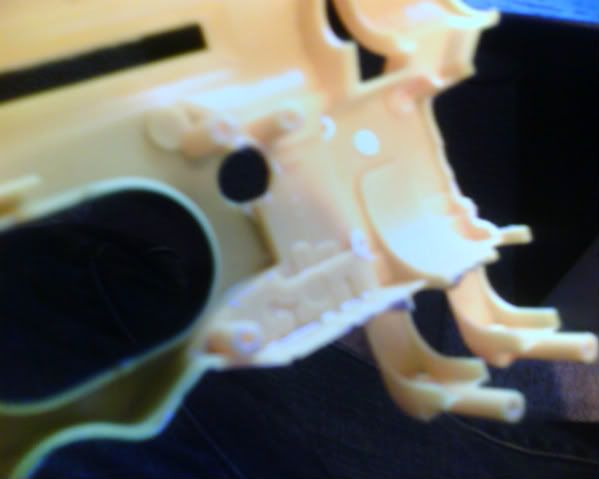
This is the basic design of the gun:
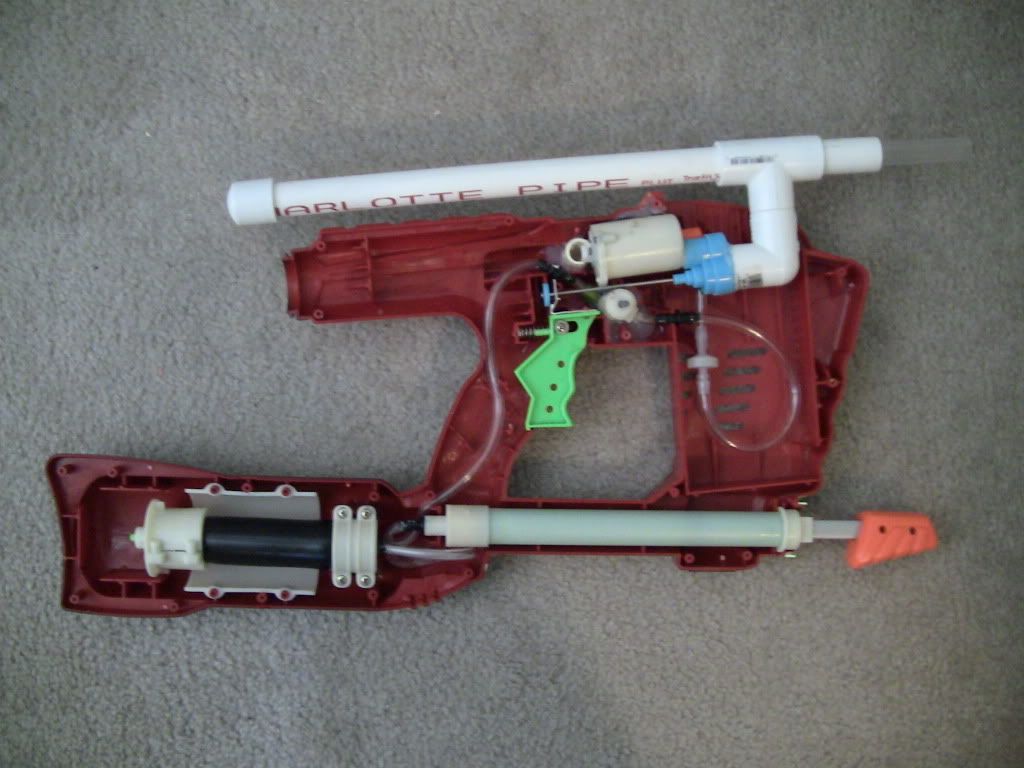
This gun functions very simple. You pump up the bladder 25-30 times, press the original Magstrike trigger valve which releases air into the tank, and then you can fire. I can get 5 streamlines into the RSCB and I can fire them all on about 25 pumps.
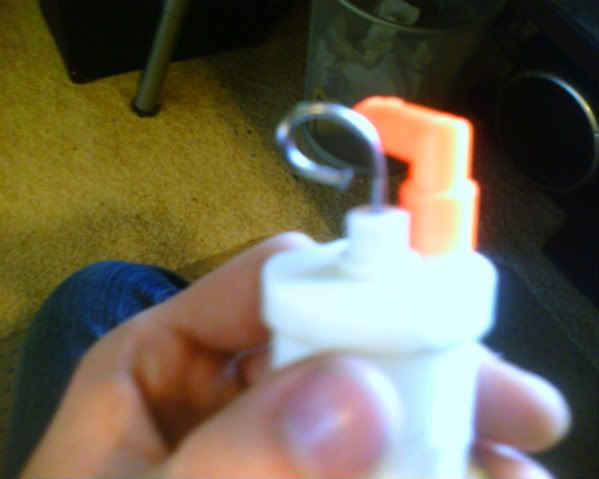
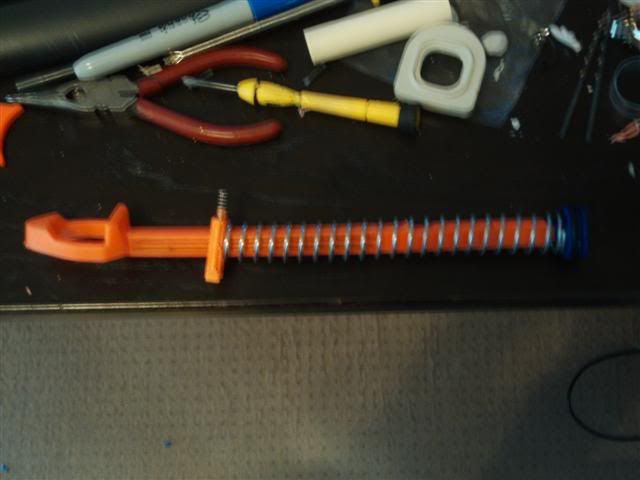
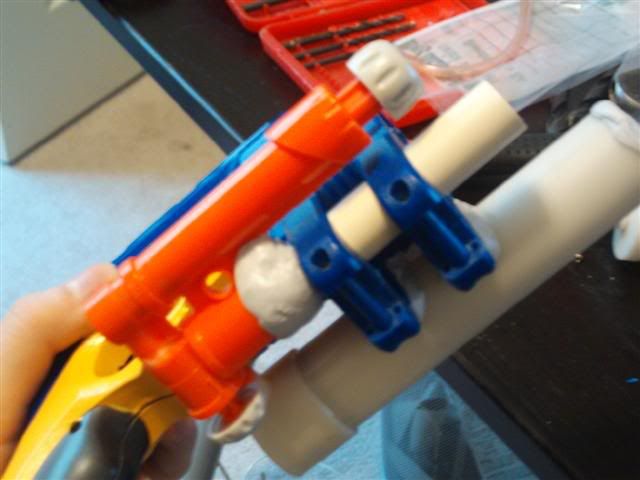
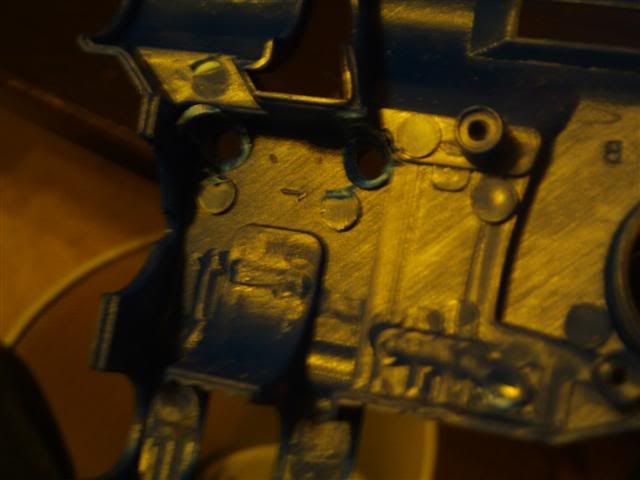
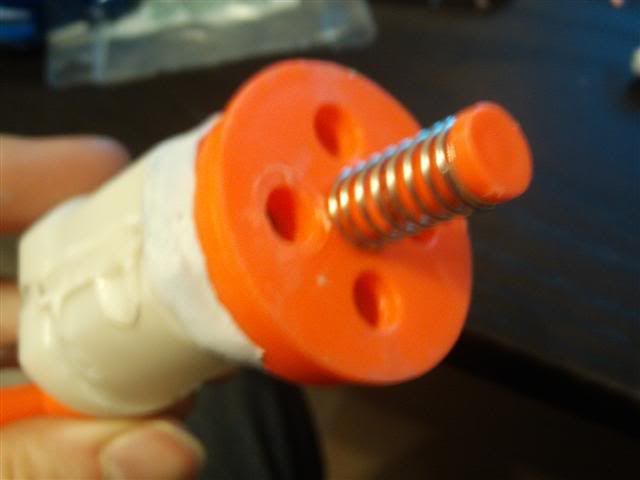
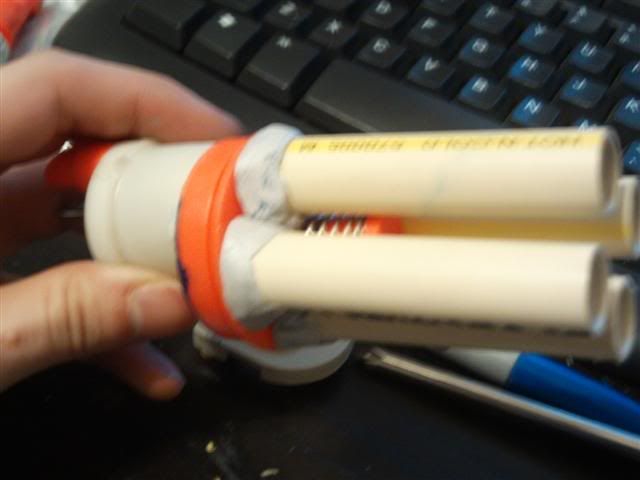
This is a closeup to show you what I have inside:
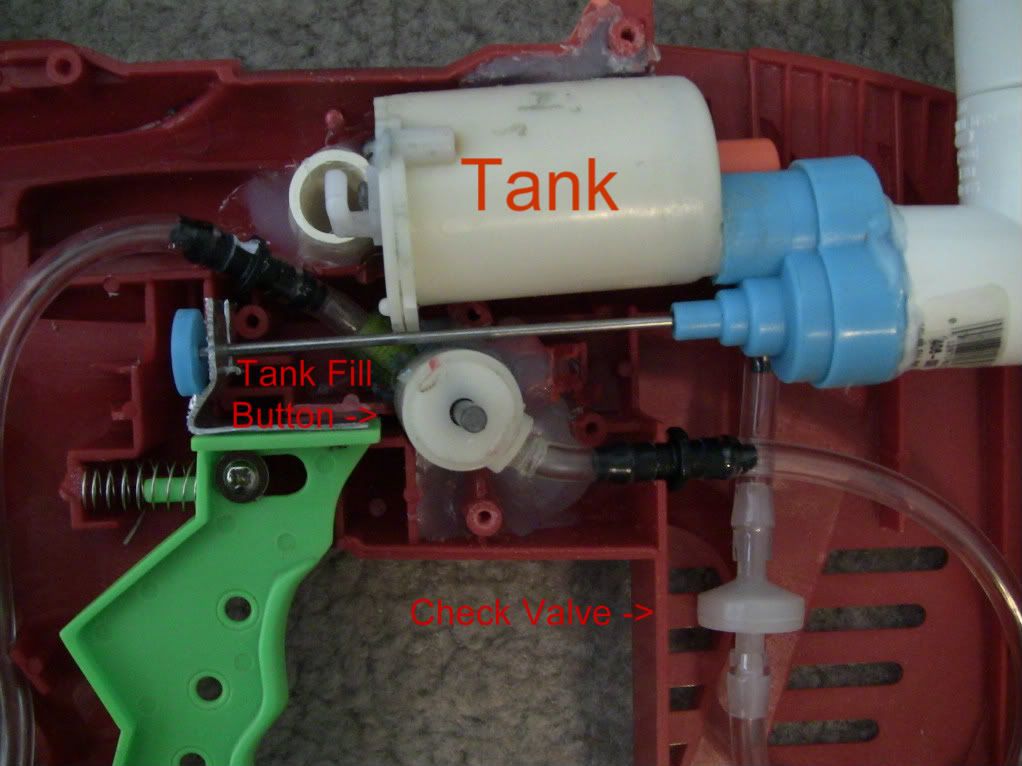
The air release valve is meant to extend through the shell so it can be pressed with my trigger finger as I tip the gun downward to load a new shot. I use this design so there is no wasted air between shots if I had just linked the bladder to the tank. That means more shots for my pumps.

The rate of fire is awesome for the range. The key here is the check valve. You can not use this design without the check valve, if you do, all your air from the tank will escape through the air release valve. Put the check valve after the air release valve before the tank.
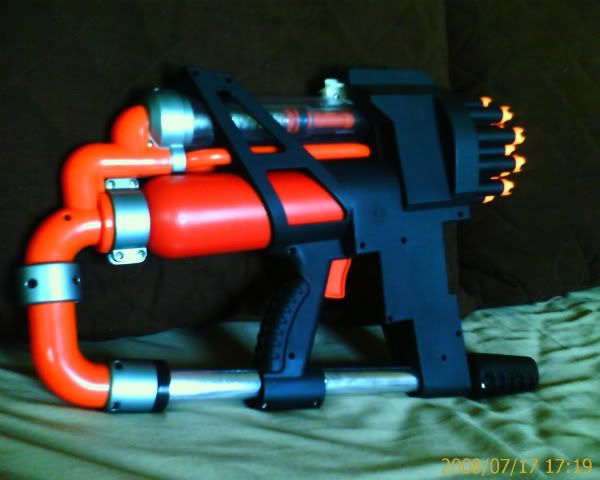
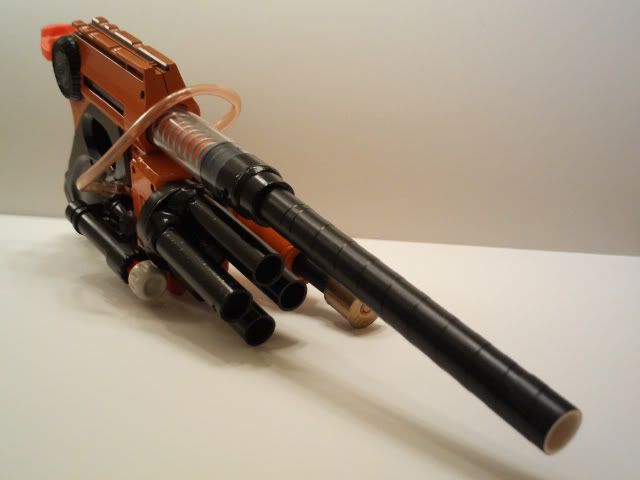
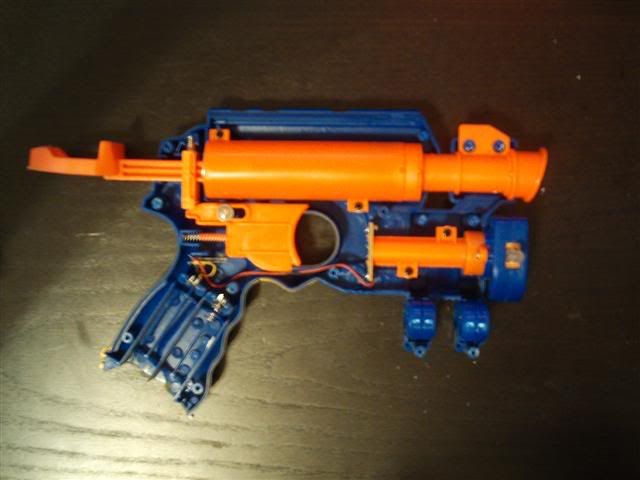
All put together:
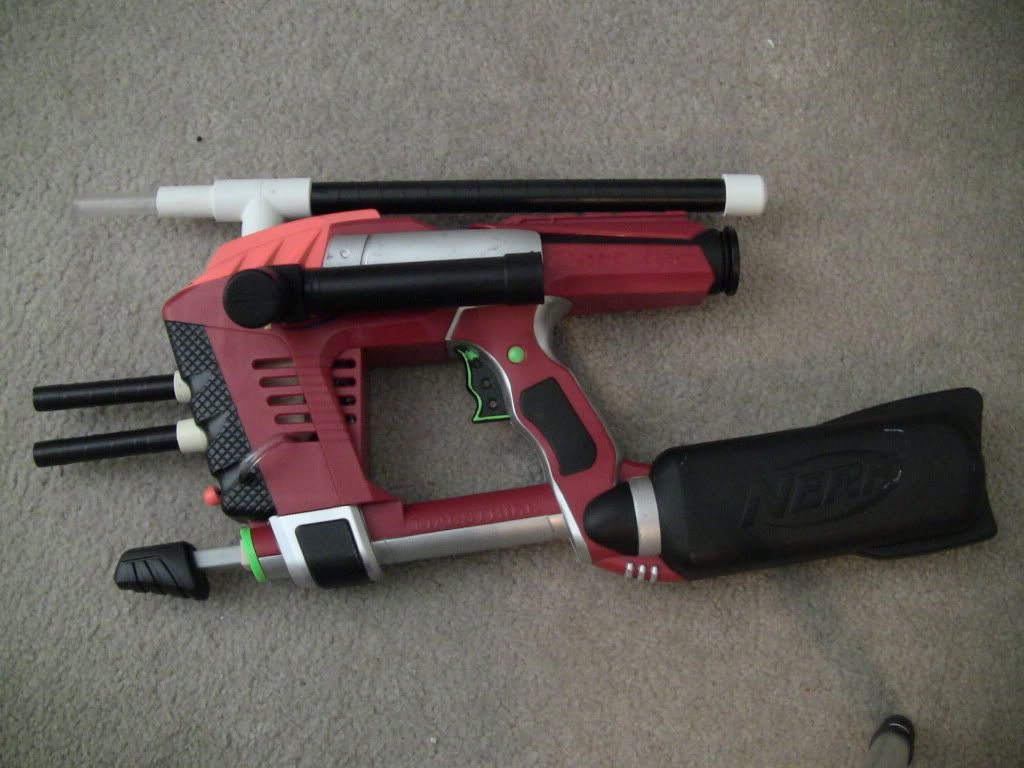
I’ve integrated 2 hornet tanks and their own AirTech 3000 pump on the side as well as a separate trigger on the front. I painted the pump handles, trigger, and the front green part of the gun because I thought it looked stupid, and there you have it! The Blast Strike!
The other side:
Now, the important questions. How does it handle? The answer is, VERY well. It fires as fast if not faster than any pump action Nerf gun. You can fill the tank in the time it takes you to tip the gun to load a new dart into the RSCB’s barrel. Meaning you can fire this as fast as you can work your RSCB. In my case, I can load 5 streamlines and I can fire them all in about 3 seconds flat. This isn’t including the time it takes you to pump the gun, but if you’re like me, then you are constantly pumping your blaster in a Nerf war.
Ranges? With the RSCB and streamline darts with a single BB stuffed in the tip, using a 4 inch thinwall PETG barrel, I’m currently getting about 95 feet with every shot. Some better stefans and a better barrel fit, and I should be breaking 100 feet with this baby no problem. New primary? I think so!
In case anyone is wondering about the Hornet tanks, they get about 70 feet with 4 inch CPVC barrels from 5 pumps out of a AT3K pump. It’s what I had on me at the time, a smaller diameter pump would be better, and I plan to swap the barrels out for PETG whenever the hell it finally gets to my house… They’re linked together and fire at the same time, and the trigger is on the front between the bottom barrel and the pump.
You can see it in action in this video here, check it out!!!
Question, comments??
This is a Quick Blast:
Inside the Quick Blast is a very simple air tank that functions like any air tank with a pin release. What makes this tank unique is that inside of it is a plunger with an O-ring and a spring. When you pump air into it, the pressure pushes the plunger out the back, and then when you pull the trigger, the plunger pushes all the air out the front. It’s quite interesting, it’s like a springer/tank hybrid. I’m sure you could achieve higher performance by adding a spring or replacing it, but I’m not doing that for now.
The reason I use this tank is because the plunger coming out of the back keeps the air pressure coming from the Magstrike bladder perfectly consistent. Testing with other tanks didn’t yield as nice results as this tank.
This is the basic design of the gun:
This gun functions very simple. You pump up the bladder 25-30 times, press the original Magstrike trigger valve which releases air into the tank, and then you can fire. I can get 5 streamlines into the RSCB and I can fire them all on about 25 pumps.
This is a closeup to show you what I have inside:
The air release valve is meant to extend through the shell so it can be pressed with my trigger finger as I tip the gun downward to load a new shot. I use this design so there is no wasted air between shots if I had just linked the bladder to the tank. That means more shots for my pumps.
The rate of fire is awesome for the range. The key here is the check valve. You can not use this design without the check valve, if you do, all your air from the tank will escape through the air release valve. Put the check valve after the air release valve before the tank.
All put together:
I’ve integrated 2 hornet tanks and their own AirTech 3000 pump on the side as well as a separate trigger on the front. I painted the pump handles, trigger, and the front green part of the gun because I thought it looked stupid, and there you have it! The Blast Strike!
The other side:
Now, the important questions. How does it handle? The answer is, VERY well. It fires as fast if not faster than any pump action Nerf gun. You can fill the tank in the time it takes you to tip the gun to load a new dart into the RSCB’s barrel. Meaning you can fire this as fast as you can work your RSCB. In my case, I can load 5 streamlines and I can fire them all in about 3 seconds flat. This isn’t including the time it takes you to pump the gun, but if you’re like me, then you are constantly pumping your blaster in a Nerf war.
Ranges? With the RSCB and streamline darts with a single BB stuffed in the tip, using a 4 inch thinwall PETG barrel, I’m currently getting about 95 feet with every shot. Some better stefans and a better barrel fit, and I should be breaking 100 feet with this baby no problem. New primary? I think so!
In case anyone is wondering about the Hornet tanks, they get about 70 feet with 4 inch CPVC barrels from 5 pumps out of a AT3K pump. It’s what I had on me at the time, a smaller diameter pump would be better, and I plan to swap the barrels out for PETG whenever the hell it finally gets to my house… They’re linked together and fire at the same time, and the trigger is on the front between the bottom barrel and the pump.
You can see it in action in this video here, check it out!!!
Question, comments??
#301642 Near-Semi-Auto Rifle
Posted by
on 16 July 2011 - 12:43 AM
in
Modifications
Correct. The air gets released from the valve. There are several ways I could put the tank fill button as a single stage operation, but I chose not to, because to use an RSCB, you have to tip the gun downwards to allow another dart to fall into the barrel. In the time it takes me to do so, I could push that button and fill the tank, seeing as it takes a fraction of a second to do so. That way it ensures me that I'm not losing air by trying to put both triggers in one. It would be simpler, yes, but not any less effective than it already is.He means that after he pushes the push button valve for the air to go from the bladder into the tank, without a check valve right before the tank, all the air just comes out the push valve thing when you release the button. The check valve stops the air from going in that direction. I know from experience, the check valve IS vital.
#301564 Near-Semi-Auto Rifle
Posted by
on 15 July 2011 - 12:41 AM
in
Modifications
No, I have a feeling it would work, but I've never even tried a hopper on any gun. By design, they don't look like they would work well with streamline darts, and I only have a handful of stefans.It seems like this would work good with a hopper, have you tried one out?
#301554 Near-Semi-Auto Rifle
Posted by
on 14 July 2011 - 07:53 PM
in
Modifications
YES!
So cool.
I've been working on something comparable using a SuperSoaker Hydro Cannon instead of the MS, and you've validated a few of the details I was worried about. Mine should be a little different, though - I hope to retain enough of the QB shell to keep the automatic trigger, and thereby have a chance at full-auto (using a hopper/chopper ... or just *maybe* if I can make it work (BIG 'if' there) an RSCB with a small hose to puff air into the back at the right time (inspired by Carrtoon's BBB)
Sounds Awesome Bob, can wait to see it!
#287060 Tiny Tim - Edit: Simpler More Effective Design On Page 2
Posted by
on 17 October 2010 - 01:48 AM
in
Modifications
Holy Hell, I thought this was going to be a troll, and then I saw a hornet tank! Nice dude! thats threw me for a loop!
#159505 Barret .50 Cal Idea
Posted by
on 17 June 2008 - 02:34 PM
in
Modifications
Can I have your guns then? Haha, seriously.Hi guys, since some of you may know, I am sadly leaving nerf, so I never got around to finishing this. I'd love to see someone continue from where I left off. Who knows, you might see me back some day.
#160492 Nifty Secret Shot Mod
Posted by
on 26 June 2008 - 11:55 AM
in
Modifications
How do we make it mandatory for new comers to actually read the CoC??? This sort of thing is happening quite often...
#180903 Favorite Pistol/secondary?
Posted by
on 01 October 2008 - 08:37 PM
in
Modifications
Okay, well this is my primary: Rapid Fire 20
Name: None
Mods: Banded Bladder, Crayola barrels, Locked on fully auto.
Range: 40-50ft
Description: This is probably my favorite gun. I love the way it looks with the silver, flat black, and red.
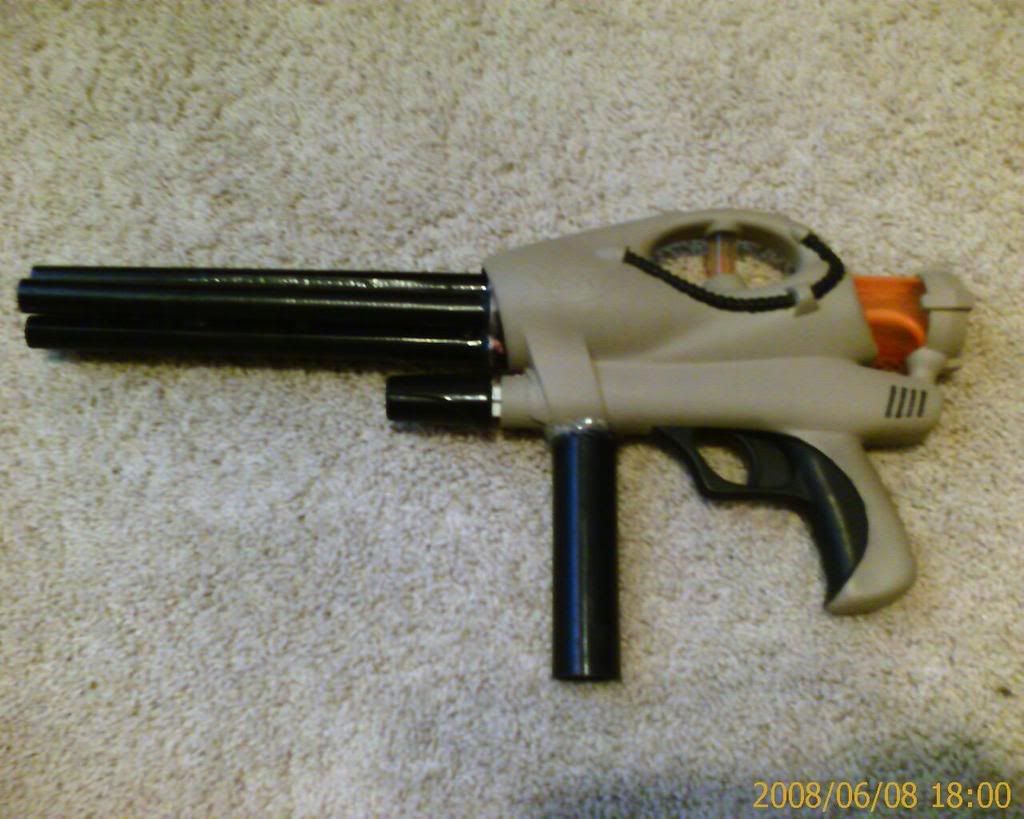
This is my secondary: Airtech 2000
Name: None
Mods: AR removal, Barrel mod, plugged pump
Range: 90-120ft
Description: I painted it a nice flat brown and added a fore grip to it. Its my 3rd farthest shooting gun, but I use it more because it has a much better rate of fire than a converted water gun. Its range greatly depends on what dart you use.
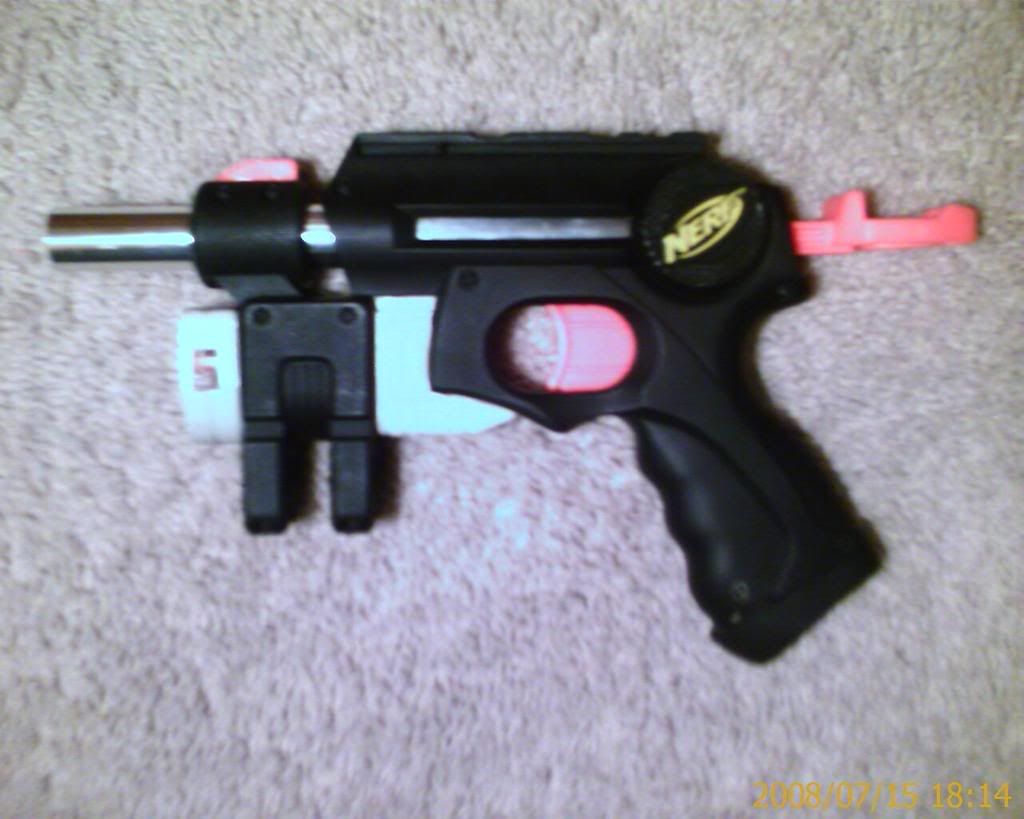
This is my sidearm: Nightfinder EX-3
Name: None
Mods: AR removal, Crayola barrel mod, #49 spring nested with a DS spring, silenced, laser pointer sight, reinforced catch, double o-ring, taped plunger
Range: 90-100+(with a good dart on a hot day)
Description: This gun is a BITCH to cock. I don't recommend putting such powerful springs in it without serious reinforcements to the gun. Its not as accurate as I'd like it to be but it stings when you get hit. And the chrome barrel tip is a shower curtain rod I took out during a renovation.
All my guns use converted dart tag darts and I never bullshit about my ranges. I don't have any proof of them, but I have absolutely no reason to lie about them. I don't need to impress a bunch of people on the internet that I'll never meet with a bullshit story about a plastic toy. So don't accuse me of lying. I live in Arizona, its good elevation and very hot... darts FLY...
And those are my guns!
Name: None
Mods: Banded Bladder, Crayola barrels, Locked on fully auto.
Range: 40-50ft
Description: This is probably my favorite gun. I love the way it looks with the silver, flat black, and red.
This is my secondary: Airtech 2000
Name: None
Mods: AR removal, Barrel mod, plugged pump
Range: 90-120ft
Description: I painted it a nice flat brown and added a fore grip to it. Its my 3rd farthest shooting gun, but I use it more because it has a much better rate of fire than a converted water gun. Its range greatly depends on what dart you use.
This is my sidearm: Nightfinder EX-3
Name: None
Mods: AR removal, Crayola barrel mod, #49 spring nested with a DS spring, silenced, laser pointer sight, reinforced catch, double o-ring, taped plunger
Range: 90-100+(with a good dart on a hot day)
Description: This gun is a BITCH to cock. I don't recommend putting such powerful springs in it without serious reinforcements to the gun. Its not as accurate as I'd like it to be but it stings when you get hit. And the chrome barrel tip is a shower curtain rod I took out during a renovation.
All my guns use converted dart tag darts and I never bullshit about my ranges. I don't have any proof of them, but I have absolutely no reason to lie about them. I don't need to impress a bunch of people on the internet that I'll never meet with a bullshit story about a plastic toy. So don't accuse me of lying. I live in Arizona, its good elevation and very hot... darts FLY...
And those are my guns!
#183121 Favorite Pistol/secondary?
Posted by
on 11 October 2008 - 09:02 PM
in
Modifications
Really.... So tell us exactly what you did to it to get that high of range?My favorite sidearm is the N-strike night finder. I like this gun because it's super simple to mod and mine maxes out at about 90ft but I don't have exact ranges. What I mean by it's super simple to mod is that all I did was replace the barrel and add rubber bands. I love this gun!!!
EDIT:I got a max range of 89 ft (with a perfect stremline) and a low of 45 ft (with a bad stefan).
#218768 Rf20 Mod - Caedo
Posted by
on 19 March 2009 - 12:43 PM
in
Modifications
Sorry to turn the thread to CaptainSlug, but I have a question about your "Big RF20 Blast". Where is the pump for the RF20? Is it linked together with the Big Blast pump? If so how did you manage to keep the Big blast tank from over pressuring as you filled the RF20 bladder? And lastly, how many pumps does it take to fill both?
#181085 Official "show Off Your Longshot" Thread
Posted by
on 02 October 2008 - 07:34 PM
in
Modifications
Oh give me a break... Come one guys! There is nothing wrong with this. The LS is probably the most popular Nerf gun and 90% of us have one with a paint job or mod of some sort. Yes I understand that the Xbow is "legendary" and deserves its own thread, but there are SO many different things you can do to a Longshot I feel it deserves its own thread just to show off these things. Yes we have the paint job thread, but how many guns in there are Longshots? Almost every other one is a longshot. Whats the big deal? How is it an insult to Haven? You guys are being so ridiculous about it. The thread is harmless, the least you could do is post nothing. Why are you flaming him!?
And nightfinder... You dumbass, you can't jump start a thread as big as you expect this to be with no freaking starting pictures. What you should've done is waited, or get a picture of someone else's (with permission) just so we have something. With what you posted, you're in the same league with the little shits who shove random fucking markers in their BBB and tell us about it. Think ahead next time.
I was gona start a topic like this myself, but I knew everyone would flip out because everyone and their mother has a Longshot.... Which is exactly why there should be a thread for them.
Nightfinder, I got your back. I don't feel that this thread in its current state is worth pinning, but we should have one for Longshots. I hereby second the act of the Official "Show Off Your Longshot" Thread.
-Banshee
#219725 Frostbite
Posted by
on 24 March 2009 - 11:06 PM
in
Modifications
Wait, so the smdtb trigger fires the hornet tanks and the keyring fires the AT3K, so whats the MS trigger fire? all of them? I don't understand the drawing completely.
#219735 Frostbite
Posted by
on 24 March 2009 - 11:44 PM
in
Modifications
Cooooooooool.... I always wanted to use a bladder like that in like an AT2K, but I couldn't part with one of my still working bladder guns.Wait, so the smdtb trigger fires the hornet tanks and the keyring fires the AT3K, so whats the MS trigger fire? all of them? I don't understand the drawing completely.
The MS trigger controls when air is released from the bladder into the tanks. I can get off multiple shots without pumping that way.
It's what I tried to do with The Dragon, except I didn't add a release valve so it didn't work as I had planned.
#183102 Tsunami Scattergun
Posted by
on 11 October 2008 - 07:11 PM
in
Modifications
You should cut the couple attached to the tank just a bit shorter to cut down on some dead space. If you can of course.
#191792 Tsunami Scattergun
Posted by
on 24 November 2008 - 09:45 PM
in
Modifications
Well, aside from his horrible grammar and the fact that this mod isn't THAT old, he actually added something, so I'm going to defend him and say that this wasn't a necro. However, he needs to clean up his posts and try not to pull anything like this very often.*Cough* NECRO! * Cough*
I would tell you to read this, but I decided to stick a link for you.
follow...MEEEEEEEEEEEEEEEEEEEEEE------->The code.
/noobish backseat moderation.
that felt somewhat satisfying.
God, I need to post a somewhat decent mod...
#196845 Pistol Tommy 20 Mod (no Writeup)
Posted by
on 17 December 2008 - 08:12 PM
in
Modifications
It wasn't necroed from its recent "bringing up", a little old yes, but it was only like 2 weeks old.
#179885 Tactical Nf Write-up
Posted by
on 27 September 2008 - 12:41 AM
in
Modifications
Nice job man. Welcome to haven. You actually look like you know what you're doing for a first poster! And by the way, whatever paint you used on your gun SUCKS. No one paints that bad, you need some new paint. Try that crap walmart sells for like 96 cents a can. It's never failed me. Keep up the good work.
#213088 Longshot Tactical
Posted by
on 17 February 2009 - 06:30 PM
in
Modifications
Are you all fucking serious? Like 4 people in a row just necroed this. If you haven't been around this site very long to notice old threads, get in the habit of READING DATES. This happens so often around here its really getting old. Stop blindly posting people. Don't post in threads that you haven't read every previous post in, and don't post in threads that are more than 2 months old. And even that's pushing it. Please people, be a little more responsible or we're all going to go crazy. Or at least I am.
#183382 Night Finder 3 In 1
Posted by
on 12 October 2008 - 09:11 PM
in
Modifications
Wow... absolutely gorgeous. Thats how a real man combines his guns! I was thinking you should attach one of those new Tek Six's underneath it Longshot style for a 6 round shotgun style backup. That sounds like my kind of gun... There are a few things that have been preventing me from making one of these myself:
1.How sturdy is the plunger once cocked? It looks like it could snap seeing as it sticks so far out the back of the gun.
2. What are the odds of the plunger rod coming disconnected at the attached points. I haven't heard of one breaking yet, but for only glue and nails, I'm a little afraid to do it. Would you recommend custom making on out of aluminum?
3. Compared to another springer, how hard is it to cock?
-Banshee
#261229 Lanard 12-shot Shotgun to Quadshot
Posted by
on 09 January 2010 - 12:50 AM
in
Modifications
I guess I'll be the one to ask for ranges. So... What kind of ranges are you getting?
#270132 Extreme Nite Finder Modification
Posted by
on 23 March 2010 - 09:22 PM
in
Modifications
Once it cures we need to bend our trigger pin in a circle. So grab two pairs of pliers and bend it like this:
Now, test fit it to make sure it all works before we attach the pump. So drop it in, and then take out the trigger. We need to drill a small hole in the far back corner according the size of your trigger wire.
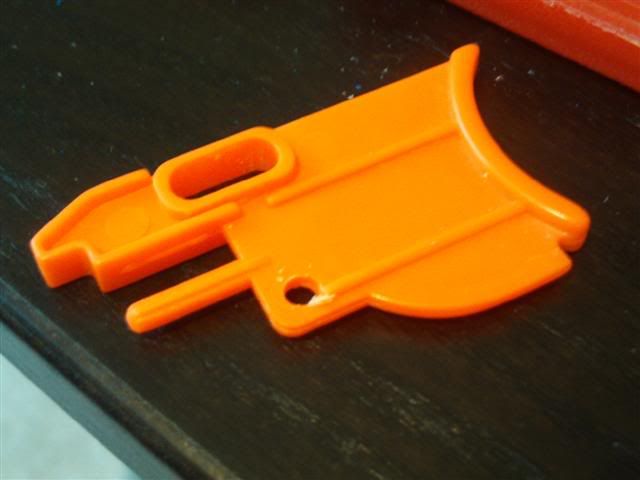
I suggest stiff wire, not flexible wire because it’s not a straight pull on the pin. I used some copper housing wire.
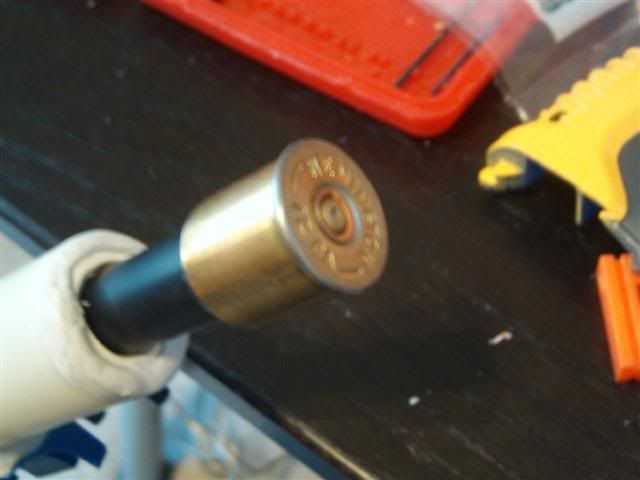
Now we’ll move onto the pump relocation. PointBlank put his where the plunger tube was, I want mine on the side of the gun. But before we place it, I’m going to do my signature shot-gun-shell pump handle! So take your shell:
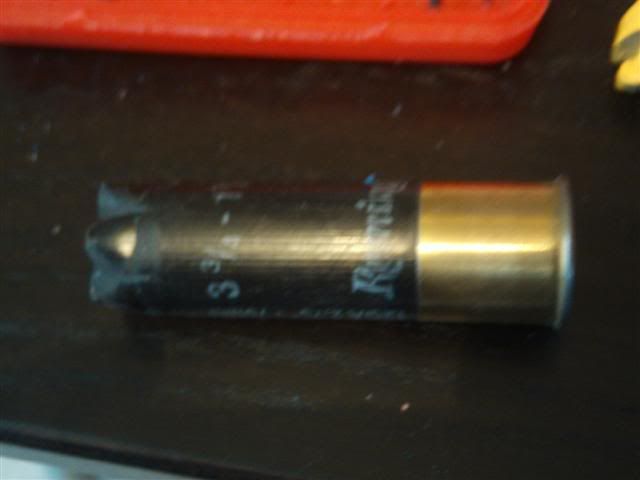
And cut the plastic off it!

Then cut the end off of our pump.
The way I install my pump is permanent, so you need to glue it in before you can put the handle on. So epoxy it in and put the shell on the end.
Now we can epoxy it on the side. I’m not very good with epoxy putty, but try and be as clean as possible.

Now because we’re going to do the Extended Plunger Tube mod originally done by KBarker, we need to lob off the barrel stabilizer thing on the front. I also grinded the whole in the front big enough for the plunger to fit out of the front.
 ]
]
Then if you care to do so, you can patch the hole like I did. I used thin sheets of Plexiglas and super glued them on.
Then I filed the edges clean and filled in some gaps with putty.
Now we’re going to work on the plunger rod. We need to combine sections of two to create one long one. I’m missing a few pictures, but I used copper wire and super glue and its rock solid. It should look like this:
Then I used an extra long bolt to run through the head, all the way through the first section and into the original plunger head of the plunger rod. It’s hard to explain without a picture. Before you put the head on, put the catch on and your spring, I don’t remember what the spring was, but I got it from Ace and it’s basically a long skinny version of the Ace #49. You’ll need to cut off about 3 inches of it.
Now measure out how long you want the plunger to be. On the end, epoxy your coupler in. I also ran 2 small screws into the sides for safe measures.
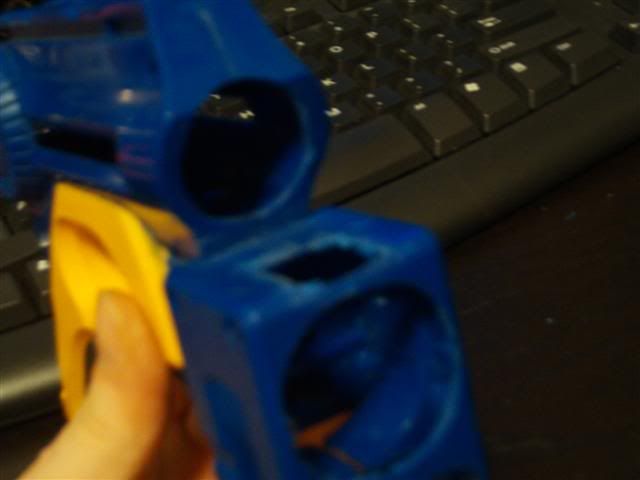
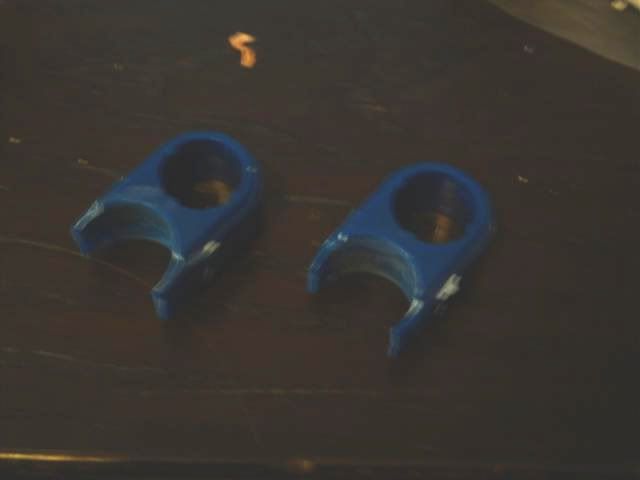
Now we can move on to the Pocket Blaster integration. This part is entirely optional, but it only takes up one ammo holder and it’s pretty easy to do. Take both ammo holder inserts out and grind them on one side to fit CPVC like this:
Now, test fit it to make sure it all works before we attach the pump. So drop it in, and then take out the trigger. We need to drill a small hole in the far back corner according the size of your trigger wire.
I suggest stiff wire, not flexible wire because it’s not a straight pull on the pin. I used some copper housing wire.
Now we’ll move onto the pump relocation. PointBlank put his where the plunger tube was, I want mine on the side of the gun. But before we place it, I’m going to do my signature shot-gun-shell pump handle! So take your shell:
And cut the plastic off it!
Then cut the end off of our pump.
The way I install my pump is permanent, so you need to glue it in before you can put the handle on. So epoxy it in and put the shell on the end.
Now we can epoxy it on the side. I’m not very good with epoxy putty, but try and be as clean as possible.
Now because we’re going to do the Extended Plunger Tube mod originally done by KBarker, we need to lob off the barrel stabilizer thing on the front. I also grinded the whole in the front big enough for the plunger to fit out of the front.
]Then if you care to do so, you can patch the hole like I did. I used thin sheets of Plexiglas and super glued them on.
Then I filed the edges clean and filled in some gaps with putty.
Now we’re going to work on the plunger rod. We need to combine sections of two to create one long one. I’m missing a few pictures, but I used copper wire and super glue and its rock solid. It should look like this:
Then I used an extra long bolt to run through the head, all the way through the first section and into the original plunger head of the plunger rod. It’s hard to explain without a picture. Before you put the head on, put the catch on and your spring, I don’t remember what the spring was, but I got it from Ace and it’s basically a long skinny version of the Ace #49. You’ll need to cut off about 3 inches of it.
Now measure out how long you want the plunger to be. On the end, epoxy your coupler in. I also ran 2 small screws into the sides for safe measures.
Now we can move on to the Pocket Blaster integration. This part is entirely optional, but it only takes up one ammo holder and it’s pretty easy to do. Take both ammo holder inserts out and grind them on one side to fit CPVC like this:
#270133 Extreme Nite Finder Modification
Posted by
on 23 March 2010 - 09:23 PM
in
Modifications
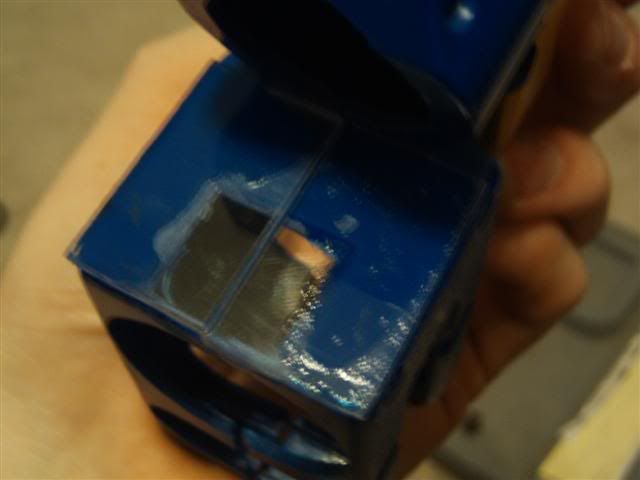
Now take your pocket blaster out of the shell, cut the barrel off and epoxy on a CPVC one. Then install your ammo holders, slide the Pocket Blaster into place and glue it. It should look like this:
Now we’ve done everything to the gun and its time to paint it. I had a craving to do an orange and black paint job for a while, so that’s what I did. I nick-named it the General Lee. And for those of you old enough to know anything about The Dukes of Hazzard will know why.
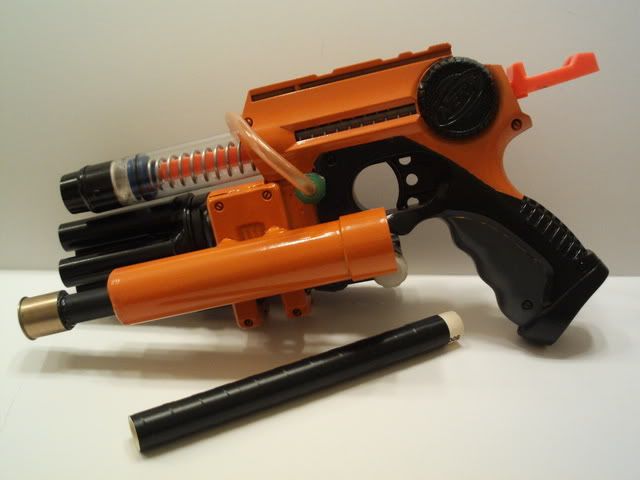
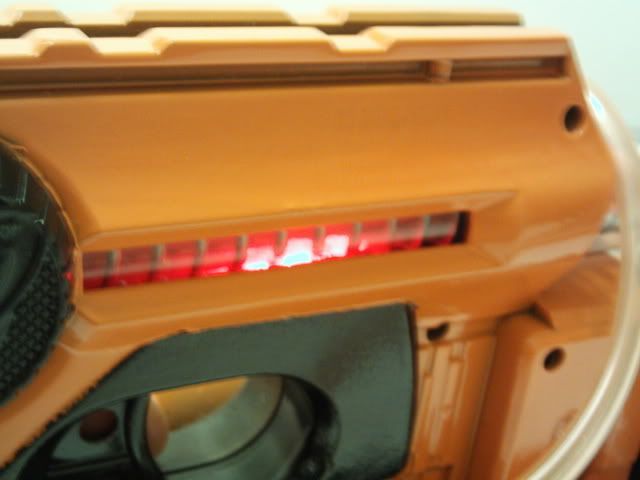
The light that was used for the sight is now angled upwards into the plunger tube. So when you pull the trigger, the plunger tube lights up red. Its just another signature modification I’ve done on previous guns I’ve sold.
Now I know you all want ranges, right?
The Nite Finder gets close to 100 feet but consistently lands in the upper 80’s and 90’s depending on the dart. I’m using a 10” CPVC Barrel. And it’s the most accurate gun I’ve ever used. I test fired it and shot my friend in the chest at 85 feet consistently.
The AirTech 3000 is getting about 70-80 feet
And the Pocket Blaster gets a whopping 40-50 feet!
Now we’ve done everything to the gun and its time to paint it. I had a craving to do an orange and black paint job for a while, so that’s what I did. I nick-named it the General Lee. And for those of you old enough to know anything about The Dukes of Hazzard will know why.
The light that was used for the sight is now angled upwards into the plunger tube. So when you pull the trigger, the plunger tube lights up red. Its just another signature modification I’ve done on previous guns I’ve sold.
Now I know you all want ranges, right?
The Nite Finder gets close to 100 feet but consistently lands in the upper 80’s and 90’s depending on the dart. I’m using a 10” CPVC Barrel. And it’s the most accurate gun I’ve ever used. I test fired it and shot my friend in the chest at 85 feet consistently.
The AirTech 3000 is getting about 70-80 feet
And the Pocket Blaster gets a whopping 40-50 feet!
#270131 Extreme Nite Finder Modification
Posted by
on 23 March 2010 - 09:21 PM
in
Modifications
Hello everyone. I’ve been working on this beast for some time now, and it’s finally finished! I have combined many modifications from many different Nerf contributors all into one gun. Essentially this is a Nite Finder with an extended plunger tube, an integrated AirTech 3000, an integrated Secret Strike Pocket Blaster, an AirTech 2000 turret, and accent lighting.
This modification is thorough and long, so if you want to skip to the good stuff, just scroll to the bottom. Otherwise, lets get started!
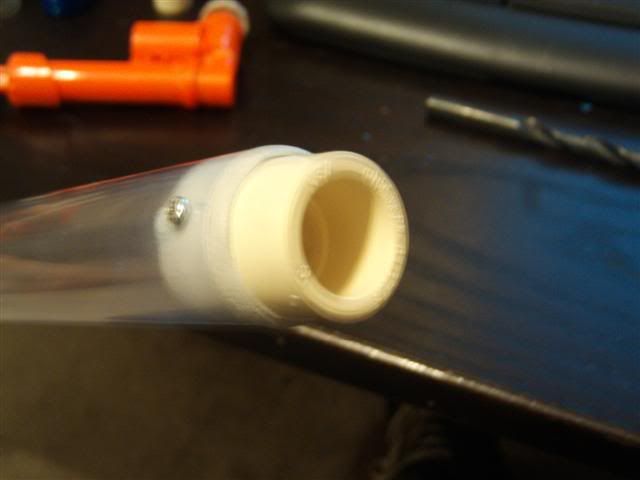
First we start with our basic materials. You’re going to also need an extra Nite Finder plunger rod or make your own from cratch. And you’re going to need some 1” PETG Tubing from Pet Smart. The following will be the installation of the AirTech 3000 to the likings of PointBlank and pump location to the liking of me and my previous Blood Finder mod.
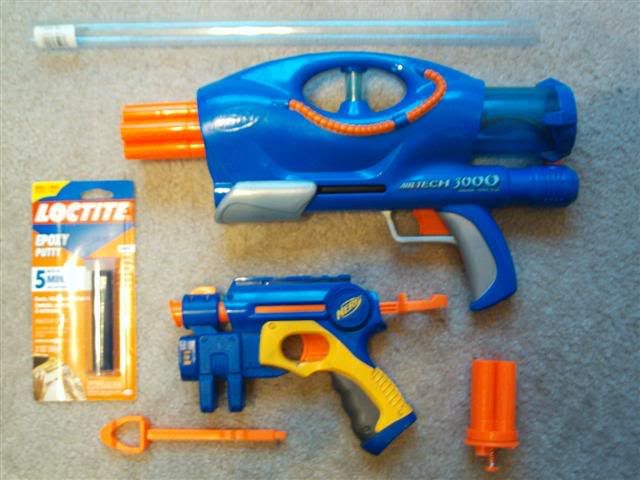
You’re going to need to rip out all the internals from the AT3K like so:
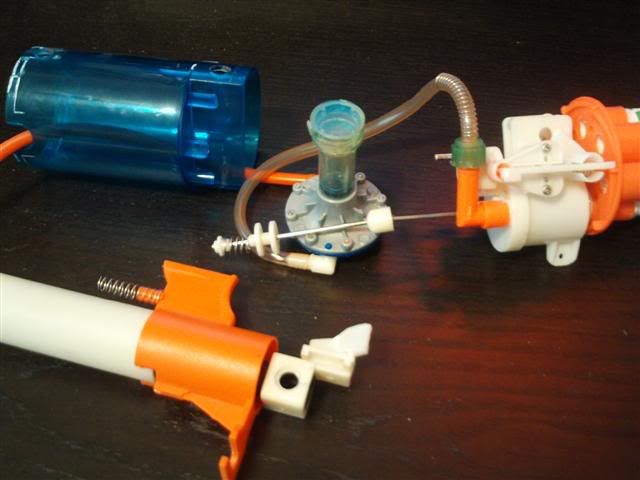
Then you need to clean all the plastic sticking out from the air tank off. It should look like this:
Then we’re going to bypass the pressure gauge and remove the second section of the tank pin so you have this:
Now you’re going to set that assembly aside for later. Before we can do anything else to it, we need to move on to the Nite Finder and prepare it for the tank installation.
So grab your Nite Finder and open it up.
Gut the gun, remove everything from the inside. Then take a large drill bit and drill down the screw pegs on the inside where the light was.
Do this to the other side as well.
Then drill a hole large enough for the tank valve out the side.
Now take a file or a Dremel tool and grind the front of the gun where the light was large enough for the tank to fit through because it will need to stick out the front a millimeter or so.
Now test fit your tank.
The Tube into the tank should stick out the side like this:
Now we’re going to take our AirTech 2000 turret and go Dremel crazy on it. We’re going to do the Reverse Turret mod like Blue did, I’m not sure if he came up with it or if it was Cheesypiza001, Blue said it was originally Black Fox. Take your Dremel and grind everything off the top, the barrels, AR’s, and the steel pin in the middle. Make sure you go slow on the steel pin and allow time for it to cool down. If not it could get hot enough to start melting the plastic on the turret and that’s never good.
Then grind everything off of the bottom of turret except for the spring of course. Then drill barrel holes all the way through.
Now we’re going to attach it onto our tank with epoxy putty. I put it on offset so it wouldn’t get in the way of the plunger or the ammo holders, where I plan to put the Pocket Blaster.
Before you do that, if you wanted to do rear loading, this would be the time. Now we can attach the barrels. Do whatever you’d like for this, but I chose to only do 3 inch CPVC barrels. I wanted a fast reload time and didn’t want to open up the turret to do rear loading, so I went with short barrels and it works fine.
This modification is thorough and long, so if you want to skip to the good stuff, just scroll to the bottom. Otherwise, lets get started!
First we start with our basic materials. You’re going to also need an extra Nite Finder plunger rod or make your own from cratch. And you’re going to need some 1” PETG Tubing from Pet Smart. The following will be the installation of the AirTech 3000 to the likings of PointBlank and pump location to the liking of me and my previous Blood Finder mod.
You’re going to need to rip out all the internals from the AT3K like so:
Then you need to clean all the plastic sticking out from the air tank off. It should look like this:
Then we’re going to bypass the pressure gauge and remove the second section of the tank pin so you have this:
Now you’re going to set that assembly aside for later. Before we can do anything else to it, we need to move on to the Nite Finder and prepare it for the tank installation.
So grab your Nite Finder and open it up.
Gut the gun, remove everything from the inside. Then take a large drill bit and drill down the screw pegs on the inside where the light was.
Do this to the other side as well.
Then drill a hole large enough for the tank valve out the side.
Now take a file or a Dremel tool and grind the front of the gun where the light was large enough for the tank to fit through because it will need to stick out the front a millimeter or so.
Now test fit your tank.
The Tube into the tank should stick out the side like this:
Now we’re going to take our AirTech 2000 turret and go Dremel crazy on it. We’re going to do the Reverse Turret mod like Blue did, I’m not sure if he came up with it or if it was Cheesypiza001, Blue said it was originally Black Fox. Take your Dremel and grind everything off the top, the barrels, AR’s, and the steel pin in the middle. Make sure you go slow on the steel pin and allow time for it to cool down. If not it could get hot enough to start melting the plastic on the turret and that’s never good.
Then grind everything off of the bottom of turret except for the spring of course. Then drill barrel holes all the way through.
Now we’re going to attach it onto our tank with epoxy putty. I put it on offset so it wouldn’t get in the way of the plunger or the ammo holders, where I plan to put the Pocket Blaster.
Before you do that, if you wanted to do rear loading, this would be the time. Now we can attach the barrels. Do whatever you’d like for this, but I chose to only do 3 inch CPVC barrels. I wanted a fast reload time and didn’t want to open up the turret to do rear loading, so I went with short barrels and it works fine.
#270136 Extreme Nite Finder Modification
Posted by
on 23 March 2010 - 09:37 PM
in
Modifications
So it was Blackfox? I'm going to change the credit then, thanks. But yeah, it works beautifully.Wow, that's amazing. I saw Black Foxes post in the Mod PJ thread, so I decided to try it myself and make a writeup. I'm glad to see it worked out so well for you.
#270150 Extreme Nite Finder Modification
Posted by
on 23 March 2010 - 10:52 PM
in
Modifications
Thanks everyone! Any questions?
Things I might add, is that this gun is not at all front heavy, it takes a real man to prime it, and firing three darts at once is always a plus!
Things I might add, is that this gun is not at all front heavy, it takes a real man to prime it, and firing three darts at once is always a plus!
#270161 Extreme Nite Finder Modification
Posted by
on 23 March 2010 - 11:43 PM
in
Modifications
I assume you mean to use them as actual shells for darts? I would say it'd be about as good as one of the BuzzBee shells. The only problem will be drilling through the primer because it rotates freely so its almost impossible to drill.I've never been much for pistol sized primaries, but I'll make an exception with this thing.
Do you think one of those shotgun shell ends could be fashioned to make a good seal on a turret?
#270166 Extreme Nite Finder Modification
Posted by
on 24 March 2010 - 12:18 AM
in
Modifications
This mod was incredibly difficult and I have no intention of doing it again unless I was given the materials to do so. The hardest part was finding the materials and killing a perfectly good AT3k. And if you had hopes of seeing it in person that would require you to come to me because I don't travel more than 20 miles for a war. So if you really want to see it, you'll have to buy it. Sorry. If you get your hands on the materials, I'll make you one for contract, but otherwise I had no plans on duplicating it.I was loving the mod. Until I saw its on sale. Any chance of duplicating this? I want to see it in person. Did you have to reinforce the catch?

