Possemhunter's Content
There have been 110 items by Possemhunter (Search limited from 11-February 97)
#256948 Official Steam/pc Gaming Thread
 Posted by
on 21 November 2009 - 05:18 PM
in
Off Topic
Posted by
on 21 November 2009 - 05:18 PM
in
Off Topic
#243655 Guess The Amount.
Posted by
on 24 July 2009 - 06:47 PM
in
Off Topic
#295665 Bs-12 Advanced Tactical Nerf Rifle
Posted by
on 09 March 2011 - 04:21 PM
in
Homemades
What I find interesting is that I have literally come up with plans for a nerf gun that functions completely identically.
I'd have posted pictures of my designs but everyone hates idea threads around here, (which is one reason why I haven't been around here much lately.) I've just never been able to build them for lack of a metal lathe. I have access to a metal lathe now in school, so just maybe I'll take a shot at building something.
#225248 The Cyclops
Posted by
on 23 April 2009 - 10:44 AM
in
Modifications

#280714 Stampede: Leaked
Posted by
on 19 July 2010 - 06:46 PM
in
General Nerf
I misspoke. Apologies.
#280703 Stampede: Leaked
Posted by
on 19 July 2010 - 04:09 PM
in
General Nerf
#239889 N-strike Clipped Pas
Posted by
on 02 July 2009 - 08:21 PM
in
Modifications
#237174 My New Ls Mod
Posted by
on 18 June 2009 - 02:53 PM
in
Modifications
#255897 Recon Cs-6 And Ertl Rapid Fire Shot Gun Mod
Posted by
on 10 November 2009 - 05:05 PM
in
Modifications
#294396 Too Much Friction
Posted by
on 11 February 2011 - 09:11 PM
in
Modifications
#236773 Bladder Indicator Light.
Posted by
on 16 June 2009 - 02:56 PM
in
Modifications
#242790 Nerf Raider Cs-35
Posted by
on 19 July 2009 - 07:39 PM
in
General Nerf
Edit- Someone beat me to it with the flip clip
#234976 The Ultimate Doubleshot
Posted by
on 08 June 2009 - 01:43 PM
in
Modifications
#234177 Full Crossbow Modification
Posted by
on 03 June 2009 - 06:20 PM
in
Modifications
#245575 Which Way Do I Go?
Posted by
on 05 August 2009 - 07:13 AM
in
General Nerf
#241136 Crossbows
Posted by
on 09 July 2009 - 05:51 PM
in
General Nerf
#235867 Dart Problem
Posted by
on 12 June 2009 - 04:11 PM
in
General Nerf
#235208 Bolt Action Bbbb Breeched To Accept Mags
Posted by
on 09 June 2009 - 02:31 PM
in
Modifications
#231512 Help! Painting Stefans
Posted by
on 20 May 2009 - 04:29 PM
in
Modifications
Just use Glow in the dark hot glue
That stuff is sick! I would love to have effective tracer darts!
#232524 Nerf Grenade, Pretty Sure This Is An Original Idea
Posted by
on 25 May 2009 - 07:27 PM
in
Homemades
#256396 Semi-automatic Valve
Posted by
on 15 November 2009 - 09:14 PM
in
Modifications
#319047 A handy dandy pistol
Posted by
on 23 July 2012 - 07:04 PM
in
Homemades
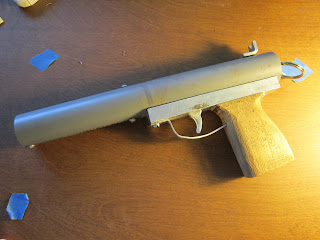
Haven't been around for a while. Nerfing had been largely forgotten by me for a while. I got into machining, metal casting and other fun "big people" things.
But then I was given a Make magazine and saw their homemade launcher and decided to see if I could combine nerf and my new tools.
The result was a nice single shot pistol.
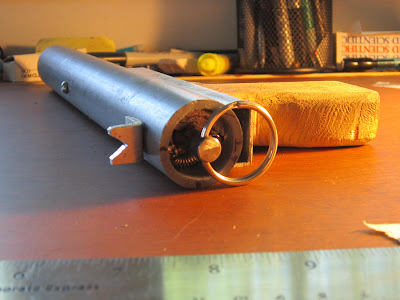
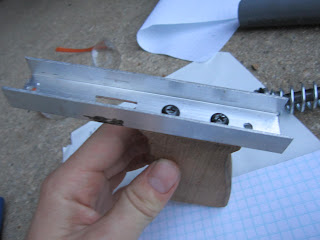
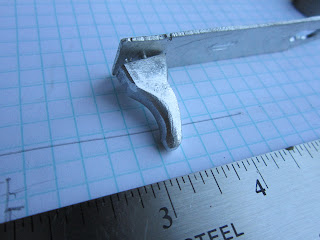
In the next one, you can sort of see the catch. I don't know if this type of catch has caught on yet or not, but a while ago, everyone still used clothespin catches. This catch is simple and dead reliable. A metal plate is just pulled inwards towards the plunger rod by the small spring. Pulling the trigger drives a wedge between the frame and the boot of the catch, pushing it out of the notch in the plunger rod.
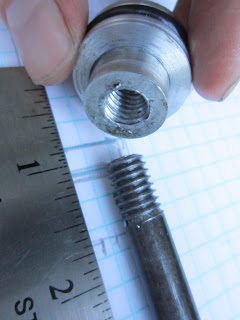
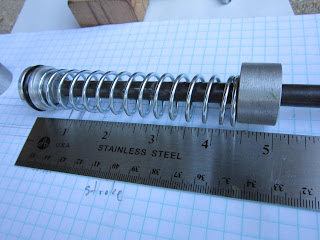
Here is the plunger head and rod. Both were machined by me of course, along with everything else. The plunger is 3/8 steel. The rod is rather heavy, but I used a nice spring and the ranges are great anyway. I have made aluminum rods before, but the catch notch rounds over and becomes unreliable.
Here is the plunger assembly. The spring rest on the rear later had a shoulder machined into it to center the spring. The mounts for the catch and catch spring are drilled and tapped into the rear of that piece.
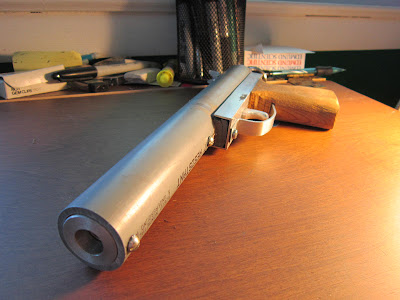
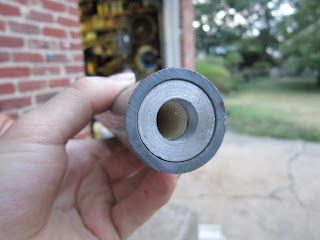
This is the barrel assembly. The forward center is recessed for the cpvc, so on one side I drilled it 17/64 for a dart, and on the other, 5/8 for the cpvc.
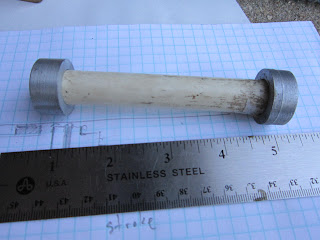
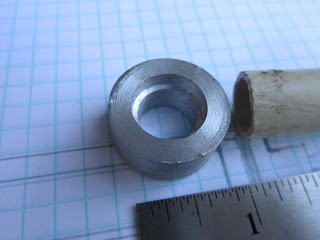
This is the rear center. It has one diameter turned that fits tightly into the 1" outer sheath, providing an airtight seal for the plunger tube to the rear. It was drilled through for the 5/8 cpvc, so that it could be coated with sealer and stay secure.

The barrel and the plunger all fit into 1" pvc, which for the purposes of explanation, I will call the upper receiver. This 1" PVC acts as the plunger tube and barrel sheath. It also provides the mounting points for the pieces.
The lower receiver...
Not much to look at. The grip is screwed on. I replaced those pictures screws with flatheads for the trigger plate to pass over.
Trigger and trigger plate. In this picture, the original mounting rivet was falling out. I re-drilled and tapped the hole for a small machine screw.
The business end. From dead on, you don't see the cpvc.
Other notes
All the centering pieces were drilled and tapped to mount to the 1" PVC. You can see all the screws along the top and bottom of the upper receiver.
The "sight" at the rear is held on by one of the same bolts that goes into the spring rest.
If you look at this picture again, you see the lug about midway, just where the lower receiver starts. This is 2 pieces of PVC solvent welded on. It gives a good spot for the lower receiver to attach.
If anyone wants more detail, please ask. I didn't make this a real writeup as you need a lathe to make most of the parts. From all the draconian measures that I see going on around here, I assume many of the users are about 12, and don't have lathes. But once again, if you would like more info, just ask.
Ranges haven't been officially measured. Shooting level, it breaks 50 feet easy with a good snug dart.
I will hopefully have some videos of the range test and construction up within a few days. Bandwidth permitting.
Questions, comments, concerns?
#319052 A handy dandy pistol
Posted by
on 23 July 2012 - 07:25 PM
in
Homemades
Oh, another note, all of my stefans have been eaten by the lawnmower...
My plan for the plunger is to thread it and and turn a nice, easy-to-grip knob. Maybe I will knurl it. The possibilities are endless.
The catch:
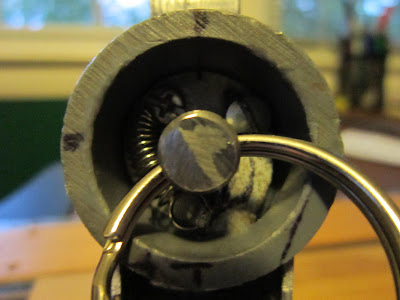
Why its sideways, I know not.
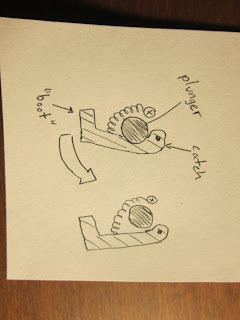

Instead of the vertical motion of a conventional catch, this one pivots out of the way to the side.
Hope that helps.
#319109 A handy dandy pistol
Posted by
on 24 July 2012 - 04:02 PM
in
Homemades
If anyone has anything else constructive, please comment.
#319084 A handy dandy pistol
Posted by
on 24 July 2012 - 10:55 AM
in
Homemades
I just want people to stop using the wrong materials. This community of homemade builders has matured a lot in the last couple of years. Collaboration has become the norm, and we are coming up with some awesome stuff because of it. But use of metals makes homemade shift toward paintball and airsoft, rather than nerf. They have their place, specifically in pressurized applications, but otherwise are overkill.
Why care what its made of? It still shoots foam and is never going to wear out or break on me. Plastics get brittle. Metal will not in this situation.
There is lots of pressure on these parts anyway. Maybe not air pressure, but a spring.
For me, this was a chance to test out new tools and materials. I think everyone should try to get the most out of their capabilities and tools. The material was also free. The aluminum came from scrap lawn mower engines that were poured into castings. The waste sprues became my stock for turning.
#319078 A handy dandy pistol
Posted by
on 24 July 2012 - 09:19 AM
in
Homemades
Taggers that fit a bit loose were going about 53 feet.
My very poorly made stefans from years ago were going 55 feet.
The best darts I have right now (just getting back into nerf) are cut down streamlines. They are 2.5 inches long and fit very snugly. I ramrodded those down the barrel. Shots were consistently hitting and passing 83 feet. These streamlines do not have the obnoxiously large hole in them for some reason ( just a pinprick that was loaded facing upwards), so they were quite accurate. There was no erratic flight path. I think I could easily hit someone that far away.
I'm very happy with 83 feet from this pistol. A better plunger rod would no doubt get me into the 90's.
To give some more specs I will say that the draw is 2.25 inches. The spring is a replacement from Joseph Fazzio's, the most amazing hardware store/ steel depot/ industrial supplier ever. I might have the package somewhere for a part number.
#319063 A handy dandy pistol
Posted by
on 23 July 2012 - 10:29 PM
in
Homemades
You could easily replace most of that steel plunger rod with aluminum, particularly if you turned it so two aluminum pieces threaded into a steel catch piece.
I also strongly suggest you try 4568T14 as a barrel material. The tolerances are much tighter, it's hard anodized (pretty), and 6063 is actually really nice to turn, if you have carbide tooling to break the anodized layer. The hole is also held concentric to the OD, unlike CPVC or the other common aluminum barrel material from McMaster. I use 6" of each on my aluminum barrels, press-fit together, and it works like a charm.
You could also invest a little in some Mother's aluminum polish and spin your parts up to 1500-2000 RPM on a lathe, then hold a piece of a paper towel with polish on it against the part, as you would with emery cloth. It gives an almost mirror finish. Automotive wax will protect that finish and prevent oxidation.
That is and idea, to thread a steel piece in. I will try to suck every bit of efficiency else where first, but I'll remember this. Heavy plunger rods never help.
I am only using HSS bits. I have heard that if you get under the layer in one pass, any bit will work. Is this true?
The catch does work extremely well. It takes up very little space and isn't prone to breaking at all. Since the catch lays flat against the spring rest, that takes all the force from both sides, which makes for a VERY sturdy build. Spring pushes against one side and catch against the other.
#257716 Mav Help
Posted by
on 01 December 2009 - 05:30 PM
in
Modifications
#235210 Tech Target Brass Breach
Posted by
on 09 June 2009 - 02:37 PM
in
Modifications
Thanks I get it now. I wonder if you could do this to any other guns. The night finder doesn't have enough shell around the barrel to do this do. At least a think.XRUSHEDX: It probably does, but its extremely close to airtight, so if it does at all, it will be a small amount. I will probably post ranges when I get rubberbands for it.
Possemhunter: The opening on the plunger tube is about the size of a screwdriver head, so the dart cannot fit through. It really doesn't matter what order you cock/load its really up to the person using the gun. Personally, I normally cock right before I fire, like as i'm pulling the gun out of a holster, so the spring doesn't get to compressed.
MOD_FREAK: Thanks, thats why I love nested brass and PEX tubing. I might drill holes in the PEX to make it look like a flash-hider.
ilzot: Mine used to vacuum load, but somehow I screwed it up. This is a good mod if you cant get it to vacuum load.
#235045 Tech Target Brass Breach
Posted by
on 08 June 2009 - 07:01 PM
in
Modifications
#257734 Mav Help
Posted by
on 01 December 2009 - 07:33 PM
in
Modifications
You might want to work on the seal in the plunger. And I'm not sure if the gun will cock with 4 pennies. There might not be enough room for the spring to compress.
The seal IN the plunger? Not quite sure what you mean by that... Actually, the gun does cock just fine.
Where the outer plunger seals with the inner plunger.
#247854 Great Dart Giveaway
Posted by
on 20 August 2009 - 05:36 PM
in
General Nerf
#278882 Vacuum Forming And Nerf
Posted by
on 28 June 2010 - 02:42 PM
in
Homemades
#235667 Ultra Dumb Ls. Halp!
Posted by
on 11 June 2009 - 04:03 PM
in
Modifications
#235961 Brass Breech Problem
Posted by
on 13 June 2009 - 11:07 AM
in
Modifications
#290954 How To Expand A 2k Tank
Posted by
on 15 December 2010 - 06:39 PM
in
Modifications
#239282 Titan Cluster Missile
Posted by
on 29 June 2009 - 05:57 PM
in
Modifications
#239370 Titan Cluster Missile
Posted by
on 30 June 2009 - 06:19 AM
in
Modifications
#239390 Titan Cluster Missile
Posted by
on 30 June 2009 - 10:19 AM
in
Modifications
does it really matter how ugly it is( which compared to some things here it isn't). It is functional and for me that is all that matters. Would giving it a fancy paintjob make it work any better?
#233446 Maverick 2000 Help
Posted by
on 30 May 2009 - 03:46 PM
in
Modifications
The problem with using a ball valve of nothing at all is that each successive shot with have less power.
If you use a large external air tank the power will go down very slowly, as much more air is required to change the PSI in the tank. I could see you getting easily 30 shots out of a decently sized air tank with only a max deviation in range of 5 to 10 feet or so.
Something the size as one of Slug's backpack air tanks (not referring to his HPA tanks here) could probably get you a bit short of one hundred or so.
Edit: Don't shoot squirrels.
Do you think a titan tank would be suitable for this? I have one to use.

