Jump to content


NerfRogue83

Member Since 07 Feb 2009
Offline Last Active Dec 06 2011 09:09 PM

Topics I've Started

Another Recon Mod

08 June 2011 - 11:59 PM

My interest in IP Blasters has been renewed lately. More from less, thats the goal here. I want to say a BIG thanks to OrangeModWorks for making the awesome new kits they offer---seeing them also contributed to my rekindled interest in the Recon. Thanks Guys!

Posted Image

Ok, so I got some goodies today-----my Stage1 kit, and a clear Recon :mrgreen:

Posted Image

I am making this write-up to show you how to take your Recon a step further---so I will assume you have taken your A/R out, and improved your plunger seal. Its not a bad idea to pad+reinforce the back of the PT also. I would have installed a L/R, but it's only like 18 days until I get my stage2 kit from OrangeModWorks. Anywho, open up your Recon----remove all your internals:

Posted Image

Throw away the dart tooth----from here on we are firing stefans! Grab a segment of PETG, and wrap with E-tape as shown:
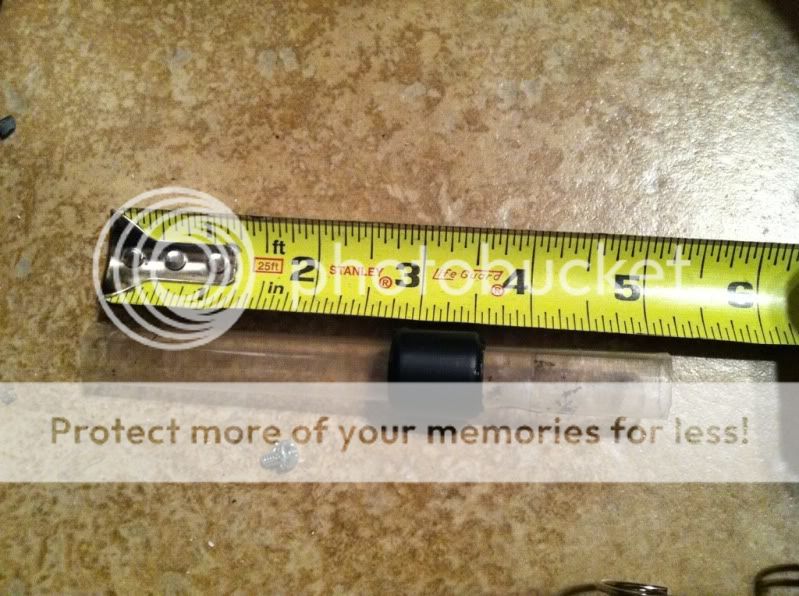
Posted Image

Install your wrapped PETG into the Recons barrel guide/stub as shown.......

Posted Image
Posted Image

Secure with Hotglue at the front AND back. You want the PETG to stay put!

Take a 1" stub of 17/32 brass--- with some strategic sanding to the ID of the Recons bolt it will slid in. The key is to sand the ID so the brass stub is nice and snug. Also a key----sand the top and sides so your PETG can slide freely without binding. Your stub should look like this:

Posted Image

When positioned, secure the stub with superglue. Your finished breech....

Posted Image

This is an adapted version of the breech in my "IronHide" LS......its cheap, easy, and now your Recon fires stefans! Back to the mod......

Install the OrangeModWorks parts.....catch+spring, Plunger spring, and back plate. Be sure your back plate is seated correctly, like so......

Posted Image

For posterity----OMW spring next to a RFSG spring....

Posted Image

Finished guts!

Posted Image

Breech......closed---

Posted Image

Breech......Open----

Posted Image

Super sweet Overview and firing vid!

http://www.youtube.com/watch?v=TLG9Fhldcyg

O.M.S....OverLoad MagStrike

07 May 2011 - 10:40 AM

First: oodalumps made a brief write-up for his assault MS on NH some time ago, so this is a twist on HIS mod
http://nerfhaven.com...=1

Credit given. On to business.......

I didnt take as many pics as usual, poor planning on my part. :shock: First thing I wanted to do was utilize two air bladders, since the piston-expansion uses a shit-ton of air. I had an extra bladder+casing sitting around, so I attached it above the existing bladder---using screws to hold it in place:

Posted Image

Both bladders were heavily banded, and obstructions inside the bladder casings were removed. Additionally, be sure to cut the protruding tips of the screws holding the casings together off, so the bladders are not damaged when they expand.....

Posted Image

I used a tee connector so that the pump fills both bladders. I also replaced the pump with a Titan pump--to fill the dual bladders with less pumps.You will need to cut the shell slightly, near the handle to accomadate the larger pump end. (sorry, missing pic.)

Posted Image
Posted Image
Posted Image

Construct the piston-expansion chamber. Two 1/2" pvc endcaps, about 1 3/4" length of 1/2" pvc, and one brass fitting will be needed......

Posted Image
Posted Image

Solvent-weld the pvc conponents together, glue the fitting in place. Be sure to drill the hole for the brass fitting with a bit that insures a nice tight fit. The hole in the piston will be at the top, right behind the clip-advancing arm.(sorry, no pic) Also, add a few bands to the piston, so aide its return.

Shell:

You now have a few shell mods to perform. As you now have a expansion tank on top of your piston--you will need to make room for it as regards your shell. The expansion tank will obviously move with the piston, so be sure to make the cut in your shell match the pistons travel distance.....

Posted Image
Posted Image

Next up, the front of the shell. We need longer barrels to utilize the new found air flow---so cut the front of your shell to make room....

Posted Image

Clips:

I chose 17/32 brass (expensive, for this mod--50" needed!) 17/32 slides into the clips with a single wrap of E-tape used to make things nice and snug.

Posted Image

I made my barrels 5" long. Cut your barrels, add E-tape, and superglue into your clip

Posted Image

Add a few strips of E-tape to the side of the clip, this keeps the clip from sliding back down. You dont want the clip to be too tight in the well---it may damage the clip-advancer. Test fit.

Posted Image

Finished, expensive ass clip.....

Posted Image
Posted Image

You can stop here if you like........

Posted Image
Posted Image

Though I decided to continue........

The above mods will greatly increase your range---but WILL slow your ROF and shots per pump, due to the massive air consumption. I decided to add a plan B.......I snagged the R.I.P I made a while back(http://www.nerfrevol....php?f=8&t=1269), and set about mounting it to the MS.

As was the case with Ratchet(my overhauled Deploy), I wanted the R.I.P to be easily removable. Removing two screws is all thats needed. To make this happen on the MS, simply secure two fasteners to the inside of the clip well. The fasteners have to be placed as shown so the dont interfere with the movement of the clip.....

Posted Image
Posted Image

Add R.I.P.....

Posted Image

Now, while re-pumping or swapping clips you have a 90' shooting defence.
Posted Image

If you place the fasteners as shown, your R.I.P will be located in a way that makes firing with the hand that holds the MS possible...WIN!

Posted Image
Posted Image
Posted Image

I will post a firing vid as soon as I get the part I needed from Kid Flash.

Warthog Time

31 March 2011 - 11:15 PM

I remember being about 12 years old and spending my allowence on a crazy ass looking Nerf blaster at K-mart.....a WartHog! Two shots at once?--yes please! Sadly, it made its way out of my hands eventually. Well, now I have another at long last! WartHogs have been modded before of course, and some of this write-up is nothing new.....a few things might be. Regardless...............

Lets begin!

Our stock blaster:

Posted Image

open her up---pretty easy, just be ready in case parts move when the shell comes apart.

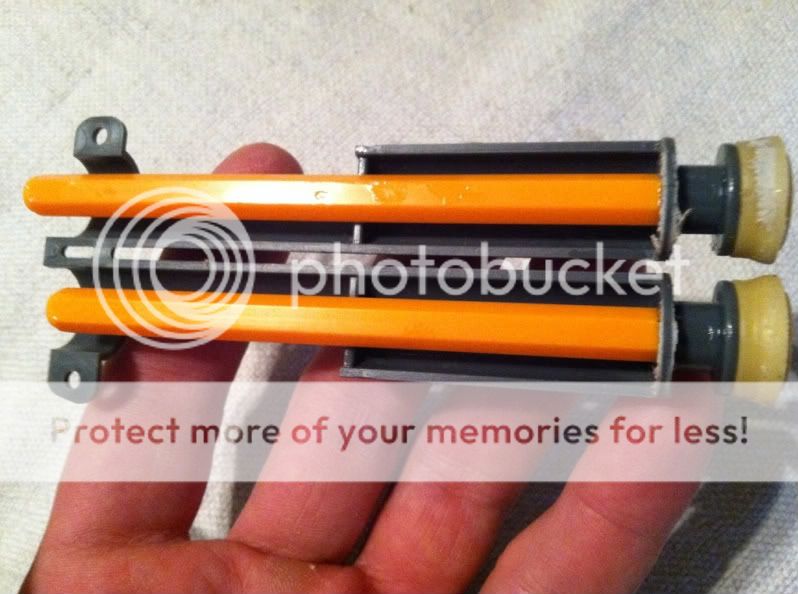
Stock Internals:

Posted Image
Posted Image

Posted Image
Remove the internals--after taking carefull note of the position of the catch. The catch is the big white piece. Set your parts aside, as we are about to get to cutt'n em up!

Posted Image

Take your Sled---we need to cut those A/R pegs out of it.

Posted Image

Cut the A/R pegs right at the base of the PlungerHeads. After cutting them out, clean up any plastic that may be hanging on or sticking out. Make the base of those plungerheads flat.

Posted Image

Now, take a look at the air holes in the middle of the plungerheads.......tiny!....Lame!

Posted Image

Open those bitches up! I used a 7/32 drill bit for this. Now we are gonna move some air......through proper barrels. Go back to your sled. See that tab on the sled that the A/R pegs used to rest on? Lose it! We want our barrels to ride nice and tight to the sled.

Posted Image
Posted Image

DONT POST YET!

Eel Attack

28 March 2011 - 10:44 PM

I have not posted here in a long time ( to many peoples delight), but I felt like sharing. This is nothing outstanding, just a simple, effective mod to a VERY fun blaster. There is an EE mod in the NH mod directory, but I didnt think it was all that descriptive.

So here we go. I have to say I am extremely pleased with this thing! Its no secret that I love clip-loading blasters.....AND vintage blasters----this thing is BOTH! WIN! Before I go any further, big thanks to BrokenSVT for hooking me up with this thing.

Now, to work!

Our stock blaster.....

Posted Image

Open her up.....THE SCREWS IN THIS SHELL SUCK!!
Posted Image

They are a funky triangle shape, instead of phillips or flathead. Remove any way you can---then throw them away!

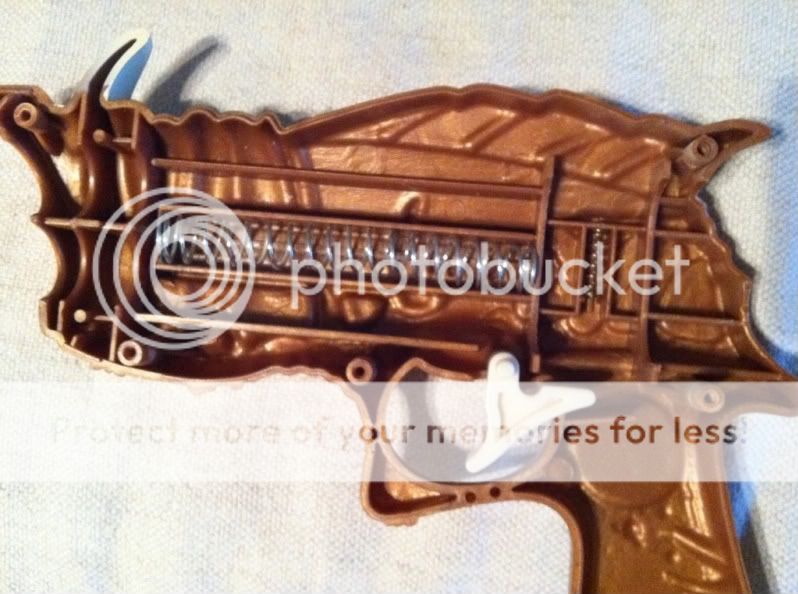
Our stock internals:Posted Image
Posted Image

Posted Image

Plunger assembly and plungerTube:

Posted Image

seperate the parts of the assembly, taking note of their placement before removing.

Posted Image

Let's add so power. I had an old EAB spring sitting around ( :D )--which happened to be the same diameter as the EE's stock spring, and slightly stronger. Unfortunately, the EAB spring is about two coils longer--so I simply cut the EAB spring to the same length as the EE's stock spring.

Posted Image

Now, for our plunger seal. Wrap the stock rubber plungerHead with some E-tape, and test fit in your PT. If the seal is good fine. If not, adjust with either more, or less tape.

Posted Image

Lets continue with the Plunger rod. See that pointy tip? Cut it off! Your plunger rod will have more travel now!

Posted Image

Add some craft foam to the top of your now shortened plunger rod, to protect your internals.

Posted Image
Posted Image


DO NOT POST YET

Rfc#2....

03 November 2010 - 06:37 AM

So, lately the FL Nerf war scene has been......stale. Lets get going gentlemen! Time for RFC#2, and it will surely be an event to remember! I certainly hope to see all the old FL guys, but visiters from the rest of the SouthEast would be outstanding......lets support each others Southern wars fella's!


The important stuff:

The Loction: http://www.ocoee.org...FreedomPark.htm
The Date: December 11th 2010
The Time: 10:00 am

Ok--Florida is doing it again, the field is prime--open fields, portables, and a small wooded section.
-http://www.youtube.com/watch?v=fvh208rJ9DY


We will play various game types(depending on number of members present), and there will even be a drawing for a NIB primary. If you live in FL, anywhere in the southeast, or are just a Northern nerfer who wants to play in 65 degree weather in January-- you need to make this one! Now, on to the important stuff.......


Rules

..............

Eye protection is a must, unless you are over eighteen years of age.

NO HOMEMADE AIR GUNS! NO EXCEPTIONS!

Don't be a douchebag. If the strength of the weapon is considered to be excessive we reserve the right to "spot ban" it.

No singled ,plugged Titans. Titans are allowed if they have more than 3 barrels(shotgunned)

No tack darts (A.K.A-deathdarts)

No Slingshot weighted stefans

No guns that shoot over 200 feet.

No darts heavier than a nerf ball. Stefans must have a rubber, glue, cloth, or foam cover.

All darts and guns will be inspected thoroughly, no jutting out spikes on guns---use your head guys, and remember that these are toys--lets keep it that way!

The only shields that will be permitted are Manta Rays and Crossfire Shields

Barrel Tapping is allowed however, your gun MUST be locked and loaded to tap--A tap from 5 feet away is nicer than being shot, wink...wink.

Do NOT bring anything painted all black. We REALLY don't want the cops called for someones stupidity!


Things To Bring

..............................

A primary

A secondary

A friend

Ammo

Water or Gatoraide

A packed lunch (we'll have a short ass lunch break)

Your "A" game!!

Your best list of excuses why you got tore up!


I and other people will bring stuff to sell--a sort of "Nerf swap meet", so bring money. Though, it is not required.

Please, if you can--join us in The SunShine state for some great spring nerfing. PM me if you have questions about the location, surrounding area, or any other travel related issue's. Nerf On!---Rogue.