Maybe he doesn't know what necroing is or what it means.I have already sent him a PM telling him to stop necroing topics. He didn't listen and necroed three more. I think he wants to be banned.

147 replies to this topic
#126

g-force
-

- Members
- 345 posts
Member
Posted 28 June 2008 - 11:58 PM
QUOTE(Carbon @ Jul 28 2008, 03:25 AM) 
My god, you actually built it. To that, all I can say is, "bravo".
Chubbs


#127
NerfCrazy
-

- Members
- 497 posts
Member
Posted 29 June 2008 - 01:18 AM
Let's just hope that is what it is and that he doesn't want to be banned.Maybe he doesn't know what necroing is or what it means.I have already sent him a PM telling him to stop necroing topics. He didn't listen and necroed three more. I think he wants to be banned.
#128
CrazyIvan VI
-

- Members
- 295 posts
Member
Posted 29 June 2008 - 08:50 AM
If he doesn't know what necroing is, he should've atleast read the CoC, and should know that posting in YEAR OLD TOPICS (not this one, the other 3 or so) is extremely erotic.
I get all giddy when I see VACC browsing a stupid topic. I just know someone is going to get banned.
#129
deaddumpster
-

- Members
- 326 posts
Member
Posted 29 June 2008 - 09:07 AM
Just let it be, he probably hasn't read it yet. Though since all of his necros are in LS threads, I think it's a good sign that he found the Directory/Longshot thread faster than most other noobs.
QUOTE(VACC @ Jan 15 2009, 01:55 PM)
I've said it before, and I'll say it again. A good nerf gun is like a good woman. It shouldn't require extra lubrication.
#130
Banshee
-

- Members
- 668 posts
Member
Posted 29 June 2008 - 10:54 PM
Honestly, it sounds like we've given him his fair warnings. He probably just doesn't care or he's too stupid to find his inbox. Either way I think banning his ass sounds good, tell him why and then boot him, You all know he'll just come back. At least by that time he might have some sense. I'm so fucking tired of these old threads popping up. How many times has it happened in the past week? Like 10! We need to do something about it!
Like my page on Facebook! PM me, I do commissions!
#131
Banshee
-
- Members
- 668 posts
Member
Posted 30 June 2008 - 12:27 AM
Sorry about the double post, My computer posted twice.
Edited by Banshee, 30 June 2008 - 12:28 AM.
Like my page on Facebook! PM me, I do commissions!
#132
Kid Flash
-

- Members
- 1,985 posts
Member
Posted 30 June 2008 - 01:07 PM
Not that this has to do with the old topic but banshee how did your computer post twice within that huge time period?
11:54 to 1:27 so almost an hour and a half...
11:54 to 1:27 so almost an hour and a half...
#133
Banshee
-
- Members
- 668 posts
Member
Posted 30 June 2008 - 10:01 PM
I had posted the message and it wasn't loading right so I left it alone. I then watched a movie and came back to find that the page had timed out and told me and and "error had occurred". So I hit back and hit the post button again to find that it had already posted it. Thats how it happened. Technically I did it, but its my stupid computers fault.Not that this has to do with the old topic but banshee how did your computer post twice within that huge time period?
11:54 to 1:27 so almost an hour and a half...
Now that thats settled, back to topic.
Like my page on Facebook! PM me, I do commissions!
#134
foammasteroffusion
-

- Members
- 17 posts
Member
Posted 03 December 2008 - 05:20 PM
so the 1/2 inch is where the dart goes into and how close to petg does it fit because it fits may dart perfectly i want to try this thanks in advance
#135
maseman 46
-

- Members
- 96 posts
Member
Posted 03 December 2008 - 05:24 PM
Dude did you not read the topics from before? They were just talking about not posting in old topics.
You should really be more attentive.
You should really be more attentive.
The only way to get a recon over 100' would be to throw it.-atomatron
Yes groove punching your mother solves all problems......Maybe George Bush should have done that during katrina?-foxdemon82
My sales thread
Yes groove punching your mother solves all problems......Maybe George Bush should have done that during katrina?-foxdemon82
My sales thread
#136
cheesypiza001
-

- Members
- 752 posts
Member
Posted 03 December 2008 - 05:34 PM
so the 1/2 inch is where the dart goes into and how close to petg does it fit because it fits may dart perfectly i want to try this thanks in advance
Code of Conduct
Edited by cheesypiza001, 03 December 2008 - 06:25 PM.
#137
keef
-

- Members
- 1,390 posts
Member
Posted 05 December 2008 - 12:08 AM
so the 1/2 inch is where the dart goes into and how close to petg does it fit because it fits may dart perfectly i want to try this thanks in advance
Actually it goes into the 19/32", which is pretty much the new bolt. The 1/2" brass stops the dart from being sucked into the plunger, mainly. Thats how I've always seen it, correct me if I'm wrong, Angel.
Timothy M-Lick <3
#138
TantumBull
-

- Moderators
- 1,929 posts
Member
Posted 05 December 2008 - 06:39 PM
so the 1/2 inch is where the dart goes into and how close to petg does it fit because it fits may dart perfectly i want to try this thanks in advance
Actually it goes into the 19/32", which is pretty much the new bolt. The 1/2" brass stops the dart from being sucked into the plunger, mainly. Thats how I've always seen it, correct me if I'm wrong, Angel.
No, it goes into the 9/16" and the 19/32" covers the breech. The 1/2" pushes the dart out of the 9/16" brass half pipe and into the tightening rings. The breach opens while the gun is cocked, so a dart being vacuumed into the PT isn't really an issue.
#139
drnerf BANNED
-
- Banned
- 8 posts
Member
Posted 10 March 2009 - 04:23 PM
nice job angelWell this has been two months in the works now. It has been put aside a few times untill I had a few different "Eureka!" moments and finally pumped out the finished product.
Lets first talk about the unique Breech system I came up with specifically for the Longshot.
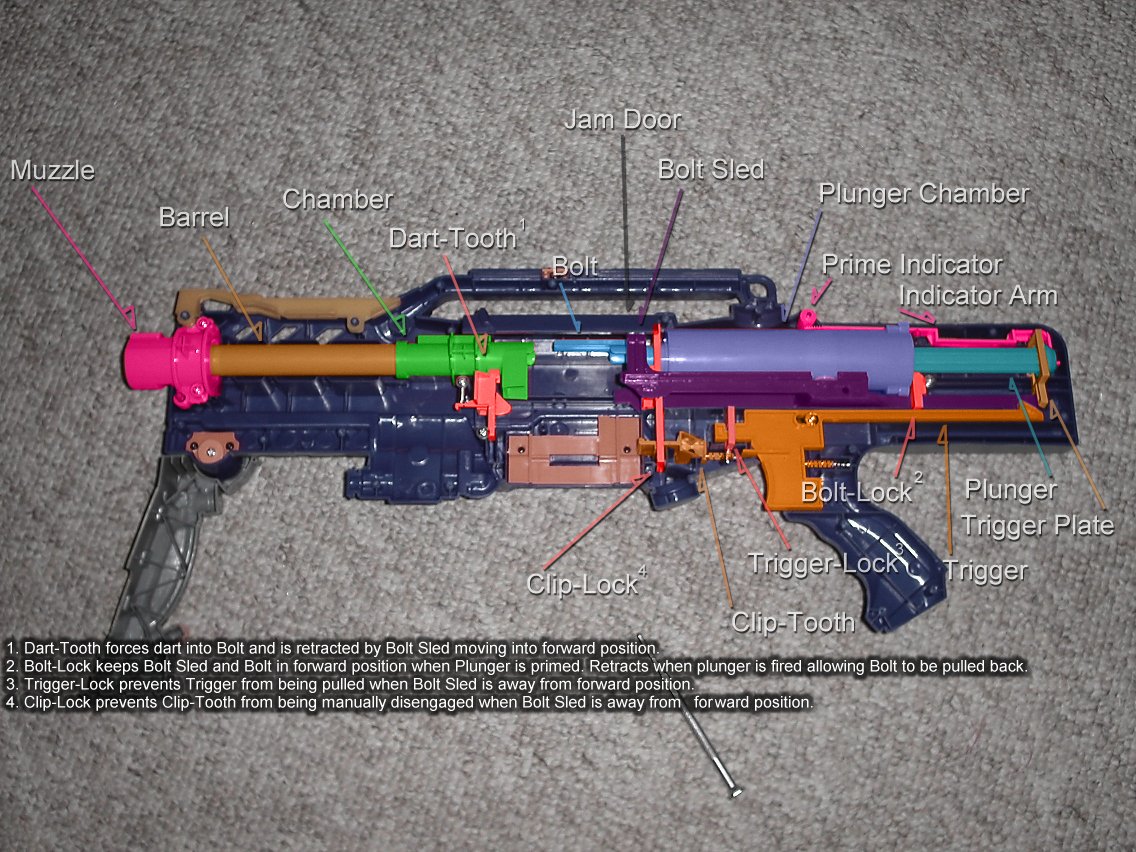
Open up your gun and take the Bolt tooth, Bolt lock, clip lock, trigger lock and put them aside you wont need them.
Here is a pic to see exactly what I am talking about. Labeled longshot internals courtesy of CS.
Take out your plunger assembly.
Drill out air restrictors.
Cut the Bolt around here.
Judge where to cut by measuring from that little air hole. The rest of the bolt with dart chamber can be put aside as we need a peice from it later.
You can see there are 4 sizes of brass in that photo. 1/2", 17/32" 9/16" and 19/32"
Take a peice of 9/16" and put it into the hole make sure it is long enough to go through the other side and sit flush with the very top of the thing that pushes the plunger back. In other words: so that brass would be touching the plunger head too. Now bust out the hot glue gun and fill the gap between the brass and the plastic. I also added a ring of rubber foam from a toilet gasket as found in the pump action shotgun mod level 2. There are pics of this later.
Now take your peice of 17/32" and cut it to the exact same size of the 9/16". Now take that brass peice and put it inside the 9/16" Now take your peice of 1/2" (The long one) and put it inside the 17/32". Now slide the peice of 19/32 ontop of the 9/16" and you should get this as the almost finished product for this side of the breech.
Now lets take a break from this side and head over to the other side fo the breech.
Take a 12" peice of 9/16" brass and cut away over half the pipe for a 2.5-3"" length at one end. Then add some tightening rings slightly ahead of where the cut half pipe begins. Now wrap some E-tape arounnd the brass barrel and slide it into the longshots chamber and barrel so it is snug. It should look like this.
Now You can start to see how this breech works. When the bolt is pushed back the breech opens and the clip pushes the dart into the half pipe of 9/16" When the bolt is closed the half pipe slides between the 1/2"brass and the 19/32". At the same time the 1/2" brass is pushing the dart into the tightening rings. At the same time the 19/32" is closing the breech creating a 100% air tight seal!
Now dont glue anything except the peice of 9/16" into place. I had to fiddle around with brass sizes and such for a while before I got this perfect. Right now my breech can open enough to chamber a 2.2" stefan.
Fiddle around with the brass and once you know that its going to work you are now going to grab what is remaining of that bolt that you chopped off earlier. You are going to want to cut off the orange nub that attaches into the blue bolt sled. Cut it off but when you cut it leave some extra plastic underneath it because you need this to be the perfect size. Keep that nub in the bolt sled and line it up with the top of your 19/32" brass.
Make sure that the nub is sanded down to the appropiate length so the bolt sled can slide back and forth comfortably. Take a pen and mark where the nub is going to be sitting. Then put your plunger tube and breech system back into the gun without the spring and make sure that the gun can still be cocked all the way back so the catch actually catches. If the catch does not engage you need to fiddle around with brass sizes again. If you only need a small bit more length try adding the rubber gasket ring if you havent already.
Now take your breech assembly out and load a stefan into the half pipe and then close the breech. If your dart is pushed way too far forward of the rings then your peice of 1/2" brass is too long. If the dart isnt pushed majority of the way into the tightening rings then your 1/2" brass is too short.
One last final thing to make sure this breech is correct. close the breech and make sure your plunger with spring is loaded into it and back peice is screwed on. Blow into the end of the barrel where the dart would come out. If you hear air leaking it is not 100% airtight now is it. If you here air leaking near the breech then your 19/32" is not long enough. If you here air leaking near the plunger then that is not an issue because we will deal with that later.
Now it is time to glue on the orange nub to the 19/32" brass. For this I used Fishin' Glue. The strongest shit you will ever get your hands on. I found it at Bass pro shops. I am sure most hunting stores should have it. You can also use Zap A Gap as I hear they are made of the same chemicals and have a similar strength. I said it before and I will say it again. This stuff puts Plumbers goop and Epoxy to shame.
Press tightly against the bolt sled to put pressure on the nub which will put pressure on the brass allowing the glue to cure stronger.
Allow 10-15 minutes to be safe. After it cured I ran the glue around the edges of the nub a couple times for good measure.
Now test it out. Your Breech assembly should be perfect. If it is not then tweak it a bit here and there. But be certain when making your little touch up cuts as cutting one peice might resolve the problem but may also start one somewhere else. Oh and to make sure things stay in place I used the fishin glue as well. This stuff has the consistency of water. Make sure things are where you want them to be before you use this stuff.
Here is a pic of the breech open and closed.
The best part about this breech is it doesnt Jam or shave the tails of of darts! Anyone who has done a tight fitting breech knows what I am talking about.
This breech was pretty tough to get out of my head and is the most complicated breech on the NIC,(I think) so I thought I should name it. I name this breech. Angel Breech
Now their should be a small amount of brass sticking out of the front. I wanted to keep my barrel safe from dents etc,
Shave down the inner circle currently inside the end fo your longshots barrel. This will make room for the 1/2" pvc.
Cut a small peice of 1/2" pvc warp some E-tape around the base and add it to the front.
Now take out your plunger and:
Add an Industrial strength spring.
Take off the O ring then wrap some thin E-tape where the o-ring would go and then either replace the o-ring and/or add and another one. I just added another one.
Lube the )rings with some O-ring lubricant found in a little blue container in your plumbing section at the local hardware store.
Dont forget to add a small ring of foam rubber at the bottom this will lengthen the life of your Longshot.
When it comes down to the clip I used the same methods The inventer Guy did with his clips but I used little hollow brass square tubes. Their size is 1/8"
When it comes to other additions to the gun I also did Dart attacks Front gun mod. The gun looks fucking menacing with it there. Good on ya Dart Attack for coming up with it! All I did was restrictor removal because I can see this add on gun breaking easy with more mods.
There it is allowing the epoxy to dry.
I however did it a little differently. I was getting upset because I couldnt get the coat hanger thing to work so I while I was at the Bass pro shops I also picked up some thin metal fishing line. I rigged it so the line would go under the clip receiver plate and hooked it to the original trigger. I had to drill through some plastic walls to acheive this but I am very please on how it turned out.
The trigger pull is slightly harder but that was to be expected because now I am going to be compressing an extra spring on each trigger pull.
I was upset about this next part. I was hoping I would be able to keep the collapsable stock but after it started collapsing in my hand while cocking I was rather pissed and in pain. Another member on the NIC did this and so did I. I added peices of PVC behind the stock so it would always stay in the cocked position.
I painted the shell black. I went nuts, 10-12 coats.
Then I put on the handles. But to protect my paint I put some felt craft sheet circles between the handle and the shell. I lightly made the felt kiss the flame just to get rid of any unwanted fuzz.
Without further adue, here is my menacing looking Longshot.
Ranges are typical.
99'
100'
102'
100'
101'
102'
I did this range test at night and it was freezing outside. On a normal sunny spring/summer/fall day I am sure the ranges would be at least 10-12 feet farther. I tried putting in a stronger spring but the gun was awkward to cock and the glue broke after four shots. This is something I will be working on improving after doing Captain slugs shotgun grip mod and some other modifications to create a stronger grip (<---what a pun!) on my next Longshot mod. If you thought this write up was confusing then I will bet you are not alone. Hopefully this video will make some sense for you.
Longshot Demo Video
The main thing I like about this mod instead of the typical Ar removal/BBB spring addition mod is this thing is much more accurate now.
Comments? Suggestions? Questions?
A lot of work went into this gun/write up/video. I would love to know what you guys think.


#140
1337
-

- Members
- 375 posts
Member
Posted 10 March 2009 - 05:02 PM
You felt like copying the whole mod, AND reviving a year old thread?
Join the REVOLUTION!
#141
halfway33
-

- Members
- 24 posts
Member
Posted 10 March 2009 - 08:48 PM
now that the topic is back. I just wanted to say that the start of the write up, it seems like you started the write up halfway through. If you could remake the breech, I woud be eternally grateful because I want one of these! P.S. awesome work angel.
No bastard ever won a war by dying for his country. He won it, by making the other poor dumb bastard die for his country Genral Patton
#142
bamblack2000
-

- Members
- 395 posts
Member
Posted 10 March 2009 - 08:54 PM
You can pm him for pictures if you're that desperate, but it's pretty clear to me, and to be honest I'm paying hereicorp to make mine.
Can everyone stop posting? It was a necro and there is no need to post. Especially since no one has anything to contribute?
Oh and just to let you know FA24 and hereicorp have slightly different breechs, not to get you confused.
Can everyone stop posting? It was a necro and there is no need to post. Especially since no one has anything to contribute?
Oh and just to let you know FA24 and hereicorp have slightly different breechs, not to get you confused.
#143
the nerfboy 8727
-

- Members
- 12 posts
Member
Posted 23 April 2009 - 10:20 PM
Did you use a dremel to shave the ring on the end of the longshot barrel? And how can you do it without a dremel if you used one?
HOT DOGS ARE GOOOOOOOOOOOOOOOOD!!!!!!!!!!!!!!!!!!!!!!!!!!!!!!!!!!!!!!!!!!!!!!!!!!!!!!!!!!!!!!!!!!!!!!!!!!!!!!!!!!!
#144
the nerfboy 8727
-
- Members
- 12 posts
Member
Posted 23 April 2009 - 10:23 PM
You can buy it from rockor.Would these modifications work with PETG?
HOT DOGS ARE GOOOOOOOOOOOOOOOOD!!!!!!!!!!!!!!!!!!!!!!!!!!!!!!!!!!!!!!!!!!!!!!!!!!!!!!!!!!!!!!!!!!!!!!!!!!!!!!!!!!!
#145
Wenie288
-

- Members
- 21 posts
Member
Posted 24 April 2009 - 07:42 AM
Great mod I'm sorta new to modding But im going to be modding a longshot
#146
SchizophrenicMC
-

- Members
- 390 posts
Member
Posted 24 April 2009 - 10:52 AM
Blatant errors in this thread:
Necromancy
Double-posting
Idiots with less than 10 posts
Hm...
I think there should be a quiz on the CoC before members are allowed to join.
Necromancy
Double-posting
Idiots with less than 10 posts
Hm...
I think there should be a quiz on the CoC before members are allowed to join.
QUOTE(NerfUK @ May 8 2009, 11:54 AM)
(I forgot to take a picture of my own poppers)
QUOTE(analogkid @ May 20 2009, 10:04 PM)
Every size rod you could ever want.
#147
CHAZZILLA
-

- Members
- 1 posts
Member
Posted 25 April 2009 - 05:19 PM
hold on im trying to find my jaw.Well this has been two months in the works now. It has been put aside a few times untill I had a few different "Eureka!" moments and finally pumped out the finished product.
Lets first talk about the unique Breech system I came up with specifically for the Longshot.
Open up your gun and take the Bolt tooth, Bolt lock, clip lock, trigger lock and put them aside you wont need them.
Here is a pic to see exactly what I am talking about. Labeled longshot internals courtesy of CS.
Take out your plunger assembly.
Drill out air restrictors.
Cut the Bolt around here.
Judge where to cut by measuring from that little air hole. The rest of the bolt with dart chamber can be put aside as we need a peice from it later.
You can see there are 4 sizes of brass in that photo. 1/2", 17/32" 9/16" and 19/32"
Take a peice of 9/16" and put it into the hole make sure it is long enough to go through the other side and sit flush with the very top of the thing that pushes the plunger back. In other words: so that brass would be touching the plunger head too. Now bust out the hot glue gun and fill the gap between the brass and the plastic. I also added a ring of rubber foam from a toilet gasket as found in the pump action shotgun mod level 2. There are pics of this later.
Now take your peice of 17/32" and cut it to the exact same size of the 9/16". Now take that brass peice and put it inside the 9/16" Now take your peice of 1/2" (The long one) and put it inside the 17/32". Now slide the peice of 19/32 ontop of the 9/16" and you should get this as the almost finished product for this side of the breech.
Now lets take a break from this side and head over to the other side fo the breech.
Take a 12" peice of 9/16" brass and cut away over half the pipe for a 2.5-3"" length at one end. Then add some tightening rings slightly ahead of where the cut half pipe begins. Now wrap some E-tape arounnd the brass barrel and slide it into the longshots chamber and barrel so it is snug. It should look like this.
Now You can start to see how this breech works. When the bolt is pushed back the breech opens and the clip pushes the dart into the half pipe of 9/16" When the bolt is closed the half pipe slides between the 1/2"brass and the 19/32". At the same time the 1/2" brass is pushing the dart into the tightening rings. At the same time the 19/32" is closing the breech creating a 100% air tight seal!
Now dont glue anything except the peice of 9/16" into place. I had to fiddle around with brass sizes and such for a while before I got this perfect. Right now my breech can open enough to chamber a 2.2" stefan.
Fiddle around with the brass and once you know that its going to work you are now going to grab what is remaining of that bolt that you chopped off earlier. You are going to want to cut off the orange nub that attaches into the blue bolt sled. Cut it off but when you cut it leave some extra plastic underneath it because you need this to be the perfect size. Keep that nub in the bolt sled and line it up with the top of your 19/32" brass.
Make sure that the nub is sanded down to the appropiate length so the bolt sled can slide back and forth comfortably. Take a pen and mark where the nub is going to be sitting. Then put your plunger tube and breech system back into the gun without the spring and make sure that the gun can still be cocked all the way back so the catch actually catches. If the catch does not engage you need to fiddle around with brass sizes again. If you only need a small bit more length try adding the rubber gasket ring if you havent already.
Now take your breech assembly out and load a stefan into the half pipe and then close the breech. If your dart is pushed way too far forward of the rings then your peice of 1/2" brass is too long. If the dart isnt pushed majority of the way into the tightening rings then your 1/2" brass is too short.
One last final thing to make sure this breech is correct. close the breech and make sure your plunger with spring is loaded into it and back peice is screwed on. Blow into the end of the barrel where the dart would come out. If you hear air leaking it is not 100% airtight now is it. If you here air leaking near the breech then your 19/32" is not long enough. If you here air leaking near the plunger then that is not an issue because we will deal with that later.
Now it is time to glue on the orange nub to the 19/32" brass. For this I used Fishin' Glue. The strongest shit you will ever get your hands on. I found it at Bass pro shops. I am sure most hunting stores should have it. You can also use Zap A Gap as I hear they are made of the same chemicals and have a similar strength. I said it before and I will say it again. This stuff puts Plumbers goop and Epoxy to shame.
Press tightly against the bolt sled to put pressure on the nub which will put pressure on the brass allowing the glue to cure stronger.
Allow 10-15 minutes to be safe. After it cured I ran the glue around the edges of the nub a couple times for good measure.
Now test it out. Your Breech assembly should be perfect. If it is not then tweak it a bit here and there. But be certain when making your little touch up cuts as cutting one peice might resolve the problem but may also start one somewhere else. Oh and to make sure things stay in place I used the fishin glue as well. This stuff has the consistency of water. Make sure things are where you want them to be before you use this stuff.
Here is a pic of the breech open and closed.
The best part about this breech is it doesnt Jam or shave the tails of of darts! Anyone who has done a tight fitting breech knows what I am talking about.
This breech was pretty tough to get out of my head and is the most complicated breech on the NIC,(I think) so I thought I should name it. I name this breech. Angel Breech
Now their should be a small amount of brass sticking out of the front. I wanted to keep my barrel safe from dents etc,
Shave down the inner circle currently inside the end fo your longshots barrel. This will make room for the 1/2" pvc.
Cut a small peice of 1/2" pvc warp some E-tape around the base and add it to the front.
Now take out your plunger and:
Add an Industrial strength spring.
Take off the O ring then wrap some thin E-tape where the o-ring would go and then either replace the o-ring and/or add and another one. I just added another one.
Lube the )rings with some O-ring lubricant found in a little blue container in your plumbing section at the local hardware store.
Dont forget to add a small ring of foam rubber at the bottom this will lengthen the life of your Longshot.
When it comes down to the clip I used the same methods The inventer Guy did with his clips but I used little hollow brass square tubes. Their size is 1/8"
When it comes to other additions to the gun I also did Dart attacks Front gun mod. The gun looks fucking menacing with it there. Good on ya Dart Attack for coming up with it! All I did was restrictor removal because I can see this add on gun breaking easy with more mods.
There it is allowing the epoxy to dry.
I however did it a little differently. I was getting upset because I couldnt get the coat hanger thing to work so I while I was at the Bass pro shops I also picked up some thin metal fishing line. I rigged it so the line would go under the clip receiver plate and hooked it to the original trigger. I had to drill through some plastic walls to acheive this but I am very please on how it turned out.
The trigger pull is slightly harder but that was to be expected because now I am going to be compressing an extra spring on each trigger pull.
I was upset about this next part. I was hoping I would be able to keep the collapsable stock but after it started collapsing in my hand while cocking I was rather pissed and in pain. Another member on the NIC did this and so did I. I added peices of PVC behind the stock so it would always stay in the cocked position.
I painted the shell black. I went nuts, 10-12 coats.
Then I put on the handles. But to protect my paint I put some felt craft sheet circles between the handle and the shell. I lightly made the felt kiss the flame just to get rid of any unwanted fuzz.
Without further adue, here is my menacing looking Longshot.
Ranges are typical.
99'
100'
102'
100'
101'
102'
I did this range test at night and it was freezing outside. On a normal sunny spring/summer/fall day I am sure the ranges would be at least 10-12 feet farther. I tried putting in a stronger spring but the gun was awkward to cock and the glue broke after four shots. This is something I will be working on improving after doing Captain slugs shotgun grip mod and some other modifications to create a stronger grip (<---what a pun!) on my next Longshot mod. If you thought this write up was confusing then I will bet you are not alone. Hopefully this video will make some sense for you.
Longshot Demo Video
The main thing I like about this mod instead of the typical Ar removal/BBB spring addition mod is this thing is much more accurate now.
Comments? Suggestions? Questions?
A lot of work went into this gun/write up/video. I would love to know what you guys think.
 one word amazing
this is CAKETOWN!!!!!!!!!!!!!!!!!!!!!!!!!!!!!!!!!!!!!!!!!!!!!!!!!!!!!!!!!!!!!!!!!
#148
Basilisk
-

- Members
- 39 posts
Member
Posted 25 April 2009 - 08:37 PM
Super UBERNECRO. DON'T POST IN THIS THREAD IT IS A YEAR OLD. READ THE COC.
"The moment you can no longer see the fun in running around like a little child is the moment you begin to die."
-Carbon
-Carbon
0 user(s) are reading this topic
0 members, 0 guests, 0 anonymous users

