Jump to content


Photo

THIS one simple design will have you in TEARS...

Pistol Sex Pistol Mag-Fed Pistol Multiple Orgasm

134 replies to this topic

#1 Chanclas

Chanclas

    Member

  • Members
  • 78 posts

Posted 22 March 2017 - 11:54 PM

*
POPULAR

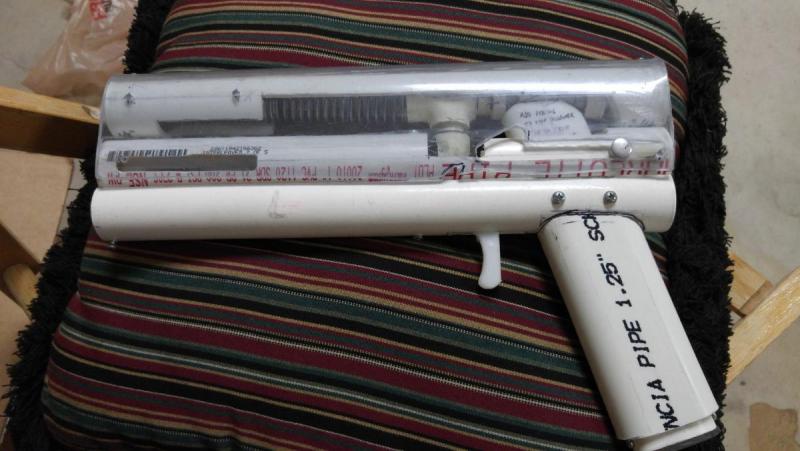
Hello, everyone! I have been dead for a long time on here. I'm back for today because I couldn't keep this a secret any longer. THIS PROJECT IS ALMOST COMPLETE, this is not a full write-up. It loads and fires but has a bad seal. I can fix that but I don't have time--I haven't touched the project or even the tools in many months. That's why I'm just gonna show you my thing and let you do what you want with it.


No official name but let's call it the Sex Pistol for now. First person to perfect it gets to rename it. But do you really want to?

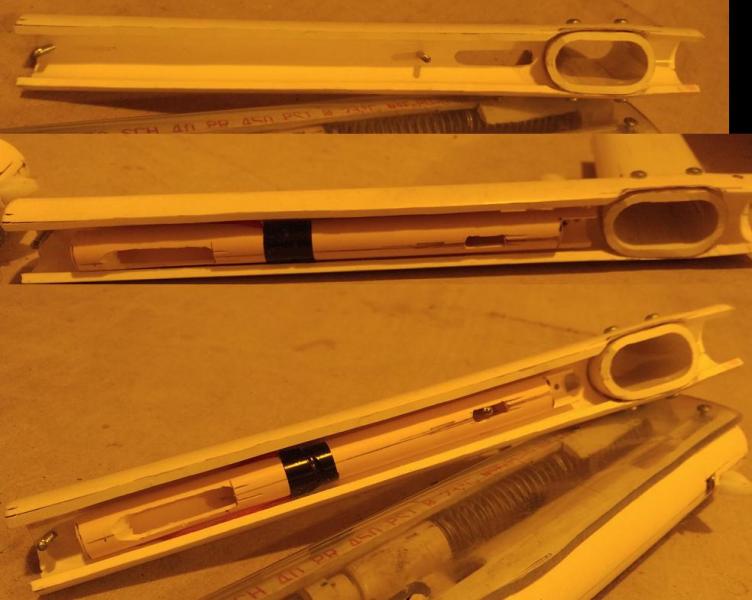
gun one.jpg gun two.jpg


The biggest inspiration was the Multiple Orgasm, by makeitgo. The day I saw that thread was the day I finally had what I needed to make the SP. Let me tell you, I had some far out ideas about how to make a mag-fed pistol, none of them realistic.


The Sex Pistol is just a like a real pistol. You can load a magazine in the handle, cock the slide back, slide returns forward, you pull the trigger, dart leaves the barrel. It's got some weight to it, feels good in the hand, and is 12" long.

ANIMATION of sexy 1st design


Of course, nothing stays the same. I've changed some moving parts when I found out that the real world isn't the same as the 3D model world.

VIDEO of sexy man cocking and dry-firing the Sex Pistol


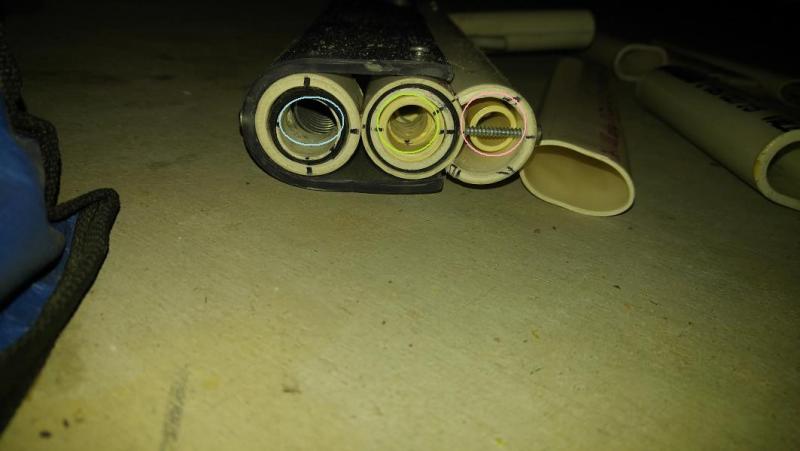
The best change I made was the way I made the handle and the magazines. For the handle, I used a heat gun to soften the 1-1/4" PVC and then shoved two lengths of 1/2" PVC inside, side by side, to "spread" it from the inside. While it cooled, I pressed it between two wooden boards to flatten the sides a bit. The result is so comfy and strong. For the magazines, you can do the same with 1" thin-wall PVC, with two lengths of 1/2" CPVC inside--OR you can shove the softened 1" pipe inside the handle you already made. As it cools, wiggle it around and slide it in and out--this will keep it from hardening and getting stuck. You can cool the pipe faster by spraying water on it. ALL OF THIS SHOULD BE DONE IN A VENTILATED AREA--some, like Captain Slug, would suggest that you also wear some kind of respiratory protection.


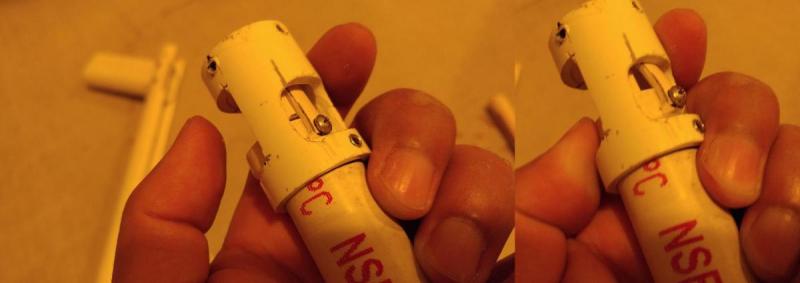
The coolest change is the way the slide can be locked in the cocked position to allow for easy magazine swap. This came about from a design change where the magazine would be "closed" at the top which wouldn't allow the dart-retainer-lips-things to spread around the bolt. I like this feature, even if the magazine lips are open and allow the bolt to pass through. You wouldn't need this slide-lock if you decide not to add the slide return spring, which is on the barrel and pushes the slide forward after being cocked. But why wouldn't you want that?! It's so cool!

VIDEO of sexy man poppin' and lockin'


The most difficult change was the damn "mobile" catch and trigger assembly. The first reason for this change was that the plunger and catch would slide back in the plunger tube, instead of firing, when the trigger was pulled. Only way to stop that was to hold the slide forward with your free hand, which is dumb. The solution was to come up with a trigger that pushed up or forward or both. I went with the one in the middle on the left side of the animated image linked below. The trigger is a length of 1/2" CPVC, with a hole cut out to allow for the gray flexible trigger-catch-pusher-thing. The gray strip is just thin metal with a rounded nub of plastic glued on it.

ANIMATION of trigger designs


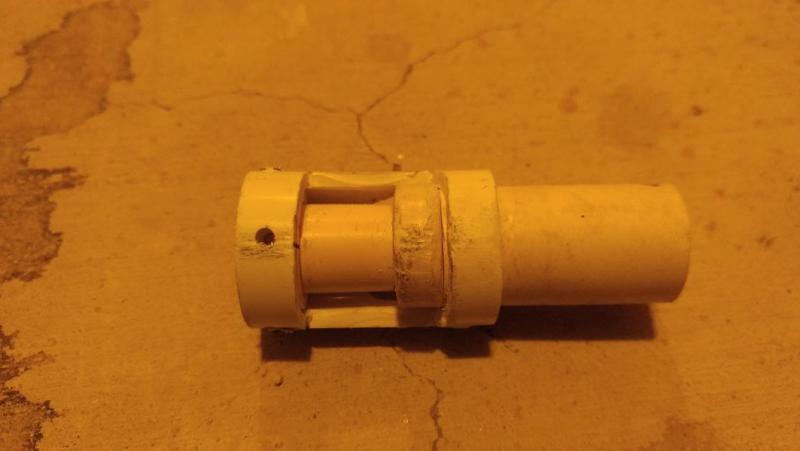
The second reason was that the simple 3-layer catch shown in the animation was not easily fabricated with my sexy Dremel and wasn't strong enough. The result is a big ugly thing but I believe it is an original concept. Imagine the plunger entering from the right, catching on the ring in the middle. The trigger pushes up on the ring, which is bonded to, and flexes up on, a strip of CPVC extending from the CPVC section that is the left end of the catch.

20151207_175054_HDR.jpg


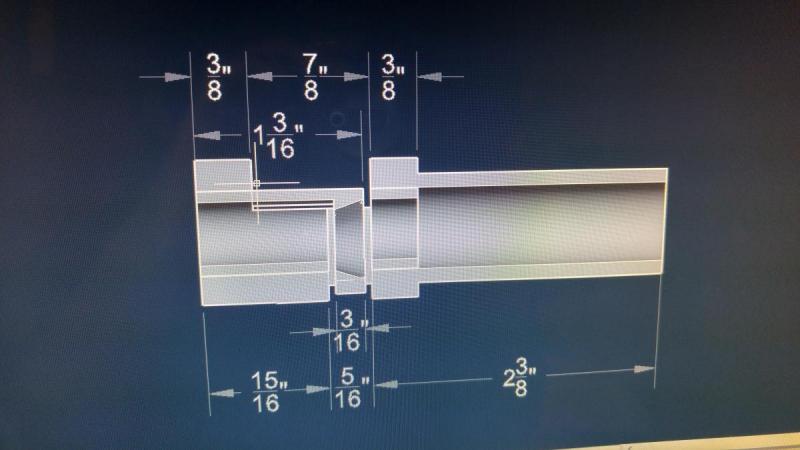
There are a few things I designed that I'm pretty sure are new ideas. Dammit, I give up, I'll just have to get better pictures tomorrow. I haven't updated the model so you won't like it if you see it. Even if I wanted to, my computer is too old to be sexy and can't even install AutoCAD properly.


A few little notes:

-Magazines can be made any length but mine is currently long enough for 14 darts

-Magazines can fit darts up to 1-1/4" in length

-Ranges aren't expected to be impressive, even with a perfect seal. Current stroke is 2-3/4", I believe, which is pathetic, I know. That's just how it is, unless you make the pistol longer.

-I know it's big but it's also smaller than you think.

-Here's a Google Drive folder with all the pictures and videos and maybe the .dwg model file thing.

-Another fitting name for this pistol is Pillow Talk. I was gonna say something gross that rhymes with "eremature pjaculation" but I didn't. Also, it's full unofficial name is Sex Pistol: Experimental Reloading Mechanism.


One more thing. When I was about halfway done building the first crappy prototype that barely held together for a few days, I emailed the guys that print and sell ESLTs and PullSCRTs. They said they'd print any design if you were willing to pay for it. The price they gave me wasn't sexy and they said my model wasn't printable. That's fine, no hard feelings. I had laughs and tears working on this. Thank you guys for not stealing my concept and making it better and printable.


Okay, I'm spent.


Edited by Chanclas, 24 March 2017 - 12:15 AM.

  • 3
QUOTE(Groove @ Oct 30 2008, 08:58 AM) View Post
QUOTE
I can say Rambo is easily one of the coolest guys I've ever met.
I'm sorry, but you just lost any and all respect I had for you.
-Groove

Tits > Video Games

#2 snakerbot

snakerbot

    Maker of Things

  • Members
  • 310 posts

Posted 23 March 2017 - 02:42 AM

I'll be honest. When I first read the thread title I clicked on your username to check and see if you were a spambot before I looked at the thread. That said, I like the design. It does share a lot with the Multiple Orgasm and even more with the Oltiple Moregasm¸ but packaging all the components like this can't have been easy. I particularly like how you handled the trigger sliding problem you mentioned. It's not the design I would have come up with, but I like it.


Am I not looking hard enough or are there no pictures of your catch? I'm pretty sure I understand how it works, but I can't tell how you fabricated it or what materials you used. Is it possible that a smaller catch could give you more draw without making the blaster longer, or is there another constraint somewhere?


  • 0

#3 Chanclas

Chanclas

    Member

  • Members
  • 78 posts

Posted 23 March 2017 - 04:49 AM

It is possible to make a smaller catch, I just don't have the tools or materials to do so. This wouldn't change the stroke, though. You have to slot the plunger tube for the screws that attach the catch to the slide. These slots are your stroke length, they determine how far you can pull the slide. I think Captain Slug's pulley design in his Piranha would help here

I will take pictures of all the parts tonight.

Please show me the trigger design you would have gone with. I'm always looking to improve the design.

Edited by Chanclas, 23 March 2017 - 04:49 AM.

  • 0
QUOTE(Groove @ Oct 30 2008, 08:58 AM) View Post
QUOTE
I can say Rambo is easily one of the coolest guys I've ever met.
I'm sorry, but you just lost any and all respect I had for you.
-Groove

Tits > Video Games

#4 CaptainSlug

CaptainSlug

    Resident Mad Scientist

  • Administrators
  • 4,763 posts

Posted 23 March 2017 - 07:54 AM

This is pretty interesting. I could futz with this design a bit once I get an artifact magazine. I've been wanting to trim one of those down to fit inside a grip for a while. JET is "working" on a "Katana" skinny mag but I don't trust them to deliver those anytime soon.


-Ranges aren't expected to be impressive, even with a perfect seal. Current stroke is 2-3/4"

You might be able to overcome this with more diameter, though there is a plateau where the added area leads to more resistance due to both friction and air restriction. You also have the complication of having your output traveling through a 180 degree bend to get out the barrel. That little passageway could easily be improved as a printed part with a smoother elbow transition.


And you are correct in that this design/construction could be made much more rigid and simplified a bit by linking the slide to the plunger rod using a cable and a pulley. The downside would be added length on the blaster (pulley diameter and clearance for the plunger end), but you gain having a static catch location. A very short plunger with a PCSR-style sear instead of a through-hole catch would probably help you save some space.


I would also recommend reading the Caliburn thread. You could make your slide return spring much much weaker if the darts are being pushed into a much looser fitting "chamber" that the ramrod seals inside of, and the barrel is nested inside ahead of where the dart is pushed to. This will make a big difference in the amount of effort required to feed darts and it uses the plunger output to load the darts into the barrel.


some, like Captain Slug, would suggest that you also wear some kind of respiratory protection.

Softening PVC will produce Chlorine and byproduct fumes. Very few respirators are rated to filter chlorine out so you should setup your workspace so you are standing upwind from a fan blowing over yourself and your work area.


  • 0
The little critters of nature, they don't know that they're ugly. That's very funny, a fly marrying a bumble bee. I told you I'd shoot, but you didn't believe me. Why didn't you believe me?

#5 snakerbot

snakerbot

    Maker of Things

  • Members
  • 310 posts

Posted 23 March 2017 - 01:34 PM

It is possible to make a smaller catch, I just don't have the tools or materials to do so. This wouldn't change the stroke, though. You have to slot the plunger tube for the screws that attach the catch to the slide. These slots are your stroke length, they determine how far you can pull the slide. I think Captain Slug's pulley design in his Piranha would help here


Ah, I see.


Please show me the trigger design you would have gone with. I'm always looking to improve the design.


I probably would have gone with something like the top two designs in your animation. I guess I just always think of rigid pieces when I think of moving parts.


  • 0

#6 Meaker VI

Meaker VI

    Member

  • Moderators
  • 1,192 posts

Posted 23 March 2017 - 03:25 PM

Well shoot, that's pretty clever. I was going to suggest looking through Boltsniper's old builds - his NTS specifically since it's a clip-fed slide-action pistol, but they seem to have lost all their pictures (Slug, is there anything we can do about that?).


  • 0

#7 Maniacal Coyote

Maniacal Coyote

    On Increasingly Thin Ice

  • Members
  • 358 posts

Posted 23 March 2017 - 04:43 PM

Softening PVC will produce Chlorine and byproduct fumes. Very few respirators are rated to filter chlorine out so you should setup your workspace so you are standing upwind from a fan blowing over yourself and your work area.


I'd recommend a military surplus gas mask for dealing with the chlorine gas.


  • -2

I know how to help you because I have broken every rule in the book.


#8 jwasko

jwasko

    PowerBeard

  • Moderators
  • 1,021 posts

Posted 23 March 2017 - 10:02 PM

This is ridiculously awesome. It's very much like something I was once planning but never had the chance to build. Great job bringing it to life, it did nearly bring me to tears of joy as per the thread title. Yours looks at least 9000 times sexier than anything I could have ever built anyways...and it even has a slidelock!


Question: Did you wind your own spring for the magazine?


Well shoot, that's pretty clever. I was going to suggest looking through Boltsniper's old builds - his NTS specifically since it's a clip-fed slide-action pistol, but they seem to have lost all their pictures (Slug, is there anything we can do about that?).

https://web.archive....des/armory2.htm(Too much sexiness for one thread? The mag wasn't in the handle, though, so it loses some style points I guess)


Edited by jwasko, 23 March 2017 - 10:04 PM.

  • 0

-Jwasko, STILL Sole Surviving member of Steel City Nerf and Sober Sister of the Sex Dwarves
We NERF ON all day, and FUCK OFF all night


#9 Snoop Doggy doge

Snoop Doggy doge

    Fig you, Van

  • Members
  • 501 posts

Posted 24 March 2017 - 12:07 AM

I'm really curious on the mag and how you formed it, I think while impractical this entire thing is really cool,
curious on how the angle effects the mag and how you formed the mag spring


  • 0

#10 Chanclas

Chanclas

    Member

  • Members
  • 78 posts

Posted 24 March 2017 - 01:17 AM

*
POPULAR

This is pretty interesting. I could futz with this design a bit once I get an artifact magazine. I've been wanting to trim one of those down to fit inside a grip for a while. JET is "working" on a "Katana" skinny mag but I don't trust them to deliver those anytime soon.

You might be able to overcome this with more diameter, though there is a plateau where the added area leads to more resistance due to both friction and air restriction. You also have the complication of having your output traveling through a 180 degree bend to get out the barrel. That little passageway could easily be improved as a printed part with a smoother elbow transition.


And you are correct in that this design/construction could be made much more rigid and simplified a bit by linking the slide to the plunger rod using a cable and a pulley. The downside would be added length on the blaster (pulley diameter and clearance for the plunger end), but you gain having a static catch location. A very short plunger with a PCSR-style sear instead of a through-hole catch would probably help you save some space.


I would also recommend reading the Caliburn thread. You could make your slide return spring much much weaker if the darts are being pushed into a much looser fitting "chamber" that the ramrod seals inside of, and the barrel is nested inside ahead of where the dart is pushed to. This will make a big difference in the amount of effort required to feed darts and it uses the plunger output to load the darts into the barrel.

Softening PVC will produce Chlorine and byproduct fumes. Very few respirators are rated to filter chlorine out so you should setup your workspace so you are standing upwind from a fan blowing over yourself and your work area.


I did consider designing a better transition between the plunger tube and the barrel. Like a bit of vinyl tubing or something similar to what is used in stock Nerf pump blasters between their pumps and barrels.


I've been trying to find a pulley system that shortens the pull but lengthens the stroke. Apparently it is possible but would multiply the force needed to cock the slide back. I do like your pulley system and would try it if I had time to do so.


The loose chamber thing is already in use. That happened after I found my breach setup was too tight to allow the spring to return the slide all the way forward. And that is when I created the bad seal and abandoned the project until now. I like the idea, I just haven't been able to make it better.


Ah, I see.


I probably would have gone with something like the top two designs in your animation. I guess I just always think of rigid pieces when I think of moving parts.


I prefer not having to make a tiny axle for those cams to pivot on. I find my design to be more sturdy than those.


Well shoot, that's pretty clever. I was going to suggest looking through Boltsniper's old builds - his NTS specifically since it's a clip-fed slide-action pistol, but they seem to have lost all their pictures (Slug, is there anything we can do about that?).


Trust me, I've memorized Boltsniper's write-ups. And many others here on NerfHaven. I've read all the ones that seemed to be related to my project. I needed the inspiration but I also didn't want to make something that has been done before.


This is ridiculously awesome. It's very much like something I was once planning but never had the chance to build. Great job bringing it to life, it did nearly bring me to tears of joy as per the thread title. Yours looks at least 9000 times sexier than anything I could have ever built anyways...and it even has a slidelock!


Question: Did you wind your own spring for the magazine?


https://web.archive....des/armory2.htm(Too much sexiness for one thread? The mag wasn't in the handle, though, so it loses some style points I guess)


Thank you for the link to his old website. What was with the ponies? Did he lose his site?


Thank you for liking it, now go make it awesome-er-er.


Yes, I made the spring, like Boltsniper used to do.


I'm really curious on the mag and how you formed it, I think while impractical this entire thing is really cool,
curious on how the angle effects the mag and how you formed the mag spring


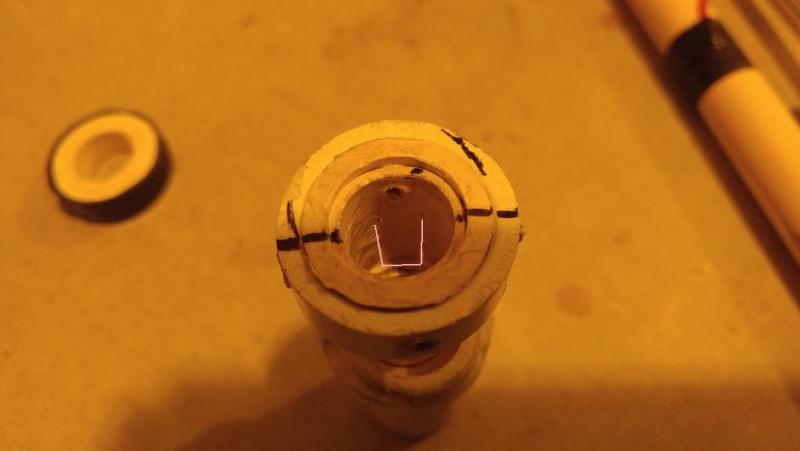
Use a heat gun, get it nice and soft. Shove two 1/2" CPVC pipes inside, side by side. Let it cool that way while you press on the sides to flatten them. To form the lips that hold the darts down, again, warm it up. Then stick a 1/2" CPVC pipe across the top, as if it were the breach, and curve the lips around it until it cools. My new pictures will show before and after this step.


I bent music wire with needle nose pliers. Requires patience and trial and error. The angle is comfortable and affects nothing. The magazine follower is made to negate the angle and the magazine lips force the darts horizontal even if the follower fails to do it's job.


NEW PICTURES:


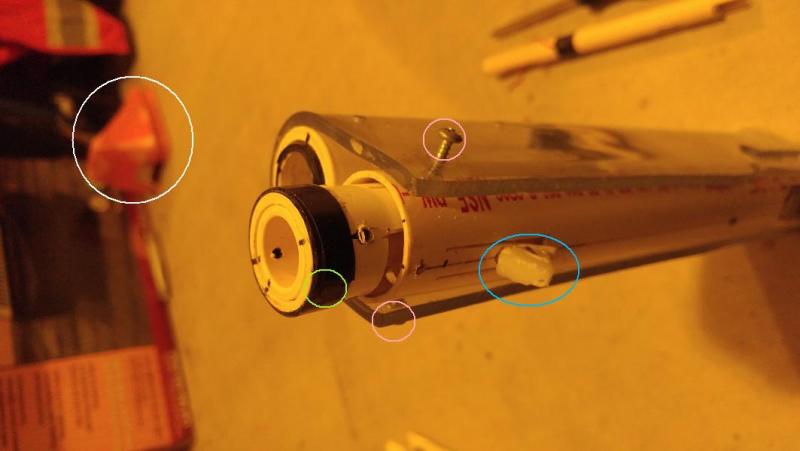
Assembly screws. Receiver is attached to Plunger Tube with 2 screws, in pink.

assembly 1.jpg


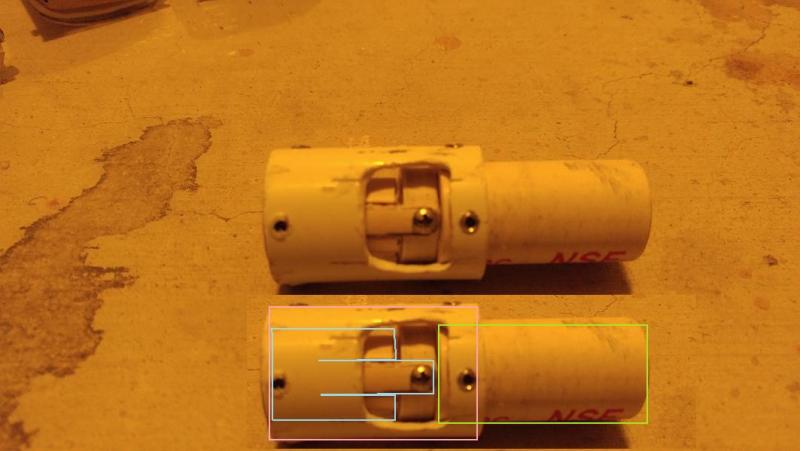
Plunger/Spring/Catch Assembly is held in by "cap", which is kept in place by the forward Receiver screw (green). Another two screws (pink) attach the Slide to the Catch Assembly, removing these allows you to remove the Catch Assembly and Plunger. Also visible, the Nub Flexor, in blue. And in white, a pair of wheel chocks.

assembly 2.jpg


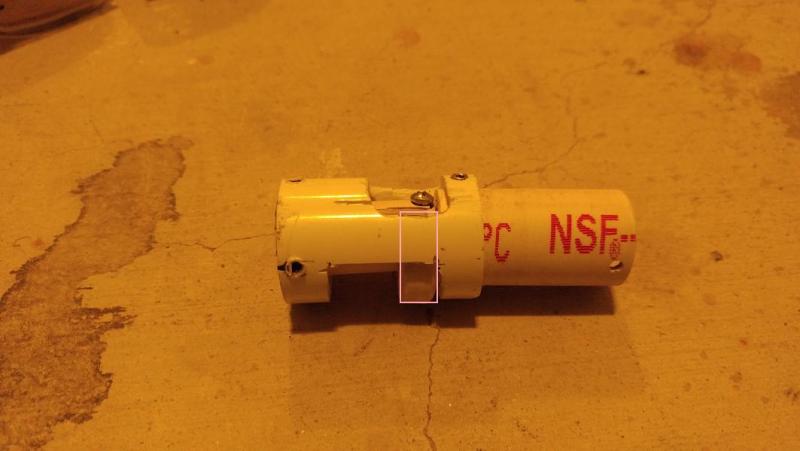
Catch Assembly. In pink, the Catch Ring, made of 1/2" PVC.

catch 3.jpg

catch 5.jpg


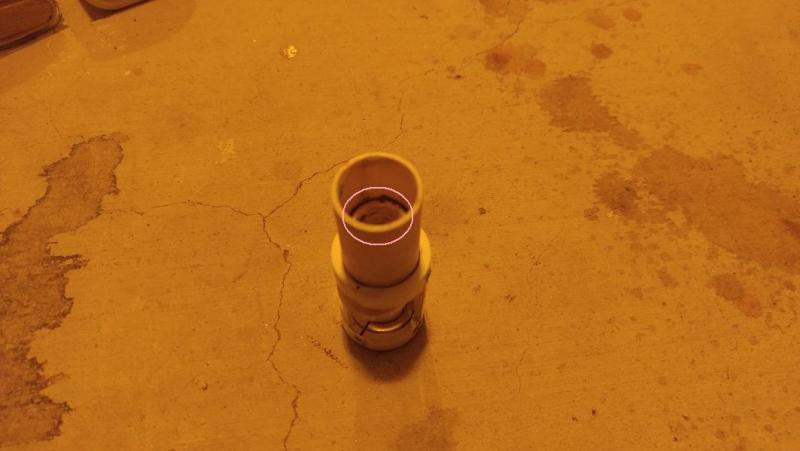
The Catch Ring is screwed to the Catch Flexor, in blue. The body, pink, is a 1/2" PVC Coupler. In green, the Plunger Guide, made of 1/2" PVC.

catch 4.jpg


Inside the Plunger Guide is a bit of 1/2" CPVC, circled in pink, for the Plunger Spring to rest against.

catch 6.jpg


The Catch Flexor, in pink, is cut into the 1/2" CPVC, it is not a separate piece.

catch 10.jpg


Here's how it works.

catch 8 9.jpg


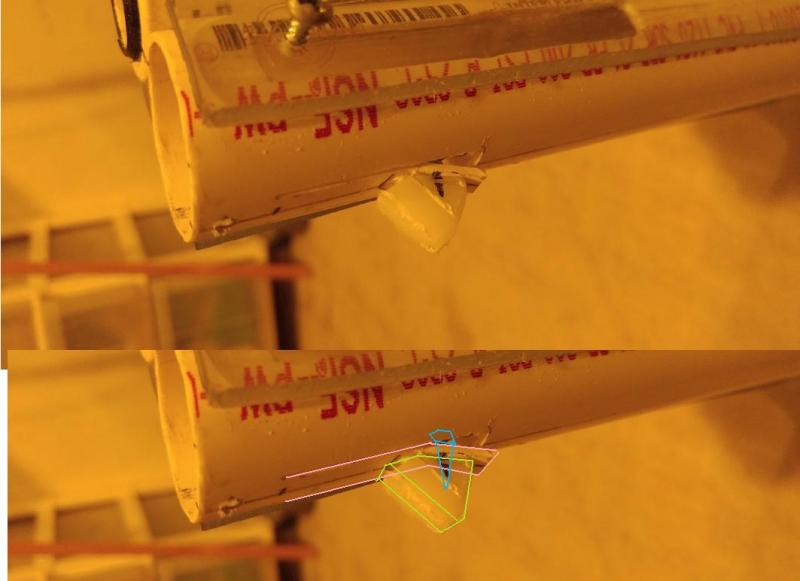
Trigger Assembly. In pink, a strip cut into the Plunger Tube--this is the Nub Flexor, same thing as the Catch Flexor. Green shows the Nub, which is glued on. There is also a screw, shown in blue.

flexor 1.jpg


Here's how it works.

flexor 2 3.jpg

flexor 4 5.jpg


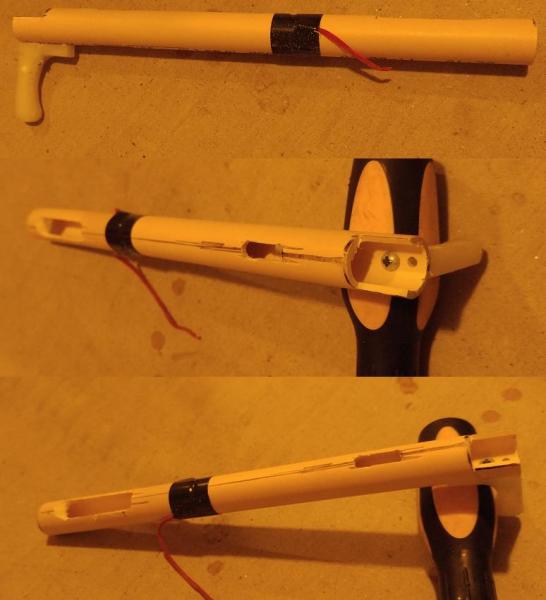
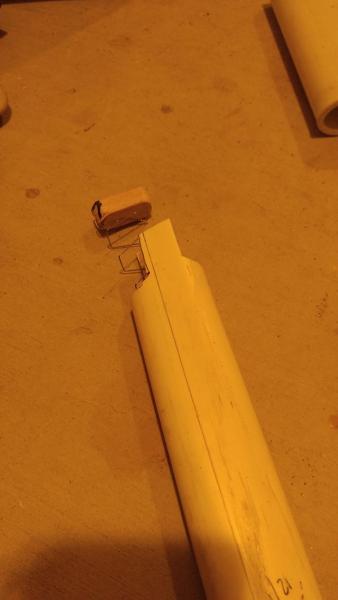
The Trigger Linkage is a 1/2" CPVC tube screwed to the Trigger which is made of 1/4" cutting board. The Nub Flexor fits in the long slot at the far end, when the trigger is pulled, the Nub goes up, releasing the Catch. The short slot is just to allow one of the Receiver assembly screws to pass through. The red rubber band, which returns the Trigger forward and is broken in the picture, should be wrapped around the Receiver assembly screw at the end of the Receiver. The slots and screws help keep the trigger aligned.

trigger combo.jpg

trigger receiver.jpg


You can see the ends of the Trigger (pink) and Catch (green) in the image below. Also visible is the spring, shown in blue, which returns the Slide forward.

catch 2.jpg


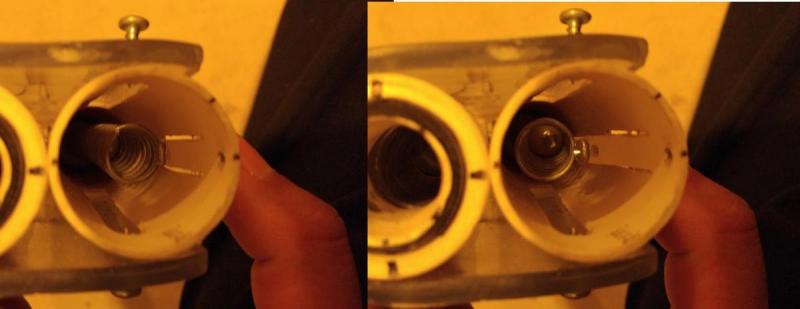
Handles and Magazines. Receiver is 1" PVC, Handles are 1-1/4" PVC, Magazines are 1" Thin-Wall PVC, Magazine Followers and Bases are Balsa Wood, Magazine Springs are Music Wire.

handle 1.jpg

magazines 1.jpg

magazines 5.jpg

magazines 6.jpg


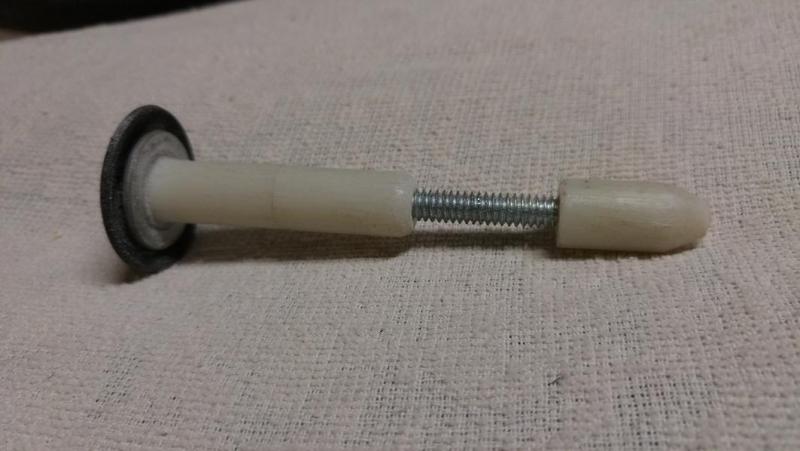
Plunger. Long bolt through threaded 1/2" OD nylon spacers that have been beveled. Standard washer sandwich. Adjustable plunger length due to the threads.

20151125_193522.jpg


  • 1
QUOTE(Groove @ Oct 30 2008, 08:58 AM) View Post
QUOTE
I can say Rambo is easily one of the coolest guys I've ever met.
I'm sorry, but you just lost any and all respect I had for you.
-Groove

Tits > Video Games

#11 CaptainSlug

CaptainSlug

    Resident Mad Scientist

  • Administrators
  • 4,763 posts

Posted 24 March 2017 - 04:05 PM

*
POPULAR

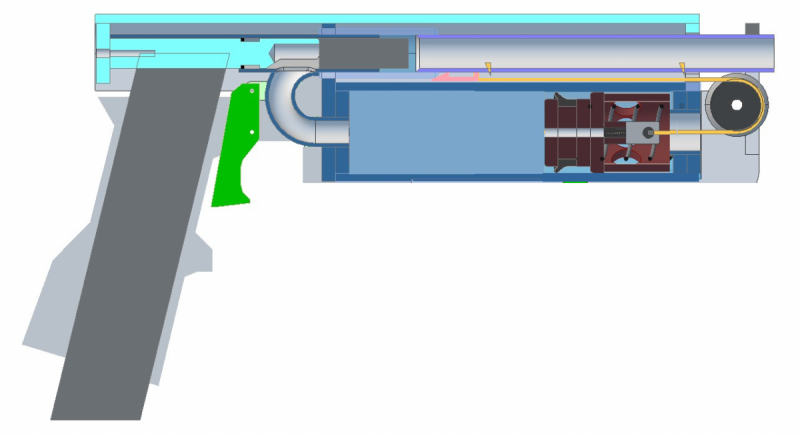
This is a pretty rough draft at the moment. I won't get any further on this for a while until I have time to try making a magazine. And given how many other things I SHOULD be working on, who knows when that will be.

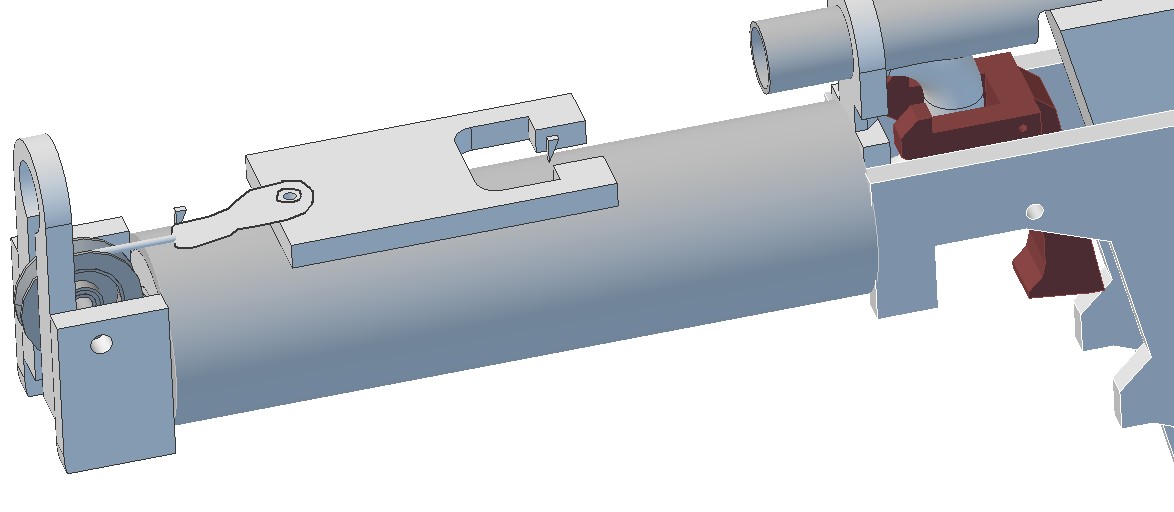
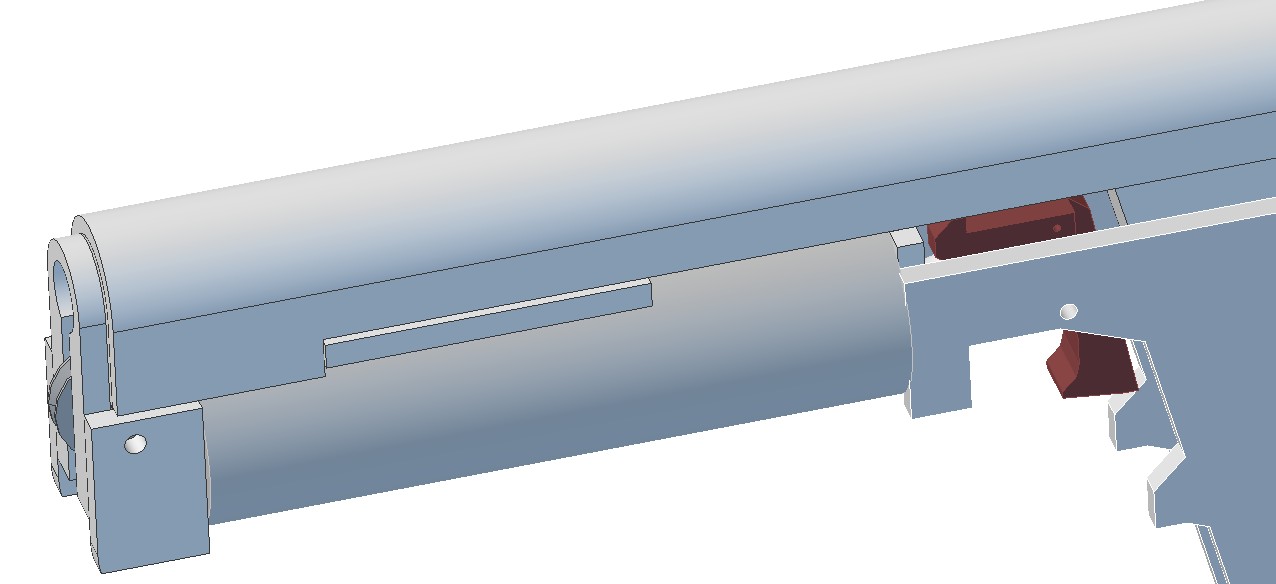
I just wanted to see what the layout would have to be for a miniaturized mag-fed Piranha. And Chanclas was correct, it could totally work. There's just enough room to get 3-1/8 inch of plunger stroke out of a 1-1/4 SCH40 pipe.

sp_00.jpg

The cut in the front of the slide lets the cable feed through, but will pull on the eyelet of it to prime the plunger. I haven't decided on a return spring for the slide yet. One I have in mind might just barely fit over the barrel but may have to be stretched to get the right collapse length to extended length measurements. If I run out of room I'll probably just have to make the barrel a little bit further away from the plunger tube.

sp_01.jpg

sp_02.jpg

sp_03.jpg


  • 1
The little critters of nature, they don't know that they're ugly. That's very funny, a fly marrying a bumble bee. I told you I'd shoot, but you didn't believe me. Why didn't you believe me?

#12 Chanclas

Chanclas

    Member

  • Members
  • 78 posts

Posted 25 March 2017 - 12:15 AM

Great design, CaptainSlug. Too bad you don't have more time.


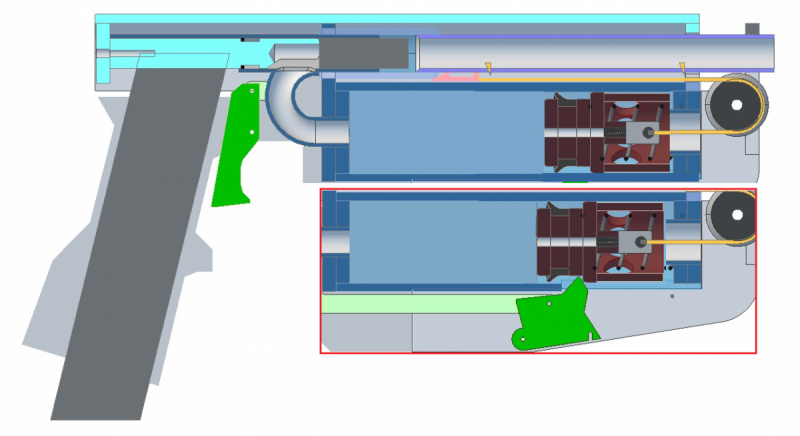
Now I wonder if you think it's possible to make the catch hold the eyelet under the barrel instead of catching on the plunger. I'm hoping this would eliminate the catch you currently have, which would mean you wouldn't need a slot there and maybe you get more stroke out of it. Unless your plunger spring is already compressed all the way.


The pink eyelet under the barrel is actually some thing that has a little ramp to catch. Wire is tied to this something and the slide pulls it back by pushing on the right side (in picture below) of the pink eyelet thing. There could be a little catch mechanism that will hold this thing in place and the trigger can release it. Having a brain fart here so I can't figure out the connection from trigger to catch.

cs c edit.png


Here it is next to yours to show the stroke difference. Not much but I'm just thinking out loud here. And you could add more stroke by shortening the plunger head since you won't need a catch face on it anymore.

cs c edit compare.png


While editing these photos I came up with two other catch designs that might be better but it's getting late. I'll draw them up tomorrow.

 
Also, is the o-ring on the bolt supposed to roll?

  • 0
QUOTE(Groove @ Oct 30 2008, 08:58 AM) View Post
QUOTE
I can say Rambo is easily one of the coolest guys I've ever met.
I'm sorry, but you just lost any and all respect I had for you.
-Groove

Tits > Video Games

#13 CaptainSlug

CaptainSlug

    Resident Mad Scientist

  • Administrators
  • 4,763 posts

Posted 25 March 2017 - 01:42 PM

It would use an 8-inch long lanyard with finished ends. The end used for priming would have a rubber band on it just like in Piranha which prevents the cable from whipping. I have no idea how you would make a catch for one, but you would probably need to attach it to a piece that acts as a shuttle for that end.

30345t162c1-e01jl.png

There's no difference in stroke. For any given setup you need a little room for over-travel of the plunger or you won't be able to prime it far enough to let your catch snap into place.


And yes the o-ring has to roll on the bolt to help reduce the friction of running it in and out of the chamber. This is done to avoid having to lubricate the o-ring.


  • 0
The little critters of nature, they don't know that they're ugly. That's very funny, a fly marrying a bumble bee. I told you I'd shoot, but you didn't believe me. Why didn't you believe me?

#14 Geric2004

Geric2004

    Member

  • Members
  • 45 posts

Posted 26 March 2017 - 05:40 AM

I was thinking of the same design but I guess someone beat me to it. Also, Imagine this 3d printed.


Edited by Geric2004, 26 March 2017 - 08:33 AM.
  • 0

youtube.com/user/asean12


#15 KaneTheMediocre

KaneTheMediocre

    Belligerent Asshole

  • Members
  • 613 posts

Posted 27 March 2017 - 06:42 PM

One more thing. When I was about halfway done building the first crappy prototype that barely held together for a few days, I emailed the guys that print and sell ESLTs and PullSCRTs. They said they'd print any design if you were willing to pay for it. The price they gave me wasn't sexy and they said my model wasn't printable. That's fine, no hard feelings. I had laughs and tears working on this. Thank you guys for not stealing my concept and making it better and printable.

That was me.  I am happy and surprised to see how much success you had with this--you seemed like you were quite far over your head.  I'm glad I was wrong.

I'm pretty sure we never said we'd print any design, as we don't have the sort of printer that does that  (SLS printers can do most anything, we have FDM printers because we are poor).  And looking at your parts, I'm pretty sure we couldn't have printed them without a redesign even if we did have 3d model files for them.

I'd mostly forgotten about this, and I am sort of working on something a bit similar (Not ultiple-more, but using a pulley or a gear like the 2nd style you showed) but right now I'm re-inventing magazines to that end.  I'm glad you posted this before I put out anything as I wouldn't want to steal your thunder.  Making something like this with the help of a 3d printer would be impressive, but out of machined PVC pipes and fittings like this shows incredible skill, craftmanship and careful planning.

One question about functionality--You seem to be the only person on earth other than me that makes nerf breeches that push darts past the air source into the barrel.  In the blasters I've made like that, I've been able to repeat the loading/priming motion to put multiple darts in the barrel and fire shotgun style.  Does anything prevent you from doing that with your blaster?


Edited by KaneTheMediocre, 27 March 2017 - 07:45 PM.

  • 0
RAINBOW CLAN FTW
I'm Purple

My Half-Baked MHA Site

#16 Geric2004

Geric2004

    Member

  • Members
  • 45 posts

Posted 27 March 2017 - 08:45 PM

That was me.  I am happy and surprised to see how much success you had with this--you seemed like you were quite far over your head.  I'm glad I was wrong.
I'm pretty sure we never said we'd print any design, as we don't have the sort of printer that does that  (SLS printers can do most anything, we have FDM printers because we are poor).  And looking at your parts, I'm pretty sure we couldn't have printed them without a redesign even if we did have 3d model files for them.

I'd mostly forgotten about this, and I am sort of working on something a bit similar (Not ultiple-more, but using a pulley or a gear like the 2nd style you showed) but right now I'm re-inventing magazines to that end.  I'm glad you posted this before I put out anything as I wouldn't want to steal your thunder.  Making something like this with the help of a 3d printer would be impressive, but out of machined PVC pipes and fittings like this shows incredible skill, craftmanship and careful planning.

One question about functionality--You seem to be the only person on earth other than me that makes nerf breeches that push darts past the air source into the barrel.  In the blasters I've made like that, I've been able to repeat the loading/priming motion to put multiple darts in the barrel and fire shotgun style.  Does anything prevent you from doing that with your blaster?

Can I help? I have some experience in Solidworks and will be getting my Printer within the week.


  • 0

youtube.com/user/asean12


#17 Chanclas

Chanclas

    Member

  • Members
  • 78 posts

Posted 28 March 2017 - 01:21 AM

*
POPULAR

That was me.  I am happy and surprised to see how much success you had with this--you seemed like you were quite far over your head.  I'm glad I was wrong.

I'm pretty sure we never said we'd print any design, as we don't have the sort of printer that does that  (SLS printers can do most anything, we have FDM printers because we are poor).  And looking at your parts, I'm pretty sure we couldn't have printed them without a redesign even if we did have 3d model files for them.

I'd mostly forgotten about this, and I am sort of working on something a bit similar (Not ultiple-more, but using a pulley or a gear like the 2nd style you showed) but right now I'm re-inventing magazines to that end.  I'm glad you posted this before I put out anything as I wouldn't want to steal your thunder.  Making something like this with the help of a 3d printer would be impressive, but out of machined PVC pipes and fittings like this shows incredible skill, craftmanship and careful planning.

One question about functionality--You seem to be the only person on earth other than me that makes nerf breeches that push darts past the air source into the barrel.  In the blasters I've made like that, I've been able to repeat the loading/priming motion to put multiple darts in the barrel and fire shotgun style.  Does anything prevent you from doing that with your blaster?


Sorry for the misunderstanding, I didn't mean literally "any design". I just thought you might be able to help but I do understand the limitations with printing.


Thank you for liking my design. It took a ton of time, reworking and refitting and crying.


I'm excited to see what you have in the works.


Yes, you can repeatedly cock the pistol to load multiple darts, at least with the current design. Or you could hold the trigger while cocking and it would fire immediately as the slide returns forward.


  • 1
QUOTE(Groove @ Oct 30 2008, 08:58 AM) View Post
QUOTE
I can say Rambo is easily one of the coolest guys I've ever met.
I'm sorry, but you just lost any and all respect I had for you.
-Groove

Tits > Video Games

#18 CaptainSlug

CaptainSlug

    Resident Mad Scientist

  • Administrators
  • 4,763 posts

Posted 28 March 2017 - 02:06 PM

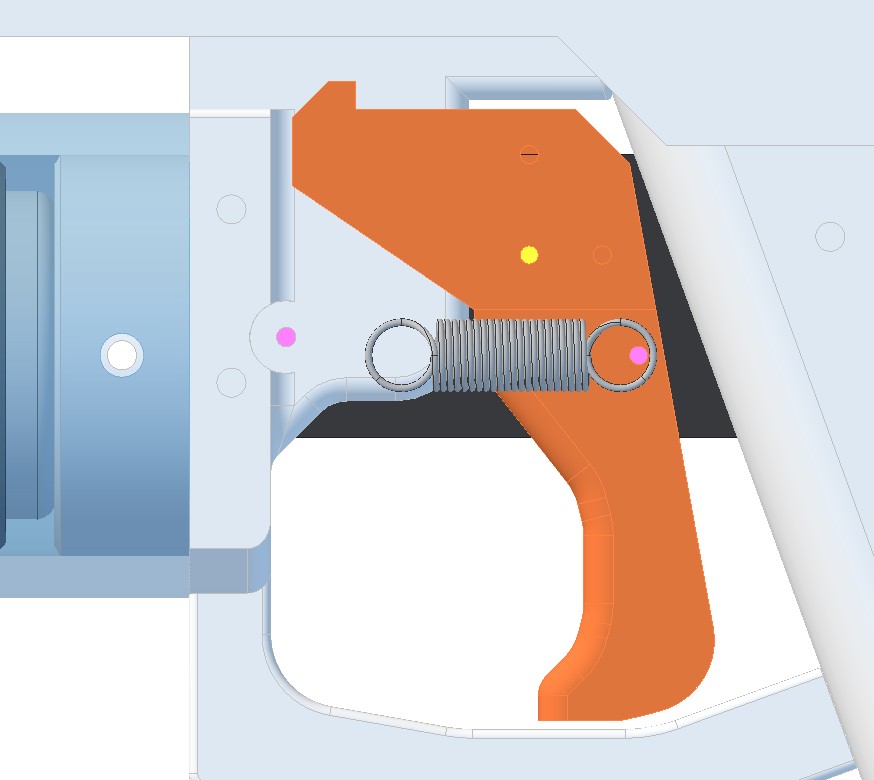
Here's where I am with the new catch design. The lanyard attaches to this shuttle plate which locks into teeth facing upwards out of the trigger.

sp_04.jpg

The slide simply has to push the front edge of the shuttle piece backwards until the shuttle locks into the trigger.

sp_05.jpg

I need to add a lip to the topside of the shuttle so that it stays centered inside the slide.


  • 0
The little critters of nature, they don't know that they're ugly. That's very funny, a fly marrying a bumble bee. I told you I'd shoot, but you didn't believe me. Why didn't you believe me?

#19 Chanclas

Chanclas

    Member

  • Members
  • 78 posts

Posted 28 March 2017 - 08:02 PM

Here's where I am with the new catch design. The lanyard attaches to this shuttle plate which locks into teeth facing upwards out of the trigger.


The slide simply has to push the front edge of the shuttle piece backwards until the shuttle locks into the trigger.


I need to add a lip to the topside of the shuttle so that it stays centered inside the slide.


HOLY--!!!


Can't believe you actually went with my idea. Definitely what I was getting at, glad you figured out the missing piece. Now, please tell me how you think this is better than the original design. I'm not saying it isn't but I would like to know the advantages, and disadvantages, in your opinion.


  • 0
QUOTE(Groove @ Oct 30 2008, 08:58 AM) View Post
QUOTE
I can say Rambo is easily one of the coolest guys I've ever met.
I'm sorry, but you just lost any and all respect I had for you.
-Groove

Tits > Video Games

#20 CaptainSlug

CaptainSlug

    Resident Mad Scientist

  • Administrators
  • 4,763 posts

Posted 28 March 2017 - 08:30 PM

The upside is that there's no trigger linkage at all. And the plunger tube itself can be used as structure for the front end of the blaster. This means less sheet materials used to make a blaster, and less time spent drilling and cutting.


The downside of pulley setups on a plunger is that doing so requires having the cable taught for both safety and reliability. Slack introduces the risk of whipping or the cable coming off of the pulley. Piranha just used a rubber band to hold the slack because those have enough of an elastic ratio to handle that difference in dimension. Bungees and springs would have worn out too fast. Here there is no such thing and the cable will be held taught by the load of the main spring all the time.


The downside to that is that the shuttle is going to have to bottom out against the slide whenever the plunger is fired. This could stress the cable, so it makes sense to do a bunch of dry-fire tests with 50lb rated ones, then take it off and measure it to make sure it isn't elongating. The shock of this load may require padding both the plunger head and the shuttle where it hits the slide. If these small lanyards can't take the stress of that happening repeatedly it either becomes a $2 wear component, or I would have to step up to a 1/8" diameter cable (rated for 400lb), which means a larger pulley and a higher price tag.


If I can't use a pre-finished lanyard at a decent price it would be worth looking at flat belts or strips of constant force spring material instead. Either of those might be cheaper and both of them have a small enough bend radius to not add bulk to the layout. A strip of constant-force spring would be dirt cheap and very easy to install. But they will have to use idler bearings instead of pulleys.


  • 0
The little critters of nature, they don't know that they're ugly. That's very funny, a fly marrying a bumble bee. I told you I'd shoot, but you didn't believe me. Why didn't you believe me?

#21 KaneTheMediocre

KaneTheMediocre

    Belligerent Asshole

  • Members
  • 613 posts

Posted 28 March 2017 - 11:40 PM

I've been down the pulley train before in my early bullpup quest, and it was generally a source of impediment and failure for a variety of reasons.  I opted for 1/4" (polyester?) string because I didn't want to lose energy bending  a steel cable around the pulley.  I was able to get away with slack because it was all contained in the pipe, but overall everything with the string made working on the blaster more difficult, and various accommodations somewhat defeated my goals of a shorter blaster.   I also experienced problems with elongation, but it did seem to stabilize eventually.

So I was planning to do a gear and pinion racks setup instead.  3d printed to save money, but 3d printed FAT to maybe not break and make it even more comically large.


  • 0
RAINBOW CLAN FTW
I'm Purple

My Half-Baked MHA Site

#22 jwasko

jwasko

    PowerBeard

  • Moderators
  • 1,021 posts

Posted 29 March 2017 - 08:03 PM

Here there is no such thing and the cable will be held taught by the load of the main spring all the time.


Could you leave ~0.25" or so gap between the unprimed shuttle plate and the slide? Then attach a rubber band to the back of the shuttle plate to keep tension as in Piranha.


By the way does the trigger pivot at the very top, at the back of the hooks? Or does it pivot further down?


Anyway, looks really sleek. Great job, as usual.


  • 0

-Jwasko, STILL Sole Surviving member of Steel City Nerf and Sober Sister of the Sex Dwarves
We NERF ON all day, and FUCK OFF all night


#23 CaptainSlug

CaptainSlug

    Resident Mad Scientist

  • Administrators
  • 4,763 posts

Posted 30 March 2017 - 07:47 AM

Could you leave ~0.25" or so gap between the unprimed shuttle plate and the slide? Then attach a rubber band to the back of the shuttle plate to keep tension as in Piranha.


By the way does the trigger pivot at the very top, at the back of the hooks? Or does it pivot further down?


Anyway, looks really sleek. Great job, as usual.

Inertia would still cause it to slam into the slide. And the extra room to move is more of a problem than it slamming into the slide.


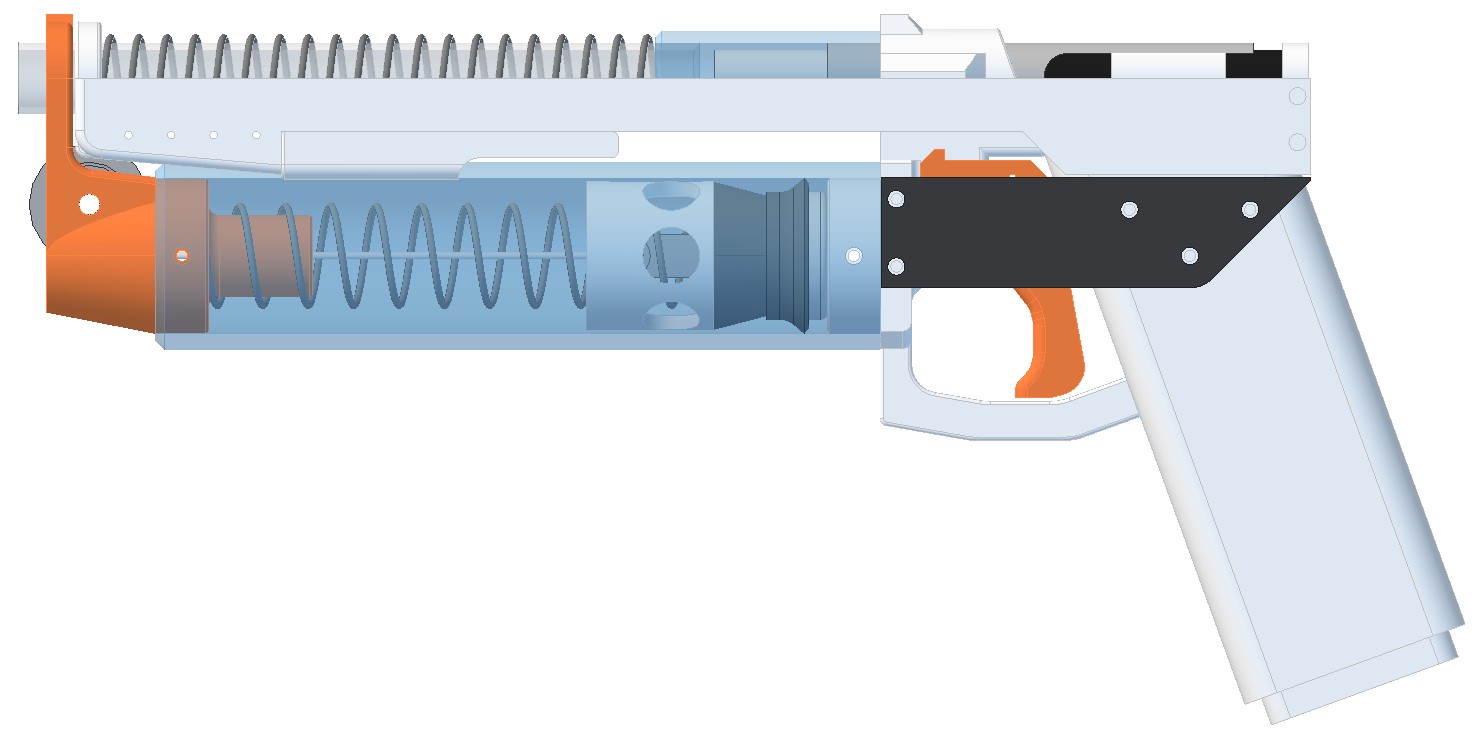
Since that post I have moved the pivot point for the trigger higher up so that I could attach return springs below that point and have them tensioned ahead of the trigger.

sp_06.jpg

sp_07.jpg


  • 0
The little critters of nature, they don't know that they're ugly. That's very funny, a fly marrying a bumble bee. I told you I'd shoot, but you didn't believe me. Why didn't you believe me?

#24 Speedr117

Speedr117

    Member

  • Members
  • 57 posts

Posted 30 March 2017 - 10:15 AM

Captainslug, what is the large spring up top for. If it is a simple return wouldn't that make priming really hard. Any chance of releaseing the stl files for printing. This would make a good sidearm for calaburn.

Edited by Speedr117, 30 March 2017 - 10:16 AM.

  • 0

#25 CaptainSlug

CaptainSlug

    Resident Mad Scientist

  • Administrators
  • 4,763 posts

Posted 30 March 2017 - 12:17 PM

It's the return spring for the slide. It's not that strong of a spring seeing as it has one third of the spring constant of a K26 or K25. Largely due to the difference in wire diameter.


Files will come much later. I have to figure out how to make the magazines first.


  • 0
The little critters of nature, they don't know that they're ugly. That's very funny, a fly marrying a bumble bee. I told you I'd shoot, but you didn't believe me. Why didn't you believe me?


Also tagged with one or more of these keywords: Pistol, Sex Pistol, Mag-Fed Pistol, Multiple Orgasm

1 user(s) are reading this topic

0 members, 1 guests, 0 anonymous users