Jump to content


CaptainSlug's Content

There have been 1000 items by CaptainSlug (Search limited from 15-December 96)


By content type

See this member's


Sort by                Order  

#73940 Where To Buy Modding Materials

Posted by CaptainSlug on 22 February 2006 - 11:10 PM in Modifications

PETG: Clueless

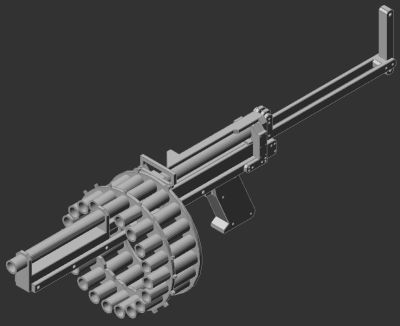
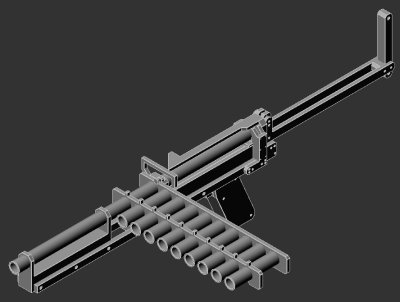
PETG (a copolyester) can be purchased from plastics shops and industrial supply.
Check your local phone book for plastics shops and try to find one that stock polyester. Unfortunately most cater to stores needing display cases and contractors that need windows and will therefore only carry acrylic or polycarbonate. But the larger more capable shops have a larger inventory. Most even sell their off-cuts for a few dollars per pound.

Teflon would obviously be a very effective barrel or chamber choice but is a bit more expensive since it's a dense plastic.

Another thing to note is that it's highly unlikely that you will be able to find plastic tubing that matches the inner diameter of PVC pipe (39/64 or .608") accurately but 5/8" (.625") is the closest and is a more commong measurement.

My first-choice online supplier for plastics is http://www.mcmaster.com and they have an ample supply of polyester. Which by the way is also one of the most cost effective plastics available and readily accepts common solvents such as IPS Weld-on 3.


#73941 Sledgehammer

Posted by CaptainSlug on 22 February 2006 - 11:26 PM in Homemades

Interested purely in the mechanical challenges presented by such a project and as yet another excuse to have more fun machining plastic I've been working on designing what I would have envisioned in my younger years as the ULTIMATE Nerf gun. The Arrowstorm was my pride and joy until the spring snapped in half from one-too-many one-handed firings and then I moved onto the crossbow so both have nostalgia for me.

As boltsniper pointed out my earlier designs were a bit more complicated than they needed to be.
Posted Image
Posted Image
So I started over trying to put myself in the mind-set of having to make a gun with limited tools and a limited budget. I ended up with a VERY simple (machining-wise anyways) design that I'm quite pleased with.
Posted Image
$25 worth of polyester, a scrollsaw, power drill, some solvent, and a #6-32 tap wrench are all that would be needed to make this design which includes the following features.

- 14 inch barrel length
- Made completely out of PETG
- 5 inch travel spring-loaded plunger
- Removable/Stowable stock
- 8 round clip that feeds during each priming cycle
- Front reloading of the 5 lower chambers on the clip
- The ability to preload a second clip (or just a larger one) after two darts have been fired
- Ease of disassembly and replaceable barrel

What I would eventually like to do is do a complete instruction manual of how to make your own including power tool specific usage tips and general plastics machining advice. I've been primarily making computer cases out of plastic but this would be an interesting change from that. ^_^

I need to make an image outlining the priming and round advancing cycle...


#73965 Sledgehammer

Posted by CaptainSlug on 23 February 2006 - 09:24 AM in Homemades

This should clarify the priming action a little bit.
Posted Image
The tubing needs to be shorter than shown in the model.


#74505 Nerf Crossbow

Posted by CaptainSlug on 27 February 2006 - 09:56 AM in Modifications

For these days, i guess. Does anyone know how much they were if you bought them in stores when they were available?

If I remember correctly it was $15 new when I bought it back in 1992.


#74596 Your Choice Of Weapons

Posted by CaptainSlug on 27 February 2006 - 10:42 PM in General Nerf

I voted custom because I'd make the effort to not only make a homemade that has a balance of all the features I want, but I would also carry a Nerf bat as a "rule enforcer". :rolleyes:


#75168 Sledgehammer

Posted by CaptainSlug on 04 March 2006 - 06:34 PM in Homemades

I'm currently considering alternative designs. I don't have alot of time to machine this right now because I have other projects that are taking priority at the moment.


#75357 Sledgehammer

Posted by CaptainSlug on 06 March 2006 - 10:49 AM in Homemades

It's nowhere near as large as some of the other homemades I've seen, but it does have an interesting weight balance.
I'm working on a design that if used with a shoulder strap can be primed and fired using only one hand. At present it's design is nowhere near as cleanly line as the previous design, but in terms of functionality it's much more interesting. I'll have some pictures this afternoon.


#75513 Sledgehammer

Posted by CaptainSlug on 07 March 2006 - 08:45 PM in Homemades

Um, these are Nerf Guns, right?

Yep, designed to shoot 1/2 Foam Backer Rod (presumably, but I'll have to test a variety of PETG tube sizes first).

Now that that's clarified, I think that these guns look excellent, though they look like you would need a plastic mold to make them.

No molding required. Thanks to large suppliers such as McMaster-Carr PETG (polytester) is easy to purchase as sheets and hollow round tubes. And that's what these are designed to be made out of with minimal machining work.

I'm confused about one thing. What is the pump to shot ratio? It seems to be 1:1 and that doesn't seem like it would provide enough air for a decently powered gun.

I should have said in the first post that these are spring-powered designs. I didn't bother to model the springs because they're such a pain to make, even in solid CAD.

Here's the new design: The One-Armed Bandit (OAB)
It's nowhere near as graceful but it should prove heavily functional. I need to do some very detailed tweaking on the model but here's basically how it works.
Posted Image
Posted Image
It's designed to be easily disassembled with a screwdriver so that the pieces can be mirror left-to-right allowing one to be held in each hand. And the butt of the gun will have a thick padded shoulder rest with a shoulder strap so that each grip can be pushed forward with a single hand to prime the next round.


#75538 Sledgehammer

Posted by CaptainSlug on 08 March 2006 - 02:05 AM in Homemades

I won't bother explaining the very first design (the black one) because it's a bit more complicated that I would like to attempt right now.

The pistol also got too complicated but could be redesigned with the new tooth-advance systems to make it easier to machine. I'm also left wondering how much of an effect the tubing would have on performance. My gut tells me that it adds too much volume to the system and would prevent the plunger from building up an effective level of pressure.
Great, now you've given me another idea I could use. :ph34r:
You pump the grip back like a shotgun, but a cable and pulley pull the plunger forward into the primed position. This would also give the gun a weak recoil effect when fired while simplifying the internals a little.

Although I saw one problem with your first version of the one you plan on building, that the barrel looked like it would take alot of force from pumping.

The priming grip doesn't really touch the barrel, it slides along the plunger tube. And the plunger tube acts as a frame support for the barrel. It it does turn out to be an issue I could get a tube with thicker walls for the barrel.

And, while somewhat confused by how the second version works (i think it's the handle being in both color and white, is there only one handle or 2?), it seems to have solved that problem.

The latest design only has one handle/grip. The white in the animated images is just a background. Another benefit of the design is that since the plunger/tube, and grip parts are on the side the grip can be rotated around 180-degrees if for some reason you want it on the side, or you want the clip to advance downward instead of upward.

Your very first one looks similar to the Pancor Jackhammer, the fully automatic 12 gauge shotgun I've mentioned before

Actually I was drawing inspiration from the AA-12 for most of the design.


#75639 Sledgehammer

Posted by CaptainSlug on 09 March 2006 - 02:44 PM in Homemades

Yes, a drum magazine is definitely not the easiest thing in the world to make.
It would involve cutting uniform lengths of PETG tubing, drilling the pattern in a disc or two, then using IPS Weld-on solvent to adhere all the peices together. All of which I can do with the tools I have.

I'm considering making a new design similar to the arrowstorm, but I'll have to figure out an easier way to make the advancing mechanism for the drum.


#75762 Canon Ammo?

Posted by CaptainSlug on 10 March 2006 - 05:09 PM in Homemades

Gate valve: Posted Image


#75847 Sledgehammer

Posted by CaptainSlug on 11 March 2006 - 08:17 PM in Homemades

Alrighty. I wanted to approach the drum magazine differently with everything I've learned so far with each successive design. This has become the most adaptable design yet.
The Nerf Monsoon.
Posted Image
Posted Image
Posted Image
+ Can use stock darts (loaded in the end of the barrel) and stefans (loaded from the rear of the drum)
+By swapping out some plates on the outside of the gun the control of the priming/advancing cycle can be changed from the grip to a secondary handle.
+The stock can be folded to fit flat over the top of the gun.
+The clip ejector is the hoop on the top of the gun and once depressed the drum can be removed.
+The plunger is attached to 1/16th-inch steel cable on a pulley so that the priming action is reverse of the plunger travel.

The only thing I'm stuck on is what compression load I want to have on the spring. It's currently designed around a 16lb spring, but with only minor adaptation I could use an 11lb spring instead.
Is it better to have more spring load or more spring travel? I'm kind of stuck between choosing a 4"/16lb spring or a 10"/2lb one.


#75851 Sledgehammer

Posted by CaptainSlug on 11 March 2006 - 08:41 PM in Homemades

How does the drum rotate? I can't quite see the top part clearly. I see a triangle, though.

Yeah sorry about that. It's really hard to get a good image to explain it.
Posted Image
1. The triangle on the top of the gun advances the drum. As it moves forward it rotates the drum by forcing the outside tooth on the clip to move counter clockwise.
2. The drum is advanced to the point that the locking tooth (which is tensioned to move upward thanks to two rubber-bands) on the inside of the drum has engaged the notch.
3. As the triangle on the top retracts the locking tooth finishes the advancing cycle and centers the next barrel.

The yellow circles in the image are free-spinning aluminum spacers with slightly larger washers on the end that act as a clamp that holds the drum in place. The rolling spacers on the inside of the drum can be disengaged by pressing down on the clip eject loop on the top of the gun.


#75867 Sledgehammer

Posted by CaptainSlug on 12 March 2006 - 12:15 AM in Homemades

Had to modify the body of the gun to accomodate a change in the main spring.
Posted Image
Posted Image
Many thanks to boltsniper for the measurements I needed. Industrial supply doesn't have the right kind of springs so I'll just have to go with what is known to.
Ironically the measurement changes also made the folding stock fit perfectly onto the top of the weapon when folded.


#75936 Program To Design

Posted by CaptainSlug on 12 March 2006 - 03:57 PM in Homemades

For the basics any graphical suite will do, such as GIMP.
For solid CAD try Alibre Xpress


#75950 The Snap-3

Posted by CaptainSlug on 12 March 2006 - 06:33 PM in Homemades

You might want to put a weak spring or rubberband on the charging handle so that it returns itself to a neutral position.


#76399 Hopper Clip

Posted by CaptainSlug on 15 March 2006 - 08:29 PM in Homemades

To make it easier for other people to find the Tee used in this project it is called a "Sanitary Tee" which is meant to be used with sewage plumbing.
Posted Image


#76473 Sledgehammer

Posted by CaptainSlug on 16 March 2006 - 12:09 AM in Homemades

I have ample experience machining plastic, I just need to find time away from machining computer-related parts to make this happen. It may be a few weeks before I can start work on a design because I have a case I need to finish.
I'm using Alibre Xpress for these designs, which functions similarly to inventor. I have several years of experience with low-poly 3D modelling but only a few months of practice in solid CAD.


#76510 Sledgehammer

Posted by CaptainSlug on 16 March 2006 - 03:21 PM in Homemades

Awesome designs, my only concern is that, that design looks extremely front heavy making it rather hard to aim well, run with, etc. (kind of like a minigun?). Anyway I'll enjoy seeing the finished product.

Of course. It should be much lighter than a PVC homemade since PETG weighs less per square inch. And the option of switching to two-handed firing should help with the balance of the weapon. Keep in mind that the outer diameter of the ammo drum is only 6 inches and the barrel lengths are are meager 5 inches.
It's not really designed for accuracy since that would require a longer barrel.

Just out of curiosity, how long does it take you to draw up those desings?  I'm in an engineering acadamy at my highschool using inventor and if I was to make those it would take days but you seem to push em' out almost immidietly!

Depends on how detailed my mental image of the design is. They take anywhere from 4 to 15 hours. I'm fast only because I have around 10 years of practice in various forms of 3D modelling. Understanding the materials and tools related to the design also makes the process much faster.

Sort of reminds me of the Gattlin' Storm.

Thankfully mine won't be a manual pump-to-fire.


#76866 Boltsniper Scar-n Rifle Bs-8

Posted by CaptainSlug on 19 March 2006 - 02:57 PM in Homemades

Boltsniper,
Would it be possible to replace the brass with CPVC? I have access to a lathe which would allow me to thin out the walls of the CPVC, but I don't have access to any brass... Would this work or can it only be brass?

You can order brass through Mcmaster. CPVC in such a low thickness would be likely to buckle, warp, or just crack.

If he can tell you the wall thickness you may be able to make short lengths of pipe from rolls of brass shim stock which is much cheaper than pipes.


#76901 Syringe Popgun

Posted by CaptainSlug on 19 March 2006 - 07:53 PM in Homemades

This gives me another weird idea for a design. Plus even if it's not accurate enough to hit someone with the noise would imobilize your opponents with laughter long enough for you to shoot them with something else. :blink:

Edit: Just realized that if you want a looser seal to allow for more plunger velocity you might be able to replace the rubber seal with an O-ring with a slightly smaller OD.


#76908 Boltsniper Scar-n Rifle Bs-8

Posted by CaptainSlug on 19 March 2006 - 08:03 PM in Homemades

Hey Bolt, what kind of spring did you use for the SCAR?

Carbine length XP AR15 spring


#77024 Sledgehammer

Posted by CaptainSlug on 20 March 2006 - 07:12 PM in Homemades

I would suggest adding a strut that goes through the mag and has a pump handle on it, similar to the new SCAR-N's system. That would balance out the weight of the gun and make it a little more convenient for close combat.

A pump handle as a grip or a pump handle to prime/advance? Either one should be simple to ad, but might only be usable if the stock were folded.


#77029 Sledgehammer

Posted by CaptainSlug on 20 March 2006 - 07:22 PM in Homemades

Oh, well the design as-is now can be setup in two modes. One where the grip is the priming handle (allowing for prime-and-fire with only one arm) and the other with the stock folded and the side plates changed out so that the grip is stationary and the handles on the side are used for priming. I do however see now that a fore-grip would be more ergonomic as a priming handle so I may ditch the side handles so all that needs to be removed is a pair of plates that lock the grip to the priming action.

I'm also considering a removable barrel attachment for the front that would improve accuracy.


#77057 Sledgehammer

Posted by CaptainSlug on 20 March 2006 - 09:02 PM in Homemades

Here we go. Now all you have to do to lock the grip/trigger so that it's not used to advance/prime is simply move 4 thumbscrews. The added foregrip provides stability when the weapon is held with two hands and the stock is folded onto the top of the gun (or removed).
Posted Image
Posted Image
The removable barrel attaches to the foregrip with 3 thumbscrews and also acts as a clamp seal to hold the drum tightly when the weapon is ready to fire. It will improve accuracy, but will prevent the drum from being able to load stock darts. Therefore it is optional.

Having the removable barrel also allowed me to shorten the length of the drum.

The drum can't be easily ejected with the barrel in place so that seems to be another disadvantage of having it. I'm not sure how to fix that at the moment.


#77068 Sledgehammer

Posted by CaptainSlug on 20 March 2006 - 09:40 PM in Homemades

I think I've fixed the drum ejection problem.
Posted Image
I widened the clip retention rollers, moved the advancing tooth back a little bit to get it out of the way, and I added a tooth to the underside of the clip eject part so that it pushes the foregrip and barrel forward a little bit. Now the drum is much easier to remove whether the barrel is in place or not.


#77074 Sledgehammer

Posted by CaptainSlug on 20 March 2006 - 09:52 PM in Homemades

Wow, you can tell how easy it is to remove the clip from a rendering?
:P

Yeah, I've been doing this kind of thing too long. :ph34r:

In effect you will point the gun at the ground, press the clip-eject all the way down with your right hand which will advance the foregrip and barrel 1/4-inch". The drum will drop forward and can be pushed towards the top of the gun a little (either with your left hand or your leg) and it will fall to the ground as it passes over the barrel and foregrip.
Without the barrel attached you should be able to simply dump the drum in the same manner with only one hand used to hold down the clip eject.

It should also be fairly easy to design a straight clip to fit in the same mechanism that's meant to hold the drum.


#77077 Making A Homemade

Posted by CaptainSlug on 20 March 2006 - 09:57 PM in Homemades

You're pumping into a holding tank (bladder) which, after having been pressurized to an effective level is released by a trigger valve to fire the dart.
Obviously your pump will need a one-way valve so that your pumping action only adds air to the tank.


#77081 Boltsniper Scar-n Rifle Bs-8

Posted by CaptainSlug on 20 March 2006 - 10:03 PM in Homemades

Ok thanks for that i will look into brass. Also i have some PETG will that work because it dosn't seem that tight.

PETG round hollow rod has completely different inner diameters and trying to make boltsniper's design out of PETG would involve either a complete redesign of the measurements, or custom lathing the inner diameters of EVERY PETG piece to get it's dimensions to match the PVC parts used in this design.

For dimensional comparison you can look up the different pipe sizes to get their inner and outer diameters by poking around at http://www.mcmaster.com


#77087 Sledgehammer

Posted by CaptainSlug on 20 March 2006 - 11:00 PM in Homemades

Indeed, but I'm still thinking it's an odd trade-off since the only thing I would gain by going to a straight clip is reducing the weigh of the gun. Do you want 20 rounds loaded at a time, or 8 loaded and the rest in three spare clips?

The potential is there, but to make it as good as I want it to be I'll have to find a way to integrate a feed system similar to what was on the sledgehammer.
I'll have to take some time to figure that out.


#77134 Sledgehammer

Posted by CaptainSlug on 21 March 2006 - 07:08 PM in Homemades

Huzzah!
Posted Image
Posted Image
Minor edits on the clip retention system were needed to allow the acceptance of both a drum magazine and a straight clip magazine. The changes made will allow a 10-round straight clip magazine to be used in place of the drum.
The straight clip is also extremely easy to feed into the gun, carry on hook straps, and eject by holding down the button and tippin the gun to either side.

Now it kind of looks like a STEN...


#77235 Syringe Popgun

Posted by CaptainSlug on 22 March 2006 - 06:02 PM in Homemades

Okay the design that was inspired by this thread is actually quite simple. Since syringes are so cheap and effectively operate in this configuration as a spring plunger it would be fairly easy to make these in sets so that they could be arrainged in a clip or drum magazine. The advancing cycle of the magazine could have a groove track that as the magazine advances will prime each syringe in sequence and then release it.
The magazine would need to be advanced with either a crank or an electric motor, but the end result would be a multi-fire nerf gun that requires no pumping and no trigger mechanism.
If advanced with a crank the gun would be very similar to the razorbeast but without the flaky belt-feed system. If motorized the rate of fire could prove quite impressive.

I'll work up a design later tonight, this is really exciting.


#77237 Syringe Popgun

Posted by CaptainSlug on 22 March 2006 - 06:15 PM in Homemades

If done in the way I'm describing no trigger would even be required because if the plungers are primed on the advancing cycle they can also be released by it automatically once they reach the desired point in the cycle. You simply have the track drop-off at some point allowing the plunger to fire.

The trigger would be either negated entirely for the crank, or simply be the on-off momentary switch to activate the motor.

I haven't even thought of this as a possiblity previous due to the cost required and the complexity of having to make some many plugners and tubes, but being able to buy packages of syringes negate both of those downsides and would require minimal modification.


#77262 Syringe Popgun

Posted by CaptainSlug on 22 March 2006 - 08:47 PM in Homemades

I think the syringe head needs some surgery...

Yeah, I (or whoever wants to try the design first) might have to look at cutting the seal down or replacing it with a single O-ring.

I'll have a design sometime in the next 24-hours.

Even with the lowest-watt motors I have access to, none have the power to drive the barrels fast enough or have enough speed if geared down via drive belt(s).

I had a small 13RPM 12V turn-table motor assembly that would be perfect. That or something similar in the 10-50RPM range.
We're not talking alot of torque here and I have enough experience shopping for motors to know what I'm looking for.
But the simplest design for starters will be designed with a crank instead of a motor. Not aonly simpler, but authentic "gatling" to boot.


#77301 Syringe Popgun

Posted by CaptainSlug on 23 March 2006 - 02:48 AM in Homemades

I came up with a name for your syringe gun. Since it's small and a single-shot pistol like a Derringer you could call it the "Syringer".
;) sorry that was corny.

And here's the really basic workup of mechanics of what my mental plan was. The drum might have to have a larger diameter than shown here to make the advancing ramp at a shallower angle.
Posted Image
Posted Image
It uses a miter gear set inside so that you turn the crank counter-clockwise and in turn the drum rotates clockwise at the same speed. I made sure all of the parts in the design are both cheap, and accurate dimensionally.

Edit: If I can find the right electric motor or a donor cordless drill I may have found a much simply way of making the motorized version with a different trigger system. I'll start a new thread for that later.


#77302 Sledgehammer

Posted by CaptainSlug on 23 March 2006 - 03:00 AM in Homemades

It's going to take some time but I'm working on a template sheet for all of the parts so that I can use label paper as a direct cutting template. This will also allow me to accurately estimate exactly how many sheets of plastic I need. I probably already have more than enough polycarbonate in my scrap pile to make this so the only thing I would need to order is the spring and some O-rings.

So I'll be back with a full materials and costs estimate list in a few days. I have another project taking priority at the moment and I'd like to make some progress on it before getting distracted by this.


#77347 Sledgehammer

Posted by CaptainSlug on 23 March 2006 - 09:42 PM in Homemades

The clip is held from the underside by two retention rollers and one on the top. It's not going to go anywhere provided the eject button is clamped shut with enough force by the spring. The rollers work more effectively than a simple track and provided they're spaced correctly they can hold a drum or a straight clip.

A belt system would be rather difficult to make reliable. I'm working on a different design at the moment that uses a huge "gravity clip". I don't really want to release that design yet because that would be "teasing" since I REALLY don't have time to make it right now.

And I don't have plans to make this design in mass quantities, unless it proves dreadfully simple to make. Material costs are quire low since it was designed to be made out of scrap plastic that I can buy for a few dollars per pound.


#77382 Sledgehammer

Posted by CaptainSlug on 24 March 2006 - 12:12 AM in Homemades

Final version that has alot of small revisions. Mainly I needed to change the size of the plunger tank, which allowed me to change some things I wanted to previously but couldn't.
Posted Image


#77383 Syringe Popgun

Posted by CaptainSlug on 24 March 2006 - 12:16 AM in Homemades

It seems like it would be easier to just attach a rod in place of the gear on the drum, and chuck it in a cordless drill, making sure to set it as slow as possible.

It's definitely cool, and definitely possible, but my concern is whether you will store enough ammo to keep up with a high ROF.

You summed up EVERYTHING I was thinking about while working on the motorized version.
I'm not sure if I should post that design or not because I don't know when I'll get around to making it.


#77443 C.s.h.g.

Posted by CaptainSlug on 24 March 2006 - 08:06 PM in Homemades

Design was revised. New design can be seen starting at post# 192

Okay I was going to keep this one under wraps but it's just too much fun. Carbon's simple Syringe Gun experiment gave me a serious epiphany that lead directly to this design. However, since the potential ROF is rather high for the configuration I decided early on that a large number of barrels and plungers would get to be too heavy to be managable. So I leaned my original concept down to just 4 barrels and a gravity-feed system to compensate for the lower number of barrels.
Posted Image
Posted Image
The barrel set will be powered by a cordless power drill with an adjustable clutch, which I will have to modify to move the handle/trigger/battery to the front of the gun but have the motor chucked onto the main axle in the rear of the gun. The plungers and brass breech covers will both be driven back and forth by helical tracks cut from large diameter PVC pipe or Acrylic scraps.
Here's the plunger and it's track.
Posted Image
And the 19/32 OD brass breech similar to what is commonly used for breech modifications.
Posted Image

And taking many cues from actual gatling guns I had to make a set of feeding teeth that pull the darts from left to right as the fall in order to guide them into the opened breech.
Posted Image
The shuriken-esque piece in the center makes sure that only one dart advances inward far enough to allow the stopping gate to close off the hopper before the next dart tries to enter. I also added an eject port to the bottom of this chamber so that in the event that I find that I have to use shells I can simply cut the breech shorter so that it acts only as a vice for the shells and then once the dart gets fire the shell can be dropped out of the bottom of the gun.
The eject port on the bottom also allows darts that failed to fire to be dropped to prevent jamming.

What I find quite strange after completing this design is that it would actually be easier to make than my other designs, but it could cost quite a bit more if I can't find the large OD PVC pipes as scrap and I can't find a cordless power drill on clearance. Each barrel assembly is designed around standard PVC pipe sizes and fittings and would only require minimal cutting with a bandsaw to add the breech hole and it's track.
Posted Image

Thoughts?