Brass oxidizes as well, just at a slower rate. Personally, I use 1/2" brass, because I have weird foam. I know the HB guys use white foam and 19/32 brass, and I think i saw a longshot of theirs with welded copper, I'm not too sure though.if the surface of copper is marked and some copper in general, you will get oxidization.
SorrowX's Content
There have been 113 items by SorrowX (Search limited from 25-December 96)
#248606 Why Brass And Not Copper?
 Posted by
on 25 August 2009 - 11:16 PM
in
General Nerf
Posted by
on 25 August 2009 - 11:16 PM
in
General Nerf
#240780 Titan/magstrike Integration
Posted by
on 08 July 2009 - 08:23 AM
in
Modifications
Dude, that is seriously worth a James T. Kirk high five. It definitely reminds me of gundam. Anyways, finish that sucker up!

(picture courtesy of =jakethesnake= of nerfHQ)
(picture courtesy of =jakethesnake= of nerfHQ)
#288434 Titan Tank
Posted by
on 15 November 2010 - 01:37 PM
in
Modifications
Another option that would be safer to operate without a regulator is a pronane tank. I'm not talking about those big ones, of course, but the smaller ones that cost $2-$5. With a airsoft propane adapter (I reccomend the Airsoft Innovations yellow model) which is about $12 (and reuseable, of course) your titan tank will be able to shoot a titan missile about 80 feet, while still mainainting a relatively safer PSI of ~115 (DISCLAIMER: i say relatively because this is safer than using a CO2 tank without a regulator). The titan tank has a built in check valve, so you can patch the other inlet in the back and utilize the check valve as an inlet valve. By the way, this is not speculation, as I use this setup to power an airsoft rocket launcher that fires giga-stefans made out of pool noodles  .
.
.
#253911 Titan Barrel
Posted by
on 19 October 2009 - 01:51 AM
in
Modifications
In the great words of that almighty Canadian nerfer, Forsaken_Angel24, "Put some elbow grease into it!"
#275045 The Reconbow
Posted by
on 17 May 2010 - 02:09 PM
in
Modifications
Dude, thats sweet. You made a Recon/L+L hybrid. Do prime it like a NF and the actuate the breech, or is the function the same?
#200145 The Humming Bird
Posted by
on 01 January 2009 - 12:13 AM
in
Modifications
This is my second contribution to the NIC, I hope you all enjoy.
Materials needed:
about 3 inches of 1/2' pvc
dremel
9 volt battery
electric tape
epoxy or other adhesive( i used hot glue)
First, take apart your tommy 20 and remove the motor assembly. Now take your 1/2' pvc and cut it the same as in the diagram. Clean up your cut a bit, and glue the sucker in the middle of your T20 wheels. (make sure that the don't contact the pvc!) Now tape your battery o the pvc, and attach the wires and a switch or something else if you want, I chose to do it simpler. you could put a coupler on it and attach a hopper ish thing to it, but i choose to keep it like this.

and please hold as I get the actually picture of the tiny thing.
here we go...


Materials needed:
about 3 inches of 1/2' pvc
dremel
9 volt battery
electric tape
epoxy or other adhesive( i used hot glue)
First, take apart your tommy 20 and remove the motor assembly. Now take your 1/2' pvc and cut it the same as in the diagram. Clean up your cut a bit, and glue the sucker in the middle of your T20 wheels. (make sure that the don't contact the pvc!) Now tape your battery o the pvc, and attach the wires and a switch or something else if you want, I chose to do it simpler. you could put a coupler on it and attach a hopper ish thing to it, but i choose to keep it like this.
and please hold as I get the actually picture of the tiny thing.
here we go...


#200156 The Humming Bird
Posted by
on 01 January 2009 - 12:53 AM
in
Modifications
The ironic thing is, Nodoka is actually be using this thing at the next war.
its pretty much a motorized blowgun
its pretty much a motorized blowgun
#200240 The Humming Bird
Posted by
on 01 January 2009 - 03:22 PM
in
Modifications
You'd think that with buying two longshots, I'd have a spare handle, but alas, I don't. I do have an M16 handle, but that's for another project. And besides, it isn't that awkward to hold, its pretty comfortable in my hand. and the phallic-ness of it just makes it that more retarded.
#200151 The Humming Bird
Posted by
on 01 January 2009 - 12:37 AM
in
Modifications
I new i'd get this reaction  and bags, its gunna be pink or purple, whatever paint I get my hands on first.
and bags, its gunna be pink or purple, whatever paint I get my hands on first.
#237591 The Ghost V.4
Posted by
on 20 June 2009 - 06:09 AM
in
Modifications
Thats really innovative. Did you just hotglue the crossfire's catch to the titan trigger, or are they not attached at all?
#171935 Stripping Paint
Posted by
on 23 August 2008 - 11:07 PM
in
Modifications
Paint thinner or acetone. With acetone however, make sure its just the shell your working on or any adhesives that come in contact with the acetone will start to come apart.Hey, I'm new to the site. I've stalked you guys since pre-vulcan launch and I like it here. I just wanted to ask if there was a way to strip the paint off of my recon without ruining the detail of it? I'll send pics when I get some time... Off to work! >.<
#255724 Stiff Ball Valve?
Posted by
on 08 November 2009 - 07:38 PM
in
Homemades
I figured the same problem when building my first homemade. I found the lowest friction ball valves tend to be in the gas section. They cost a tinsy bit more, but is worth it. Low friction, threads fit on PVC threading, etc. here's a picture of one similar o the one I got at lowes. They work wonders. 

#326122 SorrowX 8-Shot Turrets 3.0
Posted by
on 30 January 2013 - 10:02 AM
in
Homemades
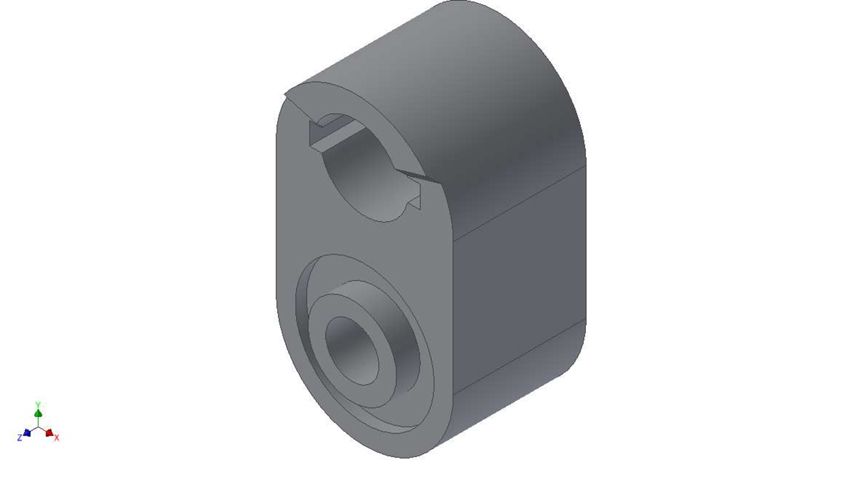
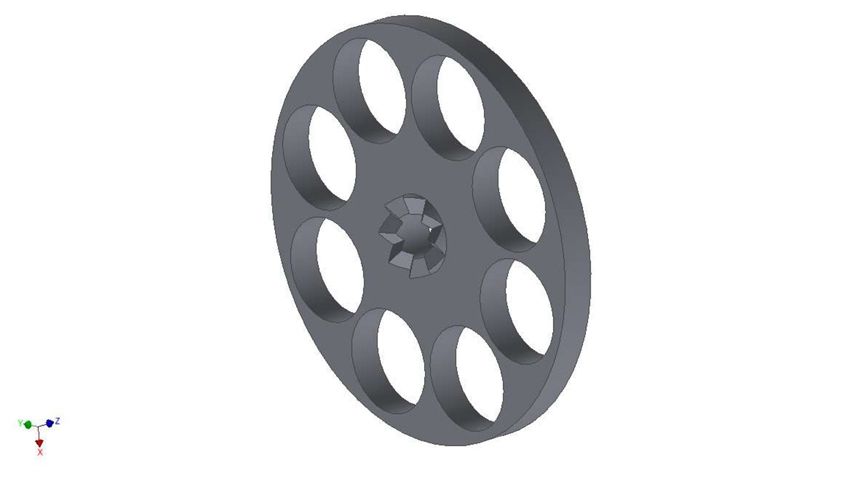
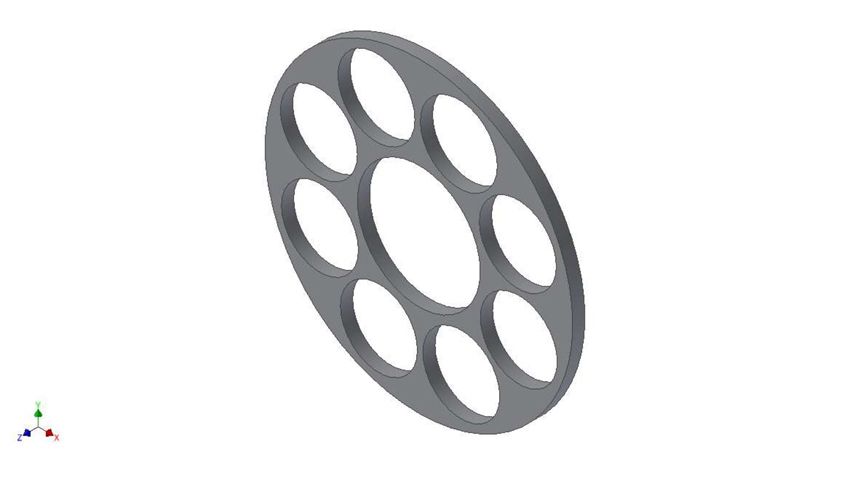
Since my recent return to the forum(and long before that, actually), people have been asking me for my turret files. Since I left the forum a couple years back, the original designs have been lost; the flash drive somewhere in my house, never to be seen again. I started to feel bad about having to tell people that, so I spent all last night redesigning them from the ground up. These turrets are slightly smaller than the previous designs, so those that can produce them can do so at a lower cost than I ever could. I remember development lessons from the original revisions, so there shouldn't be any serious kinks with them.
The files were drawn in Autodesk Inventor 2013, and are in IPT format. I'm not going to include a bunch of different format this time, because that is really a pain. If you know how to operate a 3D printer or CNC mill, you should know how to convert files.
The turrets are designed to use the number -206 O-Ring, from The O-Ring Store. You can use whatever material you prefer, but if I remember correctly, I used Buna-N 70 rings. The turret mounting screw/bolt hole is large enough to fit a 1/4 bolt. The lug sprng hasn't been firgured out, so use whatever works.
Here's some pictures, and a Download link below.
DOWNLOAD:
turret download
For those of you who wist to produce to sell, you are welcome to do so, just remember to credit the designer
#326147 SorrowX 8-Shot Turrets 3.0
Posted by
on 30 January 2013 - 03:48 PM
in
Homemades
I'll do STL, since i can readily convert it to.It's nice of you to do this, but could you load them in a slightly less obtuse format? .Dxf, .Dwg, .obj, .stl; or something that is otherwise industry-standard?
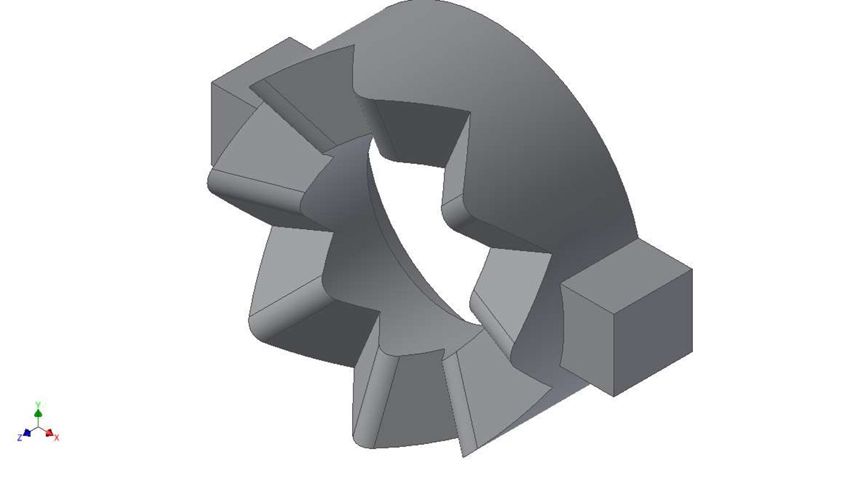
The slanted teeth on the lug is for a problem some of the first printed turrets I made, where the sharpness of the lug teeth would cause it to chip away the top layer.It looks like the teeth are slanted so that there will be a gap between them on the inside, but not on the outside. Why is that?
#164981 Sorrow's "aothino"
Posted by
on 28 July 2008 - 03:50 PM
in
Nerf Wars
Just so everyone knows, Aothino( Pronounced "outheeno" ) stands for Attack On The Hillside Intermission Nerf Outing.Also, post to say if you are coming or not. Now, on to the goodies.
http://img156.images.../aothinonc2.jpg
Ralph B. Clark Regional Park
Rear Entrance:
Latitude: 33°53'29.38"N
Longitude: 117°58'46.76"W
Main Entrance:
8800 Rosecrans Ave
Buena Park, CA 90621
Time: 10:00 AM
Date: 16th of aug.
Aothino is very open for changes in date and location at the moment due to its being my first hosted outing. It will be held at Ralph B. Clark Regional Park, at 10:00 AM.
Rules:
1. Eye Protection Required for EVERYONE, no exceptions. If needed and if anyone feels like bringing extra, we will lend you a pair.
2. Nerf Melee weapons (Axes, Swords, Gunblades, etc) are allowed, as long as they are padded with foam to the point where they are cushy. hits are only allowed on sides/back/front.
3. Leave nothing behind. That means darts, bottles, cans, trash, etc. Pick up after yourself.
4. Follow park rules. Plain and simple.
Any tips on war organization, please feel free to add. Any constructive criticism is greatly appreciated.
#263485 Soothsayer Is In The Hospital
Posted by
on 28 January 2010 - 01:11 AM
in
Off Topic
Zorn, I think thats a bit messed up. Its good to hear that he is ok. Hope he gets better.
#257452 Son’s 1 Pic Paint Tutorial
Posted by
on 28 November 2009 - 03:33 PM
in
General Nerf
I see this as very helpful to new painters out there. I wish I had this information before I did my first spray painting. Good job, SonReeceSonJensen.
#217929 Socal Nerf
Posted by
on 14 March 2009 - 05:10 PM
in
Nerf Wars
it feels as if any hope I had was swapped for sorrow, so thanks, you feel my pain.
What's that supposed to mean? Also, by "Valencia," do you mean "Placentcia" or " Valencia Dr." ?
#274443 Scunwar
Posted by
on 10 May 2010 - 01:20 PM
in
Nerf Wars
That is 6 days before my surgery...but my group and I MAY be able to go. There is the possibility of my attendance, but if I'm not able to, I'll try to send my group off under the care of Fanik or ADHD.
#293865 Rpmbnb! Updated With More Goodies!
Posted by
on 03 February 2011 - 11:01 PM
in
Homemades
I will have the zip file up soon, and it will include ALL of the parts, ready for inventor, solidworks, catalyst, etc.Excellent work, I may just have to ask you for those Inventor files (The handle, trigger, catch, and rear endcap in particular)
#293885 Rpmbnb! Updated With More Goodies!
Posted by
on 04 February 2011 - 02:15 PM
in
Homemades
It was in the very beggining.Why did I just watch a video of you talking? I wanted to see the gun shoot. False advertising!
#293855 Rpmbnb! Updated With More Goodies!
Posted by
on 03 February 2011 - 10:14 PM
in
Homemades
RPM-Built Nerf Blaster
Proving myself and others wrong

Introduction: Since I started nerfing, the idea of a viable nerf blaster being built by a Rapid Prototype Machine has been put down. I tried before, but never seemed to get the project off the ground. After that, I jumped on the wagon that it couldn’t be done. Recently, a friend of mine managed to push me off of that wagon and get started again. Needless to say, my project was a success. Of course, not everything in the blaster was made using an RPM, but the majority of the hard to manufacture parts are. The only things not made using the RPM are the cylinder, piston rod, and barrel for obvious reasons. In other words, the plunger tube, plunger rod, and barrel still come from elsewhere. I understand the people like boltsniper have made components such as magazine wells for his blasters, but I wanted to take it a step or two above by actually making crucial components from an RPM. Anyways, on to the meaty goodness.
RPM Talk: For this project, I used Autodesk Inventor 2011 and Catalyst to design and process my blaster. The machine used is a Dimension SST768 and the model material is P400 ABS. I used a sodium hydroxide/water solution in a specialized bath set at 70°C to remove the soluble support material as well as to somewhat strengthen the bond of the model material. All of the parts built used a solid material setting for maximum strength and longevity.
Design: The blaster was mainly designed as a proof-of-concept build, so almost anything can be changed design-wise. I designed it to use 1-½ PVC as the plunger tube. The plunger rod is ⅝ round Nylon rod, but that can be easily swapped for square rod with small changes in the design of the catch base, catch and plunger head. I chose to make use of the many tools available at my school, so I used a rounded catch face design and a lathe to carve the catch face itself. This can easily be substituted for a nitefinder-style catch system.
Strength: I have yet to range test it, but that’s not really a big concern for me. My main concern is for how long it will last. So far, the parts has withstood many hours of dry-firing without any padding of any sort, any there is still no sign on any physical damage. I am currently using what my friend tells me is plus-bow spring to power the main mechanism. Half of these springs plus a normal LS spring pushes longshots to around 100’.
Pictures: Well, this part is pretty self-explanatory.
Stripped:

Printed parts only:

Grip:


Trigger:

Grip AND Trigger:

Catch:

Catch inside catch base:

Piston head:

Cylinder Head:

Primed:


Notes: If anyone wants the designs or files, I can send it to them via email, just PM me. You guys are welcome to the knowledge. To be honest, my designs aren’t the greatest, and some do have trouble understanding them. If those who request the files are willing to wait a short while, I can make revisions of my designs that are much clearer and easier for everyone to understand.
Video Is Up!!!
Files are up!!! http://www.mediafire...l99ncxy0e3d0nua
#294050 Rpmbnb! Updated With More Goodies!
Posted by
on 07 February 2011 - 01:38 AM
in
Homemades
my talk
It may have been sodium hydroxide and it may have worked, but in that case you had a base bath. I admit I don't know anything about ABS chemistry in particular.
i got this from following a few links on wikipedia, and it sums up what i have access to:
A "water-soluble" material can be used for making temporary supports while manufacturing is in progress, this soluble support material is quickly dissolved with specialized mechanical agitation equipment utilizing a precisely heated sodium hydroxide solution.
#293870 Rpmbnb! Updated With More Goodies!
Posted by
on 04 February 2011 - 12:20 AM
in
Homemades
it depends on the RPM i would assume, but mine feel kind of like those 'holographic' pokemon/baseball cards.
#294643 Rpmbnb! Updated With More Goodies!
Posted by
on 17 February 2011 - 07:54 PM
in
Homemades
Well, i talked it over with my teacher, and i'm cleared to sell. i was allowed to make them for free, but i can no longer do that as my teacher is paying for the material out of her own pocket. that means i can't offer them at my projected price of $20 shipped. as it turns out, to make a basic RPMBNB and the average rate of $15 per cubic inch, it would cost around $250 to print them. Ouch. Luckily for everyone interested, my teacher is only charging me $30 per kit, turret or basic/Wye, so i'm thinking of selling the kits for $50 shipped or $30 shipped with a trade that i'm comfortable with, as well as selling individual parts and the price or shipping and teacher's price. Thats 10-15 for shipping, 30 for the teacher, and 5-10 or if its a trade, just 30 for the teacher and i'll pay shipping. I'll even throw in a few goodies every now and again when i feel like it as well as make custom kits and parts to specifications with no extra charge, unless the teacher says otherwise. What do you guys think, sounds fair?
and given incentive, i might also make custom, possibly rearloading magstrike clips that accept a barrel type of buyer's choice, hehe.
and given incentive, i might also make custom, possibly rearloading magstrike clips that accept a barrel type of buyer's choice, hehe.
#294607 Rpmbnb! Updated With More Goodies!
Posted by
on 16 February 2011 - 11:30 PM
in
Homemades
WooHoo! More printed goodies! Ok, here I have a printed turret assembly(THAT WORKS!), as well as a printed Wye and dart door for the ever popular hopper clip. On another note, i have a vertical foregrip and a crutch stock added for ergonomics.


I'm also working on a new homemade, a printed N-TS, although its not done yet.

also, i apologize for the double post.
I'm also working on a new homemade, a printed N-TS, although its not done yet.
also, i apologize for the double post.
#293971 Rpmbnb! Updated With More Goodies!
Posted by
on 06 February 2011 - 02:56 AM
in
Homemades
This is awesome, thanks for providing the files you used. Though I must question your acid bath consisting of Sodium Hydroxide...
If you don't mind, how much did it cost to print?
I'll definitely be looking to make one of this, my friend has access to a 'Stratasys Rapid Prototyper', hopefully we can churn out one of these awesome blasters.
I'm pretty sure it was sodium hydroxide... It was completely free for me, as my school is awesome. and stratasys makes catalyst, so it's almost guaranteed it would work.
#293858 Rpmbnb! Updated With More Goodies!
Posted by
on 03 February 2011 - 10:27 PM
in
Homemades
Ohh, what kinds of RPMs do your schools have? I should have the files edited and ready by Tuesday at the latest. If you guys decide to make one using my designs, feel free to post the pictures here.
The durability of the printed parts is very good. Nothing feels like its going to snap, and have withstood hours of dry-firing without any padding so far.
The durability of the printed parts is very good. Nothing feels like its going to snap, and have withstood hours of dry-firing without any padding so far.
#253549 Recon Question
Posted by
on 14 October 2009 - 07:19 PM
in
General Nerf
As far as I can remember, the only difference between 1st Gen and 2nd Gen recons is the cap the covers the plunger when primed. They replaced the old recons with this due to a few reported incidents of friction burns, etc. Other than that, maybe Hasbro put a weaker spring. Thats as many as I can think of.
#253564 Recon Question
Posted by
on 14 October 2009 - 08:30 PM
in
General Nerf
No, its just there to protect the user from friction burns. And for Hasbro to cover their own asses. I reccomend craft foam padding, and not using an overpowerful spring. If you wouldn't put it in a nitefinder, don't put it in a recon.
#182318 Recon Breech Write-up
Posted by
on 07 October 2008 - 11:07 PM
in
Modifications
each mod works in conjunction with each other. without the spring in the stock, range is dead by so much.I didn't have time to accurately measure ranges before I had to return it to my friend who asked me to mod it, but by estimating, it got about 85-90 ft. flat with a cdtd...
Get out your tape measure and start counting. No one will believe a Recon that gets 85ft without the internals being replaced with a AT2k.
#182324 Recon Breech Write-up
Posted by
on 07 October 2008 - 11:24 PM
in
Modifications
its pretty much a stefan made with the foam of a tagger dart. it fits just fine.Wait a sec, how are you getting CDTS's to shoot out of 1/2" brass?
#182304 Recon Breech Write-up
Posted by
on 07 October 2008 - 10:31 PM
in
Modifications
Hello NIC,as many of you know, this is my first write-up, so please go easy on me.
This write-up is for the Recon CS6, and will hopefully provide a standard mod for this blaster. This mod requires basic-moderate modding experience.
Materials Required:
1/2' brass
17/32' brass
9/16' brass
19/32' brass
5/8' brass
Plumber's Goop or other adhesive(your going to need to have one that at least similar consistantcy)
It is recommended you do the following mods first:
http://nerfhaven.com...showtopic=10472
http://nerfhaven.com...showtopic=10498
http://nerfhaven.com...showtopic=10436
http://nerfhaven.com...showtopic=10444
Now, on to the goods.
remove your dart tooth and clip lock. you wont be needing them. See those screws under the bolt sled? take them out and take out whats inside that little box. you wont be needing these either.


Now its time to get to the main part. Take your 1/2' brass and cut it down the middle about 3.5 inches. Mine isn't that long, i know, i screwed up. when your done cutting, clean up the cut that way the dart will be undamaged. now shove the uncut end into the breech. make a mark and measure. DO NOT CUT THIS MARK! from the front where the halfway cut ends, cut the distance from there, but leave some room.


Now coat the end of the brass in goop and shove it into the stock breech as far at it can go.while we let that sit, we work on the other end of the breech.


this is the part where my camera died, so your going to have to work off of words from here until i get some pictures. Take a 6 inch section of 17/32' brass and put it into a 2 inch section of 9/16' brass with about 2 inches of nothing but 17/32' brass and keep it that way. now take this and stick it into a 4.5 inch section of 19/32' brass.now take that heavy thing and stick it into your 5/8' brass. now the the end with the 17/32' brass exposed and put it in the stock breech receiver. it didn't work out too well by itself, so i ended up permanently attaching the barrel extension to the receiver and gooping it into that. Make sure that the breech fully closes into the receiver before gooping. this is critical, and It absolutely sucks that I have no picture to show you how to do this. Let the goop dry, then assemble your new weapon and be amazed by its weight. Then be amazed by its ranges.
I didn't have time to accurately measure ranges before I had to return it to my friend who asked me to mod it, but by estimating, it got about 85-90 ft. flat with a cdtd. I really don't know how accurate those estimates are, so don't trust your judgment on that. this is my first write-up, so of course there is bound to be errors.
This write-up is for the Recon CS6, and will hopefully provide a standard mod for this blaster. This mod requires basic-moderate modding experience.
Materials Required:
1/2' brass
17/32' brass
9/16' brass
19/32' brass
5/8' brass
Plumber's Goop or other adhesive(your going to need to have one that at least similar consistantcy)
It is recommended you do the following mods first:
http://nerfhaven.com...showtopic=10472
http://nerfhaven.com...showtopic=10498
http://nerfhaven.com...showtopic=10436
http://nerfhaven.com...showtopic=10444
Now, on to the goods.
remove your dart tooth and clip lock. you wont be needing them. See those screws under the bolt sled? take them out and take out whats inside that little box. you wont be needing these either.

Now its time to get to the main part. Take your 1/2' brass and cut it down the middle about 3.5 inches. Mine isn't that long, i know, i screwed up. when your done cutting, clean up the cut that way the dart will be undamaged. now shove the uncut end into the breech. make a mark and measure. DO NOT CUT THIS MARK! from the front where the halfway cut ends, cut the distance from there, but leave some room.

Now coat the end of the brass in goop and shove it into the stock breech as far at it can go.while we let that sit, we work on the other end of the breech.

this is the part where my camera died, so your going to have to work off of words from here until i get some pictures. Take a 6 inch section of 17/32' brass and put it into a 2 inch section of 9/16' brass with about 2 inches of nothing but 17/32' brass and keep it that way. now take this and stick it into a 4.5 inch section of 19/32' brass.now take that heavy thing and stick it into your 5/8' brass. now the the end with the 17/32' brass exposed and put it in the stock breech receiver. it didn't work out too well by itself, so i ended up permanently attaching the barrel extension to the receiver and gooping it into that. Make sure that the breech fully closes into the receiver before gooping. this is critical, and It absolutely sucks that I have no picture to show you how to do this. Let the goop dry, then assemble your new weapon and be amazed by its weight. Then be amazed by its ranges.
I didn't have time to accurately measure ranges before I had to return it to my friend who asked me to mod it, but by estimating, it got about 85-90 ft. flat with a cdtd. I really don't know how accurate those estimates are, so don't trust your judgment on that. this is my first write-up, so of course there is bound to be errors.
#183319 Recon Breech Write-up
Posted by
on 12 October 2008 - 05:29 PM
in
Modifications
Yes, actually. average ranges are 73 ft flat. It might appear different for others, but my testing range is indoors, and the only problem is that it occasionally clips the tail of the dart. 1/2" brass makes good breech material, not good barrel material(unless you have a super soaker nerf gun).I've got all this 1/2" K&S brass I bought since I was given the impression it could be used as a barrel material, it was also more available than the other sizes of K&S brass. I can push a tagger about 15mm in 1/2" brass before it buckles. Since I've measured tagger sizes with calipers, I take it that you guys must heatgun your foam or compress it to get it to fit.
Nice writeup for those who use 1/2" barrel too bad it doesn't take larger sized barrels. Are there accurate measurement of ranges for this mod yet?
#182642 Recon Breech Write-up
Posted by
on 09 October 2008 - 04:18 PM
in
Modifications
All of the breeches I make for my guns use 1/2" brass, it seems to work just fine, as far as I can tell. its a very tight fit, I understand, and the main reason i use 1/2" brass as the main breech is because I have a hard time finding 9/16" brass in any hobby shop or hardware shop that sells K&S Brass. Also, the main reason I prefer 1/2" brass is because it holds in the dart really well, which allows more pressure to build up before the dart exits the breech and continues into the barrel. It also nullifies the need for tightening rings, but you could have them on anyways. Ask Falcon, or anyone else in so-cal that designs and makes their own breech for primaries, and the majority of us will admit to using 1/2" brass. Plus, 17/32" brass can't be jammed into the recon stock breech that well without sanding down the inside.1/2" brass is the outer diameter of the brass tube, so if a tagger is 1/2" in diameter how is meant to fit into a hole with a diameter less than 1/2"?
Also in Angel's breech mod he explicitly states the 1/2" brass is to push the dart forward from the breech into the 19/32" brass barrel (with tightenging rings). I have 30 taggers and 3 x 12" lengths of 1/2" brass tube and none of them fit, actually none of my darts will fit 1/2" brass tube, even my 10mm FBR won't slide into a 1/2" brass tube. Using vernier calipers, foam from regular 30pack of nerf dart taggers are 0.4830" and I.D. of 1/2" brass is 0.4710". Explain yourself.
#255749 Raider With Brass Breech And Integration
Posted by
on 08 November 2009 - 10:33 PM
in
Modifications
First off, I'd like to say....SCORE! I got mentioned!.....OK, now that that's out of the way, nice mod. I did a similar breech on my raider, and it works just fine with streamlines, without reduced ROF and its drum mag capable. As soon as I get a working camera, I'll put up some pics and a video so maybe some fine tuning can be done. Also, interesting 2K addition, but I like not having external tubing. Nothing personal against your mod, its just a preference. For a backup, I simply bolted an Eliminator in place of the priming fore-grip. I still get a vertical fore-grip, along with a backup shot!
#248129 Raider Overhaul Write-up
Posted by
on 22 August 2009 - 02:11 PM
in
Modifications
I'll post all the factors that contributed to it's range:With stock streamlines, some wind, and un-accounted for dart skip, sure. I didn't post the ranges at which I picked up my darts, which were all about 50 to 70 feet away.Also, only 40? mine's hitting 60 flat, and I haven't even installed the breech yet.
-Single BB 2.5 inch stefans, very dense foam (I have to push them into the bolt manually, the dart tooth does nothing)
-Seal improvement with new O-rings
-Recon spring replacement
-foam padding on plunger and back of plunger tube
-Spring addition (Not a [k26] spring, just a stretched stock spring. I didn't even need to drill out the stock)
- Hot glued a Red Seal to the top of it (Ask RedHead)
There was maybe a bit of wind, maybe. As for dart skip, I think the plants I shot into took care of that. Plus, you know how heat increases dart quality, therefore, a bit of a tighter fit.
#248072 Raider Overhaul Write-up
Posted by
on 22 August 2009 - 12:47 AM
in
Modifications
I'll post this little thingie I explained in the other Raider thread, just in case anyone happened to miss it.
Also, only 40? mine's hitting 60 flat, and I haven't even installed the breech yet.
For anyone who wants to know how slam fire works yet doesn't have a mechanical mind-state, I may be able to help. (This is not speculation, I own a Raider)
First off, study and memorize this picture. (picture of internals courtesy of SPV999)
For slam fire, the trigger would be depressed, pushing the nub on part 1 of catch system part way up(Part one of catch system will be from now on referred to as 'P1'). As the user primes the blaster, the forward nub on the boltsled presses down and locks the top-side triangular piece depressed as the plunger tube catches on P2( part 2 of the catch system). So now, the bolt sled is pulled back, the plunger tube is caught, the trigger is being pressed, and P1 nub is partway up. As the user closes the breech, the rearward nub (in the picture, the nub on the boltsled that is touching P1) catches and pulls forward P1, pushing the P1 nub fully up, pressing on P2 and firing the blaster.
Hope this clears up the slam fire speculation!
EDIT
To make it so you can deprime it even when the boltsled it pulled back, you have to get rid of the slam fire. You have to glue P1 forward with some hotglue, so that P1 is stationary, in the forward position.
Also, only 40? mine's hitting 60 flat, and I haven't even installed the breech yet.
#246598 Raider Cs-35: Overview / Overhaul
Posted by
on 11 August 2009 - 04:49 PM
in
Modifications
For anyone who wants to know how slam fire works yet doesn't have a mechanical mind-state, I may be able to help. (This is not speculation, I own a Raider)
First off, study and memorize this picture. (picture of internals courtesy of SPV999)

For slam fire, the trigger would be depressed, pushing the nub on part 1 of catch system part way up(Part one of catch system will be from now on referred to as 'P1'). As the user primes the blaster, the forward nub on the boltsled presses down and locks the top-side triangular piece depressed as the plunger tube catches on P2( part 2 of the catch system). So now, the bolt sled is pulled back, the plunger tube is caught, the trigger is being pressed, and P1 nub is partway up. As the user closes the breech, the rearward nub (in the picture, the nub on the boltsled that is touching P1) catches and pulls forward P1, pushing the P1 nub fully up, pressing on P2 and firing the blaster.
Hope this clears up the slam fire speculation!
EDIT
To make it so you can deprime it even when the boltsled it pulled back, you have to get rid of the slam fire. You have to glue P1 forward with some hotglue, so that P1 is stationary, in the forward position.
First off, study and memorize this picture. (picture of internals courtesy of SPV999)
For slam fire, the trigger would be depressed, pushing the nub on part 1 of catch system part way up(Part one of catch system will be from now on referred to as 'P1'). As the user primes the blaster, the forward nub on the boltsled presses down and locks the top-side triangular piece depressed as the plunger tube catches on P2( part 2 of the catch system). So now, the bolt sled is pulled back, the plunger tube is caught, the trigger is being pressed, and P1 nub is partway up. As the user closes the breech, the rearward nub (in the picture, the nub on the boltsled that is touching P1) catches and pulls forward P1, pushing the P1 nub fully up, pressing on P2 and firing the blaster.
Hope this clears up the slam fire speculation!
EDIT
To make it so you can deprime it even when the boltsled it pulled back, you have to get rid of the slam fire. You have to glue P1 forward with some hotglue, so that P1 is stationary, in the forward position.
#280329 Quick Question About Maxshot Like Blasters
Posted by
on 15 July 2010 - 02:36 PM
in
Modifications
Staying on topic, It looks to me to be like a wheel, judging by the axle. I could be wrong, so don't quote me on it. If anything, asking some of the other nerfers around here. I'm fairly sure BagHead or Just Some Bob will know though.
off topic:
off topic:
Incredible. I don't think I've heard any Eco-threats until now. added that hilarious quote to my signature, while playing with my butthole.Please stop punishing the literate. If you don't fix your manner of posting before your next post, I'm gonna take you out like the Gulf Coast's Marine Ecosystem.

