Jump to content


Gyrvalcon's Content

There have been 104 items by Gyrvalcon (Search limited from 11-May 97)


By content type

See this member's


Sort by                Order  

#85298 Plunger How-to

Posted by Gyrvalcon on 18 July 2006 - 05:59 PM in Homemades

This How-To is not for a new plunger concept. It is simply a clean, easy way to make plungers for spring-powered homemades. Although there have been other plunger How-To's, they have involved dremeling a channel to seat the O-ring, which I find difficult. This technique was developed with the help of Prometheus.

Although this write-up will detail a plunger for 1" thinwall PVC, it could be modified for any pressure chamber diameter, as long as fittings and O-rings are available.

Materials:

-1" thinwall PVC
-3/4 PVC endcap
-3/4 PVC pipe
-O-ring w/ O.D. of pressure chamber I.D.
-Electrical Tape
-CA adhesive

Tools:

-Dremel Rotary Tool
-Cut-off Wheel
-Sanding Disc or Super-Duty Cut-off Wheel
-Drill
-3/32" Drill Bit
-Craft/Utility Knife
-Pencil

Method

1) Marking the Cut (skip this if you can make a 90 deg. cut w/out measuring)

On a short piece of PVC (1"-4"), make a mark 1/2" from the bottom. Drill a hole at this mark, so that a pencil-tip can poke through. I used a 3/32" bit.

Posted Image

Insert an easy-to-handle (1' for me) peice of 3/4" PVC into the 3/4" endcap, then insert the capped 3/4" PVC into the prepared 1" thinwall PVC. Set the assembly on a solid surface, and holding the pencil in the hole as illustrated, carefully rotate the 3/4" pipe+endcap. After one full roation, pullout the PVC

Posted Image

After one full rotation, pull out the 3/4" endcap and check if your line turned out. It should look somewhat like this.
If it is not satisfactory, erase it and try again.

Posted Image

2) Cutting and Sanding

Using your Dremel and Cut-off Wheel, make the cut. Go slowly, and keep good control of the Dremel, it may jump. I keep the endcap on the piece of PVC for more control. When you have separated to two peices, trim off any burrs or excess and sand the two new faces smooth. I use the face of the Super-Duty Cut-off Wheel to do this, some people use the Sanding Disc. Be careful not to take too much off.

Posted Image

3) Securing the Plunger Face

Put the endcap onto the piece of 3/4" pipe you are using as your plunger shaft/spacer. This may take some force. A sharp whack on the workbench worked for me. Put a few drops of CA adhesive around where the fitting and pipe join. It should work itself into the joint and bond it within a minute.

Posted Image

4) Spacing the O-ring

Wrap Electrical Tape tightly around the pipe where it meets the endcap until it fits the O-ring snugly. The Electrical Tape must be tight, or it may compress, and you will lose seal as it is used. Lube up a piece of 1" thinwall and pull the plunger through it a couple of times. Hold it up to the light, and see if any light is getting through, and try blowing through the 1" past the plunger to check the seal. Add or remove Electrical Tape until you get a good fit.

note: The O-rings I use are 1 1/8" O.D. , 3/32 width, part # 3233-860 at my local Home Hardware. The case labelled them as "Delta, Peerless, Waltec.

Posted Image

5) Trimming the Electrical Tape

Using a Craft/Utility Knife, cut all the way around the O-ring. Pull off the excess Electrical Tape. When finished, it should look somewhat like this.

Posted Image

6) Finishing the Plunger

Put the other half of the endcap on, and bond it, if needed, with CA adhesive. If you are not using 3/4" PVC as your plunger shaft, cut it off at the base of the plunger and insert the shaft of your preference.

Posted Image


Congratulations, you now have a clean looking, clean sealing plunger, suitable for any spring-powered homemade.


-Gyrvalcon


#196861 Hornet Issues

Posted by Gyrvalcon on 17 December 2008 - 08:52 PM in Modifications

I bought a Nerf Hornet from one of the guys at Massacre, and to my chagrin it's not doing so hot.

My diagnoses:

One of the blast chambers/quick exhaust valves is leaking. This keeps the internal pressure of the whole gun low, so that it can fire, but doesn't get much range. If I can't fix the valveon the bad blast chamber (doubt it), is my only option to amputate/plug the faulty blast chamber?

I'm not including pics just because there's nothing visibly wrong with it, I'm just looking for a second opinion.


#196863 Hornet Issues

Posted by Gyrvalcon on 17 December 2008 - 09:09 PM in Modifications

Well, maybe I'll just tear the thing apart and try a FANG style blaster using stock parts. Thanks for the input.

By the by, does anyone have a ballpark pressure rating for the Hornet blast chambers?


#111877 A Realy Simple Home Made

Posted by Gyrvalcon on 18 June 2007 - 03:33 PM in Homemades

Won't the handle that you added to the ball valve just make for a slower release? You get lots of torque with that, but not as much speed, right?


#120410 Nerf Shotgun

Posted by Gyrvalcon on 19 August 2007 - 12:23 PM in Off Topic

Because the blasters in stores are marketed towards a younger age bracket, the force needed to cock them must be fairly low, or kids won't be able to use them. As others have said, if you think you need something more, then go ahead and make it yourself.


#86628 Nite Finder Spring Replacement

Posted by Gyrvalcon on 06 August 2006 - 01:22 PM in Modifications

This isn't a spring replacement, he added another spring between the plunger shaft and the original spring


#87488 The Bull

Posted by Gyrvalcon on 14 August 2006 - 11:48 PM in Homemades

No Dremel??
Oh The Agony, The Suffering...
I couldn't manage without mine, and that's not the first power-tool-free blaster you've made, is it?

Anyways, nice homemade, but what do you use to bond the pieces?


Oh, and congratulations on the new camera, it's a big improvement over the old one.


#108469 Help With A Design

Posted by Gyrvalcon on 30 May 2007 - 09:40 PM in Homemades

I echo CaptainSlug on this one. Greenough said "Form ever follows Function", and I'd be inclined to agree. A blaster with the right balance between usefulness and ergenomics posesses its own asthetic appeal.

That and the chances are that you'll get hung up on looks and planning, then never build the thing.


#87489 Algonquin Park Nerf War

Posted by Gyrvalcon on 14 August 2006 - 11:58 PM in Nerf Wars

Damn, I read the title and thought "Algonquin Park"!!

Posted Image

But alas, it is not to be.

Cause Algonquin Park, man... 7,725 square kilometres (2,983 square miles), 2400 lakes, and Red Wolves.

Hot Damn.


#80662 Stomp Rocket

Posted by Gyrvalcon on 23 April 2006 - 04:30 PM in Modifications

I have played around with them occasionally, and they can certainly get some distance depending on the weight of the person stomping. Although I haven't officially tested ranges, they get to approximately 100' vertical. As for replacing the pipe, I don't understand fully what you are suggesting. Are you suggesting simply replacing the stock post with PVC? And if so, why?


#116704 Semi-auto Dart Tag Blaster

Posted by Gyrvalcon on 21 July 2007 - 04:56 PM in Modifications

These forums are a veritable vault of knowledge. Chances are, the topic you are bringing up (Nerf AEGs) had been discussed, perhaps at length. You should go ahead and read through the older posts, perhaps search for some different DTG modifications, then maybe sit down and mod your gun yourself. Not only will you get a lot more out of the process, you won't piss off the rest of us.


#208124 Modified Saw

Posted by Gyrvalcon on 31 January 2009 - 02:04 AM in Off Topic

Posted Image

Posted Image

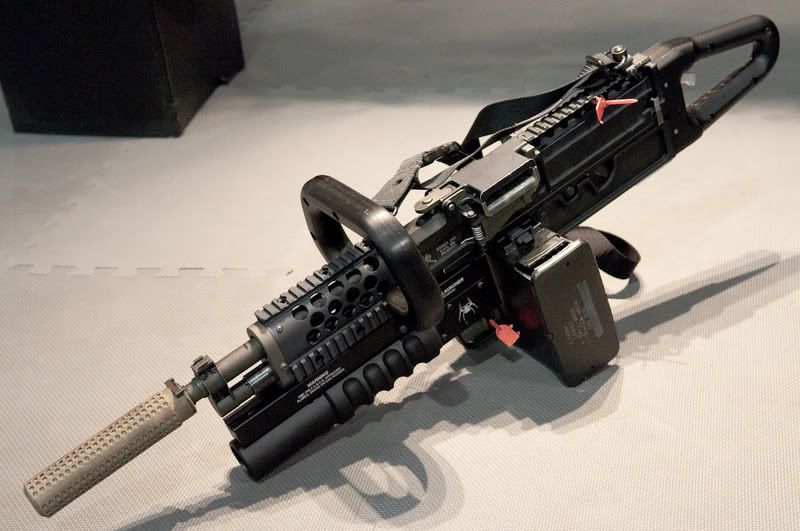
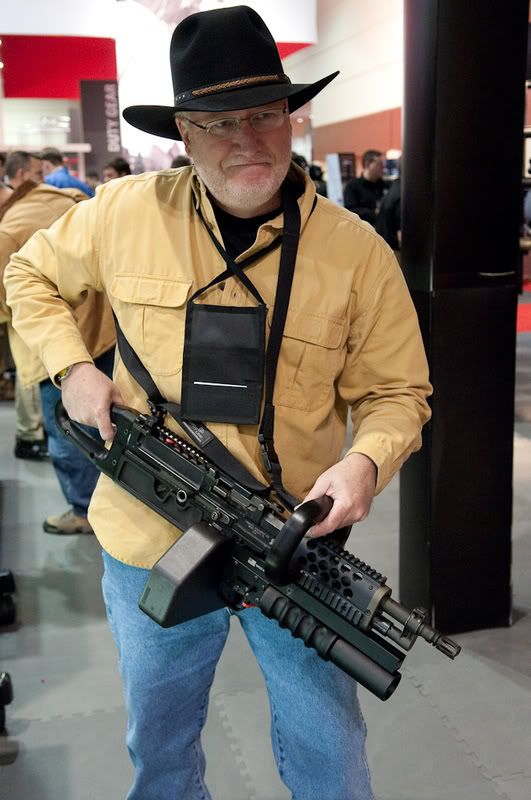
I found these pictures while browsing a popular imageboard. I don't usually post ephemera like this, but I though some folks might get a kick out of it; it sure does look like the NERF Vulcan, doesn't it? Apparently it's a M249 SAW with a 37mm grenade launcher and some obvious cosmetic modifications. It was a one-off for SHOT 2008, as the story goes.


#166837 Homemade Magazine

Posted by Gyrvalcon on 06 August 2008 - 02:56 PM in Homemades

I've found a pretty good material in the springs that drive crappy little measuring tapes. I originally intended to use it as a constant-force spring, but I found that it works great if you just bend it into a zigzag shape. It's not strong enough to really squish my darts, and it's easy and clean to make.

The measuring tape I used sold at my hardware store for around a dollar, and had a magnet on it to hold it to whatever. It was tiny, too, maybe 1.5" square in profile.


#208220 Modified Saw

Posted by Gyrvalcon on 31 January 2009 - 01:06 PM in Off Topic

Cool SAW/Grenade launcher thing. Very realistic.


You do realize that it's a real firearm, right? That's why it's so "realistic".

And yeah, the whole thing was built around the SAW/Chainsaw pun, I think.


#116701 Member # 1

Posted by Gyrvalcon on 21 July 2007 - 04:48 PM in Off Topic

He beds your mother. Nightly.


#94901 Baloon Grenade

Posted by Gyrvalcon on 20 November 2006 - 09:36 PM in Homemades

Just did a test for the record. I stuffed around 15 pieces of FBR into a ballon, and pumped it 'til it burst. I got a blast radius of about 5 ft maximum, but as CaptainSlug predicted, almost all the pieces fell straight down. Badly lit Youtube video if you care.


#101281 Brass Soldering

Posted by Gyrvalcon on 21 March 2007 - 09:08 PM in Homemades

You might want to try somewhere other than McMaster-Carr, as they no longer ship to Canada.


#192498 Hell Before Halloween. #2 Video.

Posted by Gyrvalcon on 28 November 2008 - 02:48 PM in Nerf Wars

Sweet video. Nicely edited, must have taken some time. Can't wait for Massacre!


#80823 Lever Action Ng

Posted by Gyrvalcon on 26 April 2006 - 04:36 PM in Homemades

Are you planning on shells or no?

Thanks for the comments.
I need to get to Home Depot and get more PVC, and get started on this for real.

I was hoping that I would not need to use shells, however, my early breech designs have not been successful in maintaining a good seal, so I may need to.
I am somewhat anxious about using shells due to the whole extractor/ejector component though. To tell the truth, I don't even fully understand how it works on the SCAR.


#81301 Lever Action Ng

Posted by Gyrvalcon on 05 May 2006 - 08:23 PM in Homemades

Well, it's been a while since I posted, but progress on the core of the gun has been made. It's amazing how difficult it is to find brass in small-town Canada. A pressure chamber, barrel assembly, upper receiver, and an unfinished plunger are now in front of me. Instead of regular PVC I had to use conduit piping, as well as an ABS endcap because of availability problems.

Posted Image

Posted Image

As far as "evolution" of the plan is concerned, I have realized that to make the lever (pictured in the previously posted plans) work, I would need to give the track that the PC pin slides in a curve backwards. This way, the angle between the PC and the lever will not decrease too much/at all.


#80817 Lever Action Ng

Posted by Gyrvalcon on 26 April 2006 - 01:00 PM in Homemades

Wouldn't your magazine need to be farther forward?

The pivot point is going to have a huge amount of stress placed on it. I also wonder about having enough mechanical advantage to compress a suitably strong spring with that lever arrangement.

First, thankyou for the feedback. It is encouraging.

-The magazine's placement is questionable, I agree. I originally had a vertical one on the design, for simplicitys sake, but angled it in an attempt to give the lever enough room to complete its swing. If it is not possible to squeeze it in, it may need to be mounted sideways.

-The lever is the main reason why this project's viability is suspect. Although I think it would be possible to mount it with enough strength, the mechanical advantage is low. Perhaps adding a spring that assists the PC/lever on its way towards the butt would decrease the amount of force needed to cock it. Of course, then more force would be needed to bring the lever back.


#80814 Lever Action Ng

Posted by Gyrvalcon on 26 April 2006 - 11:20 AM in Homemades

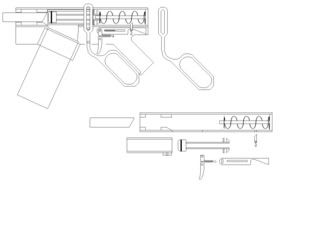
Well Folks, I apologize for Prometheus' quick, rash post. I was hoping to have some actual work done on this project before it was posted. However, I may as well post one of the designs now.

Posted Image

This design has definitely not been perfected, and is a work in progress.
It utilizes a FAR-like pressure chamber setup, as well as a GNS/SCAR inspired fire control system.
The cocking action is acheived by a lever with a second, sliding fulcrum attatched to the pressure chamber. This lever is vaguely "Y" shaped, with the two arms of the "Y" on each side of the PC.

A second, but more expensive/fiddly option would be to use a rack+pinion system to achieve the cocking action.

The best part of the Lever Action is it allows the user to "spin-cock" the gun one handed. This in itself is radical, but it brings with it the possibilty of -dare I say it- effective dual wielding

Please post your comments/ideas.


#101628 Decryption For Dollars

Posted by Gyrvalcon on 31 March 2007 - 11:34 PM in Off Topic

Let's remember, Prometheus, this is not for "entertainment", it is a test of the security of the algorythm.

In the spirit of the larger knowledge base that is the internet, I link to an identical thread over at the Penny Arcade forums, where there is also some discussion on this cipher.


#90815 The Cold War

Posted by Gyrvalcon on 29 September 2006 - 04:34 PM in Nerf Wars

A war up here would be cool.

Well, Not so much cool as Fucking Freezing.


Unless you have a large warehouse or factory we could war in, I'd rather wait untill summer.


#101603 Decryption For Dollars

Posted by Gyrvalcon on 31 March 2007 - 03:01 PM in Off Topic

A friend of mine has written his own encryption program in Java, and wants to test out how it holds up against attempts to crack it. He's offering a CAD $50 (~US $43) , paid over Paypal, to the first person who can decrypt the following code.
He's in highschool, gearing up for a University programming course, and is trying to learn a programming language to start him off.
His contact information and instructions are encrypted in the following message.

59 114 41 121 69 185 170 250 65 248 181 186 189 152 159 136 134 250 252 132 150 243 159 9 240 103 196 184 50 158 124 240 94 201 187 47 204 207 132 116 233 137 77 195 160 4 243 85 57 217 170 32 192 129 114 213 69 59 160 21 253 111 12 15 195 178 83 35 145 1 251 93 125 209 185 39 154 71 186 14 243 98 198 230 167 22 54 251 101 202 179 28 60 144 0 32 235 80 53
167 11 249 119 231 88 193 176 35 227 152 126 230 86 193 243 164 10 42 253 107 223 68 100 59 172 19 249 99 198 156 188 222 37 109 171 25 133 247 104 217 85 191 46 157 189 226 2 77 184 25 133 232 85 178 220 2 20 30 103 214 65 171 23 124 157 9 113 223 255 100 202 43 157 1 53 85 191 45 137 253 106 215 60 92 201 49 159 191 26 138 246 83 115 158 233 36 98 152
254 25 75 185 17 6 117 225 84 129 193 241 34 75 130 188 225 92 152 246 83 198 34 145 204 4 54 80 112 210 64 173 205 57 167 11 127 152 13 171 72 16 131 123 27 240 96 213 245 185 39 139 171 113 229 151 133 170 86 197 180 97 85 41 146 127 235 139 85 62 222 167 14 46 135 119 232 136 90 59 165 11 242 84 56 216 172 28 60 134 108 222 67 99 55 159 1 33 241
87 202 185 49 160 23 251 155 109 224 74 46 206 162 18 50 247 102 197 187 49 161 26 58 142 119 220 80 112 196 169 38 154 71 186 120 234 79 111 52 158 190 18 253 169 157 118 219 113 230 6 107 209 241 109 214 51 83 204 45 153 20 140 243 109 202 234 75 186 38 70 175 30 150 182 47 159 20 52 147 2 127 238 74 106 220 14 2 20 30 109 220 63 165 197 62 174 27 59
160 23 55 172 20 125 233 29 61 135 167 30 128 244 88 120 244 81 192 44 76 104 166 214 246 98 210 242 107 219 80 195 227 72 190 31 129 245 21 118 211 63 170 23 131 254 30 139 243 109 221 74 178 26 58 139 244 81 33 134 115 29 19 56 162 67 24 139 125 29 225 81 195 234 183 84 28 253 116 217 249 169 15 132 85 58 166 83 71 22 132 164 2 237 103 213 245 165 11
128 81 54 162 67 0 231 75 58 175 30 146 178 120 239 143 94 201 189 98 46 151 6 237 87 59 219 175 31 63 148 4 249 108 12 209 67 32 137 122 26 219 191 32 150 120 239 99 15 3 214 187 44 204 149 14 46 131 112 16 214 187 34 141 0 229 20 142 253 16 29 122 232 73 179 39 71 181 18 70 102 193 46 138 235 96 220 57 89 214 62 160 19 51 165 16 48 173 21
114 147 2 112 229 94 126 246 87 201 233 50 89 207 239 102 200 60 161 10 120 224 0 124 236 12 124 222 87 119 217 85 123 164 229 73 197 52 88 120 239 94 203 3 235 103 200 41 166 198 15 47 167 8 124 225 1 112 231 75 205 237 93 191 48 80 205 53 147 179 249 66 157 232 68 133 90 63 173 33 144 3 35 250 99 210 242 177 36 133 105 212 72 104 60 164 14 46 237
93 193 170 87 75 17 138 126 242 146 88 202 234 169 15 130 100 4 45 205 146 118 213 67 39 136 123 239 77 57 165 35 195 136 123 222 75 60 160 10 238 142 98 205 190 32 192 138 124 238 83 48 157 7 241 106 203 183 84 30 138 104 227 131 73 59 219 164 34 194 131 108 215 71 53 162 23 255 105 9 221 74 43 159 100 198 42 159 14 134 241 17 142 246 101 211 78 168 30
122 246 22 140 252 99 210 242 110 215 70 188 47 137 255 91 215 247 102 205 237 93 187 42 155 15 2 47 164 11 43 151 1 98 206 49 81 187 55 101 134 209 64 96 195 44 152 1 108 206 50 167 24 76 108 212 59 171 23 55 164 17 124 224 0 97 208 60 92 166 198 46 158 14 107 148 13 124 234 17 140 233 9 134 238 75 107 210 59 182 33 158 204 165 165 102 5 247 85
193 173 43 215 203 240 155 98 2 195 182 42 159 9 246 97 200 232 191 37 151 123 220 252 90 197 190 95 34 144 118 213 65 42 142 174 3 235 81 196 228 184 33 134 123 27 240 96 213 245 65 51 162 26 58 251 155 100 215 72 104 41 143 127 240 101 5 206 184 28 146 8 248 109 218 74 52 224 212 171 27 59 128 117 21 236 92 209 189 38 198 132 110 14 224 74 56 177 86
35 148 120 52 84 182 38 151 1 5 108 214 55 172 9 117 150 190 42 147 2 127 231 79 111 222 77 186 218 79 169 31 123 229 81 193 51 181 222 254 103 206 238 103 215 76 108 228 75 193 53 146 178 25 131 249 102 135 244 81 113 237 92 194 47 79 196 45 158 9 41 153 15 47 144 7 126 159 11 122 155 12 12 124 239 94 213 50 82 192 57 89 187 47 151 6 112 218 86
191 44 76 182 36 68 177 25 135 167 12 113 217 71 51 223 211 167 23 134 176 224 230 234 231 235 232 229 235 231 51 100 38 93 71

TL;DR : Numbers are actually letters, figure it out and get money.


#101611 Decryption For Dollars

Posted by Gyrvalcon on 31 March 2007 - 06:34 PM in Off Topic

TL ; DR = Too Long ; Didn't Read
It's just an internet meme for people who don't want to bother with reading the post.

As far as hints go, the encrypted file is in English, and a password is incorporated into the encryption process.


#116907 Homemade:troubleshooting

Posted by Gyrvalcon on 23 July 2007 - 12:24 PM in Homemades

Well. Didn't I just say. Make a nice little triangle. Ahm. Wait for it...

*snip*

Just replace "Valve" with what you had in mind. As for the seal in the back, use an O-ring one size smaller than the rod you use to control the valve, and it should be fine. I dun it.

Yes, that would solve the trigger pull problem, at the expense of adding another seal. I'm not sure which road I'll take yet.


#87783 Bikes!

Posted by Gyrvalcon on 18 August 2006 - 03:47 PM in Off Topic

2002 Brodie Energy.

It's light as all get out, and a simple bike. No hydraulic disc brakes or gas dampened shocks for me, no sir.

(Not that I don't want fancy fittings, but my bike is a mode of transport, not a TIE fighter wannabe)


#116903 Homemade:troubleshooting

Posted by Gyrvalcon on 23 July 2007 - 11:50 AM in Homemades

My ideas.
1. Attach the trigger to the piece and use some sort of cord on little block and tackles to pull the breach.
2. Use the block and tackle idea to do both.

After you put in the vinyl tube take a long drill bit and drill out what protruds into the outer barrel. I think that those schrader valves were used in CX's homemade in the homemades section.

*snip*


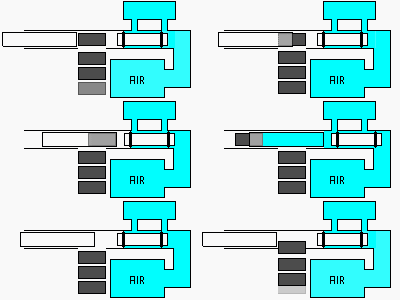
I wasn't clear enough with my original plan, I suppose. The beauty of the action in the first diagram is that the Inner Barrel can push the Valve back, and because the Inner Barrel is not sealed for its whole length, the trigger can attach at some point on it.

As for the Reservoir, I thought of something that I'd like to run by you all. If the Reservoir was wrapped all the way around the Outer Barrel, I wouldn't need to worry about protrusions into the Outer Barrel. It would be a question of making an air-tight seal at the hole through the 1" PVC endcaps.

Posted Image


#116759 Homemade:troubleshooting

Posted by Gyrvalcon on 22 July 2007 - 12:12 AM in Homemades

Do I need to use anything else to seal the hole, or is the rubber enough of a seal?


#116863 Homemade:troubleshooting

Posted by Gyrvalcon on 22 July 2007 - 11:07 PM in Homemades

You could try putting the valve to a ninety degree angle of the barrel.
...with that setup you may even be able to make it semi-auto with some leverage tricks. Making a triangle with your trigger on a short angle (IE 35) and your valve attachment on a large angle (IE 55)... and for maximum leverage you'd want to change the IEs so at full trigger stroke it'd be a 45-45-90 triangle.


This is an excellent idea, and one that I hadn't thought of previously. It brings up a new problem however: How to actuate the valve if it's on an angle. That would probably introduce a new seal into the equation.
And Seals Are A Bitch.


#116757 Homemade:troubleshooting

Posted by Gyrvalcon on 22 July 2007 - 12:07 AM in Homemades

I've been in the early stages of making my first compressed air homemade for too long now, and I approach NH with questions and a sense of apprehension. I'll start with what I have: vague plans and failed attempts.

The Vague Plan:

A valve inspired by Dr. Nerf and his valve and CaptainSlug's A.B.P.

Posted Image

I had first hoped that the barrel's back-and-forth motion would correspond directly with the trigger pull and return. Unfortunately, my first iteration proved that this would require a trigger pull of several inches: the dart length + dead space between dart and valve + valve travel.

Which brings me to...

The Failed Attempt:

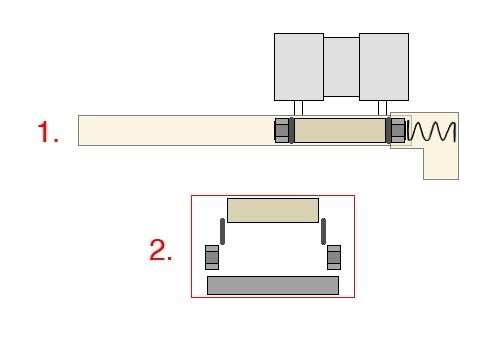
My first iteration went undocumented, as I abandoned the project after hitting some problems. I can, however, give a description and illustration.

Posted Image

1.
-The "Outer Barrel" is the long beige rectangle, with the right angle at the end, made of 3/4" CPVC
-The "Reservoir" is the grey rectangle, made of 1" PVC
-The "Connection" between the Outer Barrel and Reservoir is 1/4" Vinyl Tubing
The "Valve" is the more complex part, descibed further in (2.)

2.
-The Valve consists of two O-Rings on a section of Threaded Rod, spaced by 1/2" CPVC and kept in place by two Nuts that have been ground down to fit inside the Outer Barrel.

This model failed because of bad seals between:
-The "Air Source" (not pictured) and the Outer Barrel
-The Reservoir and the Outer Barrel, at the Connection

Mistakes/Problems To Be Solved:
-I sealed the Connection with only hot glue, and expected it to be airtight.
-I didn't use a one-way valve between my Air Source (a hand pump) and the Outer Barrel.
-Where the Connection met the Outer Barrel, there was too much obstruction, keeping the Valve from sliding freely.


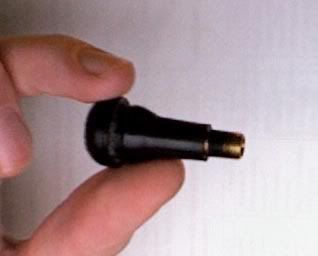
That should sum up what I've done so far. I've now been motivated to take another crack at it, but I'd like to run few ideas past the NIC. First, the Connection between the Outer Barrel and Reservoir. The "two crappy bits of tube and hot glue" approach was a bad one. Hot glue isn't durable, so I got some PVC cement, which means no more vinyl tubing. I need a Reservoir and Connection that's airtight and makes no protrusion into the Outer Barrel, so as to keep the Valve's movement unimpeded, yet allow maximum airflow when open. Second, I've realized I need a one way valve between the Air Supply and the Outer Barrel, as the pump isn't enough to hold back the pressure needed. I bought a couple Schraeder valves, but I need to find the best way to mount them. The valves are encased in rubber... and I kind of lost the little documentation they came with...has anyone used these before?

The Schraeder Valve:
Posted Image

The last problem, one which I haven't played with yet, is the best way to trigger the valve. If plain trigger pull is insufficient, then there needs to be a different way to cycle the action. I, of course, am leaning towards lever action. I'm shying away from a pneumatic ram (like in the A.B.P.) due to complexity issues. Ideas?

I hope I've explained the situation perspicuously, If you have questions, ask away.


#157975 Pbpb Writeup

Posted by Gyrvalcon on 03 June 2008 - 10:16 PM in Modifications

A fine, simple mod, but posting "eyeballed" ranges will only get you grief on the Haven. Get us ranges, fired exactly level from shoulder height and you'll have our attention.


#83146 Mad Hornet Cpvc Mod

Posted by Gyrvalcon on 11 June 2006 - 08:54 PM in Modifications

Golly-Darn, those are some fine close-ups you have there. The focus on my camera won't get anything less than 9". Any tips on how to get 'em so good, or is it just the camera?
Nice mod too, but why do you stick with stock darts?


#112859 Nerf Grenade Idea

Posted by Gyrvalcon on 24 June 2007 - 04:12 PM in General Nerf

Do you guys think it's possible?


I don't think it's possible. I don't think it's possible because all you will ever do is talk about it.

Prove Me Wrong.


#82852 Design Of Meh New Homemade!

Posted by Gyrvalcon on 06 June 2006 - 05:02 PM in Homemades

url=http://s81.photobucket.com/albums/j201/feragorn1/?action=view¤t=YonisNerfHomemades.jpg]http://s81.photobucket.com/albums/j201/fer...rfHomemades.jpg

Linky Link Brokeded... Doesn't work for me,anyways.
Instead asks me to log in.
As you.


#94303 Homeade Plunger

Posted by Gyrvalcon on 12 November 2006 - 11:59 PM in Homemades

I did a Tutorial on how I make them a while ago. It's the same method that Flaming Hilt brought up.


#111716 Any One Good With Photoshop?

Posted by Gyrvalcon on 17 June 2007 - 12:49 PM in Off Topic

I think you're trying to do a "light-bloom" effect. Gabe, from Penny-Arcade, the webcomic, has a little video tutorial on his blog.


#111785 Any One Good With Photoshop?

Posted by Gyrvalcon on 17 June 2007 - 10:59 PM in Off Topic

It looks good. I'm rather partial anything pertaining to the Halo universe, so I'm also a tad biased.

Now I don't claim to be any-some-such lighting expert, but it looks like the helmet-light-beam has edges that are too well defined. Maybe soften or diffuse it as it goes further out. Also, why isn't the chestplate/shoulder-strap a silhouette? Where is the light source illluminating it?

Again, I like the way it's looking, and I look forward to seeing the finished piece.

P.S. - What's this poster for?


#142695 Wob+

Posted by Gyrvalcon on 26 February 2008 - 09:03 PM in Homemades

The new design is rather nifty, but without the Crossbow form factor, I think it loses its original charm.

And what's all this about a much sillier project? Do Tell...