Jump to content


hummer's Content

There have been 216 items by hummer (Search limited from 20-January 97)


By content type

See this member's


Sort by                Order  

#350054 Wisconsin Winter War!

Posted by hummer on 18 December 2015 - 07:52 AM in Nerf Wars

mano_banner_by_ultranewt-d50l7hw.png


Date: December 27th

Time: 11ish - 3ish

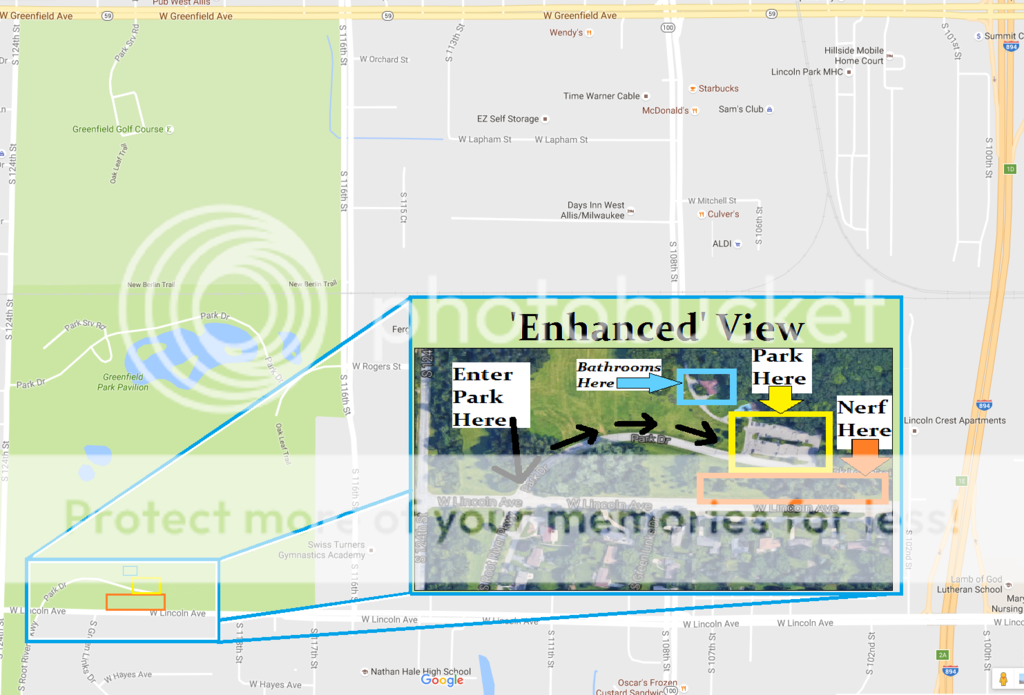
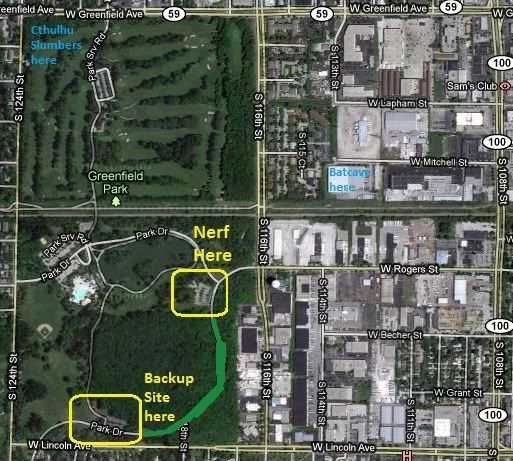
Where: Picnic Area #3

Address for your mapping site of choice: Park Dr, West Allis, WI 53227

MANOmap_zps143a157a.png

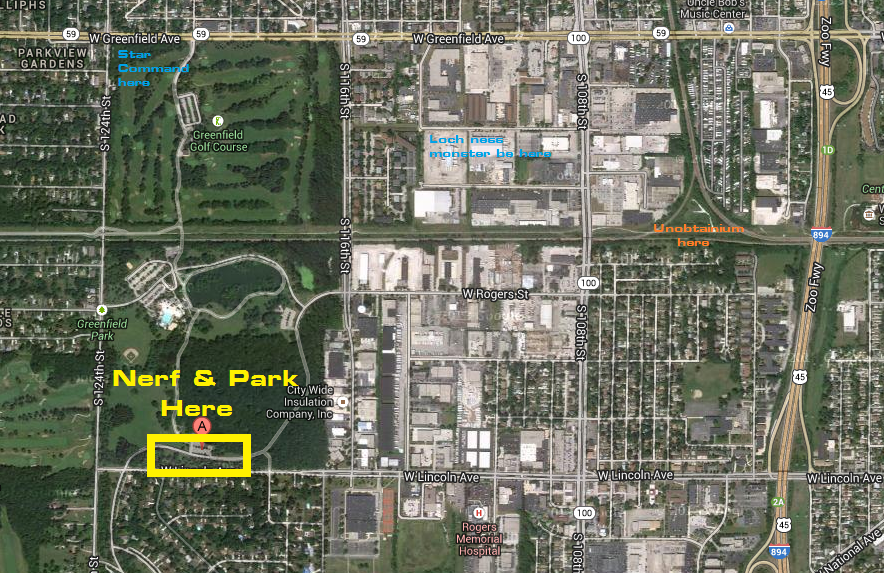
Relevant rule changes:

~ Snowballs (If applicable) count as small ammo

~ You are not out if you catch projectiles with only your hand.

~ You can choose to be a "Wisconsin/Walker" Zombie, loosing anything except handtag and you may only walk, but you are invincible. During zombie rounds only. Or not. We won't judge.

~ Homemades may now also be allowed if they are pistol-esque

What to bring:

+ At least 1 pistol for the pistol rounds. Clipped stuff counts as a pistol if 6-shot clips are used.
+ Melee Weapon if preferred. Your melee weapon can only be 1-4 feet long and less than 1 ft wide. Any melee weapon may be disallowed if I deem it unsafe.
+ Enough ammo. If you do not have ammo, don't worry, we have a community bucket going. (However, our bucket could always use a re-fill if you feel like donating)
+ Eye protection is mandatory
+ A bag lunch with plenty of water or some other type of drink
+ Appropriate clothing. Or inappropriate. We're not picky.

What not to bring:

- Slugs/Stefans/Glue domes
- Modified stock ammo
- Anything painted entirely black, silver, or any form of camouflage

- Supa-uber-sub-optimal battery modded shenanigans
- Douchy attitude

Relevant Information:

Don't be afraid to ask questions! The only dumb question is the one not asked.

~ Anybody is welcome to attend, including family and friends. Said people should be 13 years of age or older due to general shenanigans

~ Homemades are only allowed if they shoot large ammo (Arrows, Balls ect. ) or be pistol-sized

~ West coast rule-set

~ A hit is defined as the projectile in question changing direction upon the striking the player first. If there is a dispute, the host is right. Please don't break the flow of rounds over hits, it's just a game.

~ If any guns have any sharp or pointy objects on it, try and duct tape it down. This is mainly for Toaster boy. Hopefully he'll show up for once

~ Barrel taps: if you think you have to barrel tap with something at a stock-ammo war, you're doing it wrong

~ Limit of 3 weapons/shields on you at anytime

~ Shields are allowed in rounds where classes are not involved, for primaries you may have a small shield, pistol; medium, melee...just don't bring a brick wall or something.

~ Blasters count as shields

~ Shields are broken by large ammo and count as a hit

Possible Game-types:

Chaos/Meatgrinder/Shenanigans/Immortal/Style/Pattycake round

Zombie/Killing floor/dismemberment zombies

Freeze Tag


Blob/Catch 'em all!

Wingman

Capture the Flag

Attack / Defend

Experimental rounds (Always taking suggestions!)

+ More

After party
We sometimes go to Cici's after wars, here's the address for it:
2927 S 108th St, West Allis, WI 53227

Steam Group: http://steamcommunit...groups/MANONerf


#288010 Wino 1

Posted by hummer on 06 November 2010 - 07:26 AM in Nerf Wars

See you all on the battlefield soon!


(Edit: yay 100th post)


#282673 Wino 1

Posted by hummer on 10 August 2010 - 02:51 AM in Nerf Wars

I should be there


#357251 Win-sconsin Winter War

Posted by hummer on 20 December 2016 - 08:26 PM in Nerf Wars

so this going to be outdoors? 

Yup! Greenfield Park in Milwaukee!


#357141 Win-sconsin Winter War

Posted by hummer on 13 December 2016 - 09:21 PM in Nerf Wars

14317485_10209635425018923_1921363243593


Date: December 30th (Friday)

Time: 12pm - 3pm

Where: South of Picnic Area #3

Address for your mapping site of choice: Park Drive and W Lincoln Ave

Map%20final_zpsq014rej2.png
 

What to bring:


+ At least 1 pistol for the pistol rounds. Clipped blasters counts as a pistol if 6-shot clips are used.

+ Melee Weapon if preferred. Must be 4 feet long at longest and less than 6 inches wide.

+ Eye protection is mandatory

+ A bag lunch with plenty of water or some other type of drink

+ Warm clothing & change of clothes


What not to bring:


- Ammo. I have a 5 gallon bucket filled with elite darts for the community dart bucket.

- Slugs, Stefans, VTN, ACC or Full Vinyl Jacket (FVJ) darts. If it has a solid tip, basically

- Anything painted entirely black, silver, or any form of camouflage

- Anything that consistently gets 75 ft or more for ranges

- Douchey attitude


Relevant Information/Rules: I now have a Google Doc that I keep updated with my current rule set


Relevant Information/Rules:


~ Don't be afraid to ask questions! The only dumb question is the one not asked. Also; Any rules listed may be bent at my discretion. I will be more lenient towards ridiculous or amusing requests.  


~ Anybody is welcome to attend, including family and friends. Anyone under 13 years old must be accompanied by an adult at all times. Said adult can be nerfing if they wish.


~ West coast rule-set

Once you are hit, you are out and lose 1 life, no matter how many darts hit you)(In rounds with lives, 3 lives/15 second respawn {3/15} is the standard. Respawn countdown can be delayed and you can walk around/reload while respawning. Do not respawn next to an enemy active player.


~ Blasters MUST have an orange tip


~ Blasters should shoot slower than 100 feet per second.  I lack a chrono, but you’ll shred darts above 100 anyway.


~ Homemade are allowed if they are pistol-esque or shot gunned to 3 or more barrels or shoot large ammo.

    I must give the O.K. on all homemades. Pistol-esque means performance akin to superstock blasters.


~ High rate-of-fire battery operated blasters will be dis-allowed for zombies rounds.


~ Blasters may not have pointy protrusions on them.    This is for Toaster boy. Hopefully he'll show up for once.


~ Bayonets or melee weapons attached to blasters do not count as melee weapons.


~ Barrel taps: if you think you have to barrel tap with something at a stock-ammo war, you're doing it wrong


~ A hit is defined as the projectile in question changing direction upon the striking the player first. If there is a dispute, the host is right. Please don't break the flow of the round over hits, it's just a game.


~ Blasters count as shields.


~ Shields are “broken” by large ammo and count as a hit.     The bigger the shield, the bigger the target.


~ Large ammo is anything other than a standard nerf dart, boomco dart or rival ball. Bring your stress balls!


~ Large ammo hitting Melee does not count as a hit.      You’re a Jedi!


~ You are not out if you catch small ammo with only your hand. Large ammo still tags you.


~ You can choose to be a "Wisconsin/Walker" Zombie, losing anything except handtag and you may only walk, but you are invincible to small ammo.     Great if you want to play Pokemon Go while nerfing.


~ Snowballs (If applicable) count as small ammo.   


~ You may throw ammo by hand.      It is encouraged that you yell “LIGHTNING BOLT” for maximum hilarity.


Game-types:


Pattycake/Shenanigans/Style round


Humans vs. Zombies


Blob/Catch 'em all!


Freeze Tag


Free for all


Capture the Flag


Team Death Match/Wingman


Attack / Defend


H-O-R-S-E


Experimental rounds (Always taking suggestions!)


#323952 Wills Win-ter War II

Posted by hummer on 26 November 2012 - 07:21 PM in Nerf Wars

So, homemade ammo is cool?

Considering the amount of clothing (most of us) will be under, yes. Just so long as they aren't glue domes or anything else with a supa-hard tip.


#323976 Wills Win-ter War II

Posted by hummer on 27 November 2012 - 08:04 PM in Nerf Wars

One more question. Any blasters count as shields and there are no restrictions on that?

Anyway, I'll be there.


We haven't had a problem with this rule yet, so no restrictions have happened yet.


#323946 Wills Win-ter War II

Posted by hummer on 26 November 2012 - 05:10 PM in Nerf Wars

Good news everyone! Mehku is coming up from Florida for Christmas, and he wants to Nerf! Without further ado, I announce:

Posted Image
(totally what this is going to end up looking like, chubbs' and all)

Date: December 26th (A Wedensday)

Time: 11ish - 3ish

Where: Picnic Area #5

Posted Image

Address for your mapping site of choice: Park Dr, West Allis, WI 53227

What to bring:

+ Warm clothing. I would suggest layers.
+ Eye protection is mandatory
+ At least 1 pistol for the pistol rounds.
+ Melee Weapon if preferred. Your melee weapon can only be 1-5 feet long and less than 1 ft wide. Any melee weapon may be disallowed if a host deems it unsafe.
+ Enough ammo. If you do not have ammo, don't worry, we have a community bucket going. (However, our bucket could always use a re-fill if you feel like donating)
+ Something for the raffle we'll be having.
+ A bag lunch with plenty of water or some other type of drink

What not to bring:


- GLUE DOMES
- Modified stock ammo
- Anything painted entirely black, silver, or any form of camouflage.
- Blasters that have any sharp or pointy objects on them. This is for Toaster boy.
- Douchy attitude

Relevant Information:


~ Homemades are allowed so long as they don't get supa-sub-optimal ranges (150+ feet)

~ Don't be afraid to ask questions! The only dumb question is the one not asked.

~ West coast rule-set

~ A hit is defined as the projectile in question changing direction upon the striking the player first. If there is a dispute, take the hit and move on. If it continually becomes a problem, bring it up to a host.

~ Anybody is welcome to attend, including family and friends. Said people should be 13 years of age or older due to general shenanigans

~ If any guns have any sharp or pointy objects on it, try and duct tape it down. This is mainly for Toaster boy. Hopefully he'll show up for once

~ Barrel taps: if you're within range where you believe your blaster may cause your target pain, say "Barrel-tap!", "Bang!" or something to that affect and then discharge your weapon at the ground.

~ If big ammo hits a melee weapon, the melee is broken until tagged

~ Blasters count as shields

~ Shields are broken by large ammo and count as a hit

Possible Game-types:

Zombie/Killing floor

loser

Defend the core

Freeze Tag

Wingman

Capture the Flag

Attack / Defend

Chaos/Meatgrinder/Shenanigans/Immortal/Style/Pattycake round

+ More

After party
We typically go to Pizza hut/Taco bell after wars, here's the address for it:
11011 West National Avenue, West Allis, WI 53227


FIRE AT WILL!


#330326 Warhammer 40k Bolter

Posted by hummer on 28 May 2013 - 11:36 PM in Modifications

+++ Incoming Transmission +++

Hello, fellow forgers, this is Hummer. I have crafted a Bolter that fires nerf rounds and has more special features than you can swing a chainsword at.

First, have some photos of the finished product:

Posted Image

Posted Image

“Zion” Pattern Bolter Specs Without Stalker addons:

- 9 Pounds

- 27” Long (Barrel to end)

- 3 1/4” Wide (Side to Side)

- 12” Tall (Iron Sight to bottom of grip)

- 60ft Range

- 2/3 scale of a space marine bolter (Roughly)

- Awesome level: Off the charts

Now I know you're all here to see how I did it, but before we get into the how-to section, I'd like to pause for a moment to emphasize the importance of safety. Demonstrated by Louiec3:

Posted Image

Take careful note of the Buzz Lightyear safety gloves along with the old man glasses. The Wiggles poster reminds us to be safe at all times...

+++ Forging Preparations +++

Special note: Anything with an *Astrix* around it means it not necessary to use/make the most basic form of this bolter.

+++ Tools +++

Scroll saw

Hacksaw

*Band Saw*

Dremel tool

Drill

File

Sandpaper

Hot Glue gun

*Belt Sander*

*Adjustable wrench*

*Lathe*

*Popsicle Stick*

*Lighter*

+++ Materials +++

Nerf Longshot……………………………………..……….……………………………..….........................……($30)

*(2) Nerf Longshot scopes*

*(2) Small Nerf Big Bad Bow Wheels*

*(1) Recon Barrel*

*Bandoleer*……………………………………………….……………………………….........................…..…*($15)

Hot Glue

Wood Glue

*Wood Putty*

Plastic epoxy

(1) 8" wide, 3/4" thick piece of wood…………………….………………………………................….……($3)

(3) Polycarbonate 12" x 24", Clear, 1/4" thick …………..…………………………........……..…....($70)

I got mine on and then searched with this number: 8574K43. If this number does not work, I used 0.125” thick Polycarb.

Resin……………………………………………………………………………………….............................…...….($10)

I got mine at Klockit and then searched with this number: 8574K43. If this number does not work, I used 0.125” thick Polycarb.

Resin……………………………………………………………………………………….............................…...….($10)

I got mine at Klockit and got the smallest bottle set

Aluminum piece for boltsled reinforcement……….…………………………………………........(Freebie)

(1) 9 1/2" Length of 1 1/4" PVC……………………...………………………………...............……………..($2)

(1) 8" Length of 3/4" PVC……………………………...…………………………………...................…………($1)

*(2) 8" Length of 2" PVC*………………………………...………………………………...............…….*($3.50)

*(2) 1 1/4" PVC couplers*………………………………...……………………………………................*($0.80)

*(1) 1/2" length of 1/2" PVC………………...………………………………………………...............……..*($1)

Screws........................................................................................................................(Freebie)

Bolts...........................................................................................................................(Freebie)

Washers.....................................................................................................................(Freebie)

*Flashlight*…………………………………………………………………………….......................…………..*($15)

*Sound Card*…………………………………………………………………………………......................…..*($10)

I got mine on ebay, try searching "Recording module with push button"

*(2) 1/2" Wire Rope Clip* (Suitable substitute: U-Bolts)...............................(Freebies)

*(2) 2” Length of 1 ¾” PvC rod*...............................................(Courtesy of Louiec3)

*(1) 4” Length of 5/32" K&S Music Wire*...................................(Courtesy of Louiec3)

*(1) 2 1/2" dia. Magnet*………………………………………………...............………………………..*($7.50)

*Green stuff* ………………………………………....................……………………………………………...*($10)

I got mine at The War Store

*Parchment-esque Paper*..........................................................................(Freebie)

*Acrylic Red paint*……………………………………...................…………………………………………….*($3)

*Mud-colored wash*…………………………………..................…………………………………………..…*($3)

Base Cost total…….………….....……………...................……………………………………………….$116.00

With all addons total.…….……………...................………………………………………………………$184.80

+++ Forging +++

+++ The Longshot +++

(tl;dr of this section: USE. RESIN.)


You can modify your longshot to your liking, but I highly recommend you do the first on this list:

~ Reinforce the handle with resin; the stock longshot handle is meant to only handle the longshot weight, not all of the weight you will be adding in this project.

Step 1: Acquire the Resin from here or similar product.

Step 2: Follow the directions that come with your resin kit for mixing.

Step 3: Apply the resin to the areas shiny in the picture below: (remember; it's better to use more resin than less)

(Writeup assisted by angry marine Sargant !@#*PUNCHER)

Posted Image

~ If you're doing ANY spring upgrades, do a Boltsled reinforcement. An excellent write-up exists on Oznerf.

(Don't be a cop-out and do the wire hanger thing, it doesn't work as well)

~ How I minimized mine is I simply took the Longshot to a bandsaw and hacked it down to its bare essentials. Take out your internals to avoid cutting them and cut off the front and tactical rail off like so:

Posted Image

+++ Auxiliary modifications +++


~Grip dart storage

Step 1: Cut about a 1/2 inch off of a 1/2 inch pvc piece to hold your dart

Step 2: Open your longshot and pre-mark how much you will need to take out, it is better to undercut.

Step 3: Dremel until half of your pvc piece can rest in the groove. Repeat steps 2 and 3 until this is achieved.

Step 4: Hot glue the PVC into the right side of your longshot, leaving room for the other half to close upon it.

Posted Image

~ Make yourself a new priming handle, it will look better cosmetically.

Step 1: Take your 2” Length of 1 ¾” PvC rod and take it to a lathe and remove a ¼” deep by ½” long section. Repeat for the other side. They should look like this:

Posted Image

Step 2: Take a 5/32 drill bit and drill in the center of both pieces of PVC 1” deep. Take your 4” Length of 5/32" K&S Music Wire and coat one end in super glue and stick it into one of the PVC pieces. Apply less to the other side when you’re finished with your blaster.

~ Make your Bolter roar even when it’s not loaded by adding a sound card.

Step 1: Load a suiting sound onto the sound card. I just recorded the sound of the Stalker bolter from the space marine game. If you’re using the model of sound card I used, here is the video the manufacturer provides: [url]

Step 2: Find some form of spacer to put behind the button. I used a small nut.

Step 3: Cut along the back with a dremel tool to run the wires through like so:

Posted Image

Tip: To help the sound project better, I drilled holes in the polycarb on the side and covered that with a Big Bad Bow wheel. The magnetic field from the speaker allows it to just stick to the bolt I ran through the BBB wheel.

Step 4: After checking to see that the longshot trigger will set off the sound card, attach it with superglue and/or hot glue.

+++ Polycarbonate +++

(tl;dr of this section: cut some polycarb, slap it on the sides and back with super glue)

Here is a rough drawing of what I cut out and how they go together on the sides:


Posted Image

Once you print out the templates, glue them to the Polycarbonate (make sure you didn't take the shielding on the polycarbonate off)

Once they have dried, take it to the scroll saw and cut it out. Once that is done, double check to make sure you have the shape you want.

Once you have that figured out, cut out some medium sized pieces for spacers between the Polycarbonate and the deeper part of the longshot, like these:

Posted Image

Remove the shielding from both sides of the medium-sized pieces and sand both the pieces and the areas they will be attached to for greater adhesion. Once sanded, apply Super glue and apply the medium pieces. Once that is completed, start to position the Polycarbonate on the side(s) of the longshot (you should be imagining it like the following pictures)


Posted Image

Posted Image

Posted Image

Once you're sure where you want the pieces, remove the shielding, sand where they'll be attaching to each other, pre-assemble the 2 pieces with super glue, let that dry, then attach the side to your longshot. When attaching to your longshot, MAKE SURE it's level or at least make sure both sides are both equally on a slant. The end result should look something like the above pictures.

After that is completed, cut a piece that covers the back of your longshot. Make sure you only apply superglue to just the right or left side of your longshot so you can open it again.

Once the super glue has dried, reassemble your longshot. You should run into a problem of not being able to access the longshot screws. Just note on the Polycarbonate where to drill and do so.

[Continued in part 2]


#330327 Warhammer 40k Bolter

Posted by hummer on 28 May 2013 - 11:39 PM in Modifications

[Part 2]
+++ Lumbershaping +++

Step 1: You need the top parts to fill in between the polycarbonate with wood. Cut these parts out of the wood, sanding and cutting as needed. Once you have the pieces to a point where they can fit, Drill holes every 6”.

Tip: You could cut the top piece into 2 parts and make it simpler to attach.

Step 2: To make the front plate, take a 2 ½” x 7” piece and mark the vertical center. Measure and mark 1 ½” and 4 ¼” from the top of the plate. It should look like this:

Posted Image

Step 3: Drill a 2” hole in the top and a 1 ½” hole in the bottom.

Step 4: Take both 5” x 6” Pieces and take them to a belt sander to sand them down. These grooves should line up with your longshots barrel, as the 1” PVC (cut it to 9”, it should hang ½” out the back of the handle and 1” out the front) will run through this part of the handle.

Step 5: Now take your 1” x 6” and make sure your PVC and side grips can look like this:

Posted Image

Posted Image


And still line up with your longshot. Once that’s squared away, glue the wood together with wood glue and the pvc with epoxy. I cannot stress enough how the PVC has to line up with your longshot.

Step 6: Smooth the grip out with fine (I used 180 grit) sand paper.

Step 7: Attach all the pieces, except for the top piece, as the “main” barrel still needs to be inserted.

Step 8: Speaking of the top, take your recon barrel and cut off the tactical rails with a band saw. Once you’ve sanded the bottom of the tactical rails, set them aside and craft the front iron sight and back stopper part. Now find the center of the top of your top wood piece. Attach all parts like so with wood glue and/or screws:

Posted Image

+++ Shell Ejection Port +++

(I am aware that a bolter is actually a shell-less gun, this just looks cool/allows breech access)

(Also, this will make your bolter unable to be set down on the side that you put this port into, plan wisely)

Step 1: Mark out a rectangle about 3 ¼” x 1 ¼” on the polycarbonate, lined up with the longshot breach inside.


Tip: line up your hole so that the breech door can use the under layer of polycarbonate as the bottom slide rail

Posted Image

Step 2: Drill holes at the corners of the marked rectangle and cut out the in-betweens with a dremel. File/sand the opening until desired cosmetic effect is acquired.

Step 3: Cut out a 3 ½” x 1 ½” piece of polycarbonate, this will be the actual door.

Step 4: Cut out 2 1” x 1” pieces and super glue them together. After this piece has dried, file and sand it to the shape you want, leaving one side completely flat for attachment to the door.

Posted Image

Step 5: Drill 2 holes in the flat side of the new 1” x 1” piece. Only drill about ½ way through Then, drill 2 similar holes in the breech door where you want the nub to go.

Step 6: Put 2 screws in and dremel the top part of the top screw down to make room for the slide rail


Posted Image

Step 7: Cut 2 pieces of polycarbonate to make the slide rail. Super glue them together as shown:

Posted Image

Step 8: Now put the breech door in place and then super glue the rail on as shown:

Tip: Make sure the super glue doesn't glue your breech door in place

Tip: You could put this assembly on both sides, but you won't be able to set it down without all the weight going to the breech door.

Posted Image

+++Main Barrel Flashlight+++

Cut a 1 ½” piece of PVC to 9 ½”. Then cut it like pictured above out of the main barrel. (or however you want to so that your flashlight will fit in the barrel without falling out.)

+++ M41 targeting system and M4 suppressor +++

(Optional Scope and Silencer)

~ Scope

Step 1: Take 2 N-Strike tactical rail attachments and cut them down so that the part that grips to the rail remains. If you cannot acquire these through your collection/trading, here is a link to buy just what you need: &Link

Step 2: For the front part, cut a 2" piece of pvc to about 7 inches and then cut one of the ends on an angle (45 degree is recommended)

Step 3: Attach the piece to the tactical rail with epoxy, longest side at the top

Step 4: For the back, cut a piece of 2" pvc to around 5 inches and then cut it in half length-wise. Attach one of these pieces to the tactical rail with epoxy.

Posted Image

Step 5: Attach half of a 1 1/4" coupler to the middle of the assembly

Step 6: Cut a 1 1/4" piece of PVC to about 7”. Then attach a 1 1/4" coupler to one end via pvc cement and attach a hex end into the coupler

Step 7: Insert the tube into the coupler that's cut in half, then glue a coupler to the other side

Step 8: Attach random bits to make it look cooler.

~ Silencer

Step 1: Cut a piece of 2" PVC to around 9 inches

Step 2: Drill 2 holes ½” wide on opposite sides for the bolt to go through:

Posted Image

Step 3: Insert the Bolt and secure it.

Tip: This is made to be removable, if you want it to be permanent, insert a 1 1/4" coupler into the 2" pvc and apply glue where needed.

+++ Clip Conversion +++

(Optional)

Step 1: Cut out a template similar to this out of polycarbonate:

(Contact me for the template if you are interested.)

Step 2: Sand down a 6 shot clips’ bottom to accept the 2 sides of Polycarbonate. After that, cut a “filler” piece, I used wood:

Posted Image

Step 3: Cut a bottom for the clip to desired size out of Polycarbonate (I cut mine to 1 ½” x 4” ). Next, cut some more filler part(s) to reach desired form.

Step 4: Mock-assemble everything you have so far. once desired form is finally reached, use Super-adhesive to adhere the form together. Make sure to clamp it.

+++ Bandoleer Attachment Points +++

(Optional)

Step 1: Mark holes at the front and back where you find it most suiting for your 1/2" Wire Rope Clips (or u-bolts) to be attached, mark those holes.

Step 2: Drill ½” or other appropriate-sized-holes at your marks and insert your Wire Rope Clips. Make sure you put the outer nuts on before you make the final attachment.

Step 3: Screw on the inner nuts and once you double-check your result, super-glue to make sure the nuts don’t come loose.

+++ Purity Seal +++

(Optional)

Posted Image

I can claim no mastery of this forging, the best instructions I can provide you lie within this video:

One thing I do was attach a magnet to the back of the seal and to the inside of the bolter. This makes for easy removal. (and makes a pretty awesome ‘fridge magnet)

+++ The Last Turn +++

(Closing statements)

Here are some concept sketches of this project: (yes, that is a model bolter taped in)

Posted Image

Posted Image

Posted Image

Now what I’ve created here is just what I think it should look like, interpret these directions how you see fit and try some ideas I haven’t tried;

~ Find a way to make the “Shell ejection port” close on its own

~ Make a different pattern bolter

~ Make a bolt pistol out of a recon/retaliator

~ Make a terminator Assault Cannon out of a Vulcan

~ Make a stock

~ Make it pump action from the grip

~ Make the top on a hinge for on-the-fly access

~ Add Tacticool attachments to yours

~ Add the Kraken Bolts perk addon from the Space Marine game:

Posted Image

If you’re looking for more inspiration, here are some links to other Nerf Bolters I know of:

http://protagonist4h...build-part.html

http://z6.invisionfr...de/ar/t1278.htm

http://www.thingiverse.com/thing:15155

http://www.faustus70.com/

http://johnsonarms.d...37153?offset=10

If you do make a Bolter, make sure you show me! I would love to see how I’ve inspired you!

Or if you have a specific question post it in the comments/thread below.

“Honour Your Wargear”

+++ End Transmission +++


+++ Special Thanks For Aid +++

Louiec3 - For all the help. This would not have been possible without you.

Wenzel Designs - For my Uncle commissioning the awesome paint job.

Vas The Stampede & Snake51886 - For editing and support.

Volpin Props - For being my main inspiration behind this project

Lt. E Watts - For inspiration and continuing to make awesome Warhammmer 40,000 props

Protagonist4hire - For inspiration and jealousy of not having a vacuum former.

MarneusAugustaCalgar - For your wonderful video on purity seals, making your own is much more fun than just buying them.

Relic/Games Workshop - For making the Warhammer 40,000 games.


#330364 Warhammer 40k Bolter

Posted by hummer on 29 May 2013 - 10:17 PM in Modifications

Fixed photos (Thanks Dartslinger)


#244250 War In Wisconsin (echoes)

Posted by hummer on 27 July 2009 - 10:11 PM in Nerf Wars

Sweet, it's about time we get a war. However, my attendance is work-dependant, so write me down as a maybe (If I can't come though, COME TO QUIZNOS, we have cookies :P )


#233261 War In North Eastern Wisconsin

Posted by hummer on 29 May 2009 - 03:44 PM in Nerf Wars

I know you say NE for as to where, but can we get a county where-abouts at least?


#255465 Vulcan?

Posted by hummer on 05 November 2009 - 11:13 PM in Modifications

A problem I typically have with mine is that the springs that take the power from the batteries in the gun are off-center. (where you put the tray in, the end of it)

Hope this helps.


#198261 Vulcan Problem

Posted by hummer on 23 December 2008 - 09:53 AM in Modifications

perhaps the feeding gear was somehow put back the opposite way or not lined up correctly?also, check this thread out for terminology:
http://nerfhaven.com...topic=12589&hl=


#226555 Vulcan Help

Posted by hummer on 27 April 2009 - 03:43 PM in Modifications

I agree with slug, but I'll list some obvious solutions:
One conceivable problem is that the springs that receive the batteries power could be pushed a bit off where they should be. Another possibility is that the wiring could've somehow come loose, or you put the batteries in wrong. (Not insulting your intelligence, but it does happen).

Hope this helps.


#201505 Vulcan Box Mod

Posted by hummer on 06 January 2009 - 07:17 PM in Modifications

I personally just leave about 15 just hanging off the end and just stuff the rest on the box and i do just fine. Also, doesn't that make the Vulcan even MORE unwieldy?
Don't be afraid of it's internals, they don't pop out when you open the case like the recon, it just take a lot of screws to open.
I'm also curious as to how the Vulcan handles a war situation. It seems to me like it would take too long to reload to be effective.


#201542 Vulcan Box Mod

Posted by hummer on 06 January 2009 - 09:22 PM in Modifications

Well...i'm not allowed to mod the vulcan itself, just the chain/box

So it's not your Vulcan then? Not that your missing much without messing with the internals, theres nothing(unless your doing an overhaul) besides easily removing the AR, and even THAT hasn't really been proven if it gets better results than stock.

It is a really GREAT weapon for CTF, just have a Vulcan and an Absolver ready...or maybe a big salvo.

Or perhaps a salvo of vulcans? :P


#201679 Vulcan Box Mod

Posted by hummer on 07 January 2009 - 06:00 PM in Modifications

It is my vulcan, my dad just doesn't want me to mod it...I mean, if I accidentally braek something, that's $40....

Even if you do manege to somehow break something, there's ways to fix whatever you broke(unless you break it on purpose) but if you don't really want to mod it, it's understandable, just start off with modding a nitefinder or other similar small pistol.


#201975 Vulcan Box Mod

Posted by hummer on 08 January 2009 - 09:50 PM in Modifications

...and now back to the topic of this thread(I know, I kind of incited it...soory)

Are you going to paint that thing?Or are you going to have it looking like your holding cookies instead of darts? :P


#201835 Vulcan Box Mod

Posted by hummer on 08 January 2009 - 11:56 AM in Modifications

One thing that I think would work with a Vulcan is at wars. I have personally never been to a war but I have seen lots of videos and I find that usually there are a bunch of people all huddled together at the beginning of a game. So what I thought was to have a Vulcan and a really good sidearm and just spam the hell out of your Vulcan at the mob and your bound to get some people. Then when you use all of your ammo just ditch your Vulcan and use your sidearm for the rest of the round. That is just one of my wonderful ideas using the Vulcan.

infidel

The problem with this, of corse is that you may get sniped while trying to "just spam the hell out of your Vulcan" and besides it's unwieldy and pretty much will always take 2 hand to operate unless you have the shoulder strap(reduces accuracy if fired from that position) or the tripod(no mobility, again with the losing)
I am currently working on a little something that may take care of that, but I don't want to say anything really just yet.


#317098 TTAGS Chicago Summer Wars

Posted by hummer on 17 June 2012 - 12:57 AM in Nerf Wars

I'll be there, as always :)


#204313 The Hammer

Posted by hummer on 18 January 2009 - 12:28 AM in Modifications

By god, you've created a beast! It seems like you just threw a bunch of guns together, but effectively together, and that's what makes this kinda intimidating.


#207701 Super Cheap And Easy Streamline Dart Mod

Posted by hummer on 29 January 2009 - 07:15 PM in Modifications

Can you do this to other darts?

I'm pretty sure you could do this to whistler darts if you can still find them, but other than that, you'd have to use glue so in the end you'd just be making converted dart's.

Yeah, i use them as nice finishing darts for my vulcan, while they DO travel a bit less, they pack more of a punch.


#286273 South Milwaukee Nerf Rumble 2.0

Posted by hummer on 29 September 2010 - 09:31 PM in Nerf Wars

I should be there, pending any apocalypse-esque events

I suggest this is now your new seal of aproval:
Posted Image

P.S. no new pics of the battlegrounds?


#288326 South Milwaukee Nerf Rumble 2.0

Posted by hummer on 13 November 2010 - 03:01 AM in Nerf Wars

Irregardless if louiec3 shows, I shall try to host in his stead if the weather isn't snowing


#284984 South Milwaukee Nerf Rumble

Posted by hummer on 06 September 2010 - 09:50 PM in Nerf Wars

Rejoice, for I was wrong and will be there


#282808 South Milwaukee Nerf Rumble

Posted by hummer on 11 August 2010 - 01:11 AM in Nerf Wars

I can provide Tarps/poles to help out


#282616 South Milwaukee Nerf Rumble

Posted by hummer on 09 August 2010 - 07:25 PM in Nerf Wars

I will be there


#285353 South Milwaukee Nerf Rumble

Posted by hummer on 13 September 2010 - 01:14 PM in Nerf Wars

Thank you for an awesome war, really refreshing to have one to break up my collage classes. My only nitpick is a bit too much grabass time, but other than that it was a real blast! Hopefully this won't be a one shot sort of deal and can see more of this in the future.

Edit: Also thank you SO much to the family that brought the food. That food was delicious and you should totaly open a resteraunt.

Also, the best 24 seconds of the war


#206087 Recon Safety Piece?!

Posted by hummer on 24 January 2009 - 10:29 PM in Modifications

Next I read a recon mod page on a "minimized trigger pull" (it is located in the directory) and I noticed that the nerfer didn't have 2 pieces in front of the trigger which also lies ontop of the clip release tab, is this a safety mech for the recon?

Well, congrats on getting it fixed the 1st time for 2 shots...
I'm not sure if this is just a safty mech for it, try firing the recon without it (once it fires correctly again that is) and see what happens.


#199305 Recon Mods

Posted by hummer on 27 December 2008 - 11:02 PM in Modifications

Well done! (Although when you said shotgun, i thought you were going to add a more...shotgun-looking gun to the bottom, well thought out none the less)
Are you going to add the spring extensions now? (because you pretty much need the stock to pump it anyway)
I was thinking of saving up for a long shot too, thanks for making my decision that much easier!


#203169 Rear Loading Maverick

Posted by hummer on 13 January 2009 - 10:01 PM in Modifications

You, my good sir, are an idiot. :P


#243732 Pretty And Removable Pump-action Recon Mod

Posted by hummer on 24 July 2009 - 10:47 PM in Modifications

Wow, very clean/neat write-up and end product! I'll have to try this!

P.S. I vote for Shot-con


#246416 Pretty And Removable Pump-action Recon Mod

Posted by hummer on 10 August 2009 - 12:07 PM in Modifications

I just finished doing this mod, I gotta say, I love it! Perfect use for my broken recon! You are a genius for thinking this one up! I just got a small beef with how the grip seems a bit sticky, nothing that a little filing can't fix though.

Edit: Waiting for the banhammer to fall for the guy below me...


#313521 Palm Sunday War - Barrabbas' Revenge

Posted by hummer on 25 March 2012 - 12:01 PM in Nerf Wars

Double post due to server error :/


#313520 Palm Sunday War - Barrabbas' Revenge

Posted by hummer on 25 March 2012 - 11:59 AM in Nerf Wars

Put me down as a maybe, might have to slave at the sub shop :P


#268545 Not Chano 4 - But Still A Decent War

Posted by hummer on 08 March 2010 - 05:58 PM in Nerf Wars

Put me down as a maybe


#235021 Nintendo Zapper Integration

Posted by hummer on 08 June 2009 - 05:55 PM in Modifications

You, my good sir, are a genius.


#207608 Nerf Wars In The Midwest

Posted by hummer on 29 January 2009 - 03:43 PM in Nerf Wars

I hate adding to the necro, but I feel the same way as you guys, because minasota is just a lttle too far away for me. the problem is noone is stepping up and making this happen. i know I'm not either, but I can't exactly cause I live above the 'ol ill, and I really don't feel like spending the effort on finding a place when I don't know the area.