Jump to content


atomatron

Member Since 28 Jul 2008
Offline Last Active Feb 26 2018 10:32 AM

Topics I've Started

HEC 2c

18 September 2012 - 07:32 PM

This blaster was designed with the intent of internalizing the priming tube/bar/cover of a pump action homemade while being relatively simple in construction and very resilient. From what I have tested of this blaster (and the previous build) it accomplishes these goals and is an all-around awesome blaster. I will say that the HEC catch can be substituted with a normal clothespin trigger without any alterations save for the plunger rod and the catch itself.

You will need the following.

Tools

Dremel
Drill (drill press would help)
Scroll saw/Band saw
Etape
Lube
6/32 Tap
Solvent Weld
Goop

Materials:

2' Piece of 1 1/4" PVC
1x 4" Piece of 1 1/4" PVC
1x 1 1/4" PVC Tee
1x 1 1/4" PVC Coupler
2x 3/4" PVC Endcaps
1x 1" to 1/2" PVC Bushing
1x 3/4" to 1/2" Reducing Bushing
1' Piece of 1/2" PVC
1x 1/2" PVC Stub (~2")
1x 1/2" PVC Endcap
1x 1/2" PVC Elbow
1x 3/4" ID Rubber O-ring
16x 6/32 Machine Screws of varying size
2x Wood Screws
1x Plunger Head setup (I use 3/4" steel, 1 1/2" rubber, 1 1/4" rubber, 1 1/4" steel, in that order)
1x 1/2" CPVC Endcap
1x 1/2" CPVC coupler
5" Piece of 1/2" CPVC
1x Vertical Handle
1x Pump Handle (could be a vertical handle too)
1x [k25] spring (or [k26], though you may have to change the measurements)
1x PVC Wye and hopper setup
5x Polycarb parts of varying size/shape
1x A chunk of 2" PVC (sort of optional)

Preparing the Main Body

From the start pick an end that will be the front. Then mark a slot starting 1/2" from the front and continuing for 9", the width of the slot was determined by the Polycarb I used (3/8"). I like putting it on the area with print so I never have to see it if I don't paint it.
Posted Image
Posted Image

Then on the exact opposite side of the tube I drilled a 5/8" hole directly in the middle (12" from the front)
Posted Image
That's all that needs to be done for now.
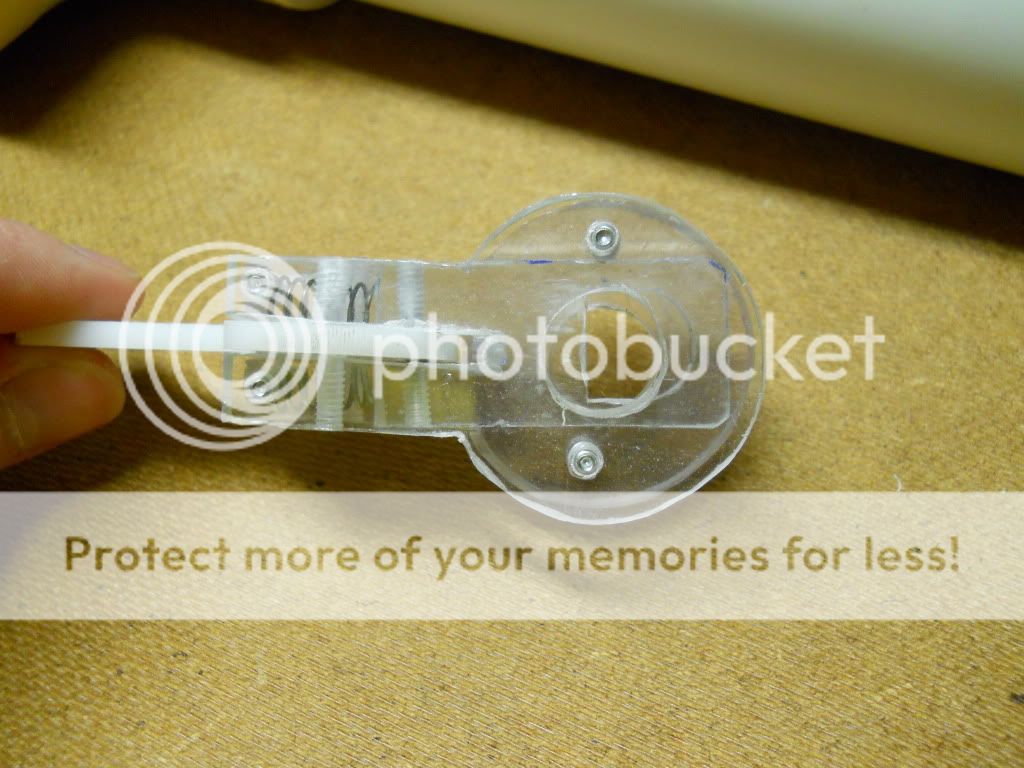

The Handle

This will use the vertical handle, the 1 1/4" coupler and the wood screws. First I drilled holes through the coupler about an inch apart then widened two of them such that a screwdriver could fit through, then I carefully lined up, marked and drilled pilot holes into the handle.
Posted Image
(The material you use may not require this)

Before final assembly I put goop where the coupler and handle would n=meet to make it a but stronger. Here it is finished.
Posted Image


The Stock

This will use the 1 1/4" Tee, one of the 3/4" Endcaps a bit of etape and the 5" section of 1 1/4" PVC.
Posted Image

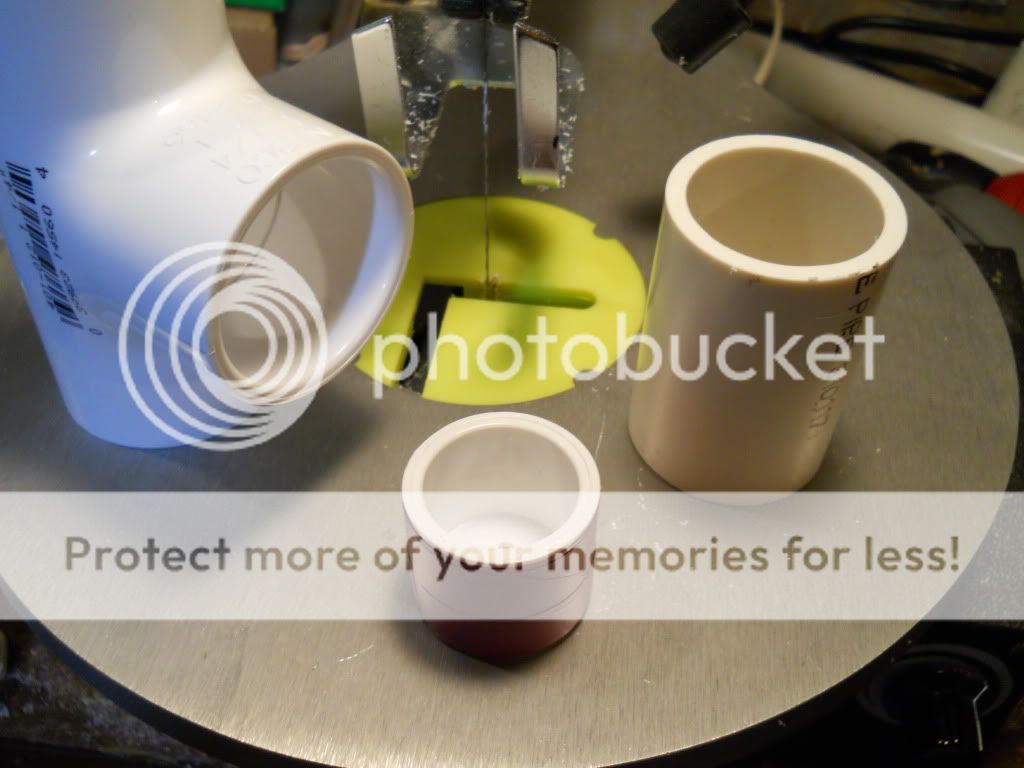
Drill some holes in the endcap, tape it up and combine like so:
Posted Image
It doesn't show it but you will want to put screws through this part as it will be the spring rest.

I then solvent welded this part into the back of the coupler to which the handle is attached, you can use screws for a less totally permanent option.


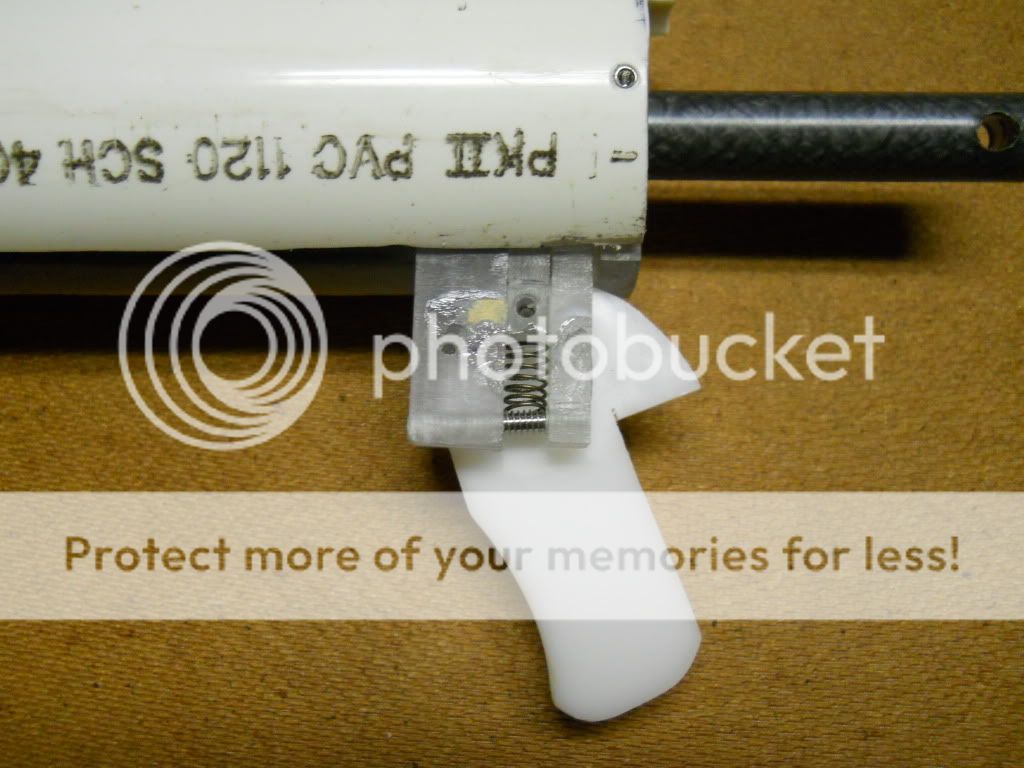
The Pump Handle Assembly

This will use the Pump grip/handle, the 1' of 1/2" PVC, the 3/4" ID O-ring, a polycarb rectangle 3/4" by 2 1/2" and the 1/2" PVC endcap.
First chose an end of the PVC and do this with the endcap and O-ring
Posted Image

Next on the other end mark the PVC, rectangle and handle/grip.
Posted Image
I attempted to stagger the holes to reduce stress of the parts as much as possible (also gives more room for error).

(I would simplify this if I had longer screws)
Posted Image
Dissemble for a future step, or trust that it'll work in final assembly, whatever.


Back to the Main Body

Take the 1" to 1/2" bushing and ream out the inside so it slides over 1/2" PVC easily (I ended up lubing it a little to prevent galling between the parts) also dremel the outside so it just barely fits in the 1 1/4" PVC of the main body. This part will fit in the ~1 1/2" gap between the hole drilled earlier and the end of the slot. I drilled a hole so I could solvent weld it in place, as an added measure I also put screws into but not through these parts.
Posted Image
Posted Image

Final position, sort of hard to tell (I should make one of these out of clear PVC)
Posted Image
If you have any issues with the parts not fitting quite as well after assembly tape some sandpaper to a long piece of CPVC and fix it by sanding 'til it works.

I inserted the 1/2" PVC part of the pump bar marked where holes should be drilled so the pump could be reassembled inside the main body, then did so.
Posted Image


I inserted the 3/4" to 1/2" reducing bushing into the remaining 3/4" endcap, cut it in half and put the cap end on the end of the pump bar. Save the other half.
Posted Image


I cut and sanded the 1/2" PVC elbow to fit over the 5/8" drill hole on the main body and the other half of the endcap-reducing bushing thing to slide over 1/2" PVC
Posted Image

Solvent welded in place, make sure it's strait. It's important.
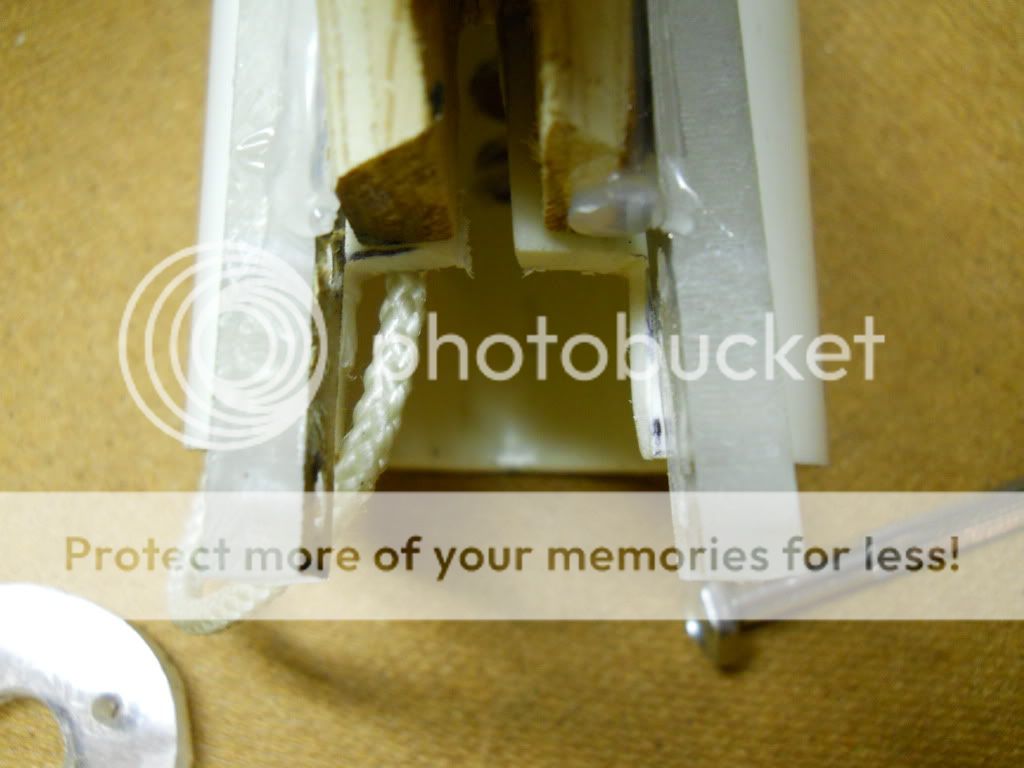
Posted Image


Plunger Rod

This will use the CPVC parts and the plunger head setup.
Posted Image
The rearmost thing is half of the coupler, it will hold the catchface in place, it needs to be a few inches back because the spring is a little shorter than optimal. All parts are solvent welded together. If you use a clothespin trigger you will need to figure that out on your own, in fact the nuances of catching are sort of ad-lib anyway, just do whatever you want; HEC's are magic anyway.


Back to the Handle

I cut polycarb parts as needed
Posted Image
as well as cut a bit out of the main body for the HEC catch.
and assembled, added a spring
Posted Image
Here you can see one of the screws I used to attach the two sections together after inserting the necessary parts (spring, plungerrod). I used the chunk of 2" PVC here as a cheek rest, it is a lot more comfortable than the edge of a coupler.


Posted Image

And that should be all you need to make a complete blaster.

Note; I'm not telling how to make a HEC catch because they have a tendency to not really work all that well and newer nerfers would probably not have the tools necessary. The one shown works absolutely perfectly, I'm just not sure how they fail/not work when it really looks like they should. I might just make a guide including all necessary information for their replication.

Any questions/comments are welcome.

HEC 3 Half Pump

01 February 2012 - 11:09 PM

This is a continuation of my Homemade ERTL Catch (HEC) series. HEC 3 is an attempt to make a light and effective pump action blaster for as cheap as possible. The catch and handle are exactly the same as the blaster in my other thread(which I will refer to as HEC 1 as it was the first blaster of this series).


Materials
1x foot of 1 1/4" PVC
2x 1 1/4" Couplers
2x 1" to 1/2" PVC Bushings
1x foot of 1/2" PVC
1x 1/2" PVC elbow
1x 4" of 1/2" PVC
1x 3/4" PVC endcap
1/2x (half of) [k25]
1x 5" of 1/2" CPVC
1x 1/2" CPVC endcap
1x 1" OD steel washer
1x 1 1/2" OD rubber washer
1x 1 1/4" OD rubber washer
1x 1 1/4" OD steel washer
Assorted 6-32 Screws
Etape (or vinyl tape)
Polycarbonate (1/4" and greater thickness)

...or at least that's what I used. My most prevalent intention is for others to build off of these designs and make something better.


Posted Image
Here's the blaster in all it's partially disassembled glory. The stock can be held in place by a screw or removed entirely, The barrel/hopper combo is one suited to the blasters lower volume but high rate of fire.

Posted Image
The top is internals, the bottom is the pump slide which consists of the two 1 1/4" couplers sanded out and solvent welded together; one cut down to make room for the catch/handle. It has 4" of draw.

Posted Image
And a slot in the top. It is 4" long, starts 5" from the front and is 1/4" wide

Posted Image
The plunger rod features a basic rubber washer seal. Using all the washers, the CPVC segment, the 3/4" PVC endcap, Etape (I used a piece of 5/8" ID tubing to decrease the amount of tape needed) and a few bolts.

Posted Image
The 1/4" bolt segment I put on the pump slide ate into the catchface, I have since ground the threads down

Posted Image
The pump handle at the end of the priming stroke.

Posted Image
Here's the HEC 1, 2(Incomplete) and 3, just as a sneak peak I guess.


I apologize for the post-writeup writeup, HEC 2 will have a full, detailed one.


Also for the sake of discussion it can hit ~100' with the half [k25]; that's about 15 feet less than the HEC 1 which has a full [k26] (hits ~120). Our blasters are basically more powerful than they need to be; half the spring still gets 83% of the range.

Homemade ERTL catch

09 January 2012 - 03:35 AM

Initially I intended to post a full writeup for an identical blaster but I am working on a pump action variant and I don't really need another one of these, hence the post-build writeup.

The purpose of this build was to take the simplification of catches to as far as possible; the catch is the trigger.

I made a basic pull back snap/rainbow type blaster as the testbed. I recycled the nylon plunger rod from the rainfire, a snap style CPVC plunger rod could be used instead, I recommend using that.
It's 1 1/4" PVC, the spring rest is a 3/4" endcap, it has a [k26] and I haven't tested ranges and probably will not.
Posted Image

A shot of the trigger pulled. This causes it to fire after it is primed....
Posted Image

Here you can see the catchface; a dremeled-to-fuck piece of polycarb, I will not be using this design again. Instead using a 3/4" endcap; it is much less work as it is already the right general shape and you would just need to bevel the inside edge to get the same functionality.
Posted Image

Here's an Ms paint drawing in case you don't get how this functions by looking at actual pictures.
Blue = trigger/catch
red = plungerhead+plunger rod
blapck = plunger tube
Posted Image

Fun tips for making this sort of thing; the longer the catch arm of the trigger/catch is and the closer the pivot point is to the plunger tube the more stably it will catch.


Additionally, since I know someone will ask about the handle; it's made of some sort of plastic+sawdust decking material I found in the scraps bin at my nearby Menards. It is easy to machine and basically the best stuff ever.
Posted Image


I'm sure there will be a lot of questions because this is so retardedly simple that it can't be understood.

Painting Tutorial

09 September 2011 - 09:59 PM

Some of you may have seen the PAS I did in the MOD/PJ thread, If not feel free to check it out.

This is a Tutorial for a technique I have developed to replicate the look of heavy wear on blasters or what have you. For this tutorial I will demonstrate using a molded clay part I made for a sculpture class I took.

Materials
-The thing to be painted (sanded and primed)
-Silver or other metallic metal-looking spray paint
-An assortment of water based acrylic paints
-Brushes
-Paper towels (with an abrasive, inconsistent surface)
-Water
-Time
-Skill(can be substituted with Confidence)

I have these things
Begin, taking the thing you want painted after it has been primed and such, I have a few of these.
Posted Image

And painting it again, with the metallic spray paint you chose, silver(color) is a good choice as it can be used to emulate steel, aluminum, nickel and a great many other materials.
Posted Image

I mixed up some light grey acrylic for my primer-emulate and applied it to most of the surface.
Posted Image

Then you wad up a piece of paper towel..
Here's the tricky part; waiting until the paint has dried enough but not too much. If it comes off when you touch it it's too soon. If you wait too long it will be difficult to rub the acrylic off but manageable.
Posted Image

Repeat for other things, red for the handle of this thing.
Posted Image

This shows what happens when you don't wait long enough (on the right), the paint just gets moved around and looks bad.
Posted Image

Then I repeated the process for the third color; greenish, over the primer emulate areas, where the least wear would be recieved.
Posted Image

Now for the grime, first mix up some black-brown sludge looking stuff and apply it to the places with recesses and whatever features you want to exaggerate.
Posted Image

Remove it more lazily than with the other colors.
Posted Image

Looks ok, you could stop here if you wanted to.
Posted Image

There's another step I decided to take; oxidation. For my "steel" I'm using a bright orange. For copper/bronze/brass I would mix a light bluish green.Slather on the areas where the first metallic color is showing, rust doesn't propagate on paint.
Posted Image

More rubbing, pretend it's a magic lamp or something.
Posted Image

It's still a little bright so I decided to do another grime layer.
Posted Image

Then clear-coat the thing: finished product.
Posted Image


And THAT's how you fake decades of wear. Any questions?

Rainfire

13 June 2011 - 08:25 PM

The Rainfire, a pump action rainbow variant with integrated, optional slamfire.

Posted Image

With this build I attempted to address some of the problems that I saw with pump action homemades; unnecessary sheath/parts, no slamfire, no rainbow catch.

Materials

2" PVC
2" PVC Tee
1 1/2" PVC
1 1/2" PVC coupler
1 1/2" to 1/2" PVC bushing
1/2" polycarb sheet
1/4" polycarb sheet
1/8" polycarb sheet
[k26]
1/2" Nylon rod
String/rope
1 1/2" neoprene washer
1 1/4" neoprene washer
7/8" steel washer
1 1/4" steel washer
Assorted 6 32 machine screws (including set screws
(two of some sort of catch spring)
Wood (or other handle material)


Recomended tools

Scroll saw
Dremel, preferably with bits
Drill press
Screwdriver
1/16" allen wrench (for 6 32 set screws)
Goop


First,

cut a slot in the 1 1/2" PVC; 6 3/4" long, 3/4" wide
Posted Image

Then break out the scroll saw, making these with a dremel isn't recomended.

Posted Image
The front plate is 1/2" polycarb, the hole in the middle is 1/2" across, enough to fit the nylon rod through. the slot is 1/8" wide and 1 1/4" long. The round section needed to slide inside 1 1/2" on my blaster, if you use 1 1/4" or something else for the plunger tube, you will need to change that. the strait section is 1 1/4" long.

Posted Image
These parts are 1/4" polycarb, from left to right, the rear plate, stabilizer and the catch.
the rear plate has only the hole for the nylon rod and the part of it that follows the curve of the PVC. the stabilizer has the same dimensions as the front plate. The catch plate has the hole drilled and tapped about 1/4" from its bottom and the strain section is 1/2" shorter than the other parts, I made it a rectangle because it didn't need to be round anywhere.

Posted Image
The trigger is 1/8" polycarb (or in my case delrin) the only important bits are the ramp on the right, the drill hole, and where your finger goes.

Attach the trigger and catch with a set screw as shown:
Posted Image
Posted Image

And finish the catch system assembly with the front plate in front and the stabilizer in the rear with set screws again, put the catch springs in now as well:
Posted Image
Posted Image
Now the catch-trigger system is done.


Assemble the plunger rod

Posted Image
The spacer is 3 1/2" long, made from sliding 1/2" polyester onto the plunger rod and 5/8" polyester over that, there are other materials that will work just as well. The catch is 9" back from the front end and the plunger head(this pic is from before I updated the plunger head, it should be the 7/8" steel washer followed by the large then smaller neoprene washers and the bigger steel washer).

Posted ImageFinally drill a hole in the rear of the nylon rod for the string. This resets the direction after every shot as well as making it dry-fireable, it could be vertical instead of horizontal, just remember which way it needs to go.

Now, back to the plungertube (1 1/2"PVC), on the end opposite the slot, goop and screw on the coupler and bushing, let dry and insert the plunger rod then the catch-trigger assembly, check to see how well the parts fit, sanding may be required.

Posted ImagePosted Image

Drill, tap and screw until the rear plate is in position at the very end of the plunger tube, locking all the parts in.

Test to see how well it functions.

It should function like so:
Posted Image
Push the catch-trigger assembly forward to prime it, pulling the trigger now should do nothing

Posted Image
Now pull back the catch-trigger assembly, either holding down the trigger or not.

Posted Image
Posted Image
If you hold down the trigger, the ramp on the trigger will be moved by the rear plate pulling the catch down, out of the catch notch, If you aren't holding down the trigger the ramp will force the trigger to turn instead of disengaging the catch.

FINISH IT

Posted Image
You will need (things) on top of the plunger tube to decrease the space between the 1 1/2" and 2" PVC, this helps keep it from wobbling as much but it still wobbles.


Cut the 2" to about 14" or so, whatever is comfortable. and attach the Tee, then make a handle and attach it like so:
Posted Image

Cut stuff out so the catch-trigger assembly will fit
Posted Image
Posted Image

(A polycarb handle might be a better choice, though harder to attach to the PVC)

Posted Image
Make something (out of mirror polycarb) to attach the catch-trigger assembly to the handle (sideplates, just like a +bow right?)

Posted Image
Deal with the string and attach the two sections together.

Rest
Posted Image

Primed
Posted Image

Ready to fire
Posted Image


Post questions and junk, I don't want to deal with PMs.