Jump to content


Lt Stefan

Member Since 04 Jun 2008
Offline Last Active Jul 15 2015 02:30 PM

Topics I've Started

The Papbow

05 August 2010 - 11:59 AM

ATTENTION: REV. 2 (SEEN BELOW) TEMPLATES ARE AVAILABLE HERE.

Posted Image

This is my take on the pump action Plusbow, herein the PAPbow.

This thread will serve as a semi-writeup/overview.

First off, credit to Ryan for his original idea and credit to Split for his awesome way of connecting the priming to the plunger rod.

I have been working on this for quite some time. This is my second design, but I have waited until it was working consistently to post. It is still not complete; in the next version I plan on changing a few minor things. Now on to the goods.

Materials
-Normal +bow materials
-Materials for a grommet plunger head
-90402A148
-89755K41
-9245K531
-91780A123
-91780A132
-[k25] spring

Tools:
-Band saw
-Scroll saw
-Drill press
-Drill
-Taps
-Files
-Bench grinder (optional)

Templates: will be available today or tomorrow. I have to finish changing the things I mentioned earlier.


Now the writeup.

Step 1: Print the templates on legal sized paper, paste them on to the PC and start drilling cutting. I don't feel like labeling thicknesses/holes but it isn't hard to figure out. All the 1/4" T pieces are grouped, and all the 1/8" T pieces are as well. As for the holes, drill them to the same size that you would on a normal Plusbow.
Posted Image
Then mark, drill, and tap holes on the sides of the pieces as shown. Make sure to label which side is which so the holes line up when you put it together.
Posted Image
Posted Image
You should end up with this:
Posted Image
Step 2: Put together the handle the same way you would on a regular +bow. The only difference is a 5/16" standoff that goes between the two core pieces toward the front.
Posted Image
Step 3: Assemble your catch like you normally would, and attach it to the side plates. Also put ½" standoffs in the side plates where shown.
Posted Image
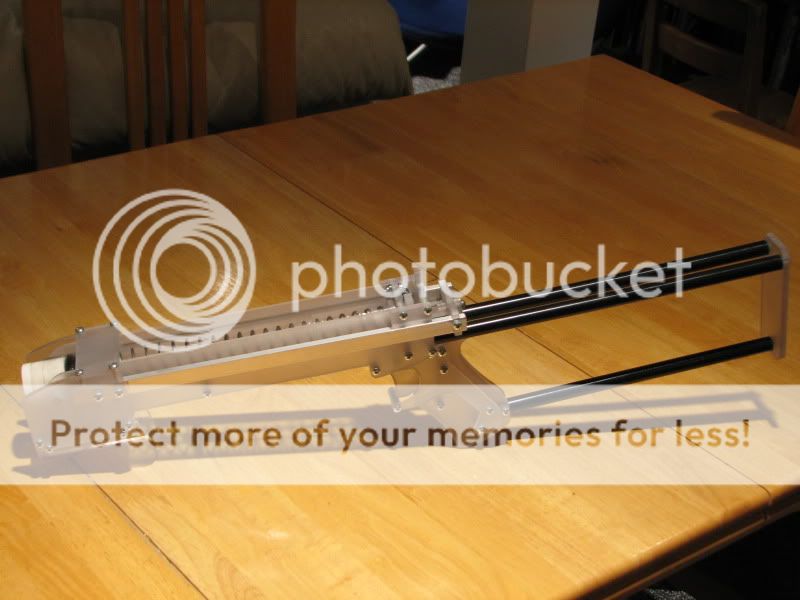
Step 4: Cut three stock rods. The length can be whatever you want it to be, except two have to be 1 1/2" longer than the other one. I used 10, 10, and 8 1/2, but I think that is too short for my tastes. Now take the two longer ones, drill and tap holes in both ends, and attach it to your frame piece like you normally would. Then attach the frame piece to the side plates/handle, and add your stock. Put everything together so far and you should have this:
Posted Image
Step 5: Now take your shorter stock rod and mark where to cut the sides off so it fits in the grip. Then attach the flat end to the stock, and slip the cut end into the grip. Now align it so it is parallel to the other rods and drill through the whole thing and put a bolt/locknut on it. It's hard to explain, so hopefully this picture will show you.
Posted Image
Step 6: Take a 1 ¼" length screw and a catch spring. Bend the last loop of the catch spring and put the bolt through the two holes as shown. Add a locknut.
Posted Image
Posted Image
Step 7: Cut your plunger tube/plunger rod/bushing and put them in the gun as usual. If you are using a [k25], you will need a 1-1/4" O.D. washer on the back of the plunger head.
Posted Image
Step 8: At this point you should have a completely functional +bow, save for the priming handle. So we will start working on that. Assemble the handle as shown.
Posted Image
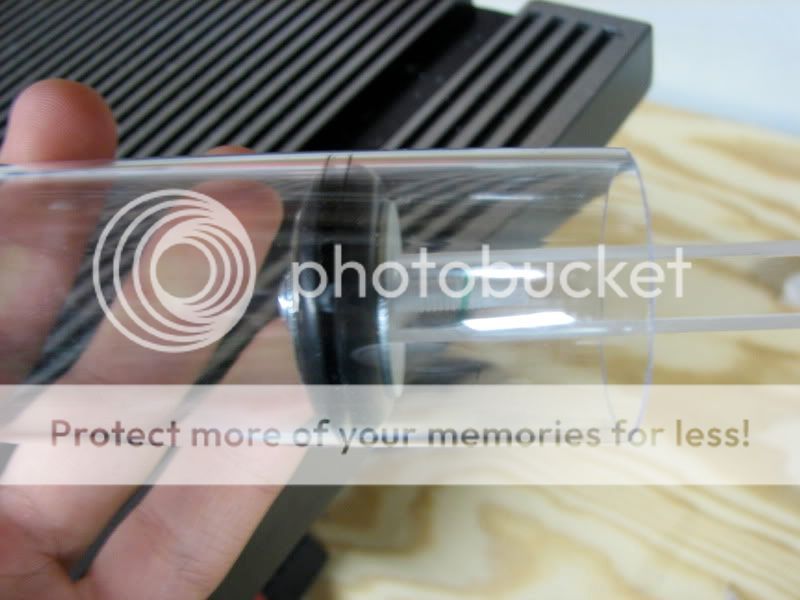
Step 9: Take your PETG tube and cut it in half. Make the cut two inches.
Posted Image
Then angle the crosscut to free the piece from the tube. You will end up with this:
Posted Image
Step 10: Mark holes in the PETG and drill/tap them and attach them to the holes on the handle. You will get this:
Posted Image

Jsno 2

05 August 2010 - 10:25 AM

This is a direct copy of Homa's post from NR.


Hey guys. All of you that went to the first know whats going down, so I'll just go right to the war.

Again, hosted by me and Lt. I'm posting this because he's been busy lately, even though it's a copy paste (lol). Again, we'll toss around dates till we find one that suits best. Preferably in August, to beat the beginning of the school year.

Date:
Location: Brice Park in Allenwood, NJ Google Maps Link
Time: 10 AM SHARP until whenever we want to stop.


General Rules:
-You get here late, we start without you.
-The average age is around 15 so there will be parents hanging around, so keep the swearing to a minimum.
-It's a huge park, so be prepared to be running a lot.
-It's only a few miles from the beach so there are food places nearby, as well as, you know, the beach.
-We (the hosts) reserve the right to tell anyone to leave if they are being an asshole.
-We will break for lunch whenever we feel like it.
-If your parents want to play, let em!

Gun Rules:
-We are not banning anything off the bat. But if you have a really strong gun, just don't bring it. Or shotgun the barrels. The usual, if brought, will probably be banned anyway, I just don't like blanket bans.
-We will be testing any powerful guns in person. On you. If you can't take a hit in the back from 20 ft with the heaviest darts on the field, you can't use it.
-The only banned guns based on performance are ones that use HPA.
-We will be testing air guns based on they're full air capacity. Homemade air guns should have a limiter of some kind so it cannot shoot farther than it will during testing.
-Darts: Only single bb weights or washers as weights with only felt or rubber or hot glue (only with bbs) as tips. Any combination of those is okay, except you can't use both weights. All darts will undergo inspection.
-Mark your darts.
-If your gun is all black/realistic looking, I will personally cover it in purple and orange tape. I don't have anything against realistic looking guns, I just want it to be clear to people that they are fake.
-No exposed brass barrels. They hurt when being barrel tapped.
-Only Crossfire and Manta Shields are allowed. Gun hits count.
-Melee weapons are allowed if determined safe by the hosts. N-Force weapons are allowed.

Game Rules:
-Barrel Tapping: If you are within 15' of someone and your gun is loaded, you can ask them to "surrender." If they say yes, they get a hit. If not though, you can shoot them, or move in for an actual tap. This just makes it safer when you have people who'd rather not get hit by a 4B at close range.
-Be honest. If you aren't no one will like you and we'll make your day suck.
-Dart sweeping: We will be looking for darts every few rounds, and have one large sweep at the end of the war. If you don't help, we won't give you any darts to use.

Game Types: This is up for discussion. What we have so far:
-Defend the Core (I have some cores)
-Freeze Deathmatch
-Team Deathmatch
-CTF
-Pistol Rounds*
-Low Range, high ROF Guns*
-Balls/Rockets only*
-Squad deathmatch

What to Bring:
-At least one primary. If we say one is too powerful or if it breaks, you will want a spare.
-Pistol*. A pistol is defined as any single-shot spring-powerd gun that can be operated (not including priming) with one hand and can not shoot over 90'. Yes I will be bringing a tape measure. Mavericks will be allowed, but they must retain the stock plunger.
-A high ROF, low range gun*. This gun should shoot less than 70 ft and should have a high ROF. Examples are Recons, Raiders, stock Longshots with Raider drums, Magstrikes, RF20's, etc.
-A ball/arrow gun and balls/arrows*. Any gun is allowed as long as it shoots the following: rockets: either homemade or stock ammunition that fits over the barrel and has no exposed hard tip (to weed out mongo stefans) and balls: stock, spherical, light, foam ammunition that fits in the barrel (obviously). Guns you would normally shoot micros with can have adapters for this round, i.e. attaching a ball barrel in the coupler of a BBBB.
-Darts. Lots of them. Make sure they follow all the dart restrictions stated above.
-Safety glasses. EVERYONE must wear them. if you don't have them, you won't play.
-Water. It's going to be pretty hot.
-Food/money. You will have time to go to a place for lunch (though there isn't much fast food around), but I'd suggest bringing a lunch. It's just easier. However there is a pizza place .1 miles away and if we all chip in we can buy a couple pies.
-Money/guns to trade. It'll be like a nerf "swap meet" (to steal Rogue's term).
-A friend. The more the merrier!


Potential Dates:

August 14
August 21
August 28


Attendance List, really just a prop until we get a date. Plus, since me and LT are hosting, we're obviously definites no matter the date.

Definites:
Homa+ 1
LT

Grommet Plungerhead Mini-writeup

21 July 2010 - 09:22 PM

So after some more testing of the grommet plunger head seal I have found a few problems that I had to fix. It is a little more complicated than slapping a seal between two washers. This mini-writeup will outline how to fix all of those problems.

Problem One: When the gun is primed, the spring pushes against the washer on the back of it. Since the rubber is pretty flexible, it squishes in and tightens the seal. This causes undue friction when you fire the gun, and it makes the seal looser when the gun isn't primed.

Problem Two: Since the I.D. of the grommet is 3/4", it has a tendency to get out of line between the washers. This causes a problem for obvious reasons.


Materials:

98026A029 1
98264A125 1
90402A192 1
93505A481 1
9307K81 1
90073A009 1

Posted Image

This puts the cost at $1.49 per plunger head, except most of the materials are bought in bulk so it is only cost effective if you plan on building multiple guns that utilize this plunger.

On to the writeup.


First start out with your plunger rod. Then drill a 9/64" hole in the top of it and tap it with an 8-32 bit.

Then put on your 1" O.D. washer followed by the standoff with a lock washer underneath it (not pictured) to keep the standoff secure. Make sure the washer is centered and tighten the hardware down (I used a nut driver). This puts the retaining force of the spring on the washer and doesn't affect the grommet.

Posted Image

Next slip two 3/4" O.D. washers over the standoff, followed by the grommet. These washers keep the seal centered on the assembly.

Posted Image

Now center the remaining 1" O.D. washer over the top, and tighten it down with a screw. The more you tighten, the better the seal.

Attempt at seal demonstration by breathing on the plunger:

Posted Image


This process just made you a great sealing plungerhead for +bows and the like for less than half the price of the skirt seal. There is one catch though... If the skirt is considered to seal 100%, I would say this plungerhead seals 90-95% based on how tight you clamp it down. However there is literally no performance loss when this head is used on such high-powered guns that it was designed for.

The Reconbow

17 May 2010 - 01:57 PM

Recons suck. They have inverse plungers and they are overrated. However, the new N-Strike blasters do have some advantages… cooler looks (in the opinion of a lot of people), a better shape and feel (in my opinion), and an amazing rate of fire (in most people’s opinions). If you bring one to a CQB Nerf War you will have a large advantage. The clips allow for extremely fast reloading and now the Raider Drum provides almost an endless supply of ammo. They are probably the basis of a lot of amazing paint jobs as well. But the blasters still suck… They can’t shoot far for shit.

Well we’re changing that.

Primary Project Goal (Achieved):
Develop a homemade plunger system for the Recon achieving intermediate range while still allowing full use of the stock blaster’s features (clip loading, attachments, etc.) and keeping most of the new internals inside the gun and maintaining compactness of the blaster.

Secondary Project Goals (In Progress):
Design the modifications/homemade parts so that anyone who is able to build a +bow can recreate the ReconBow. Also, modify the existing attachments and make new accessories to make the Recon a more useful blaster.

Intro:

So I wanted a Recon (I like the Recons shell) that had an internals replacement, but not some stupid AirTech integrated into it. I wanted a springer that could use an Angel Breech to achieve pretty good ranges while keeping the ROF of the stock blaster.

I was oringinally going to leave the catch mechanism in place, but the performance would have been worse than a NiteFinder’s. The new plunger tube is about the diameter of a NiteFinder’s, but hopefully by making it slightly longer I can achieve ranges of about 100 ft. Since I moved the catch though, I had to design a completely new one. Thanks to CS for designing the +bow catch which the ReconBow catch is based off of. Since it is made out of plastic sheeting, you will need to download the cutting templates

Also, I want to say that I designed this mod to allow for rushing while using a Raider drum while still getting shots off at more than 50 feet. +bow ranges were not necessary for this project, just good enough to hit close range targets accurately.

Materials:
You do not need everything on this list! I had most of the stuff lying around so this is what I chose to use. Please read through the writeup and see what you need before buying all this stuff.

McMaster stuff:
9245K29	Clear Petg Tube, 3/4" Od, 5/8" Id
8745K47	Gray Pvc (type I) Rod, 1" Diameter
94115K21	Neoprene O-ring, As568a Dash Number 210
91090A107	Zinc-plated Steel Large-diameter Flat Washer, 1/4" Screw Size, 7/8" Od, .04"-.06" Thick
90133A053	Neoprene Rubber Washer, 1/2" Screw Size, 1-1/16" Od, .093" Thick
92778A074	18-8 Ss Oval Point Socket Set Screw, 6-32 Thread, 3/8" Length
8660K31	Gray PVC (Type I) Square Bar 3/8" Square
8585K62	Polycarbonate Round Tube 1-1/8" OD, 1" ID, Clear
9657K39	Steel Compression Spring Music Wire, 1" L, 1/4" OD, .020" Wire Diameter
90402A146	Zinc-Plated Steel Pan Head Phil Machine Screw External Washer, 6-32 Thread, 3/8" Length
8574K24	Polycarbonate Sheet 1/16" Thick, 12" X 12", Clear
8574K28	Polycarbonate Sheet 1/4" Thick, 12" X 12", Clear
90295A075	Nylon 6/6 Flat Washer #6 Screw Size, .140" ID, .313" OD, .057"-.067" Thk
90272A151	Zinc-Pltd Stl Pan Head Phillips Machine Screw 6-32 Thread, 3/4" Length

Other Materials:
-1/2” Brass
-17/32” Brass
-9/16” Brass
-CPVC
-[k26] spring

Tools
-Adhesives and Solvents
-Screw Drivers
-Allen Wrenches
-Pipe Cutters/Dremel
-Hacksaw/Miter Saw/Table Saw
-Scroll Saw
-Band Saw (not necessary)
-Drill or Drill Press
-Drill Bits
-Sandpaper
-Files
-Utility Knife

I’m pretty sure I used every tool in my shop (which is a lot). You don’t need to though.

The writeup will be broken into two parts: One for everything dealing with the plunger/ catch, and the other one dealing with the barrel/breech. Since I went through design changes so many times the parts list/writeup may not be complete/coherent. The next time I make one I will post a better writeup. Therefore, DO NOT follow this writeup word-for-word. Use your head.

Part One:

Dremel out the back of the shell to fit the catch mechanism like so.

Posted Image

Cut out your plunger tube to fit right up against the clip, going most of the way back. You will have to trim it later.

Posted Image

Cut out all the template pieces (besides the circles) out of 1/4” polycarbonate. Drill the holes before you make the cuts. Also tap the holes that need to be tapped. (These templates are different from the ones you’ll be making).

Posted Image

Now you will have to make them fit the shell by beveling the corners and maybe thinning them out. Make sure everything can fit smoothly. Don’t forget to file the edge on the catch plate to make it slide easier.

Posted Image
Posted Image

Now put the catch mechanism together, and then cut the plunger tube where shown. This will be where the trigger will fit. In the picture, the spacers are on wrong. Put them between the frame piece and the catch.

Posted Image

Now cut and drill/tap the plunger rod from a 3/8” PVC bar. It should go from the front of the plunger tube and stick out the back a little bit.

Posted Image

Then make the plunger head by using a 3/4” washer, 1 1/6” by 1/16” rubber washer (don’t use the one in the parts list, it’s too thick. I got mine at Home Depot), and a 7/8” washer on top.

Posted Image

Now we need to make two plastic rings. I don’t like cutting circles so I got 1” plastic (PVC) rod and sliced off one 1/4” piece and one 3/16” piece. Then I put the circle templates on the rings. You could of course cut these out of regular polycarb sheets…

Posted Image

Then drill a 5/32” hole in the center. Since the plastic was too large, I put it in my drill press and lathed down the O.D. until it fit in the plunger tube.

Posted Image

Jsno - Jersey Shore Nerf Out

26 April 2010 - 04:43 PM

Check for updates towards the end of the thread. However the updated recount of the attendance list will be kept here. If you don't see your name on it that means you haven't told me you were coming after the update. The following attendance list is for July 17th. Sorry for the confusion.

Definite: 12-18
-LT +1
-Homa +3-8
-Zack the Mack
-Lucian
-Area5100
-Trashers17
-Seven7h Man
-Snowfall +2

Likely Maybe: 1
-compound

Maybe: 4
-Split
-popatachi
-balisticjoe
-Gears

The old war post is below. Most of the stuff is repeated in the update towards the end of the thread.

Attention: The rules about small things like melee weapons and shields and such are not set in stone and will be discussed come the war date. Also the same applies to round scheduling and stuff. This will be a pretty lax war.
-------------------------------------------------------------------------------------------------------------------------------------------

That's right folks. It's going down. An NJ war, hosted by Myself and Homa (NR). I posted a speculative thread for this a while ago but it never worked out. So this is official now.

Date: July 17
Location: Devine Park, LOOK AT THE LAST UPDATE. BRICE PARK.
Time: 10 AM SHARP until whenever we want to stop.


General Rules:
-You get here late, we start without you.
-The average age is around 15 so there will be parents hanging around, so keep the swearing to a minimum.
-It's a huge park, so be prepared to be running a lot.
-It's about a half mile from the beach so there are food places nearby, as well as, you know, the beach.
-We (the hosts) reserve the right to tell anyone to leave if they are being an asshole.
-We will break for lunch whenever we feel like it.
-If your parents want to play, let em!

Gun Rules:
-We are not banning anything off the bat. But if you have a really strong gun, just don't bring it. Or shotgun the barrels. The usual, if brought, will probably be banned anyway, I just don't like blanket bans.
-We will be testing any powerful guns in person. On you. If you can't take a hit in the back from 20 ft with the heaviest darts on the field, you can't use it.
-The only banned guns based on performance are ones that use HPA.
-We will be testing air guns based on they're full air capacity. Homemade air guns should have a limiter of some kind so it cannot shoot farther than it will during testing.
-Darts: Only single bb weights or washers as weights with only felt or rubber or hot glue (only with bbs) as tips. Any combination of those is okay, except you can't use both weights. All darts will undergo inspection.
-Mark your darts.
-If your gun is all black/realistic looking, I will personally cover it in purple and orange tape. I don't have anything against realistic looking guns, I just want it to be clear to people that they are fake.
-No exposed brass barrels. They hurt when being barrel tapped.
-Only Crossfire and Manta Shields are allowed. Gun hits count.
-Melee weapons are allowed if determined safe by the hosts. N-Force weapons are allowed.

Game Rules:
-Barrel Tapping: If you are within 15' of someone and your gun is loaded, you can ask them to "surrender." If they say yes, they get a hit. If not though, you can shoot them, or move in for an actual tap. This just makes it safer when you have people who'd rather not get hit by a 4B at close range.
-Be honest. If you aren't no one will like you and we'll make your day suck.
-Dart sweeping: We will be looking for darts every other round. If you don't help, we won't give you any darts to use.

Game Types: This is up for discussion. What we have so far:
-Team Deathmatch
-CTF
-Pistol Rounds*
-Low Range, high ROF Guns*
-Balls/Rockets only*
-Squad deathmatch

What to Bring:
-At least one primary. If we say one is too powerful or if it breaks, you will want a spare.
-Pistol*. A pistol is defined as any single-shot spring-powerd gun that can be operated (not including priming) with one hand and can not shoot over 90'. Yes I will be bringing a tape measure. Mavericks will be allowed, but they must retain the stock plunger.
-A high ROF, low range gun*. This gun should shoot less than 70 ft and should have a high ROF. Examples are Recons, Raiders, stock Longshots with Raider drums, Magstrikes, RF20's, etc.
-A ball/arrow gun and balls/arrows*. Any gun is allowed as long as it shoots the following: rockets: either homemade or stock ammunition that fits over the barrel and has no exposed hard tip (to weed out mongo stefans) and balls: stock, spherical, light, foam ammunition that fits in the barrel (obviously). Guns you would normally shoot micros with can have adapters for this round, i.e. attaching a ball barrel in the coupler of a BBBB.
-Darts. Lots of them. Make sure they follow all the dart restrictions stated above.
-Safety glasses. EVERYONE must wear them. if you don't have them, you won't play.
-Water. It's going to be pretty hot.
-Food/money. You will have time to go to a place for lunch (though there isn't much fast food around), but I'd suggest bringing a lunch. It's just easier. However there is a pizza place .1 miles away and if we all chip in we can buy a couple pies.
-Money/guns to trade. It'll be like a nerf "swap meet" (to steal Rogue's term).
-A friend. The more the merrier!


Atendance- Please tell us as soon as you can. If you can't make the date, suggest another one and we might change it.

Definites (14-18)
LT + 2
Homa + 3-8
trashers17
numa-t49 + 1-2 (NH)
Zack the Mack
Seven7h Man
faddle

Maybe (6)
-Echnalaid
-balisticjoe
-imaseoulman
-compound+1
-Lucian
-Popatochi
-shottedu###
-Snowfall
-Rev+4

Hope to see you there!