Jump to content


SorrowX

Member Since 11 May 2008
Offline Last Active Sep 12 2017 11:59 AM

Topics I've Started

SorrowX 8-Shot Turrets 3.0

30 January 2013 - 10:02 AM

Since my recent return to the forum(and long before that, actually), people have been asking me for my turret files. Since I left the forum a couple years back, the original designs have been lost; the flash drive somewhere in my house, never to be seen again. I started to feel bad about having to tell people that, so I spent all last night redesigning them from the ground up. These turrets are slightly smaller than the previous designs, so those that can produce them can do so at a lower cost than I ever could. I remember development lessons from the original revisions, so there shouldn't be any serious kinks with them.

The files were drawn in Autodesk Inventor 2013, and are in IPT format. I'm not going to include a bunch of different format this time, because that is really a pain. If you know how to operate a 3D printer or CNC mill, you should know how to convert files.

The turrets are designed to use the number -206 O-Ring, from The O-Ring Store. You can use whatever material you prefer, but if I remember correctly, I used Buna-N 70 rings. The turret mounting screw/bolt hole is large enough to fit a 1/4 bolt. The lug sprng hasn't been firgured out, so use whatever works.

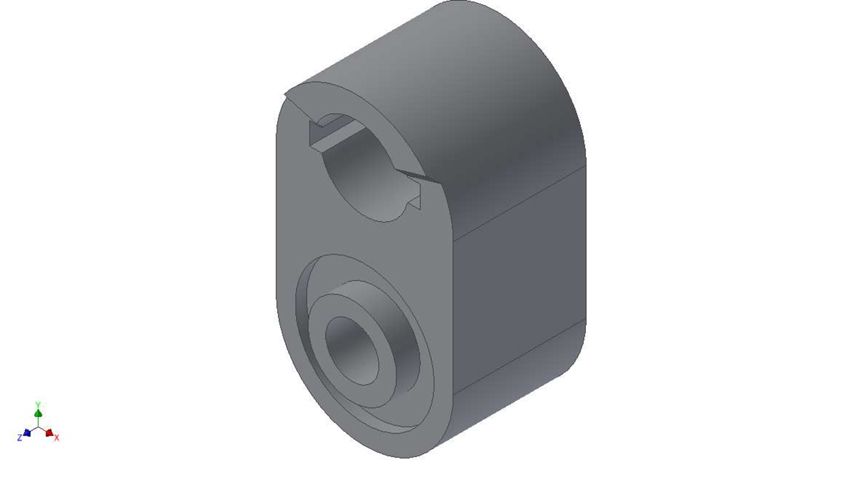
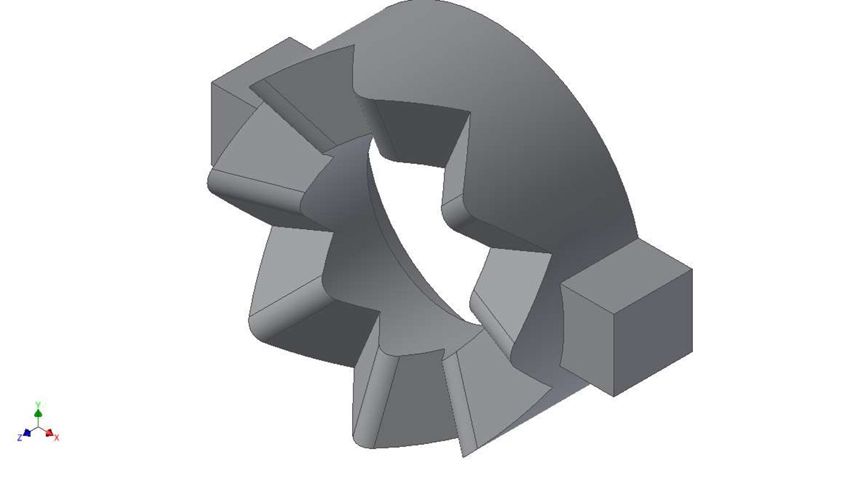
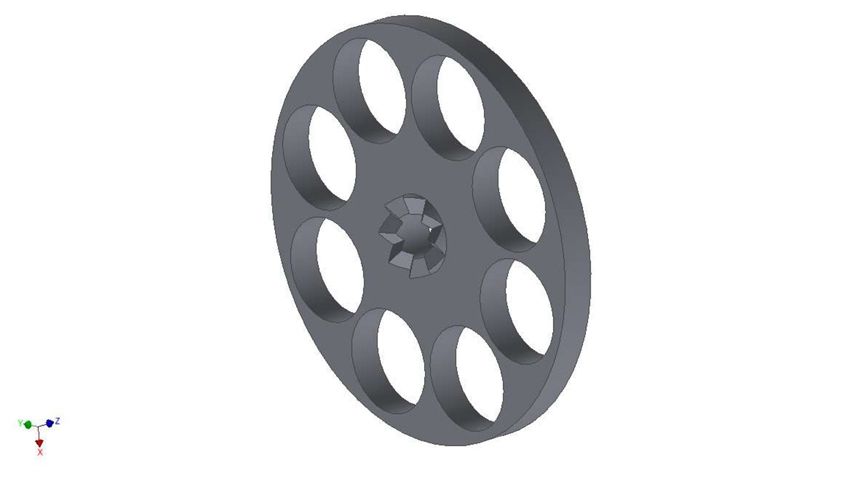
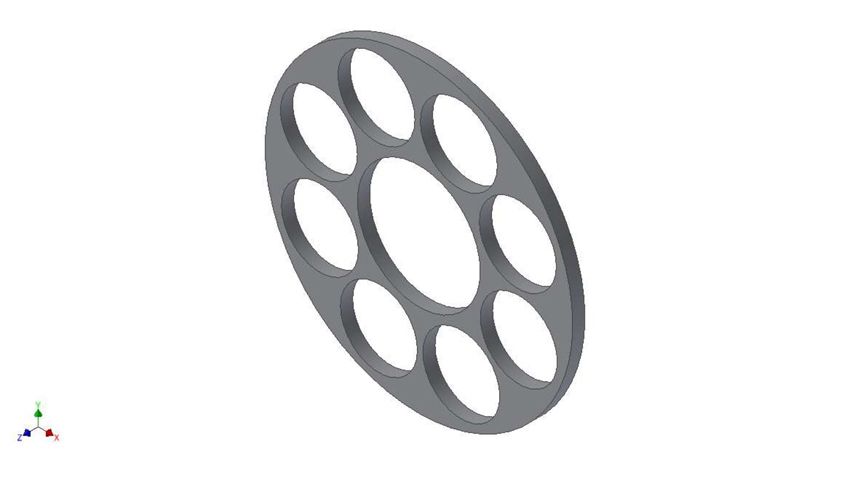
Here's some pictures, and a Download link below.

Posted Image
Posted Image
Posted Image
Posted Image
DOWNLOAD:
turret download

For those of you who wist to produce to sell, you are welcome to do so, just remember to credit the designer :lol:

Rpmbnb! Updated With More Goodies!

03 February 2011 - 10:14 PM

RPM-Built Nerf Blaster

Proving myself and others wrong

Posted Image


Introduction: Since I started nerfing, the idea of a viable nerf blaster being built by a Rapid Prototype Machine has been put down. I tried before, but never seemed to get the project off the ground. After that, I jumped on the wagon that it couldn’t be done. Recently, a friend of mine managed to push me off of that wagon and get started again. Needless to say, my project was a success. Of course, not everything in the blaster was made using an RPM, but the majority of the hard to manufacture parts are. The only things not made using the RPM are the cylinder, piston rod, and barrel for obvious reasons. In other words, the plunger tube, plunger rod, and barrel still come from elsewhere. I understand the people like boltsniper have made components such as magazine wells for his blasters, but I wanted to take it a step or two above by actually making crucial components from an RPM. Anyways, on to the meaty goodness.


RPM Talk: For this project, I used Autodesk Inventor 2011 and Catalyst to design and process my blaster. The machine used is a Dimension SST768 and the model material is P400 ABS. I used a sodium hydroxide/water solution in a specialized bath set at 70°C to remove the soluble support material as well as to somewhat strengthen the bond of the model material. All of the parts built used a solid material setting for maximum strength and longevity.


Design: The blaster was mainly designed as a proof-of-concept build, so almost anything can be changed design-wise. I designed it to use 1-½ PVC as the plunger tube. The plunger rod is ⅝ round Nylon rod, but that can be easily swapped for square rod with small changes in the design of the catch base, catch and plunger head. I chose to make use of the many tools available at my school, so I used a rounded catch face design and a lathe to carve the catch face itself. This can easily be substituted for a nitefinder-style catch system.


Strength: I have yet to range test it, but that’s not really a big concern for me. My main concern is for how long it will last. So far, the parts has withstood many hours of dry-firing without any padding of any sort, any there is still no sign on any physical damage. I am currently using what my friend tells me is plus-bow spring to power the main mechanism. Half of these springs plus a normal LS spring pushes longshots to around 100’.


Pictures: Well, this part is pretty self-explanatory.

Stripped:
Posted Image

Printed parts only:
Posted Image

Grip:
Posted Image
Posted Image

Trigger:
Posted Image

Grip AND Trigger:
Posted Image

Catch:
Posted Image

Catch inside catch base:
Posted Image

Piston head:
Posted Image

Cylinder Head:
Posted Image

Primed:
Posted Image
Posted Image


Notes: If anyone wants the designs or files, I can send it to them via email, just PM me. You guys are welcome to the knowledge. To be honest, my designs aren’t the greatest, and some do have trouble understanding them. If those who request the files are willing to wait a short while, I can make revisions of my designs that are much clearer and easier for everyone to understand.


Video Is Up!!!

Files are up!!! http://www.mediafire...l99ncxy0e3d0nua

Motivators

01 September 2009 - 04:44 AM

Ok, I haven't seen a thread like this yet, so I decided to make a motivational thread. Post your favorite (De)motivators within CoC Rules, no pr0n or any of like subject. Self made nerfy motivators are great too! I think I'll start off with this one...

Posted Image

Bfno- Fulleron, Ca Nerf Out

23 August 2009 - 02:37 PM

Well well well, folks, BFNO is back! This is most likely going to be a single portion war, and I might bring a grill so Nodoka can cook for us...but I may charge, For a good reason though. Its still not a guarantee that that will happen though. ....Anyways, the location is a bit complicated for people who haven't been here before. It a bit of a walk from the war site to the parking lot, as illustrated by the following image.

Once you have your stuff, walk down the path that the arrow under 'War Site' is pointing. Come the day of the war, I will set up some pickets to guide the way.
Posted Image

The address for the parking is::
1766 W Bastanchury Rd.
Fullerton, CA 92833


Time & Date:
9:00, September 12(( 8/12 ))

If there are any problems, let me know now that way I can hopefully arrange stuff with my parents to free up a different weekend.

Food To Be Served: Q-Bites (Please Order)


Q-bites are a tasty little treat me and Nodoka came up with tonight. they consist of hollowed out french bread, sandwich contents in the shape of cubes, and a small section of the bread that was cut out caps it off. see the diagram.

Don't complain on the phallic level, please, i tried my best on that.
Posted Image

The basic Q-bite is ham and cheese $6

the B/F-Hollows special is Ham, Cheese, Mushrooms, and grilled onions $7

special ingredents $8
Please, let me know if you want one at the war.
The money that the food generates goes the this cute little kitten Gami, who has a disease that has proved to be fatal in previous generations of his bloodline. My parents refuse to pay for a trip to the vet for some medication, but we don't even know what the name of the disease is.
Posted Image
Posted Image

That is all for now, Fellow Nerfers and Pet Owners. I will use the space below for any updates and the day nears.

A New Way To Take Away Boltsled Stress!

14 June 2009 - 10:11 PM

Ok, I'm really upset right now because I had the entire write-up ready to go when my computer decided to be an ultra-douchenozzle. Anyways, onto the write-up.

After acquiring a +Bow spring, I decided it was going to my longshots. I cut 2 portions of the spring into 4 1/2 in. segments and popped them in. I pulled back on the charging handle, when my old rival, the boltsled, snapped. After cursing furiously at now obliterated piece of plastic, I popped another one in its place. this one, much newer, didn't snap on the drawback. Instead, it bent, prohibiting the plunger rod from catching. This is my solution on how to fix that problem.

Tools And Materials Required:
- Longshot
- Drill
- Tin Snips
- Needle-Nosed Pliers
- 2 Gripping Utensils
- Bicycle brake/gear cable
- threaded rod
- 2 nuts
- 2 washers
- E-Tape
- 5/8 rubber hosing(Optional)
Posted Image

First off, cut the steel brake cable so it is out of the housing and has clean ends.
Posted Image

Now Remove the bolt pin and drill here on both sides.
Posted Image

Thread your steel cable through the hole where the bolt pin was formerly located, then feed it through the holes you drilled.
Posted Image

Cut at your desired length. make sure to leave enough room for it to double over about 1/2 an inch.
Posted Image

Fold your steel cable with your pliers. It should double over about half an inch. place your washers on, the cable leading the the boltsled on the inside.
Posted Image

Stick the washers on your threaded rod, throw on your nuts, and Bam! there you go. For the added touch, get your spice-weaseling 5/8 rubber tube and cut it to the length of your threaded rod. Cut it down one side, and place it over the rod. Wrap that sucker in E-Tape, and your all done!
Posted Image

Your finished product should look a bit like this:
Posted Image


I also have a video on how it works:
Test Firing
This thing sounds really powerful...

Questions? Comments? Spice weasels? I hope this helps out those folks who don't want anything snapping back at them. Another plus side of this mod is: you don't have to take your longshot apart!