Jump to content


boltsniper

Member Since 27 Feb 2003
Offline Last Active Aug 29 2015 03:53 PM

Topics I've Started

Bs-12 Advanced Tactical Nerf Rifle

08 March 2011 - 08:05 PM

Almost a year ago myself and three other guys from work started a competition to build nerf guns. The goals were simple and as follows:

- Must fire standard streamline nerf darts
- Shoot 10 rounds in 10 seconds.
- Hit the back of a car from 80 feet

These goals were intentionally vague so that we the objectives could be approached from many angles. For instance you could shoot 10 darts at once to meet the ROF goal, etc

The actual contest kind of fell through but myself and one other guy continued building. This is my result and he should be finishing his soon and I’m sure he’ll stick it up here as well.

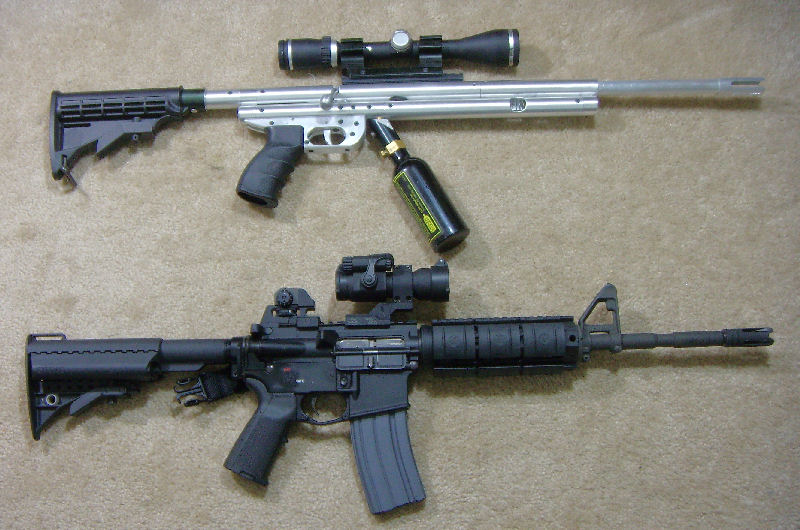
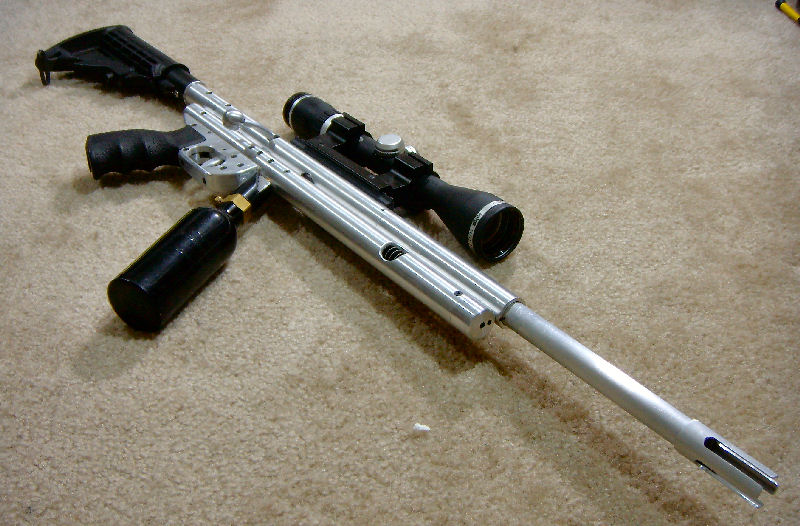
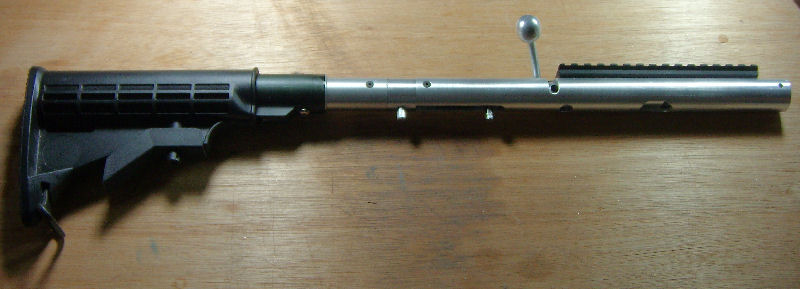
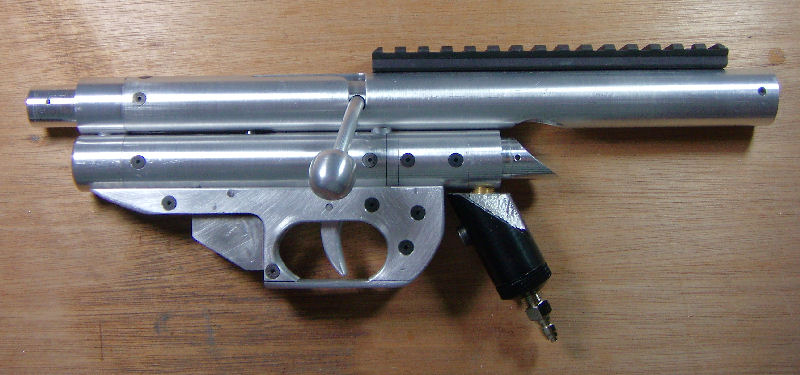
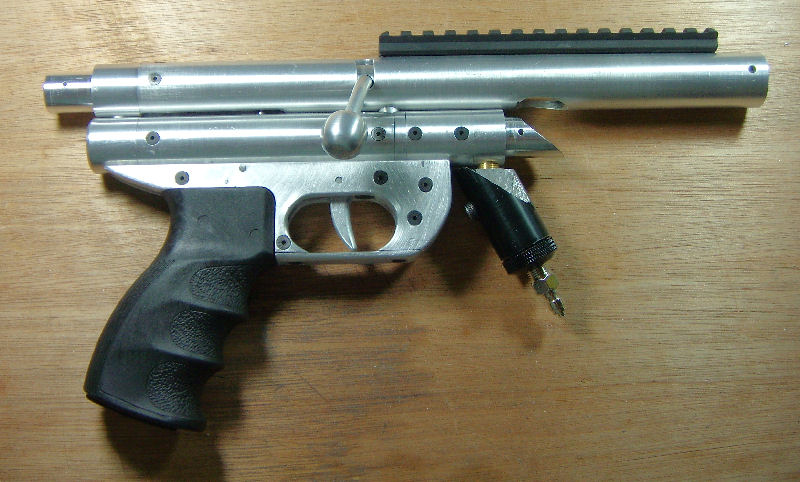
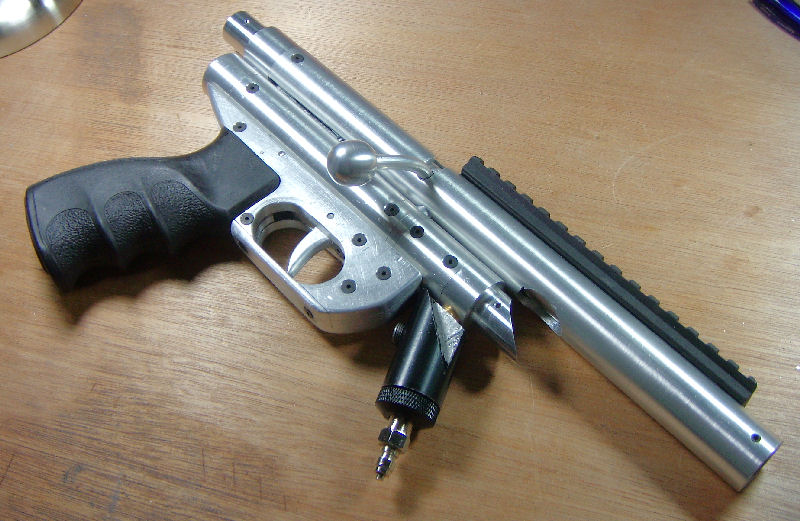
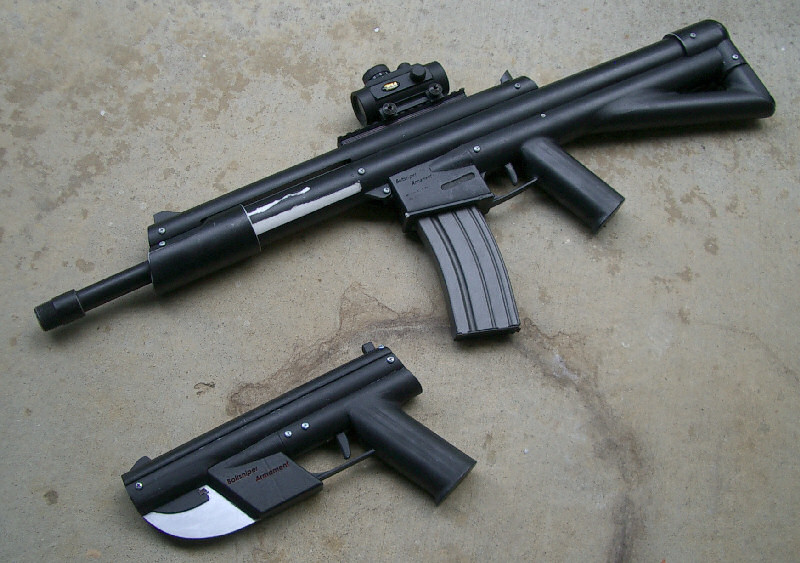
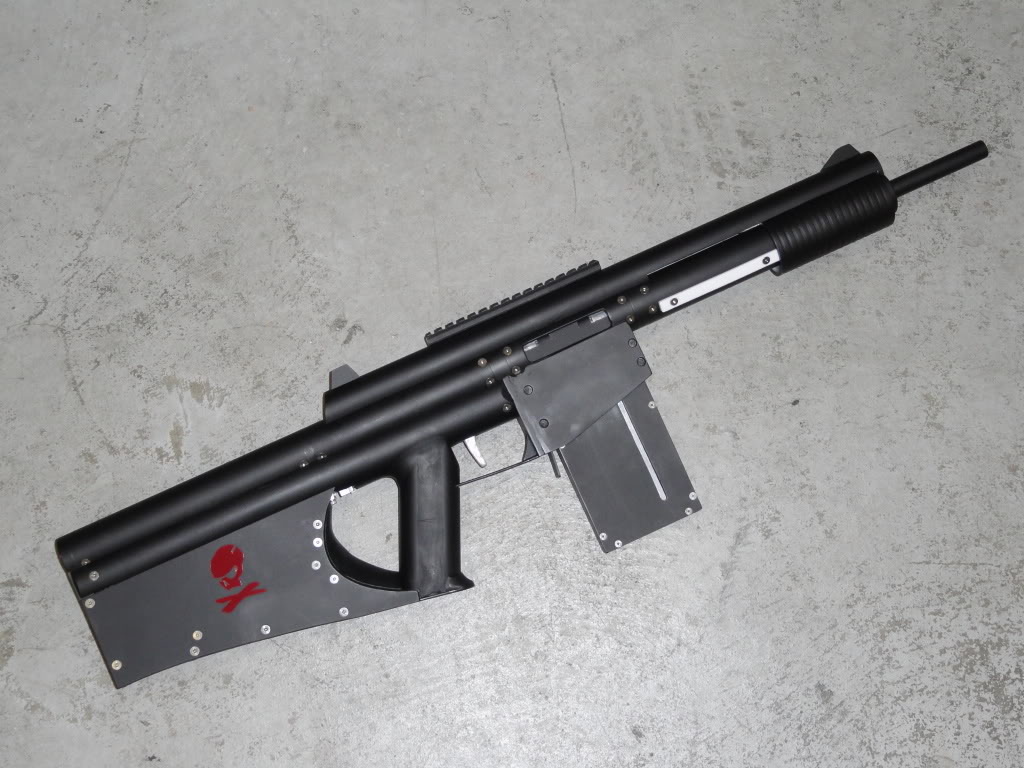
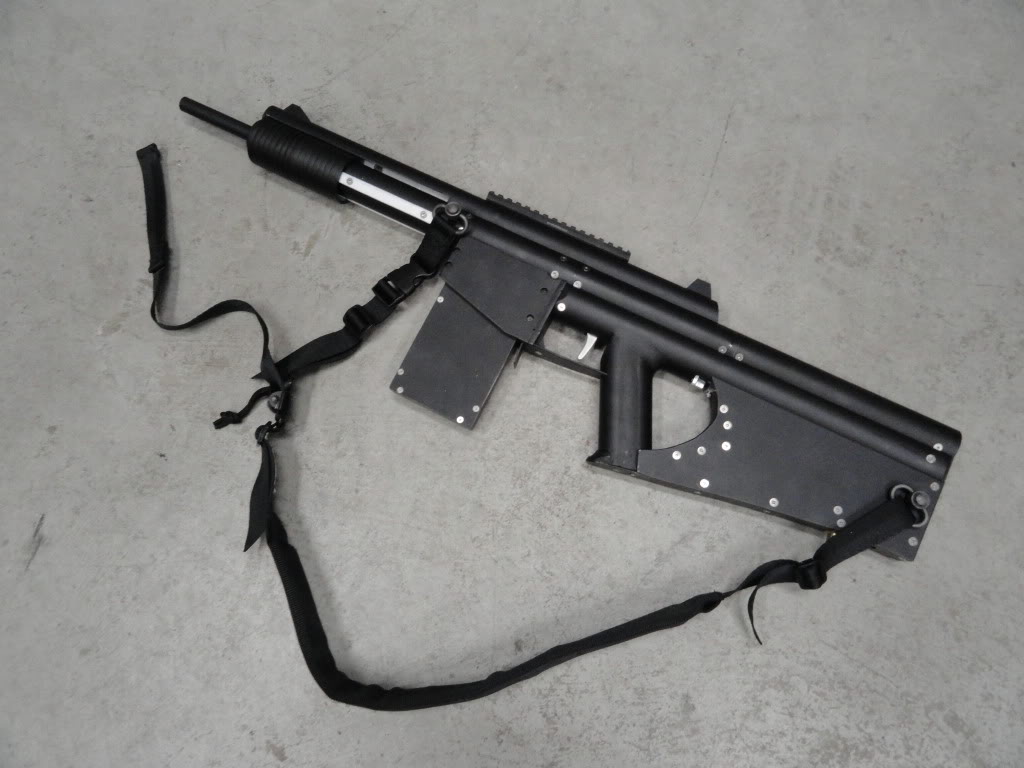
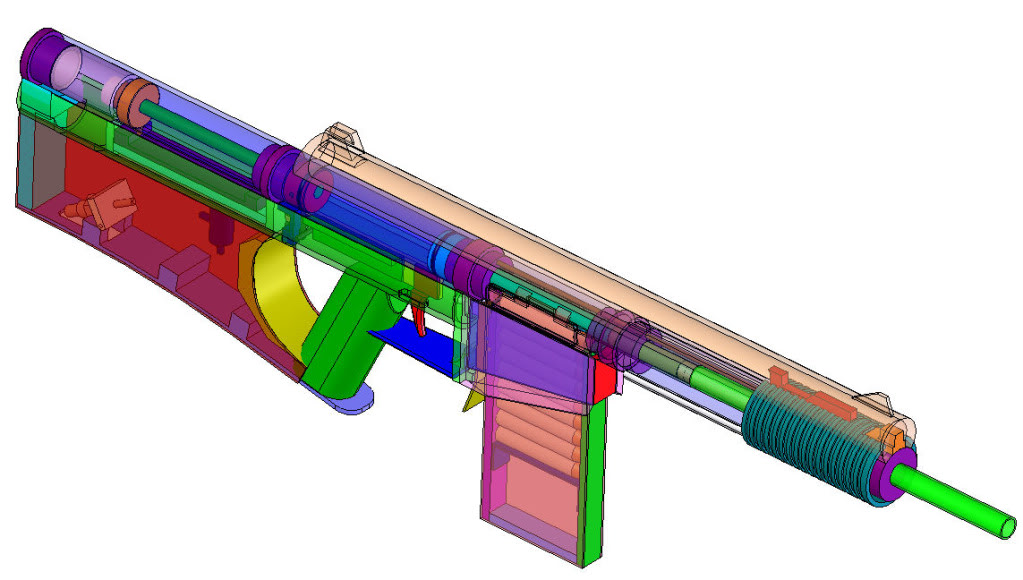
This rifle is the 12th gun I have made, hence BS-12, and I am dubbing it the Advanced Tactical Rifle, or ATR. It’s essentially the same type of rifle as the BS-8 with improvements in design, materials and the addition of semi-automatic cycling.

1420585665-295592-1-DSC02426.jpg
1420585665-295592-2-DSC02443.jpg

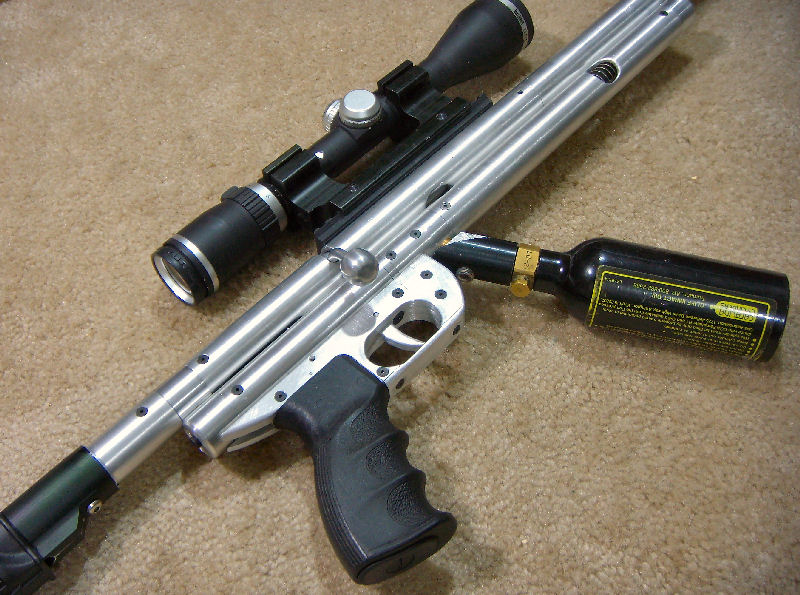
From the start I intended to make this rifle semi-automatic capable. I say capable because I never intended for it to be solely automatic. My vision was for a pump-action rifle with a semi-automatic mode available. Since the semi-automatic action would run off of compressed gas of some sort, I didn’t want it to be solely dependent on an energy supply that may run out, so I wanted it to be manually operable as well. I also wanted this rifle to be much more durable. This meant utilizing tougher materials than PVC and polycarbonate. While I still used both of those materials, the bulk of the rifle is aluminum 6061. Being able to machine the parts to very tight tolerances also lead to better seals which made it perform better and also enabled the auto-cocking function.
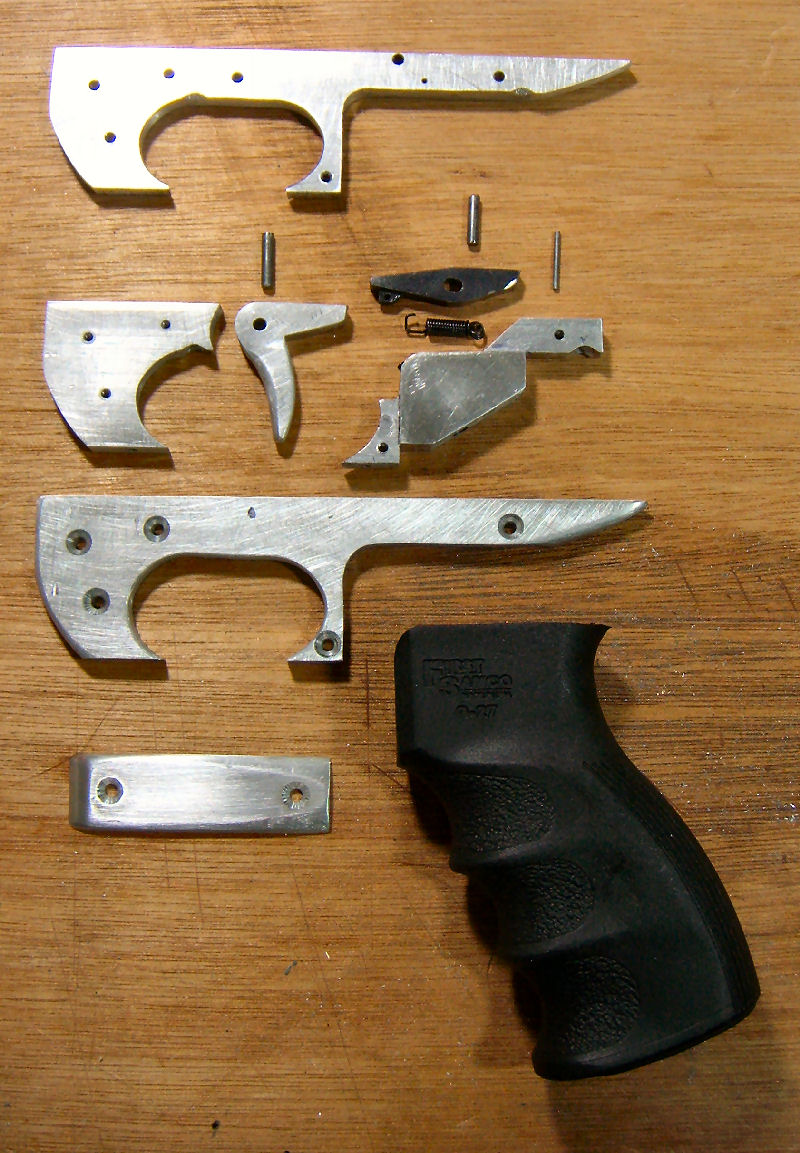
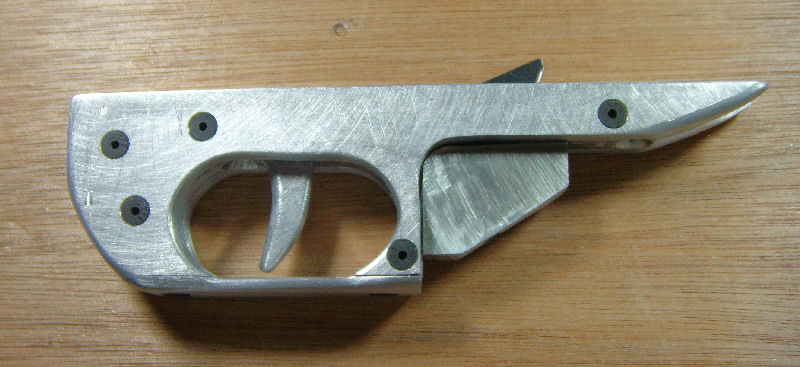
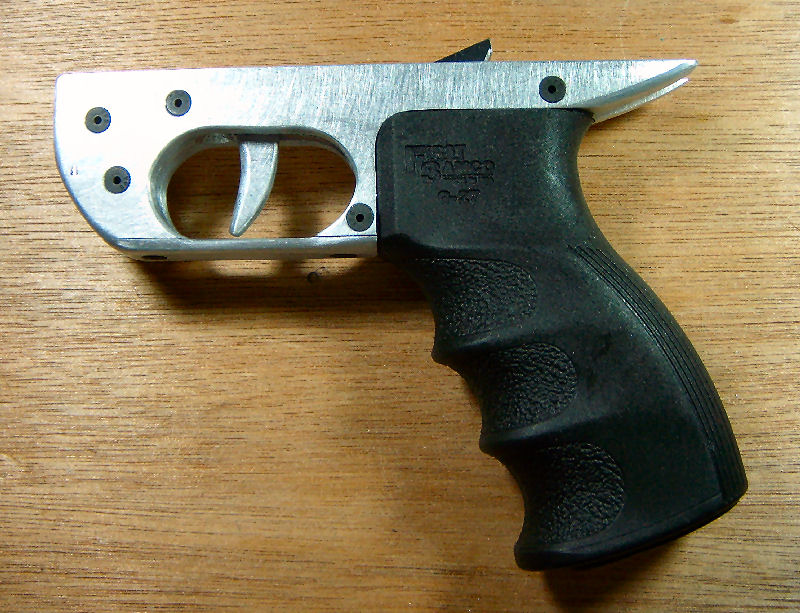
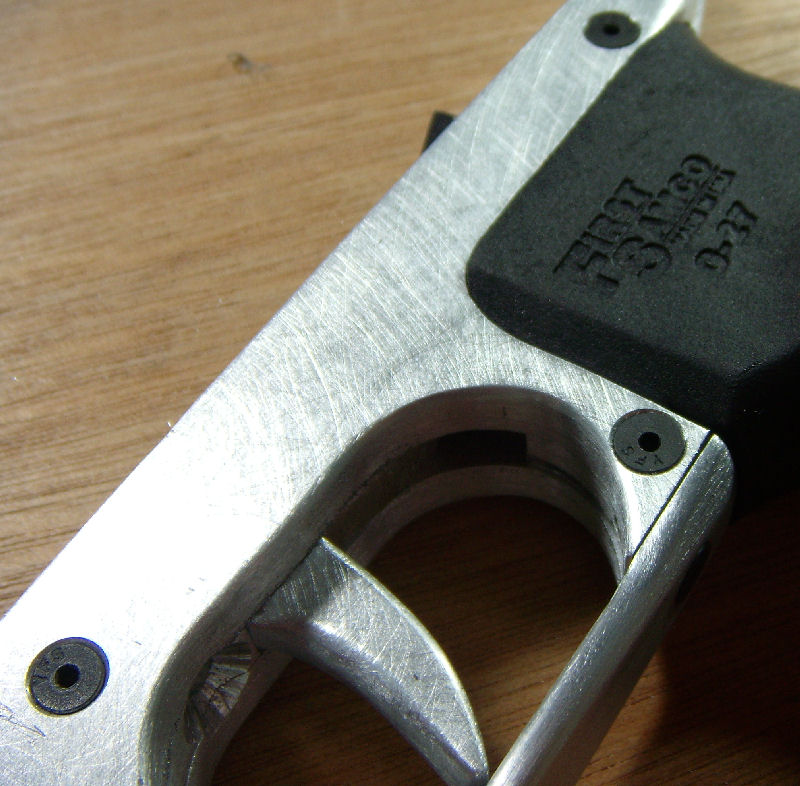
The whole thing is screwed together and with most of them being countersunk. There are over 120 fasteners in the whole rifle. Only a few parts are bonded together…mainly the pistol grip.

It fires streamline clip-system standard nerf darts WITHOUT shells making this rifle much much more practical to use.

What resulted is a detachable magazine-fed, pump-action, spring-plunger rifle which is auto-loading when attached to an external gas supply.

Specs:


Caliber 0.5 in
Plunger Volume 4.91 in3
Plunger Stroke 4 in
Muzzle Velocity 190 ft/s
Overall Length 33 in
Magazine Capacity 12
Rate of Fire
Pump-Action 80 RPM
Semi-Automatic 120 RPM
Range 165 ft
Barrel Length 12 in
Propulsion Hybrid Impulse/Acceleration
Magazine Detachable Bottom Feed

Using a standard chronograph I was able to clock the muzzle velocity. The max I have seen has been 194ft/s but it varies based on the dart. The lowest I have seen is around 170ft/s. In comparison any stock nerf gun will shoot at 45-50 ft/s. Standard mods will get them to around 60ft/s.

BALLISTICS
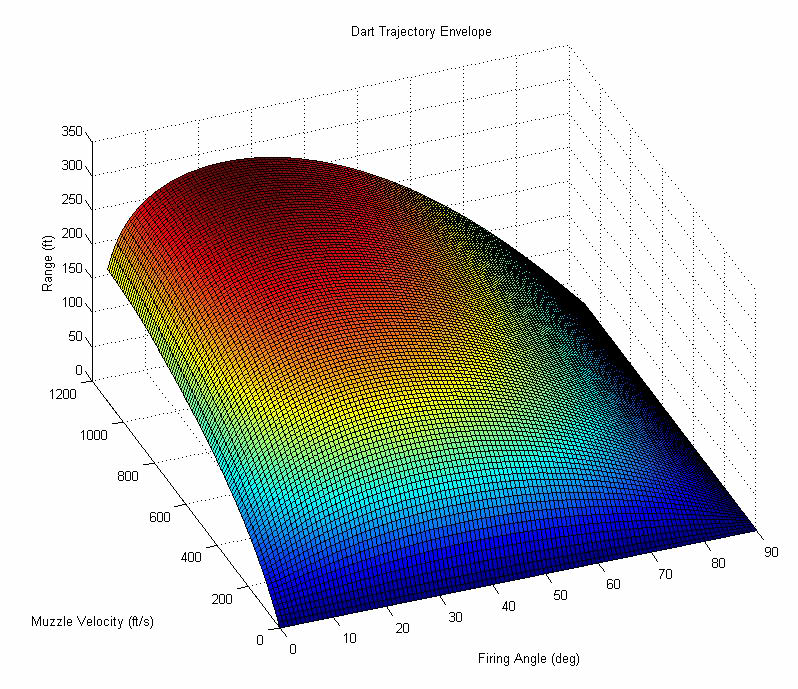
During the design of this rifle, I decided to write some programs to simulate the firing of a dart. By doing this and knowing the muzzle velocity of the gun, I can accurately predict the range. In order to compute the drag on the dart from the air I did a combination of simple computational fluid dynamics (CFD) models and empirical tests. I found a good value for the drag coefficient of a streamline dart. Knowing this value the subsonic drag can be computed and ultimately the trajectory. At transonic speeds the drag increases greatly due to shock wave formation. To account for this I applied an exponential increase in the drag from 0.8 Mach up to 1.0 Mach. I did not bother to go above Mach 1.0 for numerous reasons. For one….let’s be serious…no one is firing a nerf dart at the speed of sound. Two…I doubt a nerf dart would survive that velocity. Three….it is impossible for a spring-plunger type gun to even fire a dart above Mach 1.0.

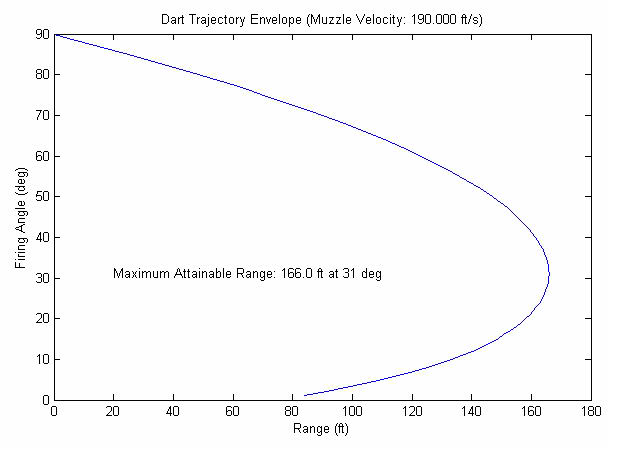
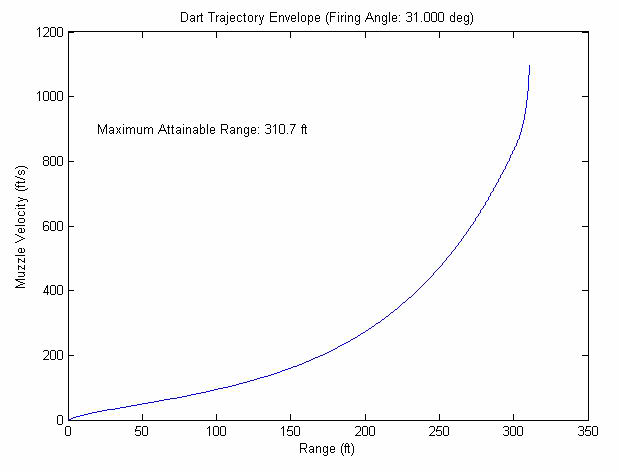
Anyways, the figure below shows the full range envelope for a streamline dart. From 0-90 degrees firing angle and 0-1100 ft/s muzzle velocity.

1420585665-295592-3-DartEnvelope.jpg

Knowing the muzzle velocity is 190ft/s for the ATR, the range vs firing angle can be plotted to determine the optimal firing angle.

1420585665-295592-4-BS12-FiringAngle.jpg

For completion, the plot of range vs muzzle velocity can be made as well. Notice the knuckle in the curve near the end as the transonic wave drag kicks in.

1420585665-295592-5-RangevsVelocity.jpg

Finally, the actual dart trajectory can be plotted.

1420585665-295592-6-BS12-Trajectory.jpg

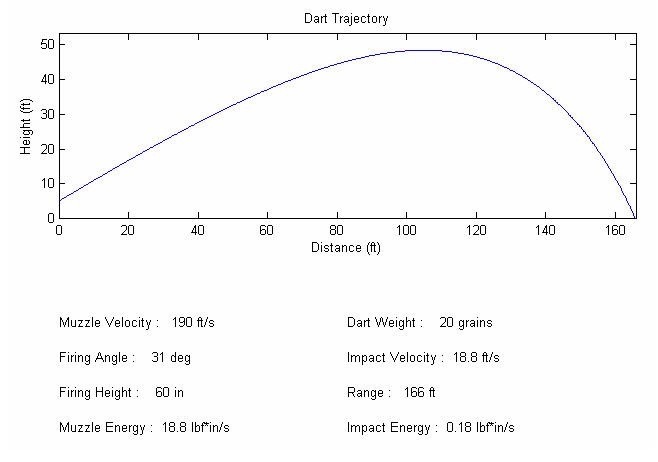
Maximum attainable range for the ATR is 166 feet. This calculated value correlates well with actual shot data.

On a side note, notice the maximum range from the full envelope of just over 300ft. It is physically impossible to fire a stock nerf dart any farther than that.

These scripts were written in MatLab and I am thinking about porting them to Java to make an interactive applet.


TECHNICAL
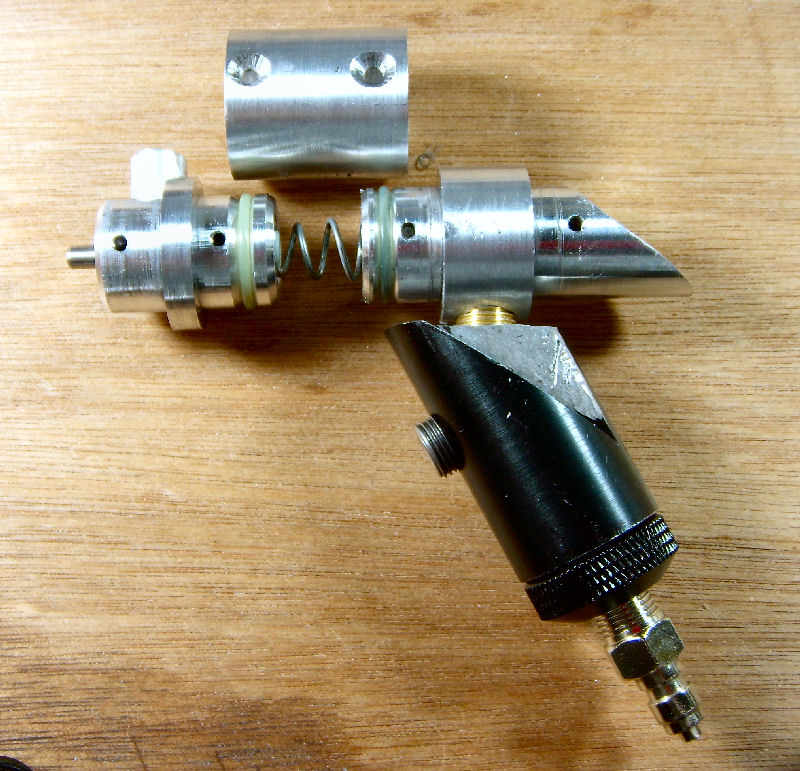
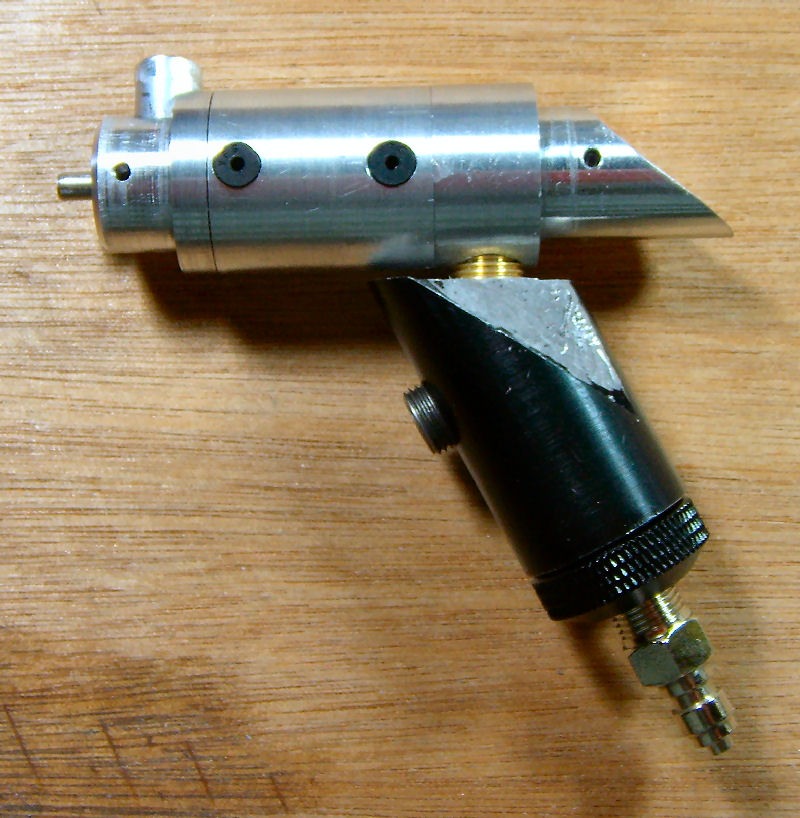
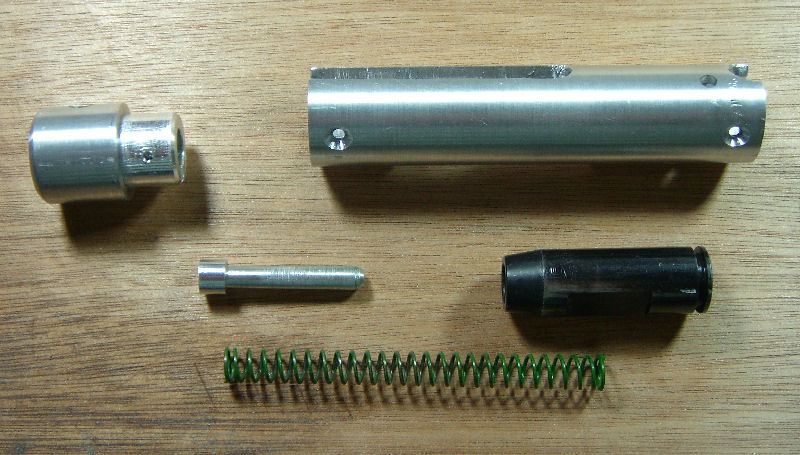
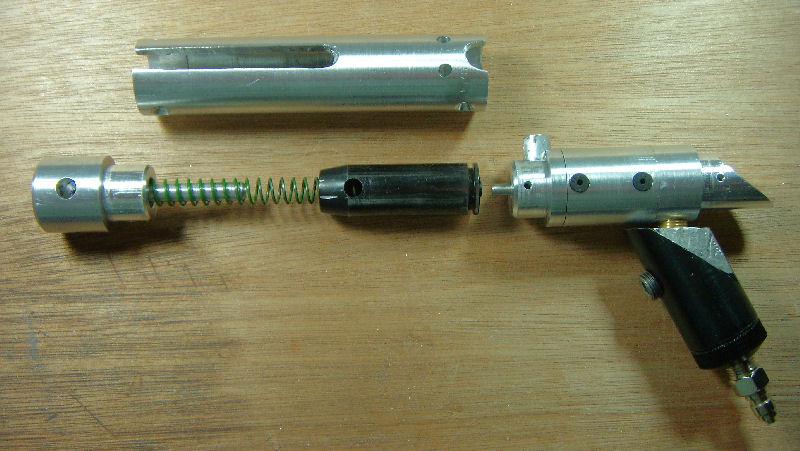
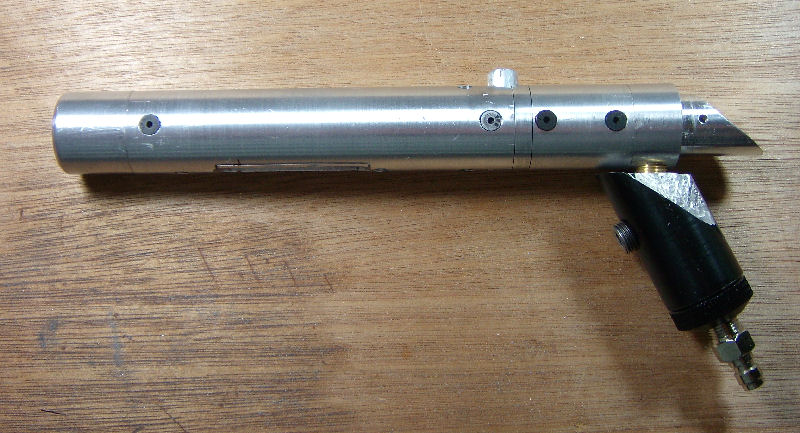
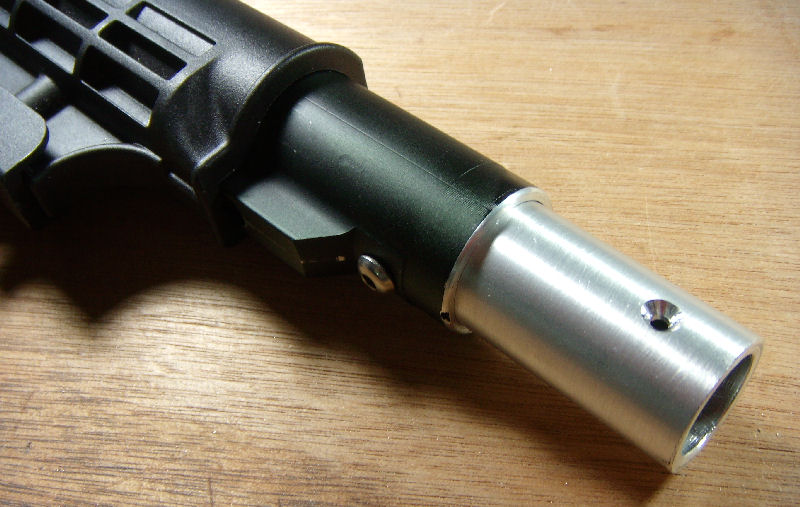
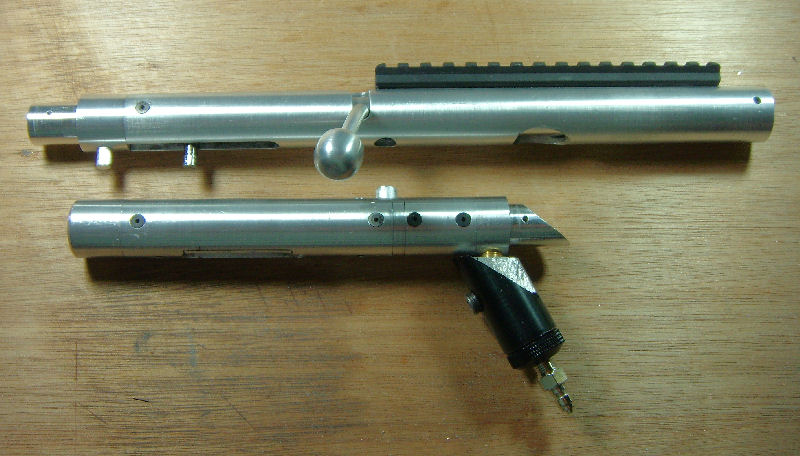
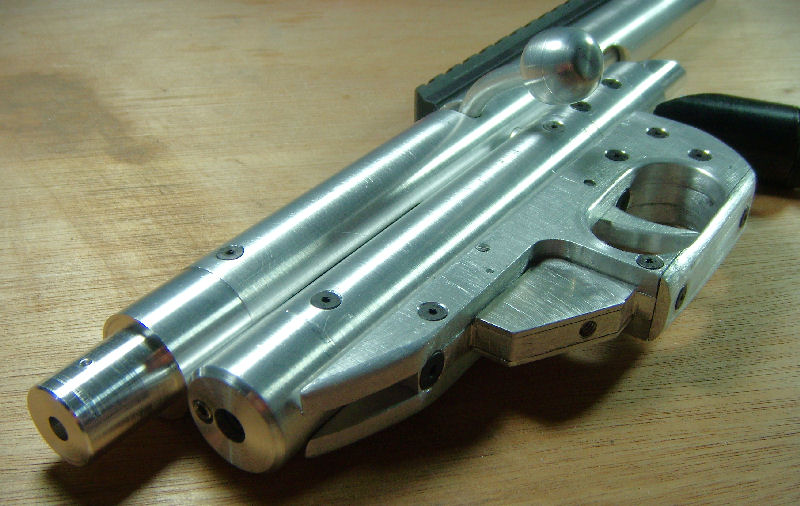
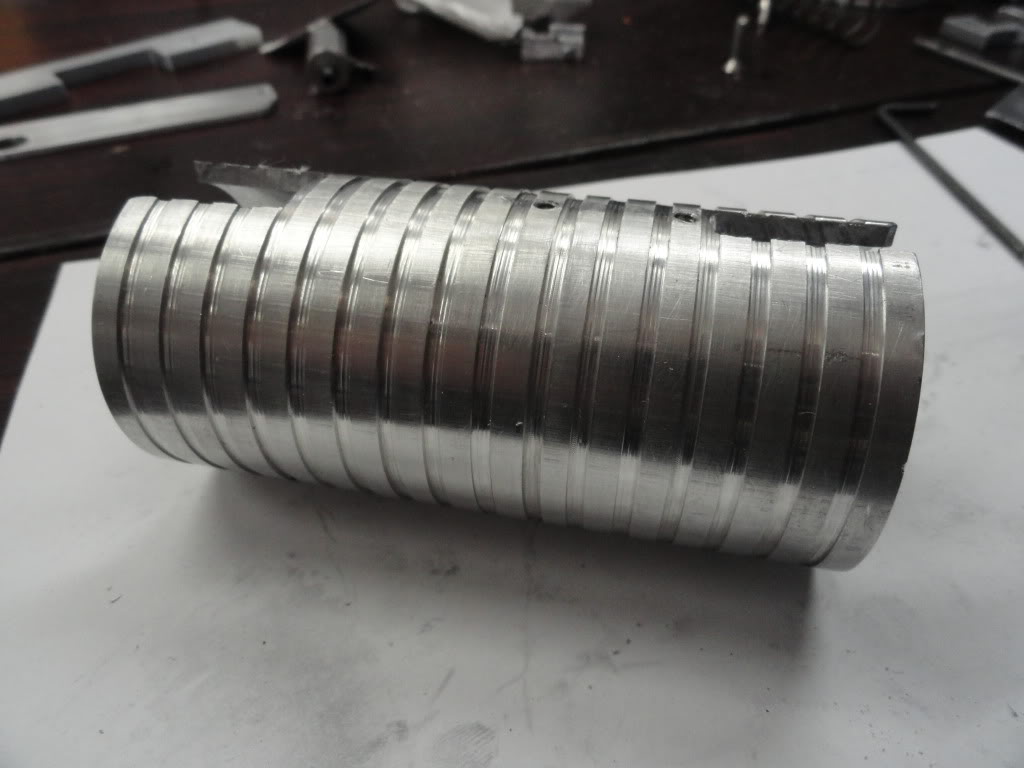
As is typical, this project started with a solid model to layout the major components and determine the primary dimensions. The main portion of the rifle consists of sections of 1.5” OD aluminum 6061 tubing with a wall thickness of 0.125”. The sections are connected together with what I call “interstages”. These are machined from 1.5” 6061 stock. There are four major sections that make up the rifle. Starting from the aft: Main Spring and Auto-valve, Plunger, Bolt/Breach, and Barrel. There are respective interstages between theses four sections.
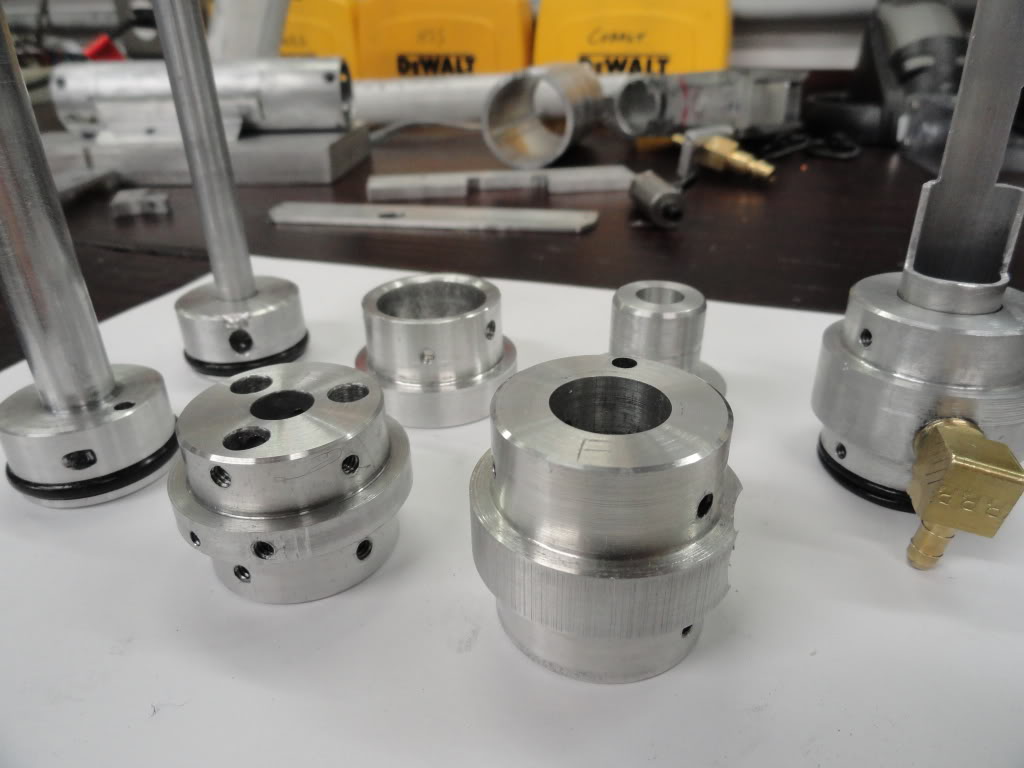
1420585665-295592-7-CAD_ISO.jpg

1420585665-295592-8-DSC02331.jpg

1420585665-295592-9-Exploded_Labeled.jpg

BARREL
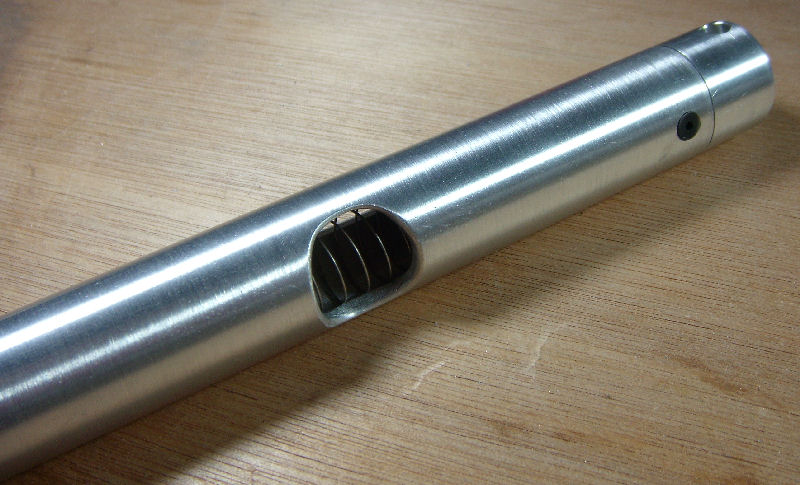
The barrel is 6061 aluminum tubing with an inner diameter of 0.53” and a wall thickness of 0.04”. This ID is perfect for near-frictionless acceleration of a streamline dart with a nominal diameter of 0.5”. A 4” section of 17/32” brass was turned down slightly to fit into the aluminum barrel at the breach end and acts as a constriction for an initial impulse to the dart.
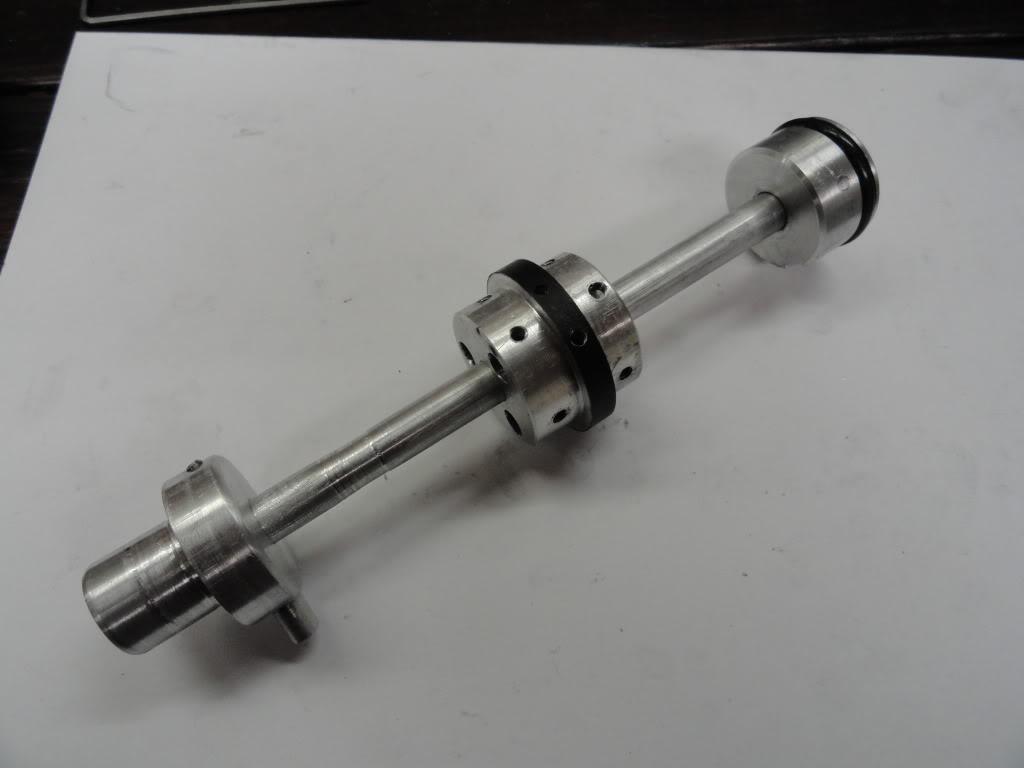
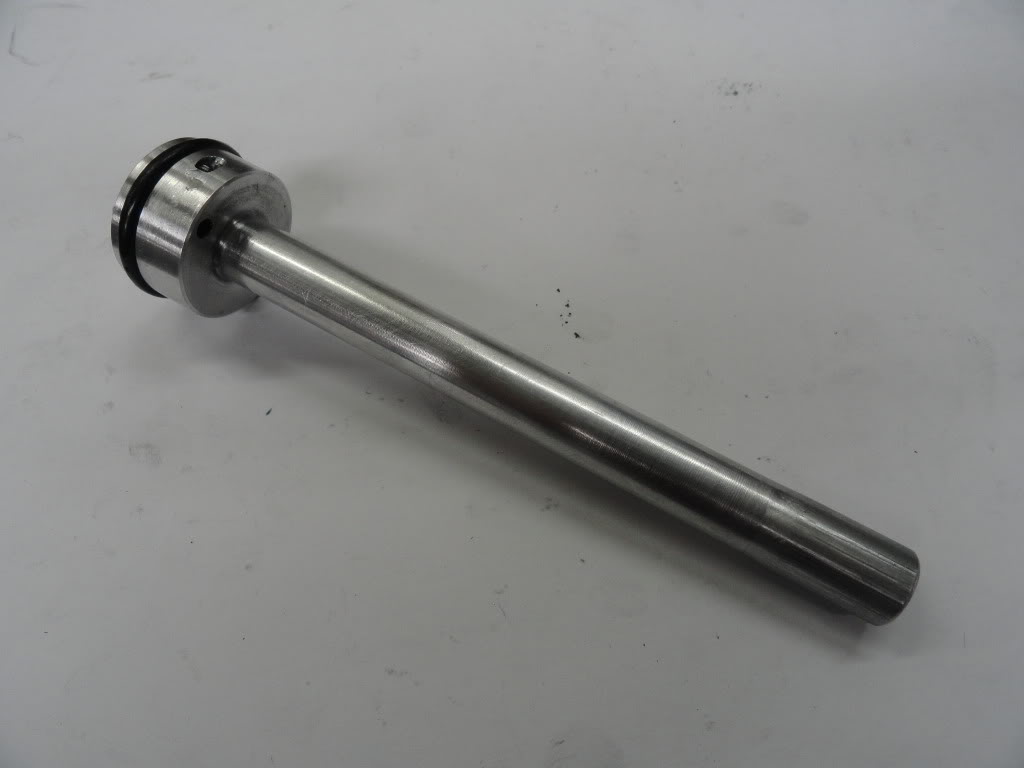
1420585665-295592-10-DSC02380.jpg

PLUNGER
The plunger is pretty standard. The plunger head is machined from 1.25” 6061 stock and has an O-ring around it for sealing. The plunger shaft is 0.375” aluminum bar stock. The shaft goes through the plunger head and a steel pin goes through both to secure them together.

The main spring is a McMaster 9637K21 with a constant of 146.3. The length used in the rifle is a 11” so the resulting stiffness is 3.75 lbs/in, giving a full draw compression of 33 lbs. The spring interfaces the plunger through a perch attached to the back of the plunger shaft. The perch also mounts the auto-valve activating pin.
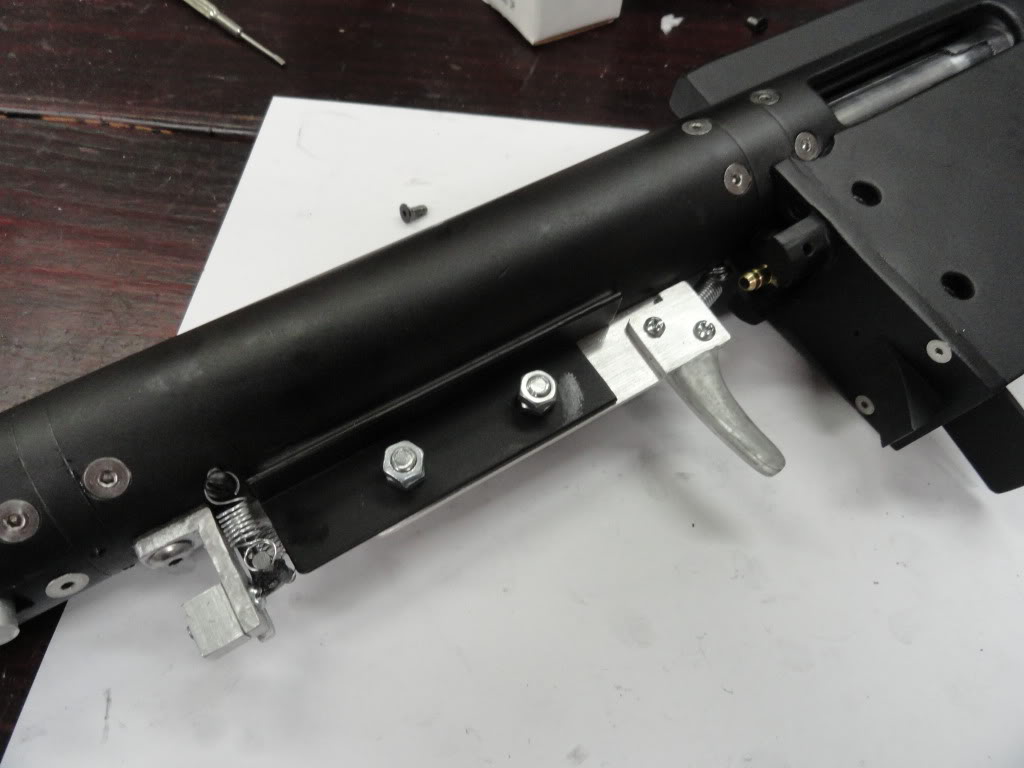
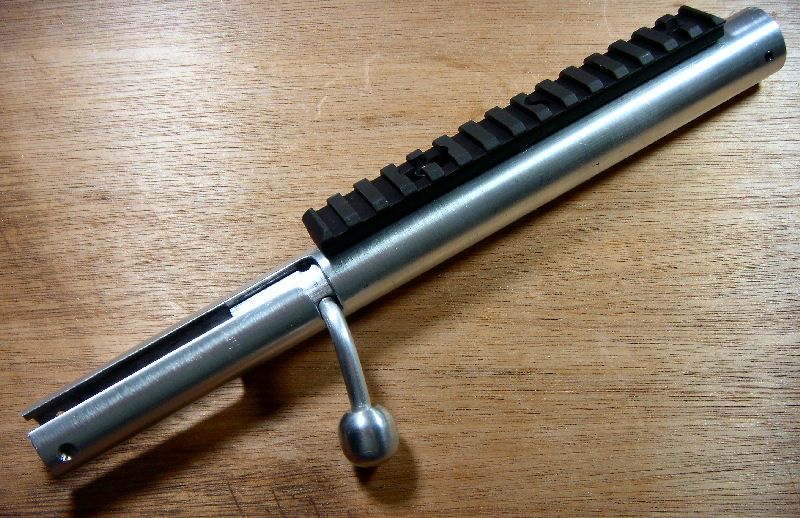
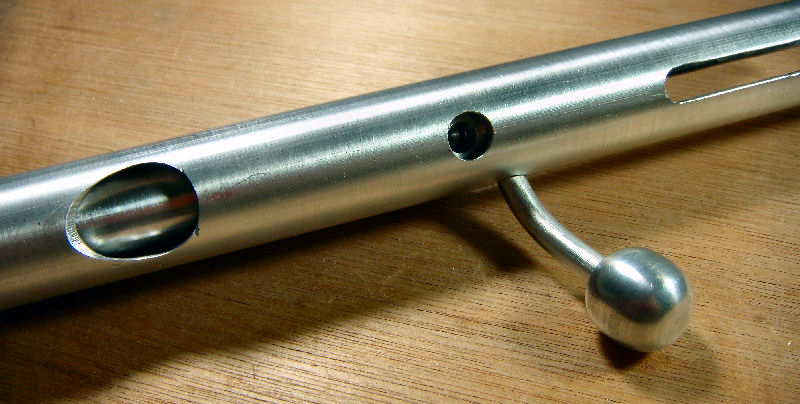
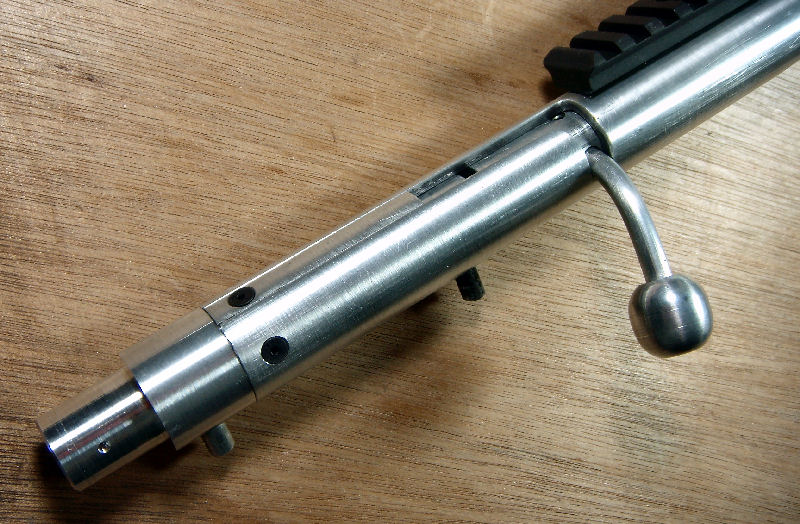
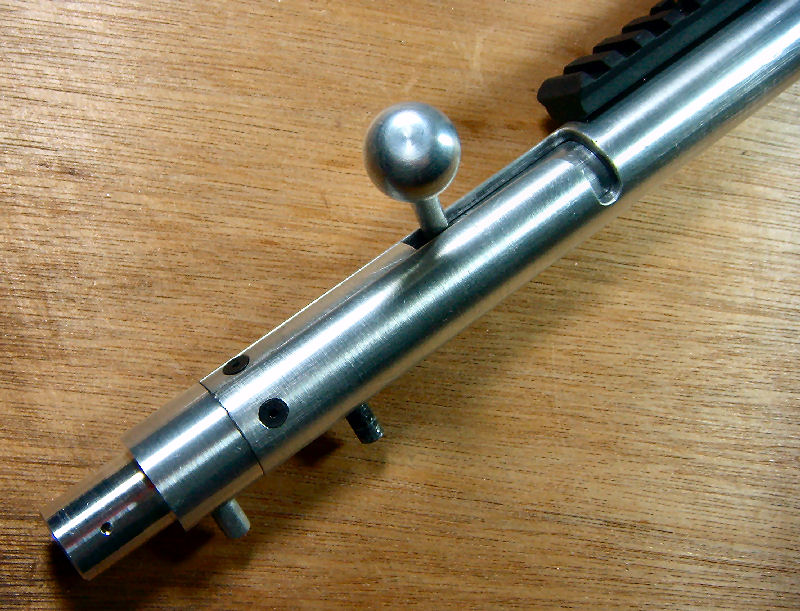
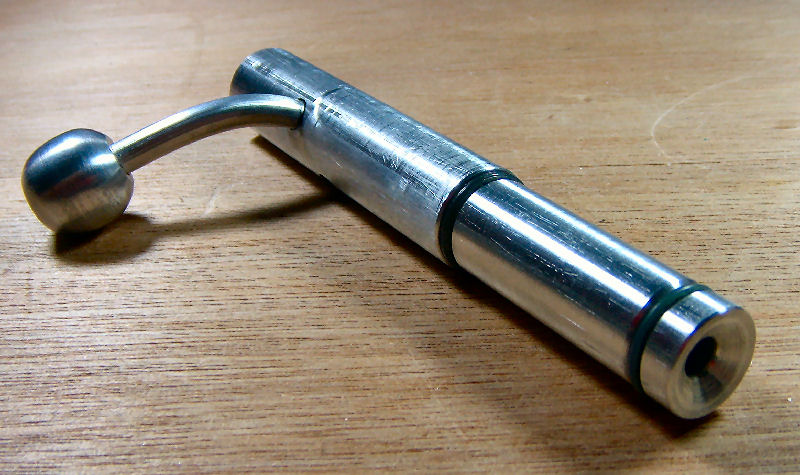
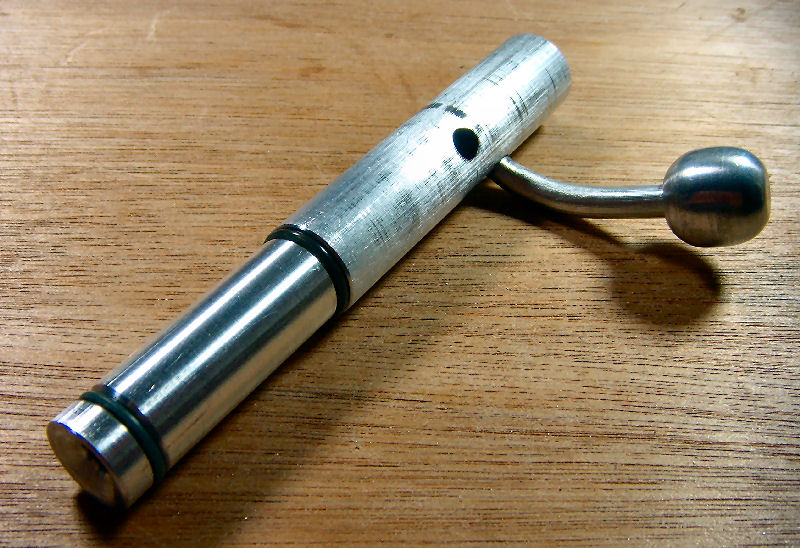
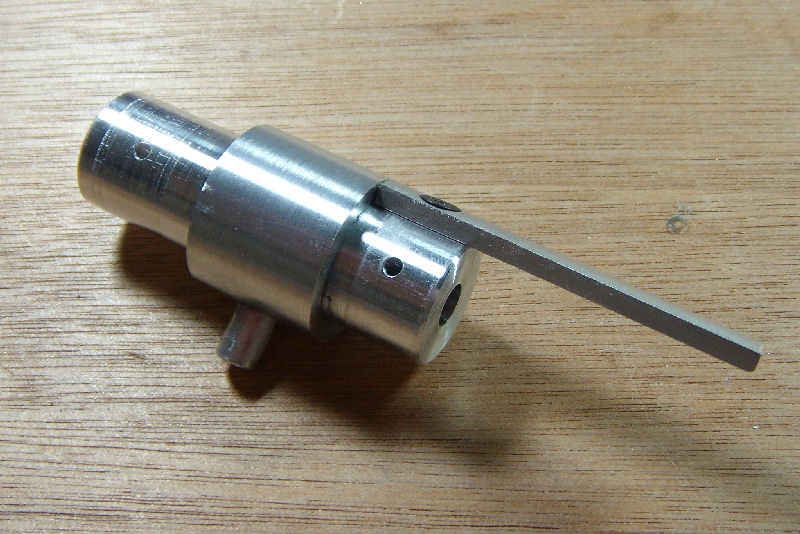
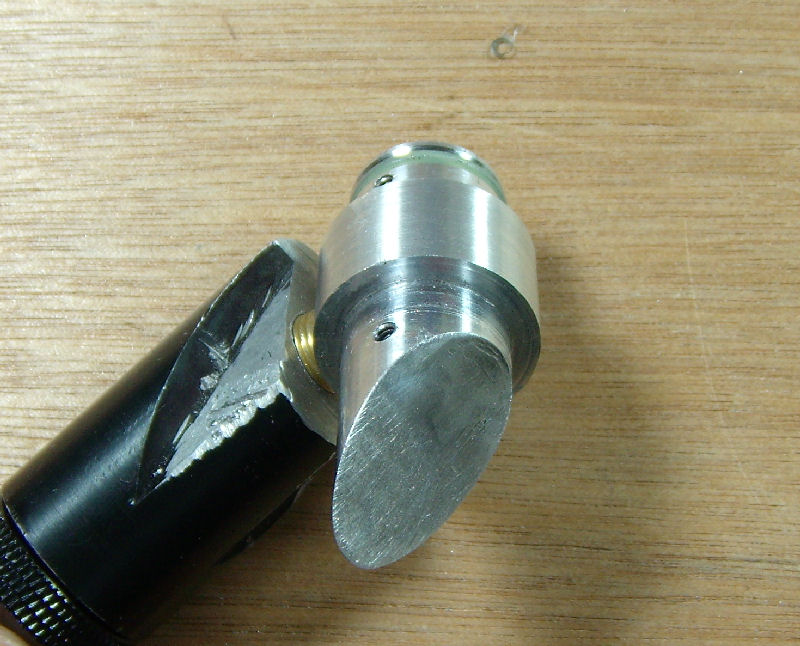
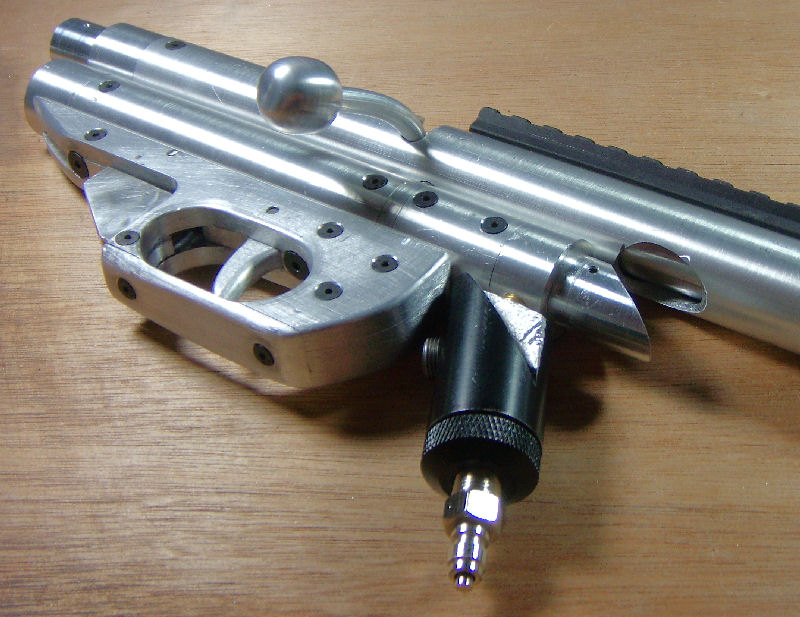
1420585665-295592-11-DSC02404.jpg

BOLT
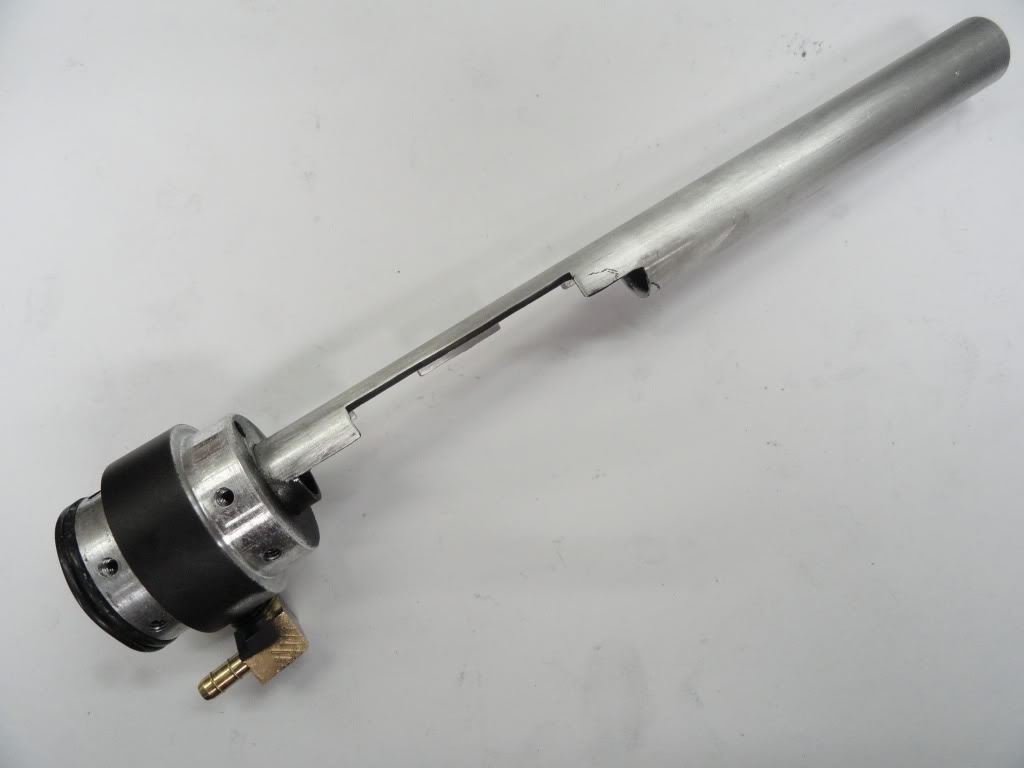
The bolt is unique to this design. It is machined from a solid piece of 1.25” 6061 stock and the forward end of the bolt matches the ID of the barrel. So a near perfect seal is made here without the use of an O-ring. About 0.75” back from the forward end of the bolt, the diameter necks down slightly to reduce friction when cycling. The aft end of the bolt forms a plunger head looking area with another O-ring. This head is what pushes the plunger back when the action is cycled. The O-ring is needed here because the chamber forward of the bolt head is where pressure is built to cycle the action in automatic mode. Corresponding O-rings are also found at the aft end of the barrel, where the bolt enters the barrel, and in the through holes for the operating rod above the barrel. A notch is cut in the front of the bolt at the bottom to let air in between the bolt and into the plunger cavity as the action cycles forward and the plunger cavity is opened up.

The operating rod rides in through holes in the interstages above the barrel and connects to the bolt head. An adapter connects to the operating rod at the forward end and either connects it directly to the pump handle or connects it to the action spring, which is a section of surgical tubing. Surgical tubing offered the right amount of stiffness and stretch.

The pump handle is a section of 2” 6061 tubing. I turned some slots into it to offer some positive grip and it works quite well. TO keep the pump handle from sliding on the receiver and scuffing the paint it rides on two Teflon runners attached to the fore-end.
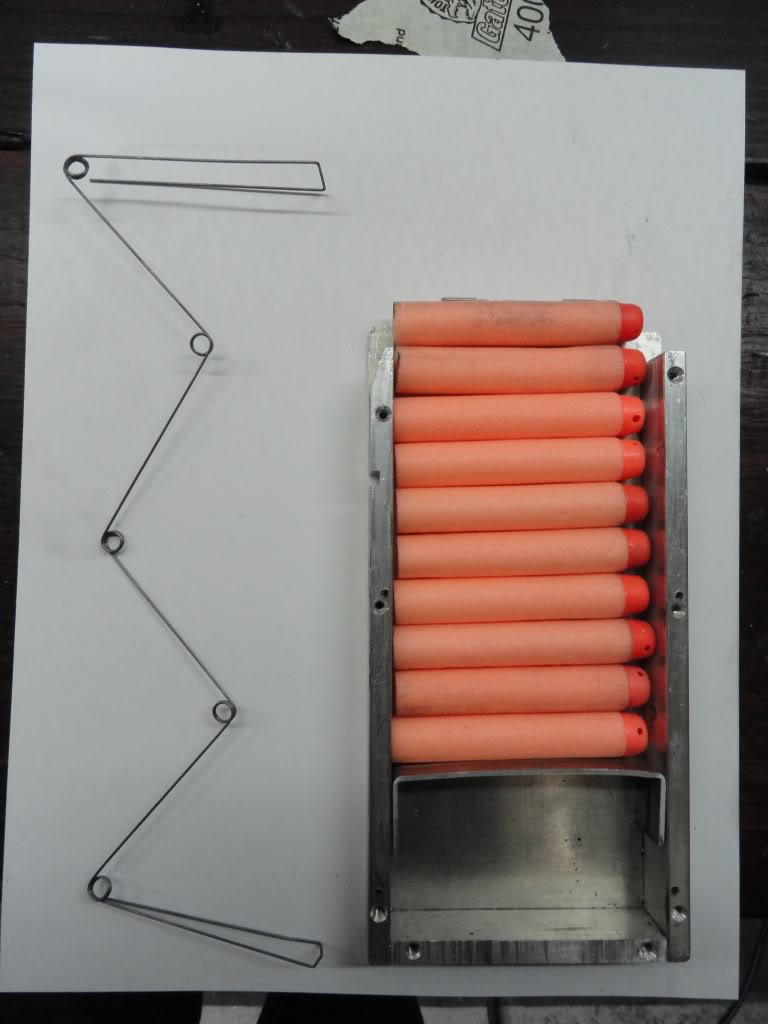
1420585665-295592-12-DSC02389.jpg

1420585665-295592-13-DSC02349.jpg

MAGAZINE
The magazine is similar to the Nerf clip system mag except it is built up with aluminum. The spring is bent from 0.03” music wire

1420585665-295592-14-DSC02351.jpg

FIRE CONTROL
The trigger is pretty standard. It consists of an aluminum plate with a ramp at the aft end. The catch is made from 0.125” steel rod and is welded together for strength.

1420585665-295592-15-DSC02415.jpg

All Aluminum Paintball (and Nerf) Bolt-action Rifle

09 November 2007 - 12:25 AM

It's been a damn while since I`ve posted anything on here. I thought I would have more time when I started working a normal job and have the weekends free. Well, I guess I have but there always seems to be something going on. I’ve been doing a lot of building as you`ll soon see. I do still intend to get Boltsniper.com put back together and updated. I would like to get the forums back up. I haven’t messed with it much at all in a while. I`ll probably just start the forums over from scratch when I do that.

Anyway,

I work with a bunch of people who like to Nerf and paintball. We do a fair share or both. I still get a lot of use out of the BS line of Nerf Guns. I mainly use the SCAR and the NTS. I lend the GNS out to whoever wants it. The FARihas been pretty much retired. It has taken a beating through the years. Still works, but has developed some cracks in places and I retired it to the wall. The SCAR is much more durable. I`ve actually dropped it on concrete a few times.

For a change of pace I decided to take a crack at building a paintball gun. If this is not fit for the homemade section because of the word "paintball" then feel free to kick it to Off topic or delete it altogether. I built this gun with the idea in mind of being able to breach load nerf darts for indoor nerf battle use, which works quite well by just taking the paintball magazine off.

SO, what we have is a magazine-fed bolt-action CO2-powered paintball rifle with the ability to single shot nerf darts. I`ll be honest, this is a paintball gun first, but I figured you guys would still be interested as a lot of it could be carried over to a primarily nerf rifle.

Excluding the obvious exceptions, the entire rifle is fabricated from aluminum stock. The barrel is 2024 T3 tubing with an inner diameter of 0.68 inches. Convenient for paintballs of 68 caliber. Is also a hell of a fit for mega stefans. The upper receiver, forend, stock tube, magazine, valve, and striker tube are all fabricated from 7075 T6 1" OD (0.125" wall thickness) pipe and 1" round stock. The lower receiver and FCG are cut from 1/4" 7075 T6 plate. I turned all of the round bar parts on a small lathe (Sherline 9" bed). Most of the turned pieces are 1" round bar of no more than 3 inches long. The largest piece I turned was the outside of the barrel for insertion into the receiver. Heavy use of the bandsaw, drill press, and dremel did the rest. The lathe will convert to a vertical mill and I made some use of this, but mounting parts on the cross slide is difficult and not accurate. I need a multi axis cross slide for milling. The rifle is assembled with countersunk socket head screws. They look awesome flush with the surface.

The rifle works much like any other paintball or CO2 gun. A striker is propelled via spring and impacts a valve stem that very briefly opens and releases some propellant gas. One of the images below shows the component break down of the rifle. The valve is positioned in the center of the rifle with the striker behind it. The trigger releases the striker and the bolt pulls it back when you retract the bolt to chamber a new round. It all works pretty fluidly. The magazine is a fixed tube magazine that will hold 10 paintballs. It is positioned ahead of the valve and under the barrel. Very shotgun-esque. When the bolt is retracted a ramp guides the next ball up through a hole in the receiver and into the chamber. Closing the bolt pushes the ball forward and seals the port. The magazine is loaded by retracting the follower all the way and inserting balls through a port in the right hand side.

The rifle works better than I had ever thought. The cycling works great. Have yet to chop a ball. Ranges are around 100 yards. Accurate out to 40-50 yards. I had some initial trouble with leakage around the valve seals, but a little RTV fixed that problem quickly. The little 2.5 ounce tank will last for 50-60 rounds or so with large time intervals between shots.

The next course of action is to touch up the blemishes and hard coat it flat black


Pictures ensue:

1420585665-129177-1-PBSN_4.JPG
1420585665-129177-2-AR15_Comp.JPG
1420585665-129177-3-PBSN_2.JPG
1420585665-129177-4-PBSN_3.JPG

Major Components
1420585665-129177-5-PBSN_Lab.JPG

All 51 pieces plus screws
1420585665-129177-6-PBSN_Comps.JPG


Fire Control Group. The sear is a modified T68 sear. The rest is hand made.
1420585665-129177-7-FCG_Comps.JPG
1420585665-129177-8-FCG_2.JPG
1420585665-129177-9-FCG.JPG
1420585665-129177-10-Lower_1.JPG
1420585665-129177-11-Lower_2.JPG
1420585665-129177-12-Lower_3.JPG


CO2 Valve. The valve body was the most complex piece to fabricate. The tolerances has to be incredibly tight on the valve seat in order to insure a good seal. Plus the gas port had to make a 90 degree turn to re route the gas into the upper receiver.
1420585665-129177-13-Valve_Comps.JPG
1420585665-129177-14-Valve_Comps_2.JPG
1420585665-129177-15-Valve_Body.JPG


1420585665-129177-16-Valve_1.JPG


Striker. I copped out and used a pre-made striker from a T68. Mainly because I didn`t have the steel stock to cut one. The striker tube was too large for the striker. It fit too loosely in the tube. I inset a piece of tubing in the striker tube to bring the ID down so the striker had better guidance. The striker tube itself required a lot of cuts and opening to allow the follower pin and sear to engage the striker from top and bottom. Pressure release holes are drilled in the forward end of the striker tube to release pressure ahead of the stiker when it is released.
1420585665-129177-17-Striker_Comp.JPG
1420585665-129177-18-Striker_Comps_2.JPG
1420585665-129177-19-Striker_Valve.JPG


Upper Receiver. The upper receiver contatins the bolt and the barrel. It is also what the stock attaches to. the bolt was the first component I fabricatied back in April sometime.
1420585665-129177-20-Upper_1.JPG
1420585665-129177-21-Upper_2.JPG
1420585665-129177-22-Upper_3.JPG
1420585665-129177-23-Upper_4.JPG
1420585665-129177-24-Bolt_1.JPG
1420585665-129177-25-Bolt_2.JPG
1420585665-129177-26-Upper_5.JPG
1420585665-129177-27-Stock_Adp.JPG
1420585665-129177-28-Stock.JPG


Barrel. The flash hider was cut free hand. Would have been a great project for the mill but I need a better cross slide to be able to do the operation.
1420585665-129177-29-Barrel_1.JPG
1420585665-129177-30-Flash_Hider.JPG


Magazine
1420585665-129177-31-Mag_Comps.JPG
1420585665-129177-32-Mag_1.JPG
1420585665-129177-33-Mag_Port.JPG
1420585665-129177-34-Mag_Ramp.JPG

Coming Together
1420585665-129177-35-Striker_Valve_Upper
1420585665-129177-36-Striker_Valve_Upper
1420585665-129177-37-Assm_1.JPG
1420585665-129177-38-Assm_2.JPG
1420585665-129177-39-Assm_3.JPG
1420585665-129177-40-Assm_4.JPG
1420585665-129177-41-Assm_5.JPG
1420585665-129177-42-PBSN_4.JPG


I`ve got many more pictures and I can always take more. I`ll try to get some video of it cycling and firing.

I`ve also got this baby...
1420585665-129177-43-PBMG.JPG

I need to work on a topic for her too.

I`ve got another strictly nerf rifle in the works. Similar to this one in construction.

Yet Another Longshot Mod...

22 September 2006 - 10:03 PM

I take no credit for the pump action idea. I first noticed it on Captain Slugs and it occurred to me how easily it could be done and how functional it is.

So here is my longshot. Inside it is bored for better airflow and has an AR spring over top of the stock spring for substantial more power.

Posted Image

Posted Image

With "silencer" barrel extension

Posted Image

Posted Image

The pump foregrip is made from two 2" couplers, balsa, and lexan for the transfer bars. The PVC is cut to form with the lines of the rifle to allow for maximum area to grab onto. Balsa rails ride against the lower side of the rifle. Lexan bars run along the side of the rifle to engage the charging handle. Very similar to Captain Slugs. Portions of lexan are bonded to the side of the rifle. These pieces engages the charging rails from the undersiade and prevent the rails from buckling and also lock the forgrip in place and prevent it from falling away from the rifle. To remove the unit you just pull the chargin pin and rotate the unit away from the rifle.

Posted Image

Posted Image

Posted Image

Modded Razr V3 And V3x

29 August 2006 - 11:09 PM

I`ve had a RAZR for almost a year now and it has always bugged me that so many damn people have them. It is a great phone. Very capable, very nice looking and is still one of the smallest you can get. A while back I started playing around with modding the firmware on the phone. It is not too hard and there is plenty of information out there about it. My RAZR started out as a black RAZR from Cingular. I liked the black but I thought blue would look good too. I installed a blue outer housing while retaining the black interior housing. I like the look of the blue on black contrast and I really like the shade of blue. I replaced the keypad with the V3i keypad which has blue division lines to add some more blue to the phone.

Posted Image

Thats it as far as appearance goes. As I got it the phone was branded for cingular as they all are. This kind of annoyed me cause there were some things you could not do due to the branding of the firmware. I reflashed the phone with the latest unbranded flash from Motorola which enabled all features and actually made the phone operate a little faster.

You have full access to all the files on the phone and by editting seems in the firmware you can enable/disable features and change most everything about the software. I installed my own skin and wallpapers.

Posted Image

I also changed the extrenal LCD image to a Ferrari logo instead of the Cingular guy

Posted Image

I was able to delete a bunch of the tones and images that are already on the phone to free up some room to put my own stuff on there. I made a bunch of ringtones from songs and dumped em on there instead of paying $3 a piece for em...


Last week I bought a V3x off ebay. The V3x is the latest available encarnation of the RAZR line. It is slightly larger than the normal RAZR but this is because of the fact that it is 3G capable. It's still a small phone and is absolutely packed with features. It has a 2MP camera which is insane. The screen resolution is phenomenal at 320x240.

Posted Image

Posted Image

Posted Image

I bought a virgin sim card for 10 bucks and programmed it to my account so I could use both phones. They both have the same number and both ring if I get a call. Kinda cool. As soon as I got the V3x I flashed it to the current formware release. When I got the phone it was branded to O2 which was annoying. The phone is 3G capable but there is no 3G service in Richmond unfortunately. The closest city with 3G coverage is DC. I might end up living up there anyway so that wil be nice. Right now the phone is operating at 2.5G. I stuck a 1 gig micro SD card in the phone and filled it with music. The phone has stereo speakers that put out surprisingly loud and clear sound. I editted the gain table to make em even louder. Now I can`t ever keep it at the highest volume cuase its that loud... But its not distorted, just loud. Pretty amazing.

Just thought I`d share. Its quite fun diving into the code of the phone software and editing to create desired effects. Most all motorola phones can be treated the same and highly modded.

Boltsniper Bs-9 Nerf Tactical Sidearm

07 July 2006 - 07:21 PM

So this pistol has been in the works for about 3 months now. Back in April I started designing this pistol and soon started fabrication. The pistol came along really quickly and I got it about 90% complete and just stopped work on it. I kept it under wraps for a long time only discussing it with my administrative team on Boltsniper.com. Ompa and Carbon were the only ones I know of that knew about it. I discussed it with Ompa wuite a bit and he ran with ideas and built a successful pistol of his own. His pistol is quite impressive and you should definitely check it out if you haven`t already.

I present then....

BS-9 NERF TACTICAL SIDEARM

Check out the extended writeup on Boltsniper.com here. And of course there is a new forum to handle questions about the pistol.

1420585665-84540-1-IMGP4173.JPG

This gun is a magazine fed slide action pistol. It can hold 5 rounds when fully loaded. The magazine will hold 4 rounds and you can alos have one chambered for a total of 5. The pistol uses a nested brass bolt/breach system to cycle the darts through the gun. There are no shells! A first for me. The magazine is non-detachable and is loaded through a port in the rear of the magazine in the trigger guard. To load the gun you depress the follower with the actuation rod protruding from the right side. When fully depressed the loading port is opened and darts are inserted until the magazine is full. the follower is then released and the pistol is ready to go.

1420585665-84540-2-IMGP4174.JPG

1420585665-84540-3-labelled.JPG

The construction and operation of the systems are very similar to the SCAR and the GNS.

The image below shows the barrel and bolt system that is the heart of the pistol.

1420585665-84540-4-IMGP4159.JPG

The image below shows the fire control group. It is very similar to the system in the SCAR only smaller. The trigger is actually an integral part of the trigger plate rather than bolted on.

1420585665-84540-5-IMGP4166.JPG


Next to a nite finder for size comparision

1420585665-84540-6-IMGP4206.JPG

My new combo!

1420585665-84540-7-IMGP4195.JPG


Much more information located on the BS-9 page on Boltsniper.com

I will get some videos of the pistol in action and loading up soon. I don`t know if I`ll get the time this weekend but surely next week.