You can make homemade springs out of music wire,
https://youtu.be/nyp9YPlaoow?t=5m36s

THIS one simple design will have you in TEARS...
#51

Posted 13 April 2017 - 03:08 PM

POPULAR
I'm Van, the weird kid with a box
Triggered as fuck and ready to gun you down
#NoBarrelTapsNoMercy
#GoFastGoFurious
"Stone Cold Operator of Death" -Clownie
#52

Posted 13 April 2017 - 06:19 PM
I won't have room for rubber bands. While that would be a nice and simple solution, it requires having space available for them.
Thankfully the oven set to 400 F only creates smoke if you leave the PVC in there too long. And the smoke you get is very minimal.
I will be making my own springs.
I now have two grip blanks and three magazine blanks. I'm going to make a mandrel for winding springs and decide on how I want to do the magazine catch.
EDIT: Figured out how to do the magazine catch last night. Boy is it elegant.
Edited by CaptainSlug, 14 April 2017 - 06:55 AM.
#53

Posted 14 April 2017 - 09:31 AM

POPULAR
Double-post of mechanical sexiness.
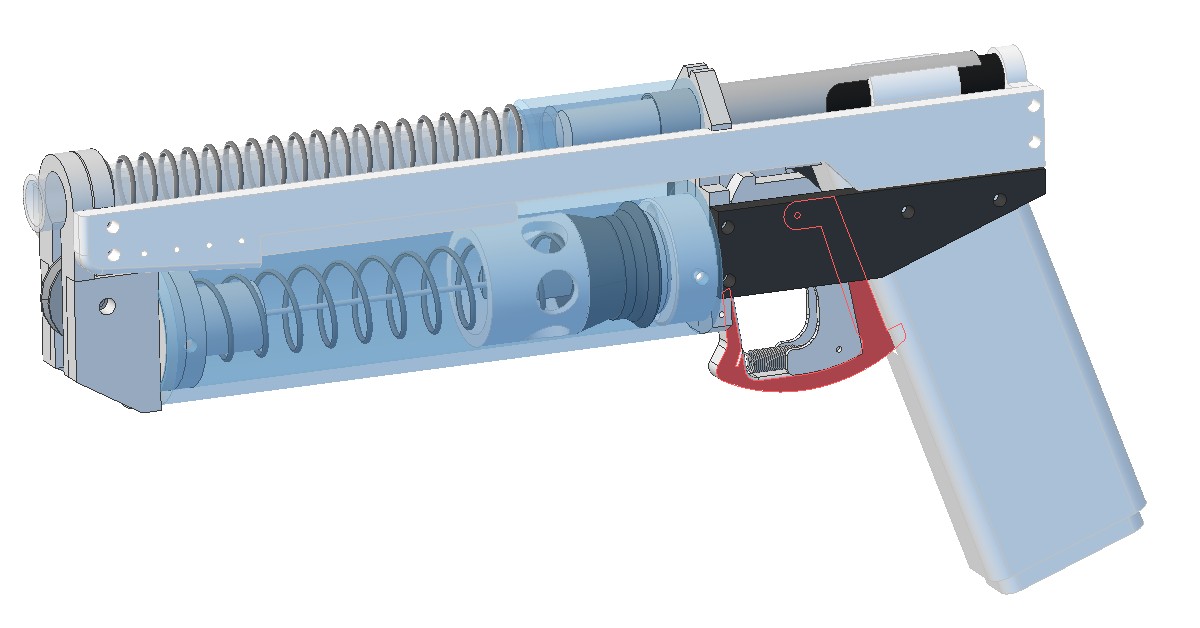
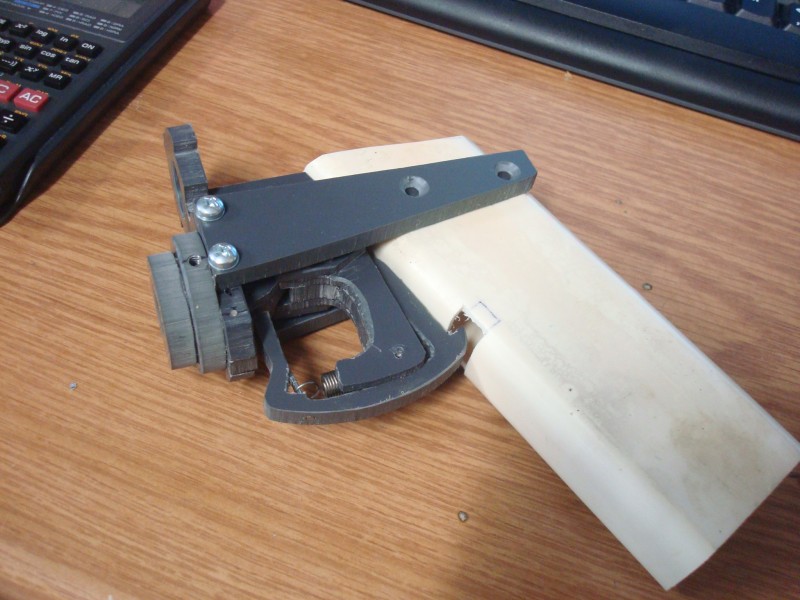
The trigger and magazine release share the same spring, and the same pivot point.
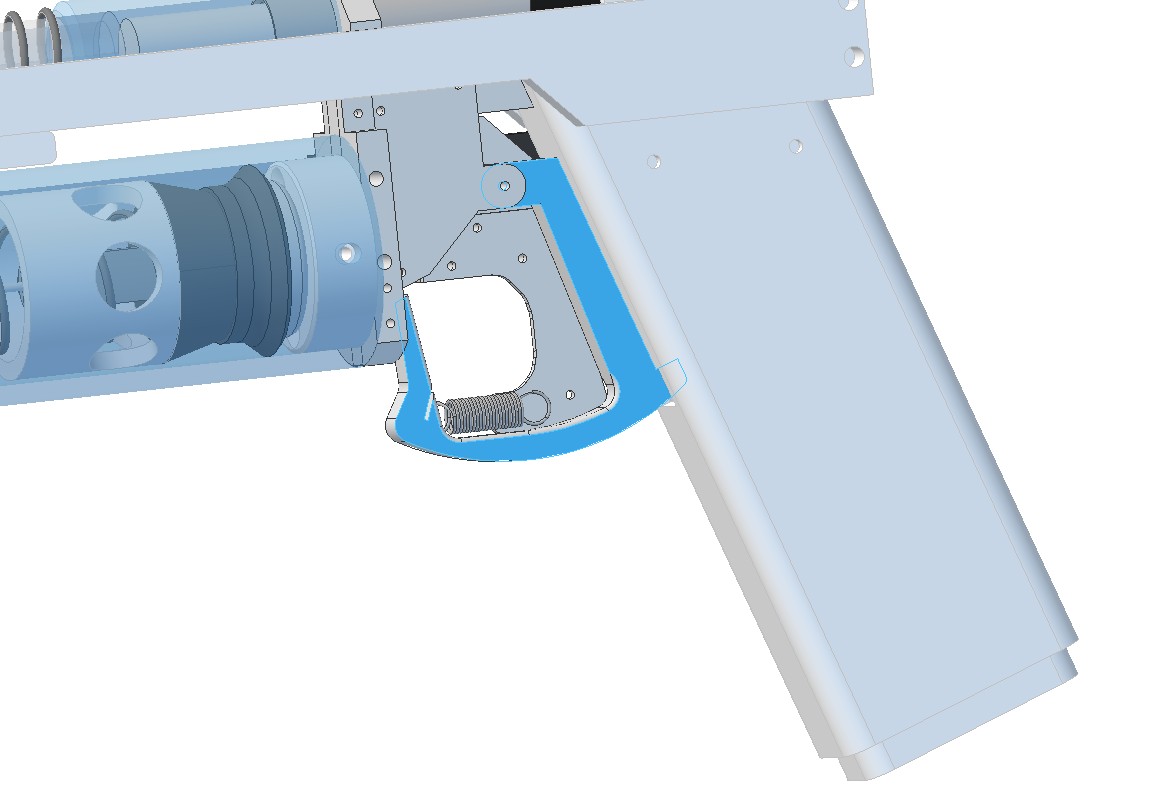
This means that the trigger guard itself is the magazine release. To drop the mag you just push your trigger finger forward inside the trigger well.
This is exceptionally novel and the only thing I can think of that's similar is the ring trigger on early revolvers that were used to index the cylinder.
#54

Posted 14 April 2017 - 07:13 PM
Wowza! "Exceptionally novel" is exactly the correct term for that design. It makes me so proud that my pistol is evolving into such a creative masterpiece.
After a second look, I have three questions.
1. Does the trigger spring mount to any static part of the frame? Or is it only stretched between the trigger and the mag release? If it's the latter, that is thinking out of the box and I like it.
2. You sure you can push the release outward with that slope on the inside where your finger will touch it? Seems like you'd try to push it and it would be harder than necessary because of the angle and the position relative to the pivot point. Maybe you could put a nub on the bottom of the release/trigger guard and your middle finger could more easily push it straight outward.
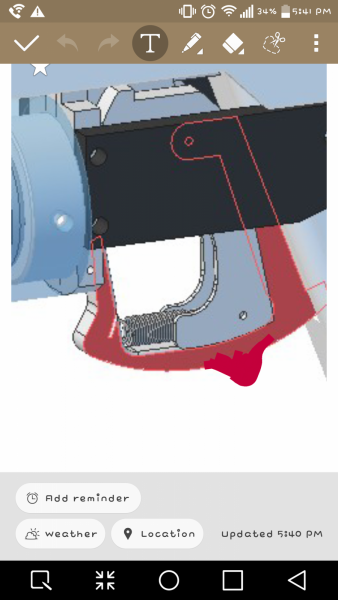
3. Does the thing have a slide cover? Or will the barrel, slide spring, and bolt be exposed as shown in the pictures
Edited by Chanclas, 14 April 2017 - 07:42 PM.
-Groove
Tits > Video Games
#55

Posted 14 April 2017 - 08:33 PM
1. Correct. Both parts move and the spring load pulls them together. Each has its own hard stop though as the mag well bottoms out against the front of the grip, and the trigger bottoms out against the frame.
2. If it's an issue I will make a replacement part with a different surface angle. I don't want a tab sticking out of the bottom of the trigger guard for the reason that I eventually intend to make a holster for this. Even though it's enormous for a pistol.
3. The slide can have a partial cover made out of 1" SCH40 pipe that hides the breech area, but a cover over the barrel and slide return spring is not likely to work unless the cover has a cut in it to clear the ears on the frame piece that is used to keep the slide in alignment. The iron sights would then have to be moved from the frame to the slide. I personally find appeal in being able to see all the moving parts of the blaster.
#56

Posted 15 April 2017 - 04:50 AM
Hey Chanclass and Captain Slug, can I help make a 3d printable version for those who don't have access to some of the tools but by some miracle have a 3d printer?
youtube.com/user/asean12
#57

Posted 15 April 2017 - 09:40 AM

POPULAR
I have one designed but will do the initial prototype through machining.
AND I'm going to break my usual habits a bit and make it entirely out of PVC. So screws will be used sparingly and some of the assemblies will just get glued together.
Edited by CaptainSlug, 15 April 2017 - 06:00 PM.
#58

Posted 18 April 2017 - 03:26 PM
The only thing that made me hate using PVC was the tendency for the machining templates to not come off of it. So the solution is to add my own protective film that I can put the templates onto that will be easy to remove after all the holes are drilled and the parts are cut out. Enter basic contact paper.
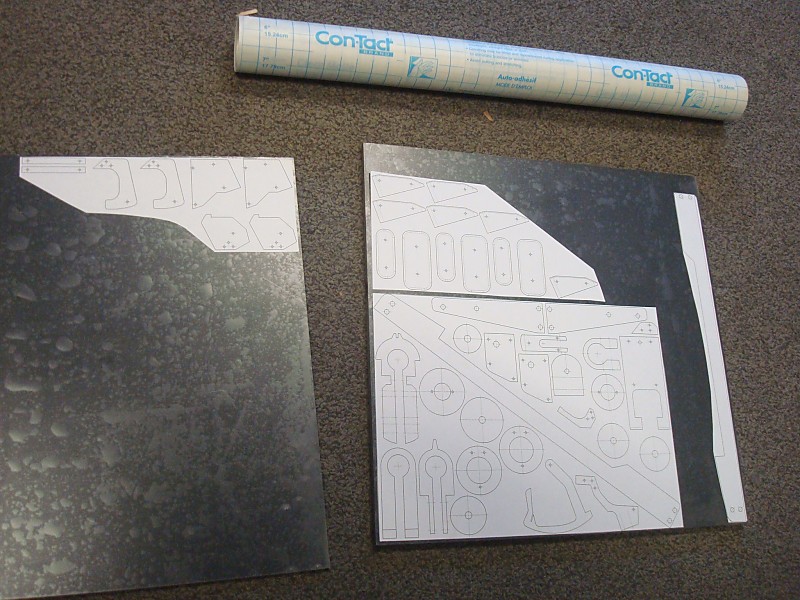
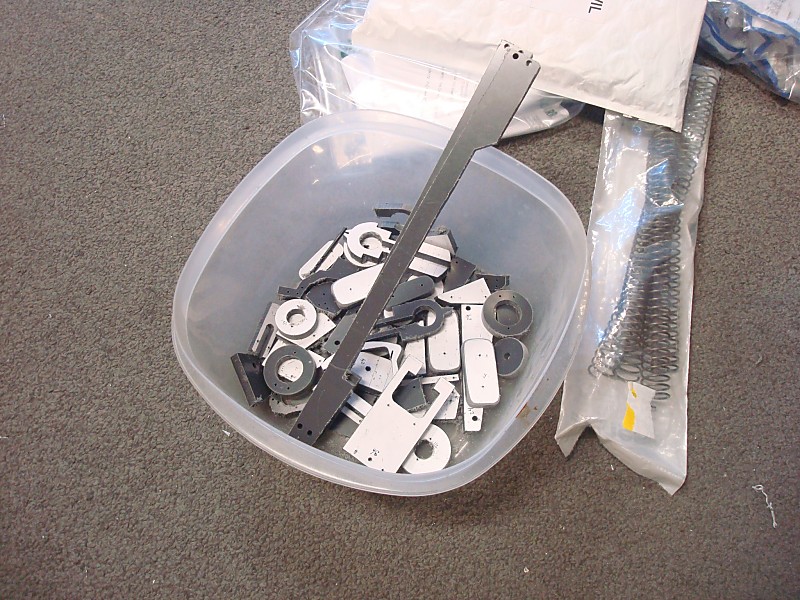
Parts is parts. I got all of them done during my lunch break today.
Now I need to drill/cut the magazine and grip blanks. I also haven't started the process of winding magazine springs yet.
#59

Posted 19 April 2017 - 12:14 AM
Captain Slug, that mag release reminds me a lot of Gavinfuzzy's Longshot trigger guard/mag release kit, but my god, the way it's connected to the trigger is beautifully elegant. Very well done, I'll be keeping an eye on how you end up making the magazines. I've been trying to find a way to make a cheap, mass-producible 1/2 length dart mag for months now, and this looks just like what I want.
#60

Posted 19 April 2017 - 11:34 AM
It wasn't the best grip, but yes I could do it.Wrap your hand around a standard mag now and try to imagine pulling a trigger with it like that. If that works for you, then yeah it could maybe work.
#61

Posted 19 April 2017 - 02:33 PM
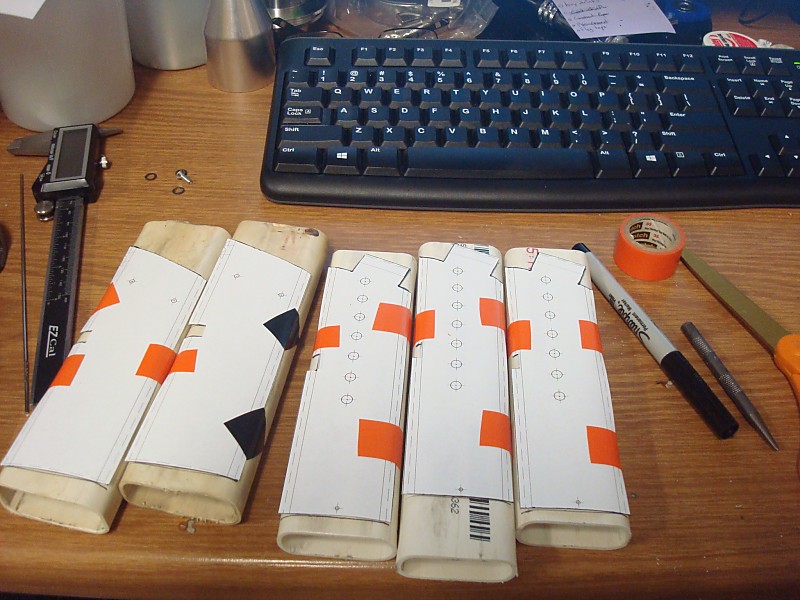
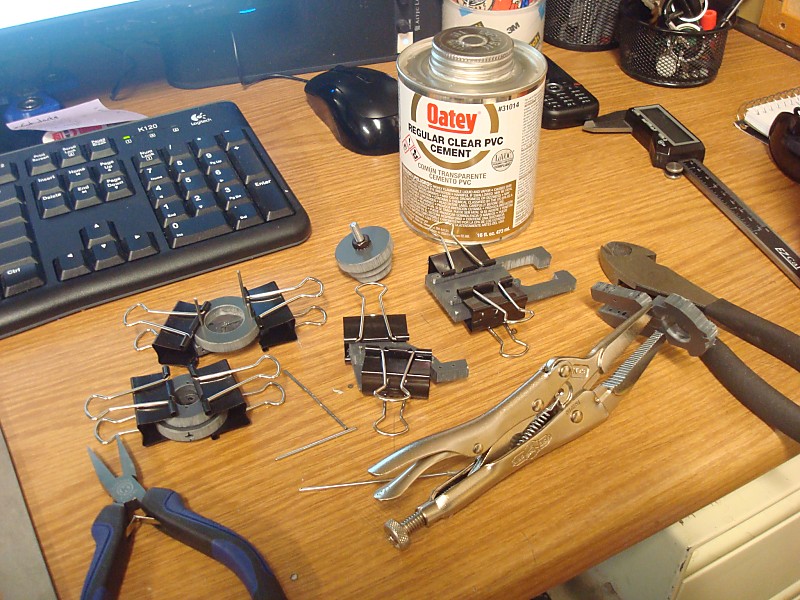
Once cut, the blanks need to be touched up on the belt-sander to get rid of any high spots on the front, back, and sides until they fit really nicely inside both grips.
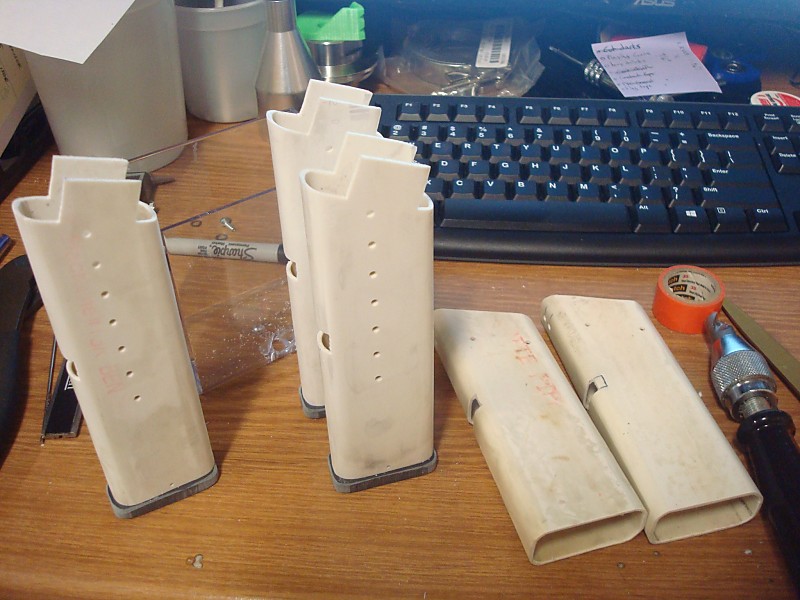
Turned the other end of the magazine forming spike into a feed-lip rounding tool. Little bit of heat gun on the tabs then fold them in with MIG gloves, then blow on them to cool them off. Then I spot-check that I can easily slide a dart into the feed-lips from the front of the magazine. These may need some filing or cutting on the back side or another touch-up with the heat gun later.
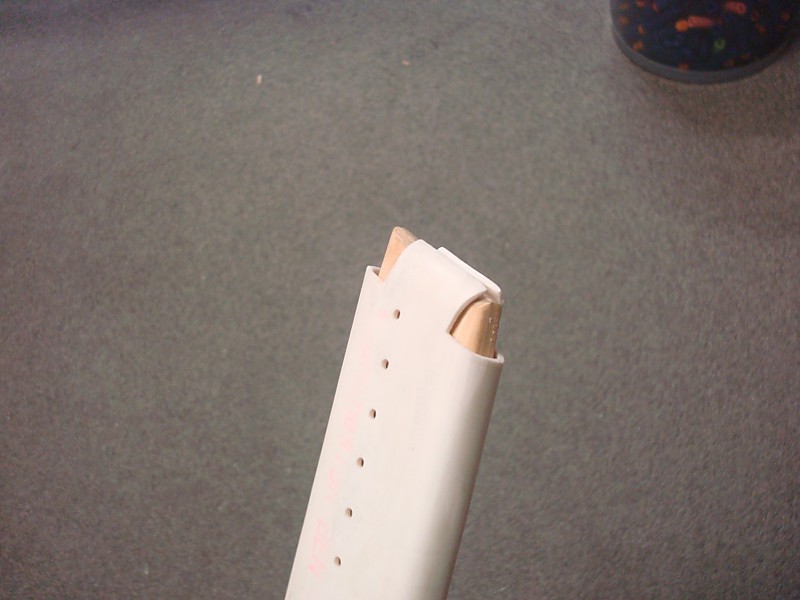
A bunch of holes were drilled in parts just for the purpose of aligning them together for solvent-adhering assemblies together. Hooray for binder clips.
#62

Posted 19 April 2017 - 08:35 PM
Will you be selling the magazines pre-made?
Oh and This: http://www.gearbest..../pp_501883.html
Will those darts work?
youtube.com/user/asean12
#63

Posted 19 April 2017 - 09:00 PM
The next big hurdle is making springs. It would be preferable to find an existing spring and I have some ideas on where to look. But for now I'm probably just going to corner-bend some and not bother with trying to do rounded short sides.
And the magazine will hold any dart that is cut down to 1-1/2" in total length. I just made a very basic dart cutter by cutting a 1-1/2" length of barrel material, then mounting that stub into a hole drilled in a plastic scrap. It only took me 90 minutes to cut 300 full-length darts down to artifact length.
4/20/17 Edit:
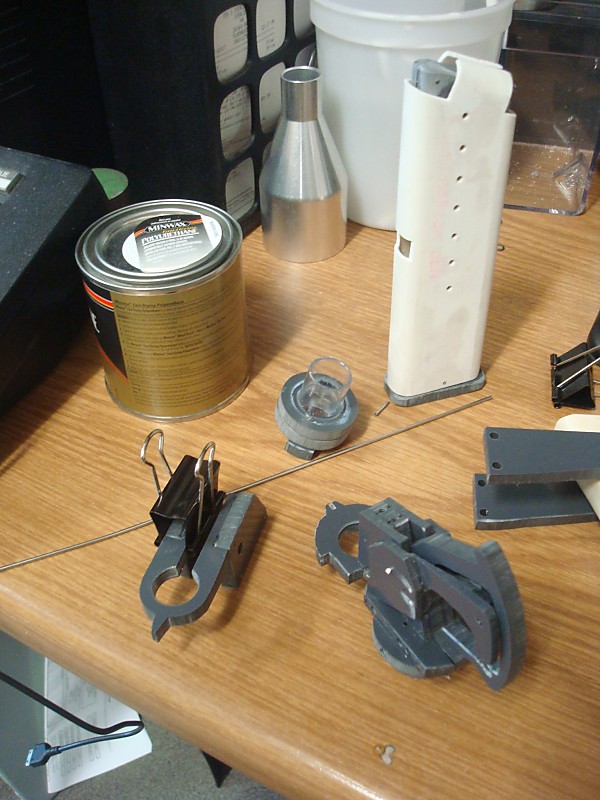
Still gluing stuff together. I'm also temporarily using a spring from an artifact mag to test this pistol magazine. The follower shape needs a little tweaking so that it won't rock quite so much, but it otherwise works fine.
4/21/17 Edit:
It works! One spring for two parts.
4/22/17 Edit:
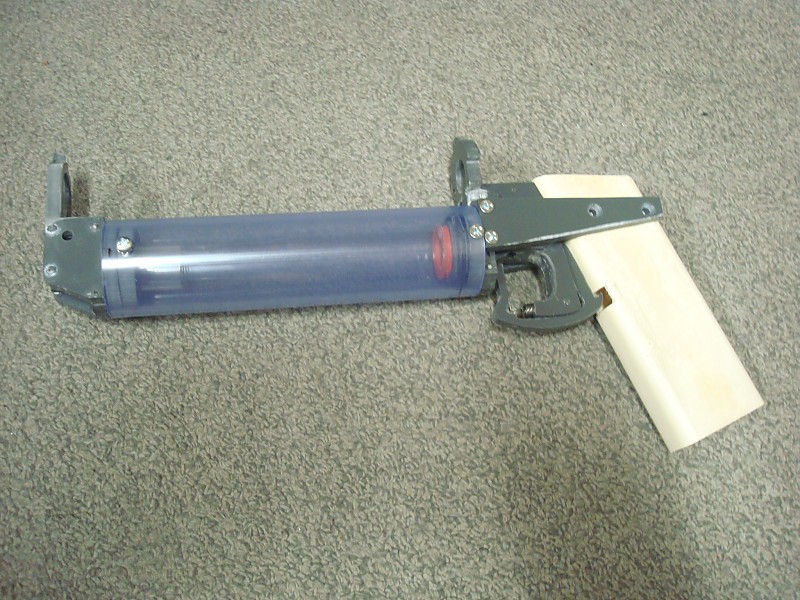
All the parts are done. Last steps are to epoxy the chamber on, then assemble and test.
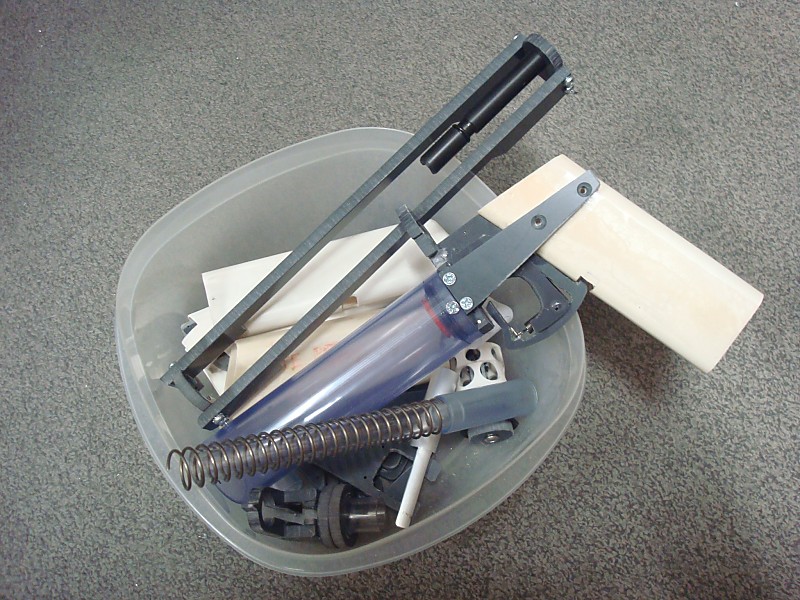
Edited by CaptainSlug, 23 April 2017 - 03:19 PM.
#64

Posted 23 April 2017 - 05:27 PM
Looks great so far, Slug. How long did the whole blaster end up being? It looks pretty compact.
How are you directing the air from the plunger tube to the chamber/barrel? You showed some tubing or some such, but I haven't caught how it all hooks up.
-Jwasko, STILL Sole Surviving member of Steel City Nerf and Sober Sister of the Sex Dwarves
We NERF ON all day, and FUCK OFF all night
#65

Posted 23 April 2017 - 06:42 PM
Length of the slide is 11 inches. So fitting the sides of the slide onto a printed template required putting them angled corner-to-corner on the page. This ends up being only slightly larger than a Hammershot. I also forgot to note earlier that the capacity of these mags is 9 darts. I won't know if I can fit a 10th or 11th in there until I start winding my own springs.
The assembly that joins the grip to the plunger tube and holds the chamber in made up of parts that when put together make a redirect passageway from the plunger tube to the chamber. Here's a crappy diagram since I didn't bring the CAD files home this weekend.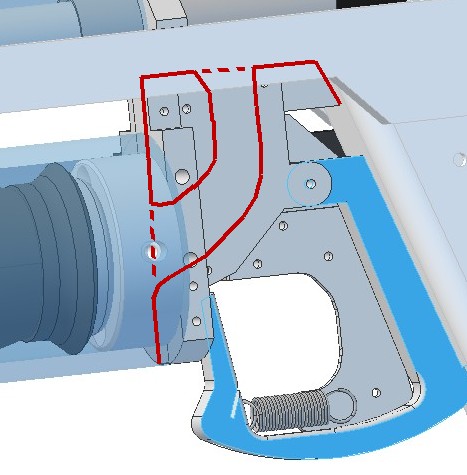
The chamber has a 1/4" x 1/2" slot cut into the bottom side of it to connect to this passageway, and the ram rod has a matching cutout in the end of it so that it doesn't obstruct the airflow after it pushes the dart beyond the slot. I'll post more pictures of this tomorrow before I epoxy the chamber into the frame.
When the rear frame assembly gets 3D-printed as a solid part, this passage way should be oriented correctly as to be printed intact and without any support material. I would have to use a machinable wax as a mold core of the passageway if I wanted to cast this part out of urethane.
#66

Posted 23 April 2017 - 11:41 PM
Definitely glad I called dibs on the first one of these that you sell. Thank you, CaptainSlug.
1. How easy will this be to disassemble and reassemble?
2. Is it getting a cool paintjob? What barrel material will you use?
3. Is there any issue at all with the mag release interfering with the follower in the magazines?
4. Is there going to be a slide lock of some kind to hold the slide back in the cocked position?
-Groove
Tits > Video Games
#67

Posted 24 April 2017 - 07:08 AM
1. You have to remove the two screws at the front end of the plunger tube then the four screws at the back (or front) of the slide in order to pull the plunger, main spring, and shuttle parts off of the front of the blaster. I don't think there's anything else that would need to be removed beyond that. Clearing a jam should simply involve pulling the mag, holding the slide open, then wiggling the smooshed dart out of the breech.
2a. A little bit. I'm going to vinyl dye the grip and stain the plunger tube. The nose assembly will get some fluorescent orange (for safety).
2b. Anything 5/8" OD. So CPVC, PETG, and aluminum barrels can be used.
3. No, it has a tapered leading edge and it only inserts into the mag well far enough to hold the wall of the magazine. It required a fair amount of filing and a few re-cuts in order to get it in just the right spot.
4. I don't have one planned at the moment. Instead I am making the breech parts so that the feed lips of the magazine will clear everything even when the breech is closed. There are two locations where a slide lock could maybe be added.
EDIT: Here are the photos for jwasko's question.
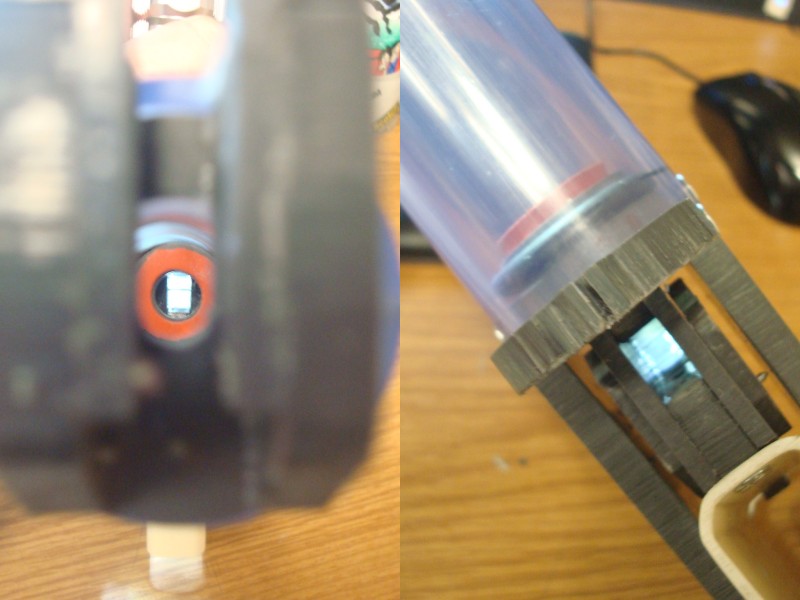
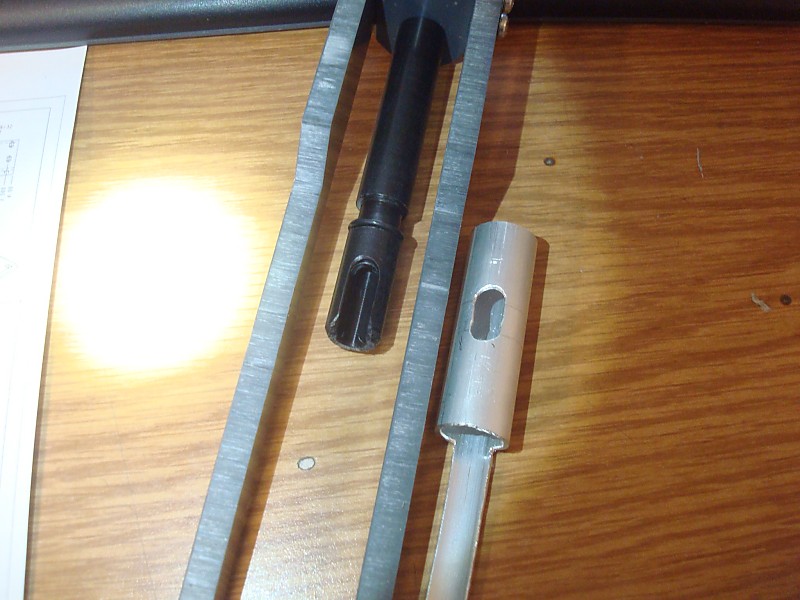
#68

Posted 24 April 2017 - 11:28 AM
OR would a homemade grip be more functional?
ALSO, is extending the magazine to fit more darts possible?
Edited by Eightdotno, 24 April 2017 - 11:33 AM.
#69

Posted 24 April 2017 - 01:13 PM
The blaster has a grip that acts as the mag-well. Yes you can add the grip from another blaster so long as it will fit over the stock mag-well/grip.
And yes, you can make longer mags as long as you wind a longer spring.
EDIT: The chamber is now epoxied to the frame assembly.
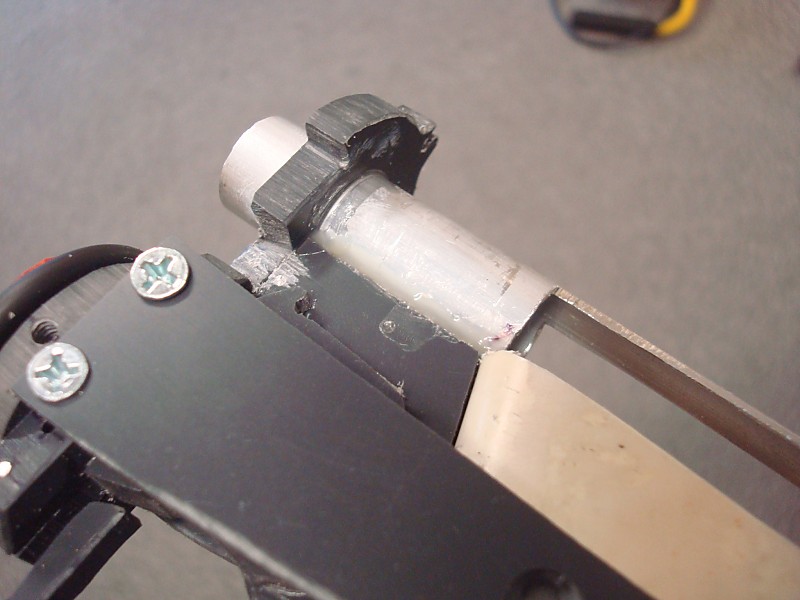
And I necked down the back half of the bolt so that the feed lips of the magazines will reach around it when they are inserted. If I release machining templates the bolt will probably have to be made from two parts.
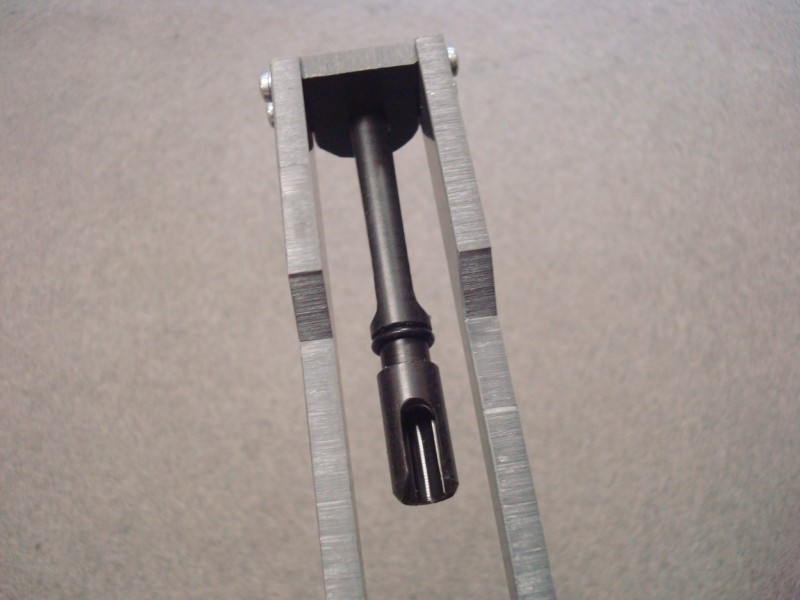
Assembly and testing can start tomorrow (after the epoxy is cured).
Edited by CaptainSlug, 24 April 2017 - 02:07 PM.
#70

Posted 25 April 2017 - 09:17 AM
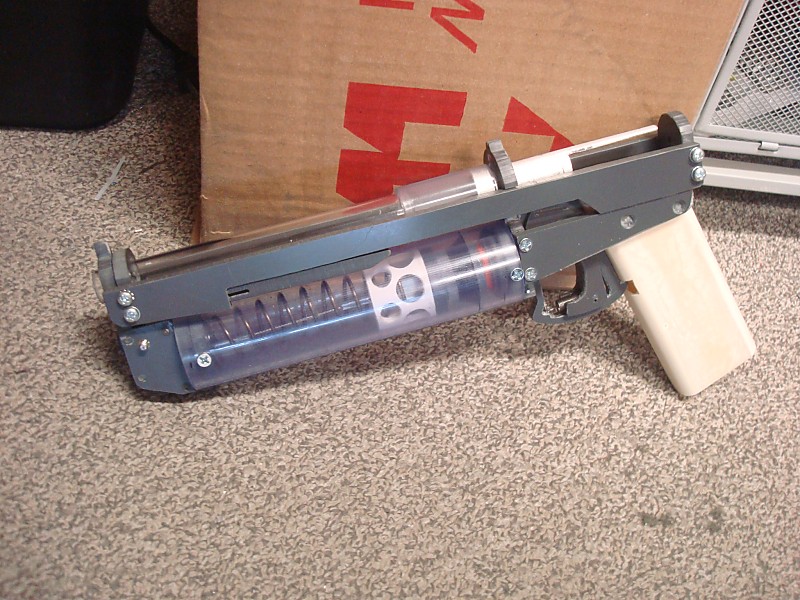
The PVC trigger is probably stretching under the spring load and it gets distorted just enough to go out of engagement. The teeth on the shuttle piece also seem to be getting crushed. The issue could be resolved by remaking the trigger and shuttle out of polycarbonate or aluminum, but I'll look at my backup plan first and come up with a catch design that doesn't require harder materials since this design will eventually need to be compatible with 3D printing. And those materials are roughly equal to PVC in mechanical properties.
Even a K25 cut down to 5-3/8 inches in length is very difficult to prime with a top grip on a slide. So this is going to need a straight pull-back handle on the back of the slide whether that is a knob or a bar grip.
#71

Posted 25 April 2017 - 09:40 AM
2. A vertical plate on the back of the slide may help
#72

Posted 25 April 2017 - 01:54 PM
Thanks for the pics, Slug. So you basically just left a channel between layers of PVC then? I always thought to possibly do that, but wasn't sure how it would work out (especially with polycarb; solvent welding helps, I'm sure).
That ram sure is sexy, too. I guess you could actually make it with a piece of sheet plastic (for the narrow part) and then just use a cylinder on the end.
2. Turn on range hood to HIGH
Missed this post before. Just wanted to remind everyone that not all kitchen range hoods actually vent anywhere... a lot just blow back into the room (at least, mine and my parents' both do).
Edited by jwasko, 25 April 2017 - 01:56 PM.
-Jwasko, STILL Sole Surviving member of Steel City Nerf and Sober Sister of the Sex Dwarves
We NERF ON all day, and FUCK OFF all night
#73

Posted 25 April 2017 - 02:23 PM
#74

Posted 25 April 2017 - 03:30 PM
Missed this post before. Just wanted to remind everyone that not all kitchen range hoods actually vent anywhere... a lot just blow back into the room (at least, mine and my parents' both do).
Good point. If you're just making a few magazine blanks it would be much safer to do so in a toaster oven OUTSIDE of your home. Many range hoods are only required by code to cycle air through a grease trap.
Wait what?
There are some exceptions; i.e. per mfr's instructions and with good outdoor air flow, but all fans should vent directly outside. And moreover, really properly constructed vents shouldn't be within 3' of a window.M505.1 DOMESTIC [kitchen exhaust] SYSTEMS.
Where domestic range hoods and domestic appliances equipped with downdraft exhaust are provided, such hoods and appliances shall discharge to the outdoors through sheet metal ducts constructed of galvanized steel, stainless steel, aluminum, or copper. Such ducts shall have smooth inner walls, shall be air tight, shall be equipped with a backdraft damper, and shall be independant of all other exhaust systems.
Granted, old or shoddy construction won't abide either, so you should probably do this outside just to be safe. But by law all fans not rated to be indoors or without significant ventilation vent outside.
Edited by Meaker VI, 25 April 2017 - 03:31 PM.
#75

Posted 25 April 2017 - 08:13 PM
While going through the awfully long process of buying my house I've seen dozens of townhouses and new homes in Northern Virginia that have range hoods that don't vent outside. The worst one I saw was previously owned by an Asian family that did a lot of stir fry and there was oil all over the ceiling in the kitchen.
But hell, there's lots of shoddy home builders around here. And it is important to note that doing this process indoors isn't a great idea in the first place. I'm doing it at work in a 25,000 sq/ft warehouse space. Not in my kitchen.
Also tagged with one or more of these keywords: Pistol, Sex Pistol, Mag-Fed Pistol, Multiple Orgasm
Community Forums →
Homemades →
Project 13: Brushless machine pistolStarted by snakerbot, 09 Mar 2022 |
|

|
||
Community Forums →
Homemades →
Powerful Nerf Double action PistolStarted by Silas4lagoon, 05 Jul 2019 |
|

|
||
Community Forums →
Homemades →
Mk18 Assault PistolStarted by Meaker VI, 15 Nov 2018 |
|

|
||
Community Forums →
Homemades →
Stacy: Mag Fed Pistol F.A.R. - First Homemade, Advice AppreciatedStarted by TulipMama, 13 Oct 2016 |
|

|
||
Community Forums →
Modifications →
New Generation NF Rifle: The FS RifleStarted by charlie156, 08 May 2016 |
|

|
1 user(s) are reading this topic
0 members, 1 guests, 0 anonymous users


