Jump to content


Photo

1995 Crossbow CAD Files

3D

67 replies to this topic

#1 CaptainSlug

CaptainSlug

    Resident Mad Scientist

  • Administrators
  • 4,763 posts

Posted 24 February 2017 - 05:10 PM

*
POPULAR

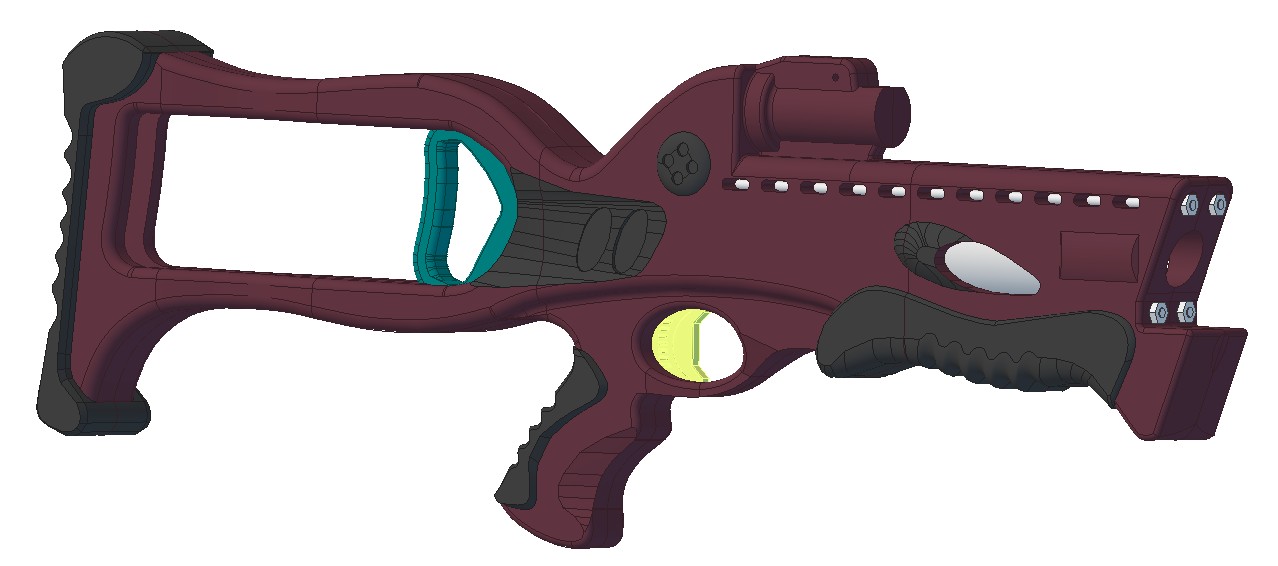
I haven't modeled the springs yet. I'll add them to the set soonish, then make the STL files available.


STEP 214 Format: http://captainslug.c.../Crossbow95.zip (2.6mb)


Stitched Shell Scan: http://captainslug.c...erf/cb95_s1.jpg

Exterior DXF: http://captainslug.c.../Crossbow95.dxf

Cutaway DXF: http://captainslug.c...bow95inside.dxf

c95_11.jpg

c95_12.jpg

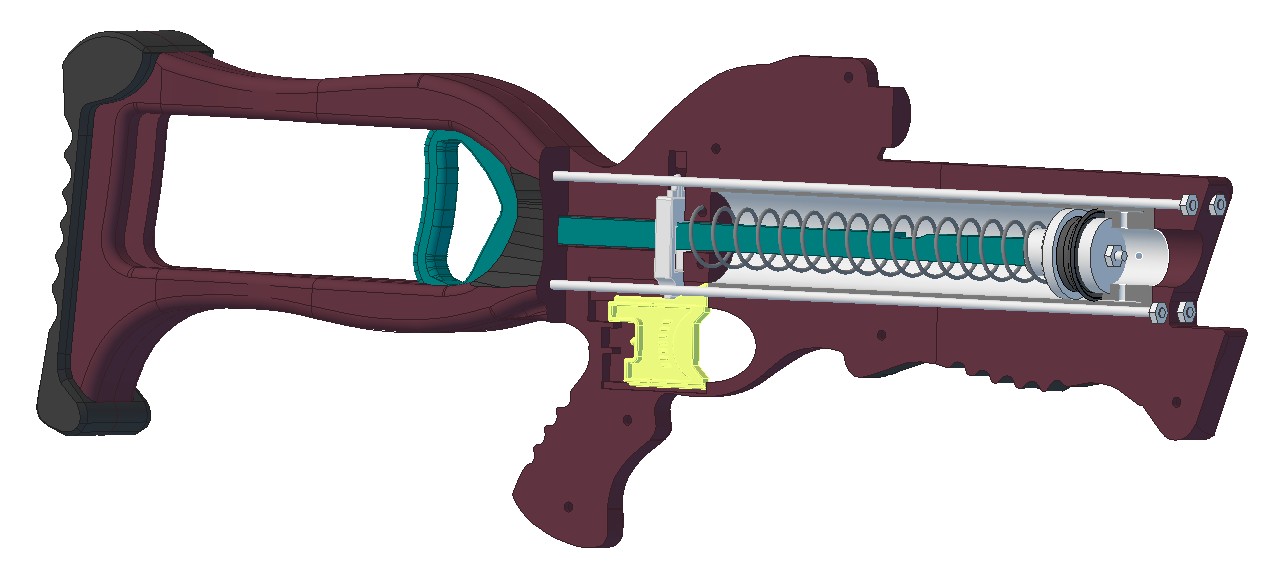
The internal parts are 100% measurement accurate. The shell however isn't exactly dimensionally perfect. It's been altered for improved strength and more compatibility with 3D printing (hopefully).


  • 6
The little critters of nature, they don't know that they're ugly. That's very funny, a fly marrying a bumble bee. I told you I'd shoot, but you didn't believe me. Why didn't you believe me?

#2 Hardly Ideal

Hardly Ideal

    Member

  • Members
  • 38 posts

Posted 24 February 2017 - 07:49 PM

Well, hello there!


I'm not sure I can think of a consumer printer that can print 21 inches of blaster in one go, but wow.


  • 0

...are you sure this thing is on?


#3 CaptainSlug

CaptainSlug

    Resident Mad Scientist

  • Administrators
  • 4,763 posts

Posted 24 February 2017 - 07:55 PM

I'll try to come up with a version that can be printed in three segments so it can fit on the majority of the available printer beds (and will need to use non-stock internals). The design isn't really optimized for printing yet.


  • 0
The little critters of nature, they don't know that they're ugly. That's very funny, a fly marrying a bumble bee. I told you I'd shoot, but you didn't believe me. Why didn't you believe me?

#4 The2ndBluesBro

The2ndBluesBro

    Member

  • Members
  • 576 posts

Posted 24 February 2017 - 08:04 PM

Maybe it's possible to build extra screw ports into the model for the purpose of attaching the segments together securely? My idea was to have one horizontal and one vertical port per segment for this. Once you've printed and bolted together the segments, you could use some resin in some places to really lock it together although I doubt you'd need to at that point. The ports would be designed to hold longer, coarser threaded screws than the ones that hold the shell together (since you'd never need/want to take them out anyway). It might also be a good idea to make a slightly larger version that has more draw. 


Edited by The2ndBluesBro, 25 February 2017 - 08:32 PM.

  • 0

Nerf, Gaming, knives: https://www.youtube....FjcObRZTl2KReDQ


#5 Maniacal Coyote

Maniacal Coyote

    On Increasingly Thin Ice

  • Members
  • 358 posts

Posted 24 February 2017 - 09:33 PM

Thanks. I've started remodelling a copy into something that could handle NIC-grade internals. It's only taken the community 21 years to digitize the Xbow. 


Sketchup is useful for this.


  • 0

I know how to help you because I have broken every rule in the book.


#6 Meaker VI

Meaker VI

    Member

  • Moderators
  • 1,192 posts

Posted 25 February 2017 - 12:09 AM

Thanks. I've started remodelling a copy into something that could handle NIC-grade internals. It's only taken the community 21 years to digitize the Xbow. 


Sketchup is useful for this.

As a sketchup expert, it's not as useful as what Slug's been using.


  • 0

#7 Langley

Langley

    LGLF - Since 2002

  • Administrators
  • 2,997 posts

Posted 25 February 2017 - 05:55 PM

Hey, could I get an SVG of the cross-section where the seam is? 

Edit: And/or a higher res version of this image http://captainslug.com/nerf/c95_10.jpg


Edited by Langley, 25 February 2017 - 05:59 PM.

  • 0

You can poop in my toilet anytime champ.

2016 Nerf War Schedule
Bless you, my son. Now recite 3 New Members Guides and 5 Code of Conducts for your sins.


#8 Daniel Beaver

Daniel Beaver

    HQRSE CQCK

  • Moderators
  • 2,099 posts

Posted 25 February 2017 - 08:00 PM

Looks good, I'll get these imported into Solidworks tonight. I'll have to brainstorm some ways of printing this out in sections.


  • 0

#9 CaptainSlug

CaptainSlug

    Resident Mad Scientist

  • Administrators
  • 4,763 posts

Posted 25 February 2017 - 08:53 PM

Hey, could I get an SVG of the cross-section where the seam is? 

Edit: And/or a higher res version of this image http://captainslug.com/nerf/c95_10.jpg


I'll get to that on Monday.


Looks good, I'll get these imported into Solidworks tonight. I'll have to brainstorm some ways of printing this out in sections.

Working on that now. There's room to fit threaded rods in the shell to cinch the three sections together.


  • 0
The little critters of nature, they don't know that they're ugly. That's very funny, a fly marrying a bumble bee. I told you I'd shoot, but you didn't believe me. Why didn't you believe me?

#10 Daniel Beaver

Daniel Beaver

    HQRSE CQCK

  • Moderators
  • 2,099 posts

Posted 25 February 2017 - 09:06 PM

Working on that now. There's room to fit threaded rods in the shell to cinch the three sections together.

Yep, some sort of internal structure will be needed. One area I'm the most concerned about is the pistol grip - this is where I'm usually holding my crossbow when I prime it.


  • 0

#11 CaptainSlug

CaptainSlug

    Resident Mad Scientist

  • Administrators
  • 4,763 posts

Posted 25 February 2017 - 10:12 PM

Okay. What I have currently for the fully 3d-printed version is the shell with only the required internal cutouts, and completely altered internal components. This allows the end user to decide what level of infill they want on their print. Each section of the shell is no longer than 9 inches, making it compatible with the majority of the entry-level machines.


c95_13.jpg


The three pairs of shell halves are held together and reinforced by a total of four 1-foot long 6-32 thread rods. These should hold the majority of the tensile stress from the spring and could be used to epoxy-cure the shell halves together permanently if desired.

The plunger rod has a 6-32 threaded rod inside the core of it too.

The catch and trigger have also been altered to be compatible with printing.


c95_14.jpg

The configuration shown offers 4-1/8 inches of plunger draw inside a 1-3/8" ID plunger tube (aluminum or polycarbonate). If a longer plunger tube is desired the rear stock cutout should have room for a full 6-1/4" stroke for a full-length K26 spring. However the front of the blaster would be cut completely open and spacers and a plate made be needed for the end of the plunger tube that would be sticking out of the shell. Or the model for the shell would be extended to cover the remaining distance.


I'll try to work up the full K26 version sometime this week.


  • 0
The little critters of nature, they don't know that they're ugly. That's very funny, a fly marrying a bumble bee. I told you I'd shoot, but you didn't believe me. Why didn't you believe me?

#12 meishel

meishel

    Member

  • Members
  • 78 posts

Posted 25 February 2017 - 11:41 PM

*
POPULAR

This allows the end user to decide what level of infill they want on their print. Each section of the shell is no longer than 9 inches, making it compatible with the majority of the entry-level machines.


I could be wrong, but I believe the most common bed size is 200x200mm which is just under 8 inches squared.    Also, there's MeshMixer as well as other applications that allow you to cut STL files into smaller pieces for printing.    Here's a tutorial on how to cut files with Meshmixer.

Edit:  I cut it in two pieces and threw it into my slicer for my larger printer.  Stats are with 20% infill and 3 outer walls as well as 3 top and 3 bottom walls.  My printer is about 5-10% slower than the slicer thinks it is, so it'd be a 15 hour print per side, and use a little more than 1/4 of a spool of filament.  I don't know what kind of spring loads it would handle, and my large printer is down at the moment.

 bAQTOIG.png


Edit again:  Forget the previous numbers, forgot to add support material because the internal structure would need it, and I had my speed set way too high for reasonable quality.  Now it's like a 30 hour print because my printer is not very fast due to the huge bed causing more sway than typical printers. :\


Edited by meishel, 26 February 2017 - 01:54 AM.

  • 1

#13 CaptainSlug

CaptainSlug

    Resident Mad Scientist

  • Administrators
  • 4,763 posts

Posted 26 February 2017 - 09:29 AM

*
POPULAR


I could be wrong, but I believe the most common bed size is 200x200mm which is just under 8 inches squared.

c95_15.jpg


GRAH!


  • 1
The little critters of nature, they don't know that they're ugly. That's very funny, a fly marrying a bumble bee. I told you I'd shoot, but you didn't believe me. Why didn't you believe me?

#14 Meaker VI

Meaker VI

    Member

  • Moderators
  • 1,192 posts

Posted 26 February 2017 - 04:15 PM

c95_15.jpg


GRAH!

Pretty sure I messaged you about that before you posted the 9" thing.


Cutting it such that just the handle, foregrip, and stock were intact would also be a valuable thing to do IMO; the top isn't a part you should be touching in normal use and adds tremendously to the print time. AND that'd make it so you can more readily service the blaster, AND AND possibly allow you to get away from clamshelling it, which is always a win in my book.


  • 0

#15 CaptainSlug

CaptainSlug

    Resident Mad Scientist

  • Administrators
  • 4,763 posts

Posted 27 February 2017 - 12:15 AM

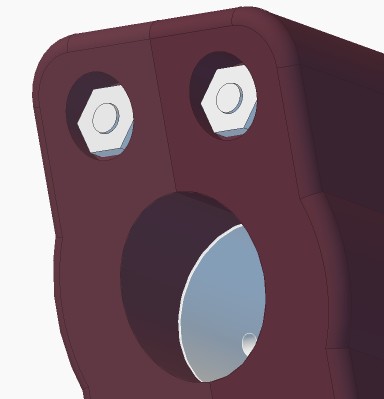
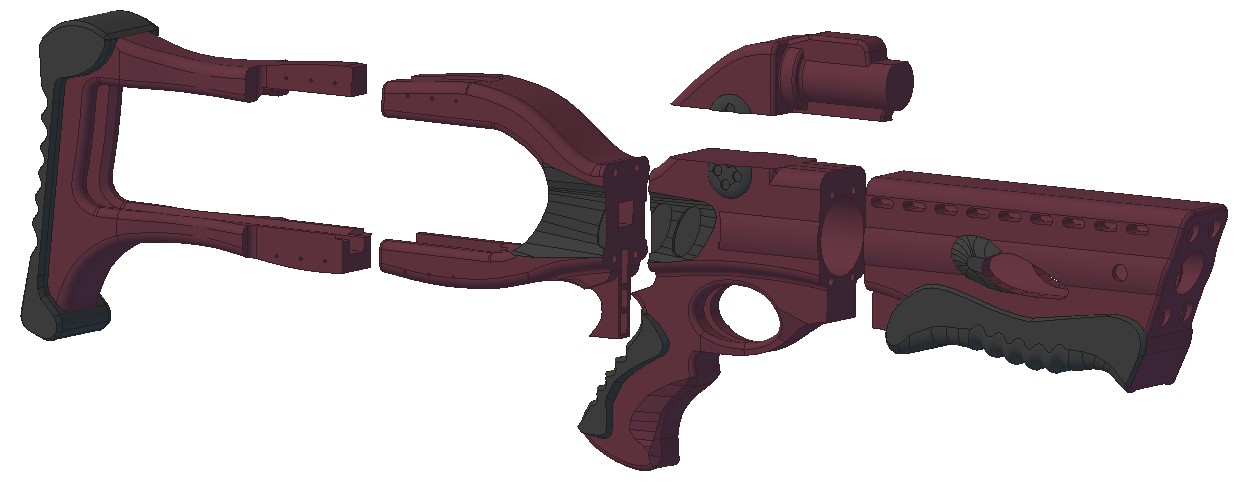
Like so? You undo the four hex nuts at the front of the shell and the whole blaster splits apart lengthwise. The top piece is optional and decorative only. The catch plate and trigger insert in from the back of the grip and become retained by the stock. Or by their springs if you use extension springs instead of compression springs.

c95_16.jpg

It's really difficult to find an ideal way to make the stock go together. I may simply end up cutting the handle slot through the back of it because otherwise the plunger handle ends up captive in it even after the head of the plunger has been removed.


As for print orientation the front and middle sections can print upside-down. The stock halves should be printed front or backside down to minimize support material. They then get pinned and glued together permanently. They'll only ever see compression loads anyway.


The longest dimensions on any given piece is no more than 7-1/8 inches.


  • 0
The little critters of nature, they don't know that they're ugly. That's very funny, a fly marrying a bumble bee. I told you I'd shoot, but you didn't believe me. Why didn't you believe me?

#16 Draconis

Draconis

    I am not Lord Draconical

  • Members
  • 2,712 posts

Posted 27 February 2017 - 02:23 PM

Now add on an accessory rail? :D


  • 0
[15:51] <+Noodle> titties
[15:51] <+Rhadamanthys> titties
[15:51] <+jakejagan> titties
[15:51] <+Lucian> boobs
[15:51] <+Gears> titties
[15:51] <@Draconis> Titties.
[15:52] <+Noodle> why is this so hard?

#17 CaptainSlug

CaptainSlug

    Resident Mad Scientist

  • Administrators
  • 4,763 posts

Posted 27 February 2017 - 02:37 PM

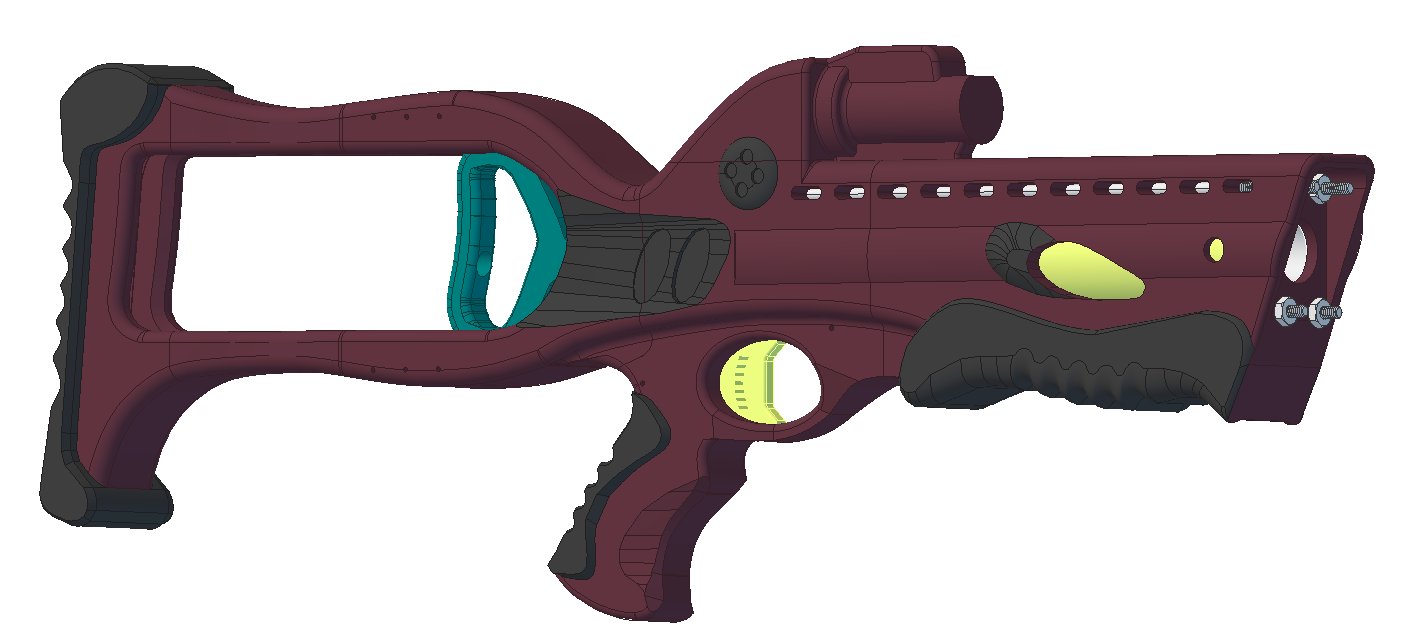
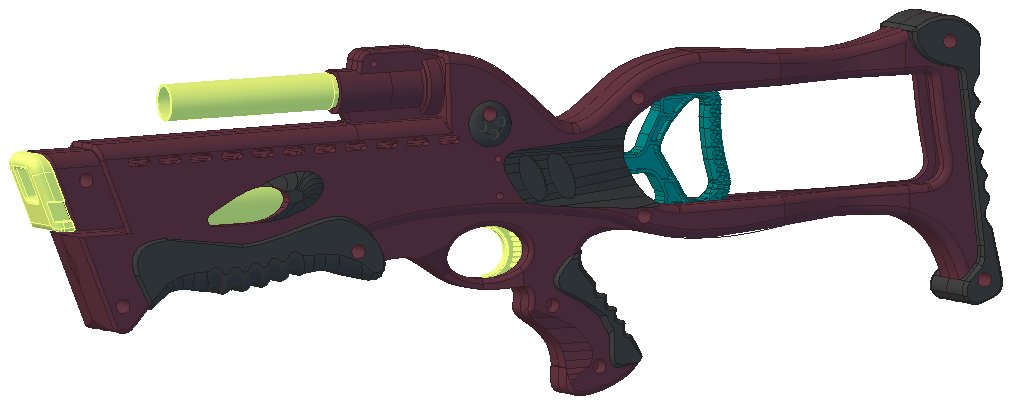
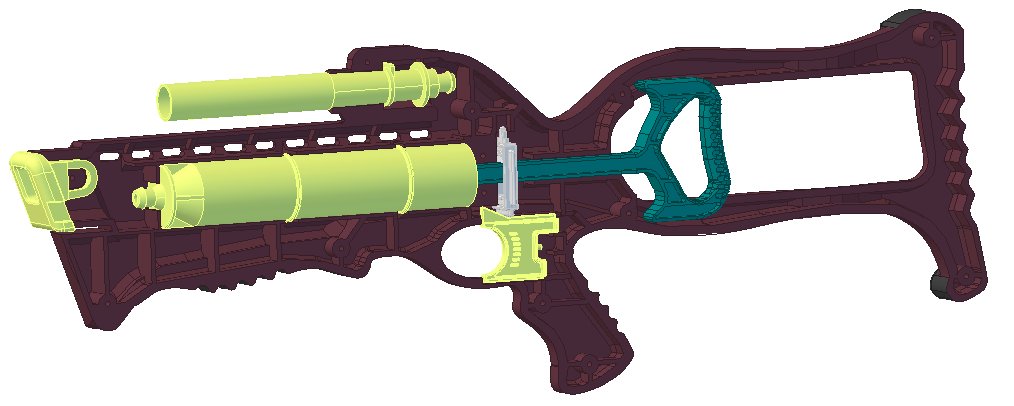
Alright, here's the non-stock version using custom parts and a larger ID plunger tube. I based this on the "Medium" configuration of Durendal since that is what will fit in the shell.


STEP 214 format: http://captainslug.c...ow95 Custom.zip (1.9mb)


STL format: http://captainslug.c... CustomSTL.zip (1.4mb)


Partslist

9637K26 1    Cut-to-Length Compression Spring, Spring-Tempered Steel, 11.0" Long,.844" OD, .08" Wire

90480A009 1  Low-Strength Steel Hex Nut Zinc-Plated, 8-32 Thread Size, pack of 100

99117A380 1  Steel Combination Slotted/Phillips Rounded Head Screw 8-32 Thread Size 12" Long, Pack of 5

94135K2 1    Type 302 SS Extension Spring, 1.0" Length, .250" OD, .029" Wire Diameter

9562K46 1    Stretch-Fit Shaft Seal for 1" Diameter Shaft

4880K314 1   Standard-Wall White PVC Pipe Fitting, 1 Pipe End Male x 1/2 Socket Female, Hex Bushing

1658T18 1    Highly Corrosion-Resistant 6063 Aluminum, Architectural, 1-1/2" OD, 0.065" Wall Thickness, 2 feet

You will need 16ga finishing nails (or 1/16" diameter weld rod) and a strong adhesive to glue the two halves of the stock together. Finishing nails are also used to hold the extension springs for the trigger and catch inside the grip.


This uses a K26 or K25 spring cut down to 8-inches in length. Trying to use a full-length of either spring would require lengthening the stock slightly and changing the plunger handle a little. You can figure that out on your own if you want. The plunger tube material needs to be cut to an 8-inch length.


All of the components can be 3D-printed except for the plunger tube, springs, and hardware. Several of the functional parts could be substituted with polycarbonate parts. If desired, reinforcing the end of the plunger tube only requires adding a plate of 1/8" or 1/4" thick polycarbonate or aluminum.

The only part that I worry about in terms of durability is the plunger rod. The notch in it might wear out and I'm not sure how well the handle will hold up. So those will need to be tested.
c95_17.jpg


Now add on an accessory rail? :D

You can put whatever kind of rail you want on top using screws. I won't judge.


  • 0
The little critters of nature, they don't know that they're ugly. That's very funny, a fly marrying a bumble bee. I told you I'd shoot, but you didn't believe me. Why didn't you believe me?
#18 Meaker VI

Meaker VI

    Member

  • Moderators
  • 1,192 posts

Posted 27 February 2017 - 05:50 PM

Like so?

 
Yep!


Alright, here's the non-stock version using custom parts and a larger ID plunger tube. I based this on the "Medium" configuration of Durendal since that is what will fit in the shell.
 
This uses a [k26] or [k25] spring cut down to 8-inches in length. Trying to use a full-length of either spring would require lengthening the stock slightly and changing the plunger handle a little. You can figure that out on your own if you want.

 
I, for one, wouldn't be opposed to a lengthened version existing.
 

The only part that I worry about in terms of durability is the plunger rod. The notch in it might wear our and I'm not sure how well the handle will hold up. So those will need to be tested.

As long as the rod isn't actually holding much tension, the notch should be ok. So far I've found that while printed parts aren't great for actual strength, they're fine in shear. The pull handle could pretty easily cause issues if it goes wrong.


How tight are the tolerances typically? I've found that printed stuff isn't always actually dimensionally correct. A 0.02" clearance all around should make for a tight-but-possible fit.


Edited by Meaker VI, 27 February 2017 - 09:46 PM.

  • 0

#19 ToadBrews

ToadBrews

    Member

  • Members
  • 140 posts

Posted 27 February 2017 - 05:54 PM


The only part that I worry about in terms of durability is the plunger rod. The notch in it might wear our and I'm not sure how well the handle will hold up.


If the notch in the plunger rod fails, is it likely to do so catastrophically, or do you just have to print a new plunger rod and swap them?


  • 0

#20 CaptainSlug

CaptainSlug

    Resident Mad Scientist

  • Administrators
  • 4,763 posts

Posted 27 February 2017 - 07:01 PM

How tight are the tolerances typically? I've found that printed stuff isn't always actually dimensionally correct. A 0.2" clearance all around should make for a tight-but-possible fit.

I have .020" clearance on moving parts. .200" would be just under a quarter inch.


 do you just have to print a new plunger rod and swap them?

That, or replace that part with a machined one.


I'm likely to be making my prototype entirely out of wood.


  • 0
The little critters of nature, they don't know that they're ugly. That's very funny, a fly marrying a bumble bee. I told you I'd shoot, but you didn't believe me. Why didn't you believe me?

#21 Meaker VI

Meaker VI

    Member

  • Moderators
  • 1,192 posts

Posted 27 February 2017 - 09:47 PM

I have .020" clearance on moving parts. .200" would be just under a quarter inch.

 
You're totally right. Post remedied.

I'm likely to be making my prototype entirely out of wood.


Fulfiller of dreams! Do it in something rad like purple heart or padook.
  • 0

#22 Spud Spudoni

Spud Spudoni

    Member

  • Members
  • 321 posts

Posted 28 February 2017 - 03:18 AM

For the STL files posted, what programs runs those? I assume Solid Works which I have access to at school, but for others who don't have the funds for something on that level, could those files be run on something free like Fusion360 (autodesk)? I've heard there is some compatibility issues between platforms.


  • 0

industrial designer


#23 CaptainSlug

CaptainSlug

    Resident Mad Scientist

  • Administrators
  • 4,763 posts

Posted 28 February 2017 - 08:15 AM

*
POPULAR

Fusion360 and Sketchup can open/edit STEP or STL files. STEP is much preferred because it's a solid model format instead of a mesh format AND it supports exported assemblies. I can give you ONE STEP file that includes all of the parts in their correct assembled locations. STEP is also compatible with CAM software like MasterCAM. But most printers (and related software) take STL files exclusively.


The software I am using (Alibre Design 12) is quite old but functional and I really hate the new versions. 3D Systems bought them, changed their name, and turned the new versions into bloated garbage.


And it looks like I'm going with PurpleHeart since its natural oxidized color is perfect.


  • 1
The little critters of nature, they don't know that they're ugly. That's very funny, a fly marrying a bumble bee. I told you I'd shoot, but you didn't believe me. Why didn't you believe me?

#24 Cali-Nerfer

Cali-Nerfer

    Member

  • Members
  • 10 posts

Posted 28 February 2017 - 02:24 PM

This is a genius design! I have mine printing right now!


  • 0

#25 Silly

Silly

    Member

  • Members
  • 245 posts

Posted 28 February 2017 - 03:39 PM

This is a genius design! I have mine printing right now!

Can you post pictures here when it is finished printing?
  • 0

Co-Owner of the History of Nerf Modding research project, moderator of r/Nerf, owner of BlasterWiki, maker of 3d printed blasters (GitHub/Thingi) and Nerfy art.


1 user(s) are reading this topic

0 members, 1 guests, 0 anonymous users