Jump to content


Photo

Extension Spring Rainbowpup post-construction writeup

extension spring rainbow bullpup rainbowpup

7 replies to this topic

#1 snakerbot

snakerbot

    Maker of Things

  • Members
  • 310 posts

Posted 20 July 2016 - 11:15 PM

*
POPULAR

IMG_1715.JPG

I had planned to do a full writeup with step-by-step instructions and pictures and all that, but as months of non-work turned to years of non-work, I decided I should get this out to the community in whatever form it took. By now nothing in this blaster is in any way new or revolutionary, (with the possible exception of the Dura brand PVC bushing trick) but I want to have this information out there.


I’d like to give credit to the rainbow clan for the rainbow catch, Ryan and Kane for the BullPAC and the original Rainbowpup, Carbon for the Snap/Revolution, Ryan for the original catch and handle templates, and Diamondback for the slightly modified ones.


In lieu of an actual writeup, I’m uploading the .dwg and template file that I have now. They are included as attachments at the bottom of this post. If you don’t have autocad, you can download draftsight for free at http://www.3ds.com/p.../free-download/ and it’ll do all of the same things. Alternatively you can find various free viewers (not editors) at http://www.autodesk....cts/dwg/viewers. I’m also including various pictures of the only one of these I still have, so you can get an idea of what the actual parts look like, especially where I wasn’t super detailed in my .dwg. The pictures I include are of a somewhat earlier revisions than what the .dwg shows, so be aware of that.


Parts needed.

Spoiler


Here’s the part I think is least clear in the .dwg: what I call the seal block. This is what seals the plunger rod. It’s made from a 3/4" to 1/2” PVC bushing nested inside a 1” to 3/4” bushing with a 9691K53 U-cup seal sandwiched in the middle. I cut down the outer lip of the U-cup to about half height. The PVC here stops the plunger when it hits home. I use SCH80 PVC since the thicker walls provide a little more surface area for the plunger head, but I don’t think it’s that important.

IMG_3381.JPG

IMG_3386.JPG

IMG_3387.JPG

IMG_3397.JPG


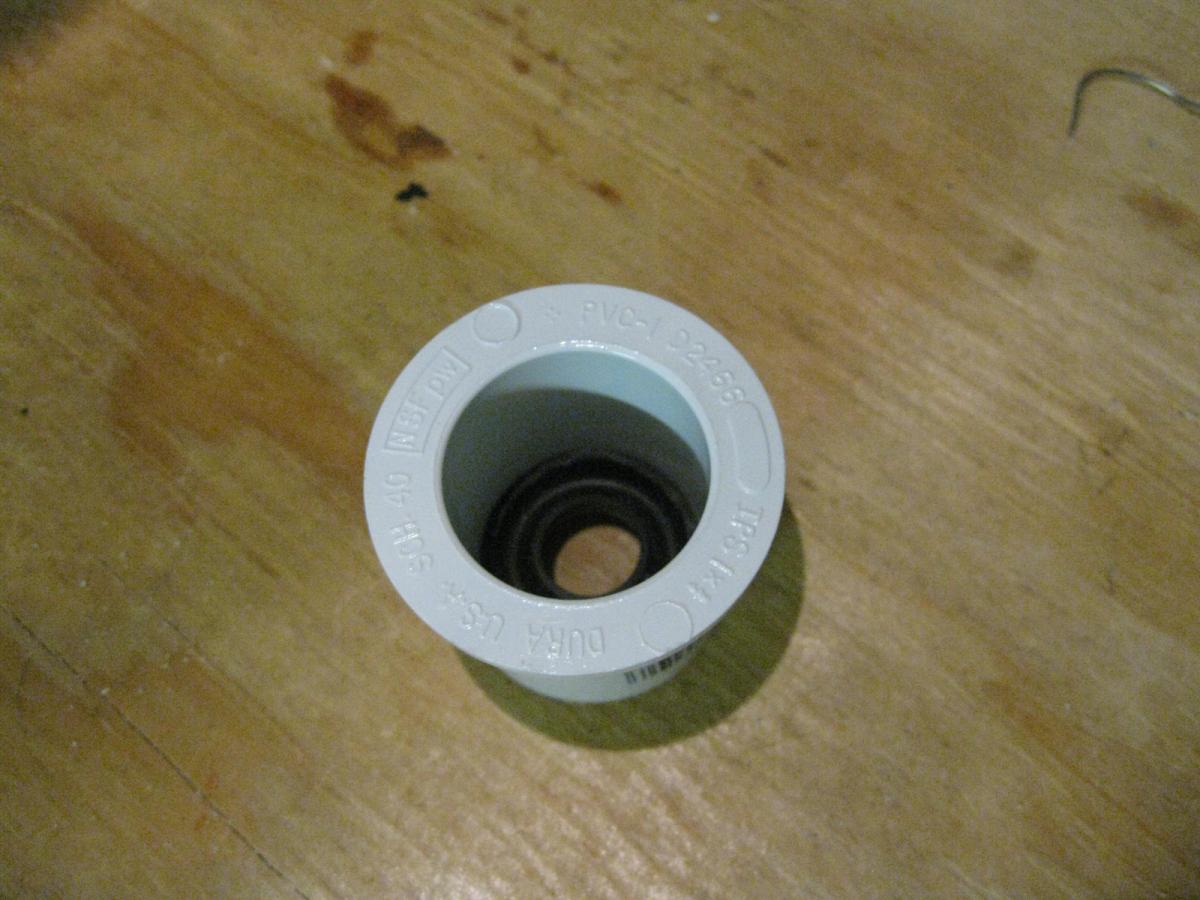
The rainbow catch is directly in front of the seal block.

IMG_3393.JPG


Here’s my plunger head. It’s a little longer than the one in the .dwg, but concept is similar enough. You can use whatever you like here to interface from the nylon plunger rod to the skirt. The .dwg and parts list use a U-cup since it’s cheaper, but I used a skirt for this one because this was the first one of these I made. Use whatever you like, but keep in mind the skirt is 1/8” taller. Those grommets there provide a little cushion when the plunger head hits home.

IMG_3402.JPG


This is the front of the plunger rod. I use a really long eye bolt to mount both the spring and priming disk to, as well as providing room for the catch, which works against the front surface of the nylon rod.

IMG_3405.JPG


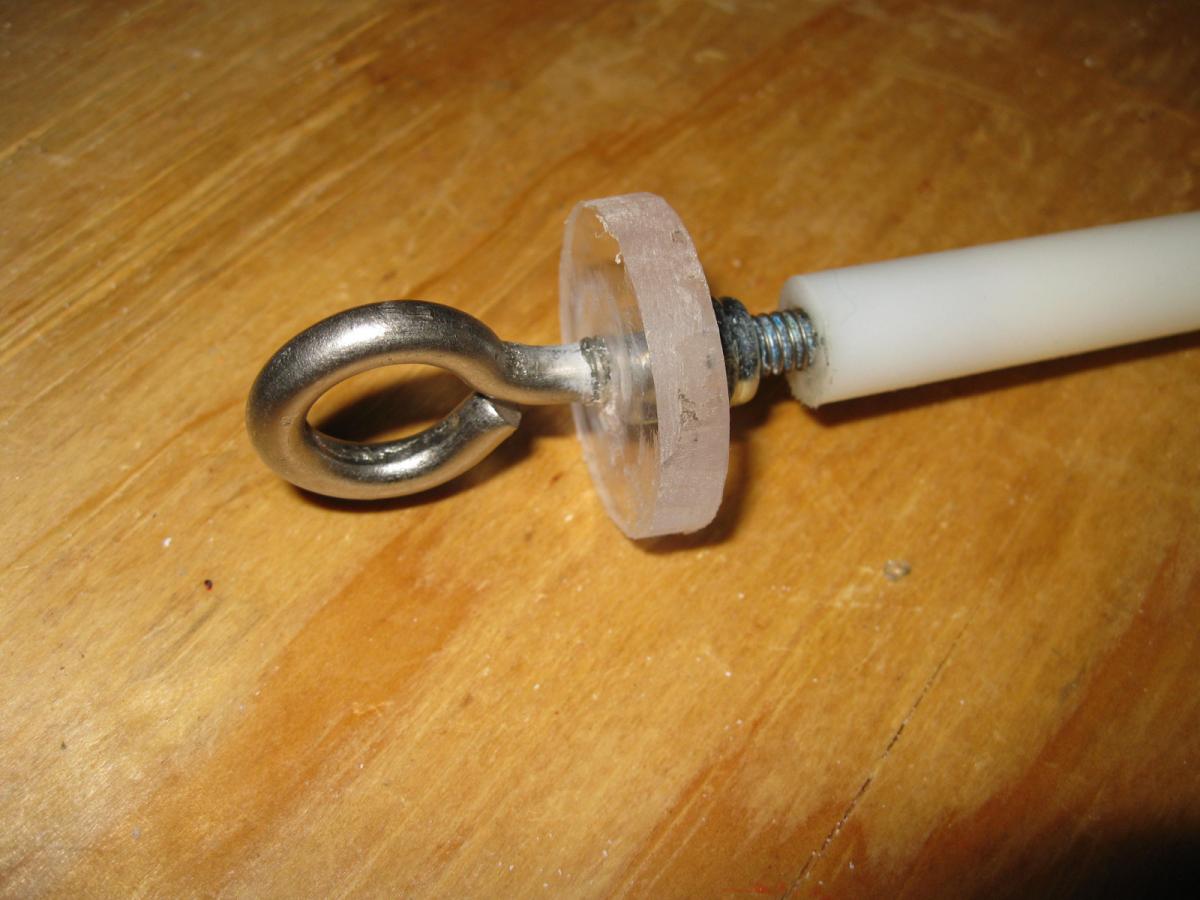
You can use a long set screw or cut the head off a regular screw to support the spring at the front. I use these things called weld nuts to hold the spring centered on the screw.

IMG_3411.JPG


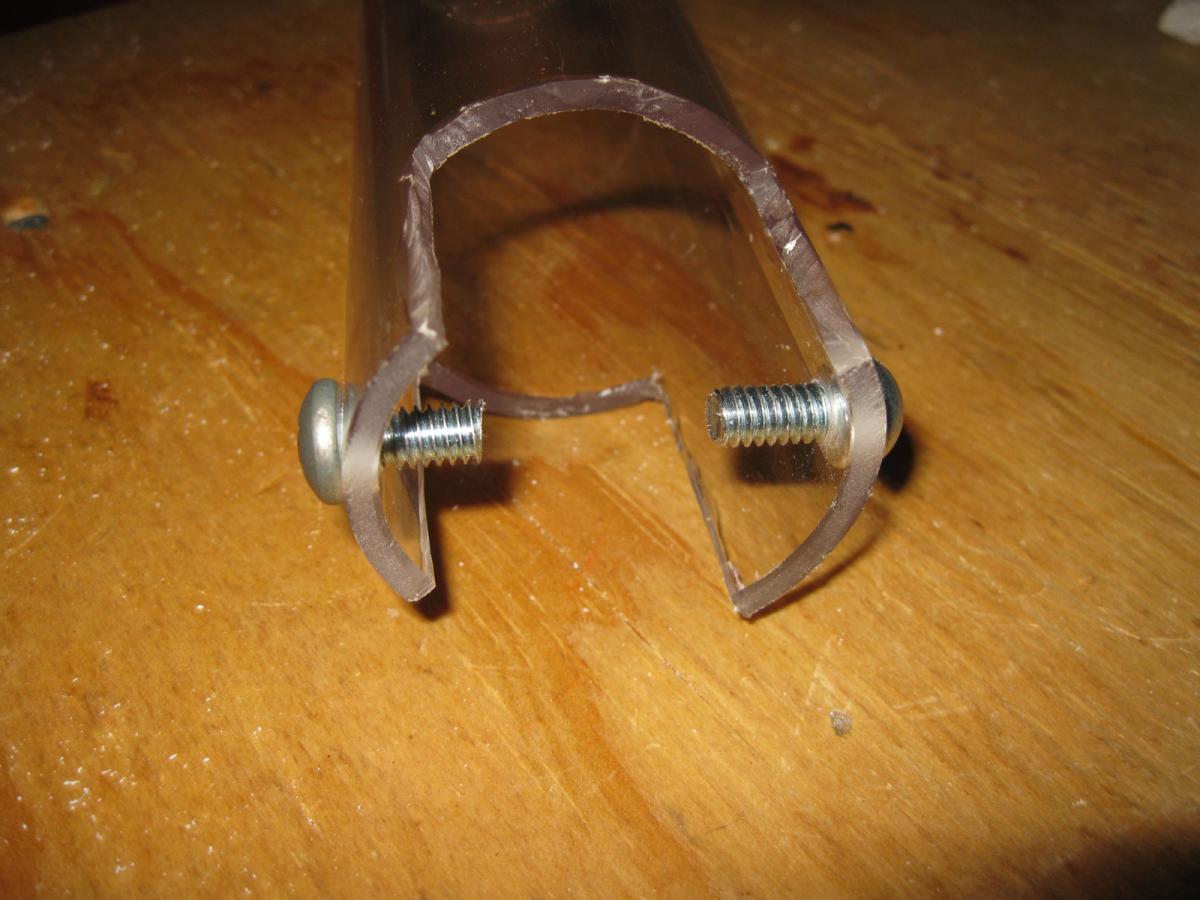
The priming grip is simple enough, but I want to point out the screws that poke in through the slots and push on the priming disk. That is how this blaster is primed. Also, the slots on the top and bottom need to be the right size to be out of the way. The .dwg shows the priming slide being stopped when the bottom slot hits the front of the handle/trigger block, but this one here stops when the plunger bottoms out against the catch. An important thing here is that you can’t really use thinwall 1-1/2” PVC for the pump grip. The walls are too thin and flex inward with those slots cut.

IMG_3413.JPG


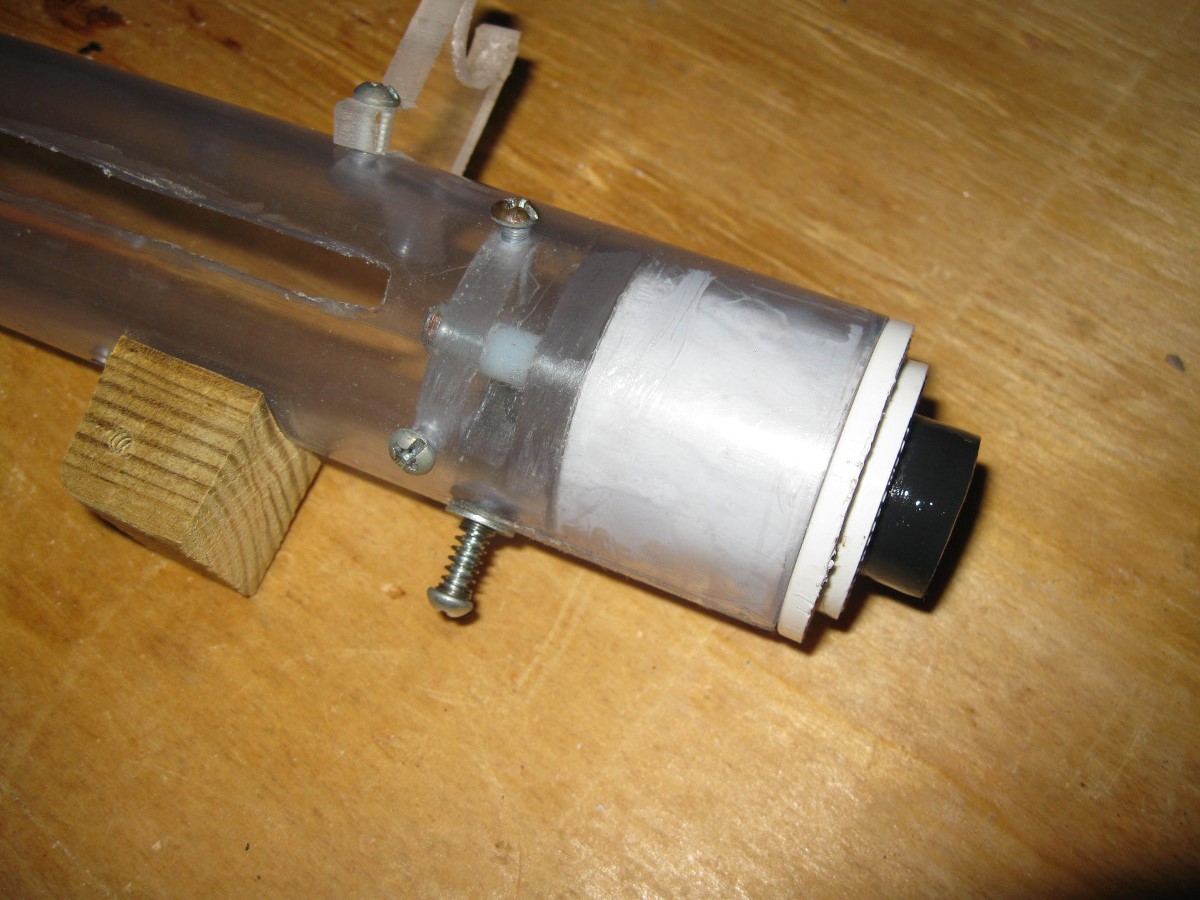
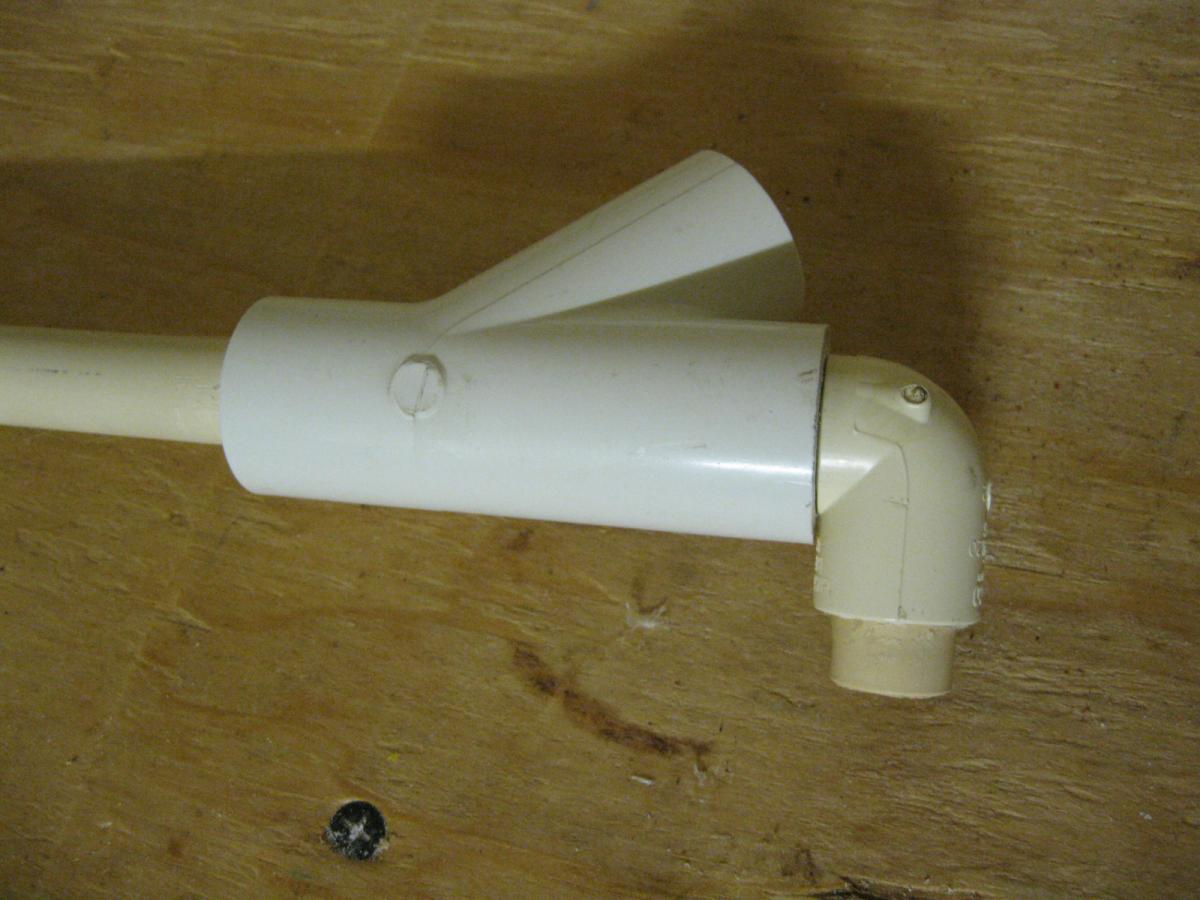
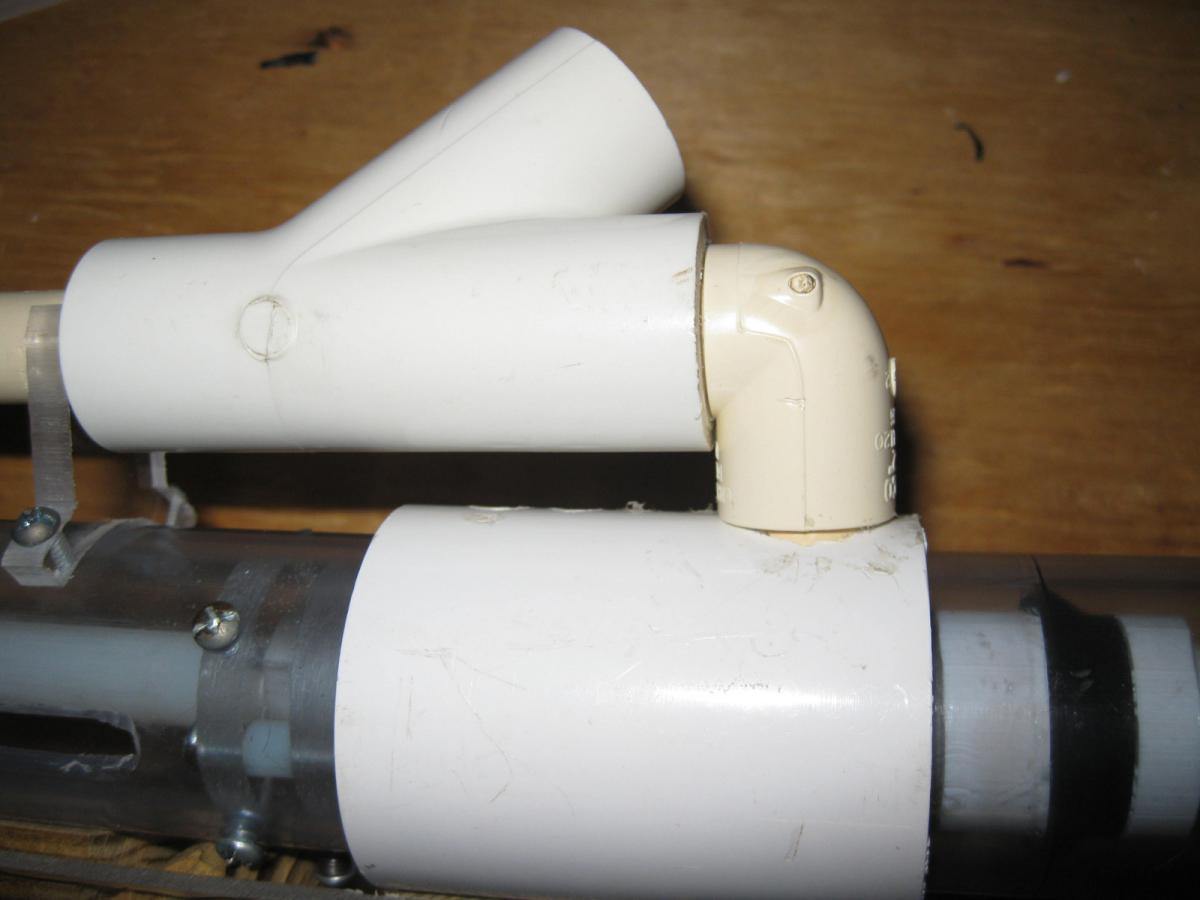
Finally, the redirect. For the actual elbow part I use a 1/2” CPVC street elbow, with the spigot end hammered into a short piece of 1/2" PVC to interface with the wye. The socket end has a short piece of CPVC in it. I just drill a hole in the coupler and plunger tube and insert the CPVC into that, but you can do various things here. I use a 5/8” forstner bit and my drillpress to make this hole, and it seals perfectly without glue, but you may or may not be able to do this, depending on your tools.

IMG_3417.JPG

IMG_3418.JPG

IMG_3422.JPG


The template file is attached to this post. I can't attach .dwg files so I put it on google drive: https://drive.google...Ym9VaGtfSkZSLW8

Attached Files


  • 2

#2 CaptainSlug

CaptainSlug

    Resident Mad Scientist

  • Administrators
  • 4,763 posts

Posted 21 July 2016 - 09:36 AM

Very clever redirect assembly. It can be reversed, made from a reducing coupler, or whatever else adapts 3/4 pipe to larger sizes.


  • 0
The little critters of nature, they don't know that they're ugly. That's very funny, a fly marrying a bumble bee. I told you I'd shoot, but you didn't believe me. Why didn't you believe me?

#3 blitz

blitz

    Member

  • Members
  • 285 posts

Posted 21 July 2016 - 08:57 PM

Thank you for posting this, I think this is super cool. 


Out of curiosity, how much draw is on this thing? I don't see it listed. 


  • 0
Blitz, member of the FNBS
"sexual innuendo no intendo"

#4 snakerbot

snakerbot

    Maker of Things

  • Members
  • 310 posts

Posted 21 July 2016 - 09:35 PM

Very clever redirect assembly. It can be reversed, made from a reducing coupler, or whatever else adapts 3/4 pipe to larger sizes.

Absolutely. It would be trivial to adapt this to something like the BullPAC 3 with different sizes of pipe front and back.


Thank you for posting this, I think this is super cool. 


Out of curiosity, how much draw is on this thing? I don't see it listed. 

6.5", but there's no reason you can't have more or less. The K125 can take up to 8" of draw.


  • 0

#5 CaptainSlug

CaptainSlug

    Resident Mad Scientist

  • Administrators
  • 4,763 posts

Posted 15 August 2016 - 01:25 PM

I just got the 1-1/4 x 3/4 Bushing adapter (part# 4880K317) in the mail from McMaster for use in making this redirect and the through hole is bigger than I expected (1" exactly) and I worry about the u-cup seal potentially just being shoved through the hole. You can push it through easily if it faces one way, and somewhat easily if it's facing the other. So if anyone else wants to make this redirect you need to either buy the adapter bushing from Home Depot, or just place a washer behind the u-cup seal in order to prevent what I feel is inevitable. I found one in a hardware bin at work with a 1.050" OD and a .523" ID that was an easy press-fit into the bushing.


snakerbot.jpg


  • 0
The little critters of nature, they don't know that they're ugly. That's very funny, a fly marrying a bumble bee. I told you I'd shoot, but you didn't believe me. Why didn't you believe me?

#6 Meaker VI

Meaker VI

    Member

  • Moderators
  • 1,192 posts

Posted 15 August 2016 - 03:09 PM

I just got the 1-1/4 x 3/4 Bushing adapter (part# 4880K317) in the mail from McMaster for use in making this redirect and the through hole is bigger than I expected (1" exactly) ..


As a potential aside, I found a rubber grommet at either HD or Lowes that fits a 1/2" rod pretty well. I think the purpose was to plug a hole in furniture you'd run cabling through, but for this purpose it should suffice (even if it doesn't provide an ideal seal). I don't remember the cost-effectiveness, but it was less than $1.00. In any case, *way* less than whatever that thing was that Aeromech used.


  • 0

#7 CaptainSlug

CaptainSlug

    Resident Mad Scientist

  • Administrators
  • 4,763 posts

Posted 15 August 2016 - 03:13 PM

Just as snakerbot is, I'm using 9691k53 which is $4.23 for a pack of 5


  • 0
The little critters of nature, they don't know that they're ugly. That's very funny, a fly marrying a bumble bee. I told you I'd shoot, but you didn't believe me. Why didn't you believe me?

#8 snakerbot

snakerbot

    Maker of Things

  • Members
  • 310 posts

Posted 15 August 2016 - 07:06 PM

I just got the 1-1/4 x 3/4 Bushing adapter (part# 4880K317) in the mail from McMaster for use in making this redirect and the through hole is bigger than I expected (1" exactly) and I worry about the u-cup seal potentially just being shoved through the hole. You can push it through easily if it faces one way, and somewhat easily if it's facing the other. So if anyone else wants to make this redirect you need to either buy the adapter bushing from Home Depot, or just place a washer behind the u-cup seal in order to prevent what I feel is inevitable. I found one in a hardware bin at work with a 1.050" OD and a .523" ID that was an easy press-fit into the bushing.


<snip>

Interesting. I don't know if it matters, but I'm using 1 x 3/4 bushings, not 1-1/4 x 3/4. I'd suspect it doesn't make a difference, since the 3/4 end is the same. The through hole on mine is ~.84".


As a potential aside, I found a rubber grommet at either HD or Lowes that fits a 1/2" rod pretty well. I think the purpose was to plug a hole in furniture you'd run cabling through, but for this purpose it should suffice (even if it doesn't provide an ideal seal). I don't remember the cost-effectiveness, but it was less than $1.00. In any case, *way* less than whatever that thing was that Aeromech used.

What you found is probably similar to what I use to cushion the plunger when it hits home. I actually used to use those to seal as well, but found that they were way more finicky than the u-cup. It was sensitive to the amount of squeeze on it, so the SCH80 PVC plunger stop wouldn't work - it would just smash the grommet every time. That version of this blaster used a string stop, which eventually led to catastrophic failure, so I switched to something more solid. I don't remember whether the desire for a more solid plunger stop or the desire to get rid of the grommet came first, but I actively moved away from both concepts. Obviously there are alternative solutions to both those problems, but I'm happy with this method.


  • 0


Also tagged with one or more of these keywords: extension spring, rainbow, bullpup, rainbowpup

1 user(s) are reading this topic

0 members, 1 guests, 0 anonymous users