Jump to content


Photo

R Series Blasters - Overview!

With PVC Pipe Catch Ring Design

68 replies to this topic

#1 SgNerf

SgNerf

    Member

  • Members
  • 204 posts

Posted 19 November 2010 - 09:04 AM

After months of building and testing dozens of designs, the SGN-R3L Blaster is finally completed!

This is part of a series of DIY blasters i plan to build, so the naming conventions i will use from here on will be as follows:

"SGN" is the maker's ID (that's me)
"R" is the series name.
"3" indicates the plunger internal diameter (which is 30mm).
"L" indicates the version's length (in this case, the "Long" variant).

Development credits go to all the DIY blaster builders at the various popular Nerf forums. Majority of the R Series blaster component designs are based on and inspired by the popular blaster designs such as the +Bow design by CaptainSlug and SNAP design by Carbon.

Okay, here are the objectives of the R Series blaster design:

- Parts all made with easy-to-source DIY materials
- Minimal tool requirement and working time
- Simple to build PVC pipe frame and parts (like SNAP designs)
- Secure catch plate and trigger system (like +Bow designs)
- Modular setup (able to be customize easily and quickly)
- Maximum priming draw (as ergonomically possible)
- Reliable and consistent firing performance
- Easy to transport and carry

Lets start:

SGN-R3L - Fully Assembled

The R3L is a hybrid DIY blaster, it strives to combine the simplicity of the SNAP blaster designs with the secure catch system of the +Bow designs.

This is the result...

Posted Image

The R3L unit shown above is equipped with a brass barrel slide breech attachment. With suitable couplers, any barrel attachments (ie. speed-loaders, rscb clips, hopper clips etc) can also be used too.


SGN-R3L - Main Blaster Unit

The R3L main blaster unit is fully built with PVC pipes.

I used locally sourced 13mm, 16mm and 20mm spec PVC pipes (Brand: SingaPlastics) which nest perfectly within each other to create the individual components, along with joints, couplers and reducers to scale down from larger diameter pipes.

In the R3L, 30mm spec PVC pipe was used for the plunger tube (slightly narrower diameter to +Bow plungers).

Posted Image


SGN-R3L - Modular Setup

The majority of components in the R3L are bolted together with machine screws, no glue is used to join sections.

Since machine screws are used to secure the frame and parts, the blaster can be easily modified and customized anytime, and the parts can be swapped around quickly. This helps to facilitate easy replacement and upgrading of parts.

Posted Image


SGN-R3L - PVC Pipe Catch Ring Design

This is the "heart" of the R Series design.

I wanted a catch system which could emulate the catch plate design that is commonly used in blasters such as the +Bow and in most spring plunger powered Nerf blasters.

But catch plate designs have traditionally been rather time consuming to make, with popular methods so far involving the use of specialized tools to do the cutting, shaping and tapping of polycarbonate sheets to make the multiple parts, along with specific screws and bolt setups.

On the other hand, the SNAP catch design of a trimmed metal rod and a clothes pin to form the catch, trigger and return spring is the epitome of simplicity, its so easy and quick to build, and it can work well in many blaster designs too. But the trade-off is that its naturally not as strong or durable as the catch-plate system.

So i tinkered with many designs, focusing on just using PVC pipe materials... and finally arrived at the PVC pipe catch ring design.

Posted Image

The design is inspired by the recent "Rainbow" design by Stark and "Mod Mans End Cap Catch Plate" design by Mod Man. The difference is i utilize only PVC pipe material for the entire catch system (no polycarbonate required).

The catch mechanism consists of a spring loaded 16mm PVC catch ring (positioned between 2 additional fixed ring sections for proper alignment) which sleeves over the 13mm PVC plunger rod. The plunger rod has a notch in it which will catch when the blaster is primed.

The entire catch assembly sits inside a 20mm PVC T-joint that is hollowed out to fit the parts. As you can see, this catch and trigger assembly is a completely modular set and can be easily swapped with other plunger and shoulder stock configurations easily.

The trigger is a metal L-bracket which operates on a simple pivot system, it links with the catch system via a cut-out slot in the trigger handle (the slot acts as a fulcrum point for the trigger). There is a return spring under the trigger with a bolt to position it properly. I wrapped the metal L-bracket in a rubber sleeve for better grip and comfort.

Pull the trigger and it pivots in an upward motion to push up the spring loaded catch ring, thereby releasing the plunger rod and firing the blaster.


SGN-R3L - Maximum Priming Draw

Another feature i wanted to achieve was to build a blaster with the maximum priming draw that i could still physically use.

Longer priming draw = More air volume = More power.

I chose to use the pull-back priming rod method as it was the simplest and most common design to build, but that also means that a longer priming draw would naturally increase the overall blaster length, and result in the trigger handle being positioned further away from the user.

After much trial and error, i managed to get the priming draw to a full 9" (+Bow priming draw is 6.5").

The 9" priming draw is almost at the limits of comfortable shoulder aiming for me (and i'm 6ft tall), any longer and i might have abit of trouble reaching the trigger handle! :blink:

Further pushing my arm reach limits, i made a proper full-length shoulder stock with a cheek rest (as you can see in the photos), so the result is a very long blaster...

Posted Image

Plunger Draw = approx. 22 cm / 9 inches.
SGN-R3L (with slide breech) = approx. 135 cm / 53 inches.


SGN-R3L - Folding Shoulder Stock

As some of you sharp eyed readers may notice, everything is machine screwed together except for the joint between the trigger handle and the shoulder stock. That is so that i can fold the shoulder stock to the right or left for easier storage and transportation.

Posted Image

Yes, the blaster could also be used with the shoulder stock folded, but great care will have to be taken to avoid getting cheeks or fingers clipped when the priming handle propels forward at high velocity.


SGN-R3L - Disassemble Sections

For transportation and storage, the blaster can also be taken apart in sections to be packed flat.

Posted Image

Here is an example of it in a protection case with layers of foam padding.

Posted Image


SGN-R3L - Scale Comparison with Nerf Longshot
(Without barrel attachments)


How does the R3L compare in size to other blasters?

Well, here is a scale comparison with a Nerf Longshot.

Posted Image


SGN-R3L - Scale Comparison with +Bow
(Without barrel attachments)


And here is a scale comparison with a +Bow.

Posted Image


SGN-R3L - Catch & Trigger Comparison with +Bow

This is an interesting comparison, the R3L and +Bow catch systems compared side-by-side.

Posted Image


SGN-R3L - Spring Plunger Internals

Standard SNAP style plunger head and rod layout using 13mm PVC pipe, end cap and T-joint. The plunger head is a rubber gasket originally designed for plumbing works, fits the 30mm spec pipe plunger perfectly with 100% air seal.

Note that the plunger head and rod are all attached together with machine screws too, so they can be replaced or upgraded easily.

The spring i use for the R3L is a custom ordered 11.5" length 14kg load aftermarket spring.

Posted Image

The R3L also has air channels drilled behind the plunger tube.

Posted Image

This helps to counteract the vacuum that forms when the plunger head propels forward, very important for maintaining the plunger velocity, especially in large plunger tube designs.


SGN-R3L - PVC Pipe Catch Ring Internals

Here is an "exploded" view of the catch ring internals, displaying all the parts in the assembly.

Posted Image


SGN-R3L - Trigger & Catch Ring Assembly

The L-bracket trigger shown here is assembled outside of the trigger handle for easier reference, you can see how the parts are attached together. Notice the spring in the front bolt? Thats the return spring to keep the trigger away from the catch when at rest. Notice also that the bolt and nut on the inside of the trigger handle are installed with washers to allow for finer adjustments in trigger pivot reach.

The catch ring consists of a section of 16mm pipe connected to a half-threaded screw with a catch spring, and everything is held down by a catch "bridge" made from a section of pvc pipe. Again, washers are also installed to help fine tune the spring load for the catch.

Posted Image


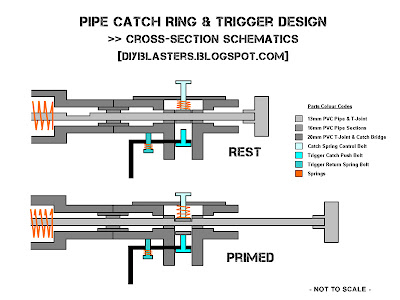
For build reference, here is a cross-section schematics of my SGN-R Series Pipe Catch Ring & Trigger Design:
Posted Image

>> Click this link for a larger picture of the schematics.


SGN-R Series Blasters - R3L Demo Video

This video will provide a demonstration of how it works.

http://www.youtube.com/watch?v=em28jkh3STk


:: Sample Test Fire Data ::

PTG: Parallel-To-Ground (Shoulder height, no elevation)
ATG: Angled-To-Ground (Aimed higher, 30 degrees elevation)

Shots fired from 1ft length Brass Barrel Slide Breech.
Distance is measured at where the dart lands (Average of 6 shots).

SGN-R3L Blaster
PTG = 140 ft
ATG = 155 ft

Note: The tests were done under controlled conditions with custom calibrated foam darts.


- Notes -

Overall, i'm quite happy with how the design turned out and i'll be building more blaster variants based on the R Series design.

Stay tuned! :)

Edited by SgNerf, 29 April 2011 - 11:28 AM.

  • 0
Nerf News & Reviews! >> http://www.sgnerf.blogspot.com
Nerf Mod Guides! >> http://www.modworks.blogspot.com

#2 Inferno Falcon

Inferno Falcon

    Member

  • Members
  • 196 posts

Posted 19 November 2010 - 10:20 AM

I could just be overlooking it, but I'm not seeing a parts list anywhere. Other than that, nice rainbow varient.
  • 0

#3 SgNerf

SgNerf

    Member

  • Members
  • 204 posts

Posted 19 November 2010 - 10:51 AM

Thanks for the feedback!

Well, other than the PVC pipe catch ring design.... the rest of the blaster is pretty much standard SNAP design, so makers can just use their own available pipe material to build their blasters accordingly. You can refer to Carbon's SNAP guides for info on how these blasters are commonly made.

Also, the pipes and joints i use are locally sourced from pipe supply stores Singapore (where i live), which have oddly different specs from the pipes and joints found in the States or other countries, so my parts list would look quite strange to most readers. :blink:

This overview is mainly for all those like me who are looking for a simpler and easier alternative to making catch plate systems using just pvc pipes instead of polycarbonate.

I guess the "exploded" view of the PVC pipe catch ring design should offer a good idea of how the parts are positioned, everything can be adjusted and customized further by makers in their own blasters.

Edited by SgNerf, 19 November 2010 - 11:06 AM.

  • 0
Nerf News & Reviews! >> http://www.sgnerf.blogspot.com
Nerf Mod Guides! >> http://www.modworks.blogspot.com

#4 Mod Man

Mod Man

    Member

  • Members
  • 75 posts

Posted 19 November 2010 - 11:30 AM

Great job SG! gun looks very well thought out and put together, excellent craftsmanship. Your presentation in your post, pictures, video etc. all are top notch. Altogether a great contribution in my humble opinion.....Thnxs. Mod
  • 0

#5 Stark

Stark

    Member

  • Members
  • 56 posts

Posted 19 November 2010 - 12:34 PM

Nice snappy rainbow remix. I like the use of a whole ring of PVC as the catch plate. I was wondering when someone was going to do that to Carbon's design. Couple of questions, your blaster does not have a radially symmetrical catch and isn't indexed. Do you have any problems with the plunger rod rotating during use and not aligning with the catch plate? I know that my rainbow has this issue a bit, but I can see into my blaster so I can manually line up the catch notch and catch plate. Second, I am slightly uneasy about the use of PVC rod for a plunger rod material. Your rod looks a bit thicker than the average blaster so the tensile strength might not be as much of a concern. Bottom line, does it seem sturdy? All in all, very clean blaster, awesome job!

Edited by Stark, 19 November 2010 - 12:36 PM.

  • 0
"Road trip." -Atomatron

BITCHES GO CRAZY FOR RAINBOWS

#6 SgNerf

SgNerf

    Member

  • Members
  • 204 posts

Posted 19 November 2010 - 12:36 PM

Thanks Mod Man!

Imho, your end cap catch plate design thread really helped to accelerate the formation of the PVC pipe catch ring design... without your thread, i'd probably still be stuck wracking my brains trying to create it!

Edited by SgNerf, 19 November 2010 - 01:39 PM.

  • 0
Nerf News & Reviews! >> http://www.sgnerf.blogspot.com
Nerf Mod Guides! >> http://www.modworks.blogspot.com

#7 SgNerf

SgNerf

    Member

  • Members
  • 204 posts

Posted 19 November 2010 - 12:56 PM

Hi Stark,

Yup, the 13mm PVC pipe i use for my plunger rod has a thick wall specification, so its very sturdy.

So far, i've fired around 100+ shots during testing and everything still looks and works perfectly without any signs of wear. The parts seem to be holding up quite well.

The catch notch is a slot section cut almost 45% into the plunger rod so it provides maximum catch "bite" but yet still retains the plunger rod's stability.

As for catch alignment, because a T-joint is used as the plunger pull handle, i simply attached it precisely in line with the catch notch, so that whenever i pull the handle backwards, even if it twisted left or right during firing, the plunger rod pull path would naturally align the catch notch back with the catch ring.

The T-joint has different printed markings on either side so i can also quite easily see if the plunger rod is aligned in the correct way.

Btw, thanks for your Rainbow thread too, it was part of the inspiration for this catch design!

Edited by SgNerf, 19 November 2010 - 01:39 PM.

  • 0
Nerf News & Reviews! >> http://www.sgnerf.blogspot.com
Nerf Mod Guides! >> http://www.modworks.blogspot.com

#8 Mod Man

Mod Man

    Member

  • Members
  • 75 posts

Posted 19 November 2010 - 01:25 PM

Hey Thnxs, I'm glad it could be of some help to you.
I've had a idea I'm trying to implement on my present project that might work for you. Since, if I get you right you are keeping the notch in your plunger rod aligned right in relationship to the catch by t-handle position. You could also have a intermediate priming notch cut out on the other side of the rod. When you would be shooting at a more closer range ( or feeling a little merciful) you could rotate the t-handle around so the catch would engage at less of a priming draw. I don't know if this would weaken the plunger rod to much or not.....just an idea to allow for a weaker shot when war'in up close. Mod
  • 0

#9 SgNerf

SgNerf

    Member

  • Members
  • 204 posts

Posted 19 November 2010 - 01:38 PM

That's an interesting idea!

I guess it could be an alternative to cutting multiple ramped catch notches along plunger rods.

Edited by SgNerf, 19 November 2010 - 01:39 PM.

  • 0
Nerf News & Reviews! >> http://www.sgnerf.blogspot.com
Nerf Mod Guides! >> http://www.modworks.blogspot.com

#10 lionhawk

lionhawk

    Member

  • Members
  • 218 posts

Posted 19 November 2010 - 03:10 PM

Very nice design Sgnerf. I actually like the looks a lot. It seems to be a very long homemade though. Once again, great job!
  • 0

#11 Y-Brik

Y-Brik

    Member

  • Members
  • 199 posts

Posted 20 November 2010 - 11:36 AM

I hate you for your beautifully-colored PVC.
Great design SG, I like how you've effectively removed the catch from the plunger tube. Now to figure out how to adapt this to American PVC specs...
  • 0

As I said I have not not alot of testes yet but I will be once I finish the mod.

Why I am boycotting Hasbro

#12 SgNerf

SgNerf

    Member

  • Members
  • 204 posts

Posted 20 November 2010 - 12:18 PM

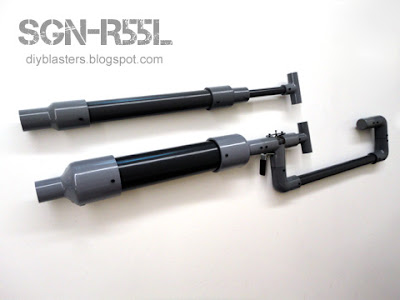
Following up on the R3L blaster... say hello to the SGN-R55L!

Yes, this variant uses 55mm internal diameter PVC pipe for the plunger tube.

Here is a R55L scale comparison with a R3L plunger tube:

Posted Image

Notice that the catch ring & trigger assembly is the same one from the R3L, it just takes less than a minute to swap the plunger tubes and rods. No need to make new parts. Thats the beauty of this modular design.

Those of you who still remember basic math will know... with almost twice the diameter, the plunger air volume works out to more than 3 x larger! And more air volume = more power! :rolleyes:

Edited by SgNerf, 22 March 2011 - 03:36 AM.

  • 0
Nerf News & Reviews! >> http://www.sgnerf.blogspot.com
Nerf Mod Guides! >> http://www.modworks.blogspot.com

#13 lionhawk

lionhawk

    Member

  • Members
  • 218 posts

Posted 20 November 2010 - 02:44 PM

Following up on the R3L blaster... say hello to the SGN-R55L!

Yes, this variant uses 55mm internal diameter PVC pipe for the plunger tube.

Here is a R55L scale comparison with a R3L plunger tube:

Posted Image

Notice that the catch ring & trigger assembly is the same one from the R3L, it just takes less than a minute to swap the plunger tubes and rods. No need to make new parts. Thats the beauty of this modular design.

Those of you who still remember basic math will know... with almost twice the diameter, the plunger air volume works out to almost 4 x larger! And more air volume = more power! :rolleyes:

Stay tuned for more variants!

Nice, it just keeps getting better and better. I once again compliment your design.
  • 0

#14 Abyss Mods

Abyss Mods

    Member

  • Members
  • 205 posts

Posted 21 November 2010 - 09:51 AM

You, sir, are a PVC mad scientist.
  • 0

#15 KaneTheMediocre

KaneTheMediocre

    Belligerent Asshole

  • Members
  • 613 posts

Posted 21 November 2010 - 01:21 PM

I love your use of a T coupler to house the catch mechanism. I'm sure that something like this could be done without too much trouble in our arcane land of inches that aren't inches. I'd love to see a parts list for it, even though it would look strange, because I'd like to see how best to translate parts between "metric" pipe sizes and "inch" pipe sizes.

But holy bejeebus, those things are long. You might try making one with only 6" of draw.
  • 0
RAINBOW CLAN FTW
I'm Purple

My Half-Baked MHA Site

#16 qwertyupp

qwertyupp

    Member

  • Members
  • 45 posts

Posted 22 November 2010 - 05:23 PM

How comfy is the handle?
  • 0

#17 veginator

veginator

    Member

  • Members
  • 301 posts

Posted 23 November 2010 - 08:50 AM

How comfy is the handle?

I imagine its about the same as holding a piece of pipe.
  • 0

#18 Fome

Fome

    Member

  • Banned
  • 312 posts

Posted 24 November 2010 - 05:49 AM

Wow.

When I first started building SNAPS, (before I became sidetracked by ergonomics) I envisioned an end product similar to this: a "3DBBQ-ization" of the PVC springer, if you will. The modular design, swappable bits, absence of machined parts and overall cleanliness of the trigger system in your design are absolutely beautiful. I can see this design being very consistently and cheaply reproduced - the former being a massive improvement to the PVC springer when you're making a lot of them to outfit a group of nerfers.

My only concern is with the ergonomics of the final design - namely the vertical handle and the rediculous length of draw. I wonder if a 45 degree angle could serve you better, as well as a stronger spring which cannot be compressed so much, yet still provides substantial power.

I would love to see some more detailed pictures of the catch setup.

Also, I eagerly await more variants :blink:

Great job.

#19 SgNerf

SgNerf

    Member

  • Members
  • 204 posts

Posted 26 November 2010 - 12:02 AM

But holy bejeebus, those things are long. You might try making one with only 6" of draw.

Yeah, i agree... the L-variant blasters are really long, i've made other variants with shorter 7.5" and 6" draws which are more akin to the draw lengths of DIY blasters commonly made, but i figured it'll be interesting to try to achieve the maximum draw i can get. :P

How comfy is the handle?

When i initially made the catch ring system and encased it in a T-joint i was expecting it to be less comfortable than an angled joint, but after using them in Nerf games, i've discovered that a T-joint was still quite comfortable to use... i guess the L-variants have trigger handles positioned much further forward so this kind of setup seems to work well with straight handle grips too.


I can see this design being very consistently and cheaply reproduced - the former being a massive improvement to the PVC springer when you're making a lot of them to outfit a group of nerfers.

My only concern is with the ergonomics of the final design - namely the vertical handle and the rediculous length of draw. I wonder if a 45 degree angle could serve you better, as well as a stronger spring which cannot be compressed so much, yet still provides substantial power.

Thanks, i had limited access to materials and tools, therefore had to come up with something simpler yet durable.

I have also made a trigger assembly with an angled-joint, and it can work nicely too. But after using it for a while, i found that i actually preferred the T-joint handle 'cos of the way i hold the trigger handle, anyways its up to personal preference so blaster builders can just easily customize their own handle ergonomics any way they like.

As for the springs, i've also test made variants with 18kg and 24kg load custom springs, but those stronger springs required much more effort to prime and tend to be really tiring to use in games, so after lots of testing i settled on using 14kg load custom springs for the combination of a more comfortable priming operation and yet still offering good firing performance.

Edited by SgNerf, 28 November 2010 - 07:58 AM.

  • 0
Nerf News & Reviews! >> http://www.sgnerf.blogspot.com
Nerf Mod Guides! >> http://www.modworks.blogspot.com

#20 SgNerf

SgNerf

    Member

  • Members
  • 204 posts

Posted 26 November 2010 - 12:07 AM

For build reference, here is a cross-section schematics of my SGN-R Series Pipe Catch Ring & Trigger Design:

Posted Image

Edited by SgNerf, 26 November 2010 - 10:00 AM.

  • 0
Nerf News & Reviews! >> http://www.sgnerf.blogspot.com
Nerf Mod Guides! >> http://www.modworks.blogspot.com

#21 bowserxx

bowserxx

    Member

  • Members
  • 12 posts

Posted 26 November 2010 - 06:42 PM

Thank you for the nice picture of the catch it helps a lot in describing how it works and how to build it.
  • 0

#22 ice

ice

    Member

  • Members
  • 895 posts

Posted 27 November 2010 - 03:34 PM

Excellent design, Im just finished my own. Now all I have to do is find a spring for it haha. Pics soon to come. Im assuming this is a diy posting thread as well?
  • 0
<!--quoteo(post=206428:date=Jan 25 2009, 05:17 PM:name=Mukersman)--><div class='quotetop'>QUOTE(Mukersman @ Jan 25 2009, 05:17 PM) View Post</div><div class='quotemain'><!--quotec-->
Turd stefans. When I pulled these out of the pillow case i was just like, what... the... fuck...
Muker
<!--QuoteEnd--></div><!--QuoteEEnd-->

#23 Bradly

Bradly

    Member

  • Members
  • 2 posts

Posted 27 November 2010 - 06:47 PM

It might just be my eyes but looks a little long and.. unwieldly. Is it very confortable to fire, shoot, and cock?

And also very good job on the design, as said before the use of a T joint as the trigger mechinism is genious.
  • 0
"It's a link to google......you idiots are worse than the spammers."

-VACC

#24 lionhawk

lionhawk

    Member

  • Members
  • 218 posts

Posted 27 November 2010 - 07:24 PM

It might just be my eyes but looks a little long and.. unwieldly. Is it very confortable to fire, shoot, and cock?

And also very good job on the design, as said before the use of a T joint as the trigger mechinism is genious.

Long is right, not sure about unwieldy. He compared it to a +bow and it was extremely long in comparison.

Edited by lionhawk, 27 November 2010 - 07:25 PM.

  • 0

#25 ice

ice

    Member

  • Members
  • 895 posts

Posted 28 November 2010 - 12:41 AM

There's nothing that says you can't just make the plunger tube wider and then shorter, it will put out the same amount of air, and you can make it much shorter.
  • 0
<!--quoteo(post=206428:date=Jan 25 2009, 05:17 PM:name=Mukersman)--><div class='quotetop'>QUOTE(Mukersman @ Jan 25 2009, 05:17 PM) View Post</div><div class='quotemain'><!--quotec-->
Turd stefans. When I pulled these out of the pillow case i was just like, what... the... fuck...
Muker
<!--QuoteEnd--></div><!--QuoteEEnd-->


2 user(s) are reading this topic

0 members, 2 guests, 0 anonymous users