Jump to content


Photo

The Clothespin Trigger Mk2

A CPT for a +bow age

31 replies to this topic

#1 Carbon

Carbon

    Contriberator

  • Moderators
  • 1,894 posts

Posted 17 October 2010 - 11:25 PM

The clothespin trigger is really simple to make, but it has its issues. Mainly, adjusting the plunger head ramp and nail length takes trial and error, and tuning to get it just right. Also, since the catch is before the spring stop, there can be problems with the nail hooking on the spring.

Things finally clicked for me when I saw Stark's fantastic RainBow. Needless to say, this catch wouldn't have happened without the Rainbow and the Minnesota crew. Major props, guys.

The goals with a CPT improvement was to get rid of the issues with nail length tuning and spring size issues, while making sure it could still be built with basic hand tools. Check and check. Here's how it currently looks.

The trigger installed:
Posted Image

Main deviation from the Rainbow catch is that it uses the clothespin to push up and keep the catch caught (whereas in the Rainbow, the push up fires the blaster). This keeps the motion the same as the old CPT. (EDIT: Yeah, the clothespin is backwards. I used a short piece of PVC for the test install, so it wouldn't fit the other way. The clothespin can go in either direction.)

Held in place by one screw and the firing pin:
Posted Image

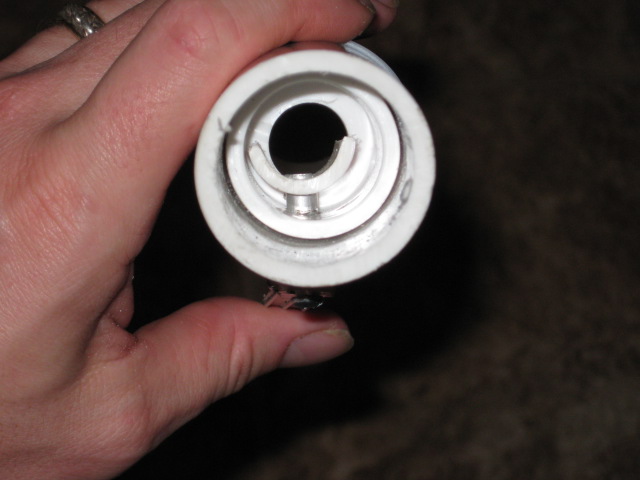
The view of the inner workings, with the rear endcap removed:
Posted Image

The aluminum tube is screwed into the clothespin. The actual catch is made of 1/2" PVC with a hole to accept the aluminum tube. Currently, it's just pressed together, and it seems to hold fine. Later refinements will probably used threaded spacers from the hardware store.

The rear endcap keeps the plunger rod centered in endcap holes, and keeps the plunger rod catch from hooking on the front endcap hole. The front hole needs to be a bit looser than the back, to make sure that the plunger rod notch doesn't hook on the front hole.

Here's how the plunger rod is set up:
Posted Image

1/2" Aluminum tube nests in 1/2" CPVC with some convincing. Once again, a stronger spring may need a retaining pin, but currently, it's not going anywhere. I beveled the front edge to allow the plunger to keep moving if I overdraw. Otherwise, the plunger draw would stop suddenly when the draw reached the front of the catch indent.

Another view of the catch, with no plunger rod in place:
Posted Image
Posted Image

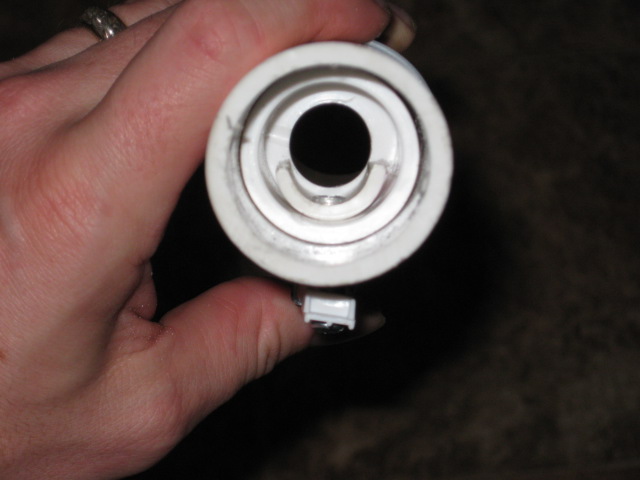
This is mainly a proof of concept, built with scraps around my workshop. Improvements can be made in the form of ease of assembly. Mainly, I'd like to see the aluminum tube be threaded into the catch, as opposed to just pressed in place. Still, even with this assembly, it built just fine, and required none of the tuning of a normal SNAP catch. The only slightly critical part is placement of the hole for the catch rod: it needs to be placed so the catchface is sliding up and down against the back of the endcap, so the force of the spring can be transferred to the front endcap. Otherwise, the catchpin will tilt, and cause similar issues to a standard CPT where the hole is too big. Then again, this system is probably a bit more tolerant of issues like that, since the catchface is in constant contact with the plunger rod. More building is needed to find out.

Edited by Carbon, 23 February 2015 - 11:32 AM.

  • 0
Hello. I am Indigo of the Rainbow Clan. You Nerfed my father. Prepare to die.

#2 jakejagan

jakejagan

    Member

  • Members
  • 209 posts

Posted 17 October 2010 - 11:38 PM

This is fantastic, I have a ton of ideas for this.
  • 0
00:38 jakejagan I hear you guys still bring up the "gangsta shot"
00:38 Bags it is legend now

17:45 *** MrPzowned was kicked by Zorn (MrPzowned)
17:45 Zorn moral of the story: don't pick on idle mods yo

#3 Daniel Beaver

Daniel Beaver

    HQRSE CQCK

  • Moderators
  • 2,096 posts

Posted 17 October 2010 - 11:51 PM

Neato. Actually, a bit more than neato.

It eliminates the plunger rod indexing problem without resorting to rectangular plunger rods. Not to mention the more fundamental robustness of this style of catch. I will see what I can do with this tomorrow, and judge it. Internal catches make me happy.

But, is it still a SNAP? I've always used the clothespin trigger as the definitive distinguishing trigger. I suppose in spirit it still is.

Edited by Daniel Beaver, 17 October 2010 - 11:56 PM.

  • 0

#4 Carbon

Carbon

    Contriberator

  • Moderators
  • 1,894 posts

Posted 18 October 2010 - 12:05 AM

Neato. Actually, a bit more than neato.

It eliminates the plunger rod indexing problem without resorting to rectangular plunger rods. Not to mention the more fundamental robustness of this style of catch. I will see what I can do with this tomorrow, and judge it. Internal catches make me happy.

But, is it still a SNAP? I've always used the clothespin trigger as the definitive distinguishing trigger. I suppose in spirit it still is.

Thanks. Looking forward to seeing how you approach it.

I'm not entirely sure if this a SNAP, or something new, either. It's definitely a SNAP in spirit, which is partially why I worked it so it still used a clothespin. Naming wise, I think that since this is inspired by the RainBow, the logical meteorological name would be the ColdSNAP.
  • 0
Hello. I am Indigo of the Rainbow Clan. You Nerfed my father. Prepare to die.

#5 CROW

CROW

    Member

  • Members
  • 367 posts

Posted 18 October 2010 - 01:32 AM

I don't have a whole lot of experience with SNAP's, so let me know if I'm talking out of my ass, but would sanding one edge of that catch to a bevel make for smoother operation?
  • 0
"You can discover what your enemy fears most by observing the means he uses to frighten you."

"ah man, I would give you so much for one of those NIB crossbows or one of those crossbows on the floor. The ones on ebay have gone up to $59 and the shipping alone is $12." -Rip32

#6 Darksircam

Darksircam

    Member

  • Members
  • 117 posts

Posted 18 October 2010 - 01:33 AM

This makes it possible to do variable draw length through multiple catches, like in +bows, right?

The only drawbacks I see are slightly increased materials cost for the aluminum rods, and the length. As I see it, it's at least one endcap longer than a normal setup because of the reversed endcap. For compactness you could cut off part of both endcaps and have them sandwich the catch.

Edited by Darksircam, 18 October 2010 - 01:45 AM.

  • 0
Travel Cost to TRU = $2. Eliminator pack = $15. Momentum testing = 2 lost darts. Outranging Recons with your mini pistol = priceless.

#7 Boot

Boot

    Member

  • Members
  • 90 posts

Posted 18 October 2010 - 03:39 AM

This is very interesting. I still consider it a Snap because I always considered a Snap to be something you could more or less make in an afternoon from a single trip to a hardware store. No fancy and expensive materials are used, and the base materials are no different from a standard Snap.

Basically, you've raised the envelope on you're own homemade once again by making it just as reliable, smooth in operation and sturdy as any +bow (from my limited experience). Nice! This could make my Snap-S an actual viable design.

Or, the direct answer: That is incredibly, incredibly cool.
  • 0
QUOTE
If you try to shoot over 45 feet with a magstrike accurately you fail

I beg to differ

#8 hawkshot

hawkshot

    Member

  • Members
  • 200 posts

Posted 18 October 2010 - 05:55 AM

the ColdSNAP.

ColdSNAP, huh?

Aside from me making myself look like a major nerd, I wanted to briefly give a hell of a lot of kudos. The only problem I can see along the road for the design is the half-pipe connected to the screw. Possibly(and I also do not know much about the clothespin trigger) could you use a full circle connected to the screw, and create a more noticeable indent into the cpvc, or only cut one 180 degree(looking down at the plunger rod) cut?
  • 0
Call me Hawk.


Hawkshot, one of the founding FL Nerfers.

#9 thedom21

thedom21

    Member

  • Members
  • 462 posts

Posted 18 October 2010 - 06:56 AM

I am going to try this on my SNAP which I will be using in the MN Halloween war. I will tell you guys how it holds up during a war. Also what is the piece in the back of the tube that keeps the plunger rod centered? Also Major props carbon.

Edited by thedom21, 18 October 2010 - 06:56 AM.

  • 0
Funny Irc moments

22:32 hookerninja I would just switch to 2 full 69's
22:32 hookerninja that would diddle shit

11:44 Zorn Her butt is too tiny even for limp 6th grade penis?
11:44 Zorn ergo the dildo

#10 Carbon

Carbon

    Contriberator

  • Moderators
  • 1,894 posts

Posted 18 October 2010 - 07:01 AM

I don't have a whole lot of experience with SNAP's, so let me know if I'm talking out of my ass, but would sanding one edge of that catch to a bevel make for smoother operation?

Perhaps, but it shouldn't be tat necessary. The catchface is supposed to lay flat against the plunger rod at all times (which a screwed in catchface will help with, as opposed to a pushed on version.)

This makes it possible to do variable draw length through multiple catches, like in +bows, right?

Yup.

Yes, with a caveat: you can have additional catches, so long as none of the notches on the plunger go through the hole on the rear endcap. Since the catchface applies upward pressure at all times and the catch goes all the way around, the catch would push the plunger rod up if a catch went through the rear hole, causing it to jam. The front endcap provides a surface for the catch to rest against, the rear cap provides alignment.

Anyway, it's not a major issue, the rear endcap can just be moved further back. However, this is also something to keep in mind if you try and minimize this catch: if any overdraw happens and the plunger rod notch goes out the back, it's going to jam.

The only drawbacks I see are slightly increased materials cost for the aluminum rods, and the length. As I see it, it's at least one endcap longer than a normal setup because of the reversed endcap. For compactness you could cut off part of both endcaps and have them sandwich the catch.

You could also make a version with a 1/2" PVC and CPVC plunger rod. Almost any two materials that nest will work, so long as the outer one has some thickness to it. And it's actually not that much longer: most of that space would normally be occupied by the handle anyway, so it's maybe a 1/2" longer in this incarnation. Trim down the endcaps, and it's definitely shorter.


Or, the direct answer: That is incredibly, incredibly cool.

Thanks.

The only problem I can see along the road for the design is the half-pipe connected to the screw. Possibly(and I also do not know much about the clothespin trigger) could you use a full circle connected to the screw, and create a more noticeable indent into the cpvc, or only cut one 180 degree(looking down at the plunger rod) cut?

I toyed with the full-circle idea, but I think it'll make assembly more difficult with the method I'm moving towards. That said, there's no reason why it couldn't work. There's a bunch of ways to approach this catch.

As far as a deeper indent, it's created by the thickness of the outer plunger rod material. A thicker outer would make a deeper catch. There again, there are probably other ways to approach this, as well.

Sorry, thedom, you posted as I was this morning, missed your question:

I am going to try this on my SNAP which I will be using in the MN Halloween war. I will tell you guys how it holds up during a war.

Looking forward to the field report.

Also what is the piece in the back of the tube that keeps the plunger rod centered?

The piece in the back is an endcap, same as the front.

Edited by Carbon, 18 October 2010 - 11:20 AM.

  • 0
Hello. I am Indigo of the Rainbow Clan. You Nerfed my father. Prepare to die.

#11 TxNerfer

TxNerfer

    Member

  • Members
  • 126 posts

Posted 18 October 2010 - 07:31 PM

Looks interesting but I'll probably end up using the traditional CPT as it seems like a sturdier catch. Do you have any misfires from dropping it and such? When this design is improved, (which I'm sure it will be) I may use it in the future for multiple catch notches. I don't see any drawbacks from the traditional one (at least from my perspective) because I personally use a [k26] in my SNAPs so spring catching isn't much of an issue. Either way, props.
  • 0

1. Thank you, I take donations in horse/wolf porn


#12 KaneTheMediocre

KaneTheMediocre

    Belligerent Asshole

  • Members
  • 613 posts

Posted 18 October 2010 - 11:52 PM

I really like this catch--It's got the large surface of a +bow catch, but still has that beautiful no-polycarb-to-cut goodness of PVC and clothespin construction. I especially like that you can use hollow plunger rod material like aluminum tube, and maybe even PEX if you can get something to stick to it.

I'm amazed that the PVC U is just stuck in there, and doesnt fly off when it's used. In the picture it looks like it sticks up past the U, is that an illusion? If so, I'd expect the plunger rod to "doublecatch", where it catches on the aluminum after sliding past the U.
  • 0
RAINBOW CLAN FTW
I'm Purple

My Half-Baked MHA Site

#13 TantumBull

TantumBull

    Member

  • Moderators
  • 1,929 posts

Posted 19 October 2010 - 12:43 AM

Looks awesome as usual, Carbon. I also was wondering about what Kane brought up - has that been an issue?
  • 0

#14 Langley

Langley

    LGLF - Since 2002

  • Administrators
  • 2,997 posts

Posted 19 October 2010 - 07:19 AM

This makes it possible to do variable draw length through multiple catches, like in +bows, right?

Yup.

Yes, with a caveat: you can have additional catches, so long as none of the notches on the plunger go through the hole on the rear endcap. Since the catchface applies upward pressure at all times and the catch goes all the way around, the catch would push the plunger rod up if a catch went through the rear hole, causing it to jam. The front endcap provides a surface for the catch to rest against, the rear cap provides alignment.

Anyway, it's not a major issue, the rear endcap can just be moved further back. However, this is also something to keep in mind if you try and minimize this catch: if any overdraw happens and the plunger rod notch goes out the back, it's going to jam.


An alternative would be to make the main tube a bit longer, and add yet another endcap in the rear of the gun. If you look at the design of most nerf guns, there is a channel that centers the priming rod that is longer than the notch, so that the notch cant catch anywhere on the back of the shell. So you can replace the endcap with a reducer brushing that's been dremeled out, and make sure your notch is shorter than the bushing; or you can add a second endcap and make sure the spacing between them and between notches is such that at least one of the holes in the endcaps is always supporting an un-notched section of the plunger rod.
  • 0

You can poop in my toilet anytime champ.

2016 Nerf War Schedule
Bless you, my son. Now recite 3 New Members Guides and 5 Code of Conducts for your sins.


#15 Carbon

Carbon

    Contriberator

  • Moderators
  • 1,894 posts

Posted 19 October 2010 - 11:27 AM

Kane and Tantum: It's a bit of an illusion, but yeah, it was sticking up a bit in that photo (I had it flush in a previous assembly). The plunger tube isn't transparent, so I don't know exactly what was going on in there, but I couldn't feel two catches happening. That said, that's exactly why that particular part of the build is going to be first against the wall when the revolution comes. I want something screwed in place, rather than press fit. "Press fit" doesn't quite do the joint justice, though...I used a hammer to tap it into place, so it doesn't move much.

For this test, though, I used a relatively small spring (I think it's a BBB spring, maybe....the only one I had that would fit over CPVC). A serious spring might apply enough force to tear off the catch.

Langley: Thanks for clarifying and expanding on that part. A small reducing bushing behind the front endcap is a nice idea...I'll look into that.

That's what I've been enjoying about working on this catch, anyway...it feels like there's a dozen different ways to approach it.
  • 0
Hello. I am Indigo of the Rainbow Clan. You Nerfed my father. Prepare to die.

#16 ggk

ggk

    Member

  • Members
  • 113 posts

Posted 20 October 2010 - 11:07 AM

For the aluminum tube in the trigger have you thought of using a small threaded spacer?
Use a pan head screw on the clothes pin side and on the side with a catch use a flat head screw countersunk into the 1/2"pvc.

Real interesting idea though might give it a shot if I ever make a snap.
  • 0
17:18 Snake51886 to those who hamp: you do not nerf well, you paintball poorly

#17 Carbon

Carbon

    Contriberator

  • Moderators
  • 1,894 posts

Posted 20 October 2010 - 11:15 AM

For the aluminum tube in the trigger have you thought of using a small threaded spacer?


Later refinements will probably used threaded spacers from the hardware store.


Yup. I was just building with scraps so I could get a feeling for sizes. Now that I know how big things need to be, I can work with actual measurements for the spacers.
  • 0
Hello. I am Indigo of the Rainbow Clan. You Nerfed my father. Prepare to die.

#18 ggk

ggk

    Member

  • Members
  • 113 posts

Posted 20 October 2010 - 11:20 AM

Sorry bout that some how missed that line.
Any idea how long it might need to be? Somewhere <1" would be my guess.
  • 0
17:18 Snake51886 to those who hamp: you do not nerf well, you paintball poorly

#19 Fome

Fome

    Member

  • Banned
  • 312 posts

Posted 21 October 2010 - 11:42 PM

Forgive me if I've missed the point, but what are the advantages in this design to a traditional clothespin trigger?

I noticed some mention of it being more durable but in my experience the least durable part about the clothespin trigger is the clothespin itself. The fact that you can pull the clothespin apart or twist it laterally, destroying the alignment or memory of the spring, is the primary cause of damage. As far as the actual interface between the ramp on the plunger rod (whether it's PVC or epoxy putty), the metal catch face and the metal pin, well it's nearly indestructible if made properly.

Also, I'm having difficulty seeing how this design is an improvement in terms of less work and lower cost. It seems that you have more parts with more shaping and fine tuning. Also, how would you disassemble this system? In a traditional CPT, you just unscrew the back endcap/bushing, depress the trigger and pull out the whole assembly. If you need to wipe down your PT, fix a broken part, or otherwise service any part of your gun it takes a screwdriver and a matter of minutes.

Anyways, I don't want to detract from this, it's certainly cool but in my opinion (here we go :ph34r: ) it takes the best part of the CPT (the metal catch interface) and makes it overcomplicated while keeping the worst part of the CPT (the clothespin itself).

#20 rork

rork

    Member

  • Members
  • 1,008 posts

Posted 22 October 2010 - 01:28 AM

Catching on a notch in the plunger rod has significant advantages over catching on the plunger head (plunger weight/complexity, catch placement). A lot of the issues with clothespins you mention can be minimized by using good ones (like I do).

That being said, I do have a significant degree of faith in a steel-on-steel catch that I'm not sure I'd ever have in anything else. The thing is sturdy.
  • 0
<a href="http://nerfhaven.com...howtopic=20296" target="_blank">SNAPbow Mk. V</a>
<a href="http://nerfhaven.com...howtopic=20409" target="_blank">Make it pump-action</a>

#21 Fome

Fome

    Member

  • Banned
  • 312 posts

Posted 22 October 2010 - 02:07 AM

That being said, I do have a significant degree of faith in a steel-on-steel catch that I'm not sure I'd ever have in anything else. The thing is sturdy.


Agreed.

I'm not sure why but I've seen a large volume of posts about CPT's apparent lack of durability (usually in comparison with the new rainbow catch). Why people have suddenly decided that the rainbow catch or some variation of it is awesome and that everything else sucks, including the SNAPs proven and much simpler design is beyond me.

Having the catch face on the plunger rod is certainly nice, but plastic wears down eventually. Also, I wonder, since you're inserting a length of tube inside of the cpvc, are you really producing a much lighter plunger?

#22 Carbon

Carbon

    Contriberator

  • Moderators
  • 1,894 posts

Posted 22 October 2010 - 11:18 AM

Forgive me if I've missed the point, but what are the advantages in this design to a traditional clothespin trigger?


There are several advantages with this catch over a traditional CPT.

1. Increased catch surface area.

The metal-on-metal SNAP catchface is indeed indestructible. It’s also a response to a design flaw in the catch. The catchpin surface area is tiny, resulting in a lot of concentrated force in the catch area, plus added friction during priming.

A plate catch spreads out force, reducing wear, and results in a smoother catch and trigger pull. Have you ever heard of a +Bow catch wearing out? The goal in this trigger is an attempt to bring something like that to a SNAP.

Real world comparison: last weekend, I got to try out a PACBow, which uses a +Bow plate catch. When compared to my SNAPped version, the smoothness is incredible. There's no "bump" when the pin hits the ramp, there's a "click" when the catch snaps home. That's what I'm going after.

2. Zero tuning.

And by tuning, I mean the work involved in getting the nail so it’s just right. Yes, after building a few, you can cut them to the same length, but it still requires trial and error to get it dialed in. This method requires zero measuring and tuning.

3. Scalability

This trigger system should scale up very nicely, without the normal weight penalty associated with a large plunger head catch.

4. Other advantages are subjective: the catch can be further back on the blaster, and it can use multiple catch notches.

I also need to mention it again: this is a proof-of-concept. Further improvements are forthcoming.

Other points to address:

I noticed some mention of it being more durable

As I said before, this was not my goal in building this. We know that a CPT is durable. My goal was to build something more akin to a plate catch in a CPT, that doesn’t require polycarbonate.

It seems that you have more parts with more shaping and fine tuning.

Seems? Nay, I know not "seems". /Hamlet

The overall construction method requires drilling five holes, and making some rough cuts with a saw, no shaping…and this was what was built during the invention phase, revisions will simplify construction further. I was serious when I said that this could be made with a drill and a hacksaw. (Later revisions might be able to leave out the hacksaw). All measurements were eyeballed. When I assembled it, it just worked: no tuning of the catch needed.

More parts is relative. The rear is a bit more complex, but my plungerhead is greatly simplified: I used the “hammer some scraps together” method that I used on my crossbow.

This catch has the potential for lower cost. Two endcaps, but it doesn’t require the extra washers, epoxy, nuts or bolts for a current plungerhead. Aluminum tube is expensive, but this uses very little per plunger. The design is in no way dependent upon it, anyway: any two tubes that snugly nest can work. And the aluminum tube for the catchpin is going to be replaced, anyway.

Also, I'm having difficulty seeing how this design is an improvement in terms of less work and lower cost.

Like I said, it required five holes and some cuts. It requires a little more work in terms of trigger assembly, but gives an extremely light plunger with the advantages of a plate catch (without the disadvantages of normal plate catch assembly). Disassembly will require a few more screws, but hardly insurmountable. It will still take only

a screwdriver and a matter of minutes

to take apart.

Less work also comes in the form of no tuning to make it work, from trigger to trigger. Also, one catch mech could be removed from one blaster and used in another.

it takes the best part of the CPT (the metal catch interface) and makes it overcomplicated while keeping the worst part of the CPT (the clothespin itself).

There isn't any metal catch face in this build, that was mostly the point (the aluminum tube isn't supposed to be sticking up from the PVC U). I find the metal catch interface to be the worst part, as it’s overbuilding and extra weight needed to compensate for a design flaw. Likewise, I find adding the advantages of a plate catch (very light trigger action, very smooth priming) to be desirable.

I'm not sure why but I've seen a large volume of posts about CPT's apparent lack of durability (usually in comparison with the new rainbow catch). Why people have suddenly decided that the rainbow catch or some variation of it is awesome and that everything else sucks, including the SNAPs proven and much simpler design is beyond me.

I don't think anyone is saying anything of the sort. Once again, what I’m addressing here is not lack of durability, but a different feel and a different way to approach the problem. It's always been a given that plate catches are better than CPTs. Plate catches feel nice, and don’t have the wear problems that require overbuilding to address.

Also, I wonder, since you're inserting a length of tube inside of the cpvc, are you really producing a much lighter plunger?

Yes. The 3" of aluminum tubing I used is both overkill, and the only significant metal I used in the plunger (aside from a finishing washer and a #6 screw). No bolts, no wingnuts...no metal catchfaces.

Anyway, it’s not like I’m revoking anyone’s right to use a standard CPT. This is just another way to approach it, with both advantages and disadvantages….just like a standard CPT.

Edited by Carbon, 22 October 2010 - 11:25 AM.

  • 0
Hello. I am Indigo of the Rainbow Clan. You Nerfed my father. Prepare to die.

#23 rork

rork

    Member

  • Members
  • 1,008 posts

Posted 22 October 2010 - 11:49 AM

^Yes. That.

Unless I am misreading this thing pretty badly, one should be able to use a +bow style, notched, single-piece plunger rod with this, and align it with the priming handle position, no?

Also, Carbon, you've obviously missed the memo: when you design a homemade, you're personally responsible for anything that goes wrong with anyone else's rendition of that design, however shitty it may be. It's a lot of responsibility, but someone's got to shoulder it. :D

Edited by rork, 22 October 2010 - 11:51 AM.

  • 0
<a href="http://nerfhaven.com...howtopic=20296" target="_blank">SNAPbow Mk. V</a>
<a href="http://nerfhaven.com...howtopic=20409" target="_blank">Make it pump-action</a>

#24 Carbon

Carbon

    Contriberator

  • Moderators
  • 1,894 posts

Posted 22 October 2010 - 01:28 PM

Unless I am misreading this thing pretty badly, one should be able to use a +bow style, notched, single-piece plunger rod with this, and align it with the priming handle position, no?

Spot on. My plunger rod is just a version of the same thing, sans indexing problems. A +bow handle would take care of that.

Also, Carbon, you've obviously missed the memo: when you design a homemade, you're personally responsible for anything that goes wrong with anyone else's rendition of that design, however shitty it may be. It's a lot of responsibility, but someone's got to shoulder it. :D

The memo? I write articles for the newsletter. I believe Slug is editor-in-chief.
  • 0
Hello. I am Indigo of the Rainbow Clan. You Nerfed my father. Prepare to die.

#25 windtex1

windtex1

    Member

  • Members
  • 294 posts

Posted 23 October 2010 - 02:56 PM

That is a really nice and appealing job but I have a simple question. On a regular CPT, when you attach the right angle, the clothespin is facing forwards. On this CPT, the clothespin is facing backwards and therefore would need a different trigger. So do you have any ideas for that?

Thank You and this is really a big step.
  • 0
I am open to contracts. I am relatively cheap. PM me

In Soviet Russia, blasters mod YOU!!
In Soviet Russia, darts shoot YOU!!

legendary, just...legendary
I make home-mades


0 user(s) are reading this topic

0 members, 0 guests, 0 anonymous users