Dude, c'mon, my first male child is just WAITING to be claimed.

57 replies to this topic


#27

Buffdaddy
-

- DO NOT TRADE
- 824 posts
Do not buy from this member
Posted 17 August 2010 - 07:31 AM
If I may add my two cents in, this this is absolutely beautiful. I have to wait and see what my fall schedule is classwise, but I daresay that I could actually make this in my dorm room with just my drill, file, and dremel (plus whatever I can borrow)...not the ideal tools, certainly, but considering that was my toolset all of last school year, I should be proficient enough.
Hat's off to your awesomeness.
Hat's off to your awesomeness.
#28
CaptainSlug
-
- Administrators
- 4,763 posts
Resident Mad Scientist
Posted 17 August 2010 - 08:41 AM
You're not likely to be able to cut out the parts with just a dremel. And if you do it's going to take WAY more time to get them right.but I daresay that I could actually make this in my dorm room with just my drill, file, and dremel (plus whatever I can borrow)...
I still recommend a scroll saw or band saw in order to cut them cleanly enough for them to fit together.
Draft required tool list
+ Drill press or Power drill
+ Scroll saw or Band saw + coping saw
+ UNC #6-32 tapping bit
+ 1/2" OD or larger 90-degree Countersink bit
+ Wood-boring drill bit sizes: 1/2", 5/8", & 3/4"
+ Small round file
+ Flat file
+ Screwdriver
+ X-acto knife
+ Bolt cutters (for cutting spring)
Edited by CaptainSlug, 17 August 2010 - 10:41 AM.
The little critters of nature, they don't know that they're ugly. That's very funny, a fly marrying a bumble bee. I told you I'd shoot, but you didn't believe me. Why didn't you believe me?
#29
ilzot
-

- Members
- 286 posts
Member
Posted 17 August 2010 - 10:00 AM
Sexy as shit is all I can say.
I think the aesthetics of the Plusbow are slightly better, but that's the only thing it has over this. Functionality, cost, design, and range are all better or identical.
I don't have really enough knowledge/experience/tools to make this thing, but I'd make this if I could.
Mad props 'yo.
And to the assholes posting write-ups before Slug has posted his; fuck you. If you spent a fucking YEAR designing a work of art, and someone pretty much took credit, you'd be very pissed off. He pretty much gave a sneak peek of it with a few details, and you decided to do what he's working on doing. Sorry if I seem like I'm kissing ass, which this probably looks like, but just use your mind before acting like a douche.
QUOTE(Vinnie D. @ Feb 1 2010, 05:28 AM) 
... to be able to get a better burst or sustained fire, rather than blowing the whole load at once.
#30
Lt Stefan
-

- Members
- 892 posts
Member
Posted 17 August 2010 - 10:51 AM
What would be the McMaster part # of an appropriate counter sink bit that can be used?
Also which size ring seal did you use that was 1/16" too small?
Also which size ring seal did you use that was 1/16" too small?
#31
CaptainSlug
-
- Administrators
- 4,763 posts
Resident Mad Scientist
Posted 17 August 2010 - 11:02 AM
1. Any multi-fluted countersink of a suitable diameter will work. I used one from a bit set and any of the cheap ones you can get at Home Depot will work.1. What would be the McMaster part # of an appropriate counter sink bit that can be used?
2. Also which size ring seal did you use that was 1/16" too small?
http://www.homedepot...catalogId=10053
Otherwise part# 3013A43 should work fine
The countersink bit is only used for one step and that one step can also be accomplished with a small round file. The countersink bit will simply produce a smoother finish and will cut the desired angle.
2. 9562K48, but I'm not going to recommend shaft ring seals or O-Rings in the write-up because they require you to make perfectly circular parts to fairly tight tolerances in order to get a good seal. The part number above requires that you make a 1.55" diameter core piece to stretch it over.
I'm still researching the best way to use that part# as a plunger head seal without requiring such machining accuracy.
One possibility is a stack of fender washers. But that would get expensive.
Edited by CaptainSlug, 17 August 2010 - 11:07 AM.
The little critters of nature, they don't know that they're ugly. That's very funny, a fly marrying a bumble bee. I told you I'd shoot, but you didn't believe me. Why didn't you believe me?
#32
Lt Stefan
-
- Members
- 892 posts
Member
Posted 17 August 2010 - 11:14 AM
2. 9562K48, but I'm not going to recommend shaft ring seals or O-Rings in the write-up because they require you to make perfectly circular parts to fairly tight tolerances in order to get a good seal. The part number above requires that you make a 1.55" diameter core piece to stretch it over.
I'm still researching the best way to use that part# as a plunger head seal without requiring such machining accuracy.
One possibility is a stack of fender washers. But that would get expensive.
Since 1.55" O.D. washers seem hard to find, I assume it would be possible to get 1.625" washers and decrease the O.D. by either using a bench grinder, lathe, or drill press. I have successfully mounted a washer on a 1" screw and put that in the chuck of my drill press and used a file to make it smaller.
The same method can be used to make perfectly round plastic pieces. For example, you could use a polycarbonate piece that was cut with a bandsaw to 1.6" diameter and "lathe" it down to a perfect circle of the right size.
#33
CaptainSlug
-
- Administrators
- 4,763 posts
Resident Mad Scientist
Posted 17 August 2010 - 11:19 AM
Yeah, that's basically how the beveled edge gets added to the plunger rod catch piece. You use the hex spacer and a screw as a mandrel for it in a drill press or power drill so you can file the edge down.
I'll figure that out after the write-up is done, then append the templates to include whatever extra/optional parts I come up with.
I'll figure that out after the write-up is done, then append the templates to include whatever extra/optional parts I come up with.
Edited by CaptainSlug, 17 August 2010 - 11:21 AM.
The little critters of nature, they don't know that they're ugly. That's very funny, a fly marrying a bumble bee. I told you I'd shoot, but you didn't believe me. Why didn't you believe me?
#34
CaptainSlug
-
- Administrators
- 4,763 posts
Resident Mad Scientist
Posted 18 August 2010 - 09:27 AM
The draft of the write-up is completed. The templates and part list are linked within.
http://captainslug.com/2-11.html
http://captainslug.com/2-11.html
The little critters of nature, they don't know that they're ugly. That's very funny, a fly marrying a bumble bee. I told you I'd shoot, but you didn't believe me. Why didn't you believe me?
#35
Draconis
-

- Members
- 2,712 posts
I am not Lord Draconical
Posted 18 August 2010 - 09:42 AM
Wooo! New projects!
[15:51] <+Noodle> titties
[15:51] <+Rhadamanthys> titties
[15:51] <+jakejagan> titties
[15:51] <+Lucian> boobs
[15:51] <+Gears> titties
[15:51] <@Draconis> Titties.
[15:52] <+Noodle> why is this so hard?
[15:51] <+Rhadamanthys> titties
[15:51] <+jakejagan> titties
[15:51] <+Lucian> boobs
[15:51] <+Gears> titties
[15:51] <@Draconis> Titties.
[15:52] <+Noodle> why is this so hard?
#36
Zorns Lemma
-

- Moderators
- 1,277 posts
Sir Scrt
Posted 18 August 2010 - 10:21 AM
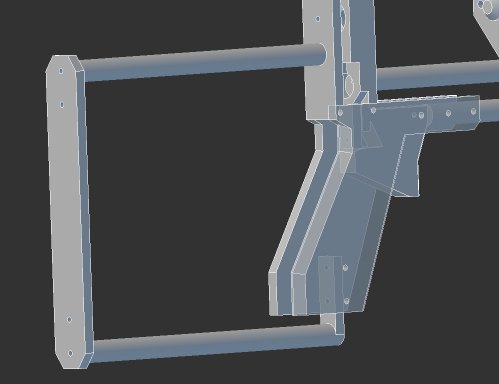
What's the 5/8" hole on CATCH for? Ease of assembly? Also the random 1/8" hole at the top of PRIME.
Everything else, as usual, is super pimp of course.
Everything else, as usual, is super pimp of course.
"In short, the same knowledge that underlies the ability to produce correct judgement is also the knowledge that underlies the ability to recognize correct judgement. To lack the former is to be deficient in the latter."
Kruger and Dunning (1999)
Kruger and Dunning (1999)
#37
Draconis
-
- Members
- 2,712 posts
I am not Lord Draconical
Posted 18 August 2010 - 10:46 AM
Also the random 1/8" hole at the top of PRIME.
From the positioning, I'd say that port is to facilitate U3 dickwaving.
[15:51] <+Noodle> titties
[15:51] <+Rhadamanthys> titties
[15:51] <+jakejagan> titties
[15:51] <+Lucian> boobs
[15:51] <+Gears> titties
[15:51] <@Draconis> Titties.
[15:52] <+Noodle> why is this so hard?
[15:51] <+Rhadamanthys> titties
[15:51] <+jakejagan> titties
[15:51] <+Lucian> boobs
[15:51] <+Gears> titties
[15:51] <@Draconis> Titties.
[15:52] <+Noodle> why is this so hard?
#38
Lt Stefan
-
- Members
- 892 posts
Member
Posted 18 August 2010 - 10:55 AM
Great looking templates, but I have a few questions.
1. I assume the two trigger pieces can be replaced with a 1/2" piece of polycarbonate?
2. Also was the coupler for the foregrip in the parts list? Is it just a normal 3" coupler?
3. If I may ask, where does the name 2-11 come from?
By the way, the video seems to link to the video on the +bow.
Thanks for the design, can't wait to build mine.
Edited by Lt. Stefan, 18 August 2010 - 02:14 PM.
#39
Zorns Lemma
-
- Moderators
- 1,277 posts
Sir Scrt
Posted 18 August 2010 - 11:49 AM
Also the random 1/8" hole at the top of PRIME.
From the positioning, I'd say that port is to facilitate U3 dickwaving.
No that's the one at ... oh that's the plunger tube? I wonder why people dump lube in there then...
"In short, the same knowledge that underlies the ability to produce correct judgement is also the knowledge that underlies the ability to recognize correct judgement. To lack the former is to be deficient in the latter."
Kruger and Dunning (1999)
Kruger and Dunning (1999)
#40
CaptainSlug
-
- Administrators
- 4,763 posts
Resident Mad Scientist
Posted 18 August 2010 - 03:20 PM
What's the 5/8" hole on CATCH for? Ease of assembly? Also the random 1/8" hole at the top of PRIME.
Everything else, as usual, is super pimp of course.
The screw that attaches FRAME1 to the 5-1/2" rod is right there, so the 5/8" hole is so that the CATCH piece clears it.
The 1/4" hole at the top of the PRIME piece is clearance for the head of the screw in the top of the FRAME1 piece.
1. Yes, if you have some. You could also just cut one 1/4" thickness trigger and use spacers/washers with it. But the extra width of the completed trigger feels better.1. I assume the two trigger pieces can be replaced with a 1/2" piece of polycarbonate?
2. Also was the coupler for the foregrip in the parts list? Is it just a normal 3" coupler?
3. If I may ask, where does the name 2-11 come from?
2. It's in the "optional" sub-section of the part list. It's a gravity-feed coupler rather than a SCHedule rated one so the ID is slightly smaller, as is the wall thickness.
3. Because this design goes to 11
Edited by CaptainSlug, 18 August 2010 - 03:47 PM.
The little critters of nature, they don't know that they're ugly. That's very funny, a fly marrying a bumble bee. I told you I'd shoot, but you didn't believe me. Why didn't you believe me?
#41
Edible Autopsy
-

- Members
- 84 posts
Member
Posted 21 August 2010 - 03:29 AM
Hmm, after taking the last 2 hours of my life to read and intently think about the write-up, it seems really very simple. I've never attempted anything like this, but I actually think i'm going to go out and buy myself some polycarbonate and give it a go. Thanks for this Slug. Great job as always.
Hot glue is my best friend.
#42
BustaNinja
-

- Members
- 1,916 posts
Member
Posted 21 August 2010 - 06:35 AM
I read over the write up, and I must say, I am once again in awe. I like how its all made out one thickness, saving tremendously on polycarbonate. The trigger seems smarter then that of the +bow. I also like how the plunger draw has been reduced, something that I never really liked about using my +bow. I always had to pull it farther back just to prime it. It seems like the perfect logical upgrade, and coupled with the very cleen looking pump action, also a very smartly designed gun in general.
After I acquire the money, I am going to make one.
Again, Good Show Old Boy.
After I acquire the money, I am going to make one.
Again, Good Show Old Boy.
Me: Yeah. he beat a hooker
Venom: Haven't we all?
Venom: Haven't we all?
#43
CaptainSlug
-
- Administrators
- 4,763 posts
Resident Mad Scientist
Posted 23 August 2010 - 09:01 PM
Something I forgot to mention earlier.
For those of you with
BIG MEATY CLAWS

The GRIP-SPACER piece can either be lengthened by 3/4" or just flipped around to give you more space on the back of the grip.
I left plenty of room for adjustment of the stock by providing several ways for it to be attached and adjusted.
Fore-going the trigger guard and step in the GRIP halves also improved this issue that a couple people had with the +bow grip. I wanted to make the grip as minimalistic as possible to make it easier to machine, but could only go so far without compromising its function.
Customizing the GRIP halves on this blaster will be significantly easier since it involves fewer parts. The only requirements on the GRIP halves are the placement of the drilled holes.
For those of you with
BIG MEATY CLAWS
The GRIP-SPACER piece can either be lengthened by 3/4" or just flipped around to give you more space on the back of the grip.
I left plenty of room for adjustment of the stock by providing several ways for it to be attached and adjusted.
Fore-going the trigger guard and step in the GRIP halves also improved this issue that a couple people had with the +bow grip. I wanted to make the grip as minimalistic as possible to make it easier to machine, but could only go so far without compromising its function.
Customizing the GRIP halves on this blaster will be significantly easier since it involves fewer parts. The only requirements on the GRIP halves are the placement of the drilled holes.
Edited by CaptainSlug, 24 August 2010 - 08:40 AM.
The little critters of nature, they don't know that they're ugly. That's very funny, a fly marrying a bumble bee. I told you I'd shoot, but you didn't believe me. Why didn't you believe me?
#44
Lt Stefan
-
- Members
- 892 posts
Member
Posted 26 August 2010 - 08:57 PM
I've gotten to building some, and as of now only have one question.
How tight is the FOREGRIP piece supposed to be around the plunger? The ones I cut out fit only when stretched, and do not slide very easily. Is this okay?
How tight is the FOREGRIP piece supposed to be around the plunger? The ones I cut out fit only when stretched, and do not slide very easily. Is this okay?
#45
VACC
-

- Founders
- 3,265 posts
Vacc is Legend
Posted 27 August 2010 - 09:53 AM
I've gotten to building some, and as of now only have one question.
How tight is the FOREGRIP piece supposed to be around the plunger? The ones I cut out fit only when stretched, and do not slide very easily. Is this okay?
The pump handle on mine slides freely with no friction. The only resistance is created by the spring and return band.
#46
Lt Stefan
-
- Members
- 892 posts
Member
Posted 27 August 2010 - 09:59 AM
The pump handle on mine slides freely with no friction. The only resistance is created by the spring and return band.
Then I guess that piece needs to be cut inside the lines to fit on the plunger tube. Thanks.
#47
CaptainSlug
-
- Administrators
- 4,763 posts
Resident Mad Scientist
Posted 27 August 2010 - 04:50 PM
The inside line on the Foregrip frame piece is the only place where I would recommend centering your blade on the line when cutting it. Yes it should be able to slide freely on the outside of the plunger tube.The pump handle on mine slides freely with no friction. The only resistance is created by the spring and return band.
Then I guess that piece needs to be cut inside the lines to fit on the plunger tube. Thanks.
Edited by CaptainSlug, 27 August 2010 - 04:51 PM.
The little critters of nature, they don't know that they're ugly. That's very funny, a fly marrying a bumble bee. I told you I'd shoot, but you didn't believe me. Why didn't you believe me?
#48
Klaiviel
-

- Members
- 20 posts
Member
Posted 10 September 2010 - 02:16 AM
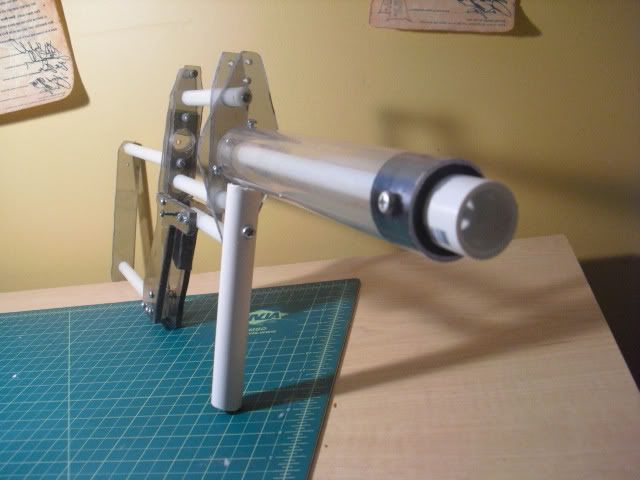
Completed my 2-11, with a hacksaw I might add (highly not recommended); I ended up removing the stock and elongating the cylinder back to 12" which in turn elongated most of the nylon rods. I also changed the 3/8" screws to 1/2" screws and fastened both sides of the plunger rod with 2" screws. Additionally the screws fastening the plunger tube to the cross have been staggered so as not to interfere with the sliding of the pump arms. I added a skirt seal part number 9562K48 stretched over a 1.55" diameter disc; the discs in front and back of it are 1.85" diameter. I replaced the 9637K26 +bow spring with a full 11" 9637K14 spring which is the same spring used in Split's LAB. Below are some pictures of the finished product, the last pic shows the optional 8 capacity Tagger RSCB created in preparation for the upcoming stock war on Sunday.


#49
A side of nerf
-

- Members
- 755 posts
Georgia Nerf Lives
Posted 15 October 2010 - 10:13 PM
2-11:

-foregrip addition
-needs bobbin and spring
-foregrip addition
-needs bobbin and spring
Southeast Nerf Contingent
#50
veginator
-

- Members
- 301 posts
Member
Posted 16 November 2010 - 06:46 PM
Is this new gun perhaps named after the lotus 2eleven? The car 2eleven is basically a stripped down version of the exige/elise. I don't know if you did that on purpose but I can see the similarities.
0 user(s) are reading this topic
0 members, 0 guests, 0 anonymous users

