Jump to content


Photo

Community Snap Thread

An open source project

157 replies to this topic

#76 PVC Arsenal 17

PVC Arsenal 17

    Member

  • Members
  • 115 posts

Posted 07 November 2010 - 08:50 PM

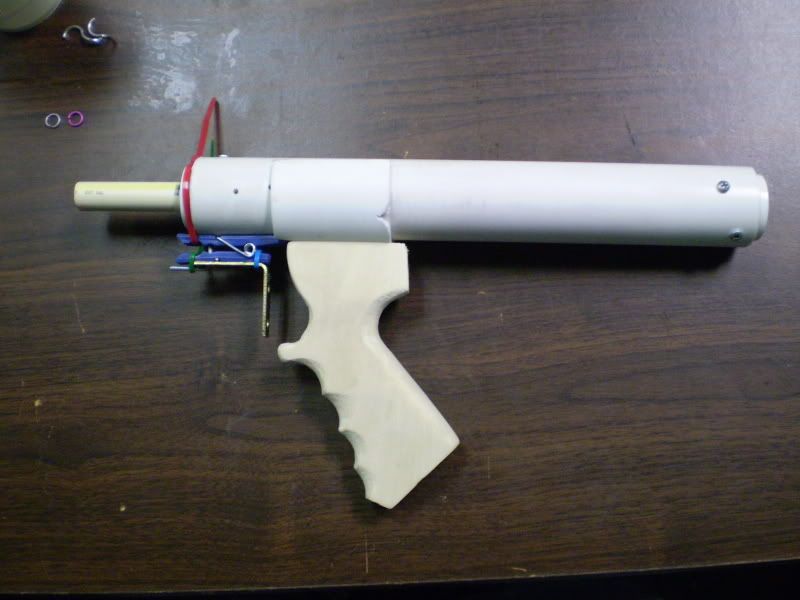
Here's something I've been working on. I thought it might be of interest to the SNAP fans to show a picture of its progress. Excuse the poor picture quality.

Posted Image

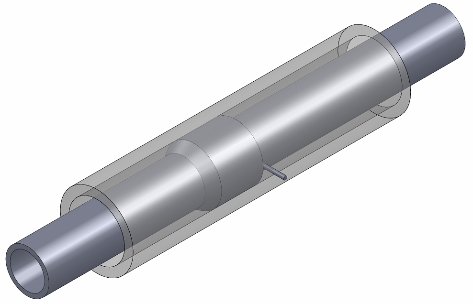
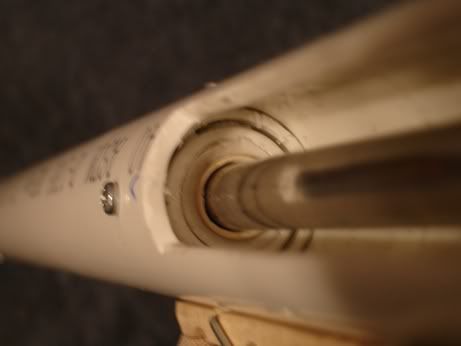
The sear pin is a spring plunger (McMaster part #8487A18). It's extremely compact and perfectly suited to this sort of application. Eventually a linkage or lever system will be incorporated to allow for a formal trigger. The pin catches on a short length of 1/2" brass pipe which has been chamfered on one end. This catch rides nicely inside 3/4" sch40 PVC. It's secured to a 1/2" CPVC plunger rod using two 8-32 set screws.


The finished project will [hopefully] be unlike anthing posted before, and without a doubt something you guys will appreciate. I've shifted my focus from overpowered pneumatic guns to the familiar spring type, and as always, I'm keeping things simple enough to be made by the average nerfer with limited access to tools.

Edit: Here is a quick drawing to clarify my description of the catch:
Posted Image

Edited by PVC Arsenal 17, 08 November 2010 - 03:59 PM.

  • 0

#77 Langley

Langley

    LGLF - Since 2002

  • Administrators
  • 2,997 posts

Posted 08 November 2010 - 11:46 PM

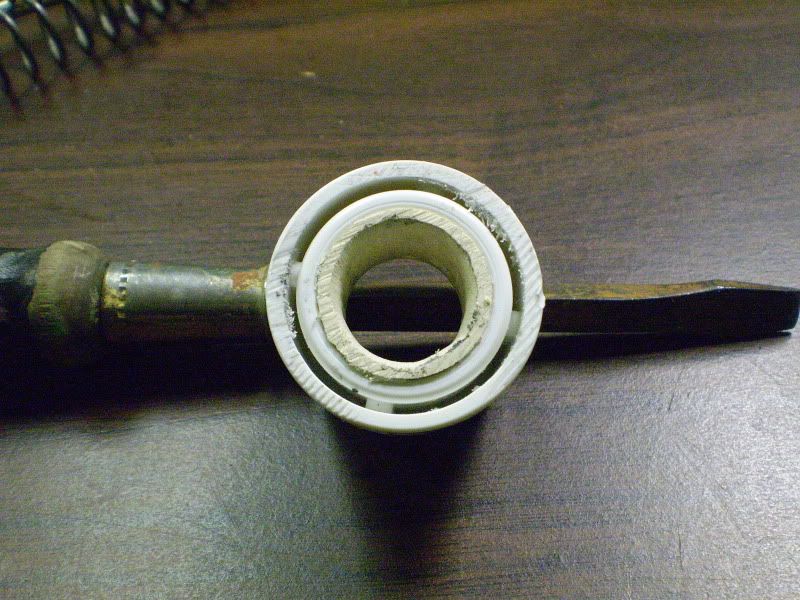
PVC Arsenal 17 inspired me to try out something similar. I've been trying to put together a catch mechanism that can sit behind the spring, like the rainbow, so that I can make a pumpsnap where the pump doesn't have to stick out in front of the gun. I had some ideas about using a 1/2" flat endcap as a catch plate, but the post above got me thinking about using a simple clothespin trigger on the plunger rod itself, and just using narrower pipe behind the spring to eliminate the space in between, to prevent the pin from being able to wiggle free. What I came up with is surprisingly simple.

First, you cut a 1/2" cpvc coupler in half, or cut a similarly sized chunk out of whatever 1/2" fitting you have lying around. Then sand out the inside with a file or dremel until a piece of cpvc slides easily through. Then sand the outside until it fits into the same 1"-1/2" reducer brushing that you use in the fore of the gun for your barrel. You may need to use a hammer for this step. Finally, add a little tape around the edge to center the fitting in 1-1/4" pvc. You should now have a piece that looks like this:
Posted Image

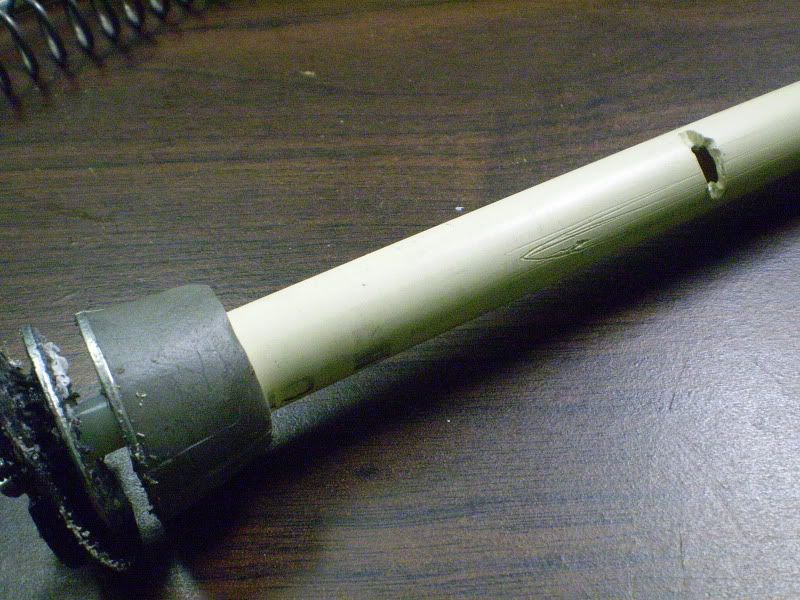
The next step is to drill a hole through the gun for the catch pin. Estimate the length of the compressed spring, or put the spring in and hold the gun in it's cocked position. Now drill a hole from outside the pressure tube, through the reducer and coupler into one side of the plunger rod. Remove the plunger rod and widen the hole into a slot using a cutoff wheel or a hand file. Your plunger rod should look like this:
Posted Image
Note that you don't actually need the epoxy putty ramp, or the second metal washer on your plunger head for this catch, that's just the plunger I had lying around at the time.

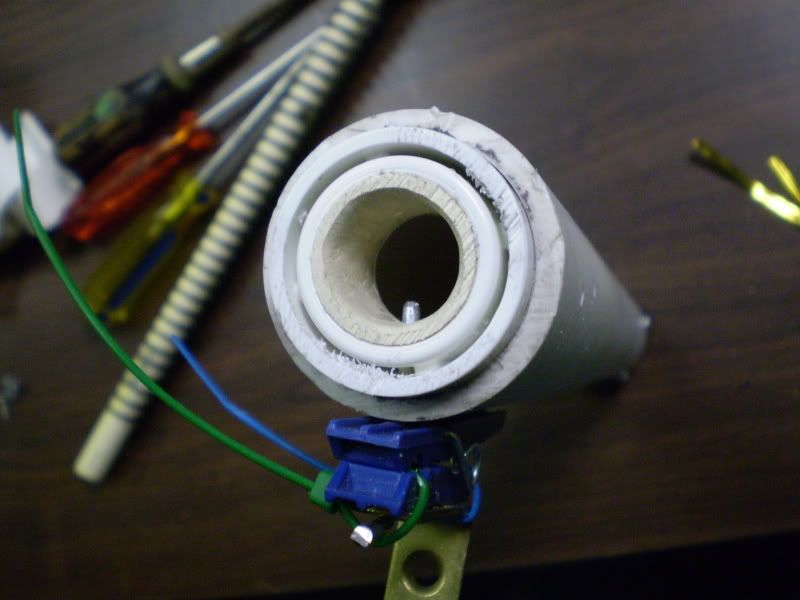
Now just make a standard clothespin trigger, but with a longer catch pin. You may also want to lightly sand the tip of the catch pin with a file or dremel until it is smooth, so it won't gouge out big ruts in your plunger rod. Note that I used ceiling hanging wire, since I didn't have an appropriately sized nail handy. Ceiling hanging wire is sold for less than $10 in huge coils, and it's used in the construction of drop ceilings. When you get your trigger assembled, it should look something like this without a plunger rod in it:
Posted Image
Note that the trigger here is backwards, for the same reason Carbon's mk2 trigger was backwards: this design needs a longer pressure tube to accommodate the handle.

So basically, this trigger serves a similar function to Carbon's mk2 trigger: it gets the trigger and handle behind the spring without adding anything to the outside of the gun. The primary difference is that this design should be easy to set up in a pumpsnap type configuration, where you don't have easy access to the inside of the plunger because the catch is in the middle of the gun. The added bonus to this style of catch is that you can use any spring that fits in the plunger tube without fear of it fouling up the catch pin.

And, since I'm just so damn proud of my new handle, here's a photo of the the whole thing put together, but......backwards:
Posted Image
Obviously the gun won't be configured this way in the future, but I just love that handle. Because of the way I had to reverse the handle to test this design, I'm calling this The Suicide Trigger (although really it's obviously just a clothespin in a slightly different configuration. )
  • 0

You can poop in my toilet anytime champ.

2016 Nerf War Schedule
Bless you, my son. Now recite 3 New Members Guides and 5 Code of Conducts for your sins.


#78 PVC Arsenal 17

PVC Arsenal 17

    Member

  • Members
  • 115 posts

Posted 09 November 2010 - 02:16 PM

I'm happy to see I've already inspired some innovation! Actually, what you've made is pretty damn close to what I'm putting together (assuming I've understood your idea correctly).

Keep the trigger and grip exactly where they are... I wouldn't call it backwards at all.
  • 0

#79 qwertyupp

qwertyupp

    Member

  • Members
  • 45 posts

Posted 10 November 2010 - 03:03 PM

Keep the trigger and grip exactly where they are... I wouldn't call it backwards at all.

Assuming I'm not blind, that would make you shoot yourself.
  • 0

#80 k9turrent

k9turrent

    Member

  • Members
  • 829 posts

Posted 10 November 2010 - 03:28 PM

Keep the trigger and grip exactly where they are... I wouldn't call it backwards at all.

Assuming I'm not blind, that would make you shoot yourself.


Stick a RSCB on top of that bastard and you got an Effeminate and a half gun
  • 0
QUOTE View Post

That's about it. And thanks Angela who helped me with these pictures.. It looks huge in her hands.


HOLY CRAP!

FU ALL

#81 PVC Arsenal 17

PVC Arsenal 17

    Member

  • Members
  • 115 posts

Posted 10 November 2010 - 04:09 PM

Keep the trigger and grip exactly where they are... I wouldn't call it backwards at all.

Assuming I'm not blind, that would make you shoot yourself.


Stick a RSCB on top of that bastard and you got an Effeminate and a half gun


On the right track...
  • 0

#82 jwasko

jwasko

    PowerBeard

  • Moderators
  • 1,021 posts

Posted 10 November 2010 - 06:00 PM

I don't mean to sound like I'm trying to outdo anyone, but I happen to have tried something similar to Langley a little while back and wanted to share:
Posted Image

My plunger rod is 1/2" aluminum, so I added a ring of CPVC inside of the CPVC coupler.

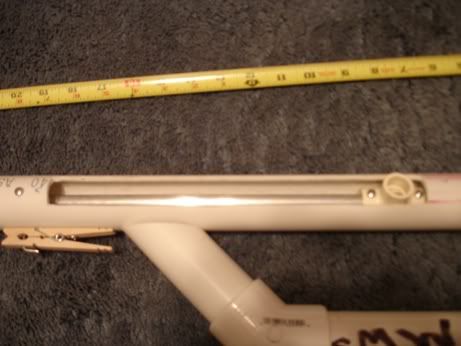
Since mine wasn't assembled "backwards," I extended the plunger tube back into a stock with a slot cut in it to keep the plunger rod in the correct position:
Posted Image

More details here.

In all, it turned out okay. But I need a stronger spring, less friction, and/or a lighter plunger rod.
  • 0

-Jwasko, STILL Sole Surviving member of Steel City Nerf and Sober Sister of the Sex Dwarves
We NERF ON all day, and FUCK OFF all night


#83 Langley

Langley

    LGLF - Since 2002

  • Administrators
  • 2,997 posts

Posted 10 November 2010 - 07:50 PM

Well, like I said, it's nothing revolutionary, and I only have the handle backwards because I wanted to modify an existing snap that could be converted back again if the idea didn't work out. I've been waiting on building a gun around my trigger idea while I try to find some of that magic 1-1/2" thinwall to use as a pump handle.

Also, where are you guys getting this cpvc and 1/2" aluminum tubing that fit together so nicely? The only hammer I had that would force the two together wasn't so much a hammer as a piece of I-beam welded to 1.5" rebar, and the cpvc was at least 1/16" wider afterwards.
  • 0

You can poop in my toilet anytime champ.

2016 Nerf War Schedule
Bless you, my son. Now recite 3 New Members Guides and 5 Code of Conducts for your sins.


#84 jwasko

jwasko

    PowerBeard

  • Moderators
  • 1,021 posts

Posted 10 November 2010 - 10:01 PM

I had to dremel out the CPVC a fair amount, in this case (probably a 17/32" or maybe even 9/16" drill bit would have been ideal).

But I have found CPVC with an (extremely) large OD, which slipped right over the 1/2" Aluminum as if they were two nesting pieces of brass. It seems CPVC varies widely not only from one manufacturer to another, but from one lot to the next. *shrugs*

Edited by jwasko, 10 November 2010 - 10:05 PM.

  • 0

-Jwasko, STILL Sole Surviving member of Steel City Nerf and Sober Sister of the Sex Dwarves
We NERF ON all day, and FUCK OFF all night


#85 PVC Arsenal 17

PVC Arsenal 17

    Member

  • Members
  • 115 posts

Posted 12 November 2010 - 11:12 PM

Video update:

http://s237.photobuc...urrent=gun1.mp4

Forgot to mention: Plunger head uses a skirt seal. What's shown in the video is not the actual plunger head, just something I stuck on there. And apparently I forgot where the webcam is on my laptop... but the injury is just a nice blood blister about 1/4" in diameter.

Edited by PVC Arsenal 17, 12 November 2010 - 11:15 PM.

  • 0

#86 Y-Brik

Y-Brik

    Member

  • Members
  • 199 posts

Posted 13 November 2010 - 02:44 PM

EDIT- totally put this in the wrong place; sorry

Edited by Y-Brik, 13 November 2010 - 03:47 PM.

  • 0

As I said I have not not alot of testes yet but I will be once I finish the mod.

Why I am boycotting Hasbro

#87 TantumBull

TantumBull

    Member

  • Moderators
  • 1,929 posts

Posted 21 November 2010 - 06:11 PM

My apologies about Stark's blaster - links are about to be removed. Sorry it took me so long to get to this!
  • 0

#88 Boot

Boot

    Member

  • Members
  • 90 posts

Posted 22 November 2010 - 06:01 AM

Two of my earlier homemades that got their own topics, but I figured I should post them here for posterity. Although they aren't that nice to look at I believe the principles they operate on are slightly different than normal:

Snap-Compact:

http://nerfhaven.com...showtopic=14608

PaSnapbow-s:

http://nerfhaven.com...showtopic=20343
  • 0
QUOTE
If you try to shoot over 45 feet with a magstrike accurately you fail

I beg to differ

#89 Carbon

Carbon

    Contriberator

  • Moderators
  • 1,894 posts

Posted 07 December 2010 - 12:23 PM

SNAP-1 [2 PVC endcaps make the seal (eww)]

The "eww" made me laugh...

To be accurate, the very, very first one (early January) used a Mk2 plunger head with no fender washer. A day after I made the initial thread, I posted up something resembling a current fender washer setup (scroll down).

Considering the weak springs and lack of seal, it's still a little surprising it worked at all....

Edited by Carbon, 07 December 2010 - 12:24 PM.

  • 0
Hello. I am Indigo of the Rainbow Clan. You Nerfed my father. Prepare to die.

#90 utahnerf

utahnerf

    Member

  • Members
  • 339 posts

Posted 07 December 2010 - 06:24 PM

Yeah, given that it used vegetable oil as a lubricant, hahahaha.
  • 0

#91 Daniel Beaver

Daniel Beaver

    HQRSE CQCK

  • Moderators
  • 2,099 posts

Posted 08 December 2010 - 10:41 AM

Jesus, I forgot that you painted it flat black.

Posted Image


And that your first one didn't even have washers to seal it. How that thing got ranges of 50ft, I don't know. But, a mere 7 days later, you post the SNAP-2, which is basically identical to some modern pump-action SNAPS (but minus the critical "pump action").

Posted Image


Not to mention that you were doing hoppers in 2006.
I don't think people realize how long the "modern" Nerf technology has existed. I'm glad to see it finally getting used.

Edited by Daniel Beaver, 08 December 2010 - 10:42 AM.

  • 0

#92 Carbon

Carbon

    Contriberator

  • Moderators
  • 1,894 posts

Posted 08 December 2010 - 12:13 PM

Jesus, I forgot that you painted it flat black.

By this point, I'd like to forget that, too.

Call it the Boltsniper Effect, as it's hard to understate just how influential his work was in getting me (and a lot of others) started. I'm feeling much better now, though...I still use a lot of silver or black, but pair it with primary colors.

But, a mere 7 days later, you post the SNAP-2, which is basically identical to some modern pump-action SNAPS (but minus the critical "pump action").

I had been working for a couple of months by that point...the validation time was a bit of a wait then, too.

Not to mention that you were doing hoppers in 2006.
I don't think people realize how long the "modern" Nerf technology has existed. I'm glad to see it finally getting used.

It's what I love about posting here...the projects always become better with everyone's input, and ideas are never lost...they just build. Frost Vectron took the initial inline idea and actually made it usable, rork pretty much defined what a modern, powerful SNAP is, davidbowie was critical in the early discussions of what made a CPT...there's an idea in the things I post, but others tend to make it far cooler than I initially did.

Edited by Carbon, 08 December 2010 - 12:13 PM.

  • 0
Hello. I am Indigo of the Rainbow Clan. You Nerfed my father. Prepare to die.

#93 NerfGeek416

NerfGeek416

    Member

  • Members
  • 151 posts

Posted 16 December 2010 - 11:36 AM

This is a gun a built a while ago. The full write-up is available on NerfRevolution, but here is a summary.

When I first saw Split's write-up for the original RTP, I was amazed by how simple the design was, and astounded by the ranges it was capable of. However, I, like many others, do not have the tools to machine polycarbonate. Since then it has been my goal to design and build a RTP-type blaster that uses entirely pre-fabricated PVC parts. With this blaster, I feel I have succeeded.

Before I continue, I would like to give credit to Split for the original RTP design, which can be found here: http://nerfhaven.com...showtopic=19638

The Write-Up


Parts
1 1/4" PVC
1" PVC (schedule 40)
1" PVC coupler
1x 1 1/4" metal washer
1x 1 1/4" rubber washer
1x 1 1/2" rubber washer
1" x 1/2" bushing
3/4" x 1/2" bushing
2x 1/2" CPVC endcaps
2x 1" #6 machine screws
3x #6 nuts (yes, I do mean THREE)
1x #6 wing nut
1x finishing washer
2x 1" metal washers
1/2" CPVC
1x +bow spring
1x roofing nail
1x clothes pin
1x angle iron (also called angle brace)
Wood (for handle
About 10x 1/2" #6 screws


Tools
Drill/screwgun
Hacksaw (a miter box is helpful, but not necessary)
Hot-glue gun
Some way to cut nails

How the gun works:
The sealing face is at the front of the plunger, but the catch notch is at the rear. You cock the gun by pushing the 1" PVC into the 1 1/4" PVC. the spring can't fit through the bushing at the front of the 1" PVC, but the plunger rod can. this compresses the spring, until the catch hits the clothespin trigger, locking it in place. when you pull the 1" pvc back, the spring remains compressed. Pulling the trigger releases the plunger rod, firing the dart.


To make the sealing face, make a superlative plunger head, but DO NOT USE A SECOND METAL WASHER!!
It should look like this:
Posted Image


You will now need to make the catch. The catch is effectively a superlative plunger head, but without the rubber washers, and with 2 hex nuts replacing the nylon spacer in the original design. This catch also uses 1" washers instead of 1 1/4".
Here is a picture of the completed catch:
Posted Image

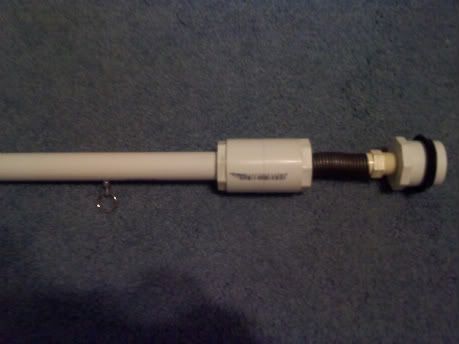
The completed plunger rod should look like this:
Front half (ignore the handle):
Posted Image

Back half:
Posted Image

Whole thing:
Posted Image


Push the back of the plunger rod into the 1" pipe, making sure that the 3/4" bushing gets into the end of the 1" pipe. Make sure that the plunger doesn't fall out of the 1 1/4" pipe.

You are done!
In case you don't get how it works, the 1" PVC and 3/4" bushing function like the threaded rods and polycarb circles in splits version.

In detail:
The sealing face is at the front of the plunger, but the catch notch is at the rear. You cock the gun by pushing the 1" PVC into the 1 1/4" PVC. the spring can't fit through the bushing at the front of the 1" PVC, but the plunger rod can. this compresses the spring, until the catch hits the clothespin trigger, locking it in place. when you pull the 1" pvc back, the spring remains compressed. Pulling the trigger releases the plunger rod, firing the dart.


Disassembled pic:
Posted Image


Firing Video:
http://img191.images...i/dscn0431.mp4/

I stabilized the thing like this

1. Loosen the screws holding the front bushing on.

2. Tie one end of the string to on of the front screws of the gun
Posted Image
(the paper is only to highlight the string)
3. Tighten that screw
4. Cut a small notch in the back of the gun.

5. Slip the string into the notch and tie it off back at the front bushing. Secure the string in the notch with hot glue, and tighten all screws.
The back of the gun should now look like this:

Posted Image

This method is pretty effective, and makes the whole thing easier to fire and use.

Posted Image


Final thoughts:
This Blaster is pretty much finished by now. Everything works, and ROF and ranges are impressive. The kite string is holding up well, and does not hinder priming or firing.
Ranges are a little less than my snapbow, probably ~90-100'


Qs? Cs? Fs?

This is reposted from a while ago, so it doesn't include the newer advances, like the ring catches. It is still a very fun blaster though. However, I must say I prefer my bows, because they are a lot easier to build.
some of these pictures got screwed up by the formatting. Click on them to view the whole thing.[/quote]
  • 0
 

#94 TantumBull

TantumBull

    Member

  • Moderators
  • 1,929 posts

Posted 18 December 2010 - 03:33 PM

SNAP-1 [2 PVC endcaps make the seal (eww)]

The "eww" made me laugh...

To be accurate, the very, very first one (early January) used a Mk2 plunger head with no fender washer. A day after I made the initial thread, I posted up something resembling a current fender washer setup (scroll down).

Considering the weak springs and lack of seal, it's still a little surprising it worked at all....

Hahaha, glad to get a reaction outta that. And yeah, when I was reading that, I was like "wtf, where's the sea- oooooooh, woooooow".
  • 0

#95 street slick

street slick

    Member

  • Members
  • 20 posts

Posted 23 December 2010 - 05:41 PM

Hello interwebz, I was just inquiring weather mighty putty would work in replacement of epoxy putty?
Thanks, slick

Edited by street slick, 23 December 2010 - 05:41 PM.

  • 0
Last night I was at the bar and got really drunk, so I decided I would take a bus home instead, this may seem like no big deal to you guys but driving a bus while your drunk is really dangerous.

You are really cool!

#96 NimbleFellow

NimbleFellow

    Member

  • Members
  • 9 posts

Posted 23 December 2010 - 10:23 PM

Hello interwebz, I was just inquiring weather mighty putty would work in replacement of epoxy putty?
Thanks, slick

Mighty putty is epoxy putty.
  • 0

#97 utahnerf

utahnerf

    Member

  • Members
  • 339 posts

Posted 23 December 2010 - 11:23 PM

Yeah, except mighty putty is cooler because screaming men promote it!
  • 0

#98 street slick

street slick

    Member

  • Members
  • 20 posts

Posted 27 December 2010 - 07:06 PM

Can you use ABS PVC 1 1/4 for a snap?
  • 0
Last night I was at the bar and got really drunk, so I decided I would take a bus home instead, this may seem like no big deal to you guys but driving a bus while your drunk is really dangerous.

You are really cool!

#99 TantumBull

TantumBull

    Member

  • Moderators
  • 1,929 posts

Posted 27 December 2010 - 11:24 PM

Can you use ABS PVC 1 1/4 for a snap?

Probably, you may just have to cut a different washer size because of ID variances. But seriously, just use PVC. It isn't black.
  • 0

#100 Darksircam

Darksircam

    Member

  • Members
  • 117 posts

Posted 28 December 2010 - 02:16 AM

ABS seems harder to cut. There's also the issue with parts fit with the different inner diameter - the bushings and endcaps may not fit in ABS. You'll need to get white PVC bushings and endcaps, because ABS fittings don't come in small sizes.
It's lighter than PVC, which comes in handy when making things that use massive amounts of pipe like HAMPs.

Terminology: ABS is not PVC. They are different plastics. Neither of these are UV resistant, so you might want to paint your blaster regardless.
  • 0
Travel Cost to TRU = $2. Eliminator pack = $15. Momentum testing = 2 lost darts. Outranging Recons with your mini pistol = priceless.


1 user(s) are reading this topic

0 members, 1 guests, 0 anonymous users