Hey, before you sell them off would you mind opening one and taking some internal pics?
- NerfHaven
- → shmmee's Content
shmmee's Content
There have been 412 items by shmmee (Search limited from 20-January 97)
#361105 Sling Fire DX400
 Posted by
shmmee
on 27 July 2017 - 10:26 AM
in
General Nerf
#361167 Slimeball Gobzooka
 Posted by
shmmee
on 02 August 2017 - 08:34 AM
in
Modifications
Wow, thanks for the heads up on this Aydensnake! Time to stock up before they get pulled or neutered. That has some amazing potential. It'd be fun to put an aggressively sized absolver on this thing or rebarrel it for missiles - or just coupler the thing so either can be thrown on there. This might just become my new favorite integration fodder.
Penguin, my local target shows them as in stock and on the shelf in utah, USA so hopefully Australia follows quickly.
#338793 Sledgefire lever-action-mod
 Posted by
shmmee
on 08 May 2014 - 08:29 AM
in
Modifications
#298196 slc may war - recapping
 Posted by
shmmee
on 16 May 2011 - 01:50 PM
in
Nerf Wars
Date: Sat, may 21
Time:
Location: Big cottonwood park 4300 South 1300 East, Murray, Ut (this park is split in half by 4500 south. We'll be in the eastern wedge of the south eastern half. (parking lot only accessable off of murray holiday rd. (not 4500 south!)
The alternate location (in case we are asked to leave) will be the park directly south of there: Creekside park.
If we get rained out - [ still working on a contingency, sorry]
The rules:
I have a liablility waver i'd like signed by parents of minors, and participating adults. Kind of covering my butt type of thing. Pm me your e-mail address and i'de be happy to send it allong to you. Our code of conduct and game types rules will also be attached.
Eye protection is an absolute requirement.
No extra heavy darts- IE ball bearing weights.
Padding on the steffans would be appreciated - but not required. Since other steffan technologies are still in the works, I'll just keep it limited to that right now. We can standardize after some trial and error is done.
The Utah scene seems to have Nerfers (those thems that show up and borrow a blaster), and Modders (those thems that not only own their own blasters, but have taken the time to mod them themselves!). This war, because of the location change - should see fewer nerfers, but more modders! Should be a great time!
Thanks,
Shmmee
#298398 slc may war - recapping
 Posted by
shmmee
on 22 May 2011 - 10:18 AM
in
Nerf Wars
Wow that was an awesome war! Throwing the dates and times up on nerfhaven really helped. We had 4 new serious modders join us!
Pros-
13 attended. While it wasn't the most attended war we've had, it was certainly of the highest caliber of individuals. It was exactly the direction I've wanted the SLC nerf scene to go. I usually have to bring my entire arsenal as loaners, but this time every one had their own blasters -they were modded too! I still loaned out a couple, but they were to people who were informed enough to recognize a classic blaster when they saw one. The only ones relying on my blasters - was me! Very sweet. Still buzzing about that!
New modders! I'll keep announcing them here, and across the nic looking for more lost souls in SLC.
Perfect weather.
The parking lot being repaved ensured no baseball games were scheduled, and we were able to use the field - following a massive hosting error on my part.
New permutation to the dork vest game. It's now a single round, fast paced, team switching game that is ends in an Effeminate one vs everyone bout of glory.
Getting a semi-standard established for steffans.
Cons-
The nicely wooded section of the park I had scouted via google maps was in fact a heavily flooded natural preserve with several inches of standing water and 1' high reeds. Luckily we were able to re-locate else where in the park, and everyone was able to find us.
Staying up till 3 am, working on a mod that I wasn't able to use for the war, then getting up with the kids 4 hours later.
*because so very many of those who attended are waiting for validations - I'm setting up a "doodle poll" to pick the date for Junes' war. If you are close enough to attend (and only if you are able/willing to attend!) click the link, and check off any dates you are able to attend. Then e-mail me letting me know you're interested so I can put you on my e-mailing list! I promise the e-mail address on my profile is my own, and I'm not too much of a weirdo. Please, please please participate and vote. It makes me feel happy to know I'm not the only one working on these things. You do not need to have an account with doodle.com, but even if you did, IT'S FREE! so you really have no excuse not too participate!
doodle poll
We should probably form ourselves into a "clan". E-mail me with any thoughts for a clan name. Kinda looking for something not intense or threatening, maybe something slightly humorous. We should also pick a regular park to meet at. Many of our modders are now from the east side of the valley, so we might as well pick a park over there somewhere. I'd like one that's not normally dedicated to an organized sport (ie soccer field...). We got lucky with the base ball field being un-used, but that definitely wouldn't be the norm. Trees and cover is a plus, it would also help if it was an obscure park that doesn't see much regular use, or isn't visible from an entire neighborhood. We tend to get swarmed with 8 year olds' when we play at a highly visible park. Not a good thing when steffans are in use.
#304579 SLANG sept war
 Posted by
shmmee
on 11 September 2011 - 12:01 PM
in
Nerf Wars
This saturday (17th)
3 pm - 6 pm
wheeler historic farm - south east lawn (primary location)
murray park soccer field (the east section that's accessed via vine street - not state street)(alternate location)
Google the maps. you'll find them easier
Bring:
Safety glasses
Water
primary, secondary, and an arrow shooter (cause it's how we roll for a round or two)
stuff to trade (optional)
All darts and modded blasters subject to my inspection and approval.
Steffans must be padded with either felt, pompoms something softish... (no hot glue domes), No sling shot weights.
Also - vortex blasters (the disc shooters) are now on the shelves. I picked up the Praxis and proton and will be bringing them for group evaluation and discussion.
Thanks,
Shmmee
#304612 SLANG sept war
 Posted by
shmmee
on 11 September 2011 - 09:45 PM
in
Nerf Wars
Wish I could be there - it'd give me reason to try cooking up some gumdrop heads!
Yeah, some day we absolutely need to nerf together, though SLANG is still in it's growing phase so it may not exactly be worth your traveling here. It seems once every other year or so I get to make one grand pilgrimage to nerf in a foreign land. We're eyeballing Florida for next years family vacation to see the harry pottery amusement park (and possibly nerf with Rouge and crew). Oregon might also be a possible destination. My wife has family in Oregon so at least we have a reason to make it a family event.
Perhaps if I can come up with a spare second or two I can make some tetrahedral mobstacles for this weekend, and you can be there in spirit. Our normal nerfing grounds has absolutely no cover.
Edit: origional post updated with um... date.
#305019 SLANG salt lake, ut Oct wars 15th, 30th
 Posted by
shmmee
on 26 September 2011 - 01:58 PM
in
Nerf Wars
Salt Lake Area Nerf Group
(Salt lake city, ut)
After getting some feed back about war dates for october, (as well as my own schedule filling out) I would like to officialize SLANG war dates for next month. I am hoping to have two wars - since last months war was a semi-fail, and since we're running out of nerfing weather. So...
October 15,
and
October
Both times starting at 3 pm. (the 30th is a special request from one of our new nerfers who has a cousin or something comming into town - they'll not be able to join us till 5 ish.)
Wheeler historic farm (murray ut)- South end of the south east lawn (primary location) - if the field is in use - stay there till i get there (if it's in use, I promise not to leave Wheeler till 3:15!), and we'll send a runner to the alternate to see if it's any better, then we'll move as a group so we stay together. Lets avoid the fail that Septembers war.
Murray park soccer field (very east parking lot - accessed only from vine st) Alternate location (wait at wheeler from 3:00 to 3:15 before moving to the alternate)
Remember:
Safety glasses
Water
Primary and pistol
Arrow shooter gun (It's a SLANG thing)
We'll also need to decide if we want to continue warring through the winter (indoors - possibly my house, or some other venue - Suggestions?) or if we want to break till spring. We'll go into November outdoors if the weather holds up for us.
Thanks,
Shmmee
#318390 SLANE
 Posted by
shmmee
on 12 July 2012 - 06:28 PM
in
Nerf Wars
Which is no to be confused with S.L.A.N.G. (salt lake area nerf geeks) whose wars are also advertised on this site... When I remember to post them...Hello and welcome to the first St Louis Area Nerf Event!
Dude, our factions must share some distant relative or something ...
#353112 Slamfire issues
 Posted by
shmmee
on 28 April 2016 - 12:26 AM
in
General Nerf
With issues happening on both blasters I'd blame your darts. I suspect the tails of your darts are compressed so the AR (Air restrictor) is able to push them slightly out of the barrel and closing the AR. With that closed - all you get is the poof of the AR slowly arresting the travel of your plunger tube. When you slam fire you shoot before the spring can nudge the dart out of the barrel while your AR is still open resulting in better performance.
At the very least, it's easy to test my theory - Just buy new darts. No modding required.
#343570 Singled Magstrike
 Posted by
shmmee
on 16 December 2014 - 10:13 AM
in
Modifications
Please shell up your bladder.
#347993 Single pump Ultimator
 Posted by
shmmee
on 22 July 2015 - 09:03 AM
in
Modifications
I then considered having some type of carriage in front of the rear priming plate with springs to retract it so the carriage is retracted to the front after priming. That would require holes drilled through the rear priming plate, and I'm not sure if it would survive the forces once compromised.
I then considered a third option. Weld a bar to the back of the priming plate and cut slots out the sides for the bar. This seemed the simplest and most viable. I eventually scrapped the concept though. I'd had my Ultimator since Christmas morning - straight off the store shelf. It's one of my more precious blasters and I didn't want to do any major shell work to it. If I was to pick any of the modifications that's the one I'd go with, just be sure to brace and reinforce the handles. I don't think they would last long if you were pushing against one of them while pulling a priming bar. Installing a shoulder stock to brace against would also move the priming force off the handle and into your shoulder. Try to keep the added priming bar light weight. You don't want to add any more mass to the priming bar than you have to. It's already got a lot of mass in play.
Good luck. I don't think i've ever seen anyone single pump load an ultimator but i'm pretty sure it would rock. Oh, and btw if you ever want to make a slip on shotgun attachment - they do pretty amazing things with long loose fitting barrels like petg and sch 80. It doesn't like tight barrels.
#347282 Simple Question
 Posted by
shmmee
on 18 June 2015 - 03:56 PM
in
Modifications
#361786 Simple mods for people without screwdrivers
 Posted by
shmmee
on 19 October 2017 - 08:56 AM
in
Modifications
When you do get a screw driver it might need a little further tuning. Most of the micro screw drivers I've seen are still too pointy to fully engage nerf screws - which strips the heads instead of turns them. You'll need a hand file, sand paper or even a small patch of semi-smooth concrete. Remove a screw and sand/file down the tip of the screw driver until the nerf screw can sit on it without wobbling around. The flares on the screwdriver tip needs to reach all the way out to the edges of the screw head.
A good screw driver is the single most important tool a modder can have. It sucks to be so limited now, I hope you're able to figure it out. Maybe if you can convince your dad to "help" you mod, you'll be allowed to use his tools under his supervision and find a father/son bonding activity (or better yet - he'll get you your own tools so you don't have to use his! Heck, my 6 year old has his own tool box full of real steel tools and he keeps them together and in great condition. (harbor freight ftw!)))
Sadly, I can't think of a single significantly effective mod that doesn't start with opening a blaster up to get at it's internals. Scratch that. You can go old school and "band" some blasters. You can run bungees or rubber bands from the barrel to the pull rings of nitefinders/firestrikes/messangers... (pistols with an exposed pull ring). That'll let you significantly increase the power to the plunger head without even opening up the blaster. Just make sure the right and left bands are pulling evenly on the ring or you'll loose power / break your priming rod. If you add too much pull, the additional force will over power the catch spring so you'll still have a limit there.
#361843 Simple mods for people without screwdrivers
 Posted by
shmmee
on 25 October 2017 - 08:18 AM
in
Modifications
Well never mind the nite finder. I have the best un modded gun. It's that gun I rubber banded without them. I'll do the nite finder another time. I'm going to upload the gun I mentioned. https://mail.google....p=emb&zw&atsh=1copy and paste it if you want to see.
I dont think that image share worked. I think that's a link to your gmail account which we are all unable to access (and rightfully so). You can upload pics directly in your posts by clicking the little image icon in the reply or edit window. If you simply want to share your work (without expecting discussion and feedback to follow) you can share your mods here:
http://nerfhaven.com/forums/topic/5250-modification-and-paintjob-pictures/page-1
#361901 Simple mods for people without screwdrivers
 Posted by
shmmee
on 06 November 2017 - 10:35 AM
in
Modifications
I'm sorry to bother you guys over some thing stupid but i forgot how to create a new post.
First make sure you're logged in. Second, go to the forum you'd like to post in. The "start new post" is a big black button on the upper right.
#311476 Simple and Durable Plunger Head Padding
 Posted by
shmmee
on 19 February 2012 - 12:46 PM
in
Modifications
I'll bet this stuff will have a much longer life than any kind of foam.
If you have any silicone lubricant, spray it on the finger of your glove. You'll be able to poke and smooth it out without it sticking. Just be careful not to transfer any lubricant to the part. It will prevent a bond between the part and the sealant.
#332553 Silicone domes
 Posted by
shmmee
on 31 July 2013 - 07:28 PM
in
Darts and Barrels
#332534 Silicone domes
 Posted by
shmmee
on 31 July 2013 - 01:31 PM
in
Darts and Barrels
I can't answer for Kane, or bare silicone domes but a felt padded silicone tip hurts less than both a slug and a bare silicone dome in my own biased opinion. I'll have to do some welt comparison testing at S.L.A.N.G this Saturday for some un-objective results. As per "have they ever actually hurt anyone"? I can't cite specific occurrences against people, but I killed a house mouse a week or two ago with a slug and my RSCB'd panther. It took two shots - the first one stunned it. We still have more of the critters wreaking havoc in the kitchen. Next time I go hunting, I'll load gumdrops just to see what happens.So, if silicone domes hurt more than slugs do, why do you push silicone domes, but ban slugs? I've heard your ploy about how this is the magical land of Nerf, and somehow metal washers might magically come out of slugs and begin wreaking carnage on the field. But has the metal washer in a slug ever actually hurt anyone.
My argument for metal free darts stems from the removal of the potential for injury. If a silicone head comes loose, you have a squishy silicone head and a piece of foam. If a slug head comes loose... well we've all heard the rest of that conversation.
#348925 Shot counters for my Stryfe and Rapidstrike
 Posted by
shmmee
on 01 October 2015 - 12:22 PM
in
Modifications
Very impressive work btw.
#357588 Shields: Do you love them? Hate them? Ban them? Permit them?
 Posted by
shmmee
on 16 January 2017 - 01:21 PM
in
General Nerf
I personally hate them, but since my newest group uses them extensively I'm trying to give them a chance.
We limit blasters shield wielders can use to one handed non mag fed blasters and that exotic projectiles break the shield. I still feel that grants the shield bearers an unfair second life. I really wouldn't count it as balanced unless the shield users are melee only and exotic projectiles not only break the shield but eliminate the bearer too until respawn. If they're armed with a blaster maybe a shield breaking round would also break the shield for their next spawned life as well.
#336190 Sharpshooter II micro-dart adapter low cost, quick deadspace removal.
 Posted by
shmmee
on 31 December 2013 - 01:17 PM
in
Modifications
#336195 Sharpshooter II micro-dart adapter low cost, quick deadspace removal.
 Posted by
shmmee
on 31 December 2013 - 03:35 PM
in
Modifications
It's still stock on the inside...
*edit; Dark pictures. I now see the e-tape around the barrel back ends.
#294595 Semi Automatic Firefly Valves
 Posted by
shmmee
on 16 February 2011 - 08:59 PM
in
Modifications
I would almost suggest adding the back pack tank as version 2.0, and just keeping it simple for now. You can always cut a hose and insert a tee later with the air hose quick disconnect. Get the thing running first. Don't over complicate in your initial build.
I favor a bladder vs a hard tank. True a MS bladder wouldn't fit inside the firefly shell, but a hard tank might not fit too well either. It would be easy enough to lop off the MS bladder shell portion and glue it externally under at the bottom of the firefly. (external integration). You'll be sacrificing a MS anyway for the valve. You might not get enough volume with a hard tank stored in the rear of the firefly shell. It would be wise to experiment with both without integrating anything or chopping any holes. It would also remove the regulator from the equation.
Good luck with it all.
#292907 Semi Auto Valve For Backfire Tanks
 Posted by
shmmee
on 16 January 2011 - 12:03 AM
in
Homemades
I really do appreciate input. Good, bad, or indifferent, Though thanks for being civil in your disagreement. I would probably be more concerned about a heavy trigger pull if i wasn't relying on it to open a breach for me. If it's still more force than i need, i can counter balance with a spring. I haven't weighed it,Issues resolved: Hornet sliding valves have more inputs than are needed for one tank, and sliding the O-rings past any of the extras will vent your reservoir. Those extra inputs are also waiting to chew up your o-rings.
Benefits: O-rings only traverse one hole. Extra brass on the venting end will turn your valve into a piston that will push back on a trigger (as discovered by Boot), or maybe open a bolt sled (a hint at what I've been working on). It looks simpler and cleaner, and unless something breaks, a seal fails, or you push your piston through the cross section, you can't vent your reservoir.
I hate to say this, but I'm going to have to protest this.
In your current setup, your fighting against the pressure of the reserve tank. In cheesy's mod, he had o rings on both sides of the reservoir's input. This is the same basic concept zero invented. This eliminates all the pressure against the trigger. Although you say it's manageable, it can be a hell of a lot better.
The extra inputs on a hornet valve don't hurt the o rings in any way. In fact, the sharp thin edge of the brass is more likely to damage your o rings then the hornet. This doesn't vent your reservoir either, which is why there are two o rings instead of just one.
If you really want a "semi-auto valve", I'd suggest just using a hornet trigger valve. If you are unable to get your hands on one, then I suggest atomatron's valve. Using cpvc is a hell of a lot easier then dremeling and soldering brass. But thats just my 2 cents.
Did some math (which has been wrong before) With a 3/8" diameter (.1875" radius) piston having a surface area (Pi*r squared) of .11039"*40 psi=4.415 pounds of pull on the trigger. (Just Some Bob, feel free to check and correct me if I'm wrong...again...). Four and a half pounds? I'd call that manageable.
#292995 Semi Auto Valve For Backfire Tanks
 Posted by
shmmee
on 17 January 2011 - 09:37 AM
in
Homemades
That's ok, i've gotten a lot of feedback on this valve, positive, negitive, but all of it helpfull. Just some bob really helped me avoid a lot of wasted work (this valve supports a gun I'm designing to be used at BAFF. It's a long drive from Utah to California, and it really would of sucked to have the gun spot banned because the darts were too short.)Really? That's too bad, because I thought it was a great idea. Sorry some of the others are giving you guff.
Draconius was also able to point me to an old post that I didn't know existed, and could be usefull.
I do feel justified after calculating the trigger pull to be about 4.5 pounds @40 psi. Any valve with a 0 pound pull would have to have a return spring, and a larger diameter piston would have more friction to overcome.
You're right though, soldering a joint isn't that exotic. It's also very strong. I've solldered plumbing in the basement before, and this project was much easier. This is the second valve i've built, and both are air tight. I feel my design remains competitive, and an ideal choice for a
All things considered, thanks for the support!
#292940 Semi Auto Valve For Backfire Tanks
 Posted by
shmmee
on 16 January 2011 - 03:13 PM
in
Homemades
I'm trying for a clip fed semi-auto. (which has been done before, but I haven't seen any without extensive machining. I'm trying for something simple enough that a modder with moderate experience can duplicate.) With .75" steffans and extra .25" to seal the breech it will have a long trigger pull.
At our wars, any dart that doesn't have a full inch of foam gets ignored.
There has to be a limit somewhere, or eventually you're just shooting BBs with a foam 'beard' glued on.
I predict you're going to want to use leverage to shorten that trigger pull.
At which point the issue of fighting chamber pressure will get multiplied.
Oh. That's really, really good to know. I had originally planned on using a lever, but It is going in a raider shell, which doesn't have much room for levers and such. Guess it's about time for a small set back. I appreciate the heads up.
#292890 Semi Auto Valve For Backfire Tanks
 Posted by
shmmee
on 15 January 2011 - 08:56 PM
in
Homemades
This valve is inspired and builds upon frame work done by Cheesypiza001, and Boot. They modified a hornet sliding valve to fire a backfire tank in semi auto fashion.
Cheesypiza001's semi auto valve Concept; semi-auto'd a firefly.
Mirage-ss by boot Semi-auto rscb
Both systems were successful in filling a tank, and venting the tank without venting the main reservoir. This just provides a little more polish with some unexpected benefits. This was developed to compliment my hornet tank expansion mod, but should work for any
Issues resolved: Hornet sliding valves have more inputs than are needed for one tank, and sliding the O-rings past any of the extras will vent your reservoir. Those extra inputs are also waiting to chew up your o-rings.
Benefits: O-rings only traverse one hole. Extra brass on the venting end will turn your valve into a piston that will push back on a trigger (as discovered by Boot), or maybe open a bolt sled (a hint at what I've been working on). It looks simpler and cleaner, and unless something breaks, a seal fails, or you push your piston through the cross section, you can't vent your reservoir.
Materials:
Hornet plunger rod (or figure out how to make your own)
13/32 brass tube
Solder, flux (or solder with a rosin core), and heat source (like a torch)
zip ties
lubricant
tubing
Tools:
pipe cutter
drill or drill press
torch (propane, benzine, acetylene, something to make the pipe hot. A candle might even work...)
sharp pointy knife to help with de-burring
Dremel with cut off wheel and 3/8” ish sanding or grinding drum (the closest to your brass tube diameter that you have)
drill bits: 9/64” (or 1/8” if you don't have the 9/64") and 3/8” (to de-burr after the 9/64” hole is drilled)
needle nosed pliers
helpful:
Heat gun (to soften tubing and stretch over brass tube.)
Vise
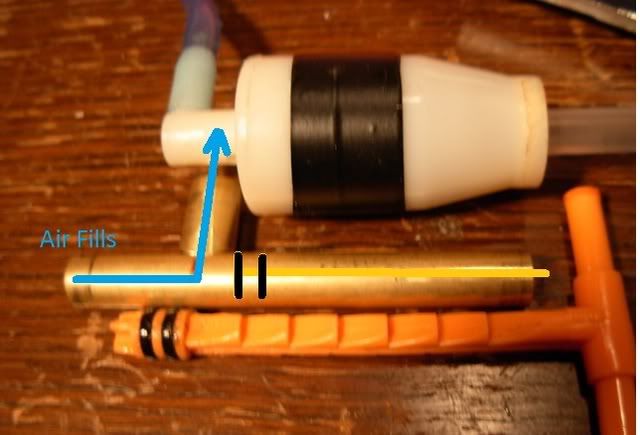
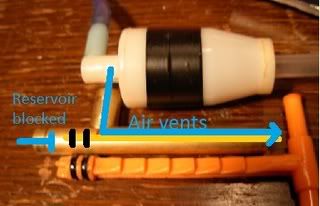
Theory and concept: A brass tee is made. The middle leg is hooked up to the tank, one leg is hooked to the air reservoir, the piston is inserted into the third leg. When both o-rings on the piston are behind the tee, air flows from reservoir to tank. The piston is depressed and when both o-rings straddle the middle leg of the tee, all 3 passages are isolated from each other. When both o-rings pass the middle leg, the tank vents around the piston post and out to atmosphere, causing the tank to fire (without venting the reservoir). Pressure is maintained on the piston in all stages causing the piston to return to the priming state as soon as no counter pressure exists. Testing at 40 psi results in a slightly firm, but manageable trigger pull.
Construction:
Build this:
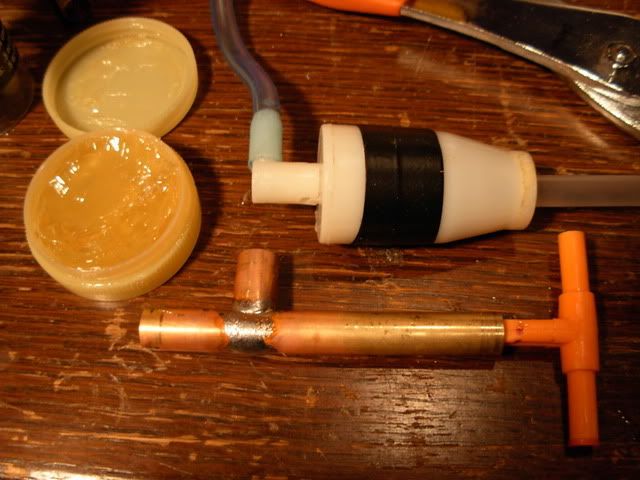
Take your brass tube, and chop off a 1/2” long piece. You'll need this for a guide. Now grab your Dremel and grinding drum and grind a saddle (U shaped divot) into the tip on both top and bottom sides.
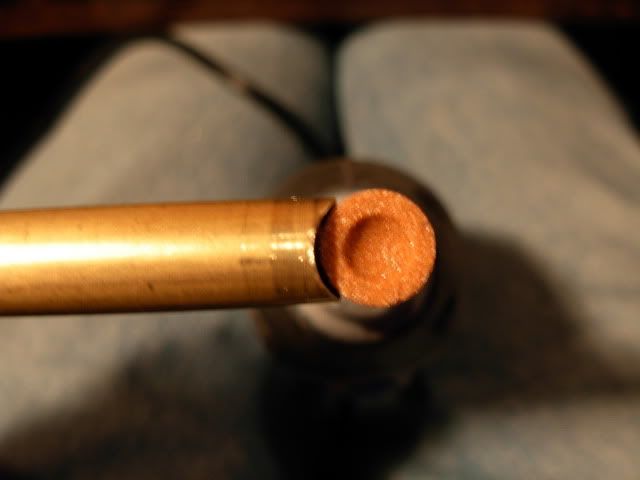
Fit check with the 1/2” long piece. You want metal to keep constant contact between both parts when one straddles the other. Squishing the tall tips together slightly may help fit up. Once free of gaps, chop off about 3/4” of the ground down side. This will become the middle leg of the tee.
Now figure out how long you want the top part of the tee by laying the hornet piston next to it. You want to give your self enough space for both sets of o-rings to pass by the middle leg. Mark that spot. Don't drill your vent hole till after you have solder in place. I'm not going to be too specific on dimensions, you can figure out that stuff, and tailor it to your own needs.
Solder time. “Tin” your pieces by getting solder on the parts to be joined before you try to join them, Apply flux to both contact points of the brass tee (the saddle inside and out) and the cross section where the tee will be mounted. Now heat and melt solder to both of those areas. Apply heat to the tube not solder. Heat the tube, remove the heat, and apply the solder. Fine wire solder will be easier to work with than a thicker gauge solder. Get globs of solder built up on the saddle of the middle leg.
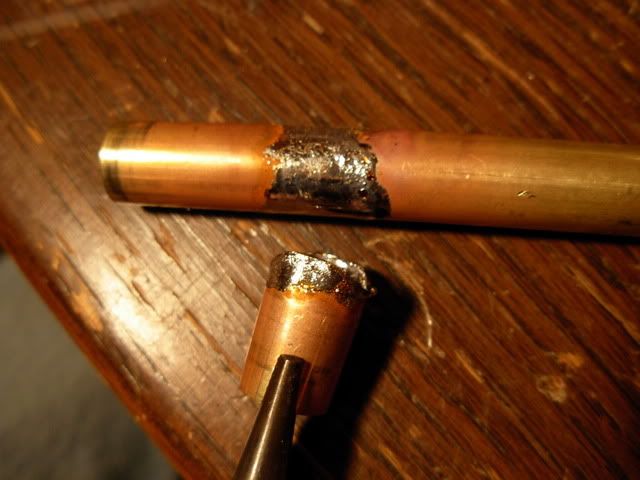
Now that we have solder built up on the cross section, drill the vent hole (9/64”) in the center of where the tee will be placed. File off the solder around the vent hole (leaving it around where the tee will be placed. We don't want solder getting inside. Use the 3/8” drill bit to hand ream out the debris from your 9/64” hole.
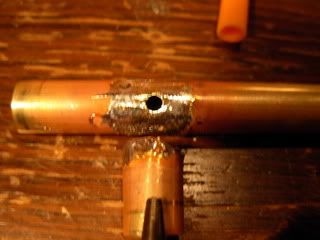
To join the pieces, just place the tee on the cross section and heat them both. They'll bond. Quick and easy. The better prep and fit up, the easier this last step will be. Once cool, air test by plugging both holes on the cross brace with fingers and sucking on the middle leg.
Lube your hornet piston and stuff it in. I found the lube shown in the first picture in the faucet guts section of the hardware store. It was labeled "safe for all gaskets including ceramic" and "non-toxic" (so no petroleum distillates) It lubes well. It's also thick and stays where you put it.
Plumb by warming 3/8” tubing and stretch with a pair of needle nose pliers, then slide them over their connection. Or goop barbed connections in place as needed. Secure them with a zip tie.
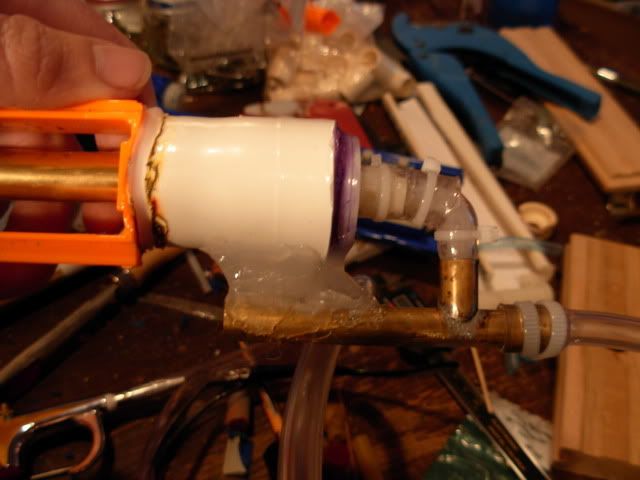
Here it is being integrated into my latest project.
#293059 Semi Auto Valve For Backfire Tanks
 Posted by
shmmee
on 18 January 2011 - 01:10 PM
in
Homemades
Brass tubing is very thin, and heats very quickly. The propane tourch i used had it up to temp in a few seconds.Using cpvc is a hell of a lot easier then dremeling and soldering brass. But thats just my 2 cents.
Soldering brass isn't too difficult. Hell, you should be able to pull it off with a propane torch (if you're willing to wait about one hundred million years for the damn brass to heat properly).
One suggestion for soldering brass, though: sand the areas you want to apply solder to, then only apply solder to one of the surfaces you want to join. It'll make the joint look a lot better and you'll get the same effect with fewer materials.
Solder likes to stick to more solder better than sticking to bare brass. "Tinning" both sides helps to avoid a lot of trouble with the final joining. Excess solder isn't too tragic of a waste either.
The first valve i made had a minimum ammount of solder prepaired on the middle leg. Each time i tried to apply more solder, I pushed the fitting around, knocked it off a couple of times and risked getting solder on the id of the long tube. (clamping it down probably would of helped.) It eventually sealed up, but took a couple of minutes. The final joining on the second valve i assembeled (the one with a noticable bead built up around the edge) was as simple as placing it on the pipe and heating the two pieces for a few seconds. The moment both pieces got up to temperature, The middle leg settled, solder joined, and it was a perfect air tight joint with 15-20 seconds of heat. Well worth the prep work.
I agree with you on sanding the brass prior to soldering though, i just forgot.
#292903 Semi Auto Valve For Backfire Tanks
 Posted by
shmmee
on 15 January 2011 - 11:25 PM
in
Homemades
Now, many people on IRC, including obob, tried to convince me that such a setup will make the trigger pull obscenely hard. Let me know how that works out for you, because if it does I'm going to keep my newly built shuttle valve for something that needs it and move back to a syringe valve for my original design.
Nope, at 40 psi the trigger pull is firm, but extremely manageable. (tested from an air compressor, a constant and regulated source)
#292921 Semi Auto Valve For Backfire Tanks
 Posted by
shmmee
on 16 January 2011 - 09:24 AM
in
Homemades
Yup. Boot wins the cookie. I'm trying for a clip fed semi-auto. (which has been done before, but I haven't seen any without extensive machining. I'm trying for something simple enough that a modder with moderate experience can duplicate.) With .75" steffans and extra .25" to seal the breech it will have a long trigger pull. I definitely wouldn't call using a BS tank lazy, or less effective. They were designed with the capacity to fire arrows, and probably have a faster output too. The barrel side holes in a hornet tank are tiny. It's probably what I'd be using if i had any.The trigger pull doesn't have to be any longer than a standard hornet trigger valve pull, i'm just exploiting a longer trigger pull to assist with the project it's going into. Looking forward to mirage 3.0! I'll pm you some details when i get a moment.
Oh I know, just from the last picture (and you're latest posts) it looks like you're actuating a breech with the valve. The direct connection that you seem to have means that you will have a trigger pull as long as whatever dart you are using. (I have a similar setup in the Mirage 2.0, but with a minor change to address this problem as, since I generally use streamlines I would have a ridiculous 3" trigger pull otherwise). It looks awesome though. I also like the use of expanded hornet tanks. i never had the confidence to open air tanks since they are so hard to get here, and so took the lazy (and less effective) way of using BS tanks.
#292906 Semi Auto Valve For Backfire Tanks
 Posted by
shmmee
on 15 January 2011 - 11:33 PM
in
Homemades
The trigger pull doesn't have to be any longer than a standard hornet trigger valve pull, i'm just exploiting a longer trigger pull to assist with the project it's going into. Looking forward to mirage 3.0! I'll pm you some details when i get a moment.Nice! I have actually made several variations of my original valve (and am saving them for the final "Mirage" post). Although this seems like a difficult build, the results are awesome. My only fear is that the solder might not hold out, but I have absolutely no experience in that, so I'm just guessing.
That last picture looks interesting though! It seems very similar to what I'm working on, except from what I can tell the "trigger" pull will be very long, perhaps requiring two handed operation. Regardless, awesome work. I am very interested in seeing where this goes, and how you're project compares to the Mirage 2.0!
#358327 Semi auto mag fed (air powered) revisited
 Posted by
shmmee
on 02 March 2017 - 11:14 AM
in
Modifications
This is awesome, man! Great job on the modelling, that trigger looks perfect.
But with pneumatics, why would a person need electronics too? EEs, amirite?
I modified a Triple Strike and a Big Salvo in a similar fashion. I found that there is just enough space in that circular end cap on the valve tube that I could drill and tap for 1/8" NPT, thus allowing a connection for an external tank. It works really nicely, allowing the built-in pump to pressurize, while also allowing semi-automatic firing.
Thanks! I'm still floored that it came out looking so close to the original. I spent a couple hours on it last night and It looks like I might have to revisit it once more (not surprisingly). I need to make that third leg bumping nub a little bigger or different shaped. I seated the valve in epoxy putty (I greased the O.D. of the valve so it's not stuck permanently) and with the trigger fully forwards, (where the third leg should be open and fill the tank and piston legs) I've found the third leg to be closed... though the thought just barely occurred that since I also plugged off the pump fill line with epoxy putty and o-ring is on the opposing side sealing off the vent, the system may actually just be sealing properly and lung power isn't enough to blow open the tank and piston leg valves... The stupid thing might of been working as per designed and I just didn't realize it... I'll hook it up to a bike pump this evening and see how it acts. Once the trigger and valve is placed and working I'll be able to move on to a rough function test with a reserve tank, panther tank and piston all hooked up.
When you modded your big salvo to do the same, did you notice much air leaking from the reserve as you pulled the trigger? When I tried something similar I think I remember loosing a significant amount of air from my reserve tank with each trigger pull. It wouldn't be too bad if I was using a compressor or a regulated HPA tank, but with a hand pumped system it was a deal killer.
*Edit, after some thought, The leakiness was observed using a hornet trigger stem which had a double o-ring so I just assumed the salvo's single o-ring would be even more leak prone. I'd be thrilled to be proven wrong!
With this build, I'm so concerned with efficiency that i'm even going with 1/8" tubing from the salvo valve to the piston since any air in that line will be vented off and wasted. I'm crossing fingers and hoping it allows enough flow. The salvo valve stem ID's look to be about that size anyway so there will be a bottle neck regardless.
If memory serves, my banded RF20 bladder runs around 50 psi. If my full size panther tank runs happy on that I might swap in a smaller second gen panther tank just to see how much of a performance drop there is. I'd love to be able to get a few more shots off of a full bladder if performance doesn't suffer too much with a smaller tank.
Well Meaker, Prometheus is full auto (but I suppose it could be programmed otherwise?). I appreciate that this is semi-auto.
I'm actually working on a mag-fed semi-auto myself but it's using 2-3 off-the-shelf valves (one could be replaced with a big salvo or panther tank, though). I like that shmee's design looks able to trigger a QEV-style tank and control the pneumatic cylinder all from one valve assembly.
Although I'm starting to wonder: do we really need a pneumatic cylinder to open and close the breech? What if we simply link the breech to the trigger via linkages as in a stryfe or via rack and pinion as in a hailfire? Maybe that's more double action than semi-auto, but then everyone calls Stryfes "semi-auto."
Edit: For instance the stryfe's pusher extends roughly 30mm or 1.18". That should be just enough length to chamber a 1" long stefan.
Jwasko, I'd be very curious to see how you approached your build. I couldn't come up with anything that relied soley on off the shelf parts!
Not a terrible idea; I'd been wondering about something similar. I'd think you could even get a full-length chamber if you were OK with longer/harder trigger pull than a stryfe, which isn't an unreasonable assumption.
The option for a trigger actuated breech has definitely crossed my mind. My first true air powered semi auto was based off of a dart tag blaster -specifically because the turret is trigger actuated. When dealing with hand pumped nerf pneumatics, air is a valuable resource and any savings in mechanical movements would be used for dart propulsion instead. My clip fed prototype was designed around 1.5" darts, and I'm trying to remember the reasons I went with a piston instead of full length darts there but I think it was motivated by not wanting to rework all my 18 round mags to take half length darts. With this revisit, that decision was reinforced by my new groups distrust of half length darts, so sadly, I've got to plan on needing a full 3.125" of travel on the bolt sled. Leveraging the .5" inches of travel this trigger has into that distance would probably be too heavy of a trigger pull.
#358312 Semi auto mag fed (air powered) revisited
 Posted by
shmmee
on 01 March 2017 - 03:22 PM
in
Modifications
Hi, sorry - long time, no content. I've found a local, well established nerfing group so I've been able to pick up my favorite hobby again! And as such, I've decided to start chasing my unicorn - the project I've been trying to make for years. A reasonably simple and efficient pneumatic clip fed semi auto blaster. Some of you might remember my previous attempt involving a salvo tank plumbed in line to a secret shot pump that had been re-purposed into a piston. The theory was that when the salvo tank filled the pump would also fill - pushing the pump handle out like a piston and closing the breech. The problem, is that as soon as the salvo fired the piston retracted prematurely and half the air was blasted back out of the breech. I realized I would need a separate delayed valve to open the breech shortly after the dart had left the barrel on a delay. I looked briefly at the big salvo valve assembly. As the o-ring on the salvo trigger passed the buttons it bumped them open - venting and firing the tanks. To date I'd only looked at that valve group using the traditional pump input in the back to fill from so any space between the trigger o-ring and fill line would remain pressurized. Experimentation with this failed though. As the trigger o-ring passed a button valve it would leak air from the reserve.
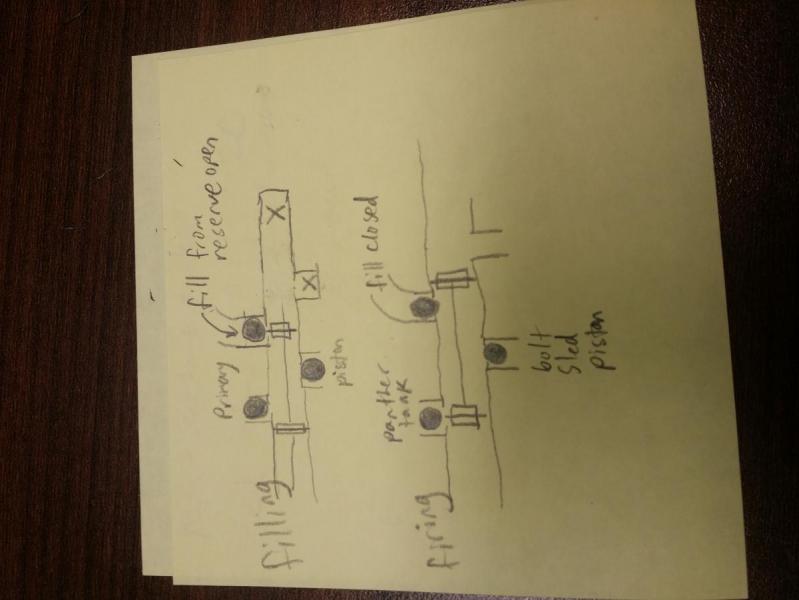
My revisit - and the progress to date is again based on a big salvo valve assembly. My "erueka!" moment came when I realized that the big salvo trigger (something I had looked at before but had given up on) was comprised of 4 individual button valves/check valves - so why not fill from one of the back legs (instead of the normal always open fill line - since it operated as a check valve) and add a bumper to the salvo trigger stem to open the fill while the o-ring sealed in pressure!
With the trigger fully retracted the valve group is sealed and the bumper opens the 3rd leg - filling the panther tank and retracting a piston - closing the breech and loading a dart. As the trigger piston begins to move backwards, the bumper slides off of the 3rd leg, (closing off the air reserve) and then the o-ring on the trigger piston bumps the first leg (firing the panther) and a fraction of a second later (hopefully long enough for the dart to leave the barrel) it bumps the second leg venting the piston and allowing the breech to be pulled open by a spring - chambering the next dart. When the trigger retracts the o-ring reseals the valve assembly and the third leg is bumped open again - priming the tank and closing the breech. The fourth leg won't be used.
I modeled up a longstrike trigger, added a riser with a big salvo trigger stem and then added the extension bumper on the end of it and sent it through my printer.
The white piece is my final 3d printed piece. It was a drop in perfect fit. Not bad for my first ever time modeling with anything, huh? (I used autodesk fusion 360 and printed in PLA)
So far, proof of concept has only happened as far as blowing into the third leg while sliding the trigger rod around inside. The 3rd leg air inlet shuts off at the appropriate time so I really, really think it'll work!
I bought a small piston on amazon and will be leveraging it's travel long enough to open and close the breech. I'll be picking up the fittings for the piston on my way home from work today. For my air reserve I'm using a banded rf20 bladder. I've still got some bridges to cross but for the first time in years, there is a light at the end of the tunnel!
#275576 Secret Shot 2 Air Tank Help
 Posted by
shmmee
on 22 May 2010 - 04:19 PM
in
Modifications
#275566 Secret Shot 2 Air Tank Help
 Posted by
shmmee
on 22 May 2010 - 01:50 PM
in
Modifications
#275652 Secret Shot 2 Air Tank Help
 Posted by
shmmee
on 23 May 2010 - 02:08 PM
in
Modifications
You're right on track, and for the benefit of other readers: This isn't just a one-shot "cure" it is more like "therapy" ... don't pump it up high, but pump and fire a bunch of times, holding the blaster at different angles, but mostly downward. The goal is to help whatever it was get all the way out.
So it would seem. After what must felt like 100+ low pressure firings, it's back up to firing at 30-35 psi. A few more should have it back to where it was earlier.
Thanks all for your advice.
#275536 Secret Shot 2 Air Tank Help
 Posted by
shmmee
on 21 May 2010 - 11:57 PM
in
Modifications
I've modified a secret shot II with a duel action bike hand pump (which also has a pressure gauge integrated into the handle to help avoid over-pressurizing.) and re barreled it in brass to shoot micros. It worked very well for an entire day of Nerfing, but when i fired it again a few days later it discharged with a half-second hiss instead of the explosive pop that I've been hearing. The air tank does hold pressure until the trigger is pulled. It just discharges slowly.
I haven't made any other mechanical alterations to the tank, or trigger and I don't see any obstructions in the barrel. Any thoughts on causes and repairs? Would shooting silicon lubricant down the barrel and into the chamber help? I'm not sure about the internal workings of this tank. It might be a big brother of the secret strike (Two air chambers with depressurization of a smaller one instigating depressurization of the main- barrel side tank. There has been a fabulous write up by:
iknowmy3tables - http://nerfhaven.com...254&hl=revealed describing the secret strikes internal workings so I won't go farther into it.) The white firing pin coming out the back leads me to suspect the dual air-chamber set up. Perhaps the stopper on the barrel side tank isn't getting out of the way completely? I'm not sure. I anyone could offer any help or insights into the matter I'd appreciate it.
Thanks,
Shmmee
- NerfHaven
- → shmmee's Content
- Terms of Service and Privacy Policy
- Code of Conduct ·


