I've really appreciated the prototype pics.
My child hood dream was to work with hasbro's R&D team designing nerf blasters. It's been exceptionally cool to see that as modders we really aren't too far off from where they start their designs too. They have more resources once they get to the production stages, but the early builds? It's poly carb, hot glue a 3d printer and what ever they've got laying around. I'll be geeking out over these pics for days.
shmmee's Content
There have been 412 items by shmmee (Search limited from 12-May 97)
#348259 Hasbro's Homemades: A look at prototypes from the Nerf design team
 Posted by
on 07 August 2015 - 08:42 AM
in
News
Posted by
on 07 August 2015 - 08:42 AM
in
News
#342785 Has anyone figured out the best way to seal slits in Elite darts?
Posted by
on 10 November 2014 - 09:22 AM
in
Darts and Barrels
Like crusher said, Scotch tape. Light weight and durable. It's especially helpful to wrap them before you split them. Using the thinnest lightest packing tape you can find would be even better since you'll have more coverage with less overlap.
#336058 Happy holidays
Posted by
on 26 December 2013 - 08:57 AM
in
News
... And congrats to Doom on his 500th post!
#361888 Gun show case
Posted by
on 02 November 2017 - 05:03 PM
in
Modifications
Don't get discouraged. I think this is more of a "know your audience" situation. We're pretty familiar with what's out there as far as blasters go and are usually more focused on the finer details of altering the mechanics or aesthetics of a blaster. I approach Nerfhaven from the perspective of social media =highschool (maybe) & NH=college. Theirs less fluff and opinion. There's more polish and refinement.
If you find yourself lurking through the much older pages you may notice that things were a little more lax and conversational around here, but the current established feel follows the model of a research paper. That split happened at about the same time the verbal/thought vomit that is social media came about. People started taking their opinions elsewhere, but kept the core knowledge continued to be deposited here. It's a semi accidental distinction, but it works.
Keep it informative, keep it detailed, keep it on topic. Save the fluff for the social media outlets, keep the more substantial offerings for NH. Hopefully (as long as the photo hosting accounts stay active) the modifications on NH will be around in an easily searchable format for future generations of nerfers to pull up and follow. Social media doesn't offer that stability. Theirs a depth of coverage and an ease of finding here that can't be found elsewhere. A completed and well documented write-up is definitely appreciated. Solid grammar is appreciated (you're good there btw). Opinions, concepts or "what-if's..." not so much.
Keep posting, but post with intent and with long term value in mind. Weigh your submissions by asking "will it matter in a year?" . Your "modding without tools" topic followed a pretty significant challenge and some good semi-forgotten approaches came out of it. It's a thread that future new nerfers might find useful. Again, don't get discouraged. It's a different purpose and format from what you're probably familiar with.
#298660 Gumdrop heads
Posted by
on 26 May 2011 - 11:06 AM
in
Darts and Barrels
Awesome! Do they feed any better in hoppers with a felt tip?I was just looking for something that would cover the head like Darth Maker said. Felt heads solve that problem anyway.
Precut felt heads, yes. I've yet to acquire a reliable method of punching holes. Especially with the thick felt. Ah well. For each dart I make, I peel off the felt on one side and use it for the tip of the next batch.
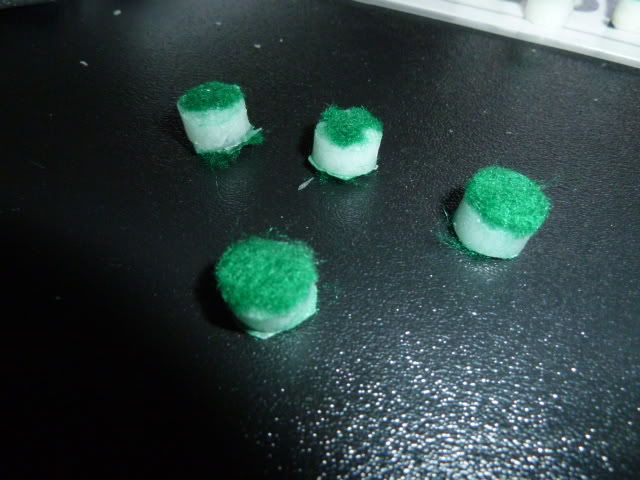
Four of the eight darts turned out well. Examples of the good and the bad. I experimented with just throwing felt pieces in as well - turned out very lumpy. The main problem here is that the felt doesn't STAY at the bottom - might leave some deadspace. You can also use thicker boards with this - I think I'll be getting some 1/2" thick boards for the final molds.
#299106 Gumdrop heads
Posted by
on 31 May 2011 - 10:56 PM
in
Darts and Barrels
I tried making a pointy head for form/some darts for the first time last night, and it turned out a bit wacky. I drilled 1/4" into the board (just as the writeup said), using the DeWalt countersink bit (I like the pointy heads a bit better), and my sili heads came out looking nothing like how they looked in the OP. First of all, there was a small dimple between the drill hole made by the countersink and the drill bit itself (caused by the open area between the 3/16" drill bit and the countersink bit (since to adjust the drill bit's location, you have to move the countersink). Also, the heads looked MUCH shorter than those in the writeup (what depth, Shmee, did you use for those heads shown in the OP pics?)I'll try to post pics this afternoon.....
The exact height of my most recent pointy head batch is .280" (a hair past 1/4"), but that includes felt...
Here's a pic of how far out the counter sink bit is (again for pointy heads.)I noticed from the pic that one of the spiral grooves is jam packed full of debris. That made drilling slow, but I guess it also prevented uncut plastic from hiding in the gap.
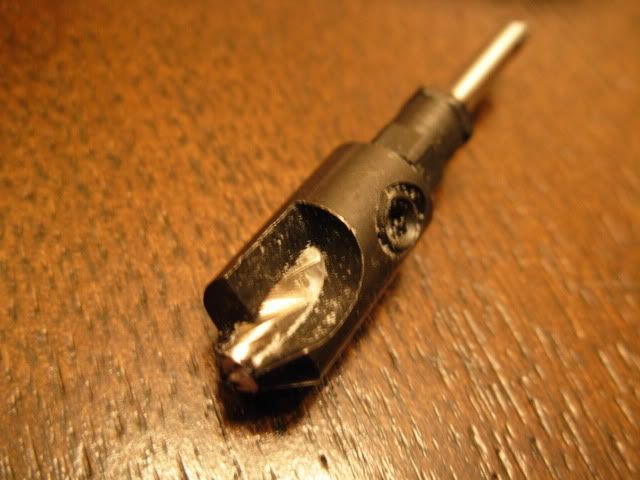
I remember pre drilling the holes with the center bit extended to a depth of 1/8". With it barely sticking out like it is, it has the potential to slip till it finds it's groove.
Updated op with pic of most recent pointy head darts.
#298261 Gumdrop heads
Posted by
on 18 May 2011 - 12:41 PM
in
Darts and Barrels
Presenting: Gumdrop dart heads!
A homemade, consistent, metal free, mass producible dart head made from materials readily available at almost any hardware and craft store!
It uses a home made mix called "oogoo" as the main dart head material (silicone caulk + corn starch to shorten cure time). http://www.instructa...gru-Substitute/ Read it, it's great.
With recent advances made, I feel confident enough to present this as a completed and functional product. The bond of the head to the felt backing is nigh inseparable! I pulled with my fingers, and gave up. I pulled with pliers, and the head tore in half before separating from the felt!
Credits: Thanks to Darth Maker for the discovery of oogoo, Taerkitty for thinking up the felt backing, and Just some Bob for coming up with the gumdrop name. Also thanks to those who helped with other ideas, and encouragements while this concept was being developed. This has truly been a group effort, without the nerfing community (special thanks to Nerfrevolution.com, where this was developed), it would never of gotten off the ground.
The format of this write up will be a written format, supported with video of the process. That way everyone can see just how incredibly easy these things are to make.
Materials:
For pointy heads - a polyethylene (white plastic) cutting board of any thickness greater than 1/4".
For flat heads - 3/8 - 1/4" white plastic cutting board (2)
counter sink: "four cutter cutting bit" ((It's a counter sink with an adsustable center bit - sold at any hardware store)#10, or #12- though #12 heads have been known to jam a hopper - but that could of been a pre-felt separation issue. I'll have to re-visit #12's the increased surface area might help decrease pain.)
3M window and door silicone caulk (or any other clear silicone caulk with a ton of warning labels on the back. NOT GE II silicone. It cures by releasing moisture instead of absorbing it.) It should reek of vinegar while curing.
corn starch
Ziploc bags (to mix in) Gallon size for batches larger than 100 heads
square of felt large enough to cover your dart form.
Mineral spirits (optional - softens the final product)
Tools:
A work space you can temporarily stink up.
Drill press or drill with masking tape to mark a depth/ stop drilling ring
Wood paint stir sticks
scrap sacrificial board - opt. (to make a flat head form put it under your cutting board as you drill, any flat drillable material will work)
clamps/screws - opt. (helpful)
scissors
caulk gun
3/4" (or larger) scrap of PVC to use as a roller, longer scrap of cpvc to slide in and use as an axle.
Packing tape (or other) to tape your mixing bag to the table to hold it in place while you mix.
#10 (.375") or #12 (.425") "four cutter counter sink (For pointy head darts)(or a normal 3/8" or 7/16" drill bit - for less pointy heads) to drill your form with.
Uni-bit to pilot drill your form holes (for flat holes) (optional) They stay centered better, so you can space your holes closer together.
Materials Video: (click to open in new window and view. Not sure how to embed video. Feel free to PM me with pointers. Also, wow I hope I really don't sound like that. I sound like frekin' Kermit the frog.)
Form making basics
The majority of time spent on this project will be invested in making your form, but it's infinitely re-usable, so no big loss! Spend the necessary time to lay it out well, and do it up right.
Space your holes as close as you dare to drill if you plan on separating the heads with scissors, about 1/8" apart if you plan to separate them using a punch. Use the width of your counter sink as a guide. I laid the flat tip of mine on the edge of my board and traced around it with a permanent marker, then drew lines coming off of the point with a framing square. Try to line your holes up in straight lines so you have the option to cut them apart with scissors if needed. Off centering every other line will fit more dart heads on the mold, but it will add time to cutting them out. Leave at least a 1/2" border unrolled around the outside of your form.
To make a pointy head form: (Easiest, but not by much)
Set the depth of the internal shiny drill bit in the counter sink so it's barely poking above the black part of the bit (adjustable via hex screw). Chuck it up in your drill press / drill. Set your depth to 1/4" below the surface of the cutting board. (Less if you want shorter heads, more if you want taller heads). Drill out your heads. This plastic drills very easily and cleanly, but it did leave some scraps clinging around the center hole, so go back through and check to make sure their aren't any small pieces left behind.
To make a semi-flat head form:
Use some fine bolts (or even spare nerf gun screws) to join your cutting board to your sacrificial board. The sacrificial board will keep the edges on your exit holes clean and level.
Adjust the depth of the drill bit to to drill partially through your cutting board and into your sacrificial board. The size of the exit hole in the cutting board will be the diameter of the flat spot on your head. Your heads will be as tall as your cutting board is thick, so be picky when you buy your board.
Use a "four cutting" counter sink to drill your holes partially through your cutting board, and into your sacrificial board.
Credit for the backer board goes to Taerkitty and originally K9 for suggesting drilling through and using a backer board to take off the point.
To make a flat head board (cylinder):
Drill through your cutting board (1/4" to 3/8" thick board - board thickness defines head height) using a 3/8", or 7/16" bit (depending on how tight you want your tolerances, and how heavy you want them to be). Bolt another cutting board behind it.
To tip the cylinder heads in felt - prep felt discs by using a hollow punch and a hammer to pound through stacked layers of felt (I've gone through 6 at a time) separate the discs, and place one in the bottom of each hole. Gently separate the board from the backer (nothing holding the discs in place but friction), coat the back of the form in backing tape, re join the form and backer, then press the discs into the tape to hold them in place. (You'll have packing tape sandwiched between your form board, and backing board.)
(Currently developing similar method to tip them in dryer lint. - hopper feeding with out felt discs on the tips)
Mixing oogoo
Squeeze silicone caulk into a Ziploc bag (use a name brand bag with the double strips of seals. It's a wasteful mess if the bag opens while mixing.) 6 complete squeezes from the caulk gun makes 175 3/8" tall heads. If you want to add mineral spirits, to soften the final product, or oil based paints to change the color, add it and mix it in now. I don't have an exact ratio of mineral spirits figured out here. I just added and mixed till it didn't feel quite so thick. Tape your baggie down to a table, and mix it back and forth with the roller.
We haven't added the corn starch yet, so no rush. Make sure you have every thing you need for the rest of the process close at hand, and your form is secured some how to the table. If you're making flat head darts, screw or bolt your drilled head form onto an undrilled piece of cutting board. (That will keep oogoo from shooting out the back) Once you add the corn starch, the clock starts ticking!
Add 1/2 spoon full of corn starch for every 1 squeeze of silicone into your bag. Squeeze out the air, and tape your bag down to your table, make sure it is sealed, and mix it together with a roller. The corn starch shortens the cure time of the silicone from 24-48 hours down to 2-4 hours!
I thought I took video of the mixing, but it didn't take. It's pretty self explanatory, I'm sure you can figure out how to mix two or 3 ingredients in a plastic bag.
Filling the head form
Video (again, click to open in new window and view):
Written instructions:
Once mixed, roll every thing away from a corner, and lop off a large corner from the bag. Roll it back towards the corner, and squeeze the glob out onto the form.
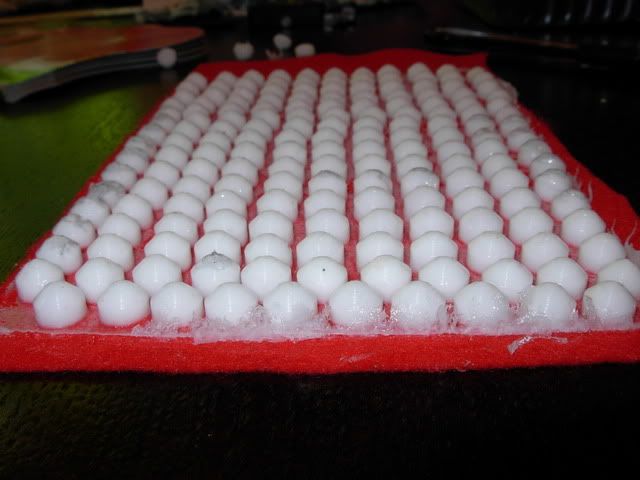
Glob of Oogoo waiting to be pressed into the head forms. You can see the backer board clamped to the head form board in this pic it was just a small, trial sized board though. I would recommend bolting them together. (It should reek of vinegar. Open windows and such.)
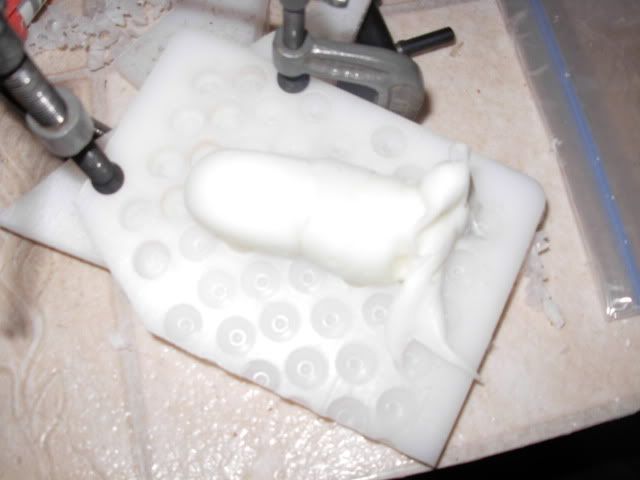
Smear it into the divots with a paint stir stick, scrape off the excess.
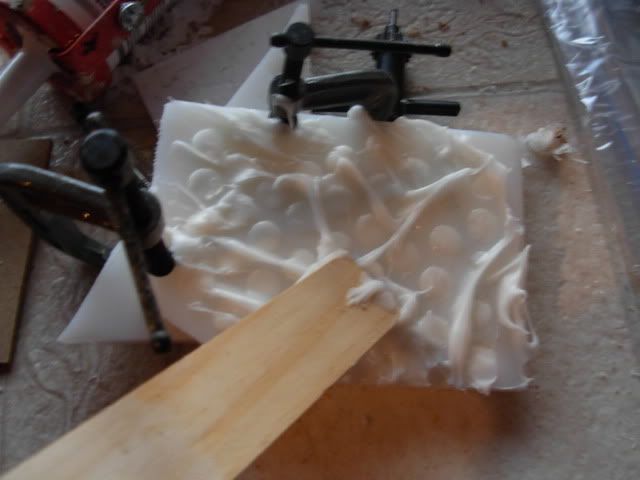
Lay your felt over the board, and go over the top of it with a roller. Rub your thumb swiftly over the top of the felt. This will help work the uncured mixture into the fibers of the felt.
Allow to cure (should feel semi firm if poked). I have waited as little as 4 hours to remove them from the mold.
[I'll add a video of the dart heads coming out of the mold as soon as I can take it.]
Once cured Pull the felt off of the mold, and the heads will come with it! Separate the heads by either cutting them apart with a pair of scissors, or use a punch and hammer (harbor freight - $8)
Pointy (before we discovered felt backing):

And after we discovered felt backing:
Flat (before we discovered felt backing):
Cylindrical felt tipped heads:
[pic goes here once they're out of the mold]
Note: save your unused tube of caulk for later by cutting a corner off of a plastic bag, fill it with silicone, and hold it on with a rubber band.

Now glue the felt side to your fbr using your favorite glue and be done with them! [I'll update with a pic of some finished darts later]
Ranges: depend largely on the size of the dart produced. Previous (heavier versions) flat heads have out ranged my slugs by 25'. It's raining all week here in Utah, can't do range tests.
Pain: Hurtsabout as much as getting shot with a hot glue dome. Comparative pain tests say less than getting shot with a hot glue dome.
Hopper feeding: sucks.
We may want to work out some sort of padding/coating on the tip.The oogoo site says fresh oogoo will stick well to cured oogoo. We may want to make completely flat heads by drilling straight through, and use oogoo to glue on felt pads post curing. I can't think of a way do do it during the initial form up. If we sandwiched the form top and bottom with sheets of felt, we would be unable to remove the heads. Maybe dropping discs into the heads pre fill? See above edit entry: Flat heads (cylindrical)
- feel free to throw out some suggestions!
(see slugs domes and other dart heads thread for development http://www.nerfrevol...t=2443&start=60, as well as the original counter sink dart heads thread: http://www.nerfrevol...&p=30679#p30679
[edit: added form description - cylindrical heads]
A homemade, consistent, metal free, mass producible dart head made from materials readily available at almost any hardware and craft store!
It uses a home made mix called "oogoo" as the main dart head material (silicone caulk + corn starch to shorten cure time). http://www.instructa...gru-Substitute/ Read it, it's great.
With recent advances made, I feel confident enough to present this as a completed and functional product. The bond of the head to the felt backing is nigh inseparable! I pulled with my fingers, and gave up. I pulled with pliers, and the head tore in half before separating from the felt!
Credits: Thanks to Darth Maker for the discovery of oogoo, Taerkitty for thinking up the felt backing, and Just some Bob for coming up with the gumdrop name. Also thanks to those who helped with other ideas, and encouragements while this concept was being developed. This has truly been a group effort, without the nerfing community (special thanks to Nerfrevolution.com, where this was developed), it would never of gotten off the ground.
The format of this write up will be a written format, supported with video of the process. That way everyone can see just how incredibly easy these things are to make.
Materials:
For pointy heads - a polyethylene (white plastic) cutting board of any thickness greater than 1/4".
For flat heads - 3/8 - 1/4" white plastic cutting board (2)
counter sink: "four cutter cutting bit" ((It's a counter sink with an adsustable center bit - sold at any hardware store)#10, or #12- though #12 heads have been known to jam a hopper - but that could of been a pre-felt separation issue. I'll have to re-visit #12's the increased surface area might help decrease pain.)
3M window and door silicone caulk (or any other clear silicone caulk with a ton of warning labels on the back. NOT GE II silicone. It cures by releasing moisture instead of absorbing it.) It should reek of vinegar while curing.
corn starch
Ziploc bags (to mix in) Gallon size for batches larger than 100 heads
square of felt large enough to cover your dart form.
Mineral spirits (optional - softens the final product)
Tools:
A work space you can temporarily stink up.
Drill press or drill with masking tape to mark a depth/ stop drilling ring
Wood paint stir sticks
scrap sacrificial board - opt. (to make a flat head form put it under your cutting board as you drill, any flat drillable material will work)
clamps/screws - opt. (helpful)
scissors
caulk gun
3/4" (or larger) scrap of PVC to use as a roller, longer scrap of cpvc to slide in and use as an axle.
Packing tape (or other) to tape your mixing bag to the table to hold it in place while you mix.
#10 (.375") or #12 (.425") "four cutter counter sink (For pointy head darts)(or a normal 3/8" or 7/16" drill bit - for less pointy heads) to drill your form with.
Uni-bit to pilot drill your form holes (for flat holes) (optional) They stay centered better, so you can space your holes closer together.
Materials Video: (click to open in new window and view. Not sure how to embed video. Feel free to PM me with pointers. Also, wow I hope I really don't sound like that. I sound like frekin' Kermit the frog.)
Form making basics
The majority of time spent on this project will be invested in making your form, but it's infinitely re-usable, so no big loss! Spend the necessary time to lay it out well, and do it up right.
Space your holes as close as you dare to drill if you plan on separating the heads with scissors, about 1/8" apart if you plan to separate them using a punch. Use the width of your counter sink as a guide. I laid the flat tip of mine on the edge of my board and traced around it with a permanent marker, then drew lines coming off of the point with a framing square. Try to line your holes up in straight lines so you have the option to cut them apart with scissors if needed. Off centering every other line will fit more dart heads on the mold, but it will add time to cutting them out. Leave at least a 1/2" border unrolled around the outside of your form.
To make a pointy head form: (Easiest, but not by much)
Set the depth of the internal shiny drill bit in the counter sink so it's barely poking above the black part of the bit (adjustable via hex screw). Chuck it up in your drill press / drill. Set your depth to 1/4" below the surface of the cutting board. (Less if you want shorter heads, more if you want taller heads). Drill out your heads. This plastic drills very easily and cleanly, but it did leave some scraps clinging around the center hole, so go back through and check to make sure their aren't any small pieces left behind.
To make a semi-flat head form:
Use some fine bolts (or even spare nerf gun screws) to join your cutting board to your sacrificial board. The sacrificial board will keep the edges on your exit holes clean and level.
Adjust the depth of the drill bit to to drill partially through your cutting board and into your sacrificial board. The size of the exit hole in the cutting board will be the diameter of the flat spot on your head. Your heads will be as tall as your cutting board is thick, so be picky when you buy your board.
Use a "four cutting" counter sink to drill your holes partially through your cutting board, and into your sacrificial board.
Credit for the backer board goes to Taerkitty and originally K9 for suggesting drilling through and using a backer board to take off the point.
To make a flat head board (cylinder):
Drill through your cutting board (1/4" to 3/8" thick board - board thickness defines head height) using a 3/8", or 7/16" bit (depending on how tight you want your tolerances, and how heavy you want them to be). Bolt another cutting board behind it.
To tip the cylinder heads in felt - prep felt discs by using a hollow punch and a hammer to pound through stacked layers of felt (I've gone through 6 at a time) separate the discs, and place one in the bottom of each hole. Gently separate the board from the backer (nothing holding the discs in place but friction), coat the back of the form in backing tape, re join the form and backer, then press the discs into the tape to hold them in place. (You'll have packing tape sandwiched between your form board, and backing board.)
(Currently developing similar method to tip them in dryer lint. - hopper feeding with out felt discs on the tips)
Mixing oogoo
Squeeze silicone caulk into a Ziploc bag (use a name brand bag with the double strips of seals. It's a wasteful mess if the bag opens while mixing.) 6 complete squeezes from the caulk gun makes 175 3/8" tall heads. If you want to add mineral spirits, to soften the final product, or oil based paints to change the color, add it and mix it in now. I don't have an exact ratio of mineral spirits figured out here. I just added and mixed till it didn't feel quite so thick. Tape your baggie down to a table, and mix it back and forth with the roller.
We haven't added the corn starch yet, so no rush. Make sure you have every thing you need for the rest of the process close at hand, and your form is secured some how to the table. If you're making flat head darts, screw or bolt your drilled head form onto an undrilled piece of cutting board. (That will keep oogoo from shooting out the back) Once you add the corn starch, the clock starts ticking!
Add 1/2 spoon full of corn starch for every 1 squeeze of silicone into your bag. Squeeze out the air, and tape your bag down to your table, make sure it is sealed, and mix it together with a roller. The corn starch shortens the cure time of the silicone from 24-48 hours down to 2-4 hours!
I thought I took video of the mixing, but it didn't take. It's pretty self explanatory, I'm sure you can figure out how to mix two or 3 ingredients in a plastic bag.
Filling the head form
Video (again, click to open in new window and view):
Written instructions:
Once mixed, roll every thing away from a corner, and lop off a large corner from the bag. Roll it back towards the corner, and squeeze the glob out onto the form.
Glob of Oogoo waiting to be pressed into the head forms. You can see the backer board clamped to the head form board in this pic it was just a small, trial sized board though. I would recommend bolting them together. (It should reek of vinegar. Open windows and such.)
Smear it into the divots with a paint stir stick, scrape off the excess.
Lay your felt over the board, and go over the top of it with a roller. Rub your thumb swiftly over the top of the felt. This will help work the uncured mixture into the fibers of the felt.
Allow to cure (should feel semi firm if poked). I have waited as little as 4 hours to remove them from the mold.
[I'll add a video of the dart heads coming out of the mold as soon as I can take it.]
Once cured Pull the felt off of the mold, and the heads will come with it! Separate the heads by either cutting them apart with a pair of scissors, or use a punch and hammer (harbor freight - $8)
Pointy (before we discovered felt backing):
And after we discovered felt backing:
Flat (before we discovered felt backing):
Cylindrical felt tipped heads:
[pic goes here once they're out of the mold]
Note: save your unused tube of caulk for later by cutting a corner off of a plastic bag, fill it with silicone, and hold it on with a rubber band.
Now glue the felt side to your fbr using your favorite glue and be done with them! [I'll update with a pic of some finished darts later]
Ranges: depend largely on the size of the dart produced. Previous (heavier versions) flat heads have out ranged my slugs by 25'. It's raining all week here in Utah, can't do range tests.
Pain: Hurts
Hopper feeding: sucks.
We may want to work out some sort of padding/coating on the tip.
- feel free to throw out some suggestions!
(see slugs domes and other dart heads thread for development http://www.nerfrevol...t=2443&start=60, as well as the original counter sink dart heads thread: http://www.nerfrevol...&p=30679#p30679
[edit: added form description - cylindrical heads]
#298896 Gumdrop heads
Posted by
on 28 May 2011 - 10:33 PM
in
Darts and Barrels
This is the first thought to strike my mind when trying to tip the gumdrop heads, but further thought of a mold with felt on top, felt on bottom, and cured oogoo - perma-bonded to both sides of felt cured in the middle - turning the mold into an oogoo sandwich steered me away from it. Individual pre-cut dots are probably the best way to go.Another idea is to put a sheet of felt clamped in between the two boards, but then they would be harder to punch out, because you cannot put the head through the punch prior to punching through the felt.
#298264 Gumdrop heads
Posted by
on 18 May 2011 - 01:01 PM
in
Darts and Barrels
Mother F RIGHT! Nice work Mr. Schmii.
Now, on to the questions: Do these heads cause friction or ‘sticking’ in a hopper clip or a Wye like the head of a streamline will? Or will they slide smooth like the felt head of a slug dart?
Previous versions (without the felt binding) had serious adhesion issues, and have come off while rounding the bend - jamming up mid barrel. These with the felt backing are much stronger! I'll hopper test them tonight. My hopper is a homemade one - a coupler welded to the back of a 45, and a pair of air holes through the 45. I left a center post in the middle of the wye to help guide darts around the bend (like a britt hopper), so it may not be an accurate performance baseline of a standard Wye. They don't have the stems that impair streamlines, so I expect they'll work well.
#298385 Gumdrop heads
Posted by
on 21 May 2011 - 11:40 PM
in
Darts and Barrels
Edit: Wut. My felt tore, leaving a thin layer of fibers on the dart base. I stuck it back on. If I put felt on both sides and rip it off one, I can then glue it on the torn side. The intact side acts as the tip padding, as there's no leverage to make it tear.
That's awesome! It's great to see more people experimenting with this concept! Could you post a pic of your padded tips?
Of a curiosity, do you have any idea how thick your felt is? It seems to me that the higher ration of corn starch, the stronger the felt bond, the more resistant to tearing off, but the harder the head is. The felt I've used is propapbly the thinnest cheapest felt available. (craft store) It's just pure speculation, but because there is less material between the two bonds (head/felt bond and FBR/felt bond) they may bond to more common fibers, and result in less propensity to separate. Heads separating from the felt is new news to and I'm certainly not saying it isn't possible, but if it was filming up before you could finish getting the felt on, that might explain the failed bond.
While I still haven't been able to do any measured range testing, I did have a chance to do some serious war testing. Of all the darts I was able to find after the war, not a single one showed even beginning signs of failure. Some were glued to the fbr with hot glue, some with goop. The hot glue ones were much faster to build, but that's just because of the quick set time of hot glue.
They did hurt less than hot glue domes, and it was agreed that gumdrop heads would be an acceptable dart head material for future wars. (We eventually agreed to get away from domes, due to the ouch factor.) Hopper tests (with out any felt on the tip) was a substantial failure. It would only fire every other shot- the first shot serving to prime the dart into position. That's a problem that will need to be corrected if these are going to receive any widespread acceptance. My barrel fit/length may of been a little off as well. I forgot to shorten it due to volume loss added by the hopper.
I spent most of the wars shooting them out of my barrel replaced (just a basic insert done - for now! hee, hee, hee.) big salvo. Wow, I love that gun. My last batch could stand to be a little heavier - based on flight characteristics displayed, and as previously discussed - could use a larger surface area to absorb impact. The salvo and I (with gumdrop head darts) did well over all, getting more than our share of hits during the war. The slc nerf scene is definitely picking up!
Keep up the experimenting. I really do like to see pics of this concept, as well as successes and especially failures being documented.
#298493 Gumdrop heads
Posted by
on 24 May 2011 - 08:43 AM
in
Darts and Barrels
Shmmee, have you tried a brithop-type configuration with cpvc to see if that will make the darts feed through hoppers? I would think that that possibly coupled with Taerkitty's SlantHopper could get these to feed reliably in a hopper. My hopper is currently set up like this and it has almost never mis feeds, even with 2'' slugs.
My wye is actually a homemade. I took a coupler, miter cut one end at a 45, and plastic welded it to the back of a 45 elbow. I then dremmeled out two holes for air to pass through - leaving a guide post in the center. Instead of reaming out the cpvc and pvc it's nested into - I extended the cpvc beyond the pvc, reamed it to a knife edge, then heated and flared it out till it was touching the walls of the wye. In doing so - it does sit farther in than had I simply reamed the pvc, and cpvc. Perhaps the dart is impinging upon the flared cpvc before the tail has passed the bend.
It's performed well with slugs, and pom-pom tipped darts. I recently realized that my valve at the top of the feeder tube is not air tight. That could explain why the occasional dart would stop mid barrel. However the leaky valve wouldn't explain why the first shot is needed to prime the dart, and the second shot fires it (sometimes).
At the next available opportunity, I'll ream the cpvc and pvc to a more standard set up, and replace the feeder tube valve with a simple cap and see if those changes affect performance.
#298274 Gumdrop heads
Posted by
on 18 May 2011 - 04:07 PM
in
Darts and Barrels
It seems like they are a lot more time consuming to make, and you say the impact force is similar to that of a hot glue dome. I guess my question is, what is the major benefit of these dart heads over other contemporary dart smithing methods? I'm not being sarcastic or snide here. People seem genuinely excited about this, and I'm just wondering what this new method offers in terms of improvements.
That's a fair enough question. I really would be shocked if any new unproven technology is greeted arms wide open without scrutiny.
Pros:
-No Mcmaster order (or shipping costs). All materials are waiting for purchase at your local hardware store, and craft store (felt)
-No metal weight of any kind. when a slug head separates mid flight, you have a projectile that's half felt pad, half metal washer with the potential to cut someone.
-Consistency - as long as your form is consistent, and your fill is complete, each head is identical in size, shape, and weight.
-Durability - Felt is a more porous bonding surface than metal, and is more likely to withstand abuse.
-Range - I've seen a 25' increase in previous batches compared to slugs. (I do realize there slugs are often required because of their limited range to improve game play)
- Accuracy - this has yet to be verified, but it seems logical that a heavier dart head would fly in a straighter line.
-Repeatability - Even a new dart maker with a form can produce consistent results equal to a seasoned dart smith.(which increases the overall safety and quality of darts on the field.)
-Customization- Add oil based dyes during mixture, couple with the dozens of different colors of felt, and make darts that are recognizably your own.
Cons: (yes, for the benefit and perpetuation of this discussion I'm also listing problems that I've seen. That way we might get more suggestions in, and either accept the limitations, or fix them.)
-A form is required Sure, you can make one yourself, but that's time that could be spent doing something else.
-More time and effort compared to slugs. 'Nuff said there.
-Currently lacking padding on the tips.
-Their isn't a glue on the planet that bonds extremely well with the silicone. (Trust me, I've tried close to a dozen!)Adding the felt backing was a last ditch effort to give us some way to glue finished heads onto dart blanks. Any glue bonds to felt! (The oogoo instructables website claims that fresh oogoo will bond to cured oogoo. Since oogoo bonds to felt and porous fabrics, we may be able to use oogoo to glue felt padded discs on after they've cured.
- Hurts like a hot glue dome. This needs further development, but isn't integral to the basic performance of the darts.
Increased range - this is included in both lists, because not everyone will view bigger ranges as a good thing.
- Poor hopper performance - Roughly 1 shot of 6 failed to fire on the first shot. That's a big issue. We'll need to pad the tips some how, even if only to reduce friction.
Sorry Just some Bob, Had my wife shoot me from 10' away with my pas (with added ls spring, 12" straight barrel, no hopper.) and one of the lighter pointy tipped darts. I definitely knew when I got hit. Though that was close range and a high powered blaster. I'm sure a slug would of also hurt under those circumstances. At the very least it was nothing like getting hit with a stock dart shot from a near stock blaster. The outcome might be different with a lower powered blaster, or normal ranges.
Anyone who shoots someone else from that close with any homemade dart and mid/high powered blster is going to leave the victim with a welt, and probably be labeled a douch. I just have high standards for these things, and think the pain factor can be reduced by the addition of padding. The increased surface area of the flat head darts may also help substantially. I just haven't made any of those in the felt backed edition.
#298297 Gumdrop heads
Posted by
on 19 May 2011 - 08:14 AM
in
Darts and Barrels
You are using too much cornstarch, if that is the case. Mine were substantially heavier than yours, fired from a plugged 2K at pointblank range, and were definitely not as painful as hotglue domes. Use less cornstarch and they will be softer. The cure time may increase a little, but to be honest, why wouldn't you just leave them over night?
Very nice! Do you know what ratio of corn starch to silicone you were using? Adding mineral spirits does soften them substantially, but reduces the inseparable bond to a mere great bond. They still took quite a bit of pulling to separate the head from the felt, but they were able to separate none the less. The bond is still far stronger than gluing oogoo directly to fbr, so it should still be adequate for a war, but it could be easier to skip the mineral spirits and reduce the corn starch. Reducing the amount of corn starch might decrease firmness without compromising bond strength.
I did some hopper testing yesterday. Roughly 1 shot out of 6 failed to fire on the first shot. I would definitely count that as unacceptable. For them to work reliably with hoppers we'll need to investigate a way to add felt to the tip to reduce friction. I'll add that to my pro/con list. I received a 1/4" thick cutting board yesterday. I'm going to just drill straight through and bolt a backer board then try some cylindrical heads. I need to get a punch set first though, so I can punch some felt discs, and drop them in the bottom of the forms.
#298586 Gumdrop heads
Posted by
on 25 May 2011 - 12:49 PM
in
Darts and Barrels
Did some testing with hoppers.
Homemade hopper as well, but there's nothing that the dart may catch on. CPVC+PVC slant, glued on the outside only.
I believe it might be the friction from the silicone tip preventing it from feeding fully. It takes two shots to fire from a BritHopp - when shook, it fired in one. But with a normal hopper barrel, I either fired it in one shot or it didn't fire at all. The dart took some persuading to fit into the reamed out barrel.
Tried to test by covering the tip with some material, but the chemical/adhesive resistance of the silicone tips works against us again. Modge Podge (craft glue/sealant, basically school glue) failed - did not adhere to the silicone at all. If that worked, you could just dip the tips and problem solved.
So I made a duct tape cap to cover the silicone. It fired in one shot, same case with three trials. The duct tape cap flew off afterward though - again not sticking to the silicone. This is evidence that the tip friction is the problem.
I also shot a 1/2" slug of silicone from a PETG barrel on a SNAP. It popped out, about six feet of range.
During development (before we discovered the felt backing bond) I tried close to a dozen different glues. Results ranged from absolutely crap-tacular, to moderately crap-tacular. Poke around on the Nrev slugs domes and other thread to get the list of what's been tried. If it's only a tip that's being glued on, a moderate bond strength should be adequate.
The only two things that held moderately well - were:
"liquid nails small projects silicone adhesive" in a blue and gold squeeze tube (not caulk tube!)
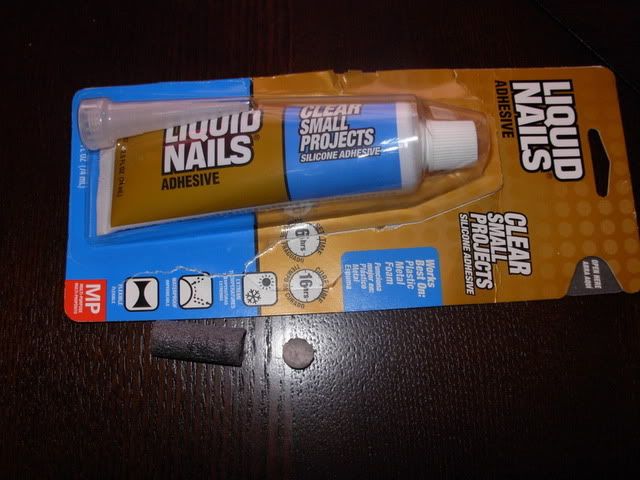
And un-cured oogoo.
I just mailed out my main form. (hope to do a new one today) Any chance I could persuade you to try dropping some pre-cut/pre-punched felt discs into the form holes before your next pour? I think If we have them sitting at the bottom of the wells, we can avoid the extra step of gluing padding on later.
#298300 Gumdrop heads
Posted by
on 19 May 2011 - 10:00 AM
in
Darts and Barrels
It was about 10:1 silicone to cornstarch. I have yet to actually test the density of caulking silicone, but all of the web resources say that most silicone rubbers have a density between 0.9 and 1.2g/cm^3. With an estimated density of 1.0g/cm^3 and an estimated tip diameter of 1.0cm, you should be using molds that are about 10~11mm deep to meet the current specifications for slugs and APOC standards. So how deep are your molds? I expect something like 1/2" or so, correct? If you drop a felt disc at the bottom and use another on top, they should be perfect. Except for, you know, being 1/2 an inch longer than your other darts.
Actually my most recent darts are about 3/8" deep + felt. My next generation (clylinders) will be 1/4" deep, but hopefully a little wider (a full 3/8" wide) to increase surface area. I don't think I've done any that come close to a full 1/2" deep. How have they worked for you? I don't know if you've had a chance to try the felt backing yet, but have you had any trouble keeping them glued on?
I'll try your 10:1 ratio of corn starch with a felt tip on my next batch. (As soon as I get the next form set up.)
#298847 Gumdrop heads
Posted by
on 28 May 2011 - 09:12 AM
in
Darts and Barrels
Darts now feed well - no misfires, I've tested four times with a five-shot hopper.
These should be more durable than slugs as well - foam-felt attachment is more secure and less prone to breakage as the felt bends with impact.
That's great! Poor hopper feeding has been one of the big down sides to these things. Thanks for doing a fix for them!
Here's a thought for getting the felt to stay put while filling:
Use a mold with holes breaking the back surface (drilled fully or at least partially through) Peel off an Avery sticky label (of appropriate size) and stick it to the back of your form. You'll then have a sticky surface exposed at all holes. Stick a felt disc in the bottom (label should hold it in place) attach backer board, and fill as normal.
You should also be able to re-use the label by shifting it slightly to expose some fresh stickiness.
#298312 Gumdrop heads
Posted by
on 19 May 2011 - 02:37 PM
in
Darts and Barrels
Just to avoid frustrations, Ge II silicone is listed on the oogoo instructables thread as one of the silicons that won't cure faster with the addition of corn starch. It's one of the caulks that cures by releasing moisture instead of absorbing it.Based off a 10.1 oz tube of GE II weighing 0.8417 lb, a 3/8" diameter, 1/4" deep head would be 1.544g.
The weight calculation should be pretty close by volume between brands. Thanks for figuring that out.
To those well versed in steffan weights - would 1.544g be too heavy, too light, or just about right? I haven't started drilling on the next form yet, so it would probably be good to know if I should carry on as planned.
#299027 Gumdrop heads
Posted by
on 30 May 2011 - 11:22 PM
in
Darts and Barrels
I did some more developmental work over the long weekend.
Everything is still curing in the forms, but here's what I've tried doing differently:
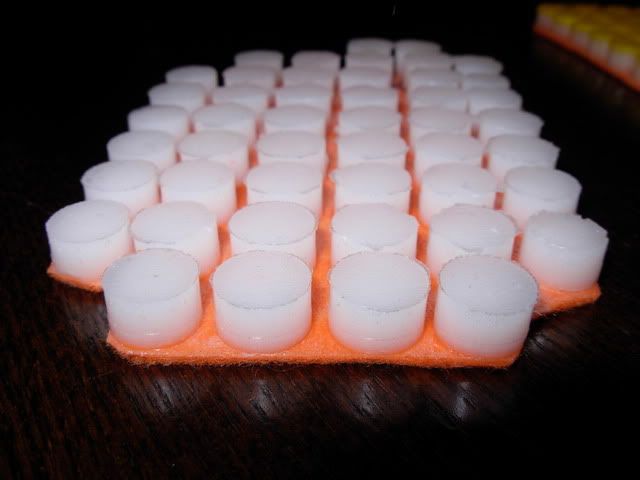
Increased diameter to 7/16" (1/4" tall), and a flat conical shape. (increases surface area, and mass)
Tipped the dart heads by dropping a felt disc down each individual head form prior to fill.
Bought a hollow punch set and a 1lb dead blow hammer (plastic hammer filled with pellets that transfer all of the energy into the object it's striking). Tried punching single felt discs out of felt (felt is substantially cheaper off of a bolt from a fabric store. I bought a full square yard for $2.39) It was difficult to punch through a single thickness of felt, but after folding it over into 6 layers, it punched well, with about 4 blows from the hammer. It also made 6 discs per 4-5 swings.
I placed a disc in each head form, but they shifted, and rode up the sides of the wall, so I coated the back of the form with packing tape, and stuck the discs to the tape in the bottom of the form. That solved the shifting, and kept them in place while filling.
Everything else was done as normal.
I'm concerned - due to the difficulty of punching through a single sheet - that it may be difficult to use the punch to separate the heads from the backer felt. I was using a scrap piece of maple floor board to pound on. Would some sort of softer material be more effective as a pounding board? Some sort of rubber, or a pine stump (facing the grain) or sacrificial layer of felt glued to the board help to make punching out discs and heads more effective?
I'll get pictures up when I can. Thanks all.
Everything is still curing in the forms, but here's what I've tried doing differently:
Increased diameter to 7/16" (1/4" tall), and a flat conical shape. (increases surface area, and mass)
Tipped the dart heads by dropping a felt disc down each individual head form prior to fill.
Bought a hollow punch set and a 1lb dead blow hammer (plastic hammer filled with pellets that transfer all of the energy into the object it's striking). Tried punching single felt discs out of felt (felt is substantially cheaper off of a bolt from a fabric store. I bought a full square yard for $2.39) It was difficult to punch through a single thickness of felt, but after folding it over into 6 layers, it punched well, with about 4 blows from the hammer. It also made 6 discs per 4-5 swings.
I placed a disc in each head form, but they shifted, and rode up the sides of the wall, so I coated the back of the form with packing tape, and stuck the discs to the tape in the bottom of the form. That solved the shifting, and kept them in place while filling.
Everything else was done as normal.
I'm concerned - due to the difficulty of punching through a single sheet - that it may be difficult to use the punch to separate the heads from the backer felt. I was using a scrap piece of maple floor board to pound on. Would some sort of softer material be more effective as a pounding board? Some sort of rubber, or a pine stump (facing the grain) or sacrificial layer of felt glued to the board help to make punching out discs and heads more effective?
I'll get pictures up when I can. Thanks all.
#299166 Gumdrop heads
Posted by
on 02 June 2011 - 12:06 AM
in
Darts and Barrels
Darksircam, ChaosPropel, Sirs I applaud both of you! Thank you for proving this concept to be reproducable, and even effective.
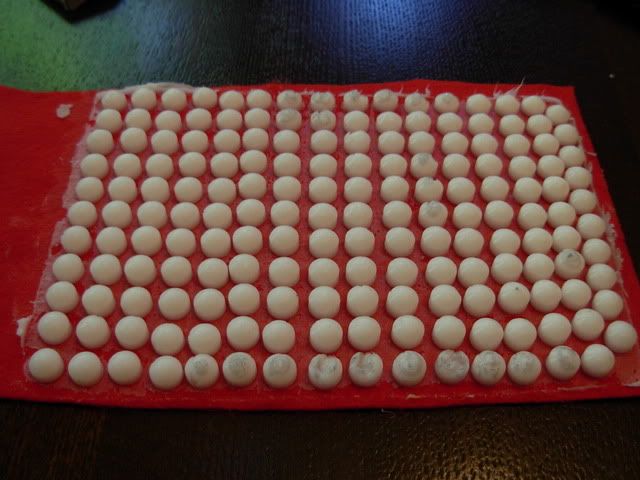
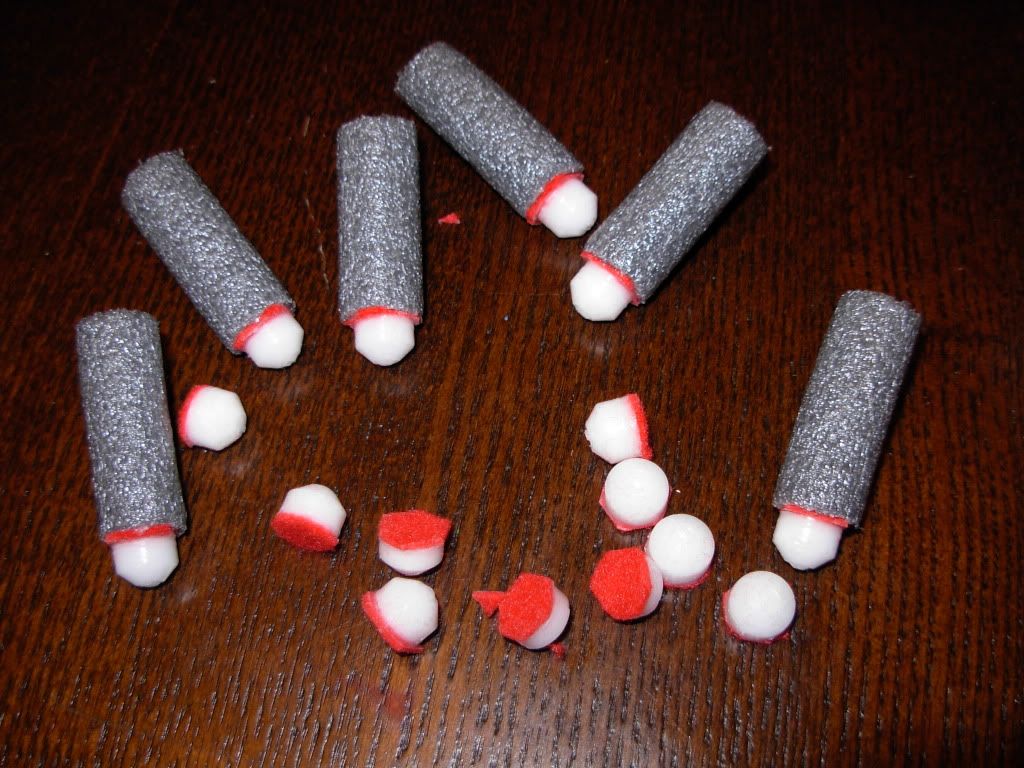
I just pulled my first batch of 7/16" felt tipped cylinder gumdrop darts from the mold, and I am Giddy with how they turned out! (I mixed too much oogoo and and to smear it in another mold before I could get felt tips prepped and in place, so some are unfelted.
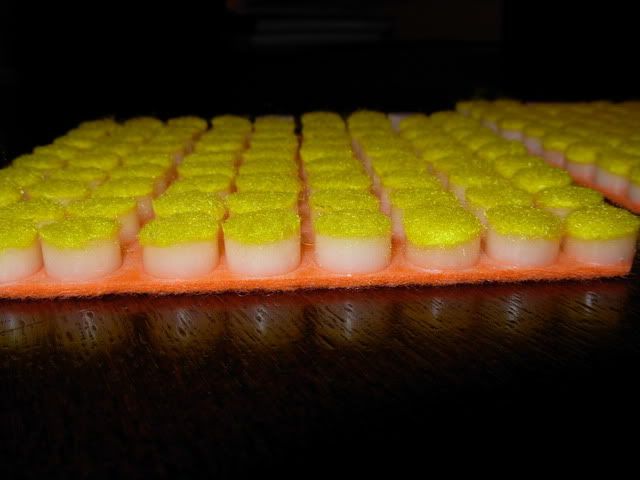
I didn't bother to put felt discs in the deformed holes. That's why a couple are missing a disc.
Thoughts:
-I have no idea how much each head weighs.
-Those 209 heads took 8 squeezes of caulk - about half the tube.
-The cheap $2.50 wallmart silicone caulk with the semi opaque tube and black lettering works just as well as the expensive $5 - $6 3M caulk for oogoo heads.
-To second what ChaosPropel said - they reeked to high heaven! Do this away from living spaces. I was working in my basement, but the smell was still noted up stairs.
-I don't know if the increased diameter or square edges will help or hinder hopper feeding.
-The packing tape backing really helped hold the felt heads down! (I filled the holes with felt, gently turned the mold over, applied the tape to the back of the form, then flipped it back over and tapped the discs down. That way the discs were already semi centered.
Edit:
Punching custom disc heads works great if you stack the felt multiple layers high. I had 6 layers stacked.
-I've offered to send some samples to Vacc so they might be considered legal at Apoc (though I have no chance of attending). We'll have to see how that goes. It may either be vindicating, or condemning.
I just pulled my first batch of 7/16" felt tipped cylinder gumdrop darts from the mold, and I am Giddy with how they turned out! (I mixed too much oogoo and and to smear it in another mold before I could get felt tips prepped and in place, so some are unfelted.
I didn't bother to put felt discs in the deformed holes. That's why a couple are missing a disc.
Thoughts:
-I have no idea how much each head weighs.
-Those 209 heads took 8 squeezes of caulk - about half the tube.
-The cheap $2.50 wallmart silicone caulk with the semi opaque tube and black lettering works just as well as the expensive $5 - $6 3M caulk for oogoo heads.
-To second what ChaosPropel said - they reeked to high heaven! Do this away from living spaces. I was working in my basement, but the smell was still noted up stairs.
-I don't know if the increased diameter or square edges will help or hinder hopper feeding.
-The packing tape backing really helped hold the felt heads down! (I filled the holes with felt, gently turned the mold over, applied the tape to the back of the form, then flipped it back over and tapped the discs down. That way the discs were already semi centered.
Edit:
Punching custom disc heads works great if you stack the felt multiple layers high. I had 6 layers stacked.
-I've offered to send some samples to Vacc so they might be considered legal at Apoc (though I have no chance of attending). We'll have to see how that goes. It may either be vindicating, or condemning.
#299251 Gumdrop heads
Posted by
on 03 June 2011 - 09:08 PM
in
Darts and Barrels
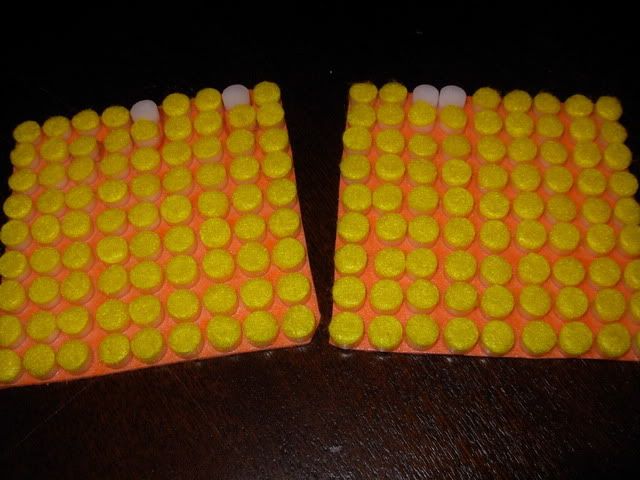
I just weighed the sheet of 7/16" x 1/4" cylindrical heads. the 81 heads weighed 42 grams. Therefore each head should weight about .51grams! (which is even half the max dart weight set for Apoc.) Chalk one more mark up in the safety column! I'm going to go punch them out of the felt now.
#299175 Gumdrop heads
Posted by
on 02 June 2011 - 08:22 AM
in
Darts and Barrels
With 3.5 squeezes out of a caulk gun, and roughly 2-2.5 spoonfuls of corn starch, I was able to make about 45 darts. There was a lot of waste since not every mold hole got filled. I'll have to do a better job at that in the future.
Darksircam-
You said "Have you tried using GE Silicone I?"
Does this mean that you've been using it? If so, I don't have to worry about using my Walmart tubes conservatively, since when I'm out (of my 3 tubes I bought), I can just use GE I.
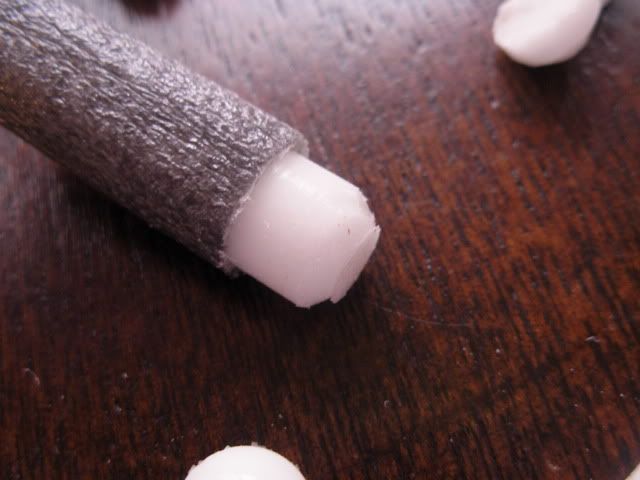
Shmmee- Those heads look fantastic! I love how neat the uppermost felt looks!
Thanks!
My latest batch used 2 spoon fulls corn starch to 3 squeezes caulk. They came out much softer than my previous batch. Darksircam suggested a volume based ratio of as little of 10:1. Your ratio might be a little rich. They look great though!
#299846 Gumdrop heads
Posted by
on 14 June 2011 - 08:19 AM
in
Darts and Barrels
Drilled out some more holes and made another batch of about 30 darts.
Is everyone using a paint stir stick to poke the oogoo into the holes? I prefer using my fingers... or if possible, a plastic-coated wooden rod about the same diameter as the tip diameter. Makes sure you get the oogoo all the way in, and it's pretty quick. Then smear some more over and repeat.
The amount of cornstarch may also affect the smell... if it acts as a catalyst, more vinegar smell is generated, and it's generated faster.
Edit: On felt: You should be looking for felt that does NOT fall apart easily - fluffy felt makes bumpy/unbalanced dart heads.
Darksircam: Thanks for helping to keep this concept alive!
With a solid piece form I did have some difficulty getting the air pockets out, and the form filled, about 1 of 20 heads were defective because of that. With a 2 piece form - It's much easier because air can escape between the boards as oogoo is pushed in.
The instructables site suggests wrapping anything you want to use as a spatula in "Gorilla tape" (gorilla [same brand as gorilla glue]brand duct tape. Cured oogoo will peel off easily from that stuff.
My experiment of "outsourcing" dart production to my sister is going well. She's had a 1 or 2 batch learning curve (first batch the backing felt wasn't pressed into the oogoo enough, so there was a poor bond to the felt), But I'm now confidant that anyone with a form and the patience can make these.
I've slapped a PTEG'd 7.5" RF20 turret onto a big salvo. I don't know what ranges are compared to slugs, but the 20 shots I took (minus the few from a belligerent tank) averaged 75'. The max was 99, min was 54'. That is a pretty big spread, not sure why, though I suspect turret seal issues. I don't know how slugs would compare, but I'm at least hitting war worthy ranges with these darts.
#336860 Game Types and Rules for Nerf Wars
Posted by
on 04 February 2014 - 10:01 AM
in
General Nerf
I play tested this game type last night with a large church group (30-40 people) where I provided most of the blasters. It is very well suited to large groups of non NIC nerfers who are not familiar with most game types or disciplined enough to not pick up a fully loaded blaster and empty the clip between rounds when they should be reloading.
Dodgeball:
Preparation -
Load and prime all loaner blasters and line them up along a center line in the field. Personal blasters may be loaded but un-primed and may be held by their owners. This game was played on a basketball court and the court size was just about perfect. 6 tables were laid on their side as barriers (3 on each side - optional). Small piles of darts are placed behind the 6 tables.
Start with some brief instruction on blaster operation - especially the clip fed ones. "POINTY DARTS ONLY". I lost count of how many screamers I had to pound out of clips.
Line everyone up and count them off into two teams. Teams start touching opposite walls of the court.
At the word "go" teams rush forward to either grab a loaner blaster (hunger games style) or touch their personal blaster to the center line. Play begins immediately.
People with dart blasters may not progress beyond the center line. People with ball or arrow blasters may progress 5' beyond the center line to fire. Swords were originally given the right to completely penetrate enemy lines, but that broke the game and all swords were removed.
Once a player is shot they drop all ammo where they were standing. With their blaster in the air they walk to the center and place their loaner blaster on the center line (they can always choose to hold on to their personal blaster) and then keep walking to the enemies back wall. Once they touch the back wall they re-spawn as a member of the opposing team. (like blob) Their first order of business is to risk life and limb grabbing a blaster from the center line.
Play ends with one lonely hold out getting massacred by the rest of the group.
Rounds lasted about 30 min.
Why it works:
Dropping all ammo at death discourages hoarding.
Dropping blasters at death encourages people to try many different blasters and keeps people from getting stuck with "the crappy gun" for too long.
Having established "team sides" avoids the "what team are you on?" confusion of many other team games.
No one sits out so everyone stays engaged. The rules are simple enough that players can govern themselves. I actually spent 90% of the night playing instead of refereeing! (10% of the night was spent clearing taggers out of clips...)
Granting 5' of approach for balls and arrows makes them a serious asset. I spent most of the night looking for my ArrowStorm.
The larger team will handicap themselves by depleting their ammo.
The smaller team is handicapped with the difficulty of getting a new blaster without getting shot.
For large groups where large amounts of loaner blasters are used (or participants are willing to let other people use their blasters) - this game type absolutely rocks!!!
#341088 Full Auto Barricade
Posted by
on 08 August 2014 - 04:37 PM
in
Modifications
Wow. I haven't witnessed this level of "fugly" since TaerKitty modded. Functional, but... well I'm sure its your baby so I'll not finish this thought.
Interesting concept. I dont think I've seen anyone try to put a diy dart pusher into a blaster. I'd like to see it with a strife or raven as a base since they're already clip compatible. It may help with your reliability issues if the clip seats consistently.
Spiffy though. Its basically a ghetto'd rapid strike.
#341110 Full Auto Barricade
Posted by
on 09 August 2014 - 08:02 AM
in
Modifications
Being Lego based you could probably make the pushed length easily adjustable son you can switch from full sized darts to shorter steffans. That'd be an awesome feature.
#348924 Forts/Cover
Posted by
on 01 October 2015 - 12:16 PM
in
General Nerf
Throw a bed sheet over a couple chairs and clamp the sheet in place. You should be able to get several 6' long barriers that way. I always prefered to tip over folding tables though.
#357517 For those in more humid areas what barrel material do you use?
Posted by
on 09 January 2017 - 11:08 AM
in
Darts and Barrels
Like Snoop said, plastics can vary greatly - especially CPVC. To dial that down into something useful, You should look for "flow guard gold" brand CPVC. I had to fish through the entire stock at several hardware stores in my area - and I can't guarantee it's even available where you live but I've never seen a stick of that brand that didn't provide a beautiful springer fit for beige hot rod foam. If you ever do come across it, I suggest you stock up and get enough barrel material to last you a lifetime.
#297537 Foam Sports (Silicone Tip Dart, Video)
Posted by
on 25 April 2011 - 02:12 PM
in
Darts and Barrels
And last, is it possible to use these with hole-less FBR (as in the standard stefan blanks) by making a hole in the blank?
I'd love to encourage the development and use of safer dart heads. These things look great! If you want to make a centered hole in fbr, may I suggest this link: center hole jig (I just barely broke it away from the thread where we've been developing other similar heads:Slugs and Domes (and other dart heads, including DIY ones)
I don't know how your silicone is any more friendly than the silicone I've been trying to work with (Jet brand), but when I tried using super glue to bond fbr to the silicone heads I made, the head fell off under it's own weight. Do you still get much of a bond even without a stem? I've tested several adhesives trying to find a suitable bond. (I've also tried: amazing goop, plumbers goop, shoe goo, hot glue, un-cured silicone, and multi-purpose cement.) The only thing I've found so far has been "liquid nails small projects silicone adhesive" (in the toothpaste tube - not the caulk gun tube) It held up to 10 - 12 shots from a BBBB into the concrete floor before separating.
#330152 Flat sheet metal
Posted by
on 22 May 2013 - 07:24 PM
in
Off Topic
Unless you live in a semi-rural area you might have better luck looking for a sheet metal distributor (Google "[your town] sheet metal distributor")close to where ever you live. While you probably wouldn't have any problem finding an online vendor - why pay shipping on such a bulky item?
I was surprised to find a plastic vendor in my neck of the woods - but not until I looked.
I was surprised to find a plastic vendor in my neck of the woods - but not until I looked.
#297845 five-can sling-coozie
Posted by
on 04 May 2011 - 11:45 AM
in
Off Topic
Am I the only one who sees it's potential to hold a nerf sword?
#292363 Finally
Posted by
on 06 January 2011 - 10:51 PM
in
Off Topic
Congratulations on your career and family! Three children under three is an amazing thing. My wife and I just had our second yesterday. That makes two under the age of two for us. Single guys: pick well and live a life with meaning and purpose! Gotta give credit to the amazing women who are willing to go through the incredible process that brings more little nerfers into the world (and who also put up with us the bigger nerfers).
Off topic: I have a tough enough time explaining this hobby to the refinery guys i work with. I cant imagine explaining the logic of foam ballistics to a group of guys who play with real, fully automatic weapons.
Edit: interrupted by crying toddler (ironically enough...) Didn't have time to proof the first post.
#339019 Failed attempt at silicone tip creation.
Posted by
on 18 May 2014 - 01:02 PM
in
Darts and Barrels
There are two types of silicon caulk. One cures by absorbing moisture - the other cures by releasing it. The type you want cures by absorbing it. I'm going to look in my crystal ball and predict that you've used GE II brand silicone or some other "low odor" silicone caulk. Thoses types cure the wrong way - by releasing moisture.
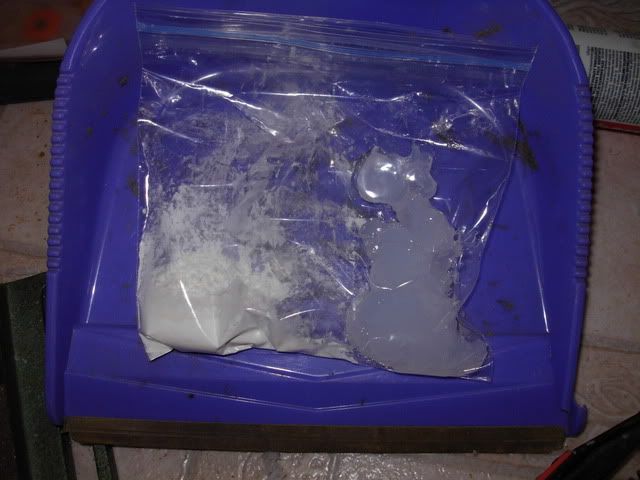
Go to Wal-Mart, look for a opaque tube with black printing - it will be the cheapest tube on the aisle most likely and buy it. That's the stuff you want. It looks like this (without the purple glove - that's just saving the unused caulk)
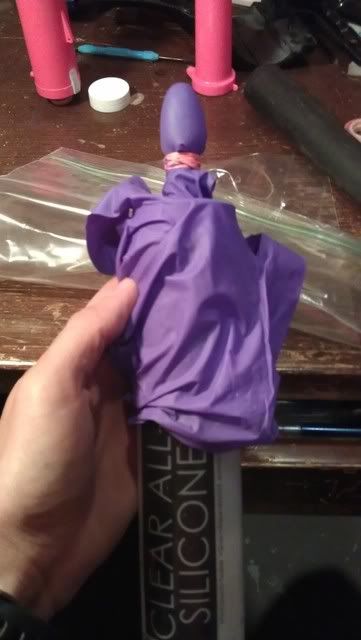
Go to Wal-Mart, look for a opaque tube with black printing - it will be the cheapest tube on the aisle most likely and buy it. That's the stuff you want. It looks like this (without the purple glove - that's just saving the unused caulk)

#339024 Failed attempt at silicone tip creation.
Posted by
on 18 May 2014 - 03:22 PM
in
Darts and Barrels
The right kind of silicone at the right ratio of corn starch and silicone can cure enough to unmold in a few hours. Too much corn starch can make heads very firm, that can be countered by mixing in mineral spirits.Here in Wisconsin (which I have to assume isn't too much different than Michigan) my silicone domes take a solid 2 days to cure in their molds, unless it is full on summer with High humidity, which neither Wisconsin or Michigan has yet. Also, if you made your dome molds too deep, those are going to take longer to cure as well.
#339098 Failed attempt at silicone tip creation.
Posted by
on 22 May 2014 - 01:27 PM
in
Darts and Barrels
Correct.Oh. Shoot, I'll have to try that stuff out. I had no idea, and what youre saying makes a lot of sense. Lets just say for a moment that it is the wood being porous that slowed down the cure time so much. The type of silicone that absorbs moisture should preform the opposite of the other type in my wood mold, correct?
The type you're using probably cures by releasing moisture. Putting it in a some what air tight mold, mixing moisture laden corn starch in with it (more moisture the silicone needs to disperse to cure) and expecting it to cure efficiently is like putting a cap (or a rubber banded finger from a glove) over the tube. It's holding in the moisture, and preventing the cure process.
The mold porosity and ambient humidity honestly has no impact on the cure time if you're adding corn starch to the right kind of silicone caulk. The corn starch is simply a vehicle to disperse moisture evenly through the silicone so it can all cure at once instead of slowly sucking moisture from the surrounding atmosphere. I've used wood to make experimental forms out of. The porosity impacts the surface finish of the dart head, (the reason I favor HPDE cutting boards for molds) but did not affect cure time at all. And like exo - I've also made large baby food sized blocks of oogoo. Such a large volume should of taken weeks to fully cure - but the corn starch cured it over night. It's not the mold but the ingredients.
I'd be interested in seeing the mold design you're using. Glory1610 and I are still actively developing metal free darts. Current experiments involve replacing felt tips with dryer lint to improve hopperability and production rate. Initial tests are very good, but who knows how the lint will hold up over time.
#328650 F-CAG
Posted by
on 09 April 2013 - 10:57 AM
in
Homemades
I usually don't chime in - unless it's really cool.
I bow hunt (or at least i try 3 years and I have yet to be able to take an actual shot) but one of the bigger challenges is ranging your target. Deer never wander in at the preset pin set up (or so I'm told) they're always somewhere in between pins - and you never have time to reach for your range finder. That set up makes a great trainer for learning that skill.
I'm also glad you've opted for a factory established base. I could just imagine a homemade plunger rod coming loose, bursting through the pt and firing like an arrow from a 60 pound bow - while it's aimed at another human being. Scary stuff.
#346207 Exhaust Valve Homemade (Current: Bladder Tests)
Posted by
on 16 April 2015 - 09:50 AM
in
Homemades
A running challenge that's been mocking my semi auto attempts has been "feeding the beast", and has centered around using tiny 1/2" dia pumps and pumping like mad every few shots. Trading 3 pumping motions for one shot has always given springers a huge mechanical advantage. Seeing your full size floor pump was a face-palming "why didn't I think of that?" moment. One stroke from that pump ought to fill for multiple shots - especially with a bladder system. It could be a game changing reversal for air blasters. Frame pumps and their relatively smaller diameter pump heads are great for higher pressures - but nerf doesn't need higher pressures and the mechanical advantage is wasted. Using a full size floor pump trades volume for a more appropriate lower pressure rating.
I also owe you a deeper thanks. I really haven't been even remotely interested in anything nerf since the last 'geddon, and had even mentally given the hobby up. My lagging interest has been largely driven by the complete famine of progressive forum content. I haven't found any personal success with homemades and our favored toy makers haven't released anything primary worthy since the hand cannon. Lacking foundational blaster material, Forum writeups have lagged and FB and has become completely inane repaints and empty fluff. I'm not quite running to my garage to dust off my own unfinished projects just yet, but this post has been the first thing to spark my interest in ages.
Thank you.
#346145 Exhaust Valve Homemade (Current: Bladder Tests)
Posted by
on 13 April 2015 - 04:25 PM
in
Homemades
*****
Thanks for sharing your knowledge and pictures, shmmee. I always liked that marshmallow airgun. Have you considered expanding the Big Salvo tank in the DTG to fire out of a hopper, rather than using a turret? A while ago I expanded one to absurd volumes and it worked really well with a hopper, but I never got around to doing anything with it, and then it got lost in Ryan's shop when we transitioned our building over to Kane's place. It might make the reloading situation a little easier.
It's worth noting (I think) that the Clippard MAVO-3 valve that you used here has a flow rate of 10 cubic feet per minute (CFM, or CPFM) at 100 PSI, which is the same flow rate as the blowgun that this design is using at the moment. The MJVO-3 valve has a flow rate of 25 CFM at 100 PSI, which is probably overkill, but I think the QEV vents more quickly with a better flow rate, so maybe there's an improvement to be had.
I'd certainly thought about expanding the B.S. tank, but since I was already struggling to get that tenth shot out I decided not to expand the rate of consumption with a larger tank. I think I mentally wandered from the DTG to try to make a clip fed semi auto so I could marry the dead space of a turret with the re-loadability of a clip. I was able to prove it conceptually possible but my chosen piston (a sspb pump) didn't have enough travel to seal the breech after chambering a dart.
http://vid1107.photo...to/DSCN1997.mp4
I think that project has entered the never-to-be completed world of "someday".
The higher flow valve is certainly intriuging. It'll be interesting to see if it helps. I've always felt triggering a backpressure tank was like kicking a ladder out from someone. The more sudden the kick - the more violent the results (the faster the tank releases)
#346139 Exhaust Valve Homemade (Current: Bladder Tests)
Posted by
on 13 April 2015 - 09:29 AM
in
Homemades
Im hoping some previous projects of mine may be helpful to you since they both share similar ground: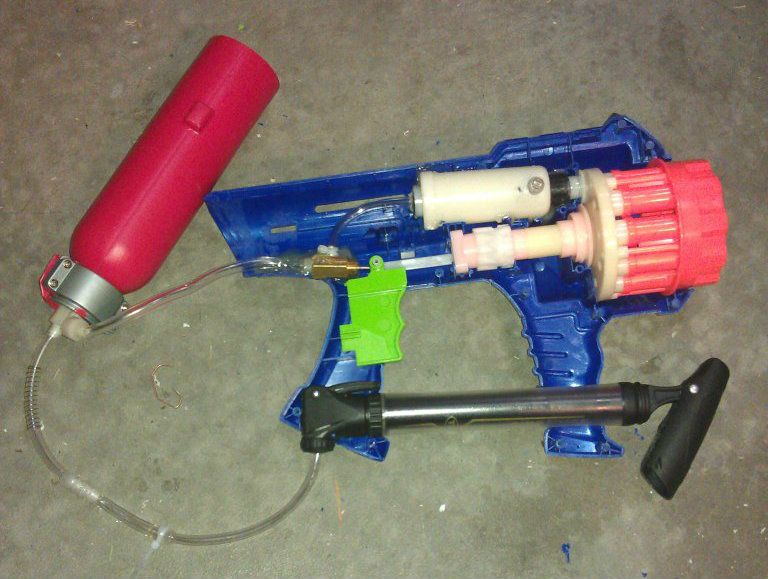
Same concept as what you're planning wrapped up into a dart tag gun.
Big salvo tank, clippard mavo-3 3 way valve, rf20 bladder (double lined with bike inner tube to get 45-50 psi). Hits about 65-75' flat and can get 8-9 of the 10 shots off before needing to be re-pumped.
There is a rear loading hole and guide ramp in the side, but it's still pretty dart hungry and its tough keeping it fed and happy during a war, so i haven't used it as much as I thought i would.
Here's a firing vid...

There might also be some helpful lessons to be learned from this thing...
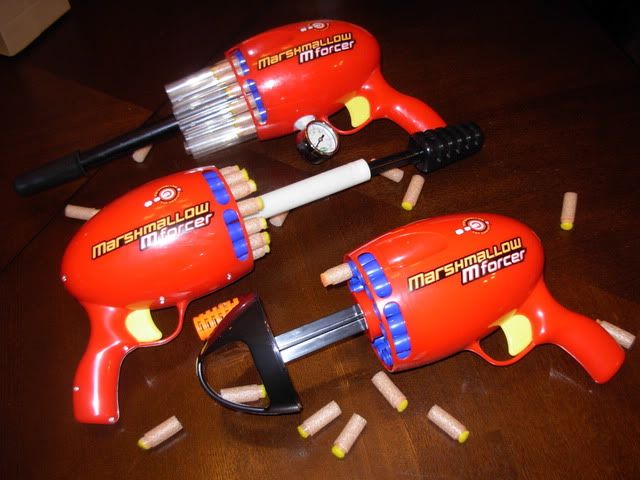
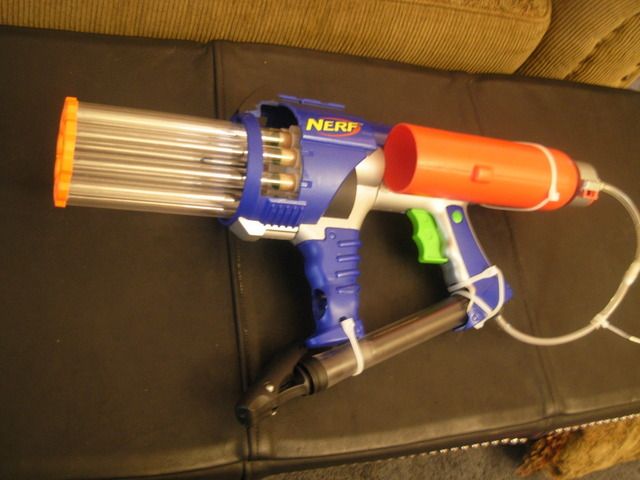
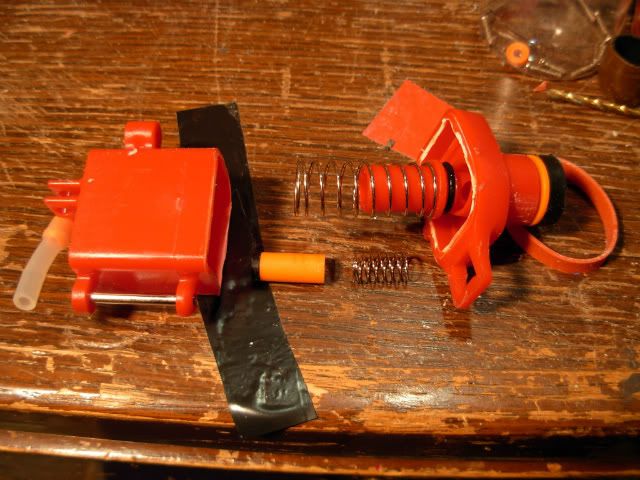
Marshmallow M-forcer (out of production, may now be tougher to find). 15 shots, semi auto, built in rear loading hole. Re-barrel and replace the pump and you're done. With 15 shots available it's much easier to keep it fed than the DTG - Much less work as well.
Like a Mavo-3, the internal valve shuts off the inlet before venting the tank, But the M-forcer valve container also acts as the firing tank. The orange piston sits inside the center stem and acts like a check valve. The entire tank/valve moves to the right towards the turret as it goes through the firing motion and that center red stem remains stationary - pressed up against the turret. Once the tank is fully forward against the turret that right 0-ring seal on the red stem breaks free and air from the valve tank is able to escape out of the stem hole to vent to the barrel. The shifting motion also crushes the check valve piston closed against the inlet (left) to keep the larger re-fill tank from venting. The M-forcer valve may actually be re-creatable to those with the right equipment.


Same concept as what you're planning wrapped up into a dart tag gun.
Big salvo tank, clippard mavo-3 3 way valve, rf20 bladder (double lined with bike inner tube to get 45-50 psi). Hits about 65-75' flat and can get 8-9 of the 10 shots off before needing to be re-pumped.
There is a rear loading hole and guide ramp in the side, but it's still pretty dart hungry and its tough keeping it fed and happy during a war, so i haven't used it as much as I thought i would.
Here's a firing vid...
There might also be some helpful lessons to be learned from this thing...

Marshmallow M-forcer (out of production, may now be tougher to find). 15 shots, semi auto, built in rear loading hole. Re-barrel and replace the pump and you're done. With 15 shots available it's much easier to keep it fed than the DTG - Much less work as well.
Like a Mavo-3, the internal valve shuts off the inlet before venting the tank, But the M-forcer valve container also acts as the firing tank. The orange piston sits inside the center stem and acts like a check valve. The entire tank/valve moves to the right towards the turret as it goes through the firing motion and that center red stem remains stationary - pressed up against the turret. Once the tank is fully forward against the turret that right 0-ring seal on the red stem breaks free and air from the valve tank is able to escape out of the stem hole to vent to the barrel. The shifting motion also crushes the check valve piston closed against the inlet (left) to keep the larger re-fill tank from venting. The M-forcer valve may actually be re-creatable to those with the right equipment.

#298450 Establishing barrel length
Posted by
on 23 May 2011 - 05:01 PM
in
Modifications
Ok, I'll trust you guys on it. I failed to take into account different darts. I guess it was one of those things that sounded simple and perfect in my head. Sorry about accidentally posting a concept instead of something more proven.
In an attempt to salvage this into something bennificial, is there any easier method than taking muzzle velocities, or measuring ranges (both of which would require many, many test shots) when establishing a barrel length?
In an attempt to salvage this into something bennificial, is there any easier method than taking muzzle velocities, or measuring ranges (both of which would require many, many test shots) when establishing a barrel length?
#298431 Establishing barrel length
Posted by
on 23 May 2011 - 11:26 AM
in
Modifications
I'm not taking pictures of this write up, because if you're so dense that you need a picture of a dart stuck in a barrel to grasp this concept, you should be playing with playschool toys, instead of hasbro.
I've been thinking about simple ways to establish a proper barrel length, and after trying to use a big salvo to fire a steffan out of 1' of pteg, (dart didn't leave the barrel) this thought kinda walked up and slapped me.
Start with a long barrel - too long for the dart to leave the barrel, and fire an unweighted fbr blank. Because the steffan is unweighted, it will have little mass, and very little momentum. It will also stop suddenly as soon as it begins to pull a vacuum. Pull off the barrel, use a rod to measure how far the dart made it down the barrel. Repeat to find the minimum length traveled.
I haven't done any testing to see where the best barrel length is in relation to where the fbr blank stops, but I would guess it wouldn't be more than 1" behind the minimum length traveled.
Approaching it from this method should spare you walking down ranges, or measuring muzzle velocity.

