Jump to content


venom213

Member Since 11 Jul 2007
Offline Last Active Private

Topics I've Started

SPANO 2014 (Minnesota)

23 April 2014 - 11:44 AM

SPANO: Saint Paul Area Nerf Outing (aka NO SPAM: Nerf Outing, Saint Paul and Minneapolis) is Minnesota's largest annual war. I am well aware that our war scene has slowed down significantly since last SPANO, but in keeping with tradition, I feel obligated to at least try to make this war happen. Currently the most important question is when to have the war. SPANO is traditionally held in mid to late June, so the dates listed below fall into that time frame.

Most of this is just copied over from SonReeceSonJensen's SPANO 2013 post, so if some things don't totally make sense right now, that is why.

SPANO Twenty-Firtteen

Alright you filthy SOB’s, I’m locking this one in right now!

When:
• Saturday June 21st. 9am to around 4pm.
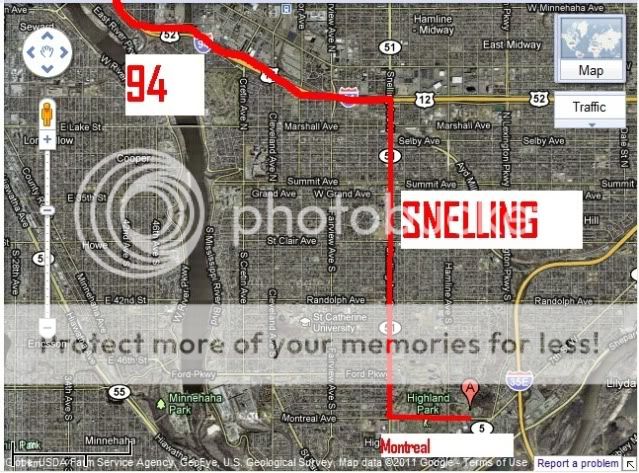
Location:
• Highland Park in St. Paul, the classic location.
Posted Image
Posted Image
Posted Image
Posted Image

Games
• Meatgrinder
• Rescue the Princess/CTF: 2-sided, moshpit
• Defend The Core: 360 4-team, Dual-Opposite Criss-Cross, Traditional
• Territories: Small Territories/Pistols, HvZ Territories
• Carpe!

Blasters
• Nothing single-shot bigger than a UMB with stock pump and oprv. No bans on springers/bow’ers.
• 4B’s, Titans, Jobars, Roto Rockets: ASK ME!!! Tell me you barrel set up and your intended ammo, I will be very fair if it is safe. No bans on blasters for big ammo.

Darts
• Slugs, Venom’s Balls, or ask me
• No glue domes

Melee Rules
• NO barrel taps
• Pool Noodle, FBR/foam insulator, crappy dollar store melee, or ask me
• No Nerf swords, nothing with a stiff shaft/core/center, nothing wrapped in duct

Shield Rules
• Mantas, manta replicas, ANY Nerf or toy blaster shell split manta style AND… ANY toy of ANY KIND cut up, hacked up, split up, I do not care as long as it is TOP MOUNTED on your blaster.

More Shield Rules
• Medium-ish hand-held toy shields and a pistol
• Bigish hand-held toy shields and melee. Look for pics of Cranky Monkey from Cataclysm 2012, you’ll know what I mean.
• Big Ammo counts as a ‘hit’, not a shield breaker

Pistols
• If you replaced the spring with anything other than another stock spring or the plunger tube with anything other than a different stock tube it is NOT a pistol. A SupaSplat and the like are NOT pistols.

Details
• Bring water. I’d advise not pop, not red bull, not sugar loaded crap: water is best but do what you like.
• Sunscreen: highly advised.
• 200 lbs of blasters and other materials: unnecessary. Bring what you need to play, what you need to trade, and maybe some things to show off.

Melee Rules
• NO barrel taps
• Pool Noodle, FBR/foam insulator, crappy dollar store melee, or ask me
• No Nerf swords, nothing with a stiff shaft/core/center, nothing wrapped in duct tape


360 DTC
Notes:
• Rounds will be no more than 10 minutes
• I know some of these aren’t nerf ammo: trust me, it does not lessen the game

360 DTC Point Gradients
• Stephens/Slugs – ZERO! Not a single damn point! Can still tag players, but no points.
• Stock ammo – 1
• Mongos/Ballistic Balls/Vortex discs or any disc ammo – 3
• Sock Grenades/Carpe balls/wiffle balls/ball pit balls (thrown) – 3
• Sonic Baz darts/Arrows/4B and UMB missiles – 5
• Stress Balls/small Nerf football/small plush toys (thrown) - 5
• Titan Rockets/Ironman Rockets/Draconas rockets – 10
• Homeade anything – Ask me, I will classify fairly
• Other crazy crap or weirdness - Ask me, I will classify fairly

Why I'm doing this - With these regulations we will maintain all the absurdly fun challenges involved as usual AND stretch our creative engineering to get higher points while NOT getting turned into pepperoni pizzas. And yes, if you want to stay on defensive whilst brandishing only melee you now can do it with a much high degree of safety and effectiveness.


HvZ Territories
HvZ Rules of Play
• 1-2 zombies at the start, rest are divided between 2 teams
• Humans and zombies are under blaster and dart regulations, see below
• If you are a human and are tagged by a human you are “dead”, and must remain in the spot you “died” in until a zombie resurrects you via touch
• Tagged zombies go to spawn points to re-enter the game

Objective
• Humans – claim every single territory
• Zombies – covert the filthy humans!

Blanket Regulations
• Stock ammo, silly ammo, or sock-grenades ONLY!
• No blaster more powerful than a Sonic Bazooka unless using sillies or multi-barreled.
• Zombies use only 2’ pool-noodle (I will provide some) or approved melee.
• Survivors get only one life, zombies are unlimited instant touch respawn.
[/quote]

Homemade SuperMaxx 1500 Missile Blaster

13 April 2013 - 11:44 PM

Many years ago, I discovered a few scraps of evidence a blaster dubbed by MIG "The Unicorn of Nerf blasters". The blaster I speak of is the SuperMaxx 1500 Missile Blaster (SM1500MB), also known as the SuperMaxx 1500 Arrow Shooter/Launcher. I have not found any credible evidence that any active members of the NIC have one in their possession. To say the least, this blaster is incredibly rare. Other than a few obscure pictures scattered around online, the only proof of this blaster's existence is an obscure YouTube video.

I instantly became fascinated with the SM1500MB. It wasn’t until about a year ago I came to the realization that obtaining a true SM1500MB would be effectively impossible. I set out to start building a homemade version of the SM1500MB, working gradually over many weeks. When Draconis announced his missile launcher project, it spurred me into action to produce the VenoMaxx. I don’t think I ever mentioned this in my original post about the VenoMaxx, but my initial primary goal of making the VenoMaxx was to reproduce the SM1500MB. As the VenoMaxx progressed, it grew to encompass reproducing many similar blasters; SuperMaxx 5000, Small Soldiers SuperMaxx 5000, SuperMaxx 2000, and the SuperTech 9000. Here is the original VenoMaxx thread.

I got sidetracked from the original project intention and didn’t bother trying to produce the turret, only mentioning that I would eventually have them available as an accessory for VenoMaxxs (and other blasters, for that matter). It wasn’t until recently that I finally decided to construct this turret.

Here is the turret without craft foam sealing or barrels:

Posted Image

The turret is supported on a 1” PVC encap with four tapped holes on it. This cap has a 1” x 1/2” PVC Reducer and a length of PVC sticking out for it to attach to 1/2” PVC couplered blasters. The base plate of the turret (on the left in the picture) is 1/4” Polycarbonate sheet, which has holes drilled and beveled for flat head screws. The base plate has 5/8” holes drilled throughout for rear-loading. Just offset from the center of the base plate is a spring plunger. The spring plunger serves as an indexing mechanism. In the very center of the turret is a 1/4” hole for the 1/4” bolt that acts as a guiding post for the base plate and the barrel plate.

The turret plate (on the right side of the picture) is also made out of 1/4” Polycarbonate sheet. On the side that contacts the base plate, there are six beveled holes for the end of the spring plunger to lock into. Like the base plate, there is a 1/4” hole in the center for the guide post. The 1/4” Bolt that acts as the guide post compresses a spring onto a washer and has a nut on the opposite end of the base plate for easy removal/adjustment. The purpose of this is to keep the barrel plate pressed onto the base plate.

Posted Image

Early stage test assembly:

Posted Image

Now onto the barrels:
I solvent welded ~1 5/8” stubs of 1/2” ID 5/8” OD Polycarbonate tube into the holes on the barrel plate. from there, I solvent welded longer pieces of 5/8” ID 3/4” OD Polycarbonate tubes over the short stubs. To me, these seems like a more robust way of attaching barrels opposed to simply solvent welding the 3/4” barrels directly into the holes. In addition, the stubs of 1/2” ID tube act as constrictions for darts if one is to use micros with additional barrel material nested inside the 5/8” ID tube. Also shown in this picture below is the craft foam applied to the base plate for sealing and spacing purposes.

Posted Image

Assembled:

Posted Image

On the VenoMaxx:

Posted Image

Posted Image

Posted Image

Loaded with arrows:
Posted Image

Posted Image

Posted Image

Here is the turret with PETG barrels nested in the 5/8” ID tube and a forward spacer in place to secure the now lengthen barrels. This setup is for firing micro darts.

Posted Image

Posted Image

Video of the turreted VenoMaxx firing arrows!

http://www.youtube.com/watch?v=oEBziNNSJEs

Firing off that first turret load of arrows was extraordinarily satisfying. The turret works well; it is not exceedingly difficult to rotate it nor does the rotation misalign by more than maybe 1/8” at most (which I doubt affects accuracy). The sealing is not the greatest, but for powerful airguns it hardly makes a difference as far as I can tell.

I’ll just throw this in here because it’s somewhat related. The production model VenoMaxx inches further towards official release. Here is a progress picture of the first VenoMaxx V2:

Posted Image

Questions you may have and answers:
Q1. Can I buy a VenoMaxx now? How much will they cost?
A1. No, I will not be making them on demand for everyone until a later date. Price is undecided, as it depends on many individual preferences.

Q2. Can I buy a turret now?
A2. Yes, you can! The price depends on many individual preferences so I'm not listing a set price now. Just email me if you want one and we'll discuss it.

Q3. Can you make a turret with more barrels?
A3. Certainly. This one only has six because I based it off the Arrowstorm's turret and I wanted to be able to shoot arrows with it.

My email address is venomm213@gmail.com, you should contact me there instead of PMing me if possible.

Homemade SuperMaxx 5000: The VenoMaxx

17 August 2012 - 01:33 PM

I figured this blaster deserves it's own thread to inform more people about it. In addition, I hope to answer a lot of the common questions I've been getting about it. First off are the common questions I didn't address in the original post:

Q: Will there be a writeup? Templates?
A: In due time, but don't expect either in the immediate future.

Q: Will you be selling these? For how much?
A: Yes. I can't say for sure yet, but I've just been telling people that it'll likely be "around the cost of a Plusbow". Keep in mind, this is by no means a guarantee.

Q: When will you have these up for sale?
A: I'm trying to have these up and finalized within two weeks.

VenoMaxx: Homemade SuperMaxx 5000

Posted Image

Posted Image

Posted Image

Posted Image

Posted Image

Posted Image

This is a project that I had in the works long before this contest came around. This contest proved to be the motivation I needed to finally finish this project, however. It is by no means "done", in a sense of finality, but it is fully functional as of now.

The VenoMaxx is constructed in a similar style to a +bow. The main body and handle are made out of polycarbonate, held together with mechanical fasteners. The only adhesives used on this gun were used to connect vinyl tubing to the pump and blast button as well as gluing together the air tank. The tank is an expanded hornet tank, with roughly 3-4 times the volume of the stock tank. I just used one of those because they've been reliable in the past, but really you could use virtually any backpressure tank. I have an updated version of my OPRV inside of it to make sure the pressure stays within reason. The trigger is a sliding trigger that connects to a hornet blast button via a piece of music wire. The fake tank portion of the blaster is made out of a rounded 2" PVC cap (Home Depot kind) and two 2" PVC coupler. This assembly reduces down to 1 1/4" PVC, which the expanded hornet tank is nested into and secured with screws. The tubes sticking out of the back of the gun are made out of 1/2" CPVC and 2 CPVC elbows. This assembly in conjunction with the two plates at the front of the blaster are what keep the tank assembly secured to the blaster frame. The pump, blast button, and CPVC coupler at the rear of the blaster are in snap on piece of 3/4" PVC with squared off sides. This makes them very easy to secure in the shell as well as more snug.

How it works:
It works like any backpressure release system. The bike pump pressurizes air into the expanded hornet tank and blast button. Pushing the blast button releases the piston in the expanded hornet tank, allowing to air to escape and fire the projectile.

Part list (most of these prices are from Ace Hardware, which is much more expensive than McMaster per unit):
-4x 3/8" 6-32 flat head screws $.32
-2x 1" 6-32 pan head screws $.20
-2x 3/8" pan head screws $.18
-5x 3/4" 6-32 pan head screws $.50
-2x 1.5" 6-32 pan head screws $.22
-9x .5" 6-32 pan head screws $.45
-2x 6-32 lock nuts $.22
-3x 1" Long 1/4" OD 6-32 Thread Aluminum Spacers $2.40
-2x 1/4" ID 1/2" OD Nylon Spacers $.60
-2x 1/2" Long 1/4" OD 6-32 Thread Aluminum Spacers $1.20
-2x .5" 10-24 screws $.40
-2x 3/16" ID 3/8" OD 1/4" thick nylon spacers $.40
-6x #6 1/4" OD 1/4" thick nylon spacers $.78
-5/64" Music Wire $.43
-1x Hornet tank
-1x Hornet Blast Button
-1/4" Polycarbonate ~$2
-1/8" Polycarbonate ~$2
-1x Small Bike Pump $4.89
-2x 2" PVC Couplers $1.94
-1x 2" PVC PVC Cap $1.56
-2x 1/2" CPVC 90 Degree Elbows $.26
-1x 1/2" CPVC Coupler $.26
-1x 1/2" CPVC Cap $.20
-1x 1/2" PVC Coupler $.36
-1x 1" PVC Cap $.66
-1/4" Vinyl Tubing NA (scrap)
-1x Barbed Tee or quick connect tee $1.25
-2" PVC NA (scrap)
-1 1/4" PVC NA (scrap)
-1" Thinwall PVC NA (scrap)
-3/4" PVC NA (scrap)

In order to differentiate this post from the one in the contest submission thread, I added some more photos and a rough overview as to how I constructed this.

I started off by carefully measuring the shell of my SM5K to make the templates. From there, I determined how to fit most of the parts together. When the templates were finally done I printed them out onto label paper and put them on their according sheets of Polycarbonate.

Posted Image

I started off by using an automatic center punch on the spots where I needed to drill holes. I then moved up to the corresponding drill bit for each hole, tapping holes where necessary. Here are some pieces fresh after cutting:
Posted Image

Next, I cleaned up the cuts with files/sandpaper, removed the paper templates, and sanded the pieces to get a frosted look.
Posted Image

I did a lot of detail oriented things with this, such as making sure the fake screw ports form the stock blaster lined up with the real ones on the VenoMaxx.

Posted Image

Once I had partially assembled the frame of the blaster, I determined that 2 2" PVC couplings and a rounded 2" PVC cap would make a good replacement for the orange "fake tank" portion of the stock blaster. Once I was able to measure how the PVC assembly rested on the frame, I determined what size to make the side plates that hold down the PVC.

Posted Image

Here's another view of the main body partially assembled.

Posted Image

Using a series of spacers, bolts, and nuts, I attached the handle.

Posted Image

Here are some more pictures of the handle as I was building it.

Posted Image

Posted Image

One thing I didn't completely plan for when designing the templates was the placement of the pump and blast button. Luckily, the pump I used already fit well in the shell and had a ridge in it that was a perfect for making sure it stays retained. All that I had to do was cut a piece of 3/4" PVC, cut a ridge out of it, snap it on the pump, square off the sides of the PVC, line the pump up in the shell, and add a bolt to make sure the ridge stays in place.

Posted Image

To drill a (mostly) centered hole in the 2" Cap, I used a series of reducers to run a piece of 1/2" SCH 80 PVC down the middle of the cap. From there, I dropped a sharpie marker (with the cap OFF, of course) through the PVC several times to mark the center of it.

Posted Image

I affixed the blast button in the shell in much a similar way to the pump. The length of the music wire connecting the trigger and the blast button was determined by cutting a piece of it slightly longer than I would need, and gradually trimming it down with a dremel until it fit well.

Posted Image

Posted Image

That's all the in process construction pictures that I have of the blaster at the moment. Obviously, the real write-up will be much more comprehensive and detailed.

Ranges:
My Draconis Missile is a lemon. It doesn't shoot more than about 10 feet from my Roto Rocket, which I know for sure works well. This blaster is definitely less powerful, so it's no surprise that the ranges with the Draconis Missile are pitiful. I'm going to be getting some fresh missiles soon, so I'll post ranges then. For now, all that I know is that it shoots an Air Zone Missile 40-50 feet flat.

Cost:
I certainly did not pay over $30 for this project. It helped that a lot of the materials and parts were purchased in bulk, as well as a lot of the parts/materials were scrap or just random things I had sitting around. If you have NOTHING and want to build one of these, yeah, you'll probably pay over $30, but then you'll extra parts/materials for more builds.

Watch the video below:

http://www.youtube.com/watch?v=iZEgxT1-HKs

Notes:
-More comprehensive range/performance testing with darts coming soon.
-I'll be war testing it tomorrow at Augustsational.
-I have a lot of plans for future additions to this blaster, many of which pertain to reproducing elements from other SuperMaxx blasters (ie an Arrow Turret to reproduce the SuperMaxx 1500 Missile Blaster).

Gotcha! The Sport: Enforcer

17 March 2012 - 09:54 PM

I was browsing a thrift store the other day when I came across this interesting find. I was so perplexed by this blaster that I didn't wait long before I did some research about it and found out what it really is. Gotcha! The Sport was line of kiddie paintball guns that were available in the late 1980's. They're very reminiscent of some of some of the "Splat" blasters of the past few years. Here are two sources of information on them:

Over the top Commercial

Virtual Toy Chest

My own photos:

Posted Image

Posted Image

Posted Image

Posted Image

Posted Image

Posted Image

From the start I knew something was wrong with this blaster. It wouldn't catch and was generally janky. Aware of my duty, being one of the few people in the NIC (if anyone else has one, speak up!) with access to one of these, I seized the opportunity to open one of these up.

The gray barrel tip slid of with just a few twists to either side to crack the glue.

Posted Image

After removing the yellow slide and all of the external screws.

Posted Image

Overall internals.

Posted Image

Close-ups.

Posted Image

Posted Image

Plunger rod and plunger tube.

Posted Image

Plunger head (really poor seal might I note).

Posted Image

The plunger tube compared to a TTG plunger tube. The Enforcer's plunger tube has an ID of ~0.9", which is slightly larger than a TTG's. The Enforcer's plunger tube is ~4.75" Long.

Posted Image

Finally, a size comparison with an Alpha Trooper.

Posted Image

Final notes:
-This blaster is horribly designed. There are so many unnecessary locks and mechanisms that need to work like clockwork (which they don't) for it to function. I can't tell if the catch is damaged or if it is really meant to be as horrible as it is.
-I do cut the manufacturer of this blaster some slack. There wasn't much to go off of at this time in terms of similar toys. The company that made these was fledgling and had more success in video games (like one with the same title as this blaster series!).
-I have likened this blaster to a bastard child of a Lock n' Load and a Pistol Splat/Supasplat.
-I plan on modding it by removing many of the internal mechanisms, replacing internals as needed, and adding a breach in the rear part of the blaster that will open as the blaster is primed forward.
-The spring is very similar to that of a "strong pistol splat" variation but several inches longer.

Sawtooth Priming Handle Removal

17 March 2012 - 04:42 PM

It has been frustrating for me in the past to try0 removing the priming handles from certain older blasters, namely the Sneakshot, Eagle Eye, and Sawtooth. Some people will tell you to pull and pry until they pop off, but in the process you often risk damaging the rest of the blaster or injuring yourself. I found a more elegant solution.

What you need:
-1/4" Hole Punch (similar metallic tubes could be substituted)
-Hammer
-Blaster that needs the priming handle removed.

We start off with the blaster. Look at that! All of the screws are out, but that meddling priming handle refuses to separate!

Posted Image

Put the punch over the priming rod on either end of the priming handle like so:

Posted Image

Hammer the punch down. I recommend holding onto the punch while you do this.

Posted Image

Finally, you should be able to separate the priming handle with ease. Notice how little damage that was done in the process!

Posted Image

Enjoy.