Jump to content


Coop

Member Since 29 Apr 2007
Offline Last Active Private

Topics I've Started

Retaliator Modification Guide - Supreme HvZ Primary

31 May 2015 - 06:24 PM

Supreme HvZ Retaliator Modifications: A Tutorial

What’s up, nerds? I’m here to teach you how to complete a quick and easy HvZ-style blaster modification for the Nerf Retaliator. As everyone that actually plays nerf knows, Stryfes are the master-race of Nerf guns and anything but a flywheel blaster is second tier. But there are some nerfers out there that don’t want to hassle with the soldering, buying upgraded batteries, or are bothered by the loud noise of an upgraded flywheel Nerf gun. Fine, live in 2009 with your spring propulsion. But while you’re back in 2009, this tutorial will show you how to make your superior-tier Retaliator into something that can at least compete with an upgraded Stryfe.

Tools Needed
- Screw driver, phillips
- Needle-nosed pliers
- Pliers
- Blade – Xacto blade, pocket knife, or sharpened unicorn horn will work
- Bandsaw – can be substituted with Dremel + cutting wheel or hacksaw

Materials Needed
- Nerf Retaliator (available through any number of Nerf retailers. Blue Elite version shown, but this mod will work with the XD or any other version)
- Worker pump kit for the Nerf Retaliator (can be found on Taobao. For the purposes of keeping this tutorial up-to-date, here is a link to the searched term ‘worker nerf’ so you can find a seller that offers these pump grips: HYPERLINK WIZARDRY)
- Worker stock (can be found on Taobao. For the purposes of keeping this tutorial up-to-date, here is a link to the searched term ‘worker nerf’ so you can find a seller that offers these pump grips: HYPERLINK WIZARDRY)
- Upgraded Retaliator primary and catch springs (can be found from many mod companies or hardware stores if you get lucky. OMW offers springs HERE)
- JB Weld (available at any hardware store)

Retaliator
IMG_1958.JPG

IMG_1961.JPG

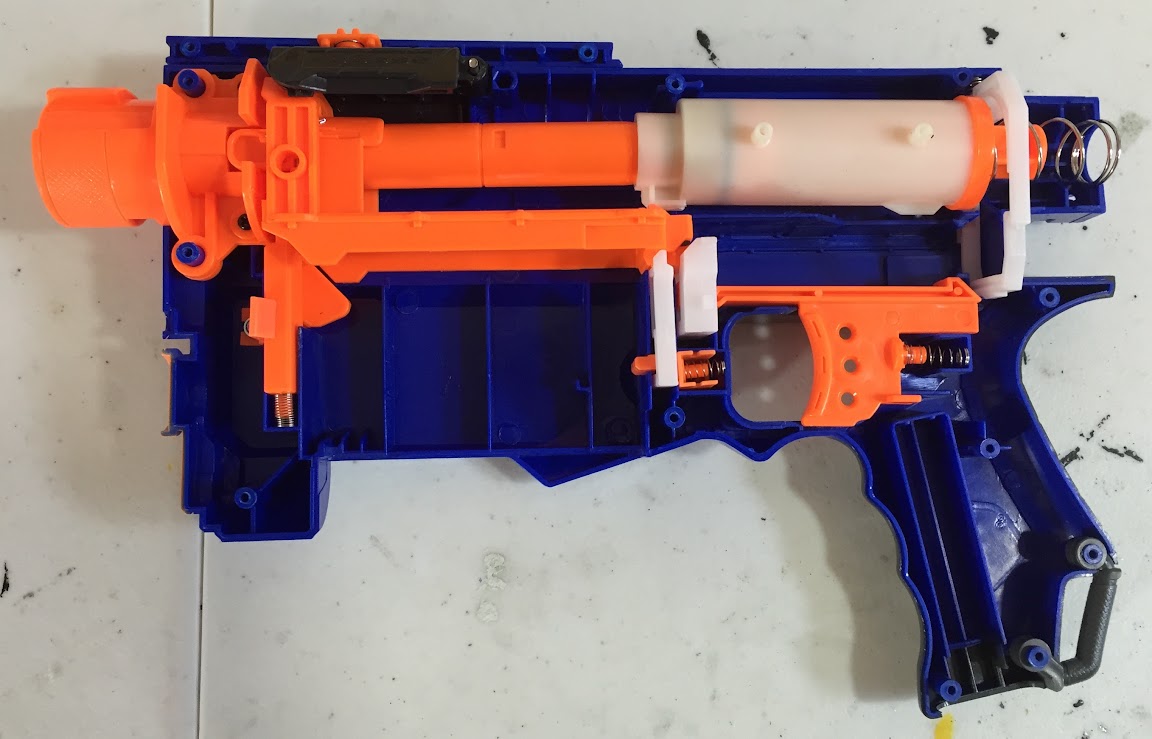
Open it up.
IMG_1964.jpg

You can start by removing these two white pieces of plastic. They restrict the magazine release and the trigger.
IMG_1968.JPG

IMG_1970.JPG

Next, remove this screw. This will release the slide from the shell.
IMG_1975.JPG

Bust out the Worker pump kit for the Nerf Retaliator.
IMG_1977.JPG

Get the small brass colored piece (from the pump kit) and push it into the Retaliator’s boltsled. This piece is what the pump kit attaches to from the outside. The small ridges in the piece create a friction hold inside the existing boltsled holes.
IMG_1982.JPG

Using pliers is a pretty easy way to ensure a snug fit.
IMG_1987.JPG

Now bust out the upgraded springs. If you upgrade the primary spring (which increases power/velocity) I would highly recommend upgrading the catch spring as well. If you have too weak a catch spring in relation to your primary spring, the catch may disengage “on its own” and when your finger is not on the trigger. Not cooh.
IMG_1972.JPG

Reassemble the internals while omitting the two locks we removed earlier and the external slide. The springs should also be replaced by this stage.
IMG_1988.JPG

Close shell.
IMG_1992.JPG

This is the piece that connects to the pump grip. It will all make sense as you read further. The answers shall come in time, young Padawan.
IMG_1994.JPG

Next, we must modify the Retaliator barrel extension to allow the use of the pump kit. The pump itself rides along the existing N-strike rail, which is part of the reason it is so smooth to operate.
IMG_1996.jpg

But the N-strike rail has a small obstacle that must be removed in order for the pump grip to have full travel.
IMG_1998.JPG

Get pliers, a dremel, or some other wizardry and remove the notch from both sides of the barrel extension.
IMG_2002.JPG

I think it’s helpful to remove the bulk of the plastic with pliers and clean up the remaining bits with a knife. An Xacto blade would be great here, or just a well-maintained pocket knife.
IMG_2004.JPG

Install the grip arms onto the grip using the included hardware and Allen wrench.
IMG_2005.JPG

Bam, completed.
IMG_2008.JPG

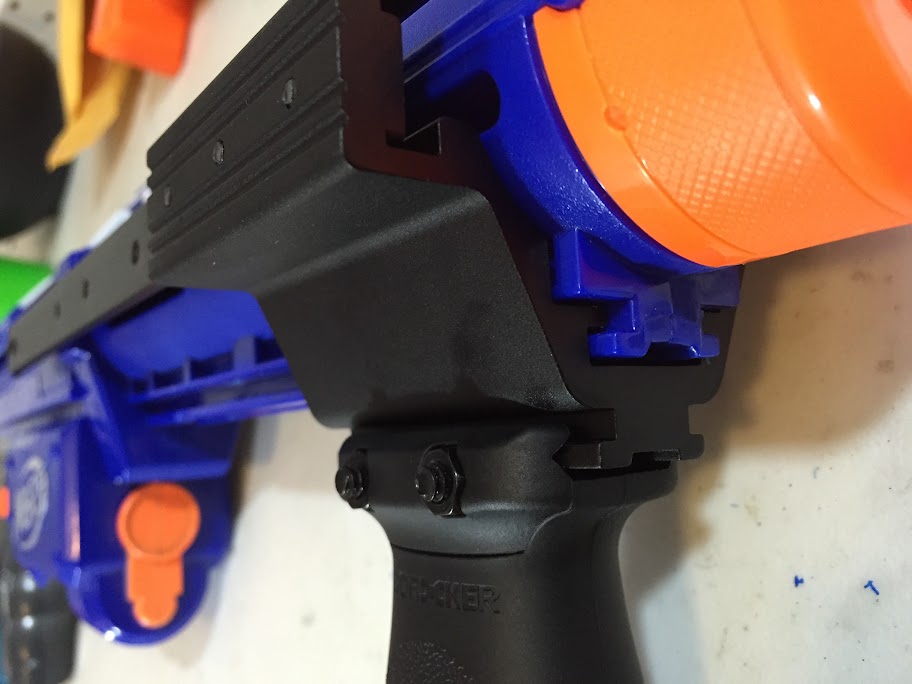
Slide the pump grip onto the barrel extension’s N-strike rail.
IMG_2038.jpg

Install the two final screws (one on each side) to connect the pump arms to the brass colored pieces we installed earlier.
IMG_2044.JPG

For added comfort and ergonomics, I definitely recommend installing the vertical grip that is included with the kit. The metal pump grip is fairly small and a bit tricky to grip alone. The vertical grip will ensure you can go supah fast.
IMG_2009.jpg

Bam, now you can fire from the hip all day every day, slayin’ zambies left and right. Maybe you’re thinking, “But Coop, I need to attach my tacti-cool scope or I won’t be able to aim! Where did the top rail go?!”
IMG_2012.jpg

We can fix that by cutting down the priming handle. I used a bandsaw but you can use a dremel or even a hacksaw. Just ensure you take enough material off to allow the pump arms to clear the blaster body.
IMG_2013.JPG

Chopped!
IMG_2017.JPG

Mix up some JB weld...
IMG_2020.JPG

And slather it on to the Retaliator shell. I chose to only put the adhesive on the right half of the shell, which allows me to unscrew the left side of the priming handle to access all of the main body screws. Because this part isn’t really load-bearing (unless you have a 5lbs. optic, lolol) it’s really not a big deal to only have adhesive on half.
IMG_2027.JPG

You can put the rail further forward to mimic the Retaliator’s traditional appearance, but I decided to move it back a bit to ensure the access door can still open.
IMG_2029.JPG

Bam, now you can slay zambies with your hardcore, supah leet tacti-cool scopes attached! But what about more comfort?
IMG_2039.jpg

The best stock on the market right now is the Lightning Storm stock in the Hasbro water-gun line. This item is a knock-off of that product made by the company Worker. Perhaps it is a patent infringement... but China aint got no time for dat.
IMG_2031.JPG

Bam, done. Now you can shoot further, faster, and more comfortably than in stock form. And the amount of time and skill for these modifications is very low.
DSC_0004.JPG

And if you prefer different colors, the grip also looks supah cool on the XD white Retaliator.
DSC_0015.JPG


The goal of this tutorial is to instruct the new modders how to build a battle-practical spring blaster if they don’t want to use a Stryfe. Some tutorials in previous mod contests didn’t even podium because they were too hardcore and way outside the reach of the superior community. So this tutorial features modifications that practically anyone can do.

"All you did was buy stuff and install it onto the blaster. That wasn't even a mod!"
Yeah, I know. The days of tinkering with your toys at home without a material cost and wrecking everyone at your wars are over. Taking out the AR's is a waste of time and the best way to increase power in a spring blaster is by replacing the spring. If you want a more cosmetically appealing mod that wrecks zambies, build a Strayven and call it a day. But garbage mods like a Strayven don't "fit the contest" so here is a tutorial on how to be successful at modding with zero skill!


- Coop


Columbus War 5.1 [OH]

01 June 2013 - 10:07 PM

Columbus War!


This is the last chance I get to play nurf guns in Ohio with NerfHaven guys. I know it's short notice, but I want to get one last foam flinging session in prior to moving south. Hopefully we can get a decent turn out on such short notice.

When:
June 29, 2013
Show up at 9:45am. Games will start around 10:00am. We’ll probably end around 3-5pm depending on people's exhaustion.

Where:
Whetstone Park of Roses
3923 North High St.
Columbus, OH 43214

Google Maps Link

- Go in the entrance and follow the road down the slope and over a number of speed bumps. Then, when the road splits after the small bridge, turn left. Since it will be Saturday morning, there will probably be quite a few cars parked along the sides of the road. We will play somewhere in the left side grass area.


Rules:
- No participants under the age of 13.
- Eye protection is mandatory for participants under the age of 18.
- Air blasters that originally fire a projectile larger than a mega dart must have their over pressure valves unmodified.
- No shields will be allowed.
- Do not use any blasters painted all black. If you have a dark blaster, please avoid wearing camouflage clothing or too much tacti-cool gear.
- Blasters will only be banned due to safety/power issues, not because it dominates.
- Hosts will have final say on all blaster bans.


Dart Rules:
We are allowing hot glue tips and felt tips for this war. These rules may be more annoying to understand, but we want more people that come to use stefans because stock dart wars are retarded.

These dart rules are revolving around safety, not range. Our idea is to standardize the “pain” level and let people use anything they want within these perimeters. Someone will eventually find a loophole or a way around these written rules. Please note: it’s not fucking cute to do this - we’ll still just ask you to leave and never come back.

Stock darts, missiles, discs or anything else like that are allowed, obviously.

Felt pad darts:
- Weights are limited to ¼” slingshot weights or lighter. This means ¼” slingshot weights are allowed under a felt pad.
- Felt pads must be approximately the same width as McMaster felt pads. This is only super important is you’re using heavy, hard weights. We don’t want a thin pad over a metal slingshot weight; that would hurt.
- If you kiss the felt to a flame to prevent fraying, please limit the amount you burn off in order to keep it soft.

Hot Glue Domes:
- Weights are limited to two (2) copper BB’s or lighter. I can’t accurately weigh these, so just don’t be a bitch and use super heavy weights with hot glue domes.
- ¼” slingshot weights with hot glue tips are BANNED.
- Hot glue must fully cover the weight - you cannot have exposed metal.
- You may not use washers in conjunction with hot glue. This causes exposed metal.

Tl;dr - Don’t be a douche bag, yo.


Game Types:
- Meat Grinder
- 3:15
- Defend the Core (DtC)
- Blob
- Ohio Wingman


Other Information:
- Bring a bagged lunch or money to get lunch during a designated break. We usually break around noon for an hour to eat at a nearby Wendy's (Columbus tradition)
- Be sure to bring enough darts to support yourself and your guests for the whole day
- Remember to bring water
- Are you new to NIC or Columbus Nerf? Check out our definitions of certain game types and other stuff that will help you when you arrive: http://pastebin.com/F8xELVyT - This is posted on an external site in order to reduce clutter. This thread is already supah long.


Definite:
- Coop
- Xellah
- Kid Flash
- BrokenSVT + 1-2
- Prince Valor + 1-2

Maybe:
- Ezio Nerf + 1
- Archangel24 + 1
- Paze
- LinkMT +1

Coop's Stryfe Modification Write-Up

06 March 2013 - 04:36 PM

Coop's Stryfe Modification Write Up - “The Strayven”

Table of Contents:
Tools Needed
Materials Needed
Stryfe Modification
Rayven Shell Integration
Strongarm Modification
Retaliator Barrel Modification
Strongarm/Retaliator Integration

What this write-up will lead to:
Posted Image

Tools and Materials Needed (expand)
Spoiler


--------------------------------------------------------
Stryfe Modifications:

I have another Stryfe write up here if you'd like to check that prior to reading this write up.

Stock Stryfe
Posted Image

Open the Stryfe
Posted Image

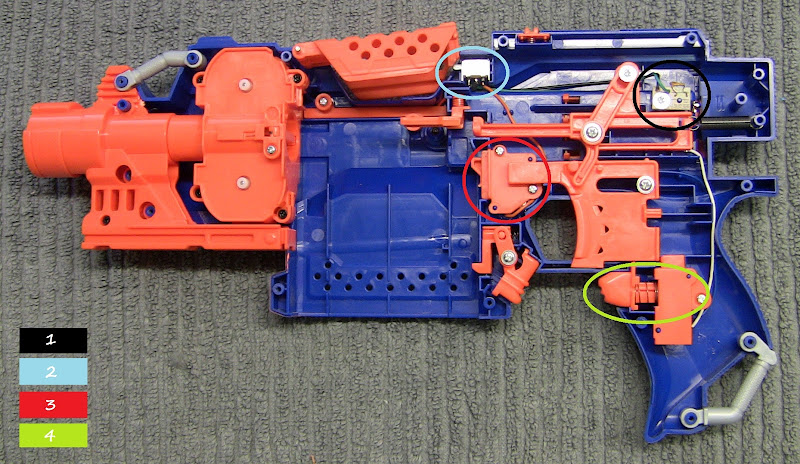
First I'll cover where some of the internal locks are and what they do. I don't think the primary components require pointing out, so I stuck with the smaller items some newer guys may be confused by.

Mechanical Stuff
Posted Image

1) Magazine release - This holds the magazine in place while firing. I wouldn't suggest taking this one out.
2) Dart lock - This lock prevents you from pulling the trigger if there is not a dart loaded in a magazine. This component slows the max ROF down a little bit by locking up under fast firing. I would definitely suggest taking it out. You can just pull it out, it takes less than 2 seconds and is nearly impossible to fuck up.
3) Magazine lock - While this isn't a mechanical lock, it's a physical piece that interacts with an electronic lock. This piece is pressed in from a magazine and closes your circuit by pressing a switch located under the little orange plate. Note: if you just remove this lock and don't rewire the circuit, your switch will always be open and not allow the blaster to fire.
4) Trigger lock - This is a lock preventing you from pulling the trigger if you are not revving the motors. This is is to prevent you from pushing a dart into the fly wheels while they are not spinning. If you're a retard, you may need to keep this lock in place to prevent jams. But if you don't pull the trigger for the LOLs while you're playing, you should be fine to take it out.

Electrical Stuff
Posted Image

1) Thermistor - this will shut down your circuit if there is too much power introduced. This little bastard is what will disable your Stryfe if you try to use four UltraFires with it out of the box.
2) Access door lock - This switch/lock will prevent you from revving the motors if the access door is not shut. This is to prevent kids from sticking their fingers into the flywheels while they're spinning.
3) Magazine lock - This switch is closed when a magazine is in the magazine well which bumps into the orange piece of plastic covering it. This switch will not allow you to rev the motors unless a magazine is in place.
4) Primary switch - This is what allows you to activate your motors at will. I wouldn't suggest taking this one out or your blaster will be revving all the time. While that would be nice since you'll always be ready - you'll be really fucking loud and your batteries will die pretty fast.

Okay, now that you know what all these things are, let's take some shit out! You can remove the dart lock, magazine lock, trigger lock, access door lock, and the thermistor unit. All of these components are rather easy to get out. I also have a tutorial here in case you need more pictures/details. Here is the shit you don't need.
Posted Image

Now remove the four screws holding in your flywheel unit. Pull it out, this is what it should look like.
Posted Image

I have tried numerous motor replacements and have tried to find ways to increase traction on the flywheels, but I am not satisfied with anything to the point of adding it to this tutorial. So we're just modifying the stuff that is already in the blaster rather than replacing it. So, cut off the resistors attached to the motors.
Posted Image

Now solder on fresh wires in the same configuration minus the resistors.
Posted Image

Be sure to cut the wires long enough to reach back to the battery tray. I usually cut a few extra inches just to be sure. Re-install the flywheel unit and rewire the blaster. Remember that you just took out a lot of electrical shit that you don't need. So, you don't need to take the same wiring route that was originally there. Copy my wiring if you don't know what you're doing. Red is positive, green is negative. (I was out of black wiring). Keep in mind, this photo shows the wiring for the DIY Firefly tech lighting as well. Also, I added an extra switch for the Stryfe under the carry handle to prevent myself from bumping my motor rev switch when I'm not playing.
Posted Image

This trigger modification will allow you to fully pull the trigger without activating the motors at the very end of the pull. It's not a big deal to have the motors rev, but I find it annoying.

Before
Posted Image

Now cut along the bottom of the trigger to prevent the plastic from pressing the little catch on the switch button. I used a dremel with a cutting wheel but you could probably manage it with scissors (LOL)

After
Posted Image

Lubricating the Stryfe trigger will make it way more comfortable to fire. I used white lithium grease which can be found at most hardware stores. It's mad cheap so feel free to go ape shit with the lubrication. Keep in mind, lube harms paint jobs so be conservative if you're painting or have painted the blaster.

Stock
Posted Image

Apply generous amount of lube
Posted Image

Lube on the area where the screw contacts also makes the trigger pull smoother. After it's applied, pull the trigger a few times to make sure it spreads all over the major contact points.
Posted Image

Also, lube the area that the trigger contacts as well. Be careful around the trigger guard or it will spill outside and ruin your paint over time.
Posted Image

--------------------------------------------------------
DIY Firefly Technology!

I like using the glow in the dark darts but I don't like the added bulk or weight (from the batteries) of using the special magazines. So, I added LEDs to the inside of the magazine well. Now you can load the glow darts into standard magazines and get them to glow.

These are not special LEDs or anything and they don't have to be. They are blue in color because that's what worked the best in my testing. I purchased these LEDs from superbrightleds.com

I'm aware this post was published prior to my thread, but I've been chatting with people about doing this for months. I did not copy that thread, but I feel it would be tacky to not mention it and pretend that I stole the idea.

The LEDs will go here. The more LEDs you use, the better your darts will glow. A slower rate of fire will also make the darts glow better because they'll be exposed to the light for a little longer.
Posted Image

Now just hot glued them into place. This isn't the cleanest way to do it, but the Stryfe magazine well is super wide and there is plenty of space for the wiring and glue.
Posted Image

I put my batteries in the back of the shell. I'm running two AA batteries without a resistor because my LED specs will allow it. I also put a switch below the carry handle to turn them on and off. I didn't want to post too many photos of that because many users will like a different battery or switch location.
Posted Image

Glow, bitch. GLOW!
Posted Image

Now reassemble and check your wiring. The Stryfe is now done.
Posted Image
--------------------------------------------------------
Rayven Shell Integration

Stock Rayven
Posted Image

Open the Rayven and clear everything out. You only need to keep the magazine catch, magazine well liner, and access door. The other components can be trashed or kept for future projects.
Posted Image

Cut along these lines.
Posted Image

So it looks like this.
Posted Image

You don't actually need to cut the Stryfe at all. Test fit the components and sand/dremel any pieces to get a snug fit.
Posted Image

Now sand both mating surfaces and apply your adhesive of choice. I used an all purpose cement which bonds plastics very well. This is just the initial bonding, it doesn't have to be mad strong or anything. Just be sure the parts stay together while adding the other adhesives.
Posted Image

Some areas are very large and difficult to apply epoxy putty. It would be a waste of putty to fill these areas. So get thin plastic sheeting or a notebook like this one for its cover.
Posted Image

Cut the plastic or notebook cover and hot glue these pieces into the large gaps. The purpose of these pieces is to lessen the area where the epoxy putty has to fill. This will make sure the putty doesn't deform, cave in, and grow weak over time, too.
Posted Image

After the sheeting is in place, cover the shell gaps with epoxy putty and sand smooth.
Posted Image

Stryfe Modification Overview

09 December 2012 - 10:10 AM

[introduction that no one reads]

Stock Stryfe
Posted Image


Open the Stryfe (unmodified internals shown)
Posted Image


This first lock prevents you from pulling the trigger if you are not activating the motor switch. You can simply remove the shown piece to disable this lock.
Posted Image

Posted Image


The next lock prevents you from pulling the trigger if a magazine is not inserted. This one also requires simply pulling it out to deactivate it.
Posted Image

Posted Image

Posted Image


This lock prevents you from pulling the trigger if a dart is not loaded in the magazine. You can remove this one very easily, just like all the other locks.
Posted Image


Photo of all the locks removed.
Posted Image


Clearing the electrical circuit will disable the magazine switch and access door switch. Also, the plate in the back will prevent you from using four UltraFires at once, so removing it will allow you to utilize a higher voltage.
Posted Image


Stock motor set-up.
Posted Image


I replaced the motors with two motors I found in a local hobby shop. They were made for RC helicopters and are quite powerful. They are a bit longer than the stock motors, so shell modification was necessary for them to work.

Motor specs: The motors are made by Blade. If you type 'EFLH1210B' into Google you can find the motors online. I paid $10.99 USD each because I had to size them up in person and the shop I go to has slightly higher prices. I bought a 'right' and 'left' version which have their positive and negative changed so they rotate in opposite directions.
Posted Image


I didn’t reinstall the resistors to the motors.
Posted Image


I experimented with using RC wheels as replacement flywheels, but I was getting nasty residue from the wheels because of the RPM. I may try different wheels later, but for now I’m sticking with the default flywheels.
Posted Image


However, I did apply a layer of Plasti-dip to the wheels for increased traction. The stock flywheels were pretty slick so I figure this will help grip the darts.
Posted Image


Modifications completed and all pieces reinstalled.
Posted Image


I glued two paint caps over the holes I had to cut for the motors to fit in the shell. It doesn’t look super clean, but I had to cover the exposed motor pieces.
Posted Image


Finished blaster. Not terribly relevant to this over view, but the paint job details are: Grey vinyl dye base coat by Duplicolor, ‘Enchanted Blue’ accents by Citadel, and ‘Chaos Black’ dry brushing by Citadel. I finished the paint with a gloss clear coat by Krylon.

The gloss coat makes photographing this blaster difficult. When there is enough light for the camera to get a good shot, there is mad reflection.
Posted Image

Posted Image


I do not have ranges, but the initial velocity is significantly higher than in stock form. I do not have space for a range test and will not have ranges any time soon.

The motor swap does not affect range all that much. While the RPM does seem to be a bit higher on the same voltage, the biggest advantage is being able to run on a higher voltage safely. With the stock motors, running four UltraFires will cause them to burn out over time. I’ve revved the motors for a pretty long time and put quite a few rounds through the blaster with the new motors and have not smelled or noticed anything with the new motors. You should not expect massive RPM gains from motors like these, the increased durability is the reason to do it.

[/overview]

Columbus War 4.5

01 October 2012 - 04:36 PM

Columbus War!

Canceled Due to Shitty Weather

When:
October 20, 2012
Show up at 9:30am. Rounds will start at 10:00am. We’ll probably end around 3-5pm depending on people's exhaustion.


Where:
Colerain Elementary
499 E Weisheimer Rd.
Columbus, OH 43214

Google Maps Link


Rules:
- No participants under the age of 13.
- Eye protection is mandatory for participants under the age of 18.
- Air blasters that originally fire a projectile larger than a mega dart must have their over pressure valves unmodified.
- No shields will be allowed.
- Do not use any blasters painted all black. If you have a dark blaster, please avoid wearing camouflage clothing or too much tacti-cool gear.
- Blasters will only be banned due to safety/power issues, not because it dominates.
- Hosts will have final say on all blaster bans.


Dart Rules:
We are allowing hot glue tips and felt tips for this war. These rules may be more annoying to understand, but we want more people that come to use stefans because stock dart wars are retarded.

These dart rules are revolving around safety, not range. Our idea is to standardize the “pain” level and let people use anything they want within these perimeters. Someone will eventually find a loophole or a way around these written rules. Please note: it’s not fucking cute to do this - we’ll still just ask you to leave and never come back.

Stock darts, missiles, discs or anything else like that are allowed, obviously.

Felt pad darts:
- Weights are limited to ¼” slingshot weights or lighter. This means ¼” slingshot weights are allowed under a felt pad.
- Felt pads must be approximately the same width as McMaster felt pads. This is only super important is you’re using heavy, hard weights. We don’t want a thin pad over a metal slingshot weight; that would hurt.
- If you kiss the felt to a flame to prevent fraying, please limit the amount you burn off in order to keep it soft.

Hot Glue Domes:
- Weights are limited to two (2) copper BB’s or lighter. I can’t accurately weigh these, so just don’t be a bitch and use super heavy weights with hot glue domes.
- ¼” slingshot weights with hot glue tips are BANNED.
- Hot glue must fully cover the weight - you cannot have exposed metal.
- You may not use washers in conjunction with hot glue. This causes exposed metal.


Tl;dr - Don’t be a douche bag, yo.


Game Types:
- 3:15
- Defend the Core (DtC)
- Blob
- Ohio Wingman
- Capture the Flag (CtF)
- Multi-team 3:15


Round Schedule:
I felt we had a lot of down time during the last war. I’m setting a round schedule to keep things on track. If you’re derping around in the staging area and being slow, we’ll start without you.

Also, if you’ve never hosted a war, you do NOT get to back seat host. Standing around complaining about how slow I am being or how bad a host I am being is fucking stupid when you’ve never hosted a war. It’s a tough balance to keep things on a speedy schedule while not coming off as a tyrant.


Other Information:
- Bring a bagged lunch or money to get lunch during a designated break. We usually break around noon for an hour to eat at a nearby Wendy's (Columbus tradition)
- Be sure to bring enough darts to support yourself and your guests for the whole day
- Remember to bring water
- Are you new to NIC or Columbus Nerf? Check out our definitions of certain game types and other stuff that will help you when you arrive: http://pastebin.com/F8xELVyT - This is posted on an external site in order to reduce clutter. This thread is already supa long.

Map of Area:

View this map with a detailed legend in a larger window.


Attendance:
- If you plan to attend but cannot post here due to validation issues, please send me an email at Coop772 (at) gmail (dot) com if you’d like to RSVP.


Definite:
- Coop
- Xellah
- ck32
- Prince Valor
- PBZ

Maybe:
- XproXglassX
- Lone Wanderer