Jump to content


pSyk

Member Since 18 May 2011
Offline Last Active Nov 10 2016 11:54 PM

Topics I've Started

pSyk's "Auto-Loading" Rampage 3k + Vid

29 October 2012 - 11:46 AM

Hello!
Long time no write-up!
:)

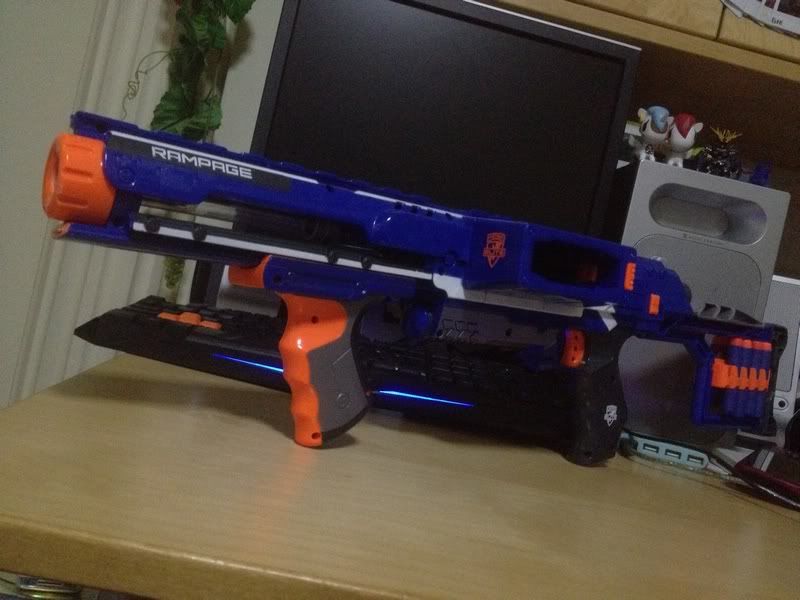
Let's start by showing you what you'll end up with:
(Or rather... what I ended up with)
Posted Image
TA-DAA!
A Stock N-Strike Elite Rampage!

Just kidding.
It looks almost like it's stock.
It's a Rampage with an Air Tech 3000 air tank.

I know that this isn't the first Raider / Rampage with air tank internals, but mine has a twist...
I made it with an "auto loading" feature.

Back story:
I first saw Popatachi make this back in 2010:
Popatachi's original Raider 3K vid

Then I saw AJ / AdelaideNerf make one with a Mega Missile Tank:
AJ's Raider + Mega Missile Tank Integration vid
(Writeup: http://nerfhaven.com...showtopic=19961)

Finally, I saw Coop make one with an SM1500 tank (and a hopper):
Coop772's Raider + SM1500 Tank vid

Recently, I landed myself an extra Rampage shell after perfoming a Rampage-Raider retrofit (that I happily call the Rapage, tee hee) so I decided to try my hand at this.

I wanted to steer away from my usual usage of wyes, and I focused my mod idea based on Popatachi's and AJ's:
Popatachi's required a manual load of a dart in-between each shot while AJ's required you to perform a separate action to work the breech to feed the next dart from the clip.
However, Popatachi's retained more of the original stock Raider look by using the stock front grip...
and I decided that I would try to come up with a version where I could maintain at least 90% of the stock appearance, while making it feed darts from a clip into the breech without the need for a "separate action".

Before I continue, I want to say that while working on this mod, hamoidar actually came up with essentially the exact same concept in the form of a homemade (with a stock airtank) that he named the "RAD-V1" and "RAD-V2".
Just to be clear, I claim no credit. It's just a case of 2 people having the same idea. Kudos to hamoidar!
Check out his writeup here:
http://nerfhaven.com...showtopic=23221

Write-up: RAW The Force Mod aka "Duo Force" (Picture Intensive

11 June 2012 - 06:16 AM

**** PICTURE INTENSIVE POST! ****

To start off, this is the finished product (or something close to this) should you choose to perform this mod:
Posted Image

Basically, it's a modded RAW The Force blaster with a BBBB tank addition and a pump replacement.
But, before you carry on, kindly read through the entire write-up first before you decide on whether you want to perform the same mod or come up with your own variation(s).
1) I have a tendency to hopper my blasters. If you don't like hoppers, then I'm sure you can come up with a variation.
2) I used a BBBB tank. You don't have to.
3) I'm Southpawed. Right handers, all you have to do is "flip" the side of the pump and hopper for the BBBB tank.
4) I kept an adjustable OPRV. You might not want that.


________________________________________________________________

Things / materials I used for this mod:
- RAW The Force blaster
- BBBB airtank (including the pump)
- CPVC
- CPVC elbow joint x 3
- PVC wye x 2 (for the hopper)
- 1/2 inch PVC pipe (for the hopper barrel & clip area, and a short little stub for Taerkitty's lever trigger mod)
- 1/2 inch PVC endcap x 2 (for the hopper clip)
- 1/2 inch PVC straight coupler
- 1 inch PVC tube (thanks to hamoidar for the clarification!)
- PETG (for the hopper)
- Pipe cutter (the spinspinspinspinspinspinspin type)
- Pipe cutter (the ratcheting type aka "parrot")
- A bunch of assorted screws
- A bunch of assorted washers
- A small spring (to add to the lever trigger mod)
- A metal stationery clip with removable arms (for the lever trigger mod - according to Taerkitty, medium sized.)
- A dremel (you absolutely need this.)
- A cutting bit
- A sanding drum bit
- A small drill bit
- Superglue
- Goop
- Hotglue gun
- Hotglue
- A (Crappy) Schwinn bike pump
- Vinyl Tubing
*** Optional: some tubing joints, depending on the type of pump you're using
- A short length of galvanized steel wire
- E-Tape

________________________________________________________________

Here we go.
First up, external, internals and exploded internals pictures courtesy of makeitgo.

Posted Image
Posted Image
Posted Image

Look at the picture just above;
We're NOT using the orange crosshair piece, the orange muzzle piece, and the purple piece that looks like binoculars.

Now look at the next picture;
We're NOT using the purple rod, the gear piece, the metal pin, the black cylindrical piece and the two black wheel pieces (that are pictured sitting in the shell) along with those metal pins.

Posted Image

I took a CPVC elbow joint, wrapped some e-tape around one end and shoved that into the back of a wye.
Then I just jammed the air output of the Force tank into the other end of the elbow joint.
It fits, you just really need to jam it in.
I drilled a hole and installed machine screws so it's going to be crazy sturdy.
Note that the machine screws are very, very, very close to the tank itself because the air output lip is very short.
Posted Image

Get your dremel and scanding bit and do this to the shell:
Posted Image

Do that on both sides so you get this:
Posted Image

Once done right you should be able to get this:
Posted Image
Posted Image

Now, if all you wanted to do was just to add a hopper to the Force tank, you can close your blaster back up and call it a day.

If not, carry on reading to the next post.

Shadowhawk Trigger Mod (pSyk's "clean" version)

31 August 2011 - 12:38 PM

Hello hello!

When Jaxx Pacific announced their Max Force series, I went crazy over the Shadowhawk... until I found out that it was not only a spitwad blaster, but it had no trigger.

However... the blaster itself appealed to me so much that I decided I'd get one just to convert it to fire darts and have a proper working trigger, much like how I converted the Xploderz Xranger.

_________________________________________________________________
*****DISCLAIMER*****

Please read through the entire write-up first before attempting your own version.
I wish to warn all of you that the way I did it is really messy on the inside because
I went through alot of trial and error to get the result I was going for.

After reading through the whole write-up, I'm sure that you'll understand what I
went through and I know for sure that you guys will end up with a better,
cleaner, more efficient version of this. Thanks.
_________________________________________________________________


Right! Let's get straight to it.

Things you need: (things I used)
- Dremel with Sanding Drum & Cutting Bit
- Random spare trigger piece
- L-bracket
- Hotglue gun (with hotglue please)
- Bunch of springs (small sized)
- Screws (varying sizes depending on what L bracket you use)
- spare piece of plastic (I used the handle of an old paintbrush)

Before I show you the pictures I want to make it clear that I did not plan to make a "step by step" sort of write-up.
Okay.

So open up your blaster and you should see this:
Posted Image

a closer look:
Posted Image

I know it's not shown in this write-up but I actually chopped the output down, and gooped on a new barrel and made it an internal in-line clip.
Check the vid at the end of the write-up where I talk a lot and give you a firing demo.

Right.

So at the area where I say "Make a cut here", I know it's kinda vague right now but take a look at the next pic and you'll understand.

Posted Image

Basically the cut area is to accomodate the new "tooth" notch that's glued and screwed down into the L-bracket.
That notch is fashioned out of the scrap plastic I mentioned in the "parts list". I got that plastic piece from the body of an old paintbrush.
I have no idea what material it is... maybe Polycarb?
It's definitely NOT acrylic though.

This will be part of the catch mech of the trigger setup.
The rest is actually kinda easy to understand while looking at the picture.

Why do I have 2 areas of hotglued springs?
Because the one on the back provides stability for the L-bracket and the one just below the tooth notch acts as the "catch spring".

Oh yes, I know I didn't mention it in the picture (but I guess this would come with common sense...),
but dremel out the grip area of the shell so that you can fit the L-bracket in, with enough space for a little movement.

another pic:
Posted Image

Sorry, I forgot what trigger I was using. It might have been a Buzz Bee Ultimate eat shit Blast trigger.
I know I cut it into the shape you see above.

The trigger has nothing holding it down. It won't slip out because the slot I cut is almost exactly in the size of the trigger and it rests nicely against the 1/2" pvc stub.

We're almost done:
Posted Image

Measure the correct place where you have to cut your notch for the tooth to go in.
Cut a notch, and also shape the end of the priming rod so that it will travel over the tooth.

Why did I chop the front?
SHOTGUN PUMP FTW!!!!!!!!!

This is so that you can have the grip return to the "forward" position instead of having it to sit at the back end of the priming stroke.

Why did I salvage the rubber piece from the front of the blaster and stick it at the head of the priming rod?
Because the head of the priming rod will smash into the back screwport of the priming grip.
Logic, my friend. Logic.

Now once you're done, it should look something like this:
Posted Image

Now... before you make this fire darts, remember to upgrade the spring.
Inbetween taking these pictures and filming the vid,
I slipped a slightly smaller O-ring infront of the stock O-ring and now it's getting a 100% seal.
Also, I've added a return spring to the pump so it works just like how a PAS does.

For a firing demo (yes, with darts, not spitwads) and everything else (like seal demo, etc),
check my vid in the next post. (2 parts... LONG but in-depth vid.)

Rads 12 Mod Write-up

06 August 2011 - 09:38 PM

Hey guys.

It's been quite awhile since I last posted a mod write-up, and so I decided I'd bring something fresh to the table.
I picked up the Rads 12 simply because I was intrigued by the turret rotation and priming systems of this blaster.
Seems that Buzz Bee put quite alot of thought into this, and came up with this clever idea.
12-shots with a relatively compact, small-sized turret.

However...
Stock ranges are crap. It averages about 20-25ft, using the stock Buzz Bee darts.
The darts that come along with it are the "rubber body" type of Buzz Bee suction darts. You know, not the soft foam ones.

Right. Before we begin, as always, here's a list of what you need. (Rather, what I used.)
- Dremel with Sanding bit / drum
- Hacksaw
- PETG (variable length; will be explained in the write-up)
- Small O-ring, harvested from a spoilt laser pointer
- Goop
- Superglue
- Screwdrivers. Philips and flat head.

So let's start.
The first thing to do is to remove the screws on the luger-style priming handle.
Then, find your own way of removing the priming handle.
I "eased" it out one side at a time.

Sorry, no pics of this because I didn't wanna risk stretching or breaking the plastic. You'll understand when you try it.

Then, go ahead and remove all the screws of the shell. They're all of the same size.
Now, customary internals pic.

Posted Image

Here's some good news for all you paintjob fans...
There's ZERO stock paint on this blaster shell.
The different colored segments of the shell are all made out of moulded plastic, and they can easily be separated. No more masking woes! haha.

Alright here's a look at the trigger and catch mech:

"Rest" Position:
Posted Image

"Squeezed" Position:
Posted Image

The catch mech is pretty damn good, I highly doubt you'll need to make any changes even if you upgrade the plunger spring.

Next up, take a look at the plunger-to-turret seal area:
Posted Image

The seal is honestly, pretty crappy. You can't really tell from this pic. But trust me, it's pretty crappy.
Yes, there's very little tolerance in that entire area. It's gonna be pretty hard to improve the air output of the plunger. You'll see in the next pic.
After seeing this, I was a little disappointed because it meant that any performance improvements made to this blaster was pretty limited due to all the restrictions.

Here's a look at the air output area:
Posted Image

Now grab your flat head screw driver and ease the rubber seal out.
Posted Image

Here's a pic of the rubber seal, alongside the small O-ring that I harvested from a spoilt laser pointer.
(I believe that you can harvest similar O-rings from spoilt laser painter modules too.)
Posted Image

Next, apply some superglue just behind the lip of the stock rubber seal and slip the O-ring on, and you'll get this:
Posted Image

And now, to remove the plunger assembly:
Posted Image

Take note of this:
Posted Image

Be careful not to lose the pin that's located just behind the trigger.

-------------Please do not post yet---------------

A Tech Target mod (plunger relocation, etc.)

03 July 2011 - 02:51 PM

Hello once again everybody!

It's been too long since I last posted a write-up so here's one!
I picked this Tech Target up in a lot, never actually intended on getting one, but since I had it, what the heck right?

So I read all the write-ups I could find on the interwebz...
And I cracked mine open. Then my mind cracked.

I'm not going to go through the "standard" mods because there are so many other great write-ups around.

Essentially, this thread is to share with everyone how I performed these mods:

- Plunger Relocation (which translates to a draw extension)
- PVC Couplered

I basically used scraps of what I had to help with this mod. This way, you don't need to worry about using glue or goop or epoxy to hold your relocated plunger tube in place.

And everything's explained in this one single picture:
Posted Image

:)