
#76

Posted 04 October 2007 - 11:01 PM
#77

Posted 04 October 2007 - 11:15 PM
It will be able to fire without the covers on so that's how I intend to take the video.That shit is grooooooooooovy. Before you paint it, you should take some shots of it firing so we can see how the internals work. Nice work, as always.
#78

Posted 04 October 2007 - 11:26 PM
You are so going to beat me done with the pnumatic semi auto, its not even funny how bad your beating me done...
Oh well mines much different and it will get done some day...
#79

Posted 05 October 2007 - 03:41 PM
Looking forward to a video. . .
"Who the hell died and made everyone the Nerf prophet?" -Piney
#80

Posted 05 October 2007 - 05:57 PM
#81

Posted 05 October 2007 - 05:59 PM
It will make more sense once I get the other parts installed, but what the air cylinder is actuating is the PETG Barrel which it slide towards the back of the gun and over the dart. The barrel then seals onto a lip piece with two o-rings.What will push the dart into the barrel/seal off the breech?
I haven't done anything today. Feeling too crappy.
#82

Posted 06 October 2007 - 04:09 PM
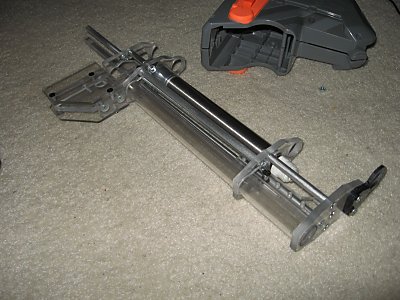
See the springs?
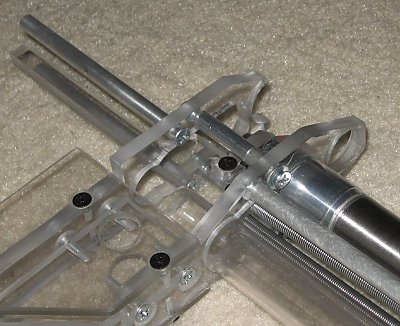
It's hard to see when most of the parts are clear, but the air cylinder is linked to a "shoe" which will be glued onto the barrel. The "shoe" keeps the top-most dart in the magazine at the correct height for the barrel to later actuate over it.
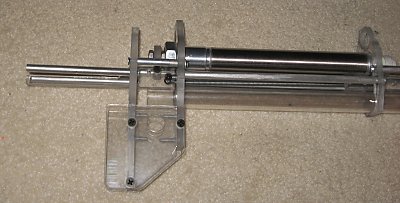
When the trigger is released the air cylinder actuates the "shoe" and the barrel backwards over the topmost dart...
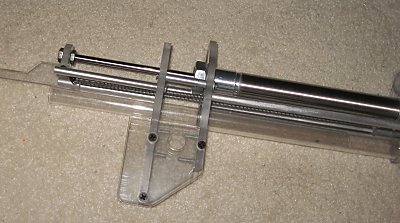
And onto this lip piece that has an o-ring making an air-tight seal on the inside of the barrel. The gun is then ready to fire. When the trigger is pulled the pressurized air in the air cylinder and the inline tank will dump into the barrel through the lip piece, and that will fire the dart.
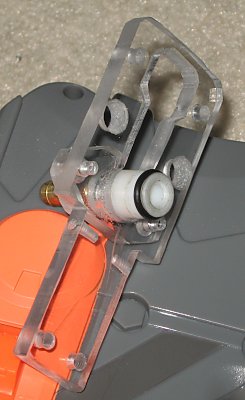
Once the air cylinder is depressurized the springs pulling on the shoe will pull the barrel open and retract the air cylinder, making a complete cycle.
Right now I'm waiting for glue to dry, and there's some final machining work to be done on the shoe so that I can glue it to the barrel.
The most annoying step possible is beyond all of that: running the tubing inside the gun.
Edited by CaptainSlug, 06 October 2007 - 04:10 PM.
#83

Posted 06 October 2007 - 06:16 PM
That thing is amazing, I can't wait to see it in action.
1. Go to the search button in the right corner of the screen
2. Click
3. Search double longshot clip.
#84

Posted 06 October 2007 - 08:21 PM
Edited by CaptainSlug, 06 October 2007 - 08:57 PM.
#85

Posted 06 October 2007 - 09:45 PM
You really are a genius, aren't you?
#86

Posted 06 October 2007 - 09:58 PM
That can be confirmed or denied once it's finished. But yes I would consider myself to have an above-average intellect.You really are a genius, aren't you?
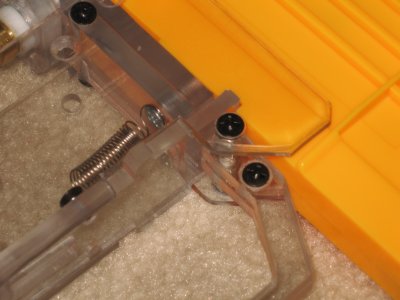
I removed the secondary lock and the magazine now stays firmly in place, but is extremely easy to remove once the mag lock is pulled back.How easily does the magazine slip out of the well? About the same resistance as in a standard LS?
Edited by CaptainSlug, 06 October 2007 - 10:42 PM.
#87

Posted 06 October 2007 - 11:25 PM
So I was thinking today. Do you think you might be able to modify this gun to run off a chain feed system.
#88

Posted 06 October 2007 - 11:30 PM
No, And I will never contemplate something like that considering the amount of work required.So I was thinking today. Do you think you might be able to modify this gun to run off a chain feed system.
#89

Posted 07 October 2007 - 05:55 PM
Founder of the Shadow Militia.
Founder of Nightshade Laboratories and The Nightshade Armament Corporation.
#90

Posted 07 October 2007 - 08:45 PM
If you compare this photo: http://www.captainsl...f/abp5k_999.jpgI really wish I had the tools and machines available to make my work that clean and precise. Out of curiosity, what was the secondary lock? I only recall there being one notch in the LS magazine, so was it a different system altogether?
To this one: http://www.captainsl.../abp5k_9997.jpg
You'll see that the side panel is now a different length. It was originally lined up against the ridges in the center of the side of the magazine rather than with the ends of the rounded part at the top. This allowed the magazine to click into its intended position once inserted. But the spring-loaded lock does a fine job of this anyways and the secondary lock makes it a little more awkward to remove/install the magazine so I got rid of the secondary.
Edited by CaptainSlug, 07 October 2007 - 08:45 PM.
#91

Posted 07 October 2007 - 11:33 PM
me to. Very nice design, great job captainslug.That looks really cool. I wonder how hard it'll sling darts.
I went into the choir room today and told the teacher," I can ony sing base" she said," I can fix that" she gave me a prompt kick in the nuts; i've been singing soprano ever since.
~DART
#92

Posted 08 October 2007 - 09:16 AM
#93

Posted 08 October 2007 - 12:28 PM
As for it's intended role: It's meant to be a primary. It should shoot farther, be more reliable, and more accurate than any Longshot.
The main goal of this project was to work around what I would consider the only great part from the Longshot (the magazine). All of the parts where built from the center outward based on the measurements of the Longshot magazine.
The mechanism of the longshot does almost everything in the most inefficient way possible. The design Hasbro came up with had to be built around the air restrictor. A part that all of us just remove, but then we're left with alot of dead space inbetween the plunger and the back of the dart.
The solution was to work in reverse. And instead of having one tube sliding inside of another like all of the other breeches that have been made the limited space dictated the need for a lip piece for the barrel/breech to seal onto.
Edited by CaptainSlug, 08 October 2007 - 12:29 PM.
#94

Posted 09 October 2007 - 05:06 PM
Sunday night nearly gave me a heart attack. Alibre Xpress was telling me that my design files for this gun were corrupted, it wouldn't let me edit or delete anything. However I was able to copy the sketches and paste them into a new clean file and everything seems fine now.
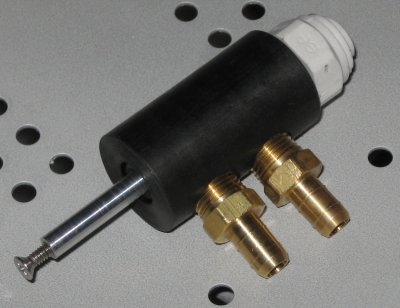
Valve number 10 is finished and is working miles better than any of the previous versions. It's a 3-port variation of Boltsniper's push-button valve and was made with just a lathe and drillpress.
The shoe and barrel/breech are being solvent-welded together tonight.
I need to make one or two replacement frame pieces and then I can mount the valve in the gun. Once that is done I should be able to test everything together.
#95

Posted 10 October 2007 - 09:50 PM
So far this project has been providing daily design challenges that require new adjustments. And no matter what kind of problem I've run into I've been able to develop a contingency plan. I should have a working arrangement now, but if something unforeseen pops up I still have some ideas on how to cope with it. The process has been very enlightening, and it's only been a few weeks.
New pictures coming soon.
Edited by CaptainSlug, 11 October 2007 - 08:57 AM.
#96

Posted 11 October 2007 - 07:31 PM
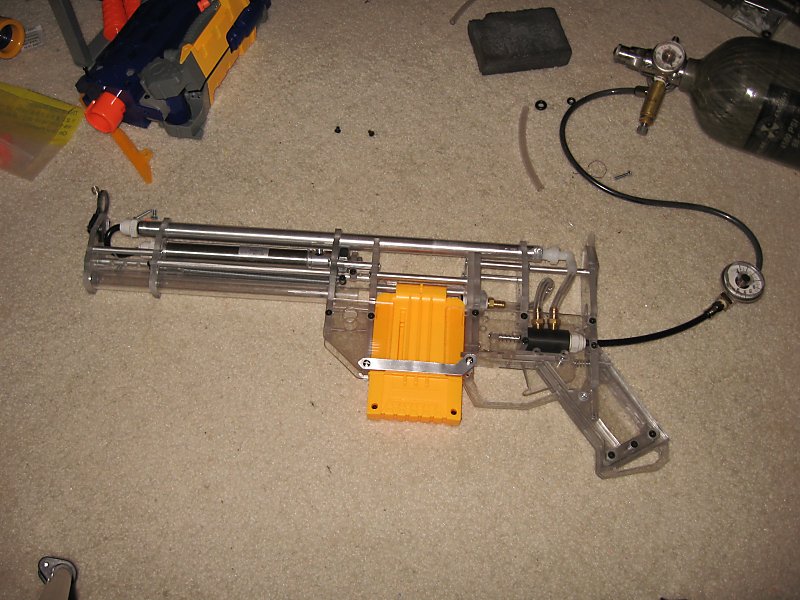
Video
Edited by CaptainSlug, 11 October 2007 - 07:44 PM.
#97

Posted 11 October 2007 - 07:35 PM
EDIT: Is this going to be one of those homemades where it's all custom machined and the only way someone could build it is if they had the schematics and a fuck-load of money?
Edited by deaddumpster, 11 October 2007 - 07:41 PM.
I've said it before, and I'll say it again. A good nerf gun is like a good woman. It shouldn't require extra lubrication.
#98

Posted 11 October 2007 - 07:37 PM
I can't wait to see it sling off darts.
#99

Posted 11 October 2007 - 07:42 PM
I'll probably be taking it even if I don't get it 100% done because there are people that want to see it.I'm going to guess you're taking this to Hell with you?
Yeah, pretty much. None of the machining was what I would consider very difficult and was all done with a drillpress, scrollsaw, and bandsaw. Only a few parts were cut with the tablesaw, and the shoe part that I glued to the barrel/breech had to be cut on it's edge using the mill so I could get a good joint. But I could have sanded it using a stone grinding bit instead if I had the right size.Is this going to be one of those homemades where it's all custom machined and the only way someone could build it is if they had the schematics and a fuck-load of
moneytools?
I'm sure if I handed a complete set of templates and assembly drawings to KBarker that he could probably build one himself, but he has access to the same tools and as far as I know is just as proficient with them as me.
This is not a simple gun by any means and I don't anticipate anyone else being able to make one that's similar any time soon. The REAL work was in getting the first one working. Making another wouldn't be anywhere near as difficult. Not that I plan to make another anytime soon though.
Edited by CaptainSlug, 11 October 2007 - 09:32 PM.
#100

Posted 11 October 2007 - 07:45 PM
I'll probably be taking it even if I don't get it 100% done because there are people that want to see it.I'm going to guess you're taking this to Hell with you?
Yo... I'm one of those. We'll all be staring, bowing down and running in fear if it actually get's finished by then.
I've said it before, and I'll say it again. A good nerf gun is like a good woman. It shouldn't require extra lubrication.
2 user(s) are reading this topic
0 members, 2 guests, 0 anonymous users


 This topic is locked


