Jump to content


Photo

Magstrike 20

clip + clip = huge clip

121 replies to this topic

#26 CaptainSlug

CaptainSlug

    Resident Mad Scientist

  • Administrators
  • 4,763 posts

Posted 06 October 2006 - 01:36 PM

I'm going to get some tubing, however, I was planning on leading it in to a back pack, soo do I need those plastic green parts? And cna I find a wide selection of hosebarbs at home depot, will I need to order them online?

If by plastic green parts you mean the forward grip on the gun, no it serves no purpose for the operation of the gun itself.
As for tubing I highly recommend Masterkleer PVC tubing. Mcmaster part# 5233K52 (1/4" OD 1/8" ID @ $0.14 per foot) will be easy to cut, flexible, and is still rated to extremely high pressures.
For fittings there's really nothing easier than Instant Tube Fittings (sometimes referred to as push-to-connect fittings). Unlike barbed fittings you shop for them based on the OD of the tubing you plan to use with them.
Mcmaster part# 1901K22 @ $1.91 each
Posted Image
But if you need to be more frugal you can use barbed fittings for most of your connections.
Mcmaster part# @ $4.05 for 10
Nylon Single-Barbed Tube Fitting Barbed X NPT Male for 1/8" Tube Id, 1/4" NPT
http://www.mcmaster....ll/5463kp1s.gif

Buying any of these items from Home Depot will cost a considerable amount more than through McMaster and your options at Home Depot will be limited by what your local contractor demand is.

1. Now the clip can hold longer barrels.
2. Captain slug you need to do my version of the clip mod or find your own way of making the clip air tight.
3. I just hope the shell doesnt snap if you were to drop it.
4. Towering Inferno is an excellent name.
5. Now the operating pressure is 30 psi. You plan on boosting that up. That will speed up the ROF. If you were to slap a few rubber bands on the piston or found some original way of strengthening the piston, the air pressure would have to build up more before firing a dart. As you know this would give you more range.
6. If you plan on backpack modding this thing then you might as well strengthen the piston.
7. If you strengthen the piston and don't do the clip mod I can guarantee you that the taggers will spiral out of control. I discovered this happened with my unbrassed clip when I fired it after banding the piston. It needs the brass.

1. I did the modification so late at night that I hadn't even though about that, but yes it's obviously very possible.
2. Indeed. I will be tackling more clip modification after I get the tank operational. I specifically want to replace the very thin backing sheet of the clip with polycarbonate so that the back face of the 20-round clip is one smooth surface. Then I may also lathe some SCH80 CPVC inserts for using micro stefans.
3. I've already dropped it three times. There's alot of polycarbonate bracing in the joint between the two clips and all of the empty space was carefully filled with hot glue.
4. I think so too. It's just so absurdly tall in it's new configuration and looks more like a nail gun than a nerf weapon.
5. 30psi is what the piston starts to actuate at that. The parts inside the gun do regulate the pressure to a limited degree because I suspect that the stock bladder is reaching very high pressure levels that are getting stepped down. 50psi input should give me very consistent results in terms of performance, but I can ramp it up to as high as 125psi in testing is I think the internals of the gun could handle the pressure load. Once I have the tank done I can start deciding on other modifications based on the capacity that the tank offers.
6. Definitely.
7. The clip modification will come after the tank. And after I have the clip the way I want it then I'll start fiddling with the piston. All I've really done inside the gun is plug the vent on the winged piece.

I ALWAYS leave some wiggle room in my modifications for later revisions. If I can avoid doing something in a permanent fashion I will. This gun is no exception and should provide me with lots of room for fine tuning later on. Thanks to the compressors I can play with at work it will be very easy to determine the optimum configuration for any modifications I do on the internals of the gun.

Edited by CaptainSlug, 06 October 2006 - 02:03 PM.

  • 0
The little critters of nature, they don't know that they're ugly. That's very funny, a fly marrying a bumble bee. I told you I'd shoot, but you didn't believe me. Why didn't you believe me?

#27 SirTofu

SirTofu

    Member

  • Members
  • 424 posts

Posted 06 October 2006 - 03:07 PM

I actually meant plastic parts that go on the bladder, I believe they are green in the magstrike?

Also do you know what ID the vinyl tubing is in the magstrike that leads to the rubber bladder?
Because I could then use product # 1901K14 to connect the tank to the vinyl tubing that leads to the piston.
Thanks.
  • 0
Nobody online Nerfs in the SE :(

#28 CaptainSlug

CaptainSlug

    Resident Mad Scientist

  • Administrators
  • 4,763 posts

Posted 06 October 2006 - 03:42 PM

1. I actually meant plastic parts that go on the bladder. I believe they are green in the magstrike?
2. Also do you know what ID the vinyl tubing is in the magstrike that leads to the rubber bladder?
3. Because I could then use product # 1901K14 to connect the tank to the vinyl tubing that leads to the piston.

1. There are two parts that connect to the stock bladder, and both are white nylon. The forward piece has a compression fitting for the tubing that goes to the trigger valve, and a cemented barbe fitting that connects to the stock pump. If you were to simply replace the stock bladder with a longer one you could slide the longer replacement bladder onto this part.
The other piece is the end cap with and integrated over-pressure valve. The over-pressure piston is a little green peg. This end cap piece is what should be replaced with a 3/4" OD PVC plug.
2. The ID of the stock tubing is a weird fractional size. It's either 3/16" or 5/32". But I recommended instant tube fittings because the stock tubing OD is 1/4".
3. Yes. That's the exact same coupler that I am using to do the same thing.

Edited by CaptainSlug, 06 October 2006 - 03:43 PM.

  • 0
The little critters of nature, they don't know that they're ugly. That's very funny, a fly marrying a bumble bee. I told you I'd shoot, but you didn't believe me. Why didn't you believe me?

#29 SirTofu

SirTofu

    Member

  • Members
  • 424 posts

Posted 06 October 2006 - 10:14 PM

Thanks captain slug! One more question, do I need to glue the tubing in to the fittings?
  • 0
Nobody online Nerfs in the SE :(

#30 CaptainSlug

CaptainSlug

    Resident Mad Scientist

  • Administrators
  • 4,763 posts

Posted 06 October 2006 - 10:16 PM

Thanks captain slug! One more question, do I need to glue the tubing in to the fittings?

Definitely not if you go with instant tube fittings. You simply push the tubing in, then tug lightly and it locks in the fitting. To remove the tubing push down on the ring collar of the fitting then pull the tubing out.

In related news: For this project I found a use for the clips from the useless scope that comes with the longshot. I'll use one of them to mount the regulator (and maybe the tank pressure gauge) onto the gun.

Edited by CaptainSlug, 06 October 2006 - 10:17 PM.

  • 0
The little critters of nature, they don't know that they're ugly. That's very funny, a fly marrying a bumble bee. I told you I'd shoot, but you didn't believe me. Why didn't you believe me?

#31 CaptainSlug

CaptainSlug

    Resident Mad Scientist

  • Administrators
  • 4,763 posts

Posted 07 October 2006 - 06:39 PM

The regulator hasn't arrived yet and I've been feeling utterly miserable the past two days due to arthritis. Despite that I got the tank finished and have been testing it thoroughly.
Posted Image
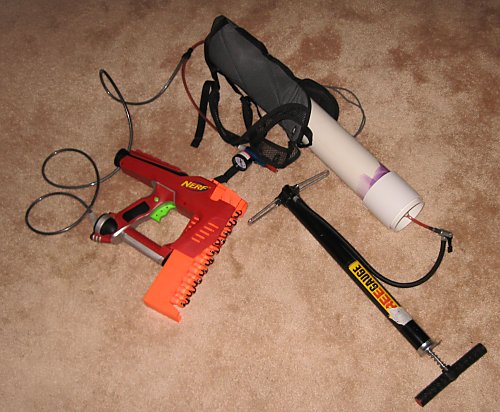
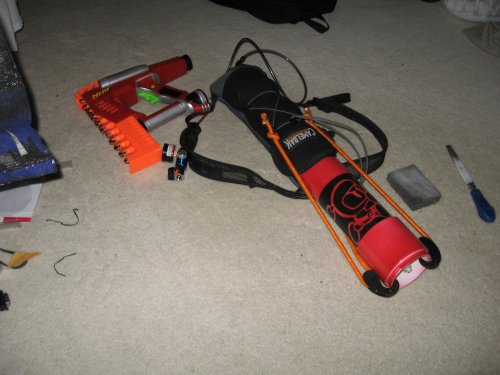
The tank is made out of a 20-inch long section of SCH40 3" PVC pipe with both ends plugged with a coupler and a pipe cap. The bottom end of the pipe has a one-way valve and an input nozzle cemented to the tubing to mate up with the pump when needed. The tank is then strapped tightly into a camelback bag so I can sling it onto my back.
The bike pump can't fill the tank above 50PSI so the regulator wasn't needed for these tests. But at that pressure level I can get off 50 shots before the tank bottoms out in pressure (25PSI, at which the gun ceases to cycle any further). This is very good news because my goal of being able to fir off 60 rounds is very close. All I need is a heavier bike pump, or a hook up from a compressor so I can reach a higher tank pressure level once the regulator comes in the mail.
Posted Image
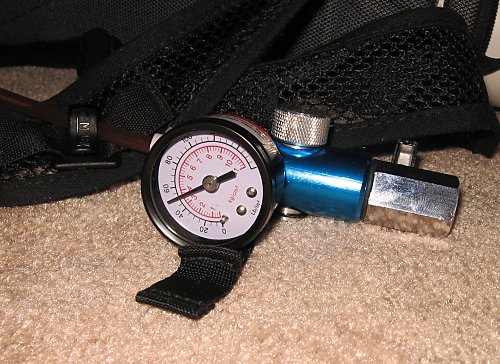
Attached to the shoulder strap is a 0-160PSI pressure gauge, a flow control valve (the blue piece), and a dump valve (the chrome piece on the end). It's easier to refill the tank if it's completely emptied first, so I can use the flow control valve and dump valve to do so in a controlled manner.

Next I need to...
1. Get another tubing coupler to add an extension to the tank input so that I can refill the tank without having to take it off of my back
2. Once it arrives, mount the regulator to the rail on the top of the gun
3. Modify the clip
4. Get a heftier bike pump

The outcome of todays test is that provided you have a strong enough pump, you can make an external tank without having to use a regulator. You just have to keep the tank pressure below 100PSI, or you could risk ruining the internals of the gun. Now I'm off to play with my motorized pump to see if it can refill the tank on a single charge...

Edited by CaptainSlug, 08 October 2006 - 09:48 PM.

  • 0
The little critters of nature, they don't know that they're ugly. That's very funny, a fly marrying a bumble bee. I told you I'd shoot, but you didn't believe me. Why didn't you believe me?

#32 funkyjake

funkyjake

    Member

  • Members
  • 69 posts

Posted 07 October 2006 - 06:43 PM

Jesus Christ, man, that thing is a beast-monster. That's like the nerf equivalent of a minigun. Looks incredible. How many pumps does it take to have enough air pressure to cycle one magazine through?
  • 0

#33 CaptainSlug

CaptainSlug

    Resident Mad Scientist

  • Administrators
  • 4,763 posts

Posted 07 October 2006 - 07:32 PM

How many pumps does it take to have enough air pressure to cycle one magazine through?

Heck if I know. But seeing as how I can get off 40 or 50 rounds from a 50PSI supply I'm not too concerned about having to pump the thing back up during a fire-fight.

And in other news I just finished testing the airman motorized pump. IT KICKS ASS!!!! I can get the tank up to 70 PSI before the pump starts to complain. And on a single charge it can fill the tank 5 or 6 times!
When I go to work on monday I will need to lathe a new threaded adapter for the pumps because the epoxied-on one I was using isn't durable enough.

I've also discovered that the maximum operating pressure of the gun is 80PSI. Anything above that and the trigger is nearly impossible to depress. Nevermind that a higher pressure could potentially destroy the inner workings of the gun.

Edited by CaptainSlug, 07 October 2006 - 08:24 PM.

  • 0
The little critters of nature, they don't know that they're ugly. That's very funny, a fly marrying a bumble bee. I told you I'd shoot, but you didn't believe me. Why didn't you believe me?

#34 InkJet

InkJet

    Member

  • Members
  • 45 posts

Posted 08 October 2006 - 12:53 PM

Wow, you're made incredible progress!!! How long does it take for the Airman pump to pump the tank up?

Also, I'm guessing you'd be the person to ask, but last night, after finally cracking open my shiny new magstrike, my engineer father and I tried for about a half hour to figure out how the automatic valve works, but to no avail. He wanted to just take the bansaw and cut it in half, to get a cross section, but I wasn't too enthusiastic about that idea!! Do you have any idea how this works? We have a basic idea that is hard to explain in writing, but do you have a better idea of how it works?
  • 0

#35 CaptainSlug

CaptainSlug

    Resident Mad Scientist

  • Administrators
  • 4,763 posts

Posted 08 October 2006 - 01:07 PM

1. How long does it take for the Airman pump to pump the tank up?

Also, I'm guessing you'd be the person to ask, but last night, after finally cracking open my shiny new magstrike, my engineer father and I tried for about a half hour to figure out how the automatic valve works, but to no avail. He wanted to just take the bansaw and cut it in half, to get a cross section, but I wasn't too enthusiastic about that idea!!
2. Do you have any idea how this works? We have a basic idea that is hard to explain in writing, but do you have a better idea of how it works?

1. About 2 minutes to go from 0PSI to 70PSI. The output of the airman pump isn't very high, but it beats having to manually fill the tank in both effort and time involved.
2. The Nylon is transparent enough for me to understand how the piston operates on a basic level. The piston in the magstrike is made up of 3 parts. A pneumatic drive piston that's linked to the spring-loaded advancing tooth, a stationary inner piston, and the winged piece that seals the gun to the back of the clip.

The trigger valve fills a rear chamber on the piston to force the drive piston forward. This is linked to the tooth that advances the clip upwards. As the drive piston moves forward it's sliding over the stationary piston. The stationary piston is the piece that the tubing is linked to. Once th drive piston reaches the forward position it opens up a dump valve that empties the air from the drive piston to fire the dart. The spring holding the advancing tooth pulls the drive piston back to start the cycle again.

This coincides with Forsaken_angel24's experiments with banding the drive piston. Doing that allows more pressure to build up in the drive piston before it reachs the end of the cycle and empties to fire the dart. This also explains why the gun cannot operate below 25 PSI, because the lower pressure level doesn't have enough force to overpower the spring on the advancing tooth.

That's my understanding of it anyways. It's ingeniusly simple because it's a single part performing multiple operations. It acts as a timing valve, pneumatic ram, and a pressure regulator (in a limited sense).

Edited by CaptainSlug, 08 October 2006 - 01:11 PM.

  • 0
The little critters of nature, they don't know that they're ugly. That's very funny, a fly marrying a bumble bee. I told you I'd shoot, but you didn't believe me. Why didn't you believe me?

#36 Forsaken angel24

Forsaken angel24

    Member

  • Contributors
  • 2,472 posts

Posted 08 October 2006 - 02:34 PM

Well it seems like the hoseclamp is just not going to work. During my range test today I got less than satisfactory results. 60 feet only! Man was I pissed. My seal on the Hoseclamp blew completely. The two range tests I did were with normal taggers and CDTD's. I got 50 with the normal taggers and low 60's with converted taggers. I figure the hoseclamps and PVC plug blew again. It looks like I am going to have to go back to the stock plastic binding with the screws in it for a good seal. I figure the ranges are much lower than expected due to air escaping/pressure releasing the whole shabang. I will now have to open her up again and do some changes. I will post the new results ASAP.
  • 0
I don't get my kicks out of you,
I don't feel the way I used to do.
I know its bad,
After what we had,
But I’m just not the angel you knew.

#37 CaptainSlug

CaptainSlug

    Resident Mad Scientist

  • Administrators
  • 4,763 posts

Posted 08 October 2006 - 04:45 PM

Well it seems like the hoseclamp is just not going to work.

If you think about if for a second or two the stock hose clamp is much wider and has multiple clamping teeth so it's clamping much more of the outside of the tubing than a single wormdrive clamp can. Perhaps you need to try using multiple constant-tension wire clamps.

If it were me I'd be lathing my own plug, but obviously you don't have access to the same equipment I do.
  • 0
The little critters of nature, they don't know that they're ugly. That's very funny, a fly marrying a bumble bee. I told you I'd shoot, but you didn't believe me. Why didn't you believe me?

#38 InkJet

InkJet

    Member

  • Members
  • 45 posts

Posted 08 October 2006 - 04:51 PM

Yeah, i was going to make a plug with my shiny new lathe, but.... i didn't feel like taking the time to cut down a 1" aluminum rod. Also right now i only have a bit for cutting down plastic tubing and cutting down metal, so i'd still have to make a bit to make the ridges in the plug, so I decided to just heat up my glue gun and seal the stock plug. I'll keep the stock clamps just in case i go through the same problem as Forsaken did.
  • 0

#39 SirTofu

SirTofu

    Member

  • Members
  • 424 posts

Posted 08 October 2006 - 04:54 PM

Question: What Kind of clamps should I use on my bladder? Spring or wire clamp?
  • 0
Nobody online Nerfs in the SE :(

#40 CaptainSlug

CaptainSlug

    Resident Mad Scientist

  • Administrators
  • 4,763 posts

Posted 08 October 2006 - 04:59 PM

Question: What Kind of clamps should I use on my bladder? Spring or wire clamp?

I personally recommend using two or three constant-tension spring hose clamps. You won't have to worry about them cutting the tubing.
Posted Image
  • 0
The little critters of nature, they don't know that they're ugly. That's very funny, a fly marrying a bumble bee. I told you I'd shoot, but you didn't believe me. Why didn't you believe me?

#41 Forsaken angel24

Forsaken angel24

    Member

  • Contributors
  • 2,472 posts

Posted 08 October 2006 - 05:00 PM

My apologies ladies and gents. I meant to post the above reply in my own thread and not this one. I am going to post a copy in my thread.

I am also confused about how a constant tension spring hose clamp works.

Edited by Forsaken_angel24, 08 October 2006 - 05:06 PM.

  • 0
I don't get my kicks out of you,
I don't feel the way I used to do.
I know its bad,
After what we had,
But I’m just not the angel you knew.

#42 SirTofu

SirTofu

    Member

  • Members
  • 424 posts

Posted 08 October 2006 - 05:01 PM

2 or three clamps on each side or what? Please clarify. Thanks.
  • 0
Nobody online Nerfs in the SE :(

#43 CaptainSlug

CaptainSlug

    Resident Mad Scientist

  • Administrators
  • 4,763 posts

Posted 08 October 2006 - 06:05 PM

2 or three clamps on each side or what? Please clarify. Thanks.

Yes, two or three clips on each side, assuming you are replacing both caps to make an external bladder.

I am also confused about how a constant tension spring hose clamp works.

They're a very thick gauge of wire with two ears which you can grab with a vice-grip wrech in order to clamp them onto your tubing. They're cold-pressed to a certain size and when clamped onto tubing they continually apply tension around the entire diameter of the tubing because the clamp is trying to return to its original memory shape. Much like a spring.

I am now working on a replacement backplate for the 20-round clip. I've already removed all of the pegs and plugged all the leaky holes with dabs of hot glue.

Edited by CaptainSlug, 08 October 2006 - 06:41 PM.

  • 0
The little critters of nature, they don't know that they're ugly. That's very funny, a fly marrying a bumble bee. I told you I'd shoot, but you didn't believe me. Why didn't you believe me?

#44 sam

sam

    Member

  • Members
  • 1,059 posts

Posted 08 October 2006 - 10:05 PM

Seeing as your an excellent fabricator, how easy would it be to make a clip for this out of lexan or PETG of something? If you check out this. You basically need three sheets of lexan/plastic/whatever and your barrel material.
  • 0

#45 Megamannt92

Megamannt92

    Member

  • Members
  • 155 posts

Posted 08 October 2006 - 10:06 PM

Very nice, your enemies will cower in fear.....

I might save up for a mag-strike....
It looks cooler than the LS.
  • 0
Muaha! We aint' no Geocity anymore. Join here! The Foam Universe!

#46 CaptainSlug

CaptainSlug

    Resident Mad Scientist

  • Administrators
  • 4,763 posts

Posted 08 October 2006 - 10:14 PM

Seeing as your an excellent fabricator, how easy would it be to make a clip for this out of lexan or PETG of something? If you check out this. You basically need three sheets of lexan/plastic/whatever and your barrel material.

I've already thought about it and I just started working on a CAD model of a custom 20-round clip. It would be much easier to make the clip if I had some PETG tubing, but I haven't been able to find anyone willing to sell me some. A custom clip could so easily be made from 1/16th" polycarbonate sheet using the tools I have.
Tomorrow I'm making a replacement backplate for my clip so that I can remove the gap between the two halves.

Edited by CaptainSlug, 08 October 2006 - 10:19 PM.

  • 0
The little critters of nature, they don't know that they're ugly. That's very funny, a fly marrying a bumble bee. I told you I'd shoot, but you didn't believe me. Why didn't you believe me?

#47 monkey with a nf

monkey with a nf

    Member

  • Members
  • 110 posts

Posted 09 October 2006 - 12:08 PM

Have you tried McMaster? They have tons of different sizes of PETG tubing.
  • 0
QUOTE(Pineapple @ Sep 12 2007, 03:13 PM) View Post

For maximum efficiency?


1. Pump up. Count how many pumps.

2. Keep going until you hear a loud "bang".

3. Subtract one pump from the total. Rebuild your air bladder.


There you go.

#48 CaptainSlug

CaptainSlug

    Resident Mad Scientist

  • Administrators
  • 4,763 posts

Posted 09 October 2006 - 02:11 PM

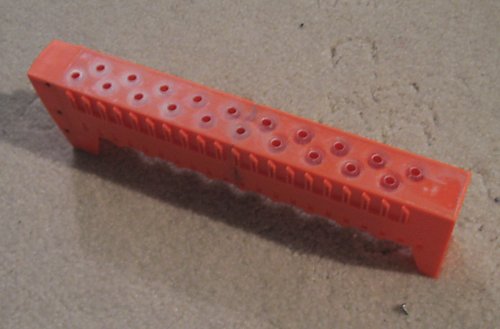
This morning I finished the replacement backplate for the clip. I used 1/16th" polycarbonate sheet, which is a hair thicker than the 1mm sheet I was replacing. This allows me to use a file to sand down the new backing until I get an even amount of sliding resistance on the clip in the gun. This prevents me from having to do the electrical tape and rubber bank changes to acheive basically the same result. More resistance in the firing cycle, and the clip won't unadvance when the clip is only partially emptied.
Posted Image
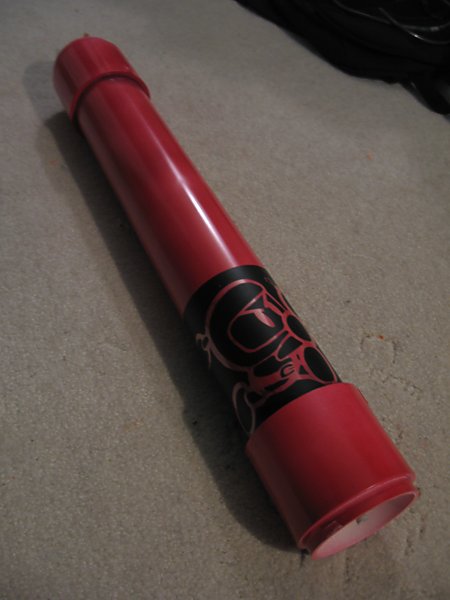
And last night I painted the tank red so that it looks less like a pipe bomb. I'll add safety labels to it later.
Posted Image

Have you tried McMaster? They have tons of different sizes of PETG tubing.

Well yeah, but they don't have 9/16th. Nobody offers it because it's a nonstandard size. Which is why others have had to buy it in 100ft lots.
  • 0
The little critters of nature, they don't know that they're ugly. That's very funny, a fly marrying a bumble bee. I told you I'd shoot, but you didn't believe me. Why didn't you believe me?

#49 CaptainSlug

CaptainSlug

    Resident Mad Scientist

  • Administrators
  • 4,763 posts

Posted 09 October 2006 - 05:46 PM

Everything is back together now. The bungie cord keeps the camelback taught so that the shoulder strap hit the right places on the tank. Should the ties that hole the tank come loose the bungie cord will also keep the tank from falling out.
Posted Image
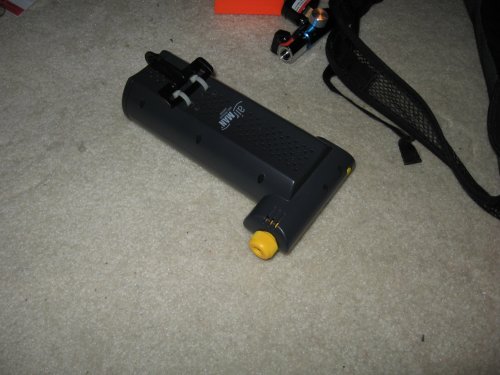
And I added a belt-loop clip to the airman pump.
Posted Image
The regulator and tube fitting for the pump should both arrive tomorrow and this gun will be finished. Then I can make and post a video.

Edited by CaptainSlug, 09 October 2006 - 05:48 PM.

  • 0
The little critters of nature, they don't know that they're ugly. That's very funny, a fly marrying a bumble bee. I told you I'd shoot, but you didn't believe me. Why didn't you believe me?

#50 King Of Butt Land

King Of Butt Land

    Member

  • Banned
  • 324 posts

Posted 09 October 2006 - 07:03 PM

So good, so good. Yet, I fail to see where you put your left hand (asuming your righty) when firing. Please elaborate. This is one of the coolest mods ever though. Kudos to you!

-Butt
QUOTE(Puppy-§layer @ Dec 18 2008, 04:22 AM) View Post

This contest may have some flaws, as people can simply be a deuschbag over the internet. By Lying.

A war-like setting/invitational would be better...


0 user(s) are reading this topic

0 members, 0 guests, 0 anonymous users