#76
Posted 28 May 2007 - 08:03 PM
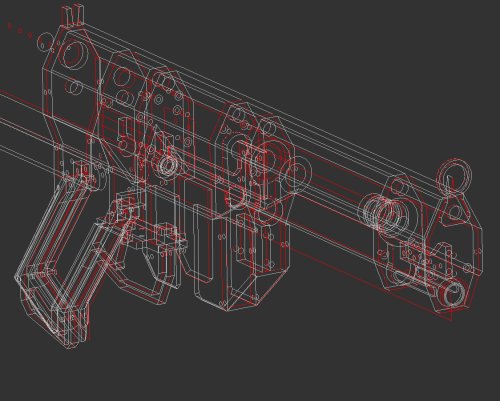
Model is completed.
And the part list and cutting list are both made.
#77
Posted 28 May 2007 - 08:09 PM
#78
Posted 28 May 2007 - 08:21 PM
Shouldn't be too hard to machine. I've done far more complicated things in the past.
Just to make this clear: This design is meant to be hooked up to an external air tank. However you could hook it directly up to a bicycle pump and be able to operate it that way. Once I figure out the best operating pressure level I can think about how best to mount a small bicycle pump onto a modified frame for the gun.
Edited by CaptainSlug, 28 May 2007 - 08:26 PM.
#79
Posted 28 May 2007 - 08:43 PM
#80
Posted 28 May 2007 - 08:48 PM
Dunno if this was asked. Since it needs an external air source to operate, will you be making any tanks and the such to be specifically used/mounted on this?
He will use the tank he currently uses for his Titan, Hornet, and Magstrikes, I assume. If not, I don't know why he would build another.
#81
Posted 29 May 2007 - 09:05 AM
No. But since the design empties only the air pressurized in the breech actuator, if you were to put an extremely basic tank inbetween the bike pump and the gun it would afford you multiple shots from a single cycle of pumping. But the pumping cycle would obviously take longer since you would have more volume to pressurize.Dunno if this was asked. Since it needs an external air source to operate, will you be making any tanks and the such to be specifically used/mounted on this?
#82
Posted 29 May 2007 - 02:44 PM
1. Go to the search button in the right corner of the screen
2. Click
3. Search double longshot clip.
#83
Posted 29 May 2007 - 03:41 PM
#84
Posted 29 May 2007 - 04:03 PM
My user name is pronounced "eat shit." I know that losing is looked down apon in nerf, but, what ever.
#85
Posted 29 May 2007 - 05:47 PM
I hope so. But no guarantees.Do you think you'll have a prototype of this by DCNO?
It's outlined in the machining guide. You make an image from the printscreen and then paste the image on a page in Microsoft Word. Change the image dimensions in Word to match the dimensions of the part from the CAD file and you end up with a 1:1 template. I cut out all the parts to square dimensions using the tablesaw first then follow the template as a guide for drill and cutting to make the rest of the detail.Those templates look very promising. But I've always wondered... How to you get the picture from Alibre to be the exact size of what you want when you print it out?
Edited by CaptainSlug, 29 May 2007 - 05:48 PM.
#86
Posted 29 May 2007 - 05:52 PM
One more thing...when you make a modle of something, do you just go to the 2d view and printscreen it from there, or do you re-draw the parts to the specs in a new part?
#87
Posted 29 May 2007 - 05:57 PM
2. highlight all of the lines using CTRL+A
3. Press CTRL + SHIFT + Z to orient the view to the sketch plane
4. PrntScrn to capture
5. Paste in Paint Shop Pro 5 then crop to sketch area
6. Select all (CTRL+A again) then press CTRL+T to deselect the background color (once for yellow and once for blue)
7. Invert the selection. Only the yellow lines and blue nodes should be selected
8. Copy and paste into a new image
9. Reduce brightness by 100% to turn everything black
10. Save image (Microsoft word seems to prefer .PNG files for some reason)
Edited by CaptainSlug, 29 May 2007 - 06:10 PM.
#88
Posted 29 May 2007 - 06:04 PM
But I mean, getting it from your completed 3d image, to all the pieces laid out 2 dimensionally.
Like the post at the top of the page.
#89
Posted 29 May 2007 - 06:10 PM
I'm simply taking a screenshot of each sketch and transferring them to images on a page in Word.
To arrange the images in Word you format the picture layout wrapping style to "behind text" or "in front of text" and you can drag the images to wherever you want them on the page.
If you still don't know what I'm talking about I'll just go with this answer: Elves. I employ lots of magical elves to do my bidding.
Edited by CaptainSlug, 29 May 2007 - 06:25 PM.
#90
Posted 29 May 2007 - 06:16 PM
That is what I was looking for.
I though, for some reason, you did something in Alibre to seperate each sketch or something.
This pic is what confused me.
Thanks a lot.
Sorry for sounding like such an ass.
And you'll have to show me where I can get me some elves of my own in case I have any more problems.
Edited by Ronster, 29 May 2007 - 06:21 PM.
#91
Posted 29 May 2007 - 11:04 PM
#92
Posted 29 May 2007 - 11:53 PM
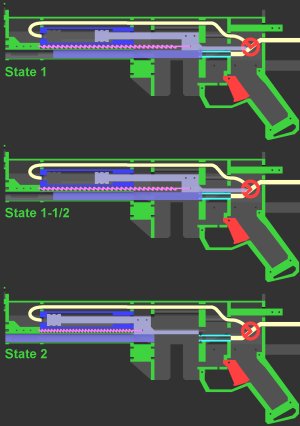
And the air cylinder/breech actuator is attached to a "shoe" that's glued to the barrel/breech. The "shoe" keeps the top-most dart in the magazine at nearly the same height as the barrel so that the breech can close around it effectively and quickly. This diagram should point out how incredible simple the new design is. There is only one moving part, which is controlled by a single valve.
State 1: Trigger neutral. Supply input pressurizes air cylinder (breech actuator)
State 1-1/2: Trigger is held down. This inbetween state only lasts around half of a second. The directional control valve connects the air cylinder to the output and closes off the tank supply line.
The barrel is sealed against the output while the air cylinder is depressurizing into the barrel to exhaust to atmosphere (and thusly shoot the dart).
State 2: Trigger is still held down. Air cylinder has completely depressurized and weak spring return can now overcome the pressure level of the air cylinder in order to return it to the forward position and open the breech.
Cycle returns to State 1 when the trigger is released. Time duration of State 1-1/2" is dependent upon the load added with the spring return. Hence the decision to use an extension type spring which is easier to adjust. The return spring really only needs to overcome the friction of the o-rings.
The air cylinder HAS to be custom made because standard models are designed to actuate at higher pressures with a smaller cylinder head. They also have shorter stroke lengths.
I have to use a larger cylinder head so that I can actuate at a lower pressure which still getting the same load force. PSI = units of pressure per square inch, so more square inches means you get more load force at a given pressure level. Assuming friction is minimized.
Same principle applies to displacement in a car engine.
1. 3-7/16"1. What is the stroke length for the breech?
2. Will mags have to be Stefan modded, or streamline compatible?
3. Also, looks like a tiny valve for the gun, which is always a huge challenge for any homemade compressed air gun.
2. Since the breech traverses the full length of the magazine it is compatible with any dart that will fit in the magazine. Magazines will not need to be stefan compatible by default since the breech is cycling towards the rear of the gun. The need to alter the magazine or not will depend on the length of your darts. You can simply load them in the rear face of the magazine to keep them from shifting around too much from friction against the breech.
3. The valve is not very flow restrictive and is snap-action so it actuates very quickly. The gun will be operating at a minimum of 20psi, but it's more likely that I will operate it at 40psi when hooked up to the tank.
Edited by CaptainSlug, 04 June 2007 - 08:40 AM.
#93
Posted 30 May 2007 - 06:41 PM
Also, how much would a valve like this cost?
#94
Posted 30 May 2007 - 06:45 PM
The pressure level inside the air cylinder will not be able to drop far enough for the breech to actuate forward until the dart has left the barrel. The spring can then pull the breech forward to chamber the next dart.
For finer adjustments to the timing I can later adjust the pull strength of the extensions springs.
Directional control valves start around $14 and the price increases based on the number of ports, what kind of tripping arm is added and what pressure level it operates at.
Edited by CaptainSlug, 30 May 2007 - 06:52 PM.
#95
Posted 30 May 2007 - 06:59 PM
#96
Posted 02 June 2007 - 07:20 PM
Edited by CaptainSlug, 02 June 2007 - 07:59 PM.
#97
Posted 02 June 2007 - 08:42 PM
The air cylinder and breech are actuated together at a rather low pressure level (around 6psi presumably) but will be filled to at least 20psi.
The pressure level inside the air cylinder will not be able to drop far enough for the breech to actuate forward until the dart has left the barrel. The spring can then pull the breech forward to chamber the next dart.
For finer adjustments to the timing I can later adjust the pull strength of the extensions springs.
Directional control valves start around $14 and the price increases based on the number of ports, what kind of tripping arm is added and what pressure level it operates at.
For a MK. II, perhaps you could incorporate a screw assembly for fine-tuning the extension spring(s). This would allow a variable timing design, which would allow different users to easily adjust the gun to their preferences/ requirements.
#98
Posted 02 June 2007 - 08:45 PM
Well, I may not be able to finish this gun before DCNO unless I can earn some more money outside of what I've been trying to save up before my trip to China. I'm going to have to order 1/4" thickness polycarbonate because the scrap at the machine shop is most likely going to be in metric sizes.
Hmmmmm
Edited by CaptainSlug, 02 June 2007 - 08:46 PM.
#99
Posted 03 June 2007 - 12:26 AM
The forward attachment point for the extension spring has 4 tension settings if adjustments are needed.
Well, I may not be able to finish this gun before DCNO unless I can earn some more money outside of what I've been trying to save up before my trip to China. I'm going to have to order 1/4" thickness polycarbonate because the scrap at the machine shop is most likely going to be in metric sizes.
Hmmmmm
Surely not all the parts are the particular to thickness?
#100
Posted 03 June 2007 - 01:04 AM
Update: I've decided to spend the next week finishing up a modification I haven't completed and instead of spending money on this right now I'm going to keep the money onhand for buying Christmas presents while I'm in China next month. I will get back to this in August.
Edited by CaptainSlug, 03 June 2007 - 07:53 PM.
1 user(s) are reading this topic
0 members, 1 guests, 0 anonymous users