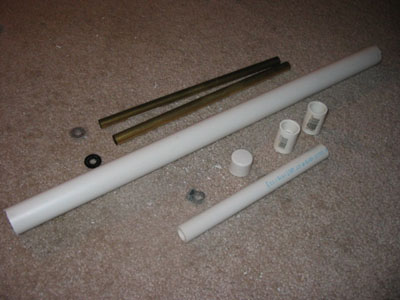
Jump to content


Photo

Pump Action Breech

Writeup

6 replies to this topic

#1 Carbon

Carbon

    Contriberator

  • Moderators
  • 1,894 posts

Posted 29 March 2006 - 12:14 AM

My last posts regarding my breech were a bit scant on details, so here's a full description of assembly...

Parts needed
IMG_4314.JPG
17/32" Brass
19/32" Brass
.5" Sched 40 PVC
1" Thinwall PVC
Small Pipe Clamp
Two .5" PVC couplers
One .5" PVC Endcap
Rubber washer and metal washer (that can roughly fit inside the coupler, but not fall through)

Tools required:
Hacksaw
Dremel
Cutting wheel/plastic cutting wheel/drum sander
Pipe cutter (you can't use a hacksaw and have it work well)
X-acto knife
Sandpaper

I'll be listing dimensions and lengths in this writeup.

Preparing the breech
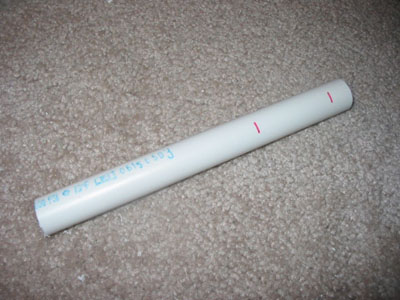
Cut a length of PVC 7.75" long. Mark off two lines, one 5/8" from the end, and then another one the length of your darts (in this case, 2"). Hacksaw across those lines to roughly the width of your darts.
IMG_4315.JPGIMG_4316.JPG

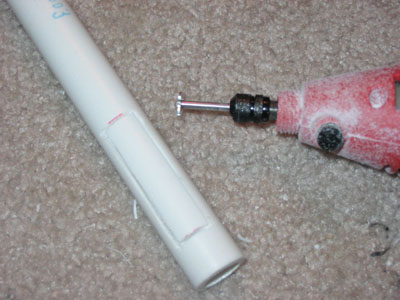
Time to break out the Dremel. If you don't have an actual plastic cutting wheel, go get one, it's worth it. Really, I'll wait.

Okay.

Connect the two lines you just sawed. The plastic cutting wheel is just deep enough that when you finish, you can just pop out the rectangle with a screwdriver. Plus, they don't shatter.
IMG_4317.JPG

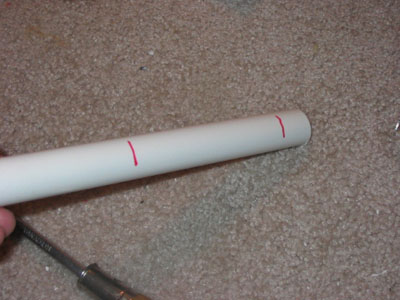
Okay, the breech is done for now. Time to make the slide knockout. Turn over the PVC and do the same thing on this side, .75" from the enn, 4.75" long. This side will be a deeper cut, about 1/3 of the tube.
IMG_4319.JPGIMG_4324.JPG

Go back over the rectangles just cut out and clean up the edges with an exacto knife. Test out the breech with a stefan, and make sure it's wide enough. You'll probably need to go back and remove the edge of the entry with a knife. Then, sand it down. You're done with the PVC for now.

Preparing the Barrel
Take the 19/32" brass and cut off 3.5" with the pipe cutter. 19/32" is a near perfect fit in .5" PVC, so we're join it up with some 17/32" for the barrel.
IMG_4327.JPG

The pinch the cutter is making is going to help seal the two pieces together.

Take your 17/32" barrel material and cut it to length with a hacksaw. The SNAP can use 12" of brass, so I left it alone. Flare one end of the pipe to the ID of the 19/32" brass. There's probably a tool for this, but I just use a needle nose pliers. Twist it against the tube to make the flare.
IMG_4328.JPG

You should be able to see the flare.
IMG_4329.JPG

End of part one (picture limit)

Edited by Carbon, 30 May 2016 - 04:52 PM.

  • 0
Hello. I am Indigo of the Rainbow Clan. You Nerfed my father. Prepare to die.

#2 Carbon

Carbon

    Contriberator

  • Moderators
  • 1,894 posts

Posted 29 March 2006 - 12:18 AM

Okay, now to join the two pieces. Put the 19/32" over the 17/32", and twist it down. Spot check to see if the flare looks like a good match.
IMG_4330.JPG

Flare it more if needed. Then, start twisting the 19/32" past the end of the 17/32". If it's too wide, you can sand it down a bit, but a tight joint is good here. Some assistance with a hammer back, and then twisting forward again seemed to help. You'll want the 17/32" about 1" inside the 19/32". There should be no wobbles at all, it should be a solid feeling piece.
IMG_4331.JPGIMG_4332.JPG

Put a turn of e-tape just above the union for a seal assistance, and for the clamp to have something to bite into.

Assembly
Tighten the pipe clamp, then put it inside the longer hole. Now loosen it so it's as large as it can be.
IMG_4333.JPG

Slide the barrel up into the PVC assembly, and through the clamp.
IMG_4334.JPG

Slide down the clamp, and lightly tighten in place. Not too tight, as it can dimple the brass. There should be about .25" of brass visible outside the PVC when the breech is full closed. Drill a hole large enough for the barrel to pass through in the .5" endcap and press it in place.
IMG_4335.JPG

Preparing the coupler and washers
All you have to do here is grund down the washer so it can fit on the inner ledge of the coupler. The washer provides a surface for the rubber washer to sit on. The rubber washer is for the exposed end of brass to bite into to provide a seal. I couldn't find a good stock size, so I ground and trimmed.
IMG_4337.JPGIMG_4338.JPG

You can also cut a 1" PVC stub to join the coupler to whatever gun you're gonna install this breech on.

Cut a .25" section off the other PVC coupler for use in installing the shroud. Sand off the inside a little so it isn't a struggle to slide it all the way on to .5" PVC...but make sure it isn't loose.

Making the shroud
Mark off on the thinwall where the breech will meet up with the gun, and where the clamp is. Align the top with the endcap, just below the top edge. Cut to length.
IMG_4341.JPG

Edited by Carbon, 30 May 2016 - 04:53 PM.

  • 0
Hello. I am Indigo of the Rainbow Clan. You Nerfed my father. Prepare to die.

#3 Carbon

Carbon

    Contriberator

  • Moderators
  • 1,894 posts

Posted 29 March 2006 - 12:21 AM

Cut a small rectangle the size of the clamp.
IMG_4344.JPG

Slide the shroud on, and get the clamp to the window. Now, the challenge: take the .25" coupler ring you cut off before, and slide it in between the breech and the clamp window. This is to show you getting it started; it has to go another inch or so past this point.
IMG_4347.JPG

Now that the shroud is installed, extend the slots by the clamp slightly. I used zipties to make sure the shroud is tight around the clamp, pushed into the slots.
IMG_4348.JPG

Trim them off and glue them down.
IMG_4349.JPG

Install it on the end of your fave gun, annd you're done.

IMG_4350.JPGIMG_4351.JPGIMG_4352.JPGIMG_4353.JPG

Edited by Carbon, 30 May 2016 - 04:53 PM.

  • 0
Hello. I am Indigo of the Rainbow Clan. You Nerfed my father. Prepare to die.

#4 CaptainSlug

CaptainSlug

    Resident Mad Scientist

  • Administrators
  • 4,763 posts

Posted 29 March 2006 - 01:08 AM

How fortuitous. This is exactly what I'm going to be doing with CShG (minus the exterior cover grip thingy).
  • 0
The little critters of nature, they don't know that they're ugly. That's very funny, a fly marrying a bumble bee. I told you I'd shoot, but you didn't believe me. Why didn't you believe me?

#5 GeneralPrimevil

GeneralPrimevil

    Member

  • Members
  • 578 posts

Posted 29 March 2006 - 07:18 AM

So...many...pictures...

Seems good, although I thought the last one covered it well...This one definitly has everything needed for anyone to make it then.

For the price of a flaring tool, it'd be more worth it to buy that than a slot cutting bit, no?
  • 0
"Fear the man with one gun, for he probably knows how to use it."

#6 Carbon

Carbon

    Contriberator

  • Moderators
  • 1,894 posts

Posted 29 March 2006 - 09:53 AM

It had changed a bit since the SNAP-2, and I had some questions after that post, so I thought I'd do it up right. It might have been a bit of overkill on the pics, though. I didn't realize when I was writing it up that it was *still* gonna cover three posts...I'll pare it down a bit, it doens't need to be this big.

As far as a flaring tool…eh. If I had to choose between a cutting wheel and a flaring tool for this project, a cutting wheel would win hands down. Straighter, smoother, faster cuts, with coarser dust (I hate that fine cutting wheel dust), plus it won’t shatter. I’m getting good results with minimal work with the pliers, so I’ll keep it for now.

That, and I use a wheel more….I’ve only flared brass tubing twice. But I'll probably get one eventually.

Edited by Carbon, 29 March 2006 - 09:54 AM.

  • 0
Hello. I am Indigo of the Rainbow Clan. You Nerfed my father. Prepare to die.

#7 GeneralPrimevil

GeneralPrimevil

    Member

  • Members
  • 578 posts

Posted 29 March 2006 - 10:18 AM

Well if you can come to MMNO, bring any brass you want flared. We have a few double flaring tools you could borrow. The difference between a double flaring tool and a single flaring tool is an extra step, so you can make a single flare by just omitting the final step. Anyway, a tool only costs about $5, so...

Yeah, I might look for brass tubing now at Lowes tonight...gotta go work on schoolwork and shit now. Then I have to move some bunkers in my backyard before Spring Break. Finally I can go to Lowes and make some homemades.

I think I've said this before, but I'm gonna have to try and make one of those without using brass...
  • 0
"Fear the man with one gun, for he probably knows how to use it."


1 user(s) are reading this topic

0 members, 1 guests, 0 anonymous users