 This topic is locked
Just make your plugs be 12v plugs, like a cigarette lighter.
Do you want an actual windshield-wiper switch? I think I might have one lying around somewhere...just pay for shipping and I'll be fine. I just need to find one for those amperages...that'll take all of a few minutes, hopefully.
10-15lbs? You think that is heavy? My SOBR weighs in at 4.9lbs and I still have to add a few more. Just make it so you have to hold the sucker like a movie-minigun, with the pistol grip in the rear and a forward handle. That makes it seem re-damn-diculously light. Seriously, then it could weigh up to 40lbs and you would then feel the difference. Better yet, Venom-ize it so that it is fired like a normal rifle. Seriously though, ten fifteen pounds is light. I mean, re-cock-ulously light, compared to some stuff I've had to haul a-field before...I like heavy things, however; hence, I am making the SOBR as heavy as I can get it. My goal is to make it at least 12lbs by sundown to-morra.

265 replies to this topic
#51

GeneralPrimevil
-

- Members
- 578 posts
Member
Posted 06 April 2006 - 08:55 PM
"Fear the man with one gun, for he probably knows how to use it."


#52
CaptainSlug
-
- Administrators
- 4,763 posts
Resident Mad Scientist
Posted 06 April 2006 - 09:04 PM
Thanks for the offer but I already ordered a high current rating SPDT switch to use as a speed selector switch. The motor has three selectable speeds, and I'll only be using the two slower ones.
The trigger will probably be a momentary interlock switch.

I wanted to use a variable speed trigger switch, but those are absurdly expensive ($20-$40 each!)
We'll see what the final weight ends up being. The battery alone is 6lb and the motor is 6lb as well. I haven't bothered to weigh the PVC yet but the 4-inch PVC pipe is a little on the chunky side so the only other comfortable configuration would be having the grip on the top.
The grip and battery compartment will be added last so the placement of those parts will be decided more definitively once I get the main mechanisms of the gun working.
I do have a joystick grip I could scalp if I decide upon a more traditional grip setup.
The trigger will probably be a momentary interlock switch.
I wanted to use a variable speed trigger switch, but those are absurdly expensive ($20-$40 each!)
We'll see what the final weight ends up being. The battery alone is 6lb and the motor is 6lb as well. I haven't bothered to weigh the PVC yet but the 4-inch PVC pipe is a little on the chunky side so the only other comfortable configuration would be having the grip on the top.
The grip and battery compartment will be added last so the placement of those parts will be decided more definitively once I get the main mechanisms of the gun working.
I do have a joystick grip I could scalp if I decide upon a more traditional grip setup.
Edited by CaptainSlug, 06 April 2006 - 11:53 PM.
The little critters of nature, they don't know that they're ugly. That's very funny, a fly marrying a bumble bee. I told you I'd shoot, but you didn't believe me. Why didn't you believe me?
#53
murakumo32
-

- Members
- 419 posts
Member
Posted 07 April 2006 - 08:21 PM
The joystick thing looks kick-ass. It also resembles the concept for that body mounted gun in Aliens (the second movie) where a heavy rapid fire gun was straped to the body and could pivot withe arms & joints connecting the gun to the harness. You could add a horizontal handle on the left side of the gun so you can fire it from your hip  . Kick-ass...
Pics

The harness

The gun
. Kick-ass...Pics
The harness
The gun
Edited by murakumo32, 07 April 2006 - 08:28 PM.
QUOTE
Nerfing, now fortified with vitamin C!
-or-
100% Nerf, for 100% pwnage.
-or-
100% Nerf, for 100% pwnage.
QUOTE
Nerf is a neutral weapons dealer. Anyone coughing up the dough can get armed.
QUOTE
and they're made of Foam... which makes them very Nerfy...
#54
GeneralPrimevil
-
- Members
- 578 posts
Member
Posted 07 April 2006 - 08:37 PM
That would be the definition of kick-ass, no matter how it turned out as long as it fired at least 50ft. I mean, major kick-ass.
Okay, I'm gonna have to try my hand at making an automatic eventually. Lemme look at my building schedule for the next three months *looks through roster**finds that all projects are either in disrepair or unable to be finished* I have room...Ha, it looks as if Flaming Hilt might get his wish of a turreted gun in a van for MidMI...muahahaha...
Hopefully you get that thing done within the next month, 'cause I seriously need to see a finished product.
"Fear the man with one gun, for he probably knows how to use it."
#55
Forsaken angel24
-

- Contributors
- 2,472 posts
Member
Posted 07 April 2006 - 08:42 PM
I also wish you good luck. I would love to have a beast of a gun that is so heavy that only I could weild it. Reminds me of that greek king I beleive that was the only one strong enough to string and fire is bow.
Edited by Forsaken_angel24, 07 April 2006 - 08:42 PM.
I don't get my kicks out of you,
I don't feel the way I used to do.
I know its bad,
After what we had,
But I’m just not the angel you knew.
I don't feel the way I used to do.
I know its bad,
After what we had,
But I’m just not the angel you knew.
#56
CaptainSlug
-
- Administrators
- 4,763 posts
Resident Mad Scientist
Posted 07 April 2006 - 09:58 PM
Well, I'm using the same parts that Carbon used to make the Snap 1 Mk.2, except that I'm using an AR15 action spring (2 inches longer than the spring he used) so the plunger travel is 6 inches instead of 5. 50ft should be a piece of cake. Anything beyond that will be icing.That would be the definition of kick-ass, no matter how it turned out as long as it fired at least 50ft. I mean, major kick-ass.
And I don't think it will be heavy enough to warrant a balancing arm. A shoulder or neck strap might be nice just for carrying puposes though. UPS dropped off some goodies this evening so I'm going to start cutting stuff tomorrow.
Edited by CaptainSlug, 07 April 2006 - 09:59 PM.
The little critters of nature, they don't know that they're ugly. That's very funny, a fly marrying a bumble bee. I told you I'd shoot, but you didn't believe me. Why didn't you believe me?
#57
GeneralPrimevil
-
- Members
- 578 posts
Member
Posted 07 April 2006 - 10:11 PM
Better yet: move that pistol grip (joystick handle) forward so that the base is 2" behind the hopper fill. Then, lash the blarmey to your arm, using a hook-and-loop adjustable 1.5" wide strap with the mount located where the joystick is on you latest CAD.
Hmm...two barrels, two systems...Mine'll be a bit different, especially since I'm not going to be governed by batteries and whatnot that you were. I could still use something to that effect, but I'll just wait until my AutoCAD LX or LS or whatever its called arrives...
Well, hurry it up lad! But always remember, measure twice, cut once. Or, be like me: never measure, use a mallet 'til it fits.
"Fear the man with one gun, for he probably knows how to use it."
#58
davidbowie
-

- Members
- 422 posts
Member
Posted 07 April 2006 - 10:51 PM
Reminds me of that greek king I beleive that was the only one strong enough to string and fire is bow.
Odysseus?
CS, I'd still say to stick with the shoulder-fired configuration, because you don't see that a whole lot with miniguns, and it would be really awesome.
Check out the all-new DBNerf. The source for all your DBNeeds.
#59
Meaker VI
-

- Moderators
- 1,192 posts
Member
Posted 08 April 2006 - 01:37 PM
Meh, I'm all for the heavy-handed approach to a weapon. And while shoulder mounted would be different, it would also hinder vision and make aiming interesting. You wouldn't have the full arc for firing in without turning. You might want to consider the top or side handle though, that would make holding it much easier.
Of course, you could just go for shock value and make a second one, using both with single pistol grips.
Of course, you could just go for shock value and make a second one, using both with single pistol grips.
#60
CaptainSlug
-
- Administrators
- 4,763 posts
Resident Mad Scientist
Posted 08 April 2006 - 08:04 PM
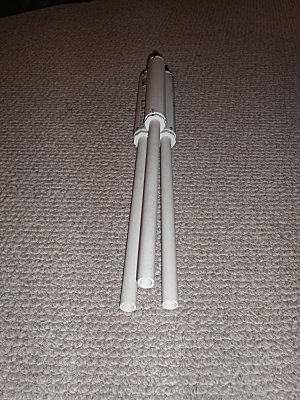
I got alot done today. Here are all of the main parts used today.
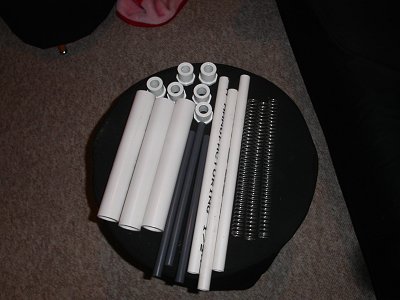
(6) 1" PVC bushings
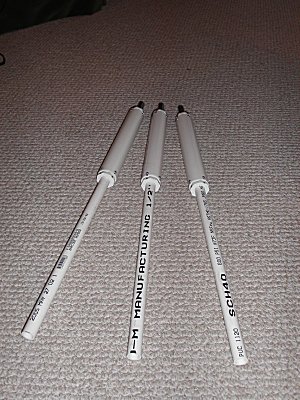
(3) 10.5" lengths of 1-1/4" PVC
(3) 11.5" lengths of 1/2" OD PVC Type I round rod
(3) 15" lengths of 1/2" PVC
(3) AR15 action springs
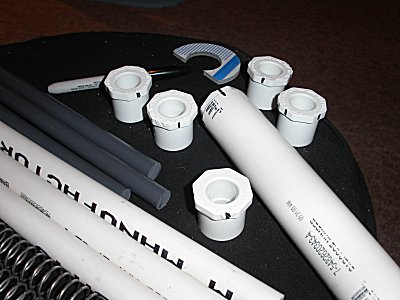
First I marked the bushing every 90 degrees using a sharpie. I used those marks to duplicate them on the ends of the 1-1/4" PVC pipe.
I measured the preferred distance for the screws on the bushings taking into account the thickness of the sheets that the bushings will have to attach through by making a temprary spacing guide from a scrap of polycarbonate.

I used this measurement to mark where I needed to drill the holes on the 1-1/4" PVC pipes.
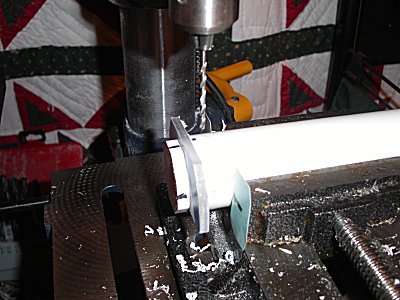
Using the vice with temporary leveling marks I drilled 7/64" holes in both the bushings and 1-1/4" pipe. I then widened the holes in the 1-1/4" pipe later with a 5/32" bit.
I then tapped the bushing for #6-32 screws. The bushings that will attach to the barrels will need to be wrapped in silicone tape, and the bushings for the rear of the tanks will be shortened by 1/2".
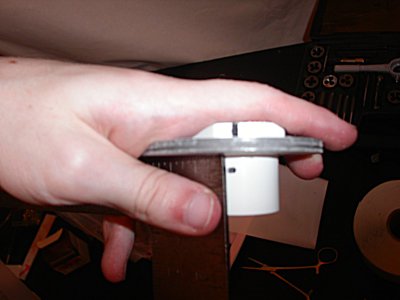
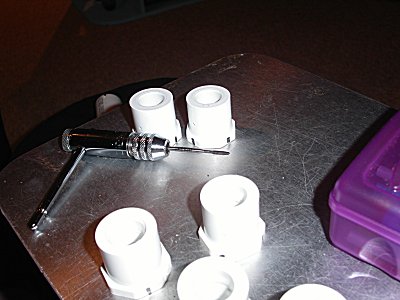
The plungers took more time to perfect than it took to do all of the previous steps combined. Here is what I settled upon in the following order.
1. #6-32 1-1/4" machine screw (I should have used ones with a flat undercut head but the local store didn't have any so I was stuck with pan head screws)
2. #6 3/8" washer
3. 1/4" washer
4. #6-32 hex nut (keeps the fender washer centered)
5. 1.5" fender washer
6. 3/4" rubber bumper foot
7. 1" rubber bumper foot
8. PVC Type I 1/2" OD round rod
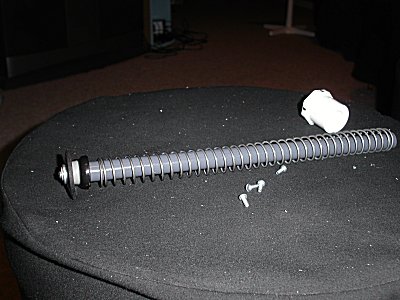
The 3/4" rubber bumper allows the fender washer to deform enough to match the inner diameter of the 1-1/4" PVC pipe and the 1" rubber bumper foot holds the spring. The 1" rubber bumper foot could be replaced with a 1" OD washer but I didn't have any that had a small enough center hole to keep it centered on the #6 screw. I also couldn't find fender washers with a small enough inner diameter, which is why the hex nut is used. A spacer could be used in it's placed if I had any small enough.
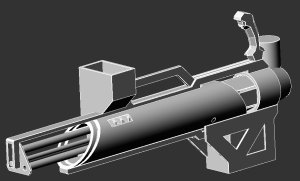
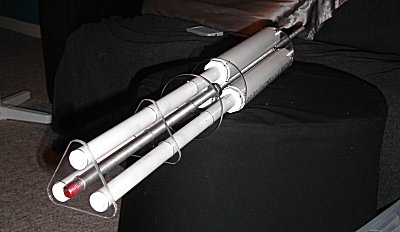
After applying teflon tape, using lots of spray silicone, and screw-mounting the bushings I now have 3 identical units. Next week after I get a considerable amount of homework out of the way I can start work on the milling for the breeches. Here's a preview of things to come...
Also, to answer the grip problem I realized that I can leave the option for both. This is the joystick handle I plan to use.
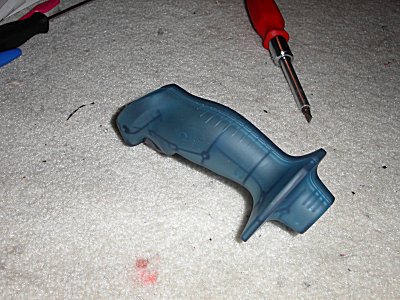
I'm going to make an aluminum or polycarbonate frame for the inside. The thumb button on the top will be replaced by a removable cap. I'll make hardpoints on both locations on the frame of the gun so that I can change the grip location if desired.
The grip really only contains a momentary switch. Because of that I can easily put a receptacle next to each hard point that the grip will plug into. The speed selector switch will remain on the rear of the gun near the battery terminal.
(6) 1" PVC bushings
(3) 10.5" lengths of 1-1/4" PVC
(3) 11.5" lengths of 1/2" OD PVC Type I round rod
(3) 15" lengths of 1/2" PVC
(3) AR15 action springs
First I marked the bushing every 90 degrees using a sharpie. I used those marks to duplicate them on the ends of the 1-1/4" PVC pipe.
I measured the preferred distance for the screws on the bushings taking into account the thickness of the sheets that the bushings will have to attach through by making a temprary spacing guide from a scrap of polycarbonate.
I used this measurement to mark where I needed to drill the holes on the 1-1/4" PVC pipes.
Using the vice with temporary leveling marks I drilled 7/64" holes in both the bushings and 1-1/4" pipe. I then widened the holes in the 1-1/4" pipe later with a 5/32" bit.
I then tapped the bushing for #6-32 screws. The bushings that will attach to the barrels will need to be wrapped in silicone tape, and the bushings for the rear of the tanks will be shortened by 1/2".
The plungers took more time to perfect than it took to do all of the previous steps combined. Here is what I settled upon in the following order.
1. #6-32 1-1/4" machine screw (I should have used ones with a flat undercut head but the local store didn't have any so I was stuck with pan head screws)
2. #6 3/8" washer
3. 1/4" washer
4. #6-32 hex nut (keeps the fender washer centered)
5. 1.5" fender washer
6. 3/4" rubber bumper foot
7. 1" rubber bumper foot
8. PVC Type I 1/2" OD round rod
The 3/4" rubber bumper allows the fender washer to deform enough to match the inner diameter of the 1-1/4" PVC pipe and the 1" rubber bumper foot holds the spring. The 1" rubber bumper foot could be replaced with a 1" OD washer but I didn't have any that had a small enough center hole to keep it centered on the #6 screw. I also couldn't find fender washers with a small enough inner diameter, which is why the hex nut is used. A spacer could be used in it's placed if I had any small enough.
After applying teflon tape, using lots of spray silicone, and screw-mounting the bushings I now have 3 identical units. Next week after I get a considerable amount of homework out of the way I can start work on the milling for the breeches. Here's a preview of things to come...
Also, to answer the grip problem I realized that I can leave the option for both. This is the joystick handle I plan to use.
I'm going to make an aluminum or polycarbonate frame for the inside. The thumb button on the top will be replaced by a removable cap. I'll make hardpoints on both locations on the frame of the gun so that I can change the grip location if desired.
The grip really only contains a momentary switch. Because of that I can easily put a receptacle next to each hard point that the grip will plug into. The speed selector switch will remain on the rear of the gun near the battery terminal.
Edited by CaptainSlug, 11 April 2006 - 05:46 PM.
The little critters of nature, they don't know that they're ugly. That's very funny, a fly marrying a bumble bee. I told you I'd shoot, but you didn't believe me. Why didn't you believe me?
#61
CaptainSlug
-
- Administrators
- 4,763 posts
Resident Mad Scientist
Posted 10 April 2006 - 08:26 PM
Hooray, I feel smart.
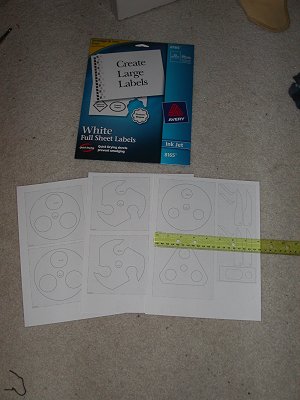
I've been meaning to try this for a while but haven't really had the time or need to do so. What I've done is I made a set of LARGE screenshot composite templates of the parts with the grid included and a marking square at a specific inch size. These images in inch dimensions are then set to the matching inch size on a page in Microsoft Word and then printed on full-sheet label paper. I can cut out each template, peel off the backing, and apply the templates to the protective film on the plastic sheets.

I don't have to do any re-measuring and I have accurate marks placed precisely where I need to drill and cut. This will save me alot of time and ensure that the placements are perfect.
I've been meaning to try this for a while but haven't really had the time or need to do so. What I've done is I made a set of LARGE screenshot composite templates of the parts with the grid included and a marking square at a specific inch size. These images in inch dimensions are then set to the matching inch size on a page in Microsoft Word and then printed on full-sheet label paper. I can cut out each template, peel off the backing, and apply the templates to the protective film on the plastic sheets.
I don't have to do any re-measuring and I have accurate marks placed precisely where I need to drill and cut. This will save me alot of time and ensure that the placements are perfect.
Edited by CaptainSlug, 10 April 2006 - 08:26 PM.
The little critters of nature, they don't know that they're ugly. That's very funny, a fly marrying a bumble bee. I told you I'd shoot, but you didn't believe me. Why didn't you believe me?
#62
Meaker VI
-
- Moderators
- 1,192 posts
Member
Posted 10 April 2006 - 08:44 PM
Now if you only had a laser cutter like the one at my old high school, you'd be done. The thing was sweet, it could cut anything but metal and some weird composites (ie: corian). All on a 12" x 24" platform, which could be converted into a rolling platform for round things. If only I had known about the Haven and you had been here then... Alas. I might still be able to get access to it, but I'd have to wait untill later in May, I get out a month and a half before the district does.
#63
CaptainSlug
-
- Administrators
- 4,763 posts
Resident Mad Scientist
Posted 10 April 2006 - 10:46 PM
I won't have any problems cutting and drilling these manually. I just need to take a trip to the machine shop that I can play around in to get the holes drilled to the correct sizes. Then I can bring the pieces back home and finish the work with my scrollsaw and my bandsaw.
The little critters of nature, they don't know that they're ugly. That's very funny, a fly marrying a bumble bee. I told you I'd shoot, but you didn't believe me. Why didn't you believe me?
#64
Meaker VI
-
- Moderators
- 1,192 posts
Member
Posted 11 April 2006 - 12:32 AM
I'm sure you wouldn't have any trouble, but our laser cutter would have them done (as in cut, drilled, smoothed, and ready to assemble) in the same amount of time as it took to print them. And they could be engraved if you wanted. All you'd need to do is figure out the right settings for your materials and set up the layers right in CAD. Then you could watch, leave, design something else, whatever. But it'd only be cost effective if you spend a TON of time doing those kind of things (cutting stuff out of plastic/wood/textile/etc. using CAD drawings). My teacher said the machine cost something like $18K. Surprisingly, she also let me play with it all year.
#65
CaptainSlug
-
- Administrators
- 4,763 posts
Resident Mad Scientist
Posted 11 April 2006 - 12:37 AM
Of course. I just don't want to wait until
1. May
or
2. I have $18k to spend

1. May
or
2. I have $18k to spend
Edited by CaptainSlug, 11 April 2006 - 12:38 AM.
The little critters of nature, they don't know that they're ugly. That's very funny, a fly marrying a bumble bee. I told you I'd shoot, but you didn't believe me. Why didn't you believe me?
#66
Meaker VI
-
- Moderators
- 1,192 posts
Member
Posted 11 April 2006 - 10:48 AM
Yeah, that is what hinders most people. But if you wanted to go into production, the laser would definately be the way to go. You could make kits that way really easily, cut out all the parts one day and then pack and ship. I'm not sure that this crowd would be enough to get a full return on 18K though.
#67
CaptainSlug
-
- Administrators
- 4,763 posts
Resident Mad Scientist
Posted 11 April 2006 - 05:28 PM
Mwahahahahaha!
End of line.
End of line.
Edited by CaptainSlug, 11 April 2006 - 05:28 PM.
The little critters of nature, they don't know that they're ugly. That's very funny, a fly marrying a bumble bee. I told you I'd shoot, but you didn't believe me. Why didn't you believe me?
#68
Pineapple
-
- Contributors
- 1,377 posts
Old-school Admin
Posted 11 April 2006 - 05:35 PM
Mwahahahahaha!
End of line.

Noice. Very, very noice.
Keep the momentum going!
-Piney-
-Piney- of White Dog Hobbies Armory
<!--quoteo(post=209846:date=Feb 5 2009, 06:27 PM:name=boom)--><div class='quotetop'>QUOTE(boom @ Feb 5 2009, 06:27 PM) </div><div class='quotemain'><!--quotec-->
It's to bad you live in hawaii I bet there are not many wars there.Wait what am I saying<b> you live in hawaii you lucky bastard.</b>
<!--QuoteEnd--></div><!--QuoteEEnd-->
<!--quoteo(post=209846:date=Feb 5 2009, 06:27 PM:name=boom)--><div class='quotetop'>QUOTE(boom @ Feb 5 2009, 06:27 PM)
</div><div class='quotemain'><!--quotec-->It's to bad you live in hawaii I bet there are not many wars there.Wait what am I saying<b> you live in hawaii you lucky bastard.</b>
<!--QuoteEnd--></div><!--QuoteEEnd-->
#69
Renegade
-

- Members
- 536 posts
Member
Posted 11 April 2006 - 06:10 PM
Wow, I never thought this would get out of the planning stage. Good job, and good luck finishing it.
#71
CaptainSlug
-
- Administrators
- 4,763 posts
Resident Mad Scientist
Posted 11 April 2006 - 06:30 PM
Oh I'll make it work. I never really mentioned but I've had alot of other hobbies that involved machining, motors, and wiring. So this is just a more entertaining extension of the kind of stuff I do for fun.
Nerf is giving me a much needed break from a project that was becoming too stressful to work on at the moment.
Getting the breeches and feeding system working are the next big steps.
Nerf is giving me a much needed break from a project that was becoming too stressful to work on at the moment.
Getting the breeches and feeding system working are the next big steps.
Edited by CaptainSlug, 11 April 2006 - 06:32 PM.
The little critters of nature, they don't know that they're ugly. That's very funny, a fly marrying a bumble bee. I told you I'd shoot, but you didn't believe me. Why didn't you believe me?
#72
Meaker VI
-
- Moderators
- 1,192 posts
Member
Posted 11 April 2006 - 06:40 PM
That thing is slick, and as I said, I didn't doubt you had the skill to do it; but what I didn't say was that I was judging that from seeing your finished barel assemblies on the previous page. You've got some fine craftsmanship there, they look really clean. I could not attempt to make anything near that clean looking. I hope that works out nicely, it'll be sweet once it's finished.
#73
wick817
-

- Members
- 49 posts
Member
Posted 11 April 2006 - 06:52 PM
I have one word for this WOW. I think that looks incredible. I cant wait to see what it looks like when its finished. Well good luck to ya and i hope it works out. Im looking forward to the finished project.
This is funny
My freind: You cant hit from there
Me:Yes i can... BANG(from my singled AT2K)
My friend:OOOWWWWW My arm.
My freind: You cant hit from there
Me:Yes i can... BANG(from my singled AT2K)
My friend:OOOWWWWW My arm.
#74
J cobbers
-

- Members
- 586 posts
Member
Posted 11 April 2006 - 07:53 PM
HOT DAMN! That is a sexy piece of work. Can't wait to see the finished project and hear about how well it works. You're really giving Boltsniper a run for his money with that one.
Don't forget to eat your meat based vegetable substitute children.
#75
CaptainSlug
-
- Administrators
- 4,763 posts
Resident Mad Scientist
Posted 11 April 2006 - 08:19 PM
The plunger track is cut. The track for the breech is probably going to have to be done at the machine shop some other day.
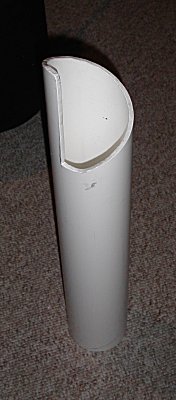
Tomorrow I have class all day so I won't get to the breech cutting until Thursday.
Tomorrow I have class all day so I won't get to the breech cutting until Thursday.
The little critters of nature, they don't know that they're ugly. That's very funny, a fly marrying a bumble bee. I told you I'd shoot, but you didn't believe me. Why didn't you believe me?
3 user(s) are reading this topic
0 members, 3 guests, 0 anonymous users

