Jump to content


Photo

Homemades Picture Thread

Photos of Homemade Nerf Guns

1306 replies to this topic

#601 burning-ice

burning-ice

    Member

  • Members
  • 65 posts

Posted 05 February 2011 - 10:26 PM

Write up on that beast? ↑
Posted Image

Basic snapbow (before my improvements).... Soon to upload pic of improved one as soon as camera charges...
Oh, and that is a bolt action snapbow prototype below it...

Edit: admins please regard these recent double posts, my wifi connection (barely usable from neighbor) keeps going away and the mac posts twice or so... Sorry for any inconvenience.
DAMNIT 3 POSTS???? Whoops, computer fail.... Sorry admins. Its the computer and the connection.

Edited by burning-ice, 05 February 2011 - 10:35 PM.

  • 0
I lurk alot.
If I double post blame my internet, I apologize.

#602 BritNerfMogul

BritNerfMogul

    Member

  • Members
  • 560 posts

Posted 06 February 2011 - 12:21 PM

Posted Image
"Tony Stark was able to build this in a cave! With a box of scraps! "
  • 0

#603 burning-ice

burning-ice

    Member

  • Members
  • 65 posts

Posted 07 February 2011 - 07:44 PM

Since I said I needed to get recent pic of snapbow:
(As of 1 hour ago)
Posted Image
Because I want to be british... Ranges: 80+ (top was 145 with slight wind and angled)
  • 0
I lurk alot.
If I double post blame my internet, I apologize.

#604 KaneTheMediocre

KaneTheMediocre

    Belligerent Asshole

  • Members
  • 613 posts

Posted 07 February 2011 - 07:57 PM

Posted Image
  • 0
RAINBOW CLAN FTW
I'm Purple

My Half-Baked MHA Site

#605 ricochet

ricochet

    Member

  • Members
  • 108 posts

Posted 07 February 2011 - 08:10 PM

Posted Image

Kane, may I ask how you beveled your darts like this? I am very intrigued.
  • 0

#606 NerfGeek416

NerfGeek416

    Member

  • Members
  • 151 posts

Posted 07 February 2011 - 08:12 PM

Posted Image

Kane, may I ask how you beveled your darts like this? I am very intrigued.


I have found that you can twist the foam instead of cutting it. This bevels it somewhat, but I am curious as to where the weights are.
  • 0
 

#607 Ice Nine

Ice Nine

    Prince Dangus

  • Administrators
  • 1,460 posts

Posted 07 February 2011 - 10:04 PM

Kane, may I ask how you beveled your darts like this? I am very intrigued.


He used a lathe.
  • 0

Unholy Three: DUPLUM SCRTA, DUPLUM PROBLEMA (2009)

But Zeke guns tend to be like proofs by contradiction

Theoretically solid but actually non-constructive

Rnbw Cln


#608 Inferno Falcon

Inferno Falcon

    Member

  • Members
  • 196 posts

Posted 08 February 2011 - 01:29 AM

Posted Image
"Tony Stark was able to build this in a cave! With a box of scraps! "

Captain slug was able to build this in a cave! With a box of reverse plungers!

Also those darts look awesome, kane. Can't wait for a writeup.
  • 0

#609 Kid Flash

Kid Flash

    Member

  • Members
  • 1,985 posts

Posted 08 February 2011 - 01:51 AM

Posted Image

N9 was saying how this looked like a glue dome, and I'm going to have to agree with him.
  • 0

#610 nerfer9

nerfer9

    Member

  • Members
  • 680 posts

Posted 08 February 2011 - 01:55 AM

Posted Image

N9 was saying how this looked like a glue dome, and I'm going to have to agree with him.


Yeah, great job matching the glue to the foam Kane.
  • 0

#611 Ryan201821

Ryan201821

    Prince Edward

  • Contributors
  • 1,892 posts

Posted 08 February 2011 - 04:40 AM

He used a lathe.

This is 100% accurate.

For sake of the thread, perfect slots!

Posted Image

Edited by Ryan201821, 08 February 2011 - 04:41 AM.

  • 0

#612 shardbearer

shardbearer

    Member

  • Members
  • 177 posts

Posted 09 February 2011 - 05:39 PM

I think he used a lathe on the foam, cut off the tip, glued in the weight, and then closed it back up. Or just used a lathe on the glue.
  • 0

#613 KaneTheMediocre

KaneTheMediocre

    Belligerent Asshole

  • Members
  • 613 posts

Posted 10 February 2011 - 07:14 PM

A 2-step clear chopper. Unlike my previous chopper, this does not require cancer, and unlike any of the 45 degree coupler choppers that I've seen or made, it actually feeds. I don't know if you guys just have super short darts, or spend many moons with a dremel to make them. The clear PVC in here IS beveled on both sides of each coupler, but no more than I'd need to for a hopper dart entry. I used a chamfering bit.

Posted Image


And this is the tooling that I used to cut aforementioned perfect slots (which are not perfect, but way better than I'd ever get them with a scroll saw). It's also got holes for guiding the pilot drill when installing a rainbow catch, but it's really much more helpful just for holding it in the mill. Still, it's super handy even if you're using a scroll saw / bladerunner thingie because it gives you square surfaces stay in the proper orientation, and to guide the 1 1/4" PVC if your saw has a fence.

By itself:
Posted Image

On the mill:
Posted Image

Schematic:
Posted Image
  • 0
RAINBOW CLAN FTW
I'm Purple

My Half-Baked MHA Site

#614 Daniel Beaver

Daniel Beaver

    HQRSE CQCK

  • Moderators
  • 2,097 posts

Posted 11 February 2011 - 08:15 AM

Good to see you're using normal blasters now, Kane.


I'm not sure I ever posted my SNAP with a skirt seal in this thread. I built this a few months ago purely experimental build, using a preeminent plunger head as a base design for the catch. I wanted to see whether there was a significant performance gap between washer seals and skirt seals. I couldn't see a big difference between them. I also tested this against my Rainbow.

I discussed this at length over at NRev, if you want to read through it.

Posted Image
  • 0

#615 ricochet

ricochet

    Member

  • Members
  • 108 posts

Posted 12 February 2011 - 10:43 PM

Here is a video I recently made to show my homemade magstrike piston setup. I use this setup for all tests and experiments. The e-tape on the air resevoir is a very primitive and crude repair to a leak that presented itself. If you have anything significant to add, put it in the thread I have already for this homemade.

Original Thread

Video
  • 0

#616 Merzlin

Merzlin

    Member

  • Members
  • 589 posts

Posted 13 February 2011 - 02:18 PM

Just a little progress:

Posted Image
Posted Image

Full credit for templates goes to DarthFreyr, thanks man!

Edited by Merzlin, 13 February 2011 - 02:22 PM.

  • 0

#617 venom213

venom213

    Member

  • Validating
  • 1,294 posts

Posted 19 February 2011 - 03:59 PM

AT3K Barrel Spacer:
One problem I've had when making barrel spacers is that 9/16" Drill Bits don't fit PETG without further expansion, which can be a pain in the ass. My solution was to get a drill bit that fits PETG much better, I did this by using a 19/32" Drill bit.

Posted Image

The spacer slides on much easier now and took far less time since I didn't have to ream or expand the holes at all. The spacer isn't too loose that it will fall off super easily, however. Super glue/electrical tape can be used to make sure it stays on.

Also, I used a 2 1/4" Hole Saw to get a perfect round shape. This saves the time of cutting it out by hand.

Posted Image

PM me if you're interested in purchasing one.

Edited by venom213, 19 February 2011 - 05:15 PM.

  • 0

#618 Daniel Beaver

Daniel Beaver

    HQRSE CQCK

  • Moderators
  • 2,097 posts

Posted 20 February 2011 - 03:33 PM

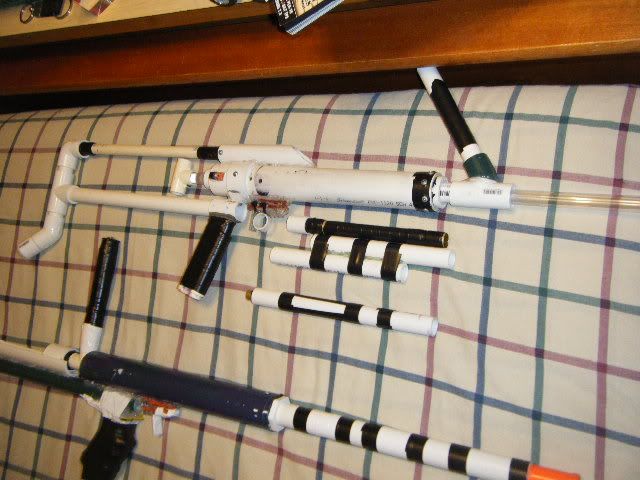
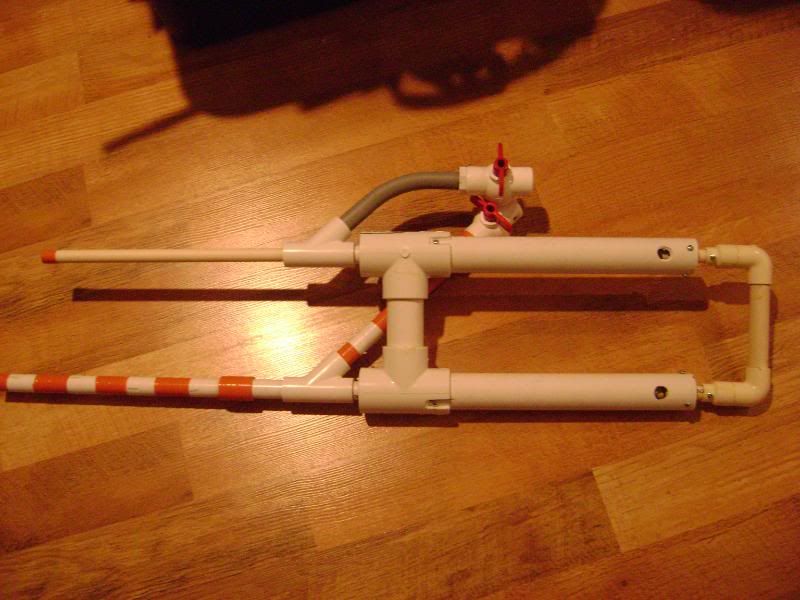
Another pump-action crossbow. It is superficially similar to my old crossbow, but with a number of improvements.

Posted Image


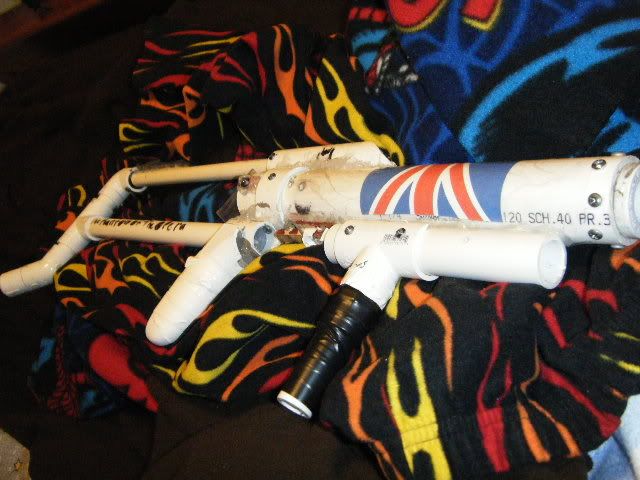
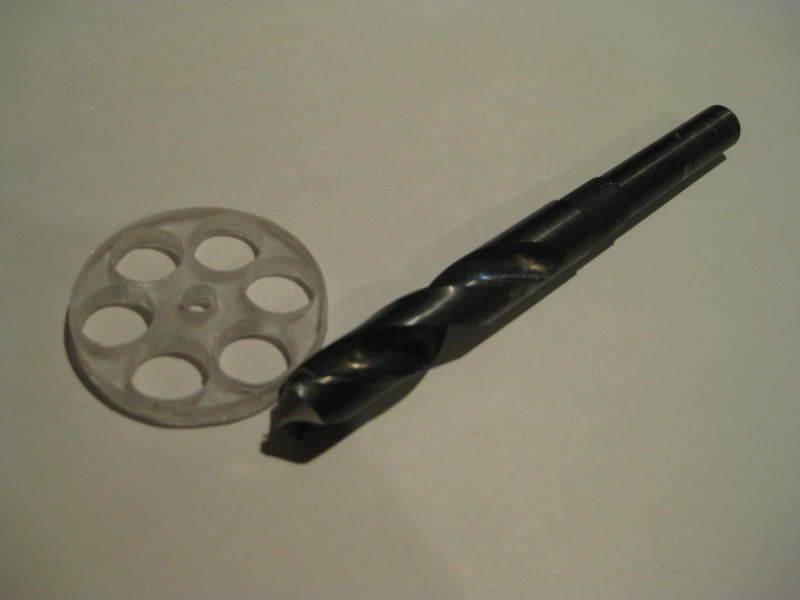
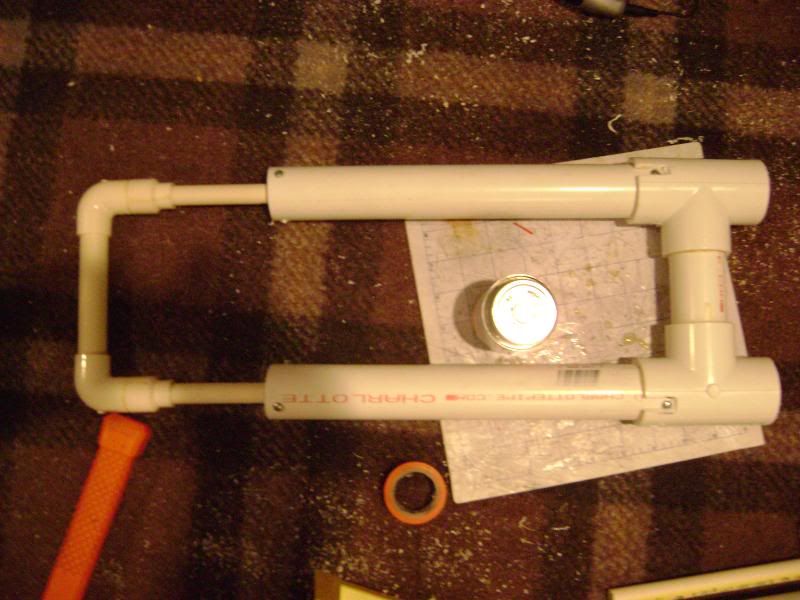
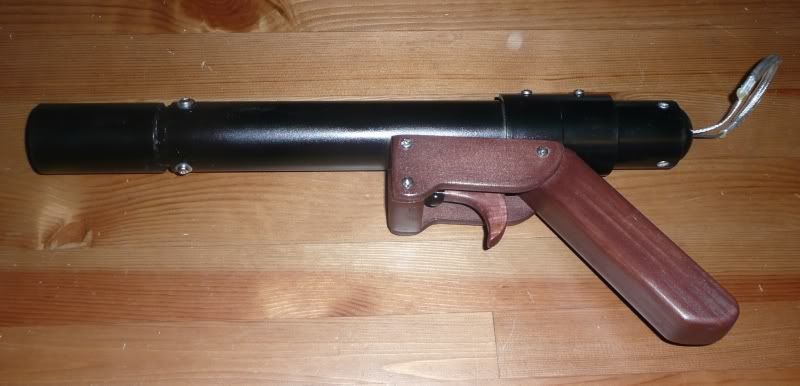
Internals below (click the picture for a closer view). This is not a SNAP; it utilizes a ring-type catch, built from PVC endcaps, and is substantially similar to several other designs that have been posted. The meat of the plunger rod is a 1/2" wooden dowel, with the rear section of CPVC acting as a stabilizer and catch face. A little screw sticks out the bottom of the catch, which the trigger pushes against. With the exception of the handle, everything is easily acquired at your local hardware store. Still needs a stock.

Posted Image


I could not find workable catch spring for the life of me, so I jimmied up a compromise solution. It works very well, but looks funny.

Posted Image


The bow arms are offset by 45 degrees, to keep them out of my way. This setup offers a clear view down the length of the barrel.

Posted Image


I can't find any decent lubricants down here, so the blaster's performance is seriously hampered by friction. The catch performance seems quite good – I have had no misfires while playing around with it.

EDIT:
Found some lube, yay!

I experimented a bit with bow arm lengths, and 20" arms seems to be a sweet spot in performance, giving me ranges between 90-120ft (my darts are a mish-mash, hence the inconsistency). Much over 24", and performance drops way off. Under 18", draw resistance increases significantly, to the point where the catch spontaneously fails. These are 1/2" PVC arms, FYI, and pre-tension is kept to a minimum.

A note on bows:
Smaller arms will exert much more force due to a couple of factors. First, the deformation of the arms is greatly increased. Second, the force vectors are more parallel with the plunger rod.

Edited by Daniel Beaver, 22 February 2011 - 06:13 PM.

  • 0

#619 Hipponater

Hipponater

    Member

  • Members
  • 297 posts

Posted 20 February 2011 - 11:04 PM

Nice stuff, Beaver. Glad to see your move isn't affecting your nerf.

Also using a ring catch:
Posted Image
I'd call it a "Ring Catch Pump", Similar to the RBPs and a pvc version on other nerf sites. Looks kinda plain from the outside, sorry for the lack of internal pictures. It's a pain to put together and take apart because I lost my 3/32" allen wrench and the metric one I'm using has trouble gripping the set screws, so no internal pictures for now.

The ring catch is 3/4" PVC T with 3/4" CPVC making the actual catch and guides. The plunger rod is 1/2" CPVC with a snap style plunger head (one of Rork's with 2 washers, can't think of the name). Plunger tube and plunger rod guide (hidden in this picture) are from 1.25" PVC. Priming grip is thinwall 1.5". The back cover is 2" PVC. The T is 1.25" and slips over the priming guide, the 2" fits around the outside nicely. All very similar to a rainbow pump.

All of the parts come from the hardware store except the springs (catch spring and main spring) and set screws; alternatives could certainly be purchased at your local store.

Ring Catches are fantastic things for PVC homemades. I've never messed with a clothespin trigger, but this was pretty easy. It does require a ruinously strong catch spring, though.
  • 0

#620 BrokenSVT

BrokenSVT

    Member

  • Members
  • 128 posts

Posted 24 February 2011 - 07:22 PM

What's better than the old school sexiness of a BnA? This:

Posted Image

Posted Image

Edited by BrokenSVT, 24 February 2011 - 09:53 PM.

  • 0
REVOLUTION Be there or be square.

#621 thedom21

thedom21

    Member

  • Members
  • 462 posts

Posted 24 February 2011 - 08:24 PM

Built a prototype today. It is a bolt action SNAP version 1. It gets great range and has some recoil.

Posted Image

Posted Image

Edited by thedom21, 24 February 2011 - 08:26 PM.

  • 0
Funny Irc moments

22:32 hookerninja I would just switch to 2 full 69's
22:32 hookerninja that would diddle shit

11:44 Zorn Her butt is too tiny even for limp 6th grade penis?
11:44 Zorn ergo the dildo

#622 The lord of fish

The lord of fish

    Member

  • Members
  • 76 posts

Posted 27 February 2011 - 09:53 PM

R3L americanized. I've had this unfinished for a few months, it still needs a better spring, paint, and some wooden furniture.

Posted Image

shoots really well for the crappy springs I have at hand (and since a [k26] doesnt fit over 1/2 PVC)
  • 0
Do you think she'll sleep with a panic switch?

#623 Wes7143

Wes7143

    Member

  • Members
  • 758 posts

Posted 28 February 2011 - 07:49 PM

I finished my core functional bit of my bolt action snap. Obviously, the overall blaster is very unfinished, and lacks a stock, grip, and other comfortable bits, but everything that makes the blaster fire darts is complete.

Posted Image

The snap is true bolt action, with a locking bolt coming out of the rear. Here it is in the locked/unprimed position.

Posted Image

Here it is again, with the bolt pulled back.

Posted Image

Notice there is no tension on the spring, even with the blaster cached.

Posted Image

Tension is added by pushing the bolt back in to the locked position. Notice the spring is slightly more compressed with the bolt halfway pushed in.

Posted Image

Here is a 1/4 scale drawing of what I hope the finished product to look like.

Posted Image

Here is a roughly drawn assembly of the internal parts.

Posted Image

Here is an older rough drawing, that may explain some of how the blaster works. Please ignore the estimated measurements, and mess.

Posted Image

And because a picture is worth a thousand words, and a video is several pictures per second, here is a video showing the blaster's function.

Edit: Please feel free to PM me any questions about the blaster.

Edited by Wes7143, 28 February 2011 - 08:01 PM.

  • 0
QUOTE(VengefulWaffle)
Get off my boyfriend


If at first you don't succeed, add more epoxy.

#624 The lord of fish

The lord of fish

    Member

  • Members
  • 76 posts

Posted 02 March 2011 - 11:01 PM

needs paint on the PVC parts, and I need to put some clear laquer on the oak that I oiled with teak oil.
Posted Image
  • 0
Do you think she'll sleep with a panic switch?

#625 Keska

Keska

    Member

  • Members
  • 35 posts

Posted 05 March 2011 - 05:41 PM

My latest guns, both SnapBows with a pre-eminent plunger head modified for a wire plunger "rod."

This was the first one I made:

Posted Image

I figured out a better design for the trigger movement restrictor on the second one, but I didn't have time for another elaborate paintjob:

Posted Image
  • 0


1 user(s) are reading this topic

0 members, 1 guests, 0 anonymous users