Jump to content


Photo

20v Power Tool Battery Blaster Adapter

flywheels batteries charger

9 replies to this topic

#1 Meaker VI

Meaker VI

    Member

  • Moderators
  • 1,192 posts

Posted 15 January 2018 - 07:17 PM

EDIT: I'm keeping the rest of this here for posterity only; DO NOT DO this mod! At least not with 20v packs and/or without substantially more knowledge on electronics and battery technology than I possess. I've tried the packs on a startlingly low powered blaster (stock motor Barricade) and burned the battery out so that it shows a temperature fault and will not charge.


I've since repaired the adapter; it appears I had a short on the battery's thermal sensor and I believe it's working correctly now. Continue with caution.


Project Overview:


This is a partial writeup on how I made use of a 20v Lion power tool pack as a ~3s rigged flywheel battery pack with an adapter. You can pretty easily adapt the process to any power tool brand/capacity, so I'm not going into specifics. If you don't know what you're doing with the power tools/systems involved, don't try it without asking someone who does for help.


INTRO & BACKGROUND:


I'm showing it on my 3s Strayvan, though because I wired it into an XT60 I can plug it into any other blaster I build in the future, or any other blaster using an XT60 running ~3s. It has also worked on my 12v/stock rayvan cage mk 13 prototype.


I know a good number of people don't like using Lipo because of the perceived danger involved in using the cells. I don't blame anyone for doing that; I don't actually keep the one large lipo I own in my house. My buddy keeps it for me, along with the charger. This arrangement worked fine to war with, but as I am always tinkering, it didn't last long: I couldn't keep asking him to charge the lipo so I could experiment with the mk 13 (current primary project). And I didn't really want to get into a charger system just for the one battery. So I began researching whether using power tool packs was, in fact, a good idea. It seemed to be, so here we are!


Process:


Time required: ~1-2 hours

Tools:

Soldiering Iron, 3rd hand

Wire snippers/strippers

Drivers as required by your tool system

Knife


Materials:

Sacrificial cordless power-tool

14-16ga stranded wire; I use primary wire

Heat-shrink

Battery connector of your choice (here, XT60)


Optionally, webbing and buckles and screws. These were scrounged from backpacks and stuff I had lying around.
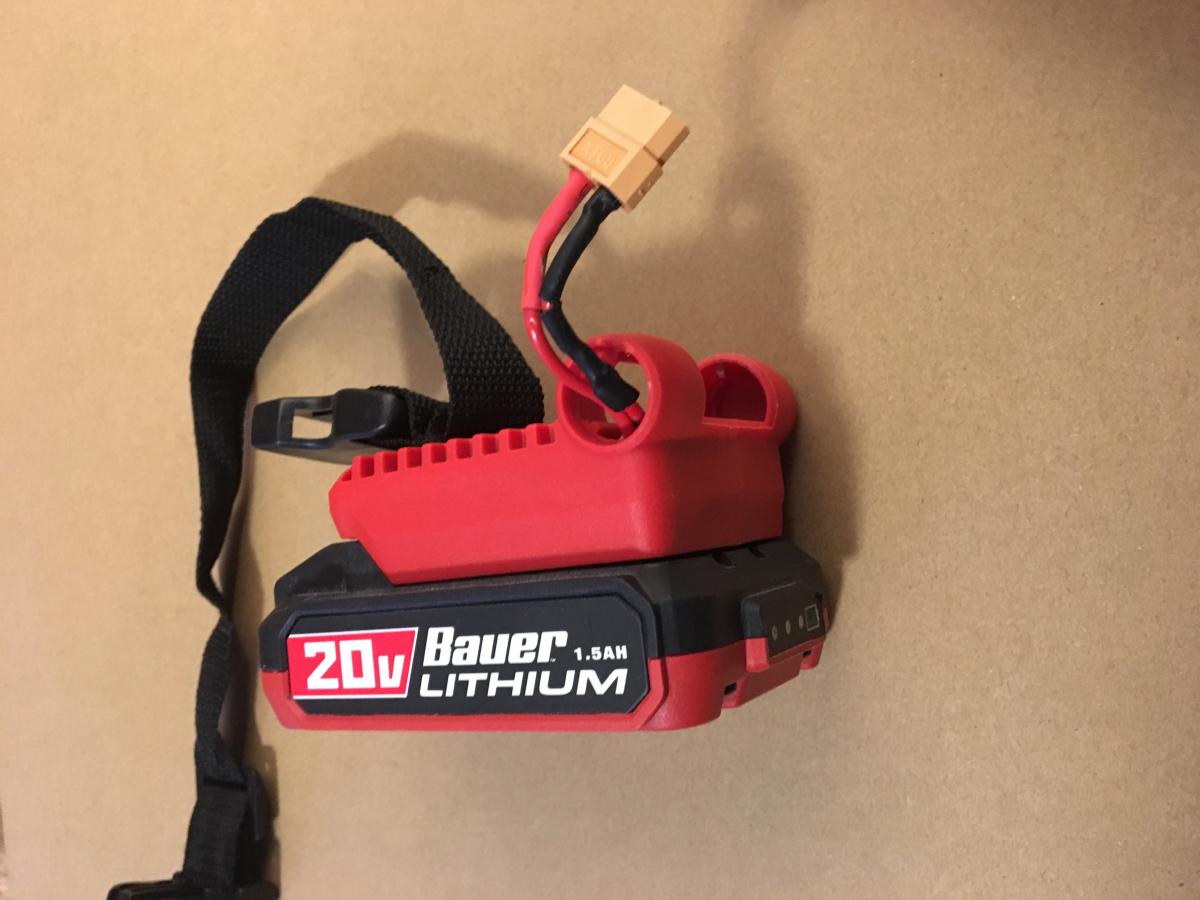
 

Here it is:


IMG_5528.jpg


IMG_5530.jpg


I used a Harbor Freight Bauer LED worklight. It cost me $10 or so, sometimes it'll be on sale for less but not as often as other no-brand Harbor Freight stuff (20% coupons don't work). To go with it, I had previously picked up a Bauer Driver Combo pack (Drill, 1.5 Ah battery, charger) on sale for $65 or so. A spare worklight is adjacent to the modified light.


To do the conversion, I opened the light up, removed the unnessecary light parts, and rewired the plug with my heavier-duty wire (being a light, the wire was pretty thin before). I also had to connect both pins of the positive and negative sides, as they weren't connected in the light (but were in other tools, I'm pretty sure I checked).


Then I just ran the wire out and attached the XT60. Screwed in the webbing and I was all set.


Here it is with a battery:


IMG_5531.jpg


These batteries are nice: hard shell, built-in charge indicator, if one is bad you can just walk it back to HF and they'll replace it no questions within their usual return window. The charger plugs into a wall outlet and has indicators to tell you if the pack is bad or not, if it's too hot/cold, and if it's charged/charging. Charge time for me is only a couple hours.


Here it is on my Strayvan, as you can see a little bulkier than if I'd integrated it, way more than if I'd used a pack inside (but who cares?):


IMG_5532.jpg


I didn't integrate it because I'd realized that $10 a pop is way more than $1 a pop for the XT60. This also caused me to realize it might be possible to wire up a split pigtail to several blasters on my person and keep the pack on my belt - not that it wouldn't also be possible with a Lipo, given a hard-shell belt pack.


Questions, comments, and criticism welcome as always.


Edited by Meaker VI, 13 December 2018 - 05:35 PM.

  • 0

#2 TantumBull

TantumBull

    Member

  • Moderators
  • 1,929 posts

Posted 23 January 2018 - 02:16 AM

As someone just now getting into flywheels, I like this a lot. Especially since I need a new drill...


Maybe I missed it, but do you know what the capacity is on the specific light battery you linked? I followed the linked and didn't see an mAh rating, though I could of missed it. All I saw was that it lasted 14 hours per charge but can't infer anything without knowing the current draw.


This also caused me to realize it might be possible to wire up a split pigtail to several blasters on my person and keep the pack on my belt


That would be amazing. Please do this. The HPA of electric blasters.


  • 0

#3 snakerbot

snakerbot

    Maker of Things

  • Members
  • 310 posts

Posted 23 January 2018 - 08:56 AM

Wait, so how is 20V roughly 3S? 3S is 11.1V nominal.


  • 0

#4 Lucian

Lucian

    Member

  • Members
  • 446 posts

Posted 23 January 2018 - 11:01 AM

More food for thought - it'd be really cool to start seeing people re-grip their blasters with drill handles. That way you wouldn't need fancy battery connectors and you could hot swap batteries just as quickly as you can change a mag.


  • 0

Contact me for design consultation relating to 3D Printing, CNC Machining, and Laser Cutting. I am always happy to collaborate on viable Open Source projects and/or business ventures. 


#5 Ryderbike1

Ryderbike1

    Member

  • Members
  • 13 posts

Posted 23 January 2018 - 11:27 AM

Wow thats really unique. I have several old Ryobi power tools that could be used for this. Personally I dont like exposed wires on my blasters so what are your thoughts on using one of these pannels and some shrink wrap on the wires to make it look better? Not a huge improvement but it would probably give it a more finished look.

http://www.ebay.co.u...r-/261802682439
  • 0

#6 Meaker VI

Meaker VI

    Member

  • Moderators
  • 1,192 posts

Posted 23 January 2018 - 01:01 PM

Maybe I missed it, but do you know what the capacity is on the specific light battery you linked? I followed the linked and didn't see an mAh rating, though I could of missed it. All I saw was that it lasted 14 hours per charge but can't infer anything without knowing the current draw.


1.5 Ah, there is a 3 Ah battery available for my set. These work for any other Bauer system tool too, not just the flashlight.


This also caused me to realize it might be possible to wire up a split pigtail to several blasters on my person and keep the pack on my belt

That would be amazing. Please do this. The HPA of electric blasters.


Once I have blasters that would require me to carry multiple batteries, I probably will. Currently, it's the one (nice) strayvan build. My thoughts for this setup are mostly for if the Mk13 pans out or if I can build a nice sidearm (something like a barriade w/swappable turrets would be my ideal). I might also do it if I don't like the battery on the blaster.
 

Wait, so how is 20V roughly 3S? 3S is 11.1V nominal.

 
It's not. It's ~5s. So far it hasn't seemed to matter; time will tell. I'm using in on my 3s setup because that's what I have and that should be more robust to handle the extra current than a 2s setup would be. Not that I've heard of a super-stock 2s rig burning out on 3s though, so maybe it'd be fine.
 

More food for thought - it'd be really cool to start seeing people re-grip their blasters with drill handles. That way you wouldn't need fancy battery connectors and you could hot swap batteries just as quickly as you can change a mag.

 
 I've seen exactly that. I didn't here for a few reasons. First, it'd require me to scrounge/buy a drill (or another LED light; these things would be so easy to integrate. It's begging to go right where the battery door is on the rayvan), which in my case is only ~$10. Second, a 10-pack of XT60 pairs is also ~$10 and now I can just swap the one pack to any number of XT60'd blasters. Third, I didn't want to spend the time integrating again on my already nicely finished integration. I might consider doing it to a demolisher I've got lying around waiting to be worked on though, if I want a more standalone setup.
 

Wow thats really unique. I have several old Ryobi power tools that could be used for this. Personally I dont like exposed wires on my blasters so what are your thoughts on using one of these pannels and some shrink wrap on the wires to make it look better? Not a huge improvement but it would probably give it a more finished look.

http://www.ebay.co.u...r-/261802682439

That's a great idea, I hadn't seen those. For a blaster designed to work with an external battery, it's a good solution. My strayvan also works off of any battery that can sit in the old rayvan magwell though, so it'd be something of a hassle to set up an external connection. I'm thinking I might just find a better way to route the cables or cut an opening or something for this blaster, but I might use something like that for a future project.


I've tried shrinking the wires, they end up inflexible. If you know of a product to sheath the wires while keeping them flexible that could also take shock-load off of them, I'd like to know about it for making an umbilical.


  • 0

#7 meow121325

meow121325

    Member

  • Members
  • 125 posts

Posted 23 January 2018 - 01:10 PM

this is interesting


  • 0

#8 Meaker VI

Meaker VI

    Member

  • Moderators
  • 1,192 posts

Posted 05 June 2018 - 11:23 PM

Bumping for significant discovery:


DO NOT USE 20V LIION PACKS.


For some reason I have no determined yet, the packs keep dying trying to run my NERF setups. I've got a rewired Barricade that just killed one. A BARRICADE! No idea why or what is going on, but every pack I've attempted to run the blasters off of has eventually shown a temperature fault and failed to charge. At first, I thought it was a mk13 problem, since that thing is sketchy for other reasons, but the Barricade tripping it made me rethink the approach.


  • 0

#9 Draconis

Draconis

    I am not Lord Draconical

  • Members
  • 2,712 posts

Posted 08 June 2018 - 06:32 PM

Bumping for significant discovery:


DO NOT USE 20V LIION PACKS.


For some reason I have no determined yet, the packs keep dying trying to run my NERF setups. I've got a rewired Barricade that just killed one. A BARRICADE! No idea why or what is going on, but every pack I've attempted to run the blasters off of has eventually shown a temperature fault and failed to charge. At first, I thought it was a mk13 problem, since that thing is sketchy for other reasons, but the Barricade tripping it made me rethink the approach.


I suspect that the issue may be the protection hardware in these cheap packs.  If the current drawn exceeds whatever the hardware is built for, it may damage something permanently, like a thermofuse.  We have that happen a lot with some fan speed control transistors, which I can then repair by just replacing the thermal fuse.  If you can exchange them, I would.  If you can't, I would open them up and look at the circuit inside.


  • 0
[15:51] <+Noodle> titties
[15:51] <+Rhadamanthys> titties
[15:51] <+jakejagan> titties
[15:51] <+Lucian> boobs
[15:51] <+Gears> titties
[15:51] <@Draconis> Titties.
[15:52] <+Noodle> why is this so hard?

#10 Meaker VI

Meaker VI

    Member

  • Moderators
  • 1,192 posts

Posted 09 June 2018 - 12:09 AM

Ive burned 3 up and exchanged 2 of them. Im not sure I want to risk being blacklisted so Im holding onto the 3rd for now, it is probably something like that that would be easy to fix but I have a couple spares for actual working ATM and this one still has a good charge.
  • 0


0 user(s) are reading this topic

0 members, 0 guests, 0 anonymous users