Jump to content


Photo

Constant Force spring blaster infodump

Constant force Cf spring test coil

31 replies to this topic

#1 snakerbot

snakerbot

    Maker of Things

  • Members
  • 310 posts

Posted 22 May 2016 - 09:51 PM

*
POPULAR

IMG_3157.JPG

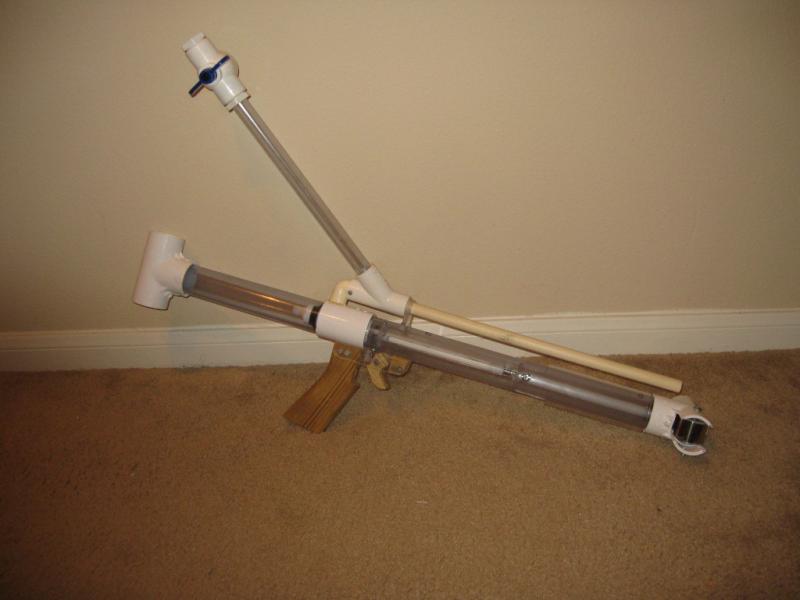
A while back I posted this in the homemades pictures thread.  In short, it was a blaster whose energy source was a constant force spring, like the kind used in Raider drums or your tape measure.  Specifically it was 9293K12.  For those who are not familiar, a constant force spring is a flat piece of metal wound in a coil around some sort of central shaft or bearing.  When you pull on the free end, the coil rotates around this shaft and unwinds.  Because pulling the free end farther only unwinds more of the spring, it doesn’t get any harder to pull as you pull it farther, hence the ‘constant force’ descriptor.


The origin of this experiment is several years ago when a poster on this forum (I can’t remember who it was or what the original context was) offhandedly mentioned constant force springs.  Fast forward several years and I have a job, disposable income, and boredom, and decide to give this a shot.  The original plan was to build a new blaster to run the experiment with, but I got lazy and retrofitted my extension spring rainbowpup instead.  Because of the nature of constant force springs they can really only be put into rainbowpup/eslt/whatever type blasters with plungers that are pulled instead of pushed. 


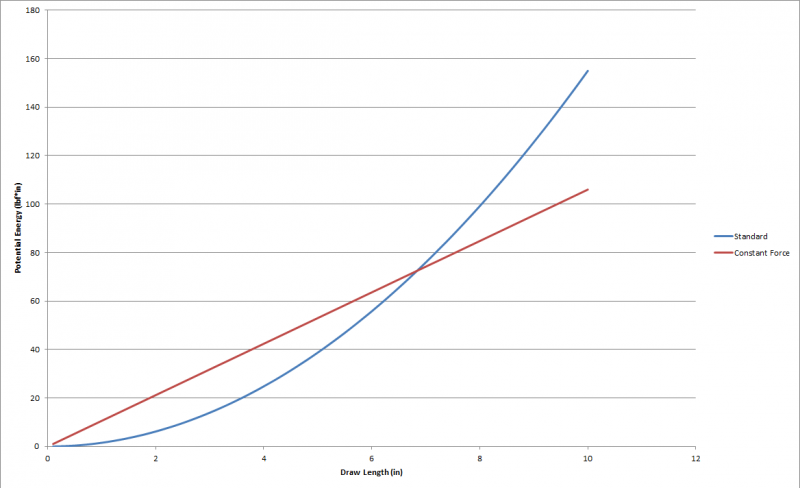
I’m going to drop some physics on you guys here.  I wasn’t sure exactly what spring to get, or how strong it should be.  Constant force springs really are a completely new area, so there are no “standard” springs or rules of thumb or anything.  Constant force springs don’t have a “spring constant” like compression or extension springs do.  So how to compare?  I didn’t come up with a good answer to this until much later.  What I eventually did was just guess and pick a spring whose draw force was about halfway (a little more actually) between the no-extension and full-extension force of the 9432k125 I found for my rainbowpup.  After buying the spring I realized that the best comparison was probably energy release.  The potential energy stored in a compression or extension spring is given by the equation E=0.5Kx^2 where E is the potential energy stored by the spring, K is the spring constant, and x is the displacement of the spring.  The potential energy stored in the K125 spring at the 6.5” of draw I use is therefore 65.4875lbf*in or 7.4J.  The potential energy at rest (I use no pre-extension) is 0J.  So the total energy released during firing (not all of which goes into the dart) is 7.4J-0J=7.4J.  So for the most equal comparison I should find a spring that can release 7.4J over 6.5in of travel.  Turns out by complete accident, I hit that on the nose with the spring I bought.


The potential energy of a constant force spring I couldn’t find online or in my machine design textbook, so I derived it.  (If someone finds a mistake in this result, please let me know, that might explain some things).  What I got was E=Fx where E is the energy released, F is the spring force, and x is the displacement.  So our total energy here is 68.9lbf*in or 7.78J. 

Note that the displacement term in the compression/extension spring is quadratic, while the displacement term for constant force springs is linear.  That means that for higher draws, the constant force spring falls behind in energy very quickly, but for this blaster/spring combo, I had almost exactly the same energy, so I moved forward with this.

spring energy graph.png


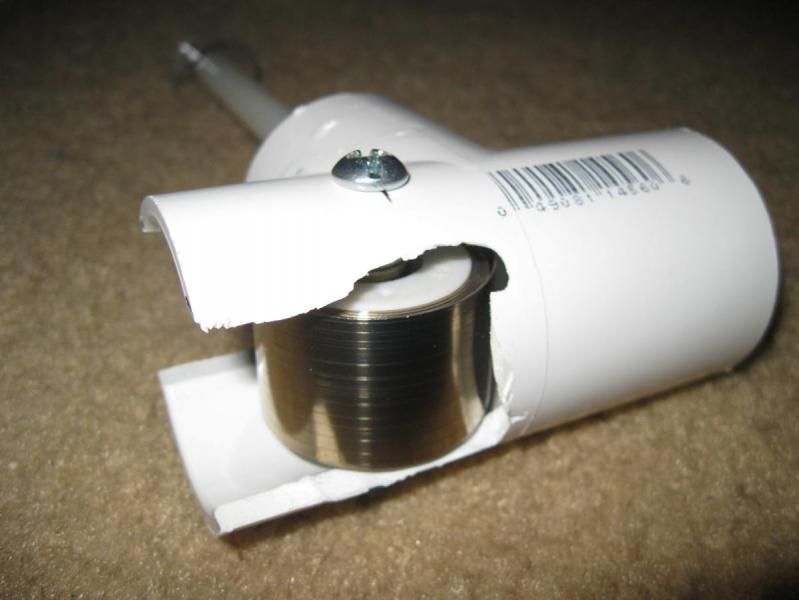
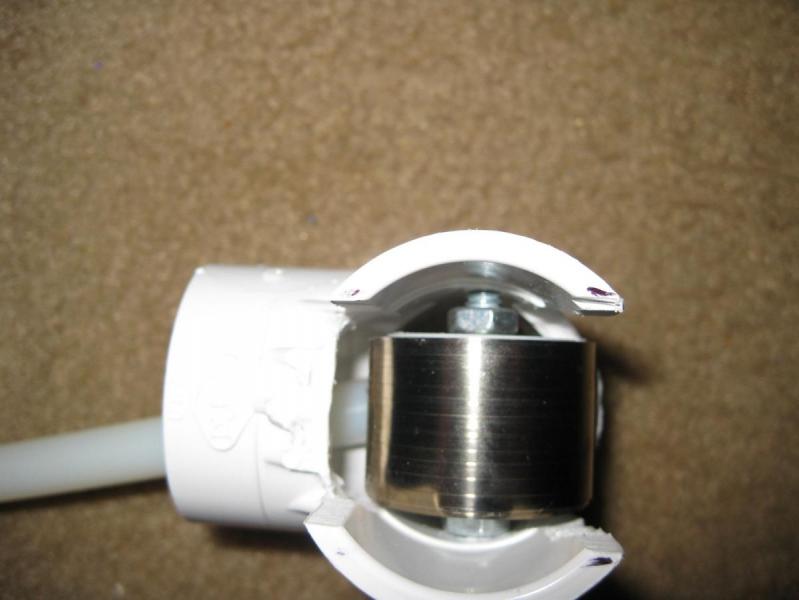
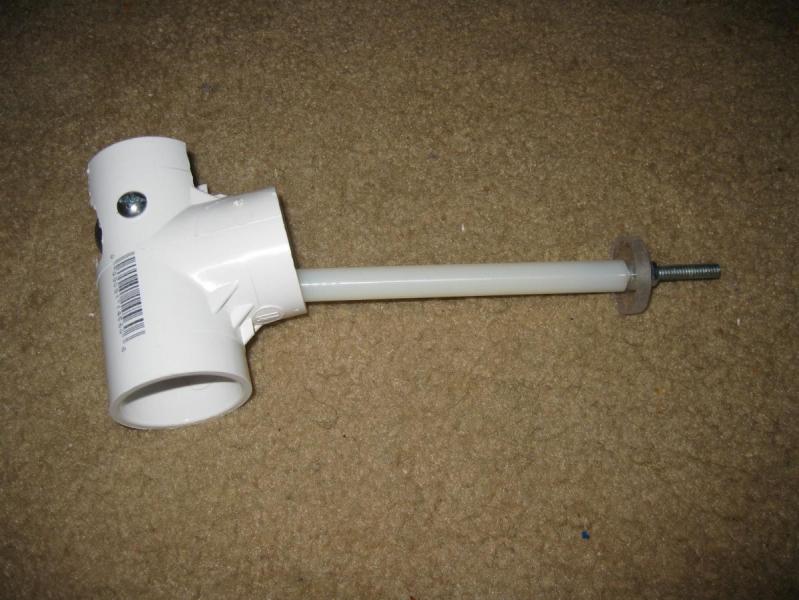
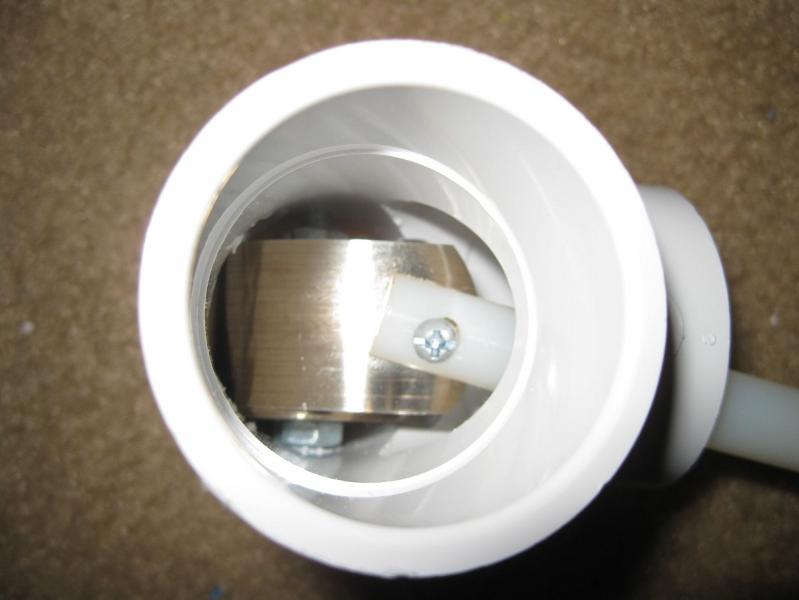
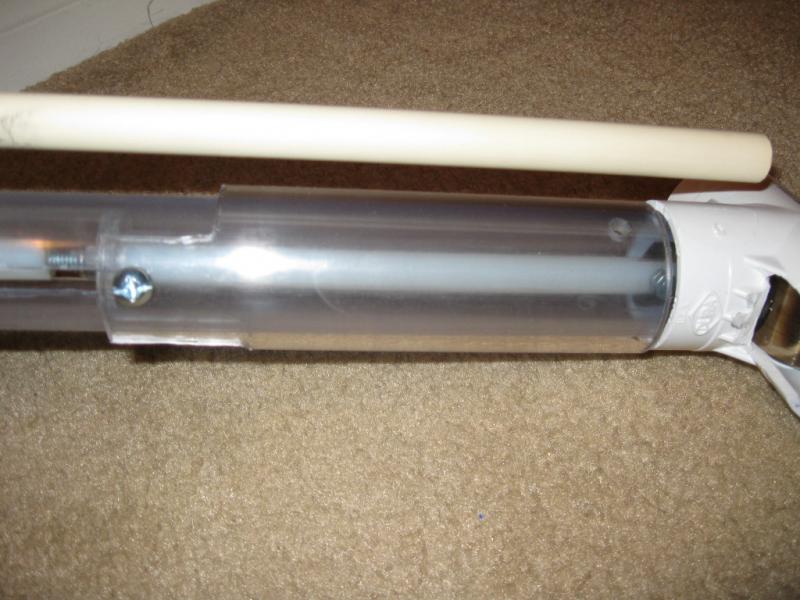
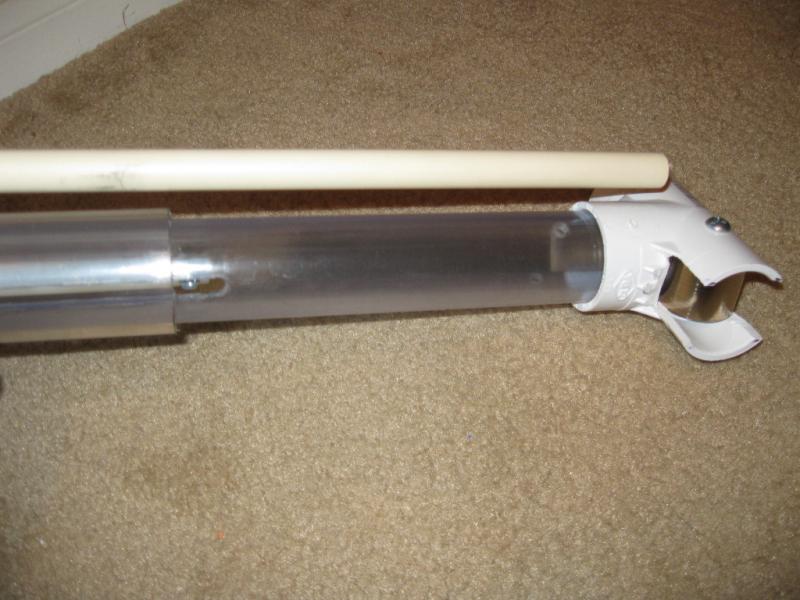
So theory over, let’s talk practical application.  The edge of the spring needs to line up with the plunger rod, because that’s where the free end comes off.  To accomplish this, I used a 1.5” pvc tee and carved it to the nines so I could mount the spring a little off to the side.  I drilled a hole through the tee and used sliding door bearings to hold the spring.  I ground them down so one edge of each could fit into the ID of the spring. 

IMG_3315.JPG

IMG_3309.JPG


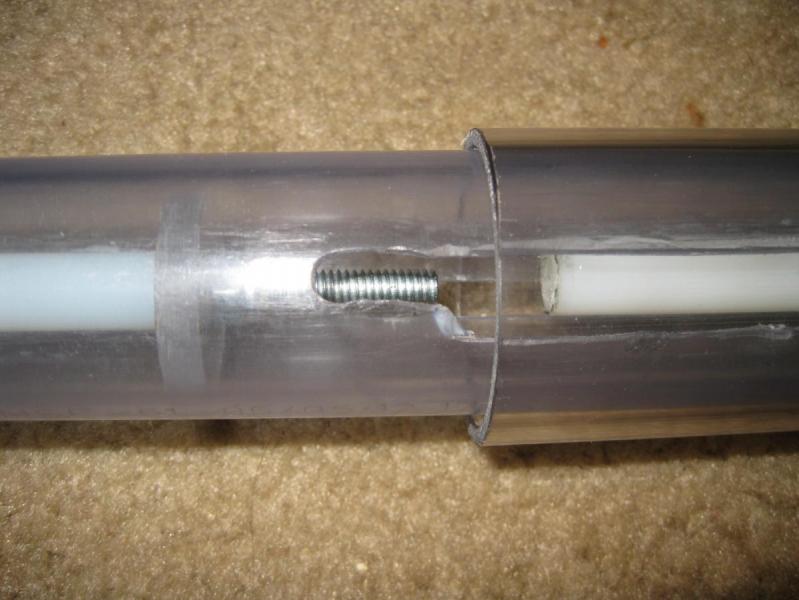
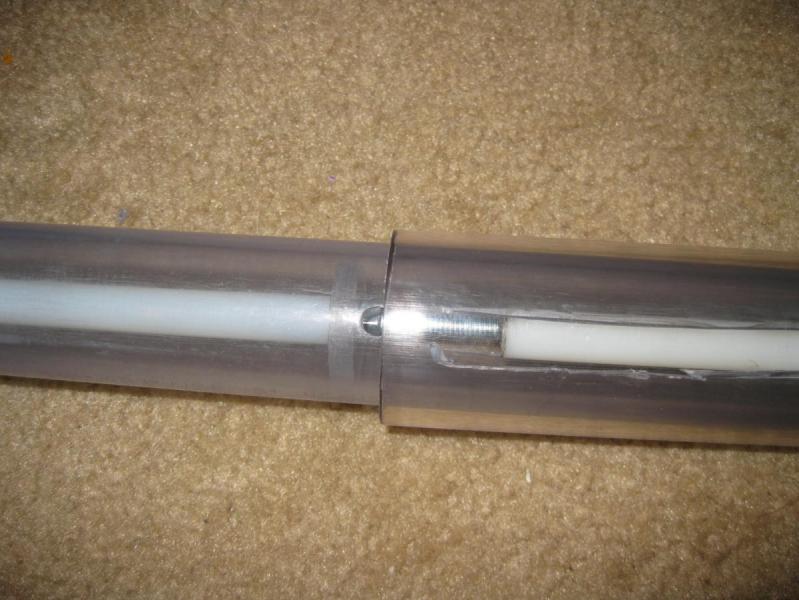
For attaching the spring to the plunger rod, I used a section of ½” nylon rod (the same material used for the plunger rod).  One end was threaded to screw onto the end of a small stud with the priming disk on it.  The other end had a slot in it, into which I inserted the spring.  A small screw goes through a hole in the end of the spring (the spring comes like that) to affix the two together. 

IMG_3317.JPG

IMG_3311.JPG


Assembly is a bitch.  To get the spring into the tee, I had to hold it in place and slowly thread the bolt down through the tee, alternating between rotating the bolt a turn or two and then going back and rotating these nuts a turn or two.  Once that was done, I inserted the plunger extension into the front of the blaster body.

IMG_3322.JPG

That is where it sits at rest, so I had to stick my finger in the tee at the front and force it down towards the plunger rod. 

IMG_3323.JPG

Then I turned the plunger with my other hand to thread the two together. Not fun.

IMG_3327.JPG


So how does it shoot?  Not well.  I’m not sure of the exact reason now, but this blaster had trouble.  About one in five darts didn’t leave the barrel.  The ones that did didn’t seem to shoot as hard.  I don’t have a chronograph, but range tests show a clear drop off. I have a couple theories for why this could be.  First, while this spring is labelled as ‘constant force’, it isn’t like that, not quite.  Constant force springs take a small amount of travel before they reach their listed force.  I guess this is due to the shape of them or something.  I have a couple inches of pre-travel built into this setup, but maybe it isn’t enough.  Further, there is almost certainly more friction in this setup compared to an extension spring.  The bearings I used are a source of some of this, and the priming disk in the middle of the plunger rod is surely rubbing against the inside of the body because of the shape of the spring pushing it sideways.  There is also a possibility that the spring, which is 1in wide, is scraping on the inside of the front body of the blaster.  One final reason is that the process of disassembling this blaster and replacing the spring seems to have messed up the rod seal a little bit.  I’m not sure why, and it doesn't seem bad enough to account for all the problems I see.


I said in the pictures thread that “this is the weirdest thing ever”. What did I mean by that?  Well, it primes like nothing else I’ve ever used.  I’m not even sure how to describe it.  “Light” is almost right, but that isn’t really it.  I end up smashing the priming handle hard against its stops almost every time I prime it.  It’s like I begin to prime back and am expecting a certain amount of force based on how much resistance at has at the beginning, but then it throws me for a loop because that extra resistance doesn’t come.  I’m sure I could get used to it eventually, but it is pretty weird at first.


So, difficult to assemble, expensive ($10.83 for one spring!), weird to prime, and not shooting quite like you’d expect.  Are there any upsides?  I don’t know.  If you could find the right spring, and get the geometry correct (no grinding), you could make one of these that shot pretty well and maybe felt like it had a weaker prime, but I don’t consider that worth it.  Extension springs already have pretty light primes for how well they shoot, and I don’t see this offering enough advantages to overcome the disadvantages.  I’ll leave the blaster as-is for a little while if anyone wants more pictures or wants me to do any more tests, but I don’t see a good reason to keep it as it is forever.


Crossposting additional pictures from the homemades pictures thread here, so it's all in one place.

IMG_3159.JPG

Not primed:

IMG_3160.JPG

Primed:

IMG_3161.JPG


Edited by snakerbot, 24 May 2016 - 10:10 PM.

  • 7

#2 Carbon

Carbon

    Contriberator

  • Moderators
  • 1,894 posts

Posted 23 May 2016 - 07:57 PM

*
POPULAR

First off, I love everything about this blaster. This is science.


As far as the irregular/sub-optimal ranges: what kinds of darts or barrel are you using? This may be a springer in the strictest of definitions, but the plunger acceleration is different. I'd be interested to see how an airgun fit barrel would work.


  • 1
Hello. I am Indigo of the Rainbow Clan. You Nerfed my father. Prepare to die.

#3 Kilomona

Kilomona

    Member

  • Members
  • 108 posts

Posted 23 May 2016 - 08:31 PM

I think this could work with a very heavy draw, because it would accelerate quickly the whole time, perhaps even performing better than more common springs deaccelerating as they compress air. That kinda makes me want to see a spring that accelerates as it pushes... But, that sounds unrealistic.
  • 0

#4 snakerbot

snakerbot

    Maker of Things

  • Members
  • 310 posts

Posted 23 May 2016 - 09:09 PM

First off, I love everything about this blaster. This is science.


As far as the irregular/sub-optimal ranges: what kinds of darts or barrel are you using? This may be a springer in the strictest of definitions, but the plunger acceleration is different. I'd be interested to see how an airgun fit barrel would work.

Most testing was with a 15" cpvc barrel and grey darts (ace foam, but I think mine is different from most people's) on the loose end of twist fit.  Using pink darts (Kane's foam) that ranged from push fit to vacuum-load-able was typically better, but not quite to the levels I'd like.  The grey darts in 12" petg yielded a push fit and no fail-to-fires in 18 darts, but it's dark out so I don't know how hard they shot.  Pink darts in petg was a fall-through fit with no fail-to-fires, but somehow it still pooped out one or two darts.  My petg barrel setup was pretty janky, so I'd like to do more tests on that, but I'll be awfully busy this week working on other stuff so it'll have to wait a while.


I think this could work with a very heavy draw, because it would accelerate quickly the whole time, perhaps even performing better than more common springs deaccelerating as they compress air. That kinda makes me want to see a spring that accelerates as it pushes... But, that sounds unrealistic.

You could certainly use a heaver draw here, and it may or may not feel lighter.  The geometry becomes an issue, but that's surmountable.  I was kind of thinking this would allow for an even easier prime than an extension spring while providing the same performance, but there's no reason you couldn't go the other way with it if the physics end up working out.


A spring that gets stronger as it pushes is kind of possible with coil springs like CF springs.  If the spring tapers down instead of being the same width, then the force changes with displacement.  It would be weird though because you'd have to have the wider part on the outside and the thinner part inside when it's coiled up.  Also, I can't see what anyone would use those for, so you'd have to order it custom.


  • 0

#5 DjOnslaught

DjOnslaught

    Member

  • Members
  • 350 posts

Posted 24 May 2016 - 04:49 AM

Sorry if I'm a bit confused by what your using the CF spring for.... are you using it to assist with priming or to charge the blaster for firing?
The idea of using a CF spring is pretty damn creative and I love the idea of it, once I know more about what your using it for exactly (maybe even a picture of the entire gun showing where it is placed and such) I may be able to help you alot more.
  • 0

#6 snakerbot

snakerbot

    Maker of Things

  • Members
  • 310 posts

Posted 24 May 2016 - 10:12 PM

Sorry if I'm a bit confused by what your using the CF spring for.... are you using it to assist with priming or to charge the blaster for firing?
The idea of using a CF spring is pretty damn creative and I love the idea of it, once I know more about what your using it for exactly (maybe even a picture of the entire gun showing where it is placed and such) I may be able to help you alot more.

Huh?  It's the main spring of the blaster, the one that moves the plunger.  That's literally the second sentence of my first post.


As for the pictures you're asking for, there were some in the pictures thread that I linked to at the beginning.  I've edited the first post to include them in this thread as well.


  • 0

#7 DjOnslaught

DjOnslaught

    Member

  • Members
  • 350 posts

Posted 25 May 2016 - 04:44 AM

Huh?  It's the main spring of the blaster, the one that moves the plunger.  That's literally the second sentence of my first post.
 
As for the pictures you're asking for, there were some in the pictures thread that I linked to at the beginning.  I've edited the first post to include them in this thread as well.

I went back threw the first post more and realized the answer about the spring was there sorry. Do you possibly have a second spring identical to the first to connect to the other side of the tube in order to increase the force generated when the trigger is pulled?

After looking at your plunger tube I'm curious with the extension what the full length of it is, because where it's not a single piece if it is too long there could be a lose of force during retraction at the screwed connection.

Edited by DjOnslaught, 25 May 2016 - 04:50 AM.

  • 0

#8 snakerbot

snakerbot

    Maker of Things

  • Members
  • 310 posts

Posted 25 May 2016 - 12:38 PM

Do you possibly have a second spring identical to the first to connect to the other side of the tube in order to increase the force generated when the trigger is pulled?

What other side of the tube?  No I don't have another spring, but I'd be interested in what your idea is anyway.


After looking at your plunger tube I'm curious with the extension what the full length of it is, because where it's not a single piece if it is too long there could be a lose of force during retraction at the screwed connection.

I don't follow.  How could having a long plunger rod make me loose spring force?  I know I'm adding mass to the plunger with that extension, but the spring will give the same force either way.


  • 0

#9 Ice Nine

Ice Nine

    Prince Dangus

  • Administrators
  • 1,460 posts

Posted 25 May 2016 - 12:58 PM

I'm really glad you posted this up, Snakerbot; I was excited to hear about it ever since I saw the pictures in the homemades thread. I looked around at the CFSs on McMaster and I could see that it was a pretty daunting task to go about picking a spring.


As far as the rod seal goes, are you sure it was messed up on disassembly? I'm not sure how wide the actual material of the spring is, but my first thought was that any kind of mounting would become unbalanced as the spring unwinds (since the center of the wound spring is necessarily offset, and as it unwinds, the spring pulls the plunger rod more towards the spring center). Is it possible there's some torque on the plunger rod? I've been thinking about extension spring/latex tubing Double Rainbows for a while now, and this could be a cool alternative to that since the seal geometry is a little less significant.


I agree as far as your ultimate evaluation of design efficiency goes; it doesn't seem like you're getting much improvement in terms of feel and frictional decrease as compared to an extension spring. Nonetheless, I am really happy to see such a creative build posted up and I really like the discussion its generated. I would love to try priming a blaster like this sometime.


  • 0

Unholy Three: DUPLUM SCRTA, DUPLUM PROBLEMA (2009)

But Zeke guns tend to be like proofs by contradiction

Theoretically solid but actually non-constructive

Rnbw Cln


#10 Langley

Langley

    LGLF - Since 2002

  • Administrators
  • 2,997 posts

Posted 25 May 2016 - 02:43 PM

What other side of the tube?  No I don't have another spring, but I'd be interested in what your idea is anyway.
 
I don't follow.  How could having a long plunger rod make me loose spring force?  I know I'm adding mass to the plunger with that extension, but the spring will give the same force either way.


I think I know what he means on both counts. Right now you have the axle of the CFS offset to one side (the right if you're pointing the blaster away from yourself). I think he means adding a second that is offset to the left.  As it is now, it could be torquing the plunger rod to one side which could fuck up your plunger rod seal. 


You said that the spring needs to be extended slightly before it applies it's maximum force.  I think he may mean that your plunger rod extension is allowing the spring to wind up too much, and it would be better to have a shorter plunger tube and the spring per-extended more, but based on what I read in your first post it seems like you already accounted for that.


  • 0

You can poop in my toilet anytime champ.

2016 Nerf War Schedule
Bless you, my son. Now recite 3 New Members Guides and 5 Code of Conducts for your sins.


#11 Kilomona

Kilomona

    Member

  • Members
  • 108 posts

Posted 25 May 2016 - 03:07 PM

Kind of building on DjOnslaught's idea, what about 4 spring coils arranged in a square design? That might help with evening out the the pull on the plunger.
  • 0

#12 Meaker VI

Meaker VI

    Member

  • Moderators
  • 1,192 posts

Posted 25 May 2016 - 03:17 PM

You said that the spring needs to be extended slightly before it applies it's maximum force.  I think he may mean that your plunger rod extension is allowing the spring to wind up too much, and it would be better to have a shorter plunger tube and the spring per-extended more, but based on what I read in your first post it seems like you already accounted for that.


I'm not sure more pre-extension will help. This is a *constant* force spring, it's designed to just keep applying Xkg of force no matter where in the extension it is. A coil spring, on the other hand, has a spring constant that adds up to more force depending on how much compression you've got. The only thing you could do with a CF spring is get some momentum built up, but that'd mean putting slack somewhere in the system.
  • 0

#13 Langley

Langley

    LGLF - Since 2002

  • Administrators
  • 2,997 posts

Posted 25 May 2016 - 06:01 PM

I'm not sure more pre-extension will help. This is a *constant* force spring, it's designed to just keep applying Xkg of force no matter where in the extension it is. A coil spring, on the other hand, has a spring constant that adds up to more force depending on how much compression you've got. The only thing you could do with a CF spring is get some momentum built up, but that'd mean putting slack somewhere in the system.


Yeah, I get that. I was mainly thinking of that initial bit of extension required to reach that X kg of force, as described in the OP:
 

First, while this spring is labelled as ‘constant force’, it isn’t like that, not quite. Constant force springs take a small amount of travel before they reach their listed force. I guess this is due to the shape of them or something. I have a couple inches of pre-travel built into this setup, but maybe it isn’t enough.


Edit: There's got to be a better way to handle that linkage so you don't need to reach through the slot to connect it. Is there enough play to pull the spring all the way out and thread it through all the pieces individually before fitting them all together?

Edited by Langley, 25 May 2016 - 06:05 PM.

  • 0

You can poop in my toilet anytime champ.

2016 Nerf War Schedule
Bless you, my son. Now recite 3 New Members Guides and 5 Code of Conducts for your sins.


#14 DjOnslaught

DjOnslaught

    Member

  • Members
  • 350 posts

Posted 25 May 2016 - 07:28 PM

I think I know what he means on both counts. Right now you have the axle of the CFS offset to one side (the right if you're pointing the blaster away from yourself). I think he means adding a second that is offset to the left.  As it is now, it could be torquing the plunger rod to one side which could fuck up your plunger rod seal. 
 
You said that the spring needs to be extended slightly before it applies it's maximum force.  I think he may mean that your plunger rod extension is allowing the spring to wind up too much, and it would be better to have a shorter plunger tube and the spring per-extended more, but based on what I read in your first post it seems like you already accounted for that.


Actually in regards to the plunger tube being longer is in reference to it being in 2 pieces instead of a solid one and it possible being torqued to one side as its being pidled.

You were exactly correct about what I meant as far as spring placements. Since your using a tee with a spring on one side, I was suggesting utilizing the other side for a second to increase the strength pulled forward with and also insuring the plunger rod stas centered while in motion.
  • 0

#15 snakerbot

snakerbot

    Maker of Things

  • Members
  • 310 posts

Posted 25 May 2016 - 11:23 PM

I'm breaking up some of your guys' quotes to group by topic.
 

As far as the rod seal goes, are you sure it was messed up on disassembly? I'm not sure how wide the actual material of the spring is, but my first thought was that any kind of mounting would become unbalanced as the spring unwinds (since the center of the wound spring is necessarily offset, and as it unwinds, the spring pulls the plunger rod more towards the spring center). Is it possible there's some torque on the plunger rod? I've been thinking about extension spring/latex tubing Double Rainbows for a while now, and this could be a cool alternative to that since the seal geometry is a little less significant.

It's definitely pulling sideways, but not for the reason you described.  The spring material is .015" thick, so for 6.5" of draw, I'm looking at a radial movement of just over .020".  But the very end of the spring, where it attaches to the plunger rod, wants to curl back up, rather than just staying straight like the rest of the extended portion.  I have a couple ideas for how to get around this, but it was not a problem I anticipated, so I don't have anything on this blaster.  Thanks for bringing this to my attention, I hadn't thought of the side force's influence on the rod seal.
 

I think I know what he means on both counts. Right now you have the axle of the CFS offset to one side (the right if you're pointing the blaster away from yourself). I think he means adding a second that is offset to the left.  As it is now, it could be torquing the plunger rod to one side which could fuck up your plunger rod seal.


Actually in regards to the plunger tube being longer is in reference to it being in 2 pieces instead of a solid one and it possible being torqued to one side as its being pidled.

You were exactly correct about what I meant as far as spring placements. Since your using a tee with a spring on one side, I was suggesting utilizing the other side for a second to increase the strength pulled forward with and also insuring the plunger rod stas centered while in motion.

This is a reasonable idea. You could use smaller springs as well if you're doubling them up, which would give more room inside the front body before they start scraping on things. As with Ice Nine's comment, I hadn't considered the side force when I designed this blaster, so it's just kind of there.
 

Kind of building on DjOnslaught's idea, what about 4 spring coils arranged in a square design? That might help with evening out the the pull on the plunger.

That sounds like a huge pain in the ass to make.
 

You said that the spring needs to be extended slightly before it applies it's maximum force.  I think he may mean that your plunger rod extension is allowing the spring to wind up too much, and it would be better to have a shorter plunger tube and the spring per-extended more, but based on what I read in your first post it seems like you already accounted for that.


I'm not sure more pre-extension will help. This is a *constant* force spring, it's designed to just keep applying Xkg of force no matter where in the extension it is. A coil spring, on the other hand, has a spring constant that adds up to more force depending on how much compression you've got. The only thing you could do with a CF spring is get some momentum built up, but that'd mean putting slack somewhere in the system.


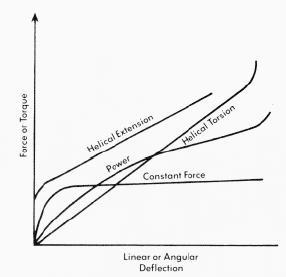
Yeah, I get that. I was mainly thinking of that initial bit of extension required to reach that X kg of force, as described in the OP:

spring force.gif
Picture stolen from Engineer's Edge. http://www.engineers...orce-spring.htm

Using their formula of 1.25xID for required pre-extension I need 1.5". I don't know how much I have, but I think it's close to that.
 

Edit: There's got to be a better way to handle that linkage so you don't need to reach through the slot to connect it. Is there enough play to pull the spring all the way out and thread it through all the pieces individually before fitting them all together?

 If you mean unwinding the spring and assembling it that way, sure, the spring is long enough, but I don't know how to keep the spring unwound without it being attached to things. I could probably have come up with a better way of doing it if I had designed this blaster from scratch, but I wanted to fabricate as few new parts as possible, and I paid for it.


  • 0

#16 DjOnslaught

DjOnslaught

    Member

  • Members
  • 350 posts

Posted 26 May 2016 - 04:48 AM

Since you already have everything in place and a working prototype (I say prototype because of the aforementioned issues) then all you might need to create is a single piece plunger rod that can be inserted with the CF spring already connected to it.

I really do think 2 springs would fix the power issue and the plunger rod pulling to the side, if nothing else your work has me milling over ideas in my head to run past my resident Mech Engineer/Physicist wife for help.
  • 0

#17 snakerbot

snakerbot

    Maker of Things

  • Members
  • 310 posts

Posted 26 May 2016 - 07:51 PM

Since you already have everything in place and a working prototype (I say prototype because of the aforementioned issues) then all you might need to create is a single piece plunger rod that can be inserted with the CF spring already connected to it.

I really do think 2 springs would fix the power issue and the plunger rod pulling to the side, if nothing else your work has me milling over ideas in my head to run past my resident Mech Engineer/Physicist wife for help.

Everything I build is a prototype.


If I made a single piece plunger rod, I'd have to 1: find a way to pull the plunger rod through the catch and seal block against spring force and attach the plunger head from there, and 2: take it down to the lab and turn a catch notch in it.  I don't know about you, but I'd rather not have to chuck nylon up in the lathe.


There's a few things going on here that I may not have made clear in my earlier posts.  One is that everything forward of the plunger tube/stock is under some sort of load at every moment.  The plunger rod is pulled up against the seal block by the spring, the seal block rests in the main body and transfers the compressive load to it, and that load goes into the tee at the front, where the spring is mounted.  The spring and all parts of the plunger rod are in tension the whole time, so the load path is just a loop through the spring, plunger rod, seal block, body, tee, and back to the spring.  Second, this is a rainbow, so I need a catch notch in the plunger rod.  I'm using that gap there where the threaded connection is.  Perhaps a clothespin trigger or ESLT lever catch might work better, but I'm working with what I had already built.


Now don't get me wrong, I'm not saying this is the only way or best way to do this or that you shouldn't try to improve the concept.  I just think this particular blaster is kind of stuck where it is, barring a major redesign.  If you or your wife can come up with anything, by all means post it.


In other news, I took an optimal barrel from an ESLT I got from Ryan and tried that on here, and HOLY FUCK.  This is by far the best this blaster has ever shot.  Again, it's dark, so I don't know how far it shot, but the darts were hitting my wall hard.  It was making a pretty loud noise when firing, so I think the lengths of the cpvc and aluminum sections could still be tweaked.


  • 0

#18 DjOnslaught

DjOnslaught

    Member

  • Members
  • 350 posts

Posted 27 May 2016 - 04:49 AM

Chucking nylon in a lathe sucks hardcore and makes deburring a pain. The catch notch is for priming the action of the rifle correct?

I'm gonna do some mock up stuff here soon especially if I can find a reasonably priced constant force spring (or 2)
  • 0

#19 KaneTheMediocre

KaneTheMediocre

    Belligerent Asshole

  • Members
  • 613 posts

Posted 28 May 2016 - 12:13 AM

So how does it shoot?  Not well.  I’m not sure of the exact reason now, but this blaster had trouble.  About one in five darts didn’t leave the barrel.  The ones that did didn’t seem to shoot as hard.  I don’t have a chronograph, but range tests show a clear drop off. I have a couple theories for why this could be.  First, while this spring is labelled as ‘constant force’, it isn’t like that, not quite.  Constant force springs take a small amount of travel before they reach their listed force.  I guess this is due to the shape of them or something.  I have a couple inches of pre-travel built into this setup, but maybe it isn’t enough.  Further, there is almost certainly more friction in this setup compared to an extension spring.  The bearings I used are a source of some of this, and the priming disk in the middle of the plunger rod is surely rubbing against the inside of the body because of the shape of the spring pushing it sideways.  There is also a possibility that the spring, which is 1in wide, is scraping on the inside of the front body of the blaster.  One final reason is that the process of disassembling this blaster and replacing the spring seems to have messed up the rod seal a little bit.  I’m not sure why, and it doesn't seem bad enough to account for all the problems I see.


I said in the pictures thread that “this is the weirdest thing ever”. What did I mean by that?  Well, it primes like nothing else I’ve ever used.  I’m not even sure how to describe it.  “Light” is almost right, but that isn’t really it.  I end up smashing the priming handle hard against its stops almost every time I prime it.  It’s like I begin to prime back and am expecting a certain amount of force based on how much resistance at has at the beginning, but then it throws me for a loop because that extra resistance doesn’t come.  I’m sure I could get used to it eventually, but it is pretty weird at first.


I think some or possibly all of the weirdness can be explained by the constant nature of the force.  Although having constant force seems neat and maybe ideal, the linear nature of traditional springs actually smooths out the prime and delivers force when it's needed most in the release.

Case 1: While priming the blaster, if you have a roughly constant force (your hand) priming against another roughly constant force (a constant force spring), the net force will be constant and your hand and the priming grip will accelerate until slamming into the end-stop after the catch.


Case 2: a roughly constant force (your hand) priming against a linearly increasing force from a traditional spring would accelerate rapidly at first, but then more slowly until the force from the spring exceeds the force from your hand, at which point the priming would decelerate.   


 With just above the minimum force to prime in the first case, priming would take a long time--Infinite time as you approach the minimum force necessary.  So there isn't really a "perfect" amount of force.

With just above the minimum force to prime in the second case, priming would accelerate, and then decelerate to just barely allow the catch to fall into place.  No slamming into the end is necessary, because the variation in the spring force acts as sort of a cushion, and the bare minimum force will prime the blaster in a finite amount of time.

As far as efficient use, I think the traditional linear springs also offer the advantage, because they produce the most force at the very start, when the plunger needs to get a move on it, and least at the end of their travel, when the momentum of the plunger system takes over.  I would expect that looser barrels would give the worst performance due to slow initial plunger acceleration, but sufficiently tight barrels and a sufficiently good seal would narrow the performance gap.  This is all based on qualitative theory and popular assumptions, so reality may vary.


In a longer draw case, there might be a space-saving advantage, and I've fantasized about using these for a regulated pressure chamber for years, so I'm super interested in this project even though I don't think it's a great context for a constant force spring.


  • 0
RAINBOW CLAN FTW
I'm Purple

My Half-Baked MHA Site

#20 Doom

Doom

    NH's Official In-House Physicist

  • Administrators
  • 559 posts

Posted 28 May 2016 - 10:43 PM

Nice work.


Back in 2008 or so I bought some hefty constant force springs (probably 9293K14) for a water gun design. You usually want constant pressure, so this would do that. I don't remember all the details, but after getting two of the springs (to avoid the balance issue you have) I scrapped the project and returned the springs to McMaster-Carr. I think I decided the springs were way too unwieldy, and I was skeptical of the safety of the design. But this is making me reconsider given that it could be combined with another crazy idea I have for a water gun, which probably wouldn't require the largest springs.


Ultimately, I think Kane is right and increasing force is better for Nerf. You want to build up pressure as quickly as possible, so you'd want higher force initially to get higher acceleration and more compression initially.


  • 0

#21 snakerbot

snakerbot

    Maker of Things

  • Members
  • 310 posts

Posted 30 May 2016 - 10:09 PM

Lots of stuff.


Those are good points, especially about priming it.  That makes a lot of sense.


Ultimately, I think Kane is right and increasing force is better for Nerf. You want to build up pressure as quickly as possible, so you'd want higher force initially to get higher acceleration and more compression initially.


Yeah, I wasn't really sure what I was expecting going into this, I kind of just wanted to see what happened. 


I did get a chance to take it outside this weekend with the optimal barrel, and it seems to be shooting pretty much just as far as what it was doing before with the 15" cpvc barrel and extension spring.  In its current state then, it should be at least viable as a primary in the sort of war environment we play in in Houston.  Perhaps it's not the most efficient thing, but it seems like it should work.  I'd still like to do some more tests with it, and maybe switch back to the extension spring and get some data with different barrels as well.  One of these days I'll find a way to get access to a chronograph, so I can get some more solid numbers.


  • 0

#22 snakerbot

snakerbot

    Maker of Things

  • Members
  • 310 posts

Posted 16 July 2016 - 08:07 PM

Double-post for war report.


I made a new optimal barrel with 6" of cpvc and 9" of SCH80 pvc and took this to the Houston Summer war 2016 today. I only used this for two rounds, but my preliminary judgement is as follows: It works fine, but doesn't offer any particular advantage over an extension spring.


The new barrel made it shoot quite consistently, with only one fail-to-fire through the two rounds I used it. It was shooting about on par with the ESLT I loaned out, maybe a little harder, although it did have a tendency to make darts corkscrew. Normally I would attribute this to poor darts or wind, but the same darts were shooting like lasers from my xbow, so I don't know what's up. The rod seal also magically fixed itself sometime before yesterday.


  • 0

#23 CaptainSlug

CaptainSlug

    Resident Mad Scientist

  • Administrators
  • 4,763 posts

Posted 16 July 2016 - 09:12 PM

 It works fine, but doesn't offer any particular advantage over an extension spring.

Presumably (if you could revise the design to take advantage of this) it could takes up less space than a normal extension spring since it has a very short length when unloaded


Also, aside from just balancing lateral loads (as DjOnslaught pointed out) if you want more load per inch you could use multiples of these. That's not easily done with other types of springs without nesting them inside each other (like plenty of people do with longshots).


This page has some diagrams on mounting methods for one or multiple constant force springs.


The downside is that these are expensive and their life span is relatively short. It makes for some potentially peculiar configurations though.


Something else that we may want to consider with one of these is adding a conical spring to the back of the plunger or plunger tube to act as an end-of-stroke assist. You need more load to accelerate the plunger head to break the initial friction of the seal, then a secondary load peak occurs once you reach peak pressure to propel the dart. The rest of the load on travel is just about maintaining inertia.


  • 0
The little critters of nature, they don't know that they're ugly. That's very funny, a fly marrying a bumble bee. I told you I'd shoot, but you didn't believe me. Why didn't you believe me?

#24 DjOnslaught

DjOnslaught

    Member

  • Members
  • 350 posts

Posted 17 July 2016 - 02:32 PM

I was actually thinking about using a standard extension spring as a assist to help prolong the life of the constant force springs, but I never made it further then mental prototyping since no wars I know of within reasonable driving allow homemades
  • 0

#25 CaptainSlug

CaptainSlug

    Resident Mad Scientist

  • Administrators
  • 4,763 posts

Posted 18 July 2016 - 08:14 AM

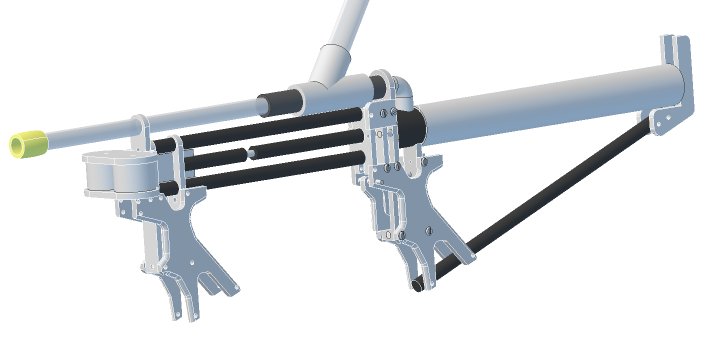
I was thinking more like a test-bed that would allow for 1-to-1 comparison against a K26 or K25. Here's my concept for a horrible chimera of a PCSR, ESLT, and +bow. The foregrip slides on the two guide rods to push the plunger rod backwards into the stock. The nicest feature is that there are no slots to cut in PVC.

dcfs_00.jpg

The catch is the +bow Rev.3 type, just working backwards so I can avoid have a linkage. The redirect piece is mounted to the back of the grip frame, which means that the frame piece itself is retaining the o-ring or shaft seal that the plunger rod slides through. The dual constant-force springs are in an optional cassette at the front. The back of the plunger tube still has room for a full-length K26 or K25 should you want to switch to one. Or you can add a trimmed one of either to act as a plunger "booster".


And the solution to the "No Wars Near Me" problem is to host one yourself.


  • 0
The little critters of nature, they don't know that they're ugly. That's very funny, a fly marrying a bumble bee. I told you I'd shoot, but you didn't believe me. Why didn't you believe me?


Also tagged with one or more of these keywords: Constant force, Cf, spring, test, coil

0 user(s) are reading this topic

0 members, 0 guests, 0 anonymous users