Jump to content


Photo

General Battle Max Sceptor Reference Thread

sceptor airgun semi-auto mod

22 replies to this topic

#1 Ice Nine

Ice Nine

    Prince Dangus

  • Administrators
  • 1,460 posts

Posted 15 May 2016 - 07:17 PM

*
POPULAR

Welcome to a simple write-up and general repair/reference thread for the Battle Max Sceptor MarkerBall v1.0, usually just called the Sceptor. I've been using one of these blasters since 2012 and have a lot of experience with them, so when Zorn's Lemma asked me to pick one up for him and modify it for Armageddon, I figured I would write it up here alongside a couple of noteworthy elements of the blaster.


As of the original post date and time, red Sceptors are available on Amazon for $21.60 with free shipping; there are Prime-qualifying Sceptors for $29.99 (red) and $34.99 (blue). In the past month I've bought three red ones, but one blue one came instead of a red one. There are no differences between the colored versions. One was leaky, probably because these have been sitting in a warehouse for four years and the lubrication dried out. If yours is leaky out of the box, the easiest thing to do is return it; Sceptor leaks are possible to fix, but a hassle.


The first post in this thread is a modification guide, and the second post is general stuff with which I've had experience (such as fixing leaks or tank replacement). If you want to jump to the guide, use this link.


These are the tools and parts I used for this modification:

  • Sceptor
  • 1-1/4" to 1/2" PVC bushing
  • Hacksaw
  • Hot glue, hot glue gun
  • Super glue
  • Small-mouth wire cutters
  • Hammer
  • Sandpaper

This is as bare-bones as it gets, pretty much. These are all things I had available when I started into this hobby in 2003. Rotary tools can be used in a few places to make things go more quickly, but this is a blaster someone can buy for thirty-ish bucks and get rewarded with a highly competitive blaster (if your wars are okay with them).


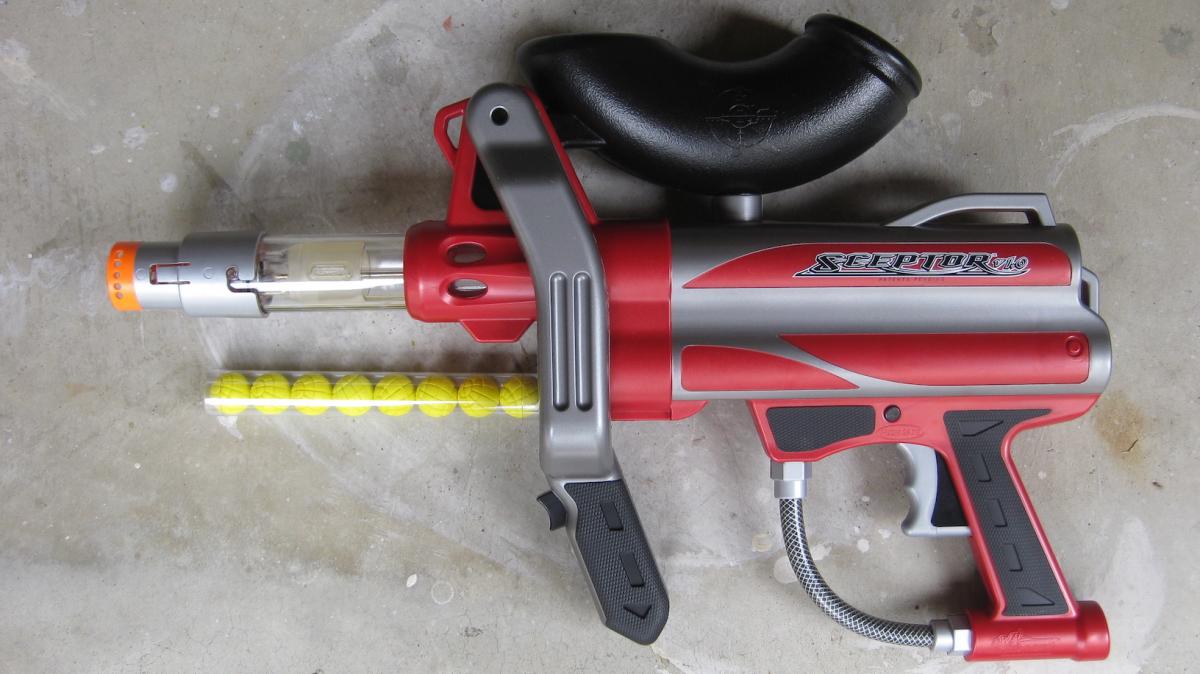
Start with your stock blaster. You can play around with the stock inline ball system; it's pretty fun. Unfortunately, the Sceptor balls and the new Rival balls are not quite the same size. I send my Sceptor balls and inline barrels to Draconis so he can use them at his wars. (Click to embiggen the pictures, I'm uploading them via NH's file attachment system so we don't lose the photos to some stupid change of service.)

Stock Closed.JPG


Remove the pump system. It's four screws. Put it aside for the time being; it can be used to make a pump handle for later on, and it has a few nice little springs inside of it you can harvest if you're like me and like to Frankenstein blaster parts for other projects.

Pump Removed.JPG


Unscrew the blaster. There's a sticker saying you'll void your warranty if you open the blaster. You can cut it down the seam of the blaster, peel it off (which will leave the word VOID written on the plastic until later in this write-up), or just pull the blaster apart without paying attention to it (it's not strong enough to hold up to shell-pulling forces).

Stock Open.JPG


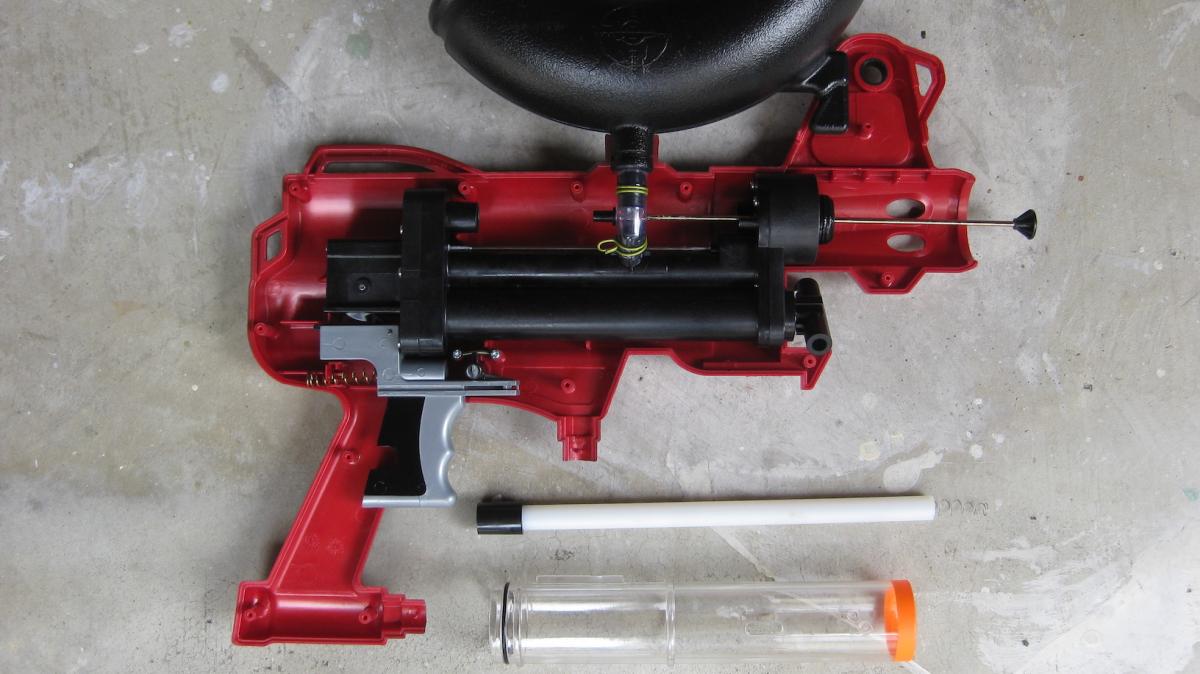
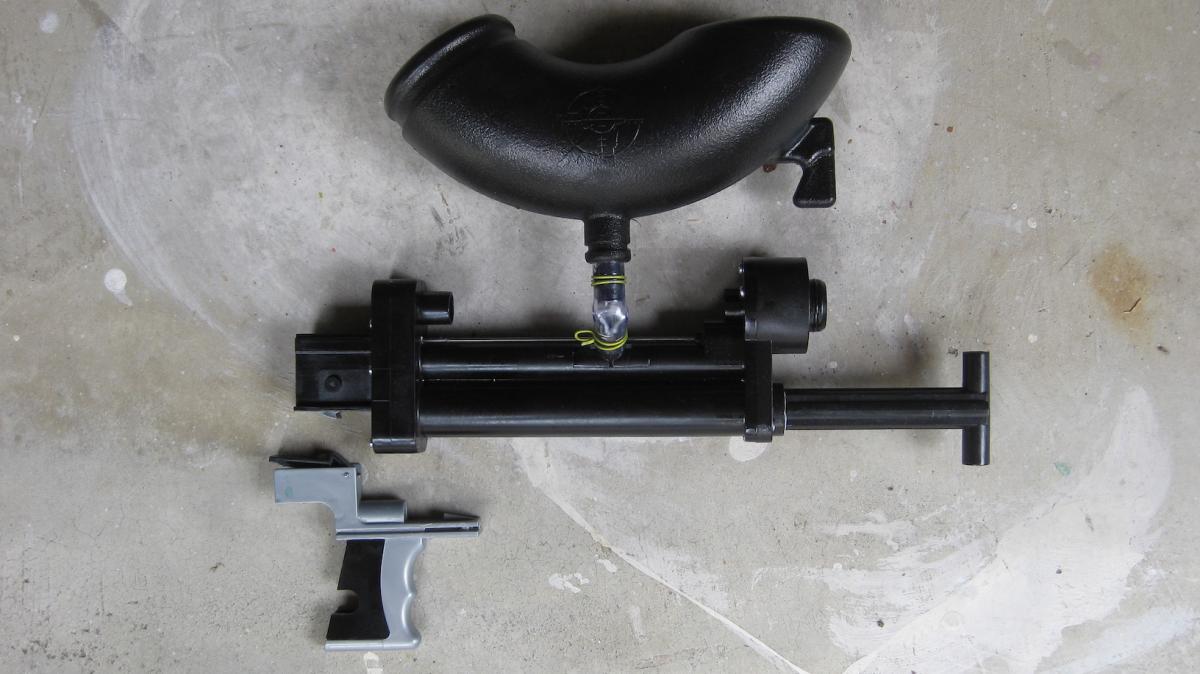
The internals are pretty simple. There are three main components: the trigger, the air tank (the fake paintball hopper), and the mechanism body. Go ahead and pull off the orange-tipped clear plastic tube and pull the white tube out of the back. Feel free to keep them for future projects, or throw them out; they're not necessary for any part of this mod in the future.

Sleeves Removed.JPG


You have two options when it comes to the ball pusher rod: you can leave it in the blaster and glue it down at the front later, or you can remove it by cutting the metal. The latter is more work, but you can get slightly better airflow to the bushing, so it's up to you. If you decide to cut the rod, go ahead and do that, taking care not to damage the actual firing pin. It doesn't take too long to do with a hacksaw, even if you don't clamp it down. Be careful not to touch the metal rod right afterwards, because it'll be very hot.

Just Internals.JPG


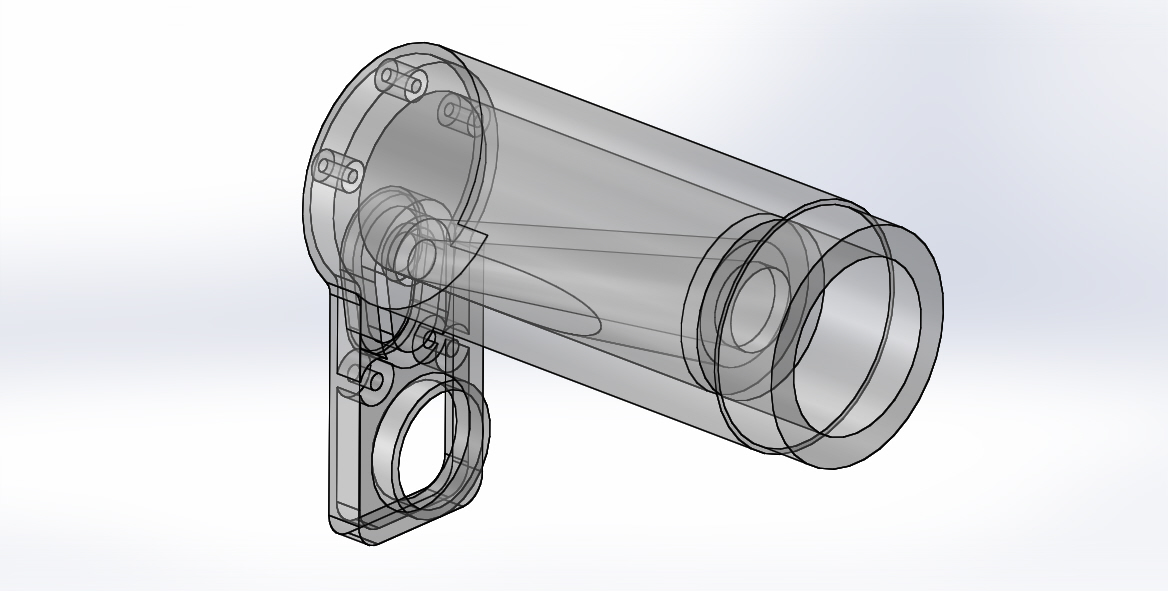
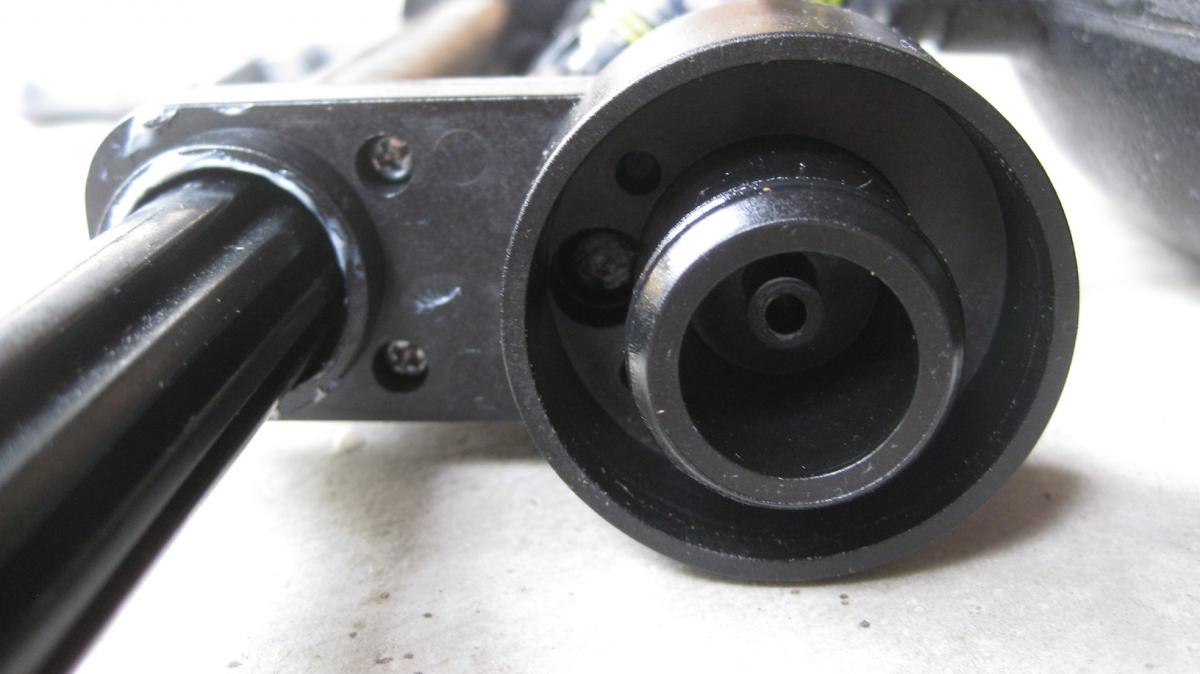
Now, this is what the front of the internals should look like once you're removed the pusher. Notice that the air port is kind of buried; be careful not to get anything in there. I like to leave a little pressure in the system while I'm working on it, just to keep the stopper closed and make sure nothing gets into it.

Front Valve.JPG


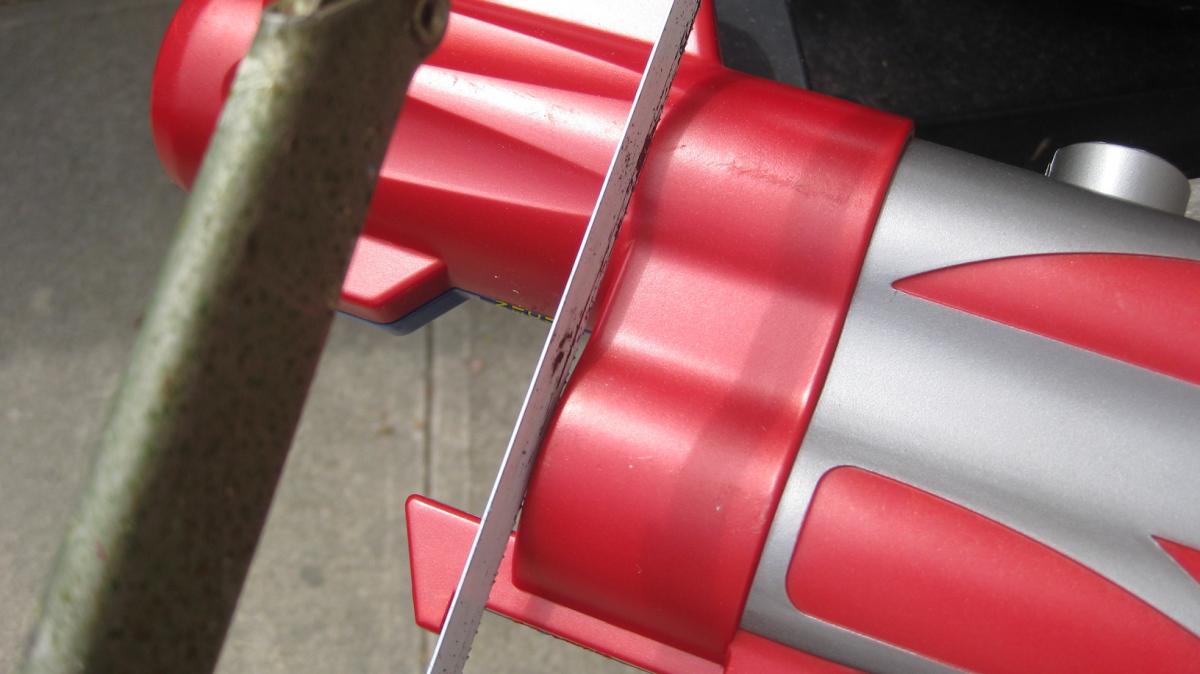
The shell will need to be modified in order to make room for the new bushing. Take the internals out of the blaster and screw the shell together if you're going to cut it with a hacksaw; if it's screwed together, it'll be easier to get a clean and consistent cut. Line up the hacksaw with the major part of the shell, where the pump emerges. (At this point, I decided that I wanted to make Zorn's shell two tone, so one half will be red and one half will be blue from here on.)

Removing the little hook part that latched onto the stock pump system will be helpful when you put on a different pump handle, so go ahead and cut that part off too.

The only downside of cutting the blaster back at this point is that there is no longer any shell support for the air tank, but it's very stable sitting in the shell so the performance trade-off is worth it in my opinion. If you want to see a modification that leave the tank support intact, please look at TantumBull's write-up.

Shell Cutting.JPG


It takes almost no time at all to do this with a hacksaw. If you have a bandsaw or scrollsaw, it's probably even faster, but this way means free arm workouts. After you're done, clean up the edges of the cut with some sandpaper or a hobby knife or even just your fingernails (not pictured here, I cleaned it up later).

Shell Cut.JPG


Put all the internals back into the shell. It should be pretty intuitive, but if it isn't, the trigger is the only place where things can go wrong. Make sure you've aligned BOTH trigger springs (the one that rests on the shell, and the one that rests under the trigger's black ramp at the top, there's a little post for it inside its channel).

Trigger Assembly.JPG


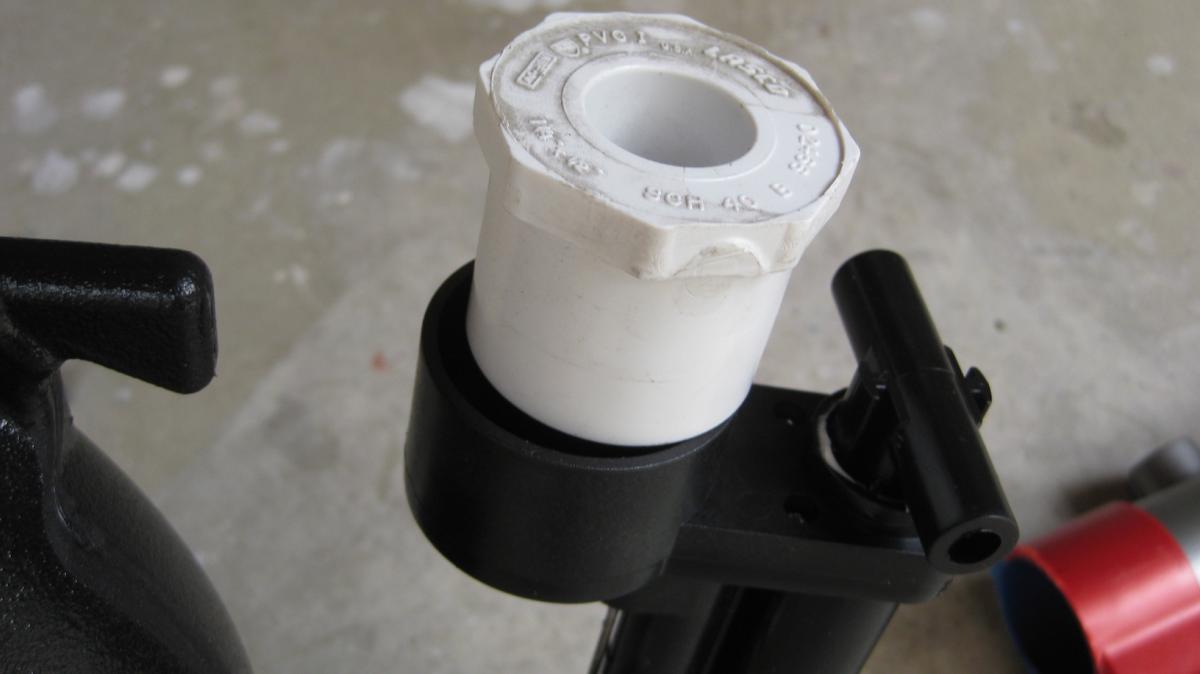
A 1-1/4" to 1/2" bushing fits PERFECTLY inside the remaining black stub at the front of the blaster. If you're skeptical, feel free to take your Sceptor internals to a hardware store and check for one that fits the best. On all the ones I've modified like this, I've managed to get perfect seals just from press-fitting them to the blaster, but we need to a little bit of work for optimal performance before we get there.

Bushing On Valve.JPG


Take your hacksaw and cut the stem with the o-ring back to even with the rest of the black piece. This is a good time to make sure the blaster is pressurized a little, since you don't want those little plastic shavings to fall into the system. Wash it out with a little bit of water afterwards.

Stem Cut.JPG


After that, take your wire cutters (or rotary tool) and shave down the wall of the center ring near the dump valve. I just bit off chunks with the cutters and that was more than enough, but a rotary tool can shave it down further if you're anal about it. You can remove the center stem piece with pliers, or leave it in; it does not matter at all.

Flow Open.JPG


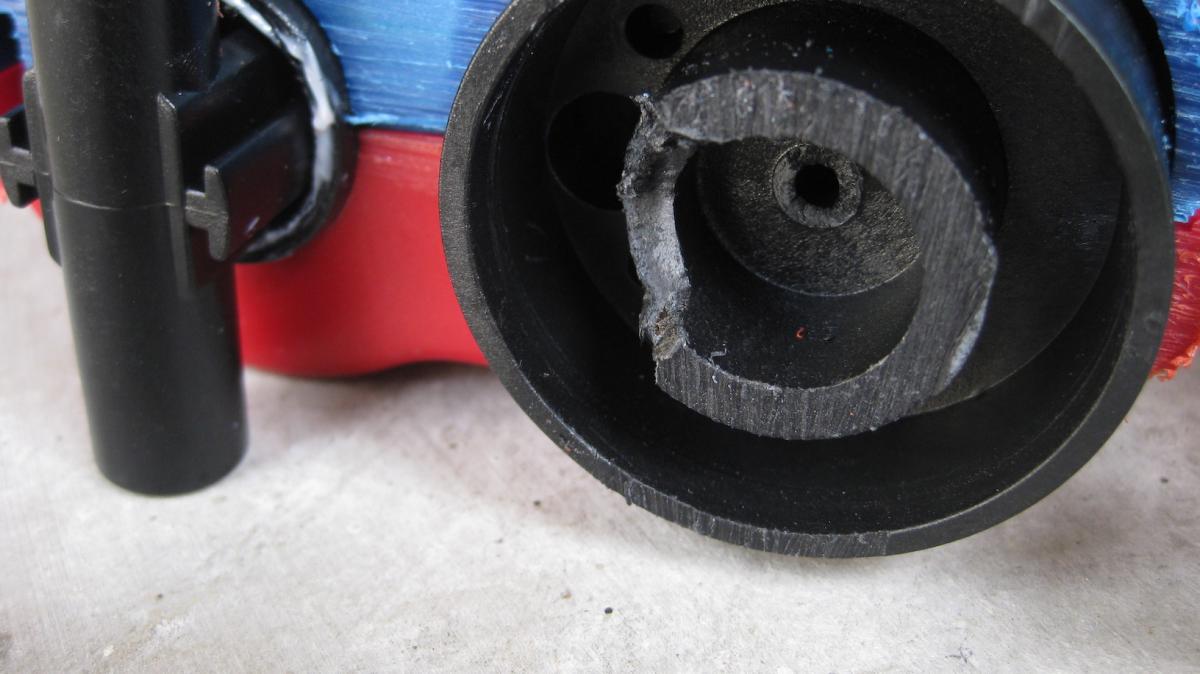
Heat up your hot glue gun and fill up the center hole area enough to pool up towards the top. You only need to fill the front hole where the pusher exited; the back hole doesn't get impacted by airflow if you fill this one.

Hot Glue.JPG


If you've done all this, then if you press your bushing in far enough, the rear wall should nearly make a seal with the area you just filled with hot glue. The airflow will pass through the channel you cut and out of the bushing, but even if you don't make that channel, this blaster puts out a lot of air sufficiently quickly that you'll still get great performance. Run a bead of superglue or goop around the seam of the bushing to make sure it stays put.

Bushing Fitted.JPG


The last thing to do is figure out a way to add a pump handle. Back when these things were the flavor of the month, CaliforniaPants started the trend of putting a wye on the front of the pump. Admittedly, this makes an incredibly comfortable handle, and at least one of my Sceptors used that idea. Anyways, take your hacksaw and cut off the little wings from the front of the pump shaft. I actually put this handle on the edge of a block of wood and smashed off the wing with a hammer, or you can do it neatly with a rotary tool or scrollsaw or bandsaw or whatever.

Pump Cut.JPG


In order to fit 1/2" PVC fittings over the pump, you'll need to shave any of the remaining wings down to the body of the pump. This is pretty easy even with just sandpaper. After you've done so, you can slip on whatever fitting you like best. TED found this "trap wye" and it makes for an amazing handle. You can glue it on, or take advantage of the soft plastic and drill in a hole and put a screw through it.

Replaced Handle.JPG


If you saved the original pump exterior part, you can cut off the bottom of it and use that as your pump handle. I have seen at least two people do this in the mods/paint thread, so here are those photos of it that I could find (from Pause and DICE134).

IMG_3341.jpg


0309D272_zpscf2122f5.jpg


Put the pump back in. Your blaster is now finished. If you pump it up until the OPRV kicks in (usually between 35 and 40 pumps), you should get four shots out of a hopper at more or less full strength. It takes a little while to pump up to full from empty, but if you only fire one or two shots, it doesn't take long to get back up full.

Finished Assembled.JPG


I have two recommendations at this point:

  • Put a stock on it. Steal an N-Strike stock attachment point and glue it on the back. Fashion one out of PVC. Do whatever. It makes the blaster more comfortable to use.
  • PLEASE do something to modify the appearance of the tank. Try and disguise the fact that it looks like a paintball hopper. Cover it in tape that is a bright color, cover it in felt stickers, cover it in denim. I still have yet to choose something for this blaster, but on my 4JAX Sceptor I plan on covering the tank in as many googly eyes as possible (I bought 600).

Now go out and enjoy your blaster.


  • 1

Unholy Three: DUPLUM SCRTA, DUPLUM PROBLEMA (2009)

But Zeke guns tend to be like proofs by contradiction

Theoretically solid but actually non-constructive

Rnbw Cln


#2 Ice Nine

Ice Nine

    Prince Dangus

  • Administrators
  • 1,460 posts

Posted 15 May 2016 - 07:19 PM

*
POPULAR

General Sceptor Reference Guide


Section I: Generic Stuff

Q: Why are you setting this up as a question/answer?

A: Because it’s easy.


Q: What should I do with the tank?

A: The easiest thing to do, the very easiest, is to wrap it in colorful tape. Get a roll of pink duct tape. Get a roll of yellow electrical tape. Go crazy on it. Paint doesn't adhere very well to the tank's plastic, but it might work depending on the paint you use.


Q: Why didn’t you plug the pump on this blaster?

A: There are a couple of reasons. The major reason is that there’s no reason to do it; the blaster fires great at its stock pressures, and since it fires ammo larger than a stock micro dart, it wouldn’t be allowed at most US wars with a plugged pump. Another reason is that the firing mechanism starts to fail at high pressures. The OPRV kicks in at about 20 PSI, in case you were wondering.

If you want to plug your pump, then prepare for: more pumping; no way to know when you have enough shots because the OPRV isn't venting to tell you; no way to know if you pressurized it too much for the valves to work right; and possible war illegality.


Q: What are your thoughts on tank replacement?

A: Tank replacements don’t really work, in my experience. One of the first things I tried to do when I picked up the blaster was make a larger tank, which you can see here as the Skeptorr: Pipe Bomb Edition. Even though this tank had more than double the volume of the original tank, I still only got four shots at usual power; it took more than twice as long to pump up for zero benefit. I was always skeptical of people who said they got more shots than that when they replaced their tanks, but who knows, it doesn’t make much sense to get fewer shots.

I actually recommend making the tanks small if you want to replace it (stock volume is 800 cubic centimeters). I took it to the point of absurdity in that Skeptorr post with the tiniest airtank I could manage; with that tiny airtank, it was basically a Big Blast. Draconis did a really wonderful tank replacement, which is pictured below.

Draconis Sceptor.jpg


Q: Why do you like this blaster so much?

A: It’s a fun piece of variety in the war scene. I prefer airguns to springers, for one, so the pumping time doesn’t bother me at all. They have super fun niche uses, too, like double-tapping a target if you’re worried about a rush, or berserker-rushing a group of people. While the sustained rate of fire is lower than pretty much any springer blaster, the burst fire is probably the fastest on any non-flywheel blaster, and I like that.


Q: Is there anything you don't like about the blaster?

A: Yes. A different shell would be better. This one is okay, but it looks too much like a paintball gun for my tastes and since the internal trigger geometry is very specific, it would be a decent challenge to put it in a different shell. It would probably be doable if you grabed this handle onto a different shell, but that would be a lot of work for little benefit.

I don't care for this one too much, nor the limited-authenticity two finger trigger, although with the very stiff pull, it's easier to operate with two fingers. On my first Sceptor, I cut the trigger down to one finger and put cushioning on it, and it was still worse.

The number one worst thing about this blaster is the pump coming out. There's no cap or anything to stop you from straight-up pulling it out of the pump tube. This isn't a huge deal, because there is a "break" in the tube towards the end that usually catches it, but if you're determined it's easy to get out. My first through for fixing this is using a rotary tool or even a drill to carve a channel into the body of the pump and put a bolt through it at the front of the shell, preventing it from being drawn out fully, but that's also too much work.


Section II: How Does It Work?

Q: How does it work?

A: It’s actually pretty cool. If you’ve every opened an older SuperMaxx blaster (e.g. SuperMaxx 500, 1000, 2500, 3000, or 5000-oids), there’s a cam system that works with the trigger to load a spring and then it drops out of the way to open the dump valve as quickly as possible. Here’s a SuperMaxx 5000 taken from Some Blog, so it’s visible:

SM5000 Internals.JPG


The Sceptor works similarly. The people to whom I’ve spoken generally call this valve a “hammer valve,” which might or might not be correct, but I’ll keep using it regardless. The latch on the trigger meets the metal latch and loads a rotational spring as force is applied.

Trigger System.JPG


When the spring hits its near-maximum deflection (and the rotation of the metal circle moves the latch far enough away), the trigger slips back and the spring winds the metal piece forwards, which opens the valve momentarily and lets just a bit of the stored air out. The piece on the trigger is spring-loaded, too, so when it slides forward it moves out of the way of the latch until you start pulling it back again.


Section III: Repairs

Q: What can go wrong?

A: I've seen two things go wrong with a Sceptor: the front seal starts to leak, or the pin starts to leak.

The front seal on my first Sceptor started to leak at Cataclysm 3. I actually ended up repairing it on-site. This blaster is pretty well made, and the blaster's core assembly actually disassembles. There are five screws in the front area, two above the pump shaft on the front, and three on the rear of the dump valve/ball pusher assembly. Here's the back three.

Rear Valve.JPG


It's difficult to get the rightmost screw because the airtank and tubing gets in the way a little. The tubing is flexible, though, and you can push it out of the way. Taking this off will remove the front sealing face of the air system, and give you direct access to the pin and the sealer at the end of the pin. I coated mine in silicone grease, used another blaster to blow off any debris from the front sealing piece, and then screwed it back together.

This fix managed to get it working and sealed up the leak. I don't know if there was something stuck in it preventing it from closing or if the sealer had dried up a bit, but this did the trick.


Q: What about the leaking pin?

A: A Sceptor of mine came like that and I decided to play with it instead of returning it. It was leaking out of the back of the front assembly, there the pin leaves to run along the spine of the air tube. I unscrewed the front of the blaster, took a tub of silicone grease, and used a long wood rod to jam as much at the interior pin as I could. I also squirted some mineral oil in there, in hopes that it would run down the pin and lubricate the o-rings (and maybe make them swell a bit).

Since I had extra blasters, I figured that this is a useful testbed. The silicone grease managed to slow down the leak somewhat, and I kept pressurizing it and pulling back the pin to move the lubrication through the system. It's not perfect, but it is a little improved, and hopefully over time the lubrication helps out.


Q: Anything else?

A: The only other person I know who uses a Sceptor regularly is Gears and he's never told me about any other leaks he's had. He did get a leak out of his most recent Sceptor, so it's probably the case that the deadstock ones being sold at the moment have dried-out lubricants in them since they've been sitting in a warehouse for years. The blaster disassembles quite a bit but if it's leaking out of the box I recommend just trying to return it.


If you have questions, or person problems with your Sceptor in the past, please post in this thread. It would be great to have more information about this blaster, since the most modern write-up on NH before this lost all its photos and most of the developments in Sceptor history are buried in the mods/paint thread and unsearchable.


  • 1

Unholy Three: DUPLUM SCRTA, DUPLUM PROBLEMA (2009)

But Zeke guns tend to be like proofs by contradiction

Theoretically solid but actually non-constructive

Rnbw Cln


#3 Cartaya

Cartaya

    Member

  • Members
  • 113 posts

Posted 16 May 2016 - 12:35 AM

Now even I want to go to war on one of these, I had no idea these were this available and this inexpensive.  See you at Armageddon.


http://www.ebay.com/...EQAAOSwKtlWj~z9


  • 0

....Fear of a Nerf Planet!


#4 DjOnslaught

DjOnslaught

    Member

  • Members
  • 350 posts

Posted 16 May 2016 - 08:15 AM

I like the looks of the the gun aesthetically, what I'm curious about is the fps and such your getting on it.
  • 0

#5 jwasko

jwasko

    PowerBeard

  • Moderators
  • 1,021 posts

Posted 16 May 2016 - 08:43 PM

Just picked one of these up for super cheap at a flea market. It has a leak, but I have yet to open the shell to figure out where it's at. Thanks for the tips on where to look.


  • 0

-Jwasko, STILL Sole Surviving member of Steel City Nerf and Sober Sister of the Sex Dwarves
We NERF ON all day, and FUCK OFF all night


#6 Ice Nine

Ice Nine

    Prince Dangus

  • Administrators
  • 1,460 posts

Posted 17 May 2016 - 10:52 AM

Thanks for the feedback, all. This weekend I'm going to write up the easiest stock attachment mechanism I know how to do, using a PVC endcap, some hot glue (just for temporary hold), a drill, and two screws. For some reason, the blaster looks off-balance to me without a stock on it, although that's really an aesthetic complaint instead of a real practical issue (it's very usable without a stock).


I also added a section in the second post about things I don't like about this blaster, in case you were looking for the downsides. Notably, there isn't anything that keeps the pump in the tube once you remove the stock pumping mechanism; a solid pull will pull it out of the tube, which is inconvenient.


I like the looks of the the gun aesthetically, what I'm curious about is the fps and such your getting on it.


I've never tested it on a chronograph, but given its performance, I would say it's safe to assume 220 FPS or higher (almost certainly higher) for the first two or three shots. It shoots on par with blasters like the UMB and +bow. In general, it will compete on the playing field against the current slate of homemades and air blasters.


Just picked one of these up for super cheap at a flea market. It has a leak, but I have yet to open the shell to figure out where it's at. Thanks for the tips on where to look.


Good find, and good luck. Feel free to post some internal pictures in here when you break it open, I wanted this thread to be a total reference for the blaster so documenting any problems people have and subsequent discussion would be useful.


  • 0

Unholy Three: DUPLUM SCRTA, DUPLUM PROBLEMA (2009)

But Zeke guns tend to be like proofs by contradiction

Theoretically solid but actually non-constructive

Rnbw Cln


#7 DjOnslaught

DjOnslaught

    Member

  • Members
  • 350 posts

Posted 18 May 2016 - 11:18 AM

Another question is how it loads it's ammo if the part that appears to be a hopper is in fact the air tank.
  • 0

#8 Langley

Langley

    LGLF - Since 2002

  • Administrators
  • 2,997 posts

Posted 18 May 2016 - 12:04 PM

The airtank looks like a paintball hopper.  The stock blaster has a sort of inline system for storing the balls in the barrel itself.  After its modded the thing that looks like a dart hopper is in fact a dart hopper.


  • 0

You can poop in my toilet anytime champ.

2016 Nerf War Schedule
Bless you, my son. Now recite 3 New Members Guides and 5 Code of Conducts for your sins.


#9 jwasko

jwasko

    PowerBeard

  • Moderators
  • 1,021 posts

Posted 18 May 2016 - 08:36 PM

Is the ball pusher just spring loaded, or does it advance forward with each trigger pull, or something else?


I may rebarrel for Rival ammo, for kicks.


  • 0

-Jwasko, STILL Sole Surviving member of Steel City Nerf and Sober Sister of the Sex Dwarves
We NERF ON all day, and FUCK OFF all night


#10 The2ndBluesBro

The2ndBluesBro

    Member

  • Members
  • 576 posts

Posted 18 May 2016 - 09:11 PM

Is the ball pusher just spring loaded, or does it advance forward with each trigger pull, or something else?


I may rebarrel for Rival ammo, for kicks.

It's spring loaded. 


  • 0

Nerf, Gaming, knives: https://www.youtube....FjcObRZTl2KReDQ


#11 Draconis

Draconis

    I am not Lord Draconical

  • Members
  • 2,712 posts

Posted 19 May 2016 - 02:18 AM

Is the ball pusher just spring loaded, or does it advance forward with each trigger pull, or something else?


It is a pretty light spring.
 

I may rebarrel for Rival ammo, for kicks.


It works as is, with longer range than my Apollos, though shorter than the BattleMAX balls. They will occasionally double fire, but that is usually the first shot with a full tank and full clip. I am trying some things, but I am anxious to see if you come up with a better solution.

If anyone purchases a new Sceptor and is rebarreling for darts, I am interested in purchasing the balls and clip that come with them. Also happy to trade for rocket stuff, PETG, blasters, etc.
  • 0
[15:51] <+Noodle> titties
[15:51] <+Rhadamanthys> titties
[15:51] <+jakejagan> titties
[15:51] <+Lucian> boobs
[15:51] <+Gears> titties
[15:51] <@Draconis> Titties.
[15:52] <+Noodle> why is this so hard?

#12 DjOnslaught

DjOnslaught

    Member

  • Members
  • 350 posts

Posted 19 May 2016 - 04:44 AM

The airtank looks like a paintball hopper.  The stock blaster has a sort of inline system for storing the balls in the barrel itself.  After its modded the thing that looks like a dart hopper is in fact a dart hopper.

Oh cause from the first pic it appeared to have a "magazine" similiar to the rival mags and I could figure out how it moved them into the barrel above it for firing.

It looks like you could probably gravity feed darts or utilize a rampage style mag feed (though if I did that I would use the entire clip portion from a deploy). May have to order one to tinker with now.

If you don't like the shell, could the internals be moved to a nerf shell maybe a gutted longshot shell or something smaller like a retaliator?

Edited by DjOnslaught, 19 May 2016 - 04:53 AM.

  • 0

#13 The2ndBluesBro

The2ndBluesBro

    Member

  • Members
  • 576 posts

Posted 19 May 2016 - 07:42 AM

If you don't like the shell, could the internals be moved to a nerf shell maybe a gutted longshot shell or something smaller like a retaliator?


Yeah, probably. It's not too complicated and most of the parts are contained in one piece. Probably not worth trying though as the shell is decent, and you're stuck with a paintball hopper tank sticking out of whatever shell you use, unless you change the tank.
  • 0

Nerf, Gaming, knives: https://www.youtube....FjcObRZTl2KReDQ


#14 DjOnslaught

DjOnslaught

    Member

  • Members
  • 350 posts

Posted 19 May 2016 - 11:05 AM

Yeah, probably. It's not too complicated and most of the parts are contained in one piece. Probably not worth trying though as the shell is decent, and you're stuck with a paintball hopper tank sticking out of whatever shell you use, unless you change the tank.


In a longshot you could fix the stock to not move and put the tank inside that area couldn't ya, looks big enough for a Titan so should prolly hold a tank for that.
  • 0

#15 The2ndBluesBro

The2ndBluesBro

    Member

  • Members
  • 576 posts

Posted 19 May 2016 - 11:20 AM

In a longshot you could fix the stock to not move and put the tank inside that area couldn't ya, looks big enough for a Titan so should prolly hold a tank for that.

It's barely big enough for a Titan tank, uin13 did that and the shell almost had to be fully cut through to fit it.
  • 0

Nerf, Gaming, knives: https://www.youtube....FjcObRZTl2KReDQ


#16 DjOnslaught

DjOnslaught

    Member

  • Members
  • 350 posts

Posted 19 May 2016 - 04:12 PM

It's barely big enough for a Titan tank, uin13 did that and the shell almost had to be fully cut through to fit it.


Oh ok, must just be the appearance that is deceptive. I was looking at other shells cause Ice Nine mentioned in the opening post that he didn't like it very much
  • 0

#17 PBZ

PBZ

    Cap'n Whitebeard

  • Members
  • 142 posts

Posted 20 May 2016 - 02:25 AM

*
POPULAR

Huh. I haven't been to these woods in a while.

I have two sceptors, one red, one blue. The only difference I found, and it may possibly be a difference in the age of them, is that the rubber seal at the front, where it dumps air, are different shapes. One is a flat rubber puck that sits against a ring in the back of the front bushing (the piece that you glue the pvc into), and the other has a slightly longer rubber piece that has a bevel to the front edge. The corresponding ring in the bushing for that model has the same bevel. This has more sealing surface and possibly a slightly better air flow?

I have photos of this difference somewhere, I'll see if I can find them for reference material.


On the other hand, if you never take the front bushing off, and simply follow this guide, it doesn't matter. However, I do have a project sitting on the back burner for a while now for a drop in front end for the Sceptor- direct replacement straight to... either 3/4 or 1/2 inch pvc. "Zero" deadspace without cutting off the front end of the blaster. I do not have access to Solidworks anymore, but I could recreate the whole thing with Onshape if there was some interest in reviving the project. I was not able to really get it dialed in to a drop-in-fit before I had to quite. See picture. I can also share the file if anyone would like to take a look at it. Or, if any can do a 3D scan of the back side of the bushing, I would love to get my hands on the file.

Attached Thumbnails

  • Sceptor front end (2).JPG

  • 1
"There's nothing quite like hunting children." -VACC

#18 Ice Nine

Ice Nine

    Prince Dangus

  • Administrators
  • 1,460 posts

Posted 20 May 2016 - 10:59 AM

Jwasko: If you look in the photo where the white tube was pulled out, you can see the end of a very thin spring poking out at the right side. The ball pusher is pushed forward by this spring and seals the balls against a lip at the front of the inline clip thing. It's a pretty clever system.


Oh ok, must just be the appearance that is deceptive. I was looking at other shells cause Ice Nine mentioned in the opening post that he didn't like it very much


I mentioned this in the second post, but I'm more complaining about the way it looks than any kind of effable element. It's a decently comfortable blaster to handle but it just looks too much like a paintball gun for my tastes, especially since all my wars are hosted in public spaces. Transferring shells would be a big challenge because the trigger requires a pretty precise geometry to work right. If it's not situated properly, the valve actuation will be off and performance will suffer. Plus, you would need to fit this giant two-finger trigger into a different shell.


Huh. I haven't been to these woods in a while.

I have two sceptors, one red, one blue. The only difference I found, and it may possibly be a difference in the age of them, is that the rubber seal at the front, where it dumps air, are different shapes. One is a flat rubber puck that sits against a ring in the back of the front bushing (the piece that you glue the pvc into), and the other has a slightly longer rubber piece that has a bevel to the front edge. The corresponding ring in the bushing for that model has the same bevel. This has more sealing surface and possibly a slightly better air flow?

I have photos of this difference somewhere, I'll see if I can find them for reference material.


On the other hand, if you never take the front bushing off, and simply follow this guide, it doesn't matter. However, I do have a project sitting on the back burner for a while now for a drop in front end for the Sceptor- direct replacement straight to... either 3/4 or 1/2 inch pvc. "Zero" deadspace without cutting off the front end of the blaster. I do not have access to Solidworks anymore, but I could recreate the whole thing with Onshape if there was some interest in reviving the project. I was not able to really get it dialed in to a drop-in-fit before I had to quite. See picture. I can also share the file if anyone would like to take a look at it. Or, if any can do a 3D scan of the back side of the bushing, I would love to get my hands on the file.


Thanks for posting up that model, it's awesome. I have also noticed that the sealer pieces are different shapes. It's only on my oldest Sceptors that they have the beveled lip; on all of the newer ones, they're flat-fronted. I never noticed a performance difference between them.


That's a totally cool project. I'm not sure how much of a benefit there would be in making one of these, since the bushing attachment process is pretty painless, but if they were cheap to print then it would probably be worth it so that people could just screw them in and be done with it.


  • 0

Unholy Three: DUPLUM SCRTA, DUPLUM PROBLEMA (2009)

But Zeke guns tend to be like proofs by contradiction

Theoretically solid but actually non-constructive

Rnbw Cln


#19 PBZ

PBZ

    Cap'n Whitebeard

  • Members
  • 142 posts

Posted 03 September 2017 - 01:43 PM

So it's been more than another year since I looked at this thread. I recently made contact with someone willing to let me borrow a 3d scanner at no cost- he wants to see what his building scanner will do at close range on small parts. Again, if anyone else reading this has access to a scanner and is willing to make a few scans of the piece I have modeled above, please let me know. My attempts are just ever so slightly off and do not fit into the main body section, mainly because of the screw ports. I would probably get these printed on a better printer as well, since mine is fairly entry level.

The answer is that these drop in parts would probably cost around $10. I feel that for an entry level mod almost equivalent to OMW, this is an acceptable price. No tools other than a phillips screwdriver are needed. And something I just thought of, I could modify the file to have a slidey bit that fits into the pump and keeps it from coming out, solving the second biggest problem with modifying them.


  • 0
"There's nothing quite like hunting children." -VACC

#20 Meaker VI

Meaker VI

    Member

  • Moderators
  • 1,192 posts

Posted 03 September 2017 - 03:00 PM

So it's been more than another year since I looked at this thread. I recently made contact with someone willing to let me borrow a 3d scanner at no cost- he wants to see what his building scanner will do at close range on small parts.


I've used $60k+ scanners before, they capture amazing detail on a building and person-scale, but aren't great (yet?) for using as actual modeling tools. I've also used Autodesk's homebrew camera-scanner thing and haven't found it capable of generating useful output either; it'd be fine for gaming but not for production.


  • 0

#21 PBZ

PBZ

    Cap'n Whitebeard

  • Members
  • 142 posts

Posted 03 September 2017 - 05:55 PM

I was told this one was around $48k. It will be interesting to see what it does- obv like you said the scale is way different. 


  • 0
"There's nothing quite like hunting children." -VACC

#22 Meaker VI

Meaker VI

    Member

  • Moderators
  • 1,192 posts

Posted 04 September 2017 - 09:27 AM

It makes a colorized point cloud of varying density. At the densities I've seen, there are enough points that objects look good, but close in the points are still a significant distance from each other (.25" or more). And the cloud is *really* hard to usefully draw off of - I ended up using it as a background to draw off (which might turn out useful in this case as well) rather than try to use the points.
  • 0

#23 PBZ

PBZ

    Cap'n Whitebeard

  • Members
  • 142 posts

Posted 11 June 2018 - 10:52 PM

So again, almost another year later. I have picked this project up as something to do in my spare time. I am sending the front bushing out to get scanned in the morning, up to some guy in MA. He says he can scan to 50 micron level, which should be close enough to get my center lines centered and my screw posts in the right place. I have also conducted some experiments with my printer and may be able to make these myself, lowering costs... But the price I stated above is way off. These would be around $25-30. I would prefer to get them done in SLA, so I might upload the file to Shapeways (which of course would cost even more). The post production work in either case would include drilling the screw post holes for accuracy and sanding to fit.

If anyone is still interested, please let me know. I had a couple people interested when I started the project, but it has been on the back burner for so long some of them have retired.


  • 0
"There's nothing quite like hunting children." -VACC


Also tagged with one or more of these keywords: sceptor, airgun, semi-auto, mod

1 user(s) are reading this topic

0 members, 1 guests, 0 anonymous users