Jump to content


Photo

Air cylinder for pushing darts through clips.


41 replies to this topic

#26 dskippy

dskippy

    Member

  • Members
  • 36 posts

Posted 08 December 2015 - 12:42 AM

Yes. You'd probably need to sand/smooth the printed part anyway unless you've got a high end printer. And PVC really is easy to chamfer - I usually use a regular pair of scissors. Beside that, you can seal with the manufactured PVC part easily, sealing with the printed ABS could be hit and miss, unless you design in an O-ring seal somewhere which just adds parts.


It's really easy to chamfer PVC, yes. I do this with my RSCBs and hoppers. However what I'm interested in avoiding with printing the chamfered part and making it stick into the tee joint is having to bore out the inside of the tee joint. How would you do that? I would use a boring bar on a lathe but it might be easier, if I'm making a few of these, to print that part. Well of course it's easier I guess. You're saying it might jam more. Quite possible. Those little rubber heads on darts are sticky.


Agree - for simplicity, 2 pieces of PVC would be easier and faster.


I'm unclear on what you guys mean by 2 pieces of PVC here. Could you clarify?


The design I have laid out has a seal between a cylindrical ram and a tubular chamber, and would probably have at least 0.25 up to0.5inches of overlap, like your average slide breech.

In any case I would think that the air cylinder would hold fast against the pressure emitted from the firing valve. You may be totally right that bounce is an issue, but personally I'd be more worried about premature retraction in Dskippy's blaster. In a springer you're right, bounce would be an issue and some sort of lockup would be needed.

Actually, for both Dskippy's semi-auto air blaster or for a springer: perhaps a simple catch could be designed. When the trigger is depressed, it notches into the ram to keep it closed. When the trigger is released, the ram may retract (by air spring, etc).


I agree, I really don't see how bounce could be an issue here. Premature retraction, however, has to be an issue to some degree. Whether or not it's enough to matter might be just a matter of testing. My original proposal is similar to what you're talking about jwasko. Which is to have the ram slide into the chamber a little bit. Hopefully it will reach the point of exiting the back of the chamber after the dart leaves the barrel. There's definitely an amount of overlap, length of barrel, and pressure of air that can make that work out. I might have to find a high speed camera I can borrow. :)


As for your simple catch idea, I don't see how this could work. You're suggesting that the ram can't retract until the trigger is released. This run counter to the mechanism I've proposed. Perhaps your design and mine are really not all that similar. I've never been completely explicit about my plan so I'll do that now. I had been considering two of them. One where a ram pushes the dart into the chamber and one where the barrel slides back over the dart. I have abandoned the latter based on this thread. Here's the former in detail.


---------

Design elements:

The mag well is a 3D printed part that mates nicely with N-Strike magazines and has a rounded ceiling that keeps the dart at the right height.

There's a hole in the back of the mag well where a ram can be extended to push a dart out the front of the mag well.

The ram has a tip on it that be pushed into the back of the barrel maybe a half inch to an inch and it seals the back of the barrel

The dart slides out the front of the mag well into the barrel.

The back of the barrel in cone shaped to make this as easy as possible.

The back part of the barrel has a hole in the bottom where air flows in from the blast chamber when triggered.


Operation:

State 1: The trigger is being held down. The ram is fully retracted. The barrel is empty. The magazine has a round pushed to the top.


State 2: The trigger has been let up. The DCV now allows air to flow from the tank to the blast chamber which includes filling the air cylinder. The ram now extends. A dart is pushed into the barrel. The ram seals the back of the barrel.


State 3: The trigger is pressed. The DCV seals off flow from the tank. The blast chamber is open to the barrel through the QEV now. Air pushes the dart out of the barrel. The ram also is retracting at this time. All of the air leaves the blast chamber causing the dart to leave the barrel. All of the air leaves the cylinder as well, causing the ram to retract all the way. Another dart pops up to the top of the magazine. The trigger is still depressed and we're now back to State 1.

--------------


So I think, unless I'm missing something, that this is totally incompatible with your idea to restrict the ram from leaving the barrel until the trigger is let up. What happens in the various stages of your design?


  • 0

#27 Meaker VI

Meaker VI

    Member

  • Moderators
  • 1,192 posts

Posted 08 December 2015 - 10:16 AM

It's really easy to chamfer PVC, yes. I do this with my RSCBs and hoppers. However what I'm interested in avoiding with printing the chamfered part and making it stick into the tee joint is having to bore out the inside of the tee joint. How would you do that? I would use a boring bar on a lathe but it might be easier, if I'm making a few of these, to print that part. Well of course it's easier I guess. You're saying it might jam more. Quite possible. Those little rubber heads on darts are sticky.
 
 
I'm unclear on what you guys mean by 2 pieces of PVC here. Could you clarify?

Instead of putting a single piece of PVC straight through the T, requiring you to bore out the T in the process, put 2 pieces in, one on either side of the parts you'd need to bore out. The piece towards the front of the blaster would be a few inches long to support the barrel and provide anchoring points for the T, the piece toward the rear wouldn't be more than 1" to just fill the hole in the T and attach to the mag well.


It sounds like you've got the design hammered out, how's physical progress coming? Have you ordered parts yet?


  • 0

#28 jwasko

jwasko

    PowerBeard

  • Moderators
  • 1,021 posts

Posted 08 December 2015 - 11:46 AM


I'm unclear on what you guys mean by 2 pieces of PVC here. Could you clarify?


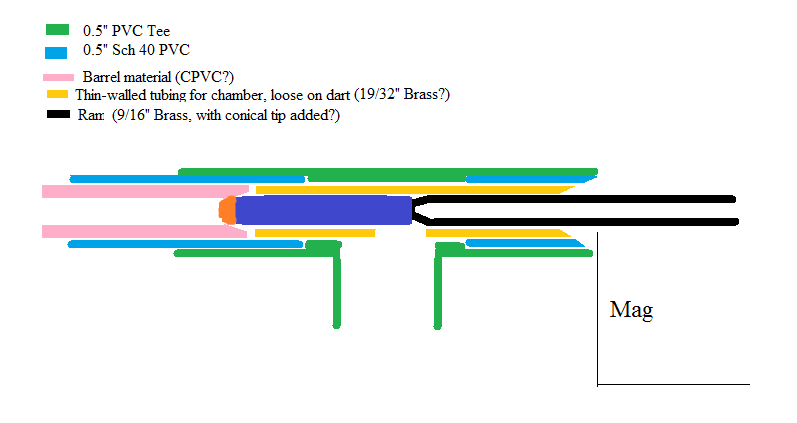
Sorry for the horrendous piant diagram:

Ram%20breech.png
Edit: Actually, I just remembered you are probably using Sch80 for your barrel...but hopefully you get the idea.

But if you have the tools to clear the stops out of a Tee then by all means do it. This is just what I'd do since I don't have fancy tools. Plus, I'd end up using brass one way or the other anyway (again, due to lack of tools to create close fitting tubes and seals).
 

So I think, unless I'm missing something, that this is totally incompatible with your idea to restrict the ram from leaving the barrel until the trigger is let up. What happens in the various stages of your design?

No, I'm the one that missed something. My idea won't work with a blowback design (which is what you are making).
 
If it comes to the point that you need to delay ram retraction, maybe look at this for some ideas.

Edited by jwasko, 08 December 2015 - 12:01 PM.

  • 0

-Jwasko, STILL Sole Surviving member of Steel City Nerf and Sober Sister of the Sex Dwarves
We NERF ON all day, and FUCK OFF all night


#29 dskippy

dskippy

    Member

  • Members
  • 36 posts

Posted 08 December 2015 - 04:38 PM

Instead of putting a single piece of PVC straight through the T, requiring you to bore out the T in the process, put 2 pieces in, one on either side of the parts you'd need to bore out. The piece towards the front of the blaster would be a few inches long to support the barrel and provide anchoring points for the T, the piece toward the rear wouldn't be more than 1" to just fill the hole in the T and attach to the mag well.


It sounds like you've got the design hammered out, how's physical progress coming? Have you ordered parts yet?


Ah! The two questions are related and I get you now. Okay so that would be a pretty straight-forward way to do this just with parts from the hardware store. Thanks for the tip. That might be the best chamber to mate with my mag well. There are some other interesting options. Machining a chamber out of a block of Delrin or PVC is actually pretty easy to do and might be the nicest final product. It's basically just three holes of different sizes drill from each end. Then one gets tapped for NPT and one gets chamfered. The other competing idea would be, as I said, to 3D print those parts all connected to the mag well. It's possible that I'll try all of these things. I'm going to try to make the PVC tee joint you guys are suggesting tonight though. Assuming I can find some thin-wall PVC. If not, as soon as I get some.


As for physical progress, things are going well. I have a prototype of the 3D printed mag well and it mates very nicely with the magazine and the dart pushes through beautifully. I'm quite happy with it so far. I order the air cylinder and it's in the mail, due very soon. I need to add a feature to the back of my mag well that mates with it ones I can play around with it physically.


 Sorry for the horrendous piant diagram:

Edit: Actually, I just remembered you are probably using Sch80 for your barrel...but hopefully you get the idea.
 
No, I'm the one that missed something. My idea won't work with a blowback design (which is what you are making).
 
If it comes to the point that you need to delay ram retraction, maybe look at this for some ideas.


Thank you for the horrendous paint diagram. ;) Yes, I understand this now. I may very well end up doing this for the chamber. I get the idea and I can adapt this to work with Sched-80 PVC for sure.


Glad we're on the same page with the blowback. I think that is all going to be considered after I have a prototype build and can see how well it functions including some range tests and maybe, if I'm lucky, some high-speed camera tests. Anyone have a better idea on how to test whether I'm getting enough overlap with the ram into the barrel without a high-speed camera?


Also, I've realized the ram is going to have an issue as I've designed it. The rod that extends out from the air cylinder is very skinny. It's a rod that's threaded at the tip. It will obviously need to have a ram that has the outer diameter of the chamber's inner diameter attached to it. If I make this ram only the length of the overlap, then it's going to allow a dart to pop up while the chamber is loaded. When the ram retracts it's going to hit that next dart on its way back. So clearly the ram needs to be the same diameter for the entire length of the ram's trip through the mag well. This width of ram cannot retract into the cylinder. So that means that I'm going to need to have a rather long ram and seat the air cylinder that distance back from the mag well. That will make the length of the gun in the back rather long. Possibly not that bad really. The other solution is to mount it above the mag well, and have it extend to push the ram backwards. In this design the ram is shaped like a J. I'm not sure which I want to do just yet. I gather it's really not important just as long as I can retract it and extend it reliably.


  • 0

#30 Meaker VI

Meaker VI

    Member

  • Moderators
  • 1,192 posts

Posted 08 December 2015 - 05:14 PM

Ah! The two questions are related and I get you now. Okay so that would be a pretty straight-forward way to do this just with parts from the hardware store. Thanks for the tip. That might be the best chamber to mate with my mag well.... Assuming I can find some thin-wall PVC. If not, as soon as I get some.


You probably don't even need thin-wall 1/2" (200 PSI). Regular 1/2" (sch. 40) should be loose fitting enough to work.
 

As for physical progress, things are going well. I have a prototype of the 3D printed mag well and it mates very nicely with the magazine and the dart pushes through beautifully. I'm quite happy with it so far. I order the air cylinder and it's in the mail, due very soon. I need to add a feature to the back of my mag well that mates with it ones I can play around with it physically.

 
Picts? Sounds like you've got significant progress.
 

Also, I've realized the ram is going to have an issue as I've designed it. The rod that extends out from the air cylinder is very skinny. It's a rod that's threaded at the tip. It will obviously need to have a ram that has the outer diameter of the chamber's inner diameter attached to it. If I make this ram only the length of the overlap, then it's going to allow a dart to pop up while the chamber is loaded. When the ram retracts it's going to hit that next dart on its way back. So clearly the ram needs to be the same diameter for the entire length of the ram's trip through the mag well. This width of ram cannot retract into the cylinder. So that means that I'm going to need to have a rather long ram and seat the air cylinder that distance back from the mag well. That will make the length of the gun in the back rather long. Possibly not that bad really. The other solution is to mount it above the mag well, and have it extend to push the ram backwards. In this design the ram is shaped like a J. I'm not sure which I want to do just yet. I gather it's really not important just as long as I can retract it and extend it reliably.


Use the ram backwards, probably mounted on top of the magwell. Attach it to a sliding bolt that is the right size and in the mag.
  • 0

#31 dskippy

dskippy

    Member

  • Members
  • 36 posts

Posted 09 December 2015 - 03:28 AM

Picts? Sounds like you've got significant progress.


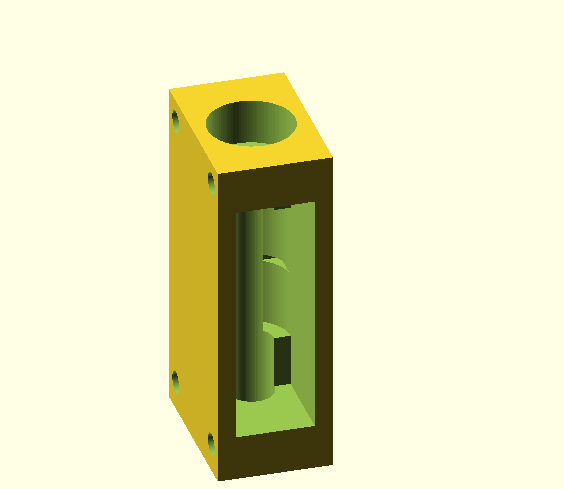
Here's a picture of the design. I got this finished tonight. I still haven't gotten it to a printer yet but I will pretty soon.


It should accept a 1/2" Sched-40 PVC tee joint (or really any 1/2" female joint) into that big hole in the top. There are four holes in the side for #6-32 screws which I'll use to mount this to some polycarb plates that I'll machine for the body. You can notice the little cutout on the inside in this photo for the directional indexing tab on N-Strike magazines. I have a print of an earlier draft which I'll try to find and post a picture of tomorrow.


magwell_zpso5ohgu6n.png


  • 0

#32 shmmee

shmmee

    Member

  • Members
  • 467 posts

Posted 09 December 2015 - 09:48 AM


 Anyone have a better idea on how to test whether I'm getting enough overlap with the ram into the barrel without a high-speed camera?


From personal experience on my prototype, if your ram is retracting before the dart has left the barrel you'll notice a significant drop in range/power. If you don't have a chrony, you could put on an excessively long barrel, a barrel 2 or 3' long should work. You want a barrel so long that the dart stops in  the barrel with the ram braced forward. With the ram forward, the dart will stop abruptly because it is pulling a vacuum in the barrel. Release the brace and let the ram retract as quickly as it's able. It will suck the dart back a little. Measure how far the dart travels in the excessively long barrel by sliding a stick down the tip of the barrel. That's your control. Your baseline. That's where your dart should be stopping if everything is working perfectly.


Shoot again with the ram operating freely. If the dart stops again in roughly the same spot as your control, the ram is engaging until all the air in the air tank is exhausted. If the dart stops significantly before or after your control depth the ram is disengaging early. The dart is either sliding past the control depth, coasting in the barrel farther because the ram isn't sealing long enough to create a vacuum and stop the dart or the dart is stopping short because the ram is disengaging before all the power in the air tank is transferred to the dart and usable air pressure is hemorrhaging out into the mag well.


Doing that should also give you a pretty good idea how long your real barrel should be for maximum efficiency.


And great work so far dskippy. You're putting a lot more quality and time into your build than I did. It should have a much better chance of succeeding than my attempt did.


Edited by shmmee, 09 December 2015 - 09:49 AM.

  • 0
"and we should respect the people who make our blasters. Even if we do molest the hell out of them..."
~BritNerfMogul


#33 dskippy

dskippy

    Member

  • Members
  • 36 posts

Posted 09 December 2015 - 10:51 AM

Doing that should also give you a pretty good idea how long your real barrel should be for maximum efficiency.


And great work so far dskippy. You're putting a lot more quality and time into your build than I did. It should have a much better chance of succeeding than my attempt did.


Thanks for laying out that test plan. That sounds great, I'll do that. If I end up with an ideal barrel length that's way too short, I either need to increase my blast chamber volume or the ram is pulling out too quickly. So with an arbitrarily large blast chamber I'll be able to see exactly how long of a barrel my ram can handle.


Also thanks a bunch. I'm looking forward to it. I'm working on getting the prototype printed up and then bolted on to the air cylinder for a test. I'll be making the tee joint chamber fairly soon.


  • 0

#34 jwasko

jwasko

    PowerBeard

  • Moderators
  • 1,021 posts

Posted 09 December 2015 - 07:20 PM

The dart is either sliding past the control depth, coasting in the barrel farther because the ram isn't sealing long enough to create a vacuum and stop the dart


Would this situation actually negatively affect performance (range and/or muzzle velocity), though?

Great testing solution, using the overly long barrel, by the way. I was going to suggest comparing to a locked breech, but couldn't think of how to measure any differences other than a basic range test. Duh moment for me, I suppose.

Dskippy, if you get a chance I'm sure people would love a copy of the files for that magwell.  :D It looks great.


  • 0

-Jwasko, STILL Sole Surviving member of Steel City Nerf and Sober Sister of the Sex Dwarves
We NERF ON all day, and FUCK OFF all night


#35 shmmee

shmmee

    Member

  • Members
  • 467 posts

Posted 10 December 2015 - 01:02 PM

Would this situation actually negatively affect performance (range and/or muzzle velocity), though?

Great testing solution, using the overly long barrel, by the way. I was going to suggest comparing to a locked breech, but couldn't think of how to measure any differences other than a basic range test. Duh moment for me, I suppose.

...

Ideally the dart would of left the barrel right as the power from the tank is exhausted from pushing it. Prematurely venting tank air or an improper barrel length could be pretty costly on ranges, performance and air efficiency, and thanks jwasko.


This testing method is all unproven theroy, but come to think of it, an excessively long barrel could potentially be applied to traditional springers too for establishing a ball park barrel length. I suspect it would be even more accurate in tighter cpvc barrels where the dart is likely to stop much closer to the point of lost air pressure. Accuracy could be increased further by using a headless foam blank to test with. A foam blank without a head/washer would help the dart stop because of friction the instant it exhausted the propelling air pressure instead of coasting until a strong enough vacuum was formed.


It would require a chrony to really verify that method but I can't see why it wouldn't work.Would anyone mind testing that theory? Ranges wouldn't be as good as a chrony, but they'd be better than nothing for verification and sadly, I just don't have the time to do the leg work on this one.


Edited by shmmee, 10 December 2015 - 01:03 PM.

  • 0
"and we should respect the people who make our blasters. Even if we do molest the hell out of them..."
~BritNerfMogul


#36 jwasko

jwasko

    PowerBeard

  • Moderators
  • 1,021 posts

Posted 11 December 2015 - 11:11 AM

 Prematurely venting tank air or an improper barrel length could be pretty costly on ranges, performance and air efficiency

Yes, this makes sense and is the main thing we were worried about, but if your theory that further down the barrel = greater performance, then:


past the control depth...coasting in the barrel farther because the ram isn't sealing long enough to create a vacuum...


Would mean increased performance because the dart went further down the barrel.


So, I was tossing around the idea that opening/venting the chamber at the exact right time...at the time when force from pressure behind the dart is equal to the force from atmospheric pressure in front of the dart) would increase performance over a sealed breach.


But, thinking about it more, friction takes over sometime before pressure equilibrium is reached let alone a vacuum is formed. Therefore, an ideal length barrel would never form a vacuum and opening/venting the chamber would do nothing.


On the other hand, your coasting statement is great for preventing a false positive on a blowback-breeched blaster. So, yeah, double kudos on your methodology.


  • 0

-Jwasko, STILL Sole Surviving member of Steel City Nerf and Sober Sister of the Sex Dwarves
We NERF ON all day, and FUCK OFF all night


#37 dskippy

dskippy

    Member

  • Members
  • 36 posts

Posted 11 December 2015 - 06:04 PM

But, thinking about it more, friction takes over sometime before pressure equilibrium is reached let alone a vacuum is formed. Therefore, an ideal length barrel would never form a vacuum and opening/venting the chamber would do nothing.


Yes but in the context we were discussing this, we did not have an ideal barrel. We had a barrel that was too long and we were planning to put a measuring stick down the barrel to see how far it got. So the statement that a lack of a vacuum could potentially increase performance is valid. Though I definitely don't know how the lack of a vacuum vs. the friction would play out.


One thing I can do is find the ideal barrel length first by firmly sealing the back of the barrel and not allowing the ram to retract. After that is done, I could test performance in an ideal length barrel and see if performance is affected. 


Edited by dskippy, 11 December 2015 - 06:06 PM.

  • 0

#38 dskippy

dskippy

    Member

  • Members
  • 36 posts

Posted 15 December 2015 - 12:13 AM

*
POPULAR

Hey guys,


I made some progress this weekend. Here's the printed out mag well.


magwell_zpsa9cxjqnb.png


The printed part came out alright, though it definitely needs some adjustments. The space for the magazine's directional tab is too small and the holes for the bolts too big. It will do just fine for the first round though.


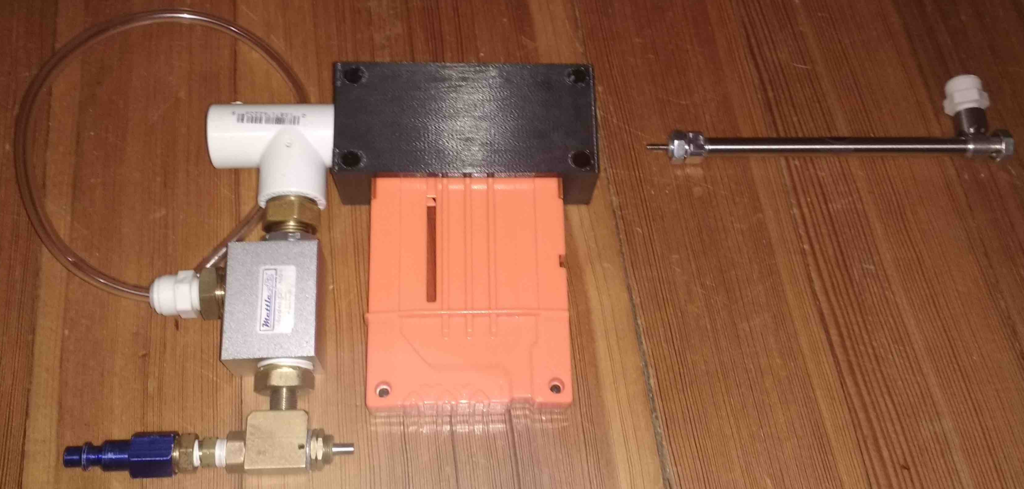
I've also gotten the air cylinder, QEV, and DCV in the mail. Here's the basic setup for the first test.


setup_zps2ibwd65w.png


I need to make the inside of the chamber (the PVC tee joint) as laid out in this thread. I also need to machine the ram rod that I just got in the mail today. It's 9/16" Derlin rod that will go on the end of the air cylinder. Hopefully I'll have a video demonstration of the whole this working next weekend.


  • 1

#39 shmmee

shmmee

    Member

  • Members
  • 467 posts

Posted 15 December 2015 - 09:39 AM

Awesome! I'm incredibly excited to see you bring it all together! Keep up with the updates, I'll be watching for them.


  • 0
"and we should respect the people who make our blasters. Even if we do molest the hell out of them..."
~BritNerfMogul


#40 CaptainSlug

CaptainSlug

    Resident Mad Scientist

  • Administrators
  • 4,763 posts

Posted 22 June 2016 - 07:14 AM

*
POPULAR

There are only 3 criteria when it comes to air cylinders.


Stroke length: This one is obvious. Pick the one that provides the travel required.


Single or Dual-acting: Single acting has a spring return so they only have one pressure input (usually for extension, ones that retract only are really rare). Dual-acting requires pressure to actuate both directions of travel, so you get full load application for both. You also have to exhaust the side opposite the direction of travel, so the valve you need for them is typically a 5-port directional.


Bore size: This determines the applied load at the rated pressure. A larger bore offers more surface area for the pressure to act upon. This presents a considerable problem for us because nerf is operating at very low pressures and if you use a bore size too small with a pressure too low the applied load on the bore face of the cylinder isn't going to be enough to overcome the friction of the seal on the cylinder itself.


For any air cylinder if you want to determine the load applied at a given pressure you need the following formula


Pressure times Pi times the radius (bore diameter divided by 2) squared: Load = psi(pr2)


If you find that your selected air cylinder will not operate at the pressure you intend to fire darts at you have three courses to take to correct that issue.


1.) Go up in bore size. The bore seal friction doesn't scale at the same rate as the area exposed. Doing a practical test with the cylinder you have of using a scale to see how much force it take to get the cylinder to move by hand will tell you how much load is required to move it. From that you can calculate the minimum operating pressure. This is not a particularly advisable course given you you'll be ordering and returning a bunch of them. The air cylinders you're likely to use are non-serviceable models so replacing the o-ring inside them isn't possible.


2.) Have a different pneumatic control circuit for the air cylinder at a higher pressure rating. This secondary circuit will need its own directional control valve.


3.) Make your own air cylinder. Obvious, but difficult. It allows you to tailor the bore seal for lower friction and select a bore size that will operate at the required pressure level.


All three paths involve wasting a certain amount of your gas supply for actuation. I kind of gave up on the concept of an actuated breech because the secondary issue you have to solve here is efficiency. A flow-control valve on the air cylinder is needed when you are operating one at higher pressures so that the retraction stroke is delayed long enough for the dart to have been fired from the barrel. At lower pressure you would kind of want to use the air in the air cylinder to help fire the dart, but in order to do that you would need some disconnect or catch on the air cylinder itself so that the retract of it is done AFTER the trigger pull, but the side effect would be a puff of air being dispensed by the cylinder stroke. I kind of dumped the ARR project upon the realization that it would an awkward marriage of a springer and an air-powered blaster.


Edited by CaptainSlug, 11 July 2016 - 08:27 AM.

  • 2
The little critters of nature, they don't know that they're ugly. That's very funny, a fly marrying a bumble bee. I told you I'd shoot, but you didn't believe me. Why didn't you believe me?

#41 Meaker VI

Meaker VI

    Member

  • Moderators
  • 1,192 posts

Posted 22 June 2016 - 09:59 AM

*
POPULAR

I kind of dumped the ARR project upon the realization that it would an awkward marriage of a springer and an air-powered blaster.

 
I think the Austrailians fairly regularly do semi-auto air blasters, dumping the spring action as well. Boltsniper's BS-12 is one of the only spring/air blasters I know of, and it sounds like you need significant air supply to run it in air mode.
 
Slug, are you back for good or just temporarily?
 
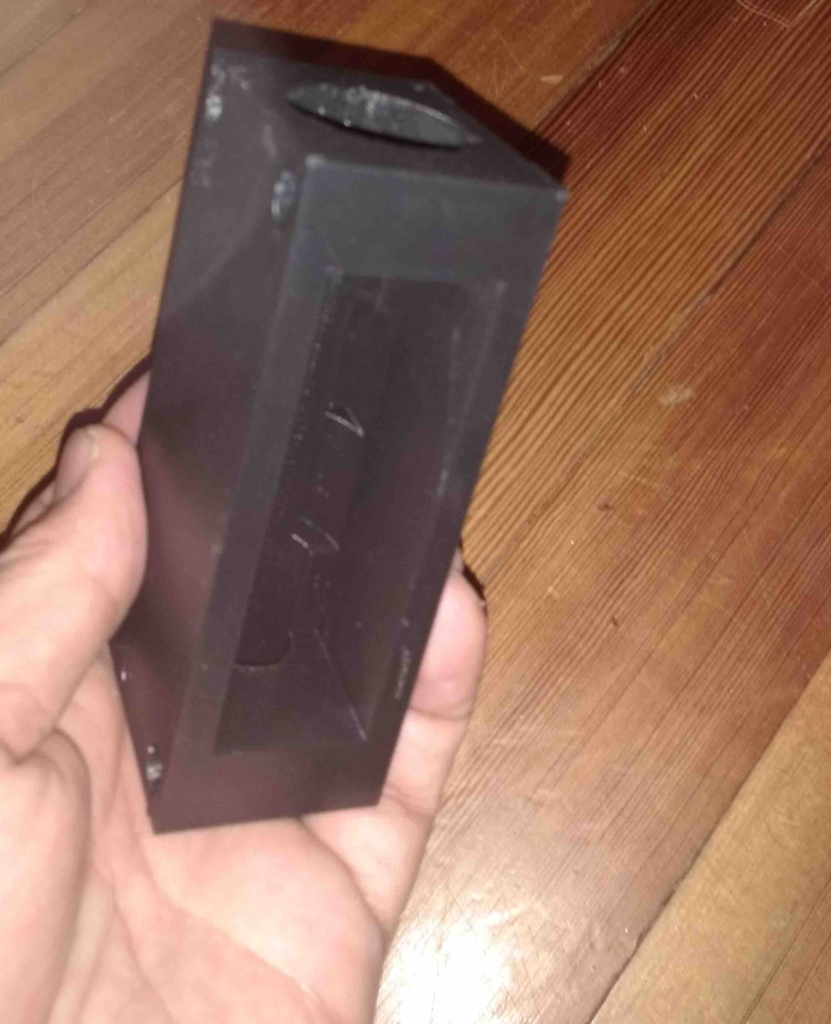
Also, I totally forgot about this thread but since got my own 3d printer and made up a magwell that might fit in this project:

IMG_1176.JPG


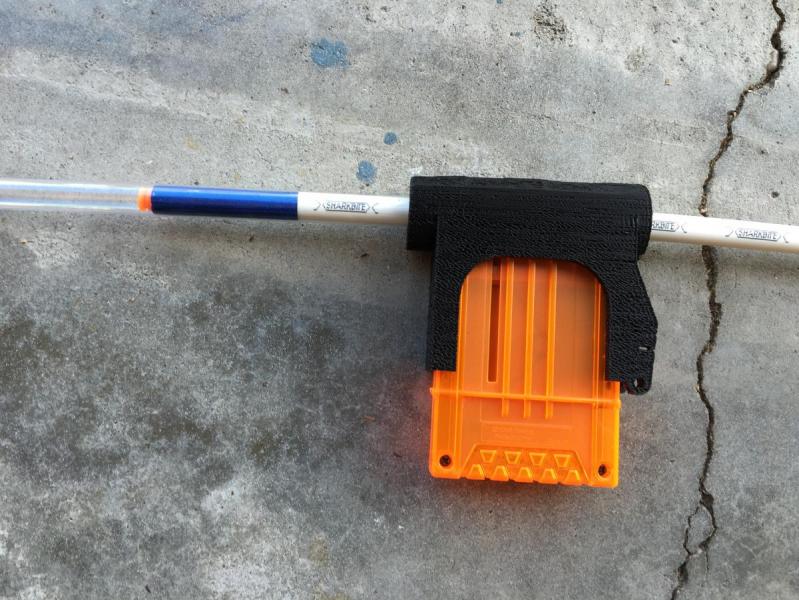
That's 3/8" PEX feeding a suction head elite dart from a mag into some kind of PETG. The foamed appearance is because my nozzle clogged up partway through the print - I'll need to redo it, but am waiting until after I've redesigned the lock. I'm waiting to do that until after I do some testing with it to see if it'll do what I want it to (note that it's got 1/8" holes running all the way through that you can't see here).For now, it seems to feed well and my printer's tolerances are tight enough that the lock not working correctly isn't a huge deal.


For printing, the mag should point up on your printbed. if you open the file there will be disposable supports that I've added in that are 0.01" or something away from the body and should keep the round top of the magwell in place. This whole thing is supposed to nest into 1-1/4" PVC, but some shaving may be required depending on your PVC's ID.

Attached Files


  • 1

#42 hbk04966

hbk04966

    Member

  • Members
  • 16 posts

Posted 22 June 2016 - 11:04 AM

That's pretty awesome
  • 0


1 user(s) are reading this topic

0 members, 1 guests, 0 anonymous users