Jump to content


Photo

ESLT 1.6 Instructions

Now w/ printed pump grip!
homemade writeup bullpup 3D printing spring bungee

13 replies to this topic

#1 Ryan201821

Ryan201821

    Prince Edward

  • Contributors
  • 1,892 posts

Posted 10 February 2015 - 12:24 AM

*
POPULAR

ESLT 1.6 Build Guide


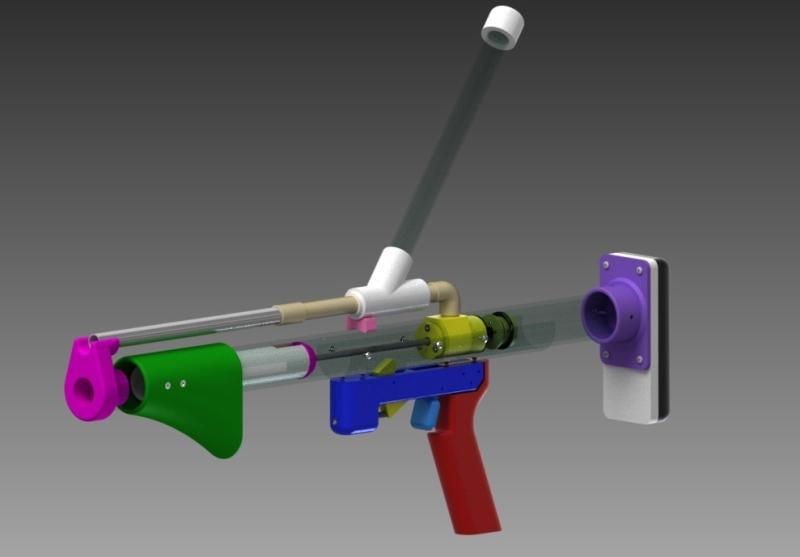
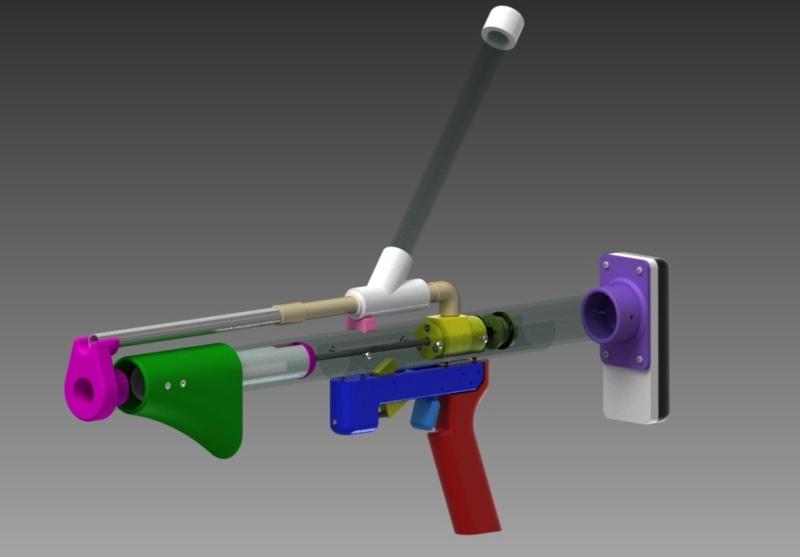
1423546055-344914-1-alAssemblyStepMaster

Background:

Original thread: http://nerfhaven.com...showtopic=23437
ESLT 1.0: https://sites.google...er---3d-printed
ESLT 1.5: https://sites.google...1-5-build-guide

Clear ESLT Demo: https://www.youtube....h?v=lz9rx-qmZmE

The first ESLT was built 2+ years ago, and a lot has changed since the original. This is the latest version MHA is producing, and the design will continue to evolve from here. A 3D printer is required to make these blasters unless you are clever enough to substitute all the printed pieces with something else. It's definitely possible, as many people have already done this, including ourselves. The 3D printed version is obviously a lot easier to build if you have the necessary tools.

This blaster is designed for 5.5" of draw.

Changes since 1.5:
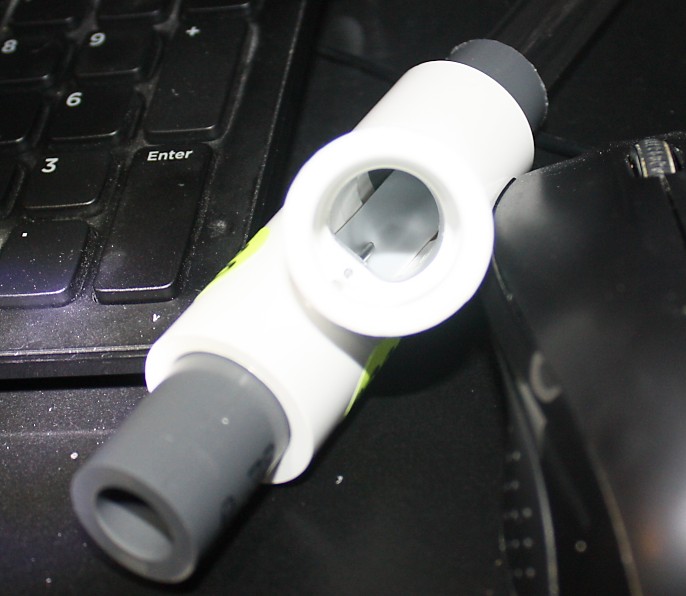
-New printed angled pump grip (replaces reducing tee)
-Eyebolt changed to a steel one
-New ReDirectPiece and o-ring holder
-Changed plunger rod material to anodized aluminum
-New BarrelSpacer to accommodate pump grip
-MainHandle more angled for comfort


Downloadable Files

Click Here
39 MB

Contains everything you need, stl's for printing, stp's for modeling, and a parts/cost sheet.

.ipt files are compatible with Autodesk Inventor 2014 or newer.

Essential Tools
-3D Printer w/ no less than 7x7x7" print area
-Scrollsaw or Hacksaw
-Drill press and/or power drill
-Dremel w/ cutting wheel or Mill/Scrollsaw
-7/64”, 5/32", .260" (or slightly over .250), 1/2", 5/8" drill bits
-#6-32 tapping bit
-1/4-20 tap and die set
-5/16-18 tapping bit
-Scissors and/or file
-Screwdriver
-Countersink (Any size, really)
-Hot glue and/or super glue
-Duct tape
-Silicone lube
-Safety glasses
-Vise and/or wrench
-Tape measure/ruler/calipers

Printing your Components
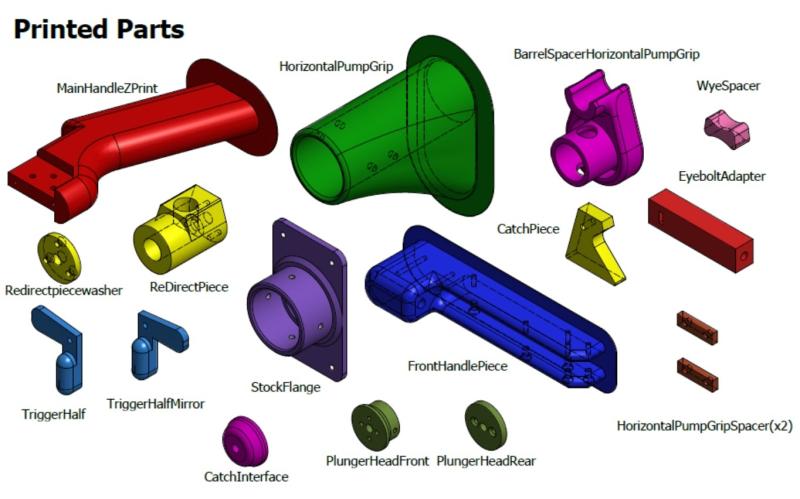
1426015450-344914-2-ESLT1.6_PrintedParts

MainHandleZPrint/Halves - This is the part of the handle you physically hold. There are two ways to do this. You can do it vertically, like we do, or you can do it in two halves and glue them together. If people don't have printers that can print up to 160mm in the Z axis, you'll need to do them in halves. Layer adhesion is the weakest point on parts that come off these printers, so extra/thicker perimeters are a must if printing vertically. A larger nozzle is preferred. Post-print you'll have to tap the two holes (#6) at the top of the print where it attaches to the HandleClamp. You also may need to drill out the three holes (#6 clearance), where it attaches to the FrontHandlePiece.

FrontHandlePiece - This is probably the most challenging print on the blaster. They are pretty long (175mm) and will warp at least a little bit unless you really have your settings on your printer super fine tuned. I've found adding lots of brim helps, especially adding brim to your model so the brim is actually attached to the printed part for a layer or two. Post-print you'll need to tap the two holes (#6) where it attaches to the HandleClamp. You also may want to drill out the two holes (#6 clearance), where the CatchPiece and Trigger are mounted.

HorizontalPumpGrip - This is the aforementioned new add-on. It replaces the reducing tee which was heavy, expensive, and a lot of machining required to get it to work. We usually print these with a few extra perimeters, and is now the biggest print on the blaster.

CatchPiece; CatchInterface - The CatchPiece is basically the catch of the blaster (hence the name), where the CatchInterface is more like the "catch notch" in a normal blaster. These two pieces need to be 100% infill since they see a lot of wear during use. Post-print you'll need to tap (1/4) the only hole on this piece.

Trigger3DPrint/Mirror - These don't really don't matter how they're printed. You'll need to glue the two piece together after they are printed. After they're glued together, drill out the hole (#6 clearance).

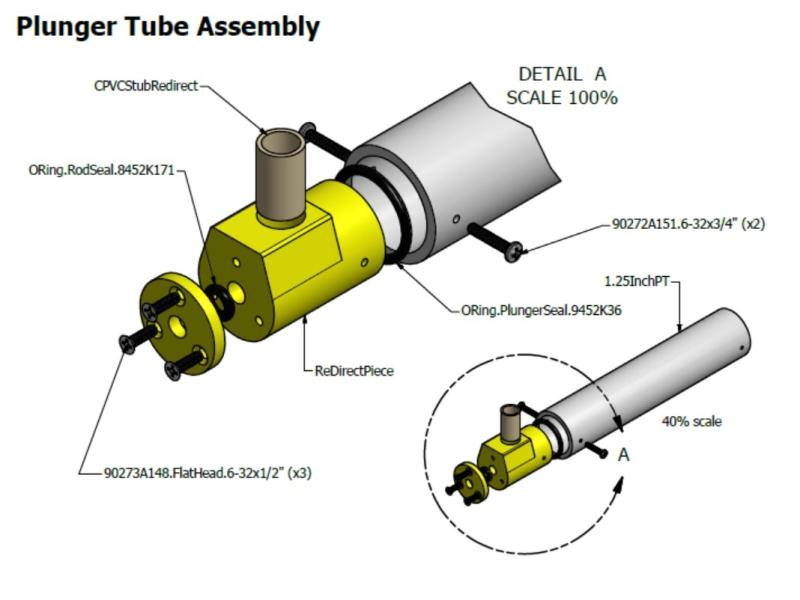
ReDirectPiece - This piece sees a lot of wear since the plunger head is smashing into it each time it's fired, so it's printed at 100% infill. After it's printed, drill out the hole for the CPVC stub (5/8"), and drill and tap (#6) the three new holes on the bottom of the piece.

ReDirectPieceWasher - This is a new piece that sandwiches the rod seal o-ring against the ReDirectPiece. We usually print these at 100% infill to be safe, and they're small pieces. Drill out the three holes (#6 clearance).

HorizontalPumpGripSpacer(x2) - These replace the old PumpGripSpacer, and need to be 100% infill. Drill out the two holes (#6 clearance). They are much smaller and easier to print than the old version.

EyeboltAdapter - The Eyebolt Adpater needs to be strong and is a quick print with a larger nozzle. The new adapters are fitted for a #6-32 steel eyebolt, as opposed to the #10-24 or 1/4-20 nylon ones we used to use. Post-print, you'll have to tap one end with a 1/4-20 tap, and the other end uses a square nut and does not need to be tapped.

BarrelSpacerHorizontalPumpGrip - The newly added printed pump grip, meant we needed to make some extra space near the front since it's much longer than the reducing tee. This new print fits inside the front end of the FrontTube as well as the outside. More perimeters is probably a good idea for this print as barrel spacers are always prone to getting damaged.

ESLTPlungerHead (Front/Rear) - More information on these can be found here. You'll need to tap (#6) the two holes in the front piece that connects the two. The back piece should be drilled out with a #6 clearance hole. Both also need to be tapped (1/4-20) to attach to the plunger rod.

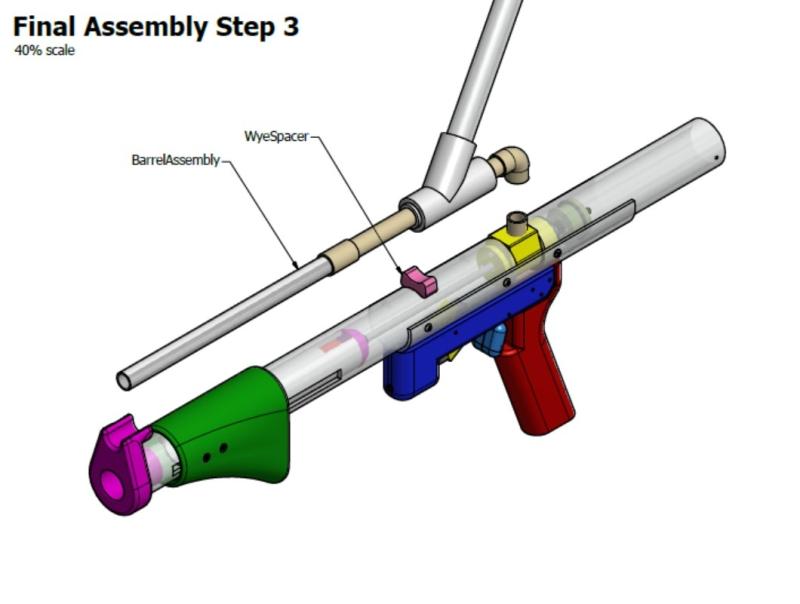
WyeSpacer - Also another print that doesn't have to meet any specifications. This print simply gives you a wedge in between the wye and the front tube to tape the barrel assembly from wobbling.

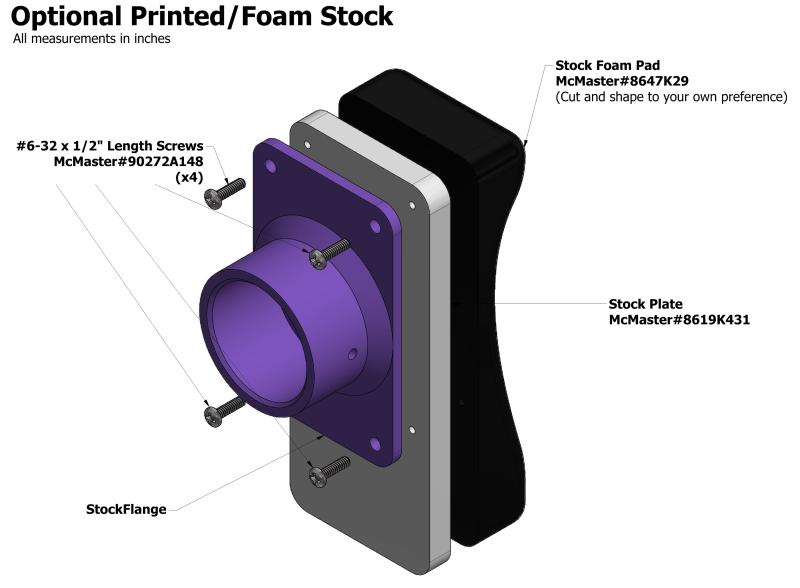
StockFlange (optional) - If you have a printer you might as well do this piece. It attaches the plunger tube to an HDPE sheet which is hot glued to a piece of foam, for comfort. This is a highly recommended add.

Tube & Rod Machining
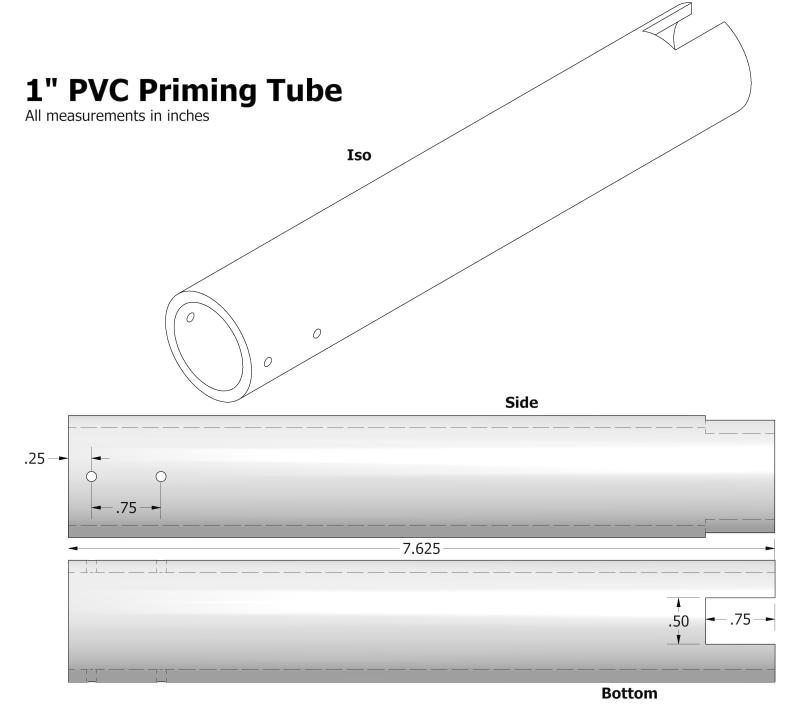
1423546055-344914-3-rimingTubeDimensions

The Priming tube is the linkage from the HorizontalPumpGrip that pushes on the CatchInterface, which pushes back the plunger rod. You can scrollsaw, mill, or dremel the bottom slot. The holes should be 7/64" or a #6 pilot, and need to be tapped afterwards. These need to be fairly centered holes so the 1" is mounted centrally inside the 1 1/4" front tube.
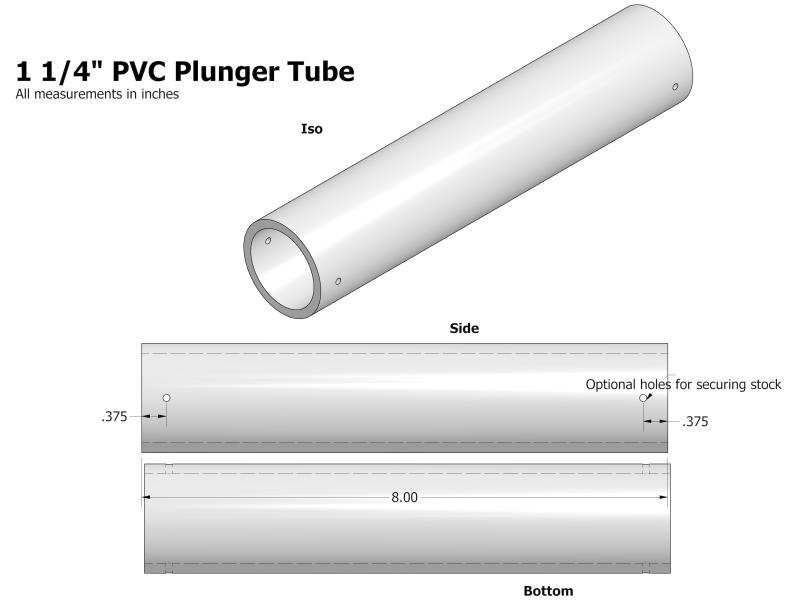
1423546055-344914-4-lungerTubeDimensions

Make sure your PVC is smooth on the inside. The majority of PVC we encounter is very bumpy and awful on the inside, creating unnecessary friction and a shitty seal. The holes will be drilled after you've inserted and attached your ReDirectPiece and Stock.
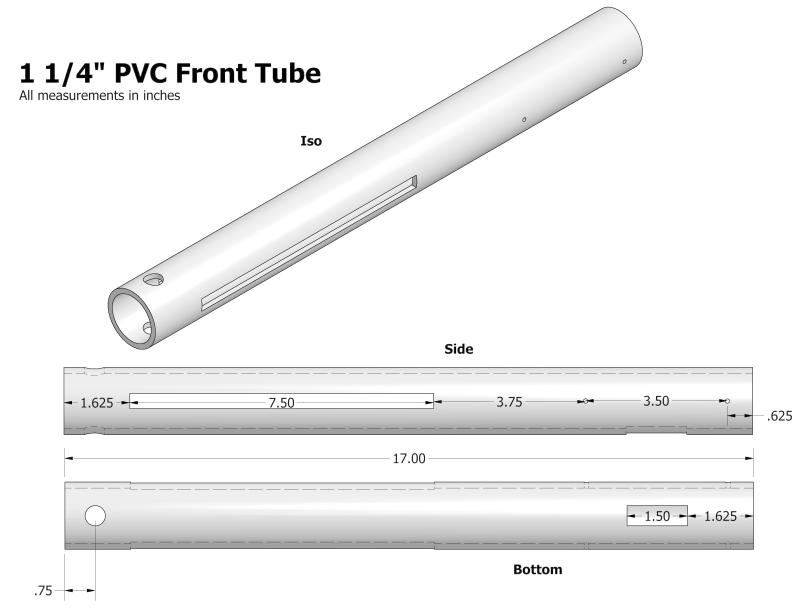
1423546055-344914-5-CFrontTubeDimensions

The biggest tube to machine, and requires some pretty long slots. We do these on a mill, but a scrollsaw is probably the next best option, followed by a Dremel, which is pretty terrible. The slot should be at least 3/8" wide, if they are centered. If they're off, they'll like need to be oversized. The holes should also be #6 pilot holes and drilled after you've assembled some stuff. Again, this will be explained more later. The larger hole in the front is 1/2" in diameter which holds the spring post. You'll also need a slot on the bottom for the CatchPiece to clear.
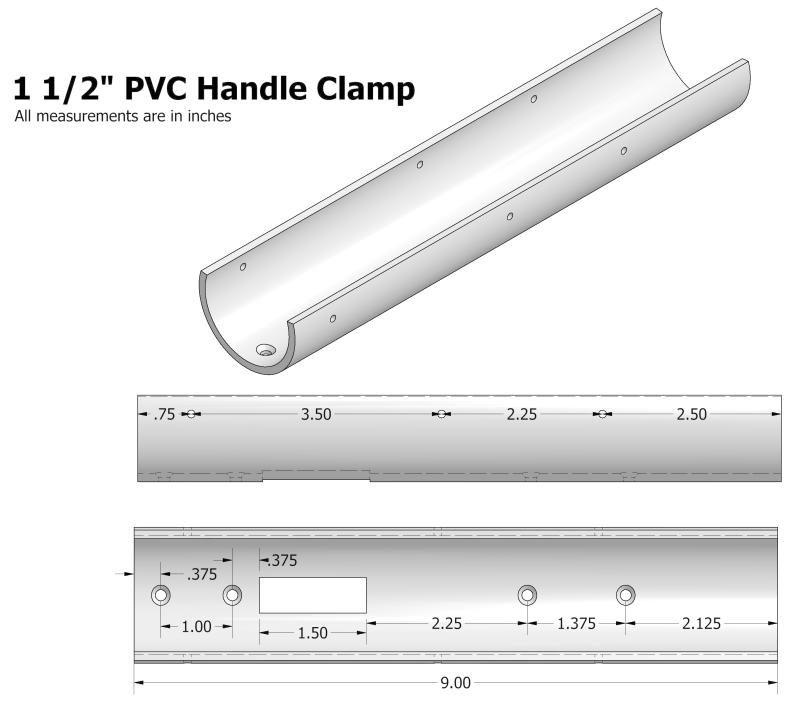
1423546055-344914-6-chPVCClampDimensions

These are basically a tube cut almost in half, leaving one side to be a little more than a half tube. This will clamp over/slide over your 1 1/4" tubes, and connect your handle to them. It needs a 1/2" slot in the bottom, with 5/32" or #6 clearance holes to attach to the handle. They also need to be countersinked. The holes near the top of the clamp should be #6 clearance holes, and you should drill them before cutting the tube in half.
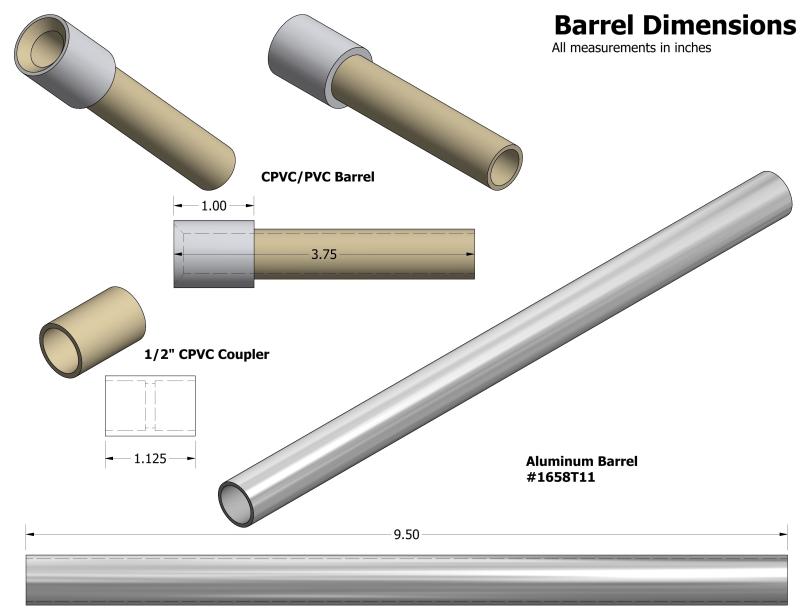
1423546055-344914-7-1.6_BarrelDimensions

Pretty straightforward here, make sure you chamfer the CPVC/PVC barrel combo to allow a smooth feed for the the darts. Instead of using a CPVC coupler, you can also use a length of 1/2" PVC drilled out to 5/8", or magical conduit that cheerios finds at Menards. Make sure you super glue your CPVC/PVC barrel combo because you don't want that coming un-done.
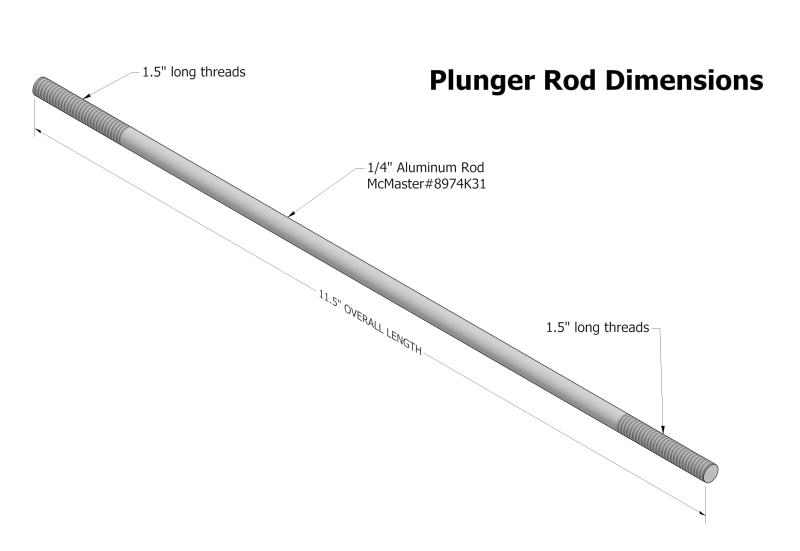
1423546055-344914-8-PlungerRodDimensions

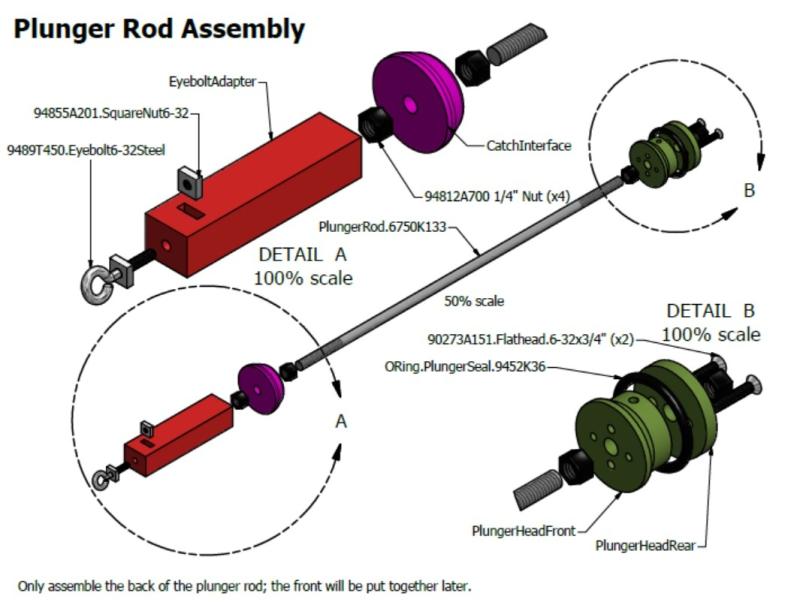
This can be a difficult piece to machine. You'll have to cut the aluminum rod to 11.5", and use a die to cut threads 1.5" long on both sides. During this process you'll have to figure out a way to vise the rod without damaging it. We usually use two pieces of soft wood that you can just crush in the vice. Make sure you don't bend the plunger rod in the process. Both of these will cause major issues later, mostly the plunger rod having tons of unnecessary friction.

We're now using a segement of anodized aluminum instead of the plain stuff. It's three times more expensive, but is much less prone to getting scratched and marred causing the plunger rod to seal like shit. The McMaster# in this drawing is incorrect, and should be #6750K13
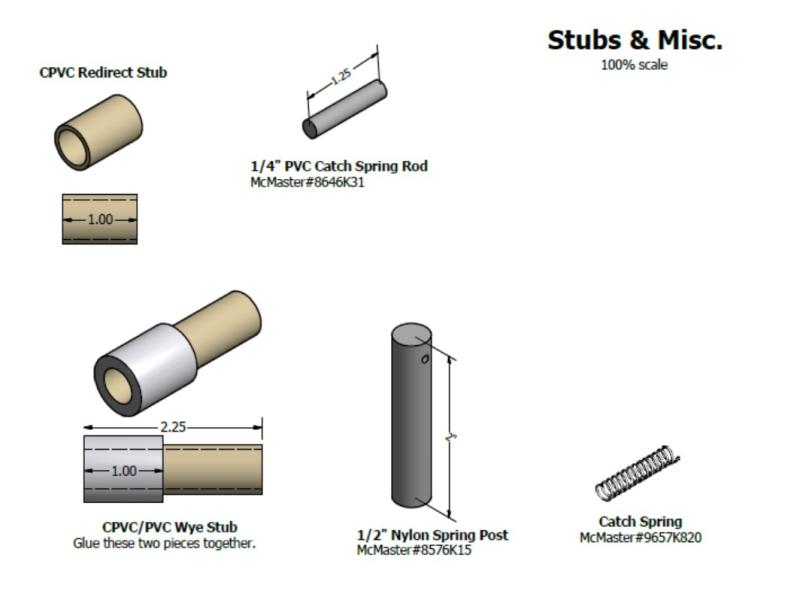
1423546055-344914-9-ESLT1.6_StubsandMisc

These are just small bits that you'll need later on. #6 clearance hole for the spring post, and roughly .25" away from the top.

Super glue the CPVC/PVC wye stub. You need this to stay together when you press fit the Barrel Assembly together.

Sub-Assemblies
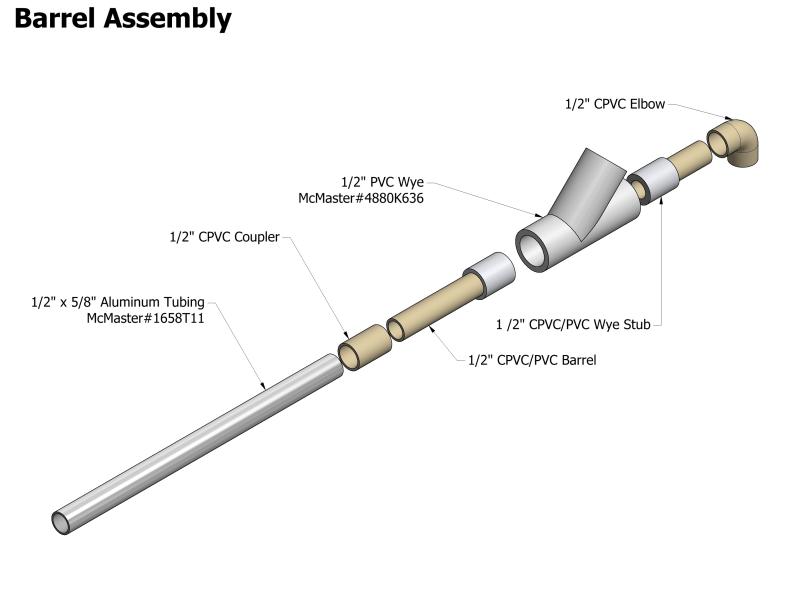
1423763669-344914-10-LT1.6_BarrelAssembl

1423763669-344914-11-6_PlungerRodAssembl

1423763669-344914-12-ESLT1.6_FoamStock.j

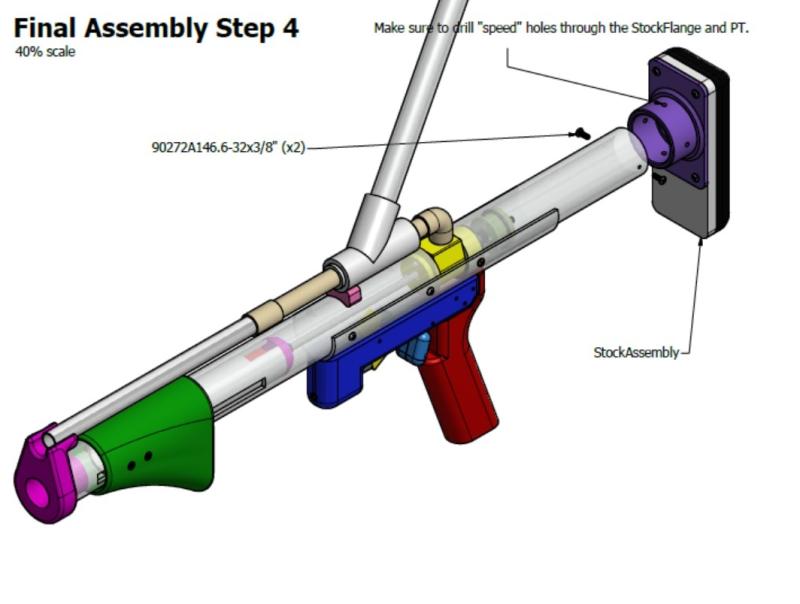
The shape of the foam piece and stock plate are really up to the user's preference. Make sure you drill speed holes after you've put the stock on the plunger tube. Your blaster won't work otherwise. Just use the 5/32" bit and drill 3 or 4 holes through the side of the flange and the plunger tube to allow air to pass through when firing.
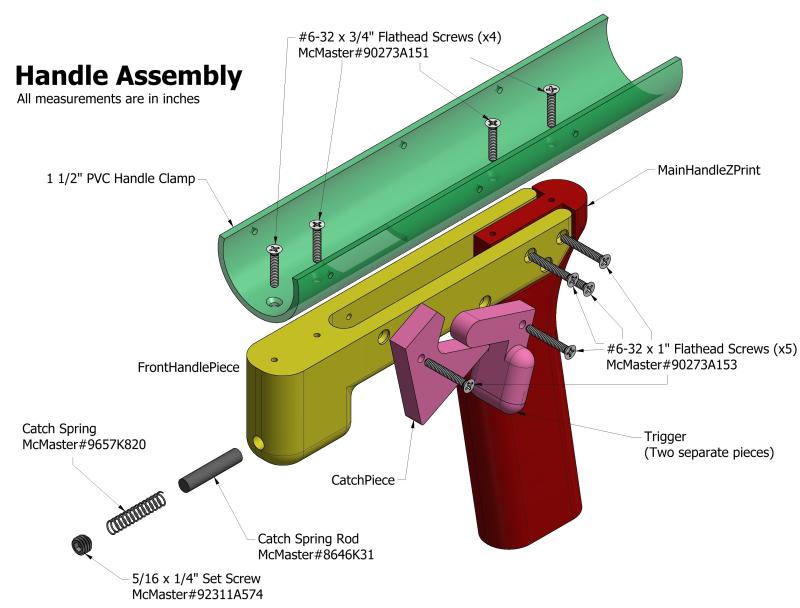
1423763669-344914-13-LT1.6_HandleAssembl

1423763669-344914-14-_PlungerTubeAssembl

This is the step where you'll need your hot glue gun. Your ReDirectPiece should be loose-ish in the Plunger tube, so add a small line of hot glue around where it's being inserted into the tube. Push that in all the way until the Plunger tube butts up against the top of the ReDirectPiece.

Now take your Redirectpiecewasher, and sandwich the smaller o-ring in between the bottom of it, and the front of the Redirectpiece. It's easier to align the o-ring when you have the plunger rod through it when you assemble. Tighten the screws enough so it seals the o-ring between the two plastic pieces. If you tighten the screws too much, you'll smash the o-ring too much, causing it to have a lot of extra friction on the plunger rod. You'll also want to lube this o-ring up during assembly.

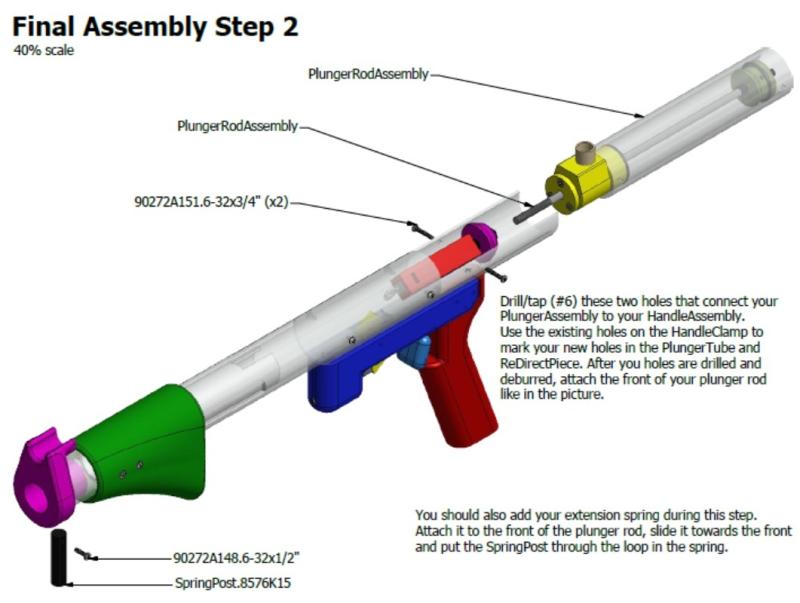
During the Final Assembly, you'll drill the holes you need to secure this assembly to the rest of the blaster. Right now, you should have no holes in the ReDirectPiece, or the Plunger tube.


Final Blaster Assembly
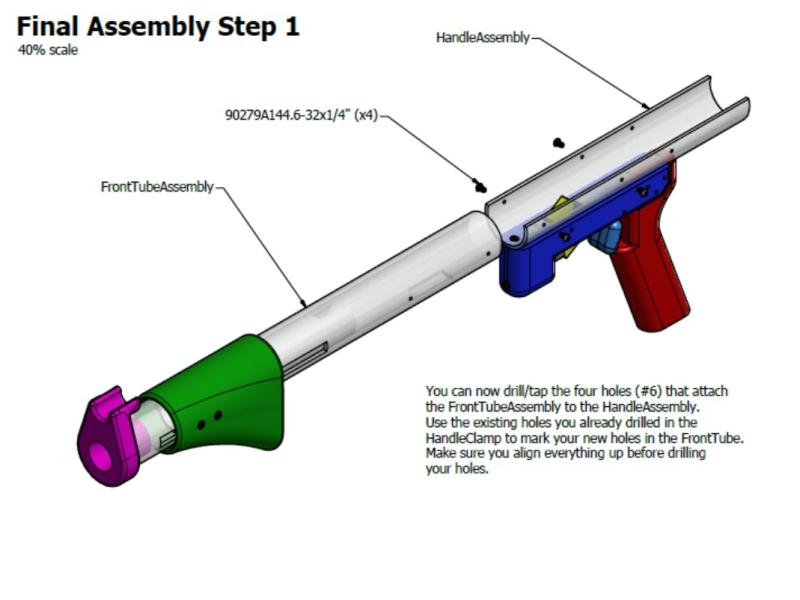
1423763669-344914-15-LT1.6_FinalAssembly

1426015450-344914-16-LT1.6_FinalAssembly

1426015450-344914-17-LT1.6_FinalAssembly

1426015450-344914-18-LT1.6_FinalAssembly

1423763669-344914-19-alAssemblyStepMaste

Questions, comments, flames, please post...

Edited by CaptainSlug, 20 November 2018 - 09:58 AM.

  • 2

#2 rockinon96

rockinon96

    Member

  • Members
  • 142 posts

Posted 11 February 2015 - 06:33 PM

ESLT 1.6 Build Guide

Questions, comments, flames, please post...


I have a question. Could you use this setup with just straight up CPVC, and not transition it to Aluminum rod?

Other than that, Great job.
  • 0

I know. I was just busting your Muttonchops. It's just what I do.


#3 Drev

Drev

    Member

  • Members
  • 135 posts

Posted 11 February 2015 - 08:45 PM

I have a question. Could you use this setup with just straight up CPVC, and not transition it to Aluminum rod?


I built one of these (1.5 actually), but I couldn't get a full CVPC barrel to work very well. Granted, that's probably because I use really fat foam, but the aluminum definitely makes it fly better if you can manage to get CPVC to work.
  • 0
Check out my blog: Fly Nerf

#4 Ryan201821

Ryan201821

    Prince Edward

  • Contributors
  • 1,892 posts

Posted 12 February 2015 - 03:42 PM

I have a question. Could you use this setup with just straight up CPVC, and not transition it to Aluminum rod?

Other than that, Great job.

Use this setup with whatever works best for your darts...but...

I built one of these (1.5 actually), but I couldn't get a full CVPC barrel to work very well. Granted, that's probably because I use really fat foam, but the aluminum definitely makes it fly better if you can manage to get CPVC to work.

A full CPVC barrel probably won't work for most people, unless you have thinner foam than most people get.

Edit: Also if you did build the 1.5, upgrading it to this version should be easy. None of the major components have changed.

Edited by Ryan201821, 12 February 2015 - 03:45 PM.

  • 0

#5 jwasko

jwasko

    PowerBeard

  • Moderators
  • 1,021 posts

Posted 28 February 2015 - 09:04 AM

I don't see a price/parts list in your rar file, Ryan. I do see models of most of the parts, which has Mcmaster part numbers, but I don't see the extension spring listed anywhere.

The spring is listed in the 1.5 list, but I figured I'd post since the whole list is missing too.

Edited by jwasko, 28 February 2015 - 09:07 AM.

  • 0

-Jwasko, STILL Sole Surviving member of Steel City Nerf and Sober Sister of the Sex Dwarves
We NERF ON all day, and FUCK OFF all night


#6 Ryan201821

Ryan201821

    Prince Edward

  • Contributors
  • 1,892 posts

Posted 16 August 2016 - 08:01 AM

I plan on releasing a full new write-up for a newer version ESLT, but here are some of the changes. I've been very active the last few months, but I just haven't been sharing it with anyone outside of people who frequent the cancer shack.


I apologize for the crappy smartphone pictures:


New style re-direct piece

IMG_20160731_241649634%20(1).jpg


Seals much better than previous versions. Also eliminates the need for CPVC stubs and elbows, another place where air could leak. More details to follow later...


The slots are also open in the front now, which makes assembly much easier. I have to say though, cutting through slots is a bit more difficult. Especially since I have to cut these on the scrollsaw now as opposed to Kane's mill which I was using when he still lived here. I've also added some thumb screws which Zorn had laying around from dicking around with his ESLT. He can provide the part numbers here if he feels like it..


I've been working a ton on 3D printed wyes, men darts, and artifacts recently, which I'll post my experiences later as well. Other small changes include a front barrel spacer with a channel to secure a zip tie (no one likes duct tape) (If you don't think a front barrel spacer is necessary you're an idiot), and a revised stock design (which is actually old). 


Otherwise, expect a new write-up soon, and a new batch of blasters.


IMG_20160731_241629878%20(1).jpg


Edited by Ryan201821, 16 August 2016 - 08:04 AM.

  • 0

#7 markeski

markeski

    Member

  • Members
  • 94 posts

Posted 16 August 2016 - 10:22 AM

Ryan, what was your experience with Artifact darts and ESLTs?  Probably the only thing I didn't like about these blasters is the exclusive ammo they used and the need for all the cornstarch. 


Edited by markeski, 16 August 2016 - 10:24 AM.

  • 0

#8 CaptainSlug

CaptainSlug

    Resident Mad Scientist

  • Administrators
  • 4,763 posts

Posted 16 August 2016 - 11:51 AM

It's not the blaster so much as it is your hopper wye setup. Hopper wyes are just really fussy things and you can get them to work with one dart type, then once you change darts your performance changes.

Blasters with way more spring load and more plunger velocity can overcome these factors through brute force. But you may still end up with inconsistency between darts and even factors such as humidity, temperature, and barometric pressure.


With hopper wyes you're always teetering between darts not feeding, reliable feeding of the darts, and double or triple-feeding of the darts.


  • 0
The little critters of nature, they don't know that they're ugly. That's very funny, a fly marrying a bumble bee. I told you I'd shoot, but you didn't believe me. Why didn't you believe me?

#9 Meaker VI

Meaker VI

    Member

  • Moderators
  • 1,192 posts

Posted 16 August 2016 - 03:37 PM

The slots are also open in the front now, which makes assembly much easier. I have to say though, cutting through slots is a bit more difficult. Especially since I have to cut these on the scrollsaw...


I see a hacksaw in the background. Use that, it'll work better. If you've got a band saw or any other kind of straight-cutting hand saw, use those (I use this). Scroll saws do not excel at straight cuts, and a hand saw can do the job pretty quickly if you can get it clamped down well (I also see you have a massive bench clamp).


Alternatively, a router table or pantorouter with a proper bit and setup would probably be the best way to do it, but you'd really want the right jigs in case the PVC exploded.


  • 0

#10 Ryan201821

Ryan201821

    Prince Edward

  • Contributors
  • 1,892 posts

Posted 17 August 2016 - 06:23 AM

I am a certified scrollbar wizard, so it's pretty easy for me, but I understand there are better tools for the job. As for previously mentioned tools, I do not have any of those, besides the hacksaw, and I can make much better cuts with the former. I was spoiled with the mill and I miss how quick and pretty it made slots. I eventually plan on building/buying a mill so I can semi-autonomously pump out slots. This probably won't happen for a while though.

Mark -

Basically what slug said is exactly what I would've said, and really the cornstarch is just for feeding darts and has nothing to do with the blaster itself. In fact, Zorn/Ice9 have discovered by putting a strip of Teflon inside the eye, this eliminates the need for cornstarch.

As for artifacts' performance I have had zero luck. They all shoot like wounded streamlines but you do occasionally get some laser beams once and a while. Other people have also noted this, which seems like it's entirely independent of what blaster you're using....

But anyway, this is a thread about ESLTs. I plan on sharing my dart/wye experimentation in a separate thread.
  • 0

#11 CaptainSlug

CaptainSlug

    Resident Mad Scientist

  • Administrators
  • 4,763 posts

Posted 17 August 2016 - 08:41 PM

Basically what slug said is exactly what I would've said, and really the cornstarch is just for feeding darts and has nothing to do with the blaster itself. In fact, Zorn/Ice9 have discovered by putting a strip of Teflon inside the eye, this eliminates the need for cornstarch.

I can fully confirm that this works really well (sometimes too well with felt-tipped darts). The material costs a ton just to get a tiny square of it, but it's more than enough to make 20 hoppers given that you really only need a piece big enough to cover the spot inside the wye where the dart at the end of the line nose-dives to.

knifty_02.jpg

These worked beautifully at Apoc. Slugs were feeding a little too easily and would probably have warranted removal of the teflon strip in order to get optimal range out of them. But it was nice to be able to fire any "short enough" dart I picked up.


  • 0
The little critters of nature, they don't know that they're ugly. That's very funny, a fly marrying a bumble bee. I told you I'd shoot, but you didn't believe me. Why didn't you believe me?

#12 Snoop Doggy doge

Snoop Doggy doge

    Fig you, Van

  • Members
  • 501 posts

Posted 17 August 2016 - 11:20 PM

Hey since this is kinda relevant, while your at it can you reupload or fix your ESLT nonprinted template files?
The ones down here

Also would a new redirect piece be purchasable? What are those large pins on the reciever? Is that wye at a 35 degree? 
Love the new stock by the way, looks dope


  • 0

#13 Ryan201821

Ryan201821

    Prince Edward

  • Contributors
  • 1,892 posts

Posted 23 August 2016 - 09:15 PM

Hey since this is kinda relevant, while your at it can you reupload or fix your ESLT nonprinted template files?
The ones down here

Also would a new redirect piece be purchasable? What are those large pins on the reciever? Is that wye at a 35 degree? 
Love the new stock by the way, looks dope


I'm planning on releasing a newer non-3d-printed version. I haven't searched all of my PC's for these files, but I really don't want to, so I'll just re-do it. It's heavily outdated anyway.


I will definitely make the new re-direct piece purchasable in the future, but I'm putting my time into a lot of other projects right now, so this probably won't happen for a couple months. However, I'll be publishing the files for it much sooner, so you could get someone else to print it for you as well. There will also probably be upgrade kits available sometime in the future to bring whatever version you own up to the latest and greatest.


The large pins are thumb screws, which I stole from Zorn since he left them in the Cancer shack. This enables the blaster to possess the ability to be disassembled to the point where you can fit it in a small travel bag without having to use any tools. This was Zorn's idea and I have to say I like it. 


The wye is actually 45 degrees. I'll be posting a separate thread on my 3d printed wye experimentation with all kinds of sweet juicy wizard action.


  • 0

#14 Silly

Silly

    Member

  • Members
  • 245 posts

Posted 01 September 2023 - 01:26 PM

For those who are searching, I believe the correct extension spring spec (from the now offline ESLT 1.5 Hardware list) is "9432K125.ExtensionSpring" 9432K125 from McMaster.


https://www.mcmaster.com/9432K125/


  • 0

Co-Owner of the History of Nerf Modding research project, moderator of r/Nerf, owner of BlasterWiki, maker of 3d printed blasters (GitHub/Thingi) and Nerfy art.


Also tagged with one or more of these keywords: homemade, writeup, bullpup, 3D printing, spring, bungee

1 user(s) are reading this topic

0 members, 1 guests, 0 anonymous users