Jump to content


Photo

Coop's Stryfe Modification Write-Up

"The Strayven"

29 replies to this topic

#1 Coop

Coop

    #sogoodmuchtacticswowinit2winit360noscopehax0rleetbeastmodeactiv

  • Members
  • 775 posts

Posted 06 March 2013 - 04:36 PM

Coop's Stryfe Modification Write Up - “The Strayven”

Table of Contents:
Tools Needed
Materials Needed
Stryfe Modification
Rayven Shell Integration
Strongarm Modification
Retaliator Barrel Modification
Strongarm/Retaliator Integration

What this write-up will lead to:
Posted Image

Tools and Materials Needed (expand)
Spoiler


--------------------------------------------------------
Stryfe Modifications:

I have another Stryfe write up here if you'd like to check that prior to reading this write up.

Stock Stryfe
Posted Image

Open the Stryfe
Posted Image

First I'll cover where some of the internal locks are and what they do. I don't think the primary components require pointing out, so I stuck with the smaller items some newer guys may be confused by.

Mechanical Stuff
Posted Image

1) Magazine release - This holds the magazine in place while firing. I wouldn't suggest taking this one out.
2) Dart lock - This lock prevents you from pulling the trigger if there is not a dart loaded in a magazine. This component slows the max ROF down a little bit by locking up under fast firing. I would definitely suggest taking it out. You can just pull it out, it takes less than 2 seconds and is nearly impossible to fuck up.
3) Magazine lock - While this isn't a mechanical lock, it's a physical piece that interacts with an electronic lock. This piece is pressed in from a magazine and closes your circuit by pressing a switch located under the little orange plate. Note: if you just remove this lock and don't rewire the circuit, your switch will always be open and not allow the blaster to fire.
4) Trigger lock - This is a lock preventing you from pulling the trigger if you are not revving the motors. This is is to prevent you from pushing a dart into the fly wheels while they are not spinning. If you're a retard, you may need to keep this lock in place to prevent jams. But if you don't pull the trigger for the LOLs while you're playing, you should be fine to take it out.

Electrical Stuff
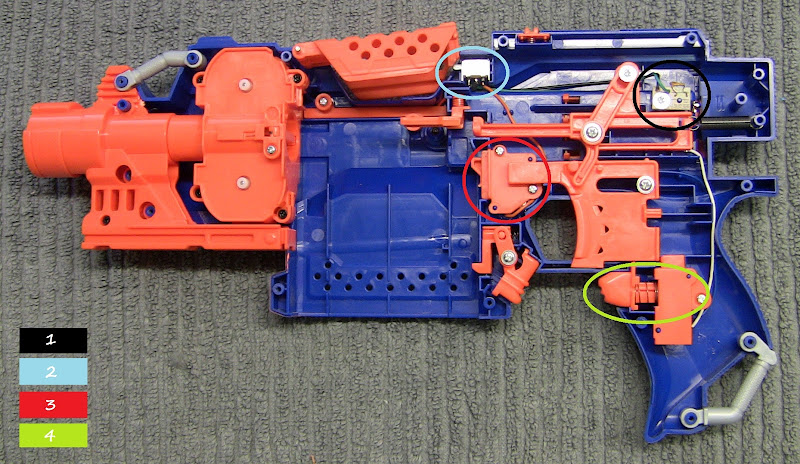
Posted Image

1) Thermistor - this will shut down your circuit if there is too much power introduced. This little bastard is what will disable your Stryfe if you try to use four UltraFires with it out of the box.
2) Access door lock - This switch/lock will prevent you from revving the motors if the access door is not shut. This is to prevent kids from sticking their fingers into the flywheels while they're spinning.
3) Magazine lock - This switch is closed when a magazine is in the magazine well which bumps into the orange piece of plastic covering it. This switch will not allow you to rev the motors unless a magazine is in place.
4) Primary switch - This is what allows you to activate your motors at will. I wouldn't suggest taking this one out or your blaster will be revving all the time. While that would be nice since you'll always be ready - you'll be really fucking loud and your batteries will die pretty fast.

Okay, now that you know what all these things are, let's take some shit out! You can remove the dart lock, magazine lock, trigger lock, access door lock, and the thermistor unit. All of these components are rather easy to get out. I also have a tutorial here in case you need more pictures/details. Here is the shit you don't need.
Posted Image

Now remove the four screws holding in your flywheel unit. Pull it out, this is what it should look like.
Posted Image

I have tried numerous motor replacements and have tried to find ways to increase traction on the flywheels, but I am not satisfied with anything to the point of adding it to this tutorial. So we're just modifying the stuff that is already in the blaster rather than replacing it. So, cut off the resistors attached to the motors.
Posted Image

Now solder on fresh wires in the same configuration minus the resistors.
Posted Image

Be sure to cut the wires long enough to reach back to the battery tray. I usually cut a few extra inches just to be sure. Re-install the flywheel unit and rewire the blaster. Remember that you just took out a lot of electrical shit that you don't need. So, you don't need to take the same wiring route that was originally there. Copy my wiring if you don't know what you're doing. Red is positive, green is negative. (I was out of black wiring). Keep in mind, this photo shows the wiring for the DIY Firefly tech lighting as well. Also, I added an extra switch for the Stryfe under the carry handle to prevent myself from bumping my motor rev switch when I'm not playing.
Posted Image

This trigger modification will allow you to fully pull the trigger without activating the motors at the very end of the pull. It's not a big deal to have the motors rev, but I find it annoying.

Before
Posted Image

Now cut along the bottom of the trigger to prevent the plastic from pressing the little catch on the switch button. I used a dremel with a cutting wheel but you could probably manage it with scissors (LOL)

After
Posted Image

Lubricating the Stryfe trigger will make it way more comfortable to fire. I used white lithium grease which can be found at most hardware stores. It's mad cheap so feel free to go ape shit with the lubrication. Keep in mind, lube harms paint jobs so be conservative if you're painting or have painted the blaster.

Stock
Posted Image

Apply generous amount of lube
Posted Image

Lube on the area where the screw contacts also makes the trigger pull smoother. After it's applied, pull the trigger a few times to make sure it spreads all over the major contact points.
Posted Image

Also, lube the area that the trigger contacts as well. Be careful around the trigger guard or it will spill outside and ruin your paint over time.
Posted Image

--------------------------------------------------------
DIY Firefly Technology!

I like using the glow in the dark darts but I don't like the added bulk or weight (from the batteries) of using the special magazines. So, I added LEDs to the inside of the magazine well. Now you can load the glow darts into standard magazines and get them to glow.

These are not special LEDs or anything and they don't have to be. They are blue in color because that's what worked the best in my testing. I purchased these LEDs from superbrightleds.com

I'm aware this post was published prior to my thread, but I've been chatting with people about doing this for months. I did not copy that thread, but I feel it would be tacky to not mention it and pretend that I stole the idea.

The LEDs will go here. The more LEDs you use, the better your darts will glow. A slower rate of fire will also make the darts glow better because they'll be exposed to the light for a little longer.
Posted Image

Now just hot glued them into place. This isn't the cleanest way to do it, but the Stryfe magazine well is super wide and there is plenty of space for the wiring and glue.
Posted Image

I put my batteries in the back of the shell. I'm running two AA batteries without a resistor because my LED specs will allow it. I also put a switch below the carry handle to turn them on and off. I didn't want to post too many photos of that because many users will like a different battery or switch location.
Posted Image

Glow, bitch. GLOW!
Posted Image

Now reassemble and check your wiring. The Stryfe is now done.
Posted Image
--------------------------------------------------------
Rayven Shell Integration

Stock Rayven
Posted Image

Open the Rayven and clear everything out. You only need to keep the magazine catch, magazine well liner, and access door. The other components can be trashed or kept for future projects.
Posted Image

Cut along these lines.
Posted Image

So it looks like this.
Posted Image

You don't actually need to cut the Stryfe at all. Test fit the components and sand/dremel any pieces to get a snug fit.
Posted Image

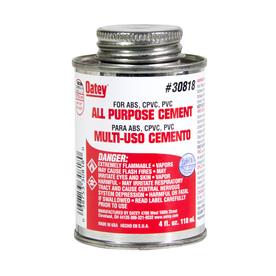
Now sand both mating surfaces and apply your adhesive of choice. I used an all purpose cement which bonds plastics very well. This is just the initial bonding, it doesn't have to be mad strong or anything. Just be sure the parts stay together while adding the other adhesives.
Posted Image

Some areas are very large and difficult to apply epoxy putty. It would be a waste of putty to fill these areas. So get thin plastic sheeting or a notebook like this one for its cover.
Posted Image

Cut the plastic or notebook cover and hot glue these pieces into the large gaps. The purpose of these pieces is to lessen the area where the epoxy putty has to fill. This will make sure the putty doesn't deform, cave in, and grow weak over time, too.
Posted Image

After the sheeting is in place, cover the shell gaps with epoxy putty and sand smooth.
Posted Image

Edited by Coop, 06 March 2013 - 04:44 PM.

  • 0

On the other hand, the guy who posted before me used the word 'fuck' a lot so he probably knows what he's talking about.


#2 Coop

Coop

    #sogoodmuchtacticswowinit2winit360noscopehax0rleetbeastmodeactiv

  • Members
  • 775 posts

Posted 06 March 2013 - 04:38 PM

Posted Image

I also used Gorilla Glue on the inside of the shells to make the bond even stronger. This glue is super messy but quite strong. I would not suggest using it on the outside of the blaster because of its messy and unpredictable nature.
Posted Image

There are a few reasons for the Rayven integration. First, it looks fucking sweet. Second, it is a great way to add extra interior shell space for the addition of batteries or circuit boards (ammo counter may go in this blaster in the future). Third, it has an extra magazine slot which doesn't get in the way while not in use. Why don't I just use a Rayven and not a Stryfe at all? Well, I like the Stryfe more. The trigger pull it smoother, its flywheels are stronger, and it doesn't have the fake barrel inside restricting range.

The idea to integrate a Rayven shell into a Stryfe originated in a Skype call with Ice. We were joking around about silly integration and he mentioned it. I originally discarded the idea, but later decided to try it. I'm glad I did.

--------------------------------------------------------
Strongarm Modification

Stock Strongarm
Posted Image

Open the blaster
Posted Image

Take note of the orientation of the catch/priming indicator piece here. It doesn't like to stay in place.
Posted Image

This entire unit can be pulled out of the shell very easily. After it's out, work the plunger tube out of the assembly and remove the plunger rod and spring.
Posted Image

Boil water over your stove and dip the front of the plunger tube into the water. Do this in short (5-10 second) bursts a few times until you can work the assembly apart. I've had many reports of people melting their plunger tubes when trying this. Don't be a fucking idiot and leave the assembly in the boiling water for too long. This component won't just fall apart after the glue is broken, it will still need to be coerced. (I'm aware the water isn't actually boiling in the photo)
Posted Image

When it comes apart, this is what should be included
Posted Image

You can now take the air restrictor and spring out and throw them in the trash. Now glue the plunger tube cap back into place. If you just pressure fit it, you'll likely be losing air.
Posted Image

There is also a small air release hole located here. Cover it will glue to prevent air loss.
Posted Image

There is additional shit in the plunger tube that could be removed. However, I don't believe it's restricting that much air and its job is to stop the plunger head. So, removing it would likely lead to the breaking of the plunger tube after harsh or extended use.
Posted Image

The cylinder can be removed from the blaster in a similar manner to a Maverick cylinder. It will look like this.
Posted Image

Now, take clippers and clip out the barrel posts. After they're clipped, get a file, sand paper, or a Dremel and make the holes smooth. Removing the barrel posts doesn't increase range, but it allows you to use non-Elite darts which makes the Strongarm more versatile.
Posted Image

----------------------------------------------
Modifying the Retaliator Barrel

This Retaliator barrel modification can be done before or after the Strongarm integration, but I suggest doing it before so it's easier to work with. This is a stock Retaliator barrel
Posted Image

Open it.
Posted Image

Now cut out the shit that holds the thin orange barrel in place. This barrel extension sucks because it reduces range of anything it's attached to by about 10-15 feet. This is due to the dart bouncing around in the barrel and losing its energy.
Posted Image

Get a piece of thinwall 3/4” PVC and cut it to length.
Posted Image

3/4” thinwall PVC is way bigger than the stock barrel.
Posted Image

Wrap duct tape around it and put it into the barrel. It doesn't need to be glued because there is very little stress on this part and it doesn't need to maintain an air seal.
Posted Image

Remember to set the spacing to allow the Stryfe muzzle to enter from the rear (giggity).
Posted Image

The front cap also needs to be cut here in order to not negate the work we've just done. (I'm really good at drawing with permanent markers, as you can see)
Posted Image

----------------------------------------------
Integrating the Strongarm into the Retaliator Barrel

Cut the shell along these lines
Posted Image

It should look something like this
Posted Image

There is also a small nub in the front of the Strongarm. I suggest sanding it down to make sure your shell mating is level.
Posted Image

Test fit
Posted Image

Glue the Strongarm to the Retaliator barrel. I used an all purpose cement for the initial bond, then added hot glue and a bit of liquid epoxy after that was dry. The rubber bands helps it stay in place while it's drying.
Posted Image

I also added two tubes (5/8” OD - 1/2” ID) along the sides. This gives additional surface area for the adhesive to stick to, but it also makes the bond look a little smoother after painting. I wouldn't normally use clear stuff since it's being painted, but this was laying around and I didn't have CPVC.
Posted Image

The trigger should also be cut down in order for it to still be functional. You can remove the trigger entirely and glue the extension arm in the blaster, but I want to keep the option of a functional trigger.
Posted Image

Also, drill a hole in the trigger to allow a zip tie to be attached. You can just let the zip tie rest on the outside, but the slant of the trigger may lead to it slipping off under extreme movement or vibration.
Posted Image

Cut the slide along this line. This is to prevent it from ramming into a magazine when it's attached to the Stryfe.
Posted Image

Edited by Coop, 07 March 2013 - 07:40 AM.

  • 0

On the other hand, the guy who posted before me used the word 'fuck' a lot so he probably knows what he's talking about.


#3 Coop

Coop

    #sogoodmuchtacticswowinit2winit360noscopehax0rleetbeastmodeactiv

  • Members
  • 775 posts

Posted 06 March 2013 - 04:40 PM

It should end up like this
Posted Image

Now reassemble.
Posted Image

All done
Posted Image

You can put a zip tie on the Strongarm trigger to make the blaster fire right when you pull the slide back. This is much faster than using the normal trigger system.
Posted Image

Now put the Strongarm attachment onto the Stryfe and go diddle some noobs.
Posted Image

Posted Image

YouTube video
http://www.youtube.com/watch?v=YO7KKjhF1mc
----------------------------------------------

Thread Notes:

This write up was written using a few different blasters and is not in the actual order that I did these modifications. I worked on parts when other parts were drying or not available so it may be a bit hard to follow or not be in the most logical order. If you have a suggestion on formatting or the order of modifications, I'll definitely edit the post if I agree with your suggestion.

I obviously painted the blaster but this write up won't be covering how I did that. There are other painting tutorials on Nerf Haven that you can view if you want to paint your shit. This write up was just covering the modifications. I did many modifications (Stryfe wiring, Firefly tech mod, and lubrication) after the paint job because it's much easier to do it that way.

Questions and comments are welcome.

Edited by Coop, 08 March 2013 - 05:22 PM.

  • 0

On the other hand, the guy who posted before me used the word 'fuck' a lot so he probably knows what he's talking about.


#4 Mully

Mully

    Member

  • Members
  • 342 posts

Posted 06 March 2013 - 05:13 PM

This is incredible, excellent write up.
What kind of cement did you use?

Edited by Mully, 06 March 2013 - 05:13 PM.

  • 0
S.C.U.N.

#5 Atlantis Risen

Atlantis Risen

    Member

  • Members
  • 9 posts

Posted 06 March 2013 - 05:15 PM

That's amazing work and a great write-up. Thanks Coop!
  • 0

#6 Defender 7

Defender 7

    Member

  • Members
  • 128 posts

Posted 06 March 2013 - 05:44 PM

Wow! very impressive! Does the Rayven still hold clips? For like a clip holder?
  • 0
I like bacon.

#7 Coop

Coop

    #sogoodmuchtacticswowinit2winit360noscopehax0rleetbeastmodeactiv

  • Members
  • 775 posts

Posted 06 March 2013 - 05:49 PM

What kind of cement did you use?

I used this (not my image)
Posted Image


Does the Rayven still hold clips? For like a clip holder?

Yes, that was the purpose of choosing this shell. I'll upload a photo with a magazine in the back later.
  • 0

On the other hand, the guy who posted before me used the word 'fuck' a lot so he probably knows what he's talking about.


#8 Goldie

Goldie

    Member

  • Members
  • 62 posts

Posted 06 March 2013 - 06:20 PM

TL;DR

This is dope,end of story.

Glad to see something that's not a rehash of old idea's.
  • 0

Longshots are terribad and you should feel bad.
Crossbow shells suck and your mom sucks.


S.C.U.N.

#9 Soothsayer

Soothsayer

    Member

  • Members
  • 663 posts

Posted 06 March 2013 - 07:00 PM

After checking this out, and remembering you had a youtube thing and looking that up. I checked some of your other work out man, and it's been years since I've been on your youtube, and I gotta say, nice stuff. I've never been into more kinda "indoor" blasters, but the way you combine these things together is rad as fuck.
  • 0

yeah I'm that guy who made that cool thing with the cool paint.


#10 Alfatrooper

Alfatrooper

    Member

  • Members
  • 93 posts

Posted 06 March 2013 - 08:23 PM

Great job coop. What are the ranges? Are the LEDs you put in brighter than the stock lights, if so are they still bright enough through the jamdoor? When a clip is in whats the clearance between it and the wires? Great job again can't wait for the video.
  • 0

 See you on the field, Alfatrooper                                                                                             My YouTube


#11 Coop

Coop

    #sogoodmuchtacticswowinit2winit360noscopehax0rleetbeastmodeactiv

  • Members
  • 775 posts

Posted 06 March 2013 - 10:04 PM

Does the Rayven still hold clips? For like a clip holder?

This is how I intend to use it for HvZ.
Posted Image

After checking this out, and remembering you had a youtube thing and looking that up. I checked some of your other work out man, and it's been years since I've been on your youtube, and I gotta say, nice stuff. I've never been into more kinda "indoor" blasters, but the way you combine these things together is rad as fuck.

Thanks, man. I hope to catch you at a Cinci war. Not sure when I'll make it down, but hopefully soon.


1) What are the ranges?
2) Are the LEDs you put in brighter than the stock lights, if so are they still bright enough through the jamdoor?
3) When a clip is in whats the clearance between it and the wires? Great job again can't wait for the video.

1) I'm gaining about 20' over the stock ranges for the Stryfe. This is mostly due to the voltage increase but the less restricted circuit is helping slightly. I'm barely gaining anything from the Strongarm with the AR removal. I haven't range tested (and doubt I ever will) but I'd estimate no more than 5' of gain. I'll be editing the thread in a few days with a firing video and such.
2) No, the LEDs aren't any brighter than the ones that come in the glow magazines. They are directional LEDs pointed towards the magazine, so the glow isn't really shining on the access door. There is plenty of space to add more LEDs pointed at the access door if you wanted, but the purpose of these LEDs was to shine at the darts.

Example
Posted Image

Lights off
Posted Image

3) There is actually a lot of clearance in the Stryfe's magazine well.
The blue rectangle shows the start of a huge slant in the magazine well. This huge change in width makes plenty of space for the wiring.
The yellow circle shows the only part you have to watch out for. The magazine can catch this area of wiring if it's not tucked in well enough. I suggest using hot glue or another adhesive to make sure the wires don't shift around from the vibration or blaster movement.
Posted Image
  • 0

On the other hand, the guy who posted before me used the word 'fuck' a lot so he probably knows what he's talking about.


#12 KeiichiRX7

KeiichiRX7

    Member

  • Members
  • 51 posts

Posted 07 March 2013 - 01:48 AM

Coop, I must tip my hard hat to you. When I started reading the only thought i had was "WHY!??!" then it started making sense. the gains from using the Rayven as a stock are far greater than using the Stampede, and i salute you, sir. A bit more elegant than my own mag holder stock solution too.

Edited by KeiichiRX7, 07 March 2013 - 01:51 AM.

  • 0
Capt Slug thinks this thread is idiotic. Why did any of you seriously reply to this?

Why so serious?

#13 HOTH

HOTH

    Member

  • DO NOT TRADE
  • 557 posts

Posted 07 March 2013 - 01:53 AM

I have tried numerous motor replacements and have tried to find ways to increase traction on the flywheels, but I am not satisfied with anything to the point of adding it to this tutorial.


Even the solarbotics RM2's? I was under the impression that people were getting great results with those things.
  • 0
My YouTube

Solved the Rubik's Cube in 46 seconds

"Nobody understands quantum mechanics" - Richard Feynman

#14 Zorns Lemma

Zorns Lemma

    Sir Scrt

  • Moderators
  • 1,277 posts

Posted 07 March 2013 - 02:15 AM

What's the point of cutting up a Rayven to attach another flywheel blaster to it? This isn't a flame as much as a genuine question. All the flywheel attention is centered on the Stryfe, so I'm wondering if the Rayven has ergonomic issues or is notoriously bad at misfiring.
  • 0
"In short, the same knowledge that underlies the ability to produce correct judgement is also the knowledge that underlies the ability to recognize correct judgement. To lack the former is to be deficient in the latter."
Kruger and Dunning (1999)

#15 Coop

Coop

    #sogoodmuchtacticswowinit2winit360noscopehax0rleetbeastmodeactiv

  • Members
  • 775 posts

Posted 07 March 2013 - 07:35 AM

Even the solarbotics RM2's? I was under the impression that people were getting great results with those things.

I did initially like them. But under constant firing they seem to bog down a bit more than the stock motors. They do give better ranges for the first few shots, but I was worried about them being damaged when I fired 18 shots very quickly. This isn't a concern for many people firing at regular rates of fire, but I plan to be spewing darts with this Stryfe.

What's the point of cutting up a Rayven to attach another flywheel blaster to it? This isn't a flame as much as a genuine question. All the flywheel attention is centered on the Stryfe, so I'm wondering if the Rayven has ergonomic issues or is notoriously bad at misfiring.

The Stryfe's trigger doesn't work on a wire system like the Rayven, so the trigger pull is way smoother and much more comfortable than the Rayven's. Also, the Stryfe's motors are straight up better than the Elite Rayven's. They shoot further and don't get bogged down nearly as much. Next, the Stryfe has its flywheels in the front of the blaster so it doesn't have the fake barrel. This barrel, even if replaced with thinwall PVC, will still lead to shorter ranges and worse accuracy than without it. Finally, I built this blaster to use at an HvZ event so I wanted to do something that looked cool.

Edited by Coop, 17 April 2014 - 11:12 PM.

  • 0

On the other hand, the guy who posted before me used the word 'fuck' a lot so he probably knows what he's talking about.


#16 Xellah

Xellah

    They call his chin.... Captain Underpants

  • Members
  • 178 posts

Posted 07 March 2013 - 08:22 AM

BAM, diddle.

When he initially spoke with me about this project I thought it might turn out like his Stryfe/Stampede. Pretty cool, but a lot of work for a neat looking blaster. This blaster has more utility and ergonomics than either individual blaster on their own.

The Rayven's trigger pull is terribad compared to the Stryfe, even more so when you lubricate the mech on the Stryfe's.

As another note, the cutting to fit the two blasters together is remarkably simple. I was amazed at how easily the two fit after Coop showed me his cuts. It's like they were almost meant to be fit together in this such way.
  • 0
Ultimator Duel

it cant be as bad as reloading an ak-47 on the run


#17 Daniel Beaver

Daniel Beaver

    HQRSE CQCK

  • Moderators
  • 2,099 posts

Posted 07 March 2013 - 09:08 AM

This is pretty rad, yo. Added to the general reference thread.
  • 0

#18 Ezio Nerf

Ezio Nerf

    Member

  • Members
  • 66 posts

Posted 07 March 2013 - 10:45 AM

Have you considered having the dart pass through both flywheels for better range? Or would that just might make it fish-tale even more? You could just run a barrel from flywheel to flywheel. But like I said, it might make it fish-tale more.... And I love the idea of integrating a LED to make the darts glow. That method could be used in a Vigolon or Diatron, (Or other Vortex Blasters), to make glow disks glow in those.
  • 0

#19 DartSlinger

DartSlinger

    Member

  • Members
  • 222 posts

Posted 07 March 2013 - 12:27 PM

Have you considered having the dart pass through both flywheels for better range? Or would that just might make it fish-tale even more? You could just run a barrel from flywheel to flywheel.

I'm pretty sure that that wouldn't increase your range at all.

Coop, do you glue each individual side of the shell onto each corresponding side of the integration? And if so, how do you get them to match up?

Edited by DartSlinger, 07 March 2013 - 12:27 PM.

  • 0

#20 Coop

Coop

    #sogoodmuchtacticswowinit2winit360noscopehax0rleetbeastmodeactiv

  • Members
  • 775 posts

Posted 07 March 2013 - 12:34 PM

Have you considered having the dart pass through both flywheels for better range?

I haven't actually tried it, but I doubt that would help the range. If the dart is moving fast into the second set of flywheels, that momentum probably wouldn't help because the flywheels will still need to grip the dart. So, I imagine the momentum wouldn't help at all. I haven't tried it though, so that's a theory.

Coop, do you glue each individual side of the shell onto each corresponding side of the integration? And if so, how do you get them to match up?

Yes, I glue the shells together so the two halves can still be split. I apply the adhesive on the halves so when I put them together, there isn't any over-spill over the seam. Making them match up is just making sure your cuts are accurate and being patient with the spacing.
  • 0

On the other hand, the guy who posted before me used the word 'fuck' a lot so he probably knows what he's talking about.


#21 The2ndBluesBro

The2ndBluesBro

    Member

  • Members
  • 576 posts

Posted 07 March 2013 - 02:00 PM

Does the solvent weld take forever to dry?
  • 0

Nerf, Gaming, knives: https://www.youtube....FjcObRZTl2KReDQ


#22 nutterbutter

nutterbutter

    Member

  • Members
  • 27 posts

Posted 07 March 2013 - 02:05 PM

This thing is cool as shit. I'm not an indoor player, but I would imagine this would hold its own very well. Any intention of eventually putting some different motors in? Also, is the Strongarm/barrel attachment removable? And a final question, how many hours do you think are into this? Including paint and what have you.
  • 0
Formerly known as Doubleshot

#23 HOTH

HOTH

    Member

  • DO NOT TRADE
  • 557 posts

Posted 07 March 2013 - 02:16 PM

Have you considered having the dart pass through both flywheels for better range? Or would that just might make it fish-tale even more? You could just run a barrel from flywheel to flywheel. But like I said, it might make it fish-tale more.... And I love the idea of integrating a LED to make the darts glow. That method could be used in a Vigolon or Diatron, (Or other Vortex Blasters), to make glow disks glow in those.


Well, I have done the dual flywheel idea. It works very well.
Here are some teaser pictures. A write up for this is coming tomorrow.

Posted Image

Posted Image

Posted Image

I can understand why you may feel that this provides no foreseeable advantage. What truly gives this method power is acceleration. The motors are wired in series, with the second set first. This means batteries are used up at a slower rate and that the first set moves slightly slower. The dart accelerates though the barrel.

I have not experienced fish tailing, and vastly outperforms my other stryfe with one set of the same motors.

Edited by HOTH, 07 March 2013 - 02:31 PM.

  • 0
My YouTube

Solved the Rubik's Cube in 46 seconds

"Nobody understands quantum mechanics" - Richard Feynman

#24 Coop

Coop

    #sogoodmuchtacticswowinit2winit360noscopehax0rleetbeastmodeactiv

  • Members
  • 775 posts

Posted 07 March 2013 - 06:16 PM

Does the solvent weld take forever to dry?

It takes a few minutes to dry and a few hours to cure. I usually hold the pieces together for a few minutes then leave them untouched for at least 12 hours to make sure the bond is strong.

This thing is cool as shit. I'm not an indoor player, but I would imagine this would hold its own very well. Any intention of eventually putting some different motors in? Also, is the Strongarm/barrel attachment removable? And a final question, how many hours do you think are into this? Including paint and what have you.

Yes, the barrel attachment is still removable. It attaches and detaches just as fast as it did without the Strongarm attached.
  • 0

On the other hand, the guy who posted before me used the word 'fuck' a lot so he probably knows what he's talking about.


#25 Jeo

Jeo

    Red Team: HooRah!

  • Members
  • 93 posts

Posted 07 March 2013 - 10:05 PM

The Stryfe's trigger doesn't work on a wire system like the Rayven, so the trigger pull is way smoother and much more comfortable than the Rayven's. Also, the Stryfe's motors are straight up better than the Elite Rayven's. They shoot further and don't get bogged down nearly as much. Next, the Stryfe has its flywheels in the front of the blaster so it doesn't have the fake barrel. This barrel, even if replaced with thinwall PVC, will still lead to shorter ranges and worse accuracy than without it. Finally, I built this blaster to use at an HvZ event so I wanted to do something that looked cool.


All solid reasons. Well done Coop!
  • 0


1 user(s) are reading this topic

0 members, 1 guests, 0 anonymous users