Jump to content


Photo

Air Tank Reinforcement

Reinforcement - how to method.

16 replies to this topic

#1 makeitgo

makeitgo

    Member

  • Members
  • 216 posts

Posted 16 May 2012 - 01:50 AM

This idea was originally inspired by xxSlimxx's Titan Strike. I've gone on to apply this method to most of my air blasters that involve having a plugged pump. (AT2K, AT3K, SM1500 etc.)

Most tank reinforcements/repairs that I've seen, involve using PVC end caps or the like. The only
problem with this is being able to find an end cap that will fit. Especially if your tank is an irregular shape.
Although the tank in this write up (SM3K) would be relatively easy to find an end cap for, I wanted to illustrate a method that could be applied to virtually any air tank.

Posted Image

This occurred at roughly 3.5 pumps (stock pump, plugged).

Posted Image

Posted Image

Posted Image

Posted Image

Posted Image

Posted Image

Posted Image

Posted Image

Posted Image

Posted Image

Posted Image

Posted Image

Posted Image

Posted Image

I've tested my reinforced tanks against my equivalent non-reinforced tanks and can say that they can handle at least twice the psi.

I'ved pumped my reinforced SM1500 tank up to 90 PSI with no sign of rupturing, where as my non-reinforced tank blew after a few shots at 45 psi. My AT3K is more than adequate at 45 psi but I've had it up to 80 psi without incident.

The SM3k tank above, could only take a maximum of 4 pumps before. Now it takes 8 pumps, no problem. It could probably handle 10 but I'll keep it at 8 just to be safe.
  • 0
"...he is one speedy bastard." ~ Cheyner

#2 Nerfomania

Nerfomania

    Member

  • Members
  • 207 posts

Posted 16 May 2012 - 02:14 AM

This is quite the nice solution. Great job!

I assume this is pretty much for from-scratch integrations? Otherwise you would have to do some shell mods :).

Overall I like it a lot, I have had to throw a tank out because of this before!

Edited by _Nerfomania_, 16 May 2012 - 02:15 AM.

  • 0
20:45 Talio I'll have the talk with you
20:45 Talio penis in vagina
20:45 Talio fin

#3 Pause

Pause

    Member

  • Members
  • 107 posts

Posted 16 May 2012 - 03:40 AM

Amazing as always MIG. I am definitely doing this to my 3k tank. We should call this the "Mummy Reinforcement"! :lol:

Just a small question, how do you connect the tubing to the tank in the write up, seeing as you cut off the port?

Edited by Pause, 16 May 2012 - 03:43 AM.

  • 0
-Pause-

http://nerfpause.blogspot.com/

'Daniel Beaver', on 24 Oct 2012 - 6:56 PM, said:

Heh.

USER WAS BLAND IN THIS POST


#4 makeitgo

makeitgo

    Member

  • Members
  • 216 posts

Posted 16 May 2012 - 06:45 AM

'_Nerfomania_', on 16 May 2012 - 07:14 AM, said:

Overall I like it a lot, I have had to throw a tank out because of this before!


I've been doing this for a while now but it was actually your video on the AT4K which inspired me to create this write up. Part of my "secret sauce" as some might say.


'Pause', on 16 May 2012 - 08:40 AM, said:

We should call this the "Mummy Reinforcement"! :lol:

Just a small question, how do you connect the tubing to the tank in the write up, seeing as you cut off the port?


"Mummy-Forcement". I like it!

I never use the stock 1/4" port on my air tanks. I find that the smaller inner diameter isn't very efficient. Instead of using the normal 1/4" vinyl tubing, I use 3/8" vinyl tubing. Since I have to Dremel a hole big enough to accommodate the larger tubing, I 'mummify' the entire tank and place the tubing wherever I need to. It really helps in those tight spaces.

Plus, the larger vinyl tubbing also performs like an tank expansion and mini CPS (constant pressure system). ...More secret sauce....

Edited by makeitgo, 16 May 2012 - 07:01 AM.

  • 0
"...he is one speedy bastard." ~ Cheyner

#5 evilbunnyo

evilbunnyo

    Member

  • Members
  • 404 posts

Posted 16 May 2012 - 06:58 AM

That looks great. How does the size change. In a shell where the tank is already squeezed to the bone how much room does this then need. Is it like 1/2inch 1/4?
  • 0
Silence is golden but duct tape is silver

#6 makeitgo

makeitgo

    Member

  • Members
  • 216 posts

Posted 16 May 2012 - 07:15 AM

'evilbunnyo', on 16 May 2012 - 11:58 AM, said:

That looks great. How does the size change. In a shell where the tank is already squeezed to the bone how much room does this then need. Is it like 1/2inch 1/4?


It really depends on how many layers you choose to use. In the example I showed, I would say rougly 1/8" to 3/16" all the way around.

Edited by makeitgo, 16 May 2012 - 09:47 AM.

  • 0
"...he is one speedy bastard." ~ Cheyner

#7 evilbunnyo

evilbunnyo

    Member

  • Members
  • 404 posts

Posted 16 May 2012 - 07:20 AM

'makeitgo', on 16 May 2012 - 12:15 PM, said:

It really depends on how many layers you choose to use. In the example I showed, I would saw rougly 1/8" to 3/16" all the way around.


That's great I was expecting after the epoxy it would be more but ill have to trythis now.
  • 0
Silence is golden but duct tape is silver

#8 Acerised

Acerised

    Member

  • Members
  • 21 posts

Posted 16 May 2012 - 07:53 AM

WOW I just love the ideas and work you come up with MIG!

Ill be definitely be doing this in the future.

Good job, Keep it up!
  • 0

#9 taerKitty

taerKitty

    Member

  • Members
  • 883 posts

Posted 16 May 2012 - 08:00 AM

Fantastic job (yawn, as usual.) Kidding, dude. It's really well-thought-out, and I love the use of something common for this.

Question - do you have a picture of a tank with your MiG-approved 3/8" tubing attached? I don't run my tanks at very high pressures, but I do have hella problems with leaks at the joints and attachment points.
  • 0
Fugly is a feature.

#10 Guitarzan

Guitarzan

    Member

  • Members
  • 133 posts

Posted 16 May 2012 - 08:35 AM

nice job man! Just so I can get a frame of reference, what are the normal operating pressures for like a at3k tank and a sm1500 tank? I know you mentioned they rupture pretty quickly at 45 psi, but I'm trying to guage whether or not to do this to my airguns if they'll last just fine on say 30 psi and still get great ranges.
  • 0

#11 hamoidar

hamoidar

    Member

  • Members
  • 367 posts

Posted 16 May 2012 - 09:56 AM

Have you tried to do this without the mesh, just the epoxy? I know the mesh/epoxy combo is to replicate high pressure air tubing, but do you think you could you use a hard-setting epoxy, like JB weld, without the mesh?
  • 0
NerfHaven > Your control panel > Profile > Change Signature > Inserts dumb sig > What! No pictures! > Inserts next best thing: http://nerfhaven.com...howuser=114052' class='bbc_url' title='External link' rel='nofollow external'>Best thing on Nerfhaven!

#12 NerfNoob10

NerfNoob10

    Member

  • Members
  • 121 posts

Posted 16 May 2012 - 10:43 AM

'taerKitty', on 16 May 2012 - 1:00 PM, said:

Question - do you have a picture of a tank with your MiG-approved 3/8" tubing attached? I don't run my tanks at very high pressures, but I do have hella problems with leaks at the joints and attachment points.


I too would like to see this since I'm trying to replicate your hypermax1500 but with a spare AT2K tank I have. I will most likely try your tank reinforcement now, but would like to see how you attach the tubing.
  • 0

#13 Daniel Beaver

Daniel Beaver

    HQRSE CQCK

  • Moderators
  • 2,099 posts

Posted 16 May 2012 - 12:14 PM

I'm curious as to whether anyone has suggestions for applying this sort of reinforcement to tanks while still maintaining their dimensions enough to fit into the original blaster. I would like to do something like this for my SM1500 (their tanks are prone to rupturing), but it needs to actually fit back into the gun.

Hamoidar: I would be willing to bet that the epoxy by itself is "enough", but the webbing certainly adds a lot of strength. It distributes the stresses more evenly throughout the mesh/resin composite, and so it is less likely to develop cracks.

Edited by Daniel Beaver, 16 May 2012 - 12:17 PM.

  • 0

#14 makeitgo

makeitgo

    Member

  • Members
  • 216 posts

Posted 16 May 2012 - 12:40 PM

'taerKitty', on 16 May 2012 - 1:00 PM, said:

Question - do you have a picture of a tank with your MiG-approved 3/8" tubing attached? I don't run my tanks at very high pressures, but I do have hella problems with leaks at the joints and attachment points.


'NerfNoob10', on 16 May 2012 - 3:43 PM, said:

I too would like to see this since I'm trying to replicate your hypermax1500 but with a spare AT2K tank I have. I will most likely try your tank reinforcement now, but would like to see how you attach the tubing.


I knew this would be the next topic of interest. ..Coming soon.


'Guitarzan', on 16 May 2012 - 1:35 PM, said:

nice job man! Just so I can get a frame of reference, what are the normal operating pressures for like a at3k tank and a sm1500 tank? I know you mentioned they rupture pretty quickly at 45 psi, but I'm trying to guage whether or not to do this to my airguns if they'll last just fine on say 30 psi and still get great ranges.


In most cases, people will say that 30psi to 35psi is enough for AT2K's, SM1500's and AT3K's (plugged pumps), which is true, but that usually only gets you 80' to 90' ranges. 30psi to 35psi is safe for the tank and will ensure the longevity of your tank. However, in practice EVERYONE tries to get in that last extra pump which usually pushes it to 40psi/45psi. This is great for getting 110' foot ranges (or more) but will eventually rupture most air tanks in a relatively short amount of time. Let's say 3 or 4 wars of heavy use max.

This mod does not make the tank(s) indestructible but at least allows for greater longevity with that extra pump at 45psi to 50psi giving you the desired century range status.


'hamoidar', on 16 May 2012 - 2:56 PM, said:

Have you tried to do this without the mesh, just the epoxy? I know the mesh/epoxy combo is to replicate high pressure air tubing, but do you think you could you use a hard-setting epoxy, like JB weld, without the mesh?


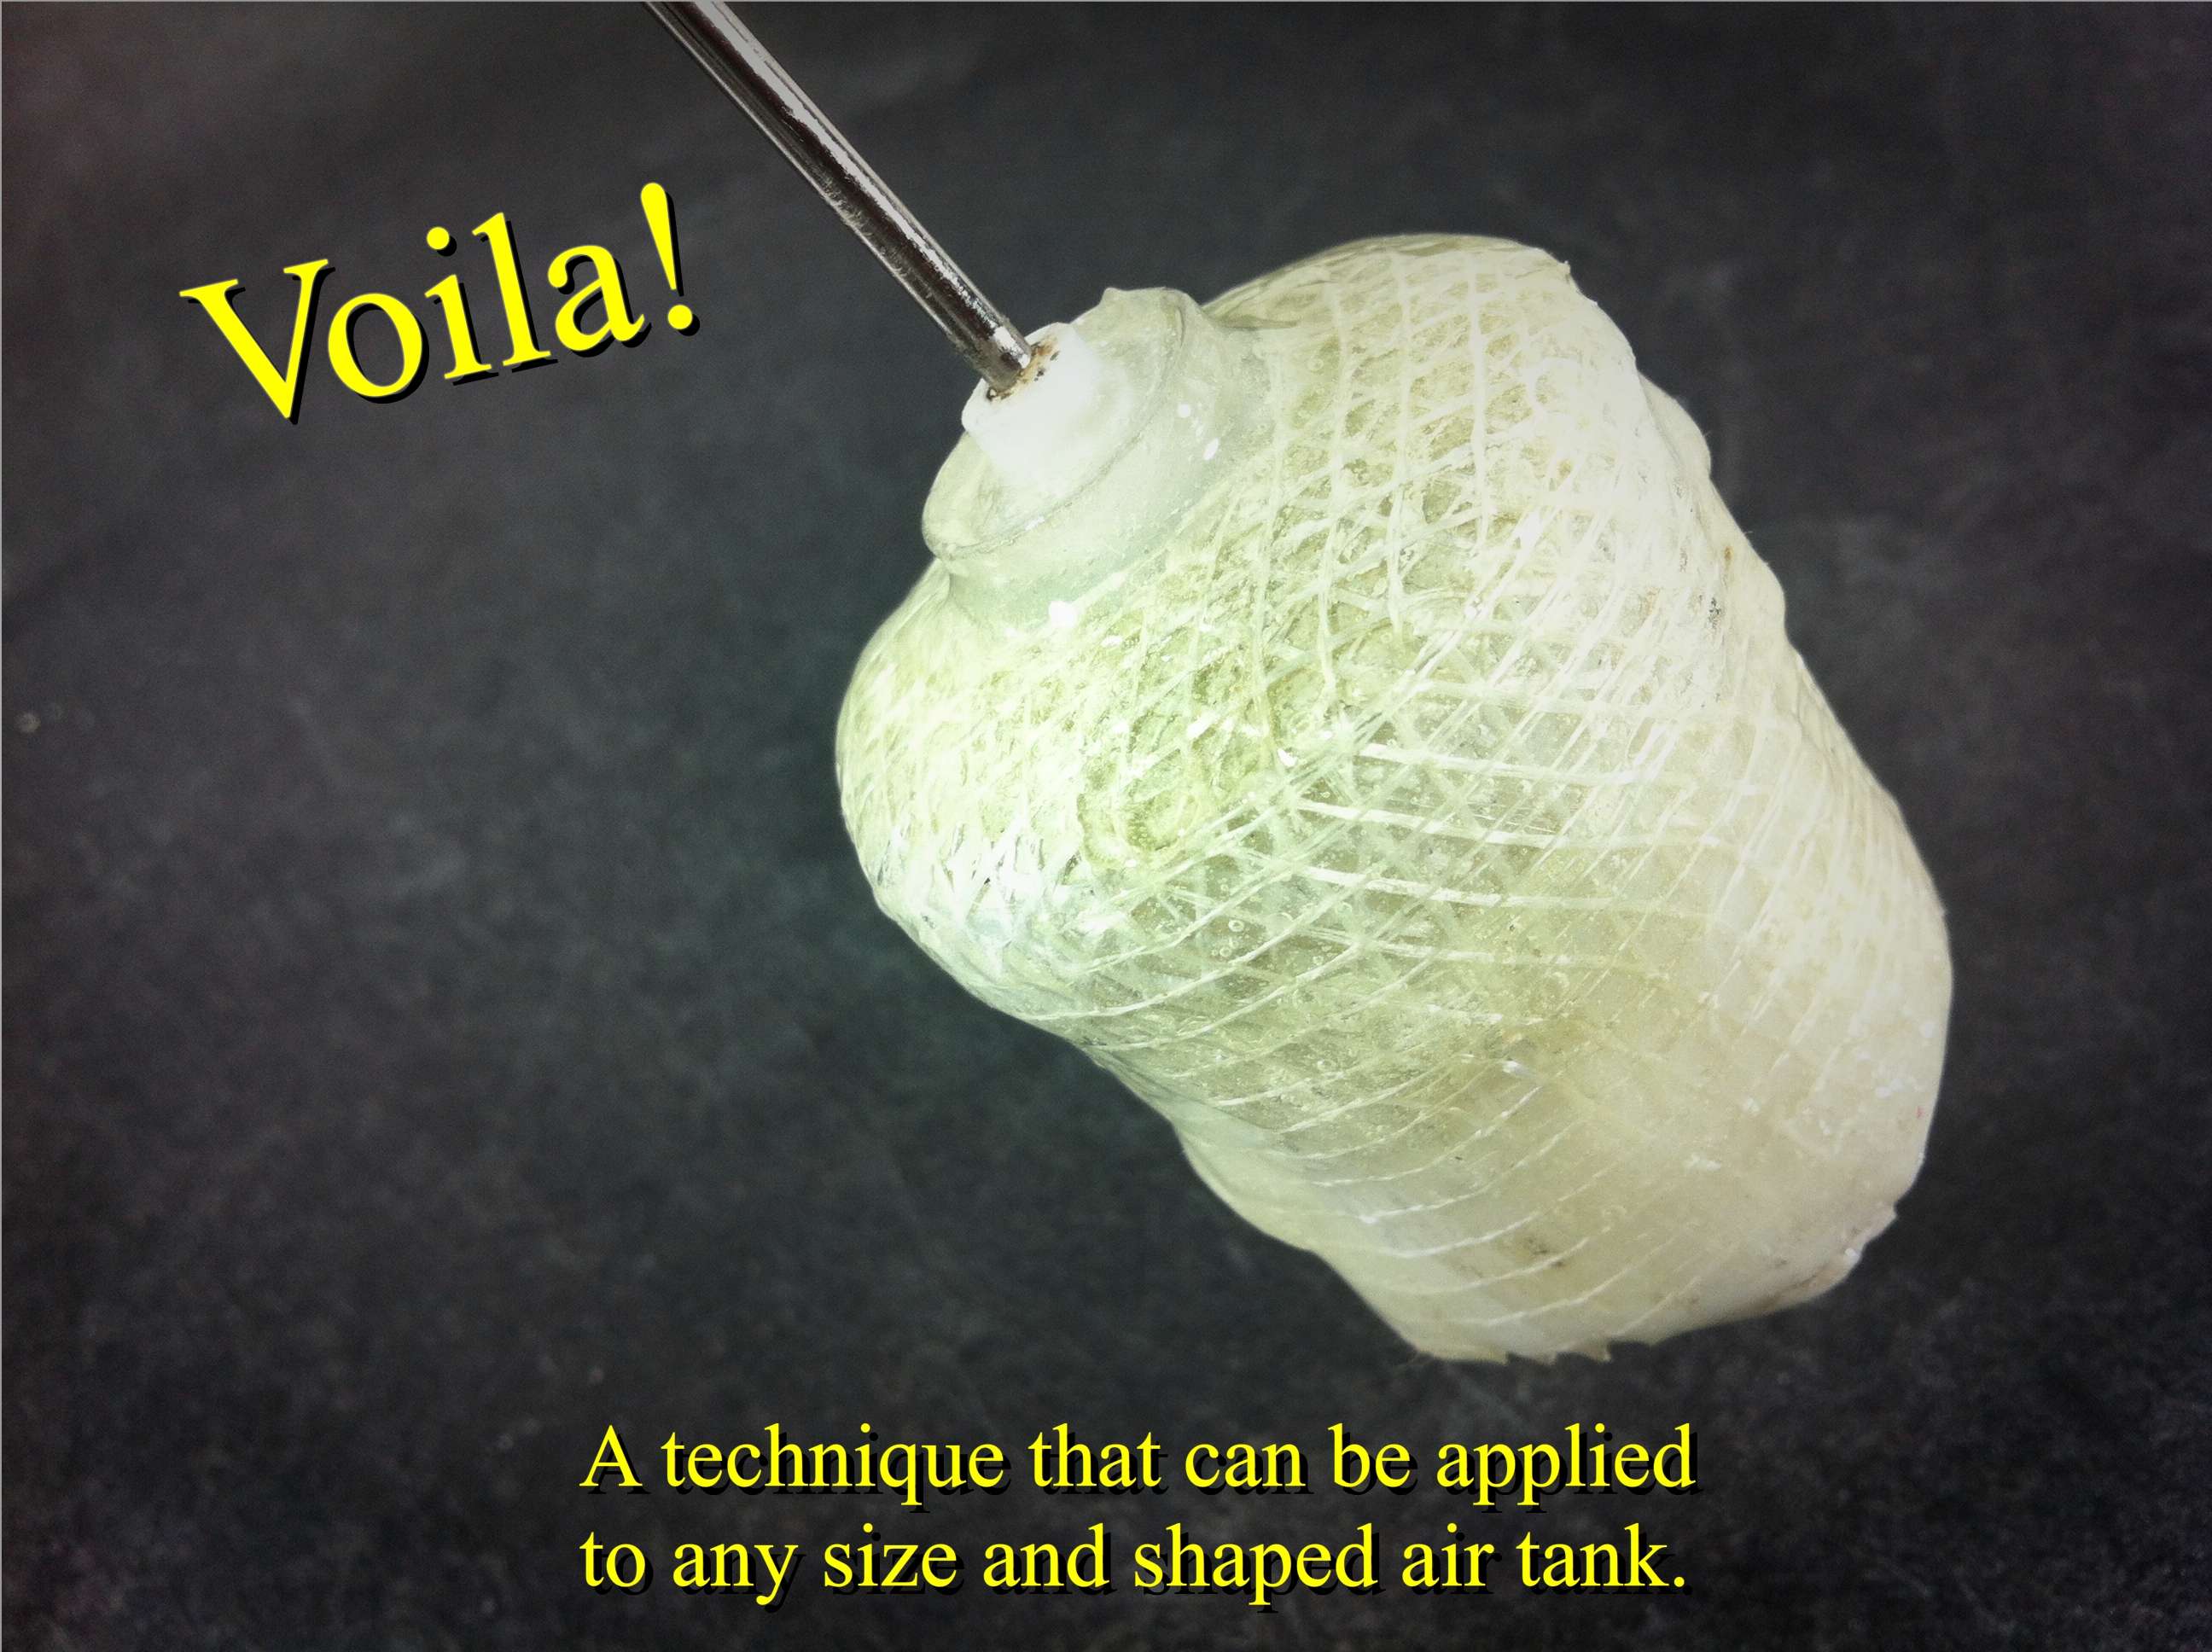
I have tried this and I don't recommend it. The epoxy resin isn't strong enough on its own unless you plan to make it really, really thick. I would assume the same is true for JB weld. The mesh is actually weaved nylon thread. Much like fiberglass and carbon fiber, combined with Resin, creates a much stronger and efficient composite.

The other issue is the 'shrapnel' danger. The epoxy resin alone is pretty much thick plastic. If the tank were to blow the pieces would fly off at high velocity flinging shards of sharp plastic everywhere. The mesh, along with giving it strength, also acts much like safety glass. If the tank were to rupture with the mesh in place, the risk of shrapnel would be greatly reduced. The nylon fibers would cling to the epoxy shards.

Edited by makeitgo, 16 May 2012 - 02:39 PM.

  • 0
"...he is one speedy bastard." ~ Cheyner

#15 Guitarzan

Guitarzan

    Member

  • Members
  • 133 posts

Posted 16 May 2012 - 09:13 PM

MIG thanks for answering my question man, that helps alot. I'd love to see how you fit these tanks back into some of your blasters. At this point im strongly considering doing this to my 3k and my sm1.5k.

Edited by Guitarzan, 16 May 2012 - 09:14 PM.

  • 0

#16 makeitgo

makeitgo

    Member

  • Members
  • 216 posts

Posted 16 May 2012 - 10:50 PM

'Daniel Beaver', on 16 May 2012 - 5:14 PM, said:

I'm curious as to whether anyone has suggestions for applying this sort of reinforcement to tanks while still maintaining their dimensions enough to fit into the original blaster. I would like to do something like this for my SM1500 (their tanks are prone to rupturing), but it needs to actually fit back into the gun.


'Guitarzan', on 17 May 2012 - 02:13 AM, said:

MIG thanks for answering my question man, that helps alot. I'd love to see how you fit these tanks back into some of your blasters. At this point im strongly considering doing this to my 3k and my sm1.5k.


Shell modification is definitely necessary if you do this mod. A Dremel works great for modifying the original supports or getting rid of them all together. Quite a bit of testing is needed for proper alignment and positioning. Using clay or Play-Doh makes positioning a bit easier. Once you've found the best positioning, use hot glue to secure it into place.


  • 0
"...he is one speedy bastard." ~ Cheyner

#17 Guitarzan

Guitarzan

    Member

  • Members
  • 133 posts

Posted 19 May 2012 - 12:17 PM

the playdough idea is actually really creative. Would you ever be willing to show us pictures of the internals of some of the blasters you've done this to? I know I'm asking for alot at this point, but picking the brain of experts is one of the best ways to learn in my opinion

Edit: I'm trying this method out on my 3k today. But im actually gonna use fiberglass mesh and fiberglass resin instead. This stuff is expensive and i probably wouldn't reccomend it, but i had the stuff lying around from the time we patched a hole in a kayak.

Edited by Guitarzan, 23 May 2012 - 04:36 PM.

  • 0


1 user(s) are reading this topic

0 members, 1 guests, 0 anonymous users