Jump to content


Photo

The Snap 7.5 Pump Crossbow

SNAPping up the McNumbers Crossbow

24 replies to this topic

#1 Carbon

Carbon

    Contriberator

  • Moderators
  • 1,894 posts

Posted 01 September 2010 - 10:37 PM

Ryan's latest project is beautiful, but requires a shopping list for McMaster-Carr. So, here's a version using slightly more common parts.

First off: Credit to Kane for the prototype, coming up with the great priming system, and for getting me started in bows, and to Ryan for making a freakin' work of art.

Now, on to the much uglier version:

Posted Image

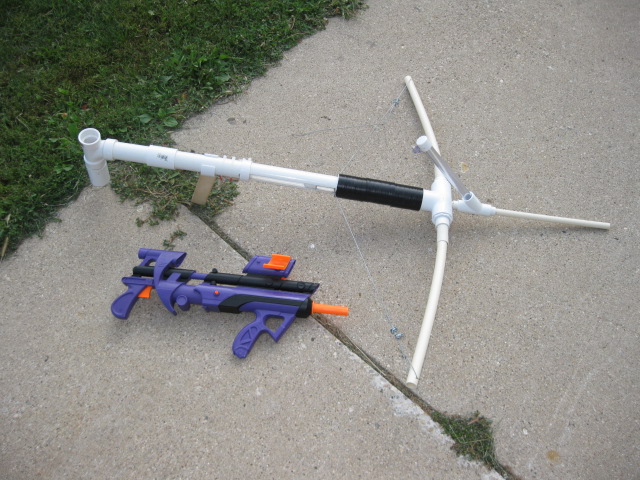
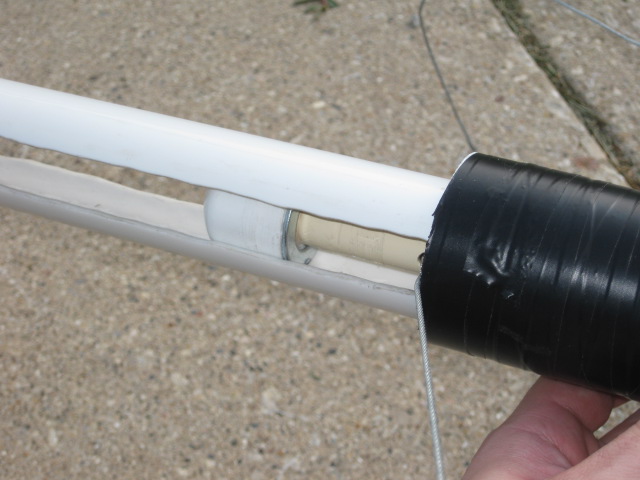
Like Kane's pump crossbow prototype, the catchface is at the rear of the plunger. It's all just pounded together CPVC, .5" and .75" PVC, and .75" endcaps.
Posted Image

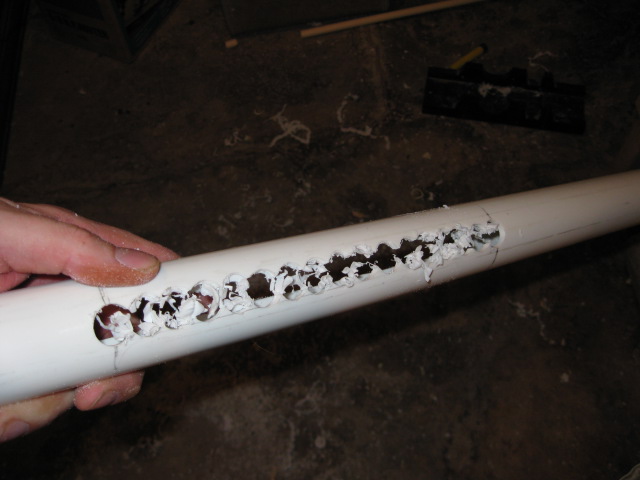
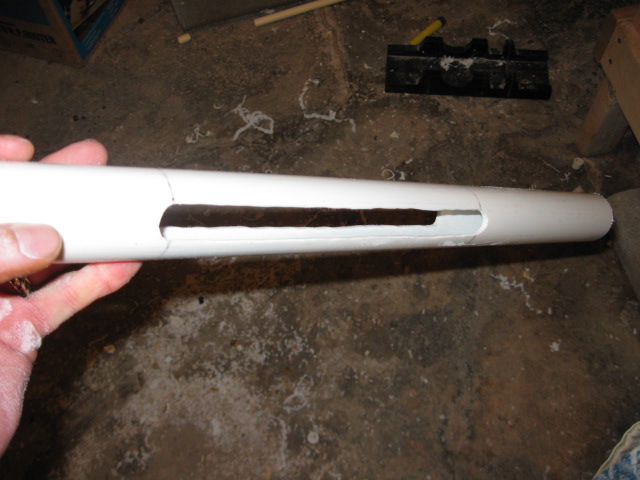
I used a new slot making method this time: I drilled out holes, and then connected them with a sanding drum.
Posted Image
Posted Image

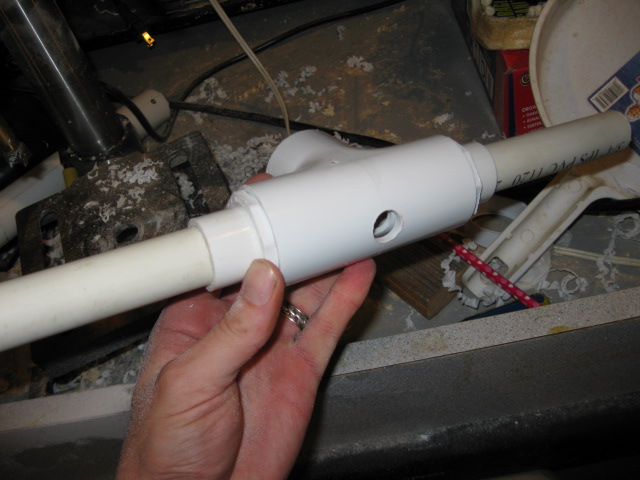
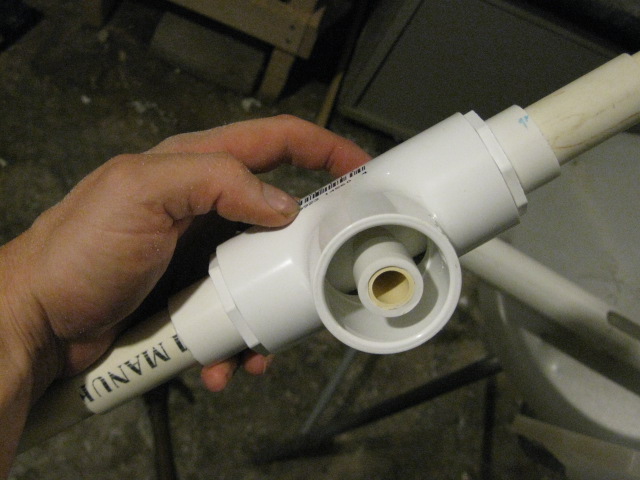
I used a slightly different method for the tee than Kane and Ryan. I used 1" PVC slightly longer than the length of the tee, and then hammered .75" thinwall into the ends of that, for a telescoping support system. .75" CPVC slides inside of that. I used the center seam of the tee to help place a 5/8" hole (air will be directed using .5" CPVC). That hole then was the guide to drill the arms.
Posted Image

.5" CPVC with .5" PVC for the reducing bushing on the plunger tube.
Posted Image

For the pump handle, I'm using two 1.5" couplers. A little loose, but they work fine.

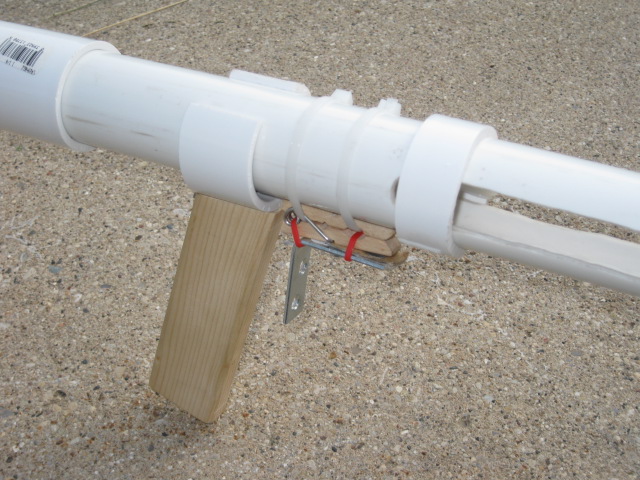
The trigger is pretty standard: wood pin and a roofing nail.

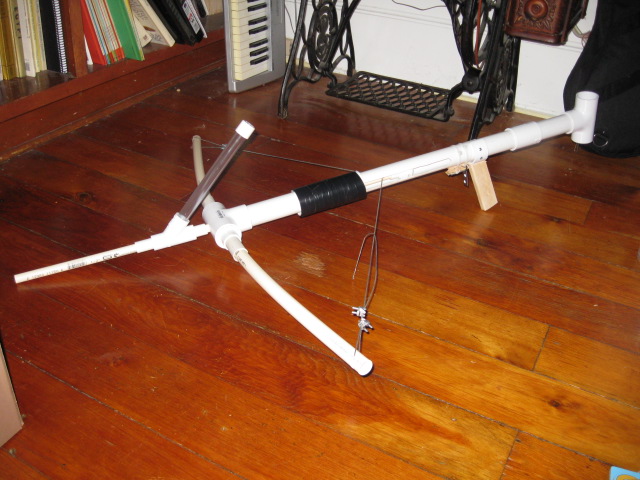
I decided a stock would be a good idea for this one, so I added a removable one with a coupler and a chunk of PVC.

Overall, it needs a few tweaks. The pump handle needs to be a bit longer, so the priming hand doesn't need to go as far back. And I screwed up a few measurements during construction (that slot is way longer than it needs to be, to the point that I had to make a new plunger, and the overall blaster is about four inches longer than it needs to be). But overall, it works, and works well.

Edited by Carbon, 23 February 2015 - 11:31 AM.

  • 0
Hello. I am Indigo of the Rainbow Clan. You Nerfed my father. Prepare to die.

#2 KaneTheMediocre

KaneTheMediocre

    Belligerent Asshole

  • Members
  • 613 posts

Posted 01 September 2010 - 11:17 PM

Nice technique for the slots--This is something that almost every builder has the tools to do. I tried a variety of ruinous and time-consuming techniques before just sticking it in the scroll saw, which was relatively quick and painless.

Also, I like that you've added a proper catch to the rear of the plunger rod, which makes the trigger work and helps to keep the plunger straight.
  • 0
RAINBOW CLAN FTW
I'm Purple

My Half-Baked MHA Site

#3 utahnerf

utahnerf

    Member

  • Members
  • 339 posts

Posted 01 September 2010 - 11:20 PM

Nice design! It looks to be extremely solid and robust. I like that drilling method too, I've used it a couple of times while making slots for breeches.
  • 0

#4 Ryan201821

Ryan201821

    Prince Edward

  • Contributors
  • 1,892 posts

Posted 02 September 2010 - 12:44 AM

Very nice. I especially like the solution for the catch. The Master of PVC one upped the other Master of PVC.

Your Tee solution is pretty much exactly how we did ours but without the use of duct tape, props.

Now, no one has an excuse not to build a PAC.
  • 0

#5 Ambience 327

Ambience 327

    Member

  • Members
  • 561 posts

Posted 02 September 2010 - 09:04 AM

Sweet-looking crossbow their Carbon. Big shock coming from you, right? :)

As always, simple and elegant work, and even if it isn't quite as pretty as the crystallized work of art Ryan made, it looks like it is probably just as much fun to use! (Now get your daughter to bling it up with the foil like her bow, and it will be gorgeous too!)


@ Ryan - if you are going to stick with calling it the PAC, can we start calling you PAC-man? ;)

Edited by Ambience 327, 02 September 2010 - 09:05 AM.

  • 0
Foam in the Fort IV
The fourth exciting Nerf War in Fort Wayne, IN.

#6 Carbon

Carbon

    Contriberator

  • Moderators
  • 1,894 posts

Posted 02 September 2010 - 11:46 AM

Kane: The only disadvantage I have right now is that I only have a sanding barrel at 5/8" inch, so my slots have to be big. I'll track down a smaller barrel to fix that. And I understand why your trigger was so touchy: getting it to catch on an unsupported plunger end would be difficult, to say the least. I'm actually surprised it worked at all.

Also, funny story about simultaneous invention: when I started work on my first crossbow, I was going to use a rear catchface with slots in the the plunger tube, a lot like yours....but I couldn't think of a good way to prime it. Seeing your prototype was a serious forehead slapping moment.

Utah: Thanks. It's defintiely solid..if a little big right now.

Ryan: The rear catch is going to see more play in the SNAP-8. My main problem right now is that this is the most powerful blaster I've built yet, so I have to go and study up on the improved catchfaces and seals that have gone into SNAPbows...I need some metal reinforcement and a better seal, as it looks like I'm only getting ~100, and inconsistently at that. To say that I've been painfully behind the curve in handling power is an understatement.

Ambience: I actually have a bling method in the works that she inspired...I'm trying it out on a bow first. I hope to get it posted this weekend. It should be....shiny.
  • 0
Hello. I am Indigo of the Rainbow Clan. You Nerfed my father. Prepare to die.

#7 Fome

Fome

    Member

  • Banned
  • 312 posts

Posted 02 September 2010 - 12:03 PM

Beautiful. I want to make one.

Do you have any tentative measurements or is it all touch and go?

Also, I'm curious to see a better look of that rear catch face. It looks like just PVC from this angle, probably a rounded endcap?

Again, great job.

#8 Carbon

Carbon

    Contriberator

  • Moderators
  • 1,894 posts

Posted 02 September 2010 - 12:14 PM

[quote name='Fome' date='Sep 2 2010, 12:03 PM' post='284578']
Do you have any tentative measurements or is it all touch and go?
[quote]
Yeah, I did all rough measurements...and then second-guessed my rough measurements partway through building, causing things to go all kittywumpus. I ended up making a new plunger to make up for my overly-long slots. You can pretty much figure out relative size by figuring out how much draw you want, and then going from there.

[quote]
Also, I'm curious to see a better look of that rear catch face. It looks like just PVC from this angle, probably a rounded endcap?
[/quote]

Here's a look at the catch from the slot:
Posted Image

It's .5" PVC on CPVC, with .75" PVC over that, and a rounded endcap over that. It's all just PVC right now, friction fit. If it comes loose, I'll add a pin, but I don't see that happening. What it does need is some metal catchface reinforcement. There's enough power here that the nail is really tearing up the catchface.
  • 0
Hello. I am Indigo of the Rainbow Clan. You Nerfed my father. Prepare to die.

#9 Ambience 327

Ambience 327

    Member

  • Members
  • 561 posts

Posted 02 September 2010 - 12:15 PM

Ambience: I actually have a bling method in the works that she inspired...I'm trying it out on a bow first. I hope to get it posted this weekend. It should be....shiny.


You're doing gold leaf inlay and encrusting the stock with diamonds, aren't you? :lol:
  • 0
Foam in the Fort IV
The fourth exciting Nerf War in Fort Wayne, IN.

#10 TantumBull

TantumBull

    Member

  • Moderators
  • 1,929 posts

Posted 02 September 2010 - 02:07 PM

Nice technique for the slots--This is something that almost every builder has the tools to do. I tried a variety of ruinous and time-consuming techniques before just sticking it in the scroll saw, which was relatively quick and painless.

Also, I like that you've added a proper catch to the rear of the plunger rod, which makes the trigger work and helps to keep the plunger straight.

Kane, I know I've inquired about your snap crossbow already in Ryan's thread, and I don't mean to beat a dead horse, but I'm still a bit confused. You had said that you had troubles with your clothespin catch and Ryan had also noted that it had something to do with the placement of your catch, correct? In what way did your catch differ from Carbon's to the effect of it not functioning properly?

Carbon, nice work. Actually looks quite a bit simpler/cost effective to make than a PumpSnap that uses a [k26] to store energy.

Edited by TantumBull, 02 September 2010 - 02:10 PM.

  • 0

#11 Broderick

Broderick

    Member

  • Members
  • 279 posts

Posted 02 September 2010 - 04:06 PM

These Pump Action Bow's are the shit. 'nuff said. I have some questions though.
How long is that piece in between the plunger head and catch? Can you adjust that length to make the bow more powerful, or less, and get more draw? I'm still a little hazy on this whole concept, so bear with me. :lol:
And just one more thing before I head out to get some materials to make this; I was just a bit confused when I got to this part:

I used 1" PVC slightly longer than the length of the tee, and then hammered .75" thinwall into the ends of that, for a telescoping support system. .75" CPVC slides inside of that.

The CPVC is what makes up the bow arms, correct?

EDIT: Nevermind that last question. I'm starting to build it now, and am going to do Ryan's method with duct tape, since I didn't see any .75" thinwall; obviously the CPVC is what makes the bow arms... not sure what I was thinking there. :lol:

Edited by Broderick, 02 September 2010 - 05:52 PM.

  • 0

#12 Carbon

Carbon

    Contriberator

  • Moderators
  • 1,894 posts

Posted 02 September 2010 - 07:22 PM

How long is that piece in between the plunger head and catch? Can you adjust that length to make the bow more powerful, or less, and get more draw?

That's what's so much fun about these things: you can more easily customize the draw and pull than if you had to build around a spring. The measurements are pretty much arbitrary. Pick how much draw you want, and cut things to fit. Then, after stringing it up, decide how much power you want. Too much? Loosen the string. Too little? Tighten things up.
  • 0
Hello. I am Indigo of the Rainbow Clan. You Nerfed my father. Prepare to die.

#13 Carbon

Carbon

    Contriberator

  • Moderators
  • 1,894 posts

Posted 05 September 2010 - 04:58 PM

Slight adjustments and improvements: I made it work with the original size plunger (10 inches) and reinforced it, lengthened the pump handle, and fixed the slot so I can't overdraw.

I realized I never showed something to give an idea how big this thing is. Yes, it's big. Here is it next to a 3B:
Posted Image
I added an extra coupler to the pump handle to improve the action. The string rests against it when at rest, so it doesn't rattle all over the place anymore.

Catchface adjustments: I trimmed off extra PVC so it's flush with the endcap, and superglued on a bushing. I then ground down the edges of the endcap to be flush. Nothing particularly new here, but it really improved the firing action.
Posted Image

I "repaired" the slot, rather than cut a new plunger tube:
Posted Image

And, what's this? A firing video? Since when do I do that?

Anyway, firing off six shots with some rather mangy U3 slugs.

Overall, it feels really nice. Things remaining to do: add something to the trigger to prevent overdraw, and lighten the pull just a little...it's a little tougher to prime than I'd like right now (i.e. I'm hurting my elbow with constantly cycling the thing).

Edited by Carbon, 23 February 2015 - 11:31 AM.

  • 0
Hello. I am Indigo of the Rainbow Clan. You Nerfed my father. Prepare to die.

#14 Broderick

Broderick

    Member

  • Members
  • 279 posts

Posted 05 September 2010 - 08:03 PM

Damn, I knew it was a big blaster, but once you put it next to a 3B... wow.
I'm in the process of making mine, but I have a couple of quick questions:
You said you made the PT 10 inches long?
How long was the piece you used to make the bow arms? I'm using a 50" long piece of 3/4" PVC (I actually managed to fuck up the piece of CPVC I made for this, long story), fed through the tee.

Edited by Broderick, 05 September 2010 - 08:03 PM.

  • 0

#15 Carbon

Carbon

    Contriberator

  • Moderators
  • 1,894 posts

Posted 05 September 2010 - 08:15 PM

You said you made the PT 10 inches long?

The entire plunger piece is ~10" long. That's 7" for the plunger stroke, and three inches hanging behind for the catchface. The plunger tube needs to have the stroke length + the same amount of length for slot, plus a few more inches for handle and stock attachment.

How long was the piece you used to make the bow arms? I'm using a 50" long piece of 3/4" PVC (I actually managed to fuck up the piece of CPVC I made for this, long story), fed through the tee.

My bow arms are 40" all told. Longer bow arms will have an easier draw.
  • 0
Hello. I am Indigo of the Rainbow Clan. You Nerfed my father. Prepare to die.

#16 archangel24

archangel24

    Member

  • Members
  • 215 posts

Posted 05 September 2010 - 08:21 PM

Quick question, about how much would it cost to make one of these with materials from Home Depot/Lowe's?
  • 0
QUOTE(Talio @ Oct 14 2010, 10:37 PM) View Post

I would much perfer a game that's free of KY. I like it rough. Right, Vacc?

"She went all Ghetto Fab on you."

#17 Carbon

Carbon

    Contriberator

  • Moderators
  • 1,894 posts

Posted 05 September 2010 - 08:39 PM

Quick question, about how much would it cost to make one of these with materials from Home Depot/Lowe's?

It depends on if you have any parts to begin with. It doesn't use a lot of fittings, but it uses five types of PVC and CPVC. I'd guess ten or 15 dollars.
  • 0
Hello. I am Indigo of the Rainbow Clan. You Nerfed my father. Prepare to die.

#18 Daniel Beaver

Daniel Beaver

    HQRSE CQCK

  • Moderators
  • 2,097 posts

Posted 05 September 2010 - 11:53 PM

venom and I built a couple. They are incredibly enormous blasters.

We got very inconsistent amounts of power out of our bows, even though they are built identically. What the hell?

Quick question, about how much would it cost to make one of these with materials from Home Depot/Lowe's?

We spent $29 on all the materials for two blaster, and got all our parts from Ace hardware and Menards, so just under $15 is reasonable. You end up with leftover PVC, so it's worth making more than one. It's worth looking around for 1.5" thinwall PVC - it works wonderfully for the pump grip.

Edited by Daniel Beaver, 06 September 2010 - 12:02 AM.

  • 0

#19 Carbon

Carbon

    Contriberator

  • Moderators
  • 1,894 posts

Posted 06 September 2010 - 12:45 PM

We got very inconsistent amounts of power out of our bows, even though they are built identically. What the hell?

That's weird. How many rubber washers did you use?
  • 0
Hello. I am Indigo of the Rainbow Clan. You Nerfed my father. Prepare to die.

#20 Daniel Beaver

Daniel Beaver

    HQRSE CQCK

  • Moderators
  • 2,097 posts

Posted 06 September 2010 - 03:00 PM

We got very inconsistent amounts of power out of our bows, even though they are built identically. What the hell?

That's weird. How many rubber washers did you use?


We have a single 1.5" washer sandwiched between two 1.25" washers. I think it has something to do with the bow arms - venom's droop a lot more, and his bow doesn't have nearly the same level of power (even when we tension the hell out of it).
  • 0

#21 Carbon

Carbon

    Contriberator

  • Moderators
  • 1,894 posts

Posted 06 September 2010 - 03:08 PM

We got very inconsistent amounts of power out of our bows, even though they are built identically. What the hell?

That's weird. How many rubber washers did you use?


We have a single 1.5" washer sandwiched between two 1.25" washers. I think it has something to do with the bow arms - venom's droop a lot more, and his bow doesn't have nearly the same level of power (even when we tension the hell out of it).

Inconsistent CPVC would make sense. My arms have very little bow when it's at rest, and it's a challenge to put the string on with what little curve I have.

I currently have two rubber washers on mine. Not sure if it's really making a difference or not, but I get very consistent range out of it. Finally fixing my hopper to avoid dart suck might also have something to do with that, though.
  • 0
Hello. I am Indigo of the Rainbow Clan. You Nerfed my father. Prepare to die.

#22 Daniel Beaver

Daniel Beaver

    HQRSE CQCK

  • Moderators
  • 2,097 posts

Posted 06 September 2010 - 04:02 PM

What's this... a spring?

Posted Image


It is very easy to convert this design to spring power. Insert a spring behind the catch fitting, add a PVC stop for the spring, and add a long screw to the plunger shaft for the pump to catch on, and BAM, instant Pump SNAP. A lot simpler than Stark's design, though it is quite long. It is easy to swap between bow powered and spring powered configurations.

Posted Image

Edited by Daniel Beaver, 06 September 2010 - 04:03 PM.

  • 0

#23 whawhasiscumba

whawhasiscumba

    Member

  • Members
  • 1 posts

Posted 24 July 2012 - 08:45 PM

Hey Carbon! I admire your work and am currently trying to make my own crossbow. I have one foot limbs on either side. I'm thinking about a 6-7" draw. That would mean I would need a 6-7" brace height right?
USER WAS WARNED FOR THIS POST

Please don't post in thread over a year old. Reread the Code of Conduct and New Members Guide before post.

Edited by Zorn's Lemma, 24 July 2012 - 09:55 PM.

  • 0

#24 Zorns Lemma

Zorns Lemma

    Sir Scrt

  • Moderators
  • 1,277 posts

Posted 24 July 2012 - 09:52 PM

The topic is over a year old. Lucky for you, Carbon is still around and hawks these forums, but in most other scenarios opening up a topic that old again is not going to be very beneficial.
  • 0
"In short, the same knowledge that underlies the ability to produce correct judgement is also the knowledge that underlies the ability to recognize correct judgement. To lack the former is to be deficient in the latter."
Kruger and Dunning (1999)

#25 Carbon

Carbon

    Contriberator

  • Moderators
  • 1,894 posts

Posted 24 July 2012 - 09:53 PM

Hey Carbon! I admire your work and am currently trying to make my own crossbow. I have one foot limbs on either side. I'm thinking about a 6-7" draw.

It's usually best to just send off a PM with a question, rather than resurrect a thread that's almost two years old....but since we're here...

I see a few issues with what you're saying, First, 12" bow arms will have an impossibly stiff pull, and would only be good for a few inches at best. 6" of draw would break your bow arms. Most bows use arms that are around 20" or so.

That would mean I would need a 6-7" brace height right?

It may just be because it's been so long since I messed with the 7.5, but what's the brace height?
  • 0
Hello. I am Indigo of the Rainbow Clan. You Nerfed my father. Prepare to die.


1 user(s) are reading this topic

0 members, 1 guests, 0 anonymous users