The maximum length dart you can use with this method is around 2" and the minimum is 1.25" If you're using any darts longer than 2" though, you might as well use 3" darts and use a stock drum.
Now, on to the actual modding.
Diassemble your raider drum completely. Remove the black follower from the magazine well by detaching the constant force spring. Remove the black follower from the drum by bending the stem while pulling. I don't have pictures of these steps but if you can't figure this out for yourself, the rest of the mod is probably not for you.
For starters, glue in the two markers that indicate you've added 35 darts. You can probably fill it to 37 without any problem, but knowning Hasbro, the constant force spring is probably just barely long enough for the drum to rotate in the 27 slots and pushing it to 29 might cause issues.

Next, cut 27 sections of whatever material you will use for the spacers. I suggest using something solid for the material. It must have an OD of 1/2" in order to fit into the slots. I use 1/2" half round. 1/2" plastic rod would also work, though I would suggest choosing something very machinable. 1/2" PEX rod, 3/8" PEX tubing (3/8" PVC pipe), and 1/2" wooden dowel would also work.
You will need 3/4" spacers for method A and 1" spacers for method B. You will need 1/2" spacers for method A if you want to use darts 2" long, however, if you do this, I suggest something slightly less than 1/2" because if you get any piece longer than 1/2" you will end up with mad jams when loading and feeding.


Glue your spacers in. Depending on what material you use, your choice of glue will vary. ABS, PEX, acrylic (PMMA), PVC, and polycarbonate will all solvent-weld nicely. Polyethylene depends on the type. Nylon and wooden dowel will be annoying to work with here.
Make sure you do not glue spacers into the slots where the black follower rests. If you are unsure of where this spot is, reassemble your drum, push stock darts in until the follower slides into positions, open up the clear casing, and mark the places with marker. You can also just push the follower down until it rests into the drum wheel.
Also, the two slots behind the black follower should also be blank. Darts feed to the front. However, if you mess up this step you can always just cut two more spacers and put them where you missed. If you accidentally put spacers where the follower rests though, you're screwed.
Glue them to the top row if you are doing method A

Glue them to the bottom row if you are doing method B

Here they are glued with method A. You can use this picture for reference to figure out the 2 squares where the follower goes and the 2 that are for the would-be 36th and 37th darts.

Depending on the material and how you cut it, you may or may not need to sand/file everything down so that it is uniform. If you used a lazor cuttor or mitre box, you might not need to. But maybe you messed up glueing? Having all the spacers the same height is crucial.

Next, open up the magazine. I used a small knife to break the welds for a super clean disassembly. You can be lazy and hack everything open with a dremel.

This is also the time where you hack up the magazine portion of the drum to clear any bits that would impeded the rotation of the drum mech, especially not that you have put the spacers in which take up slightly more vertical room than the stock drum. If you did method A with 3/4" spacers, you will also have to take out a bit of the holder for the constant force spring. Don't be shy in this step, but don't be stupid either. Rip out anything that would get in the way, but don't rip out anything vital.
Add rails onto yoru magazine like you would for a normal stefan magazine. They should line up with the line of your spacers. The length of the rails should be long (longer than in the picture), unless you know what you're doing. You can always cut them down in length later if they impede the movement of your follower. If they are too short then there will be a giant gap where the magazine to drum transition is and darts could fall down there. Do not put the rails into the gaps on the left side of the well(shown on top in the picture) because those gaps are guides for the follower.

Mod your follower. This step is self explanatory. Do not cut out the pieces that make it ride smoothly and uniformly up the magazine. You may find it easier to undo the screw and open the follower into two peices. I suggest using a dremel with one of the cutting bits (not cutting wheel).

Test fit everything. Lots of times. Make changes as needed.

Glue the magazine back together once you're positive that everything slides smoothly and lines up correctly.

(Optional) Add a strip of plastic to help prop darts up so they load easier and feed better. I used a 1/2" wide, 3/8" thick polyethylene bar, bent to the shape of the drum and secured with screws in the portion where the follower rests and the gap is (i.e. where no darts would go anyways). Use the picture as an idea of what to do, but do not follow it. I messed this one up. If you put the strip there, it interferes hardcore with the constant force spring and destroys your drum. Place it up higher (or lower, depending on how you look at it), closer to the solid end of the drum as opposed to the open end.

Here is a picture of the correct placement, but I screwed up something else on the drum there. Can you tell what it is?

Reassemble. Test with darts. Fix/tune up anything. Debugging the drum is the most annoying and longest part. If you don't do everything perfectly stupid things will go wrong that take forever to fix.
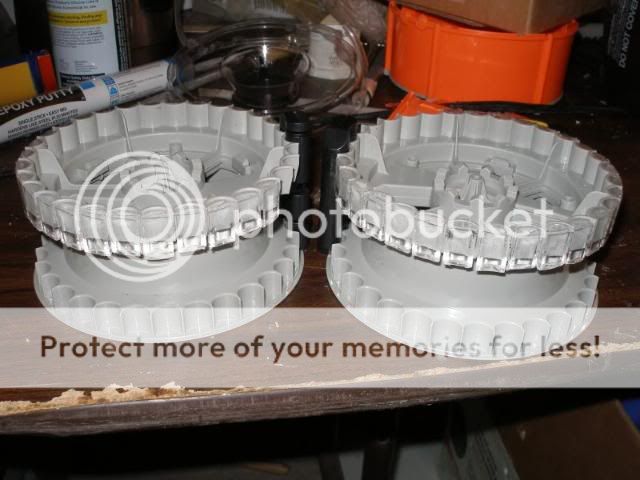
On the left you will see a drum modded method A. On the right is method B.

Edited by Zorn's Lemma, 14 March 2010 - 08:04 AM.


