Pretty And Removable Pump-action Recon Mod
#1
Posted 24 July 2009 - 09:16 PM
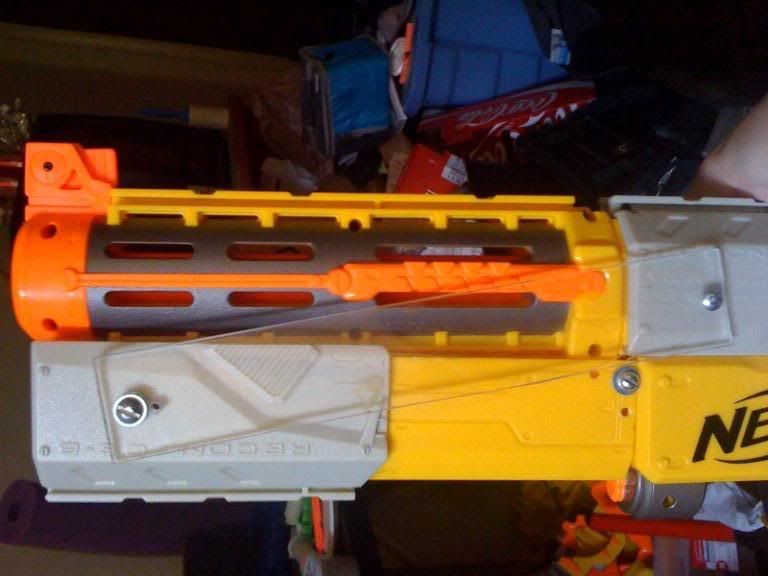
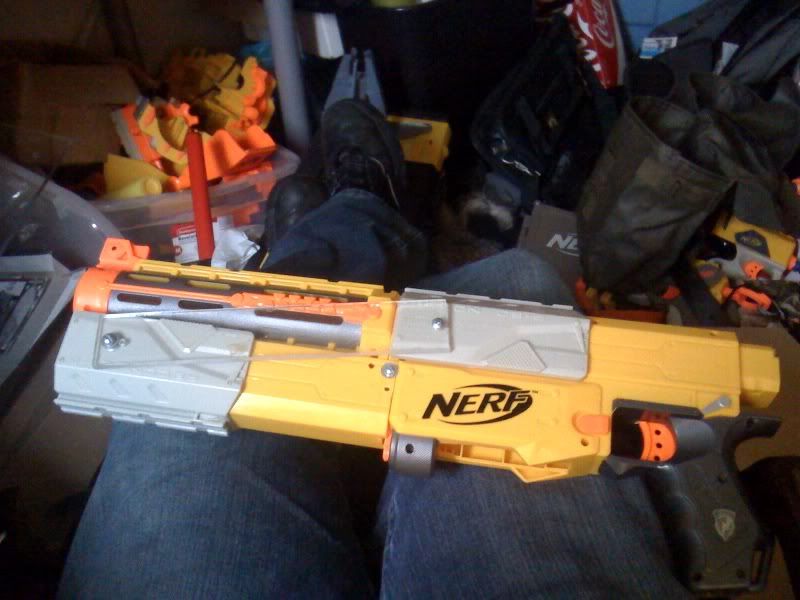
Here's the thing attached to a Recon at rest:
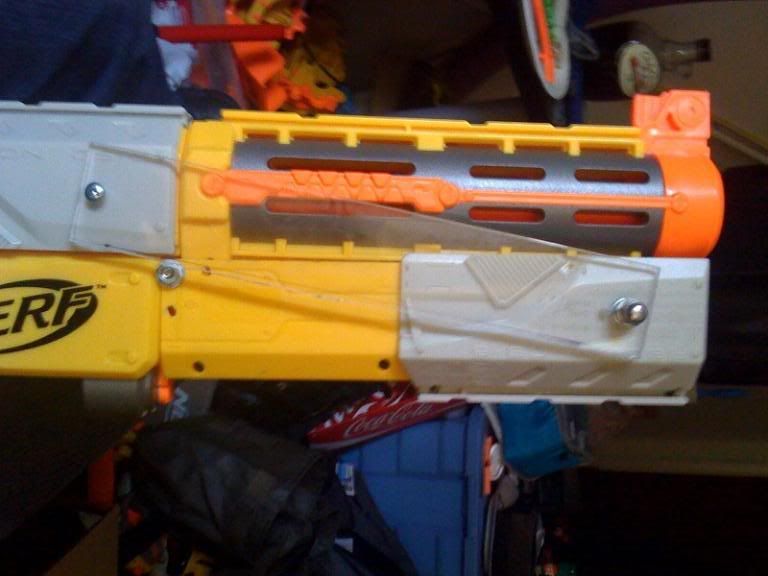
and this is what it looks like while priming:
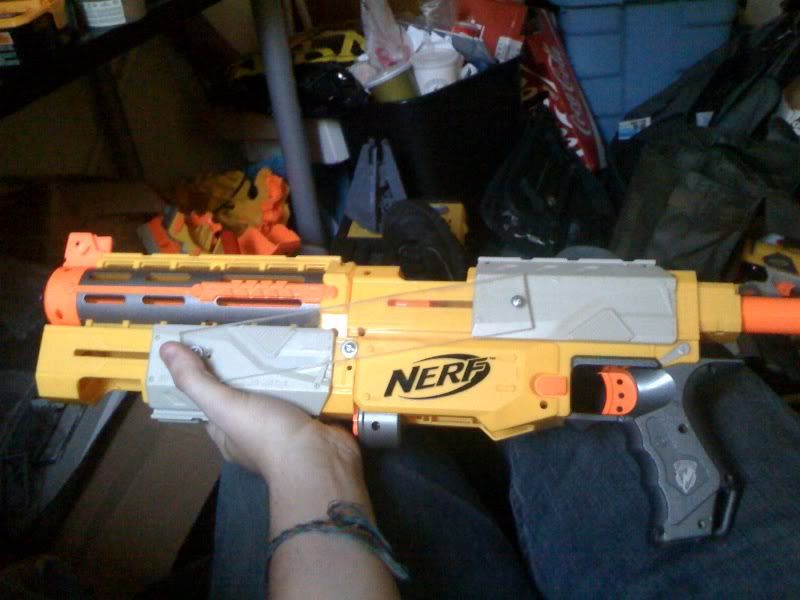
Sexy. Anyway, the materials for this include:
* Two recons (only one needs to be functional)
* 1/4" Lexan, or anything else that you can make a couple big strong bars with
* An N-Strike rail system attachment (for instance, you can take one out of the iron-sight that comes with the Recon that no one loves)
* A 2.5" machine screw size 10 without a pointy end
* An acorn nut that fits the above screw
* A 2" machine screw size 10 or less without a pointy end
* A normal nut that fits the above screw (no acorn for this one)
* Two .5" machine screws size 10 or less (with or without pointy end)
* A bunch of washers that fit your screws (I used #8s, and they fit fine. As for how many, I used... 7, but you may use more or less)
* Putty, goop, or anything else that will hold things in place despite the laws of physics
* Either a dremel or, if you hate yourself like I do, one of those things that holds a hacksaw blade in a dagger-esque grip and a hobby knife
* A drill, with a bunch of drill bits around the sizes of your screws and your screwdriver bits
* A small screwdriver (y'know, the one you use to open all your blasters)
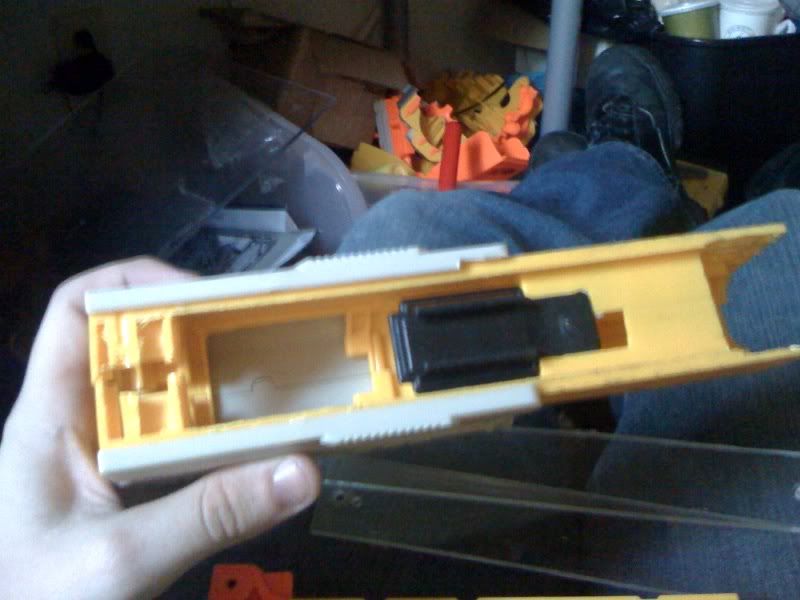
Okay, down to business. First, you're going to take the lesser of your Recons apart and get rid of all the internals. Keep the slide (or grip, or grey-piece-on-top-that-you-move-back-and-forth-to-prime-the-blaster). With the grip off to the side, cut (with dremel or hacksaw) the body down the groove where the slide grips the body. Throw away the bottom of the gun (the handle and all that) and keep the top half. And we're left with this:
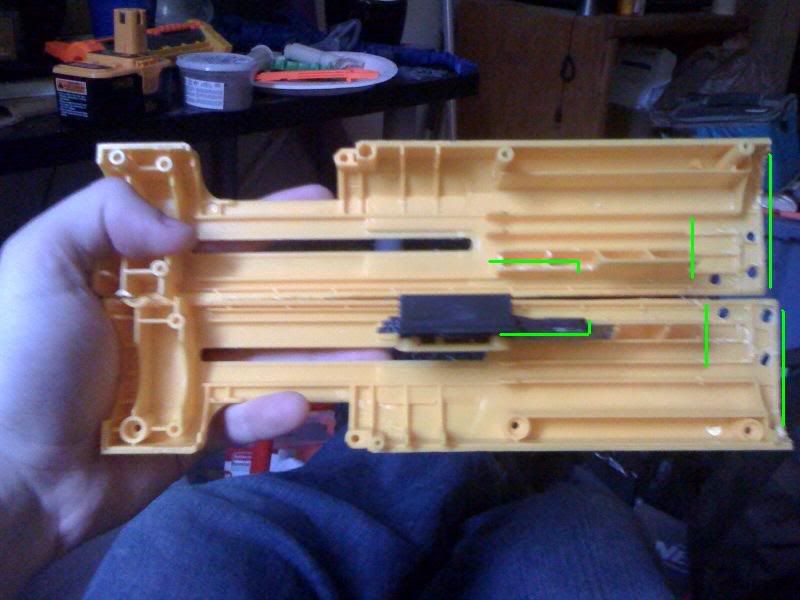
(Note: all these pictures are taken after mod completion, so you'll have to rely on the lines and the text to tell you what to do)
So what did we do in here? Well, start by cutting off the back, and then clearing out everything on the inside between those lines. This part in the back will be sliding over parts of the Recon and the extended barrel, so we want to make room for them. Here's another view that shows one more tiny cut that you may have to make.
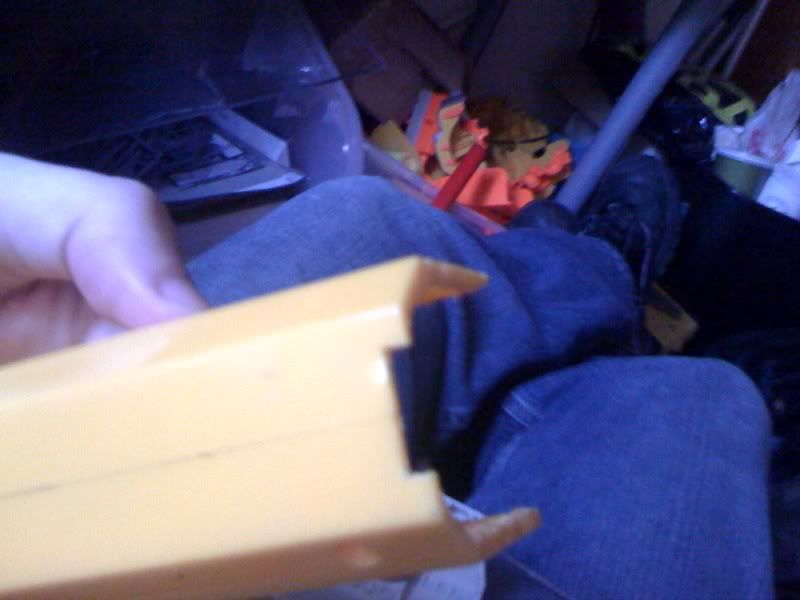
What are those green L-shapes on that first internal picture? That's where we make a place to attach the N-Strike rail clip. Now if you cut things just right, you can have the clip fit in there all nice. You're going to have to putty or goop it in there anyway to hold it still, but try to cut a space in there as close to the shape of the clip as possible. You're trying to take advantage of the tiny lip around the base of the clip. Look at whatever your clip was originally from (for me, the Recon iron-sight attachment) for inspiration.
These next pics should help you see what I'm talking about. Note that the clip is placed backwards, so I've removed the little nub that catches into the tiny spring loaded thing on all the N-Strike slides. Remember though, only putty/goop it to one side, so that you can still open the assembly later.
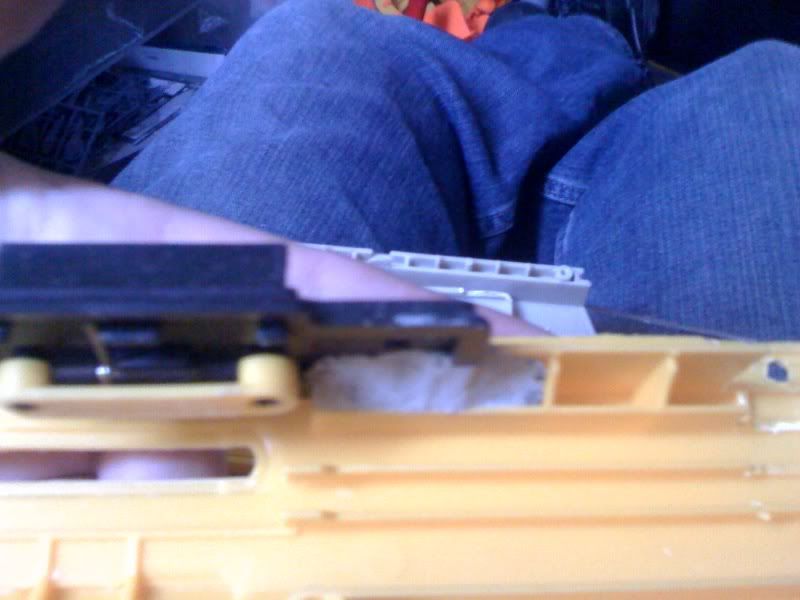
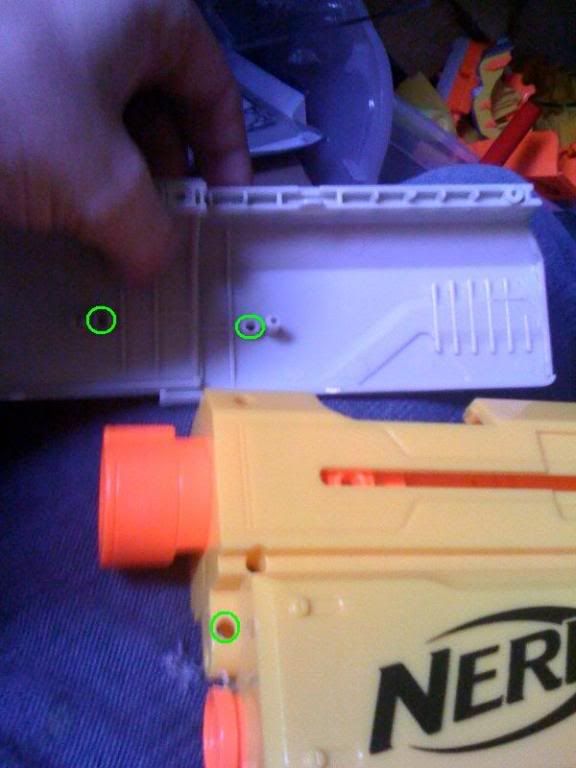
Now take the slide and drill holes right through the little bar that pokes out (this would be what connects the slide to the bolt sled if everything were assembled). These holes are for the 2.5" screw. This will decimate the pegs, so remove whatever's left of them after the hole is drilled. Here's a picture showing the aftermath (drill the holes marked in green, not the ones marked in red. The red holes are the unfortunate scars left by science).
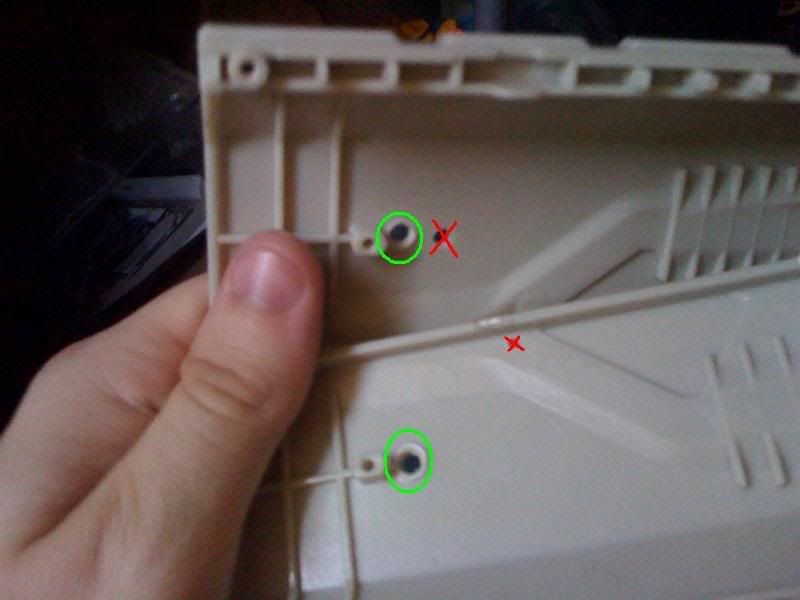
Now one last thing before we move on, look back at that first internal picture. See those three holes near the back on either side of the assembly? I want you to remember those, and particularly that the one in the corner is the only one you want. The others are bad, the corner is good.
[to be continued]
#2
Posted 24 July 2009 - 09:19 PM
The shadows are blocking the other half of the slide, but it's in the same place as the hole on the other slide. These holes are drilled through the smaller of the two protrusions on the inside of the slide (note, this is NOT where we drilled the holes on the front slide). These holes are for the 1/2" screw, and you need to make sure it's a snug fit, because you want those screws to dig into the slide. All the other holes in this modification can afford to be a little bigger than they need to be, but it's imperative that these be just the right size.
The third hole, the one on the body of the Recon, needs to fit the 2" screw. Remember the three holes I talked about earlier? The 2" screw is designed to keep the forward assembly from slipping around, so it goes through the third hole on the blaster and the hole in the back corner of the forward assembly. So in order to line these up, you're going to assemble what you have so far, and then drill through both at the same time. So, attach the extended barrel to the Recon, then slide the assembly onto the underside of the extended barrel. This next picture is a closeup of the fully assembled... assembly. See that screw that's right where the assembly and the Recon meet (and the two pointless holes right beside it)? This is your 2" screw, that goes through the corner holes on the assembly and the hole on the body of the Recon.
Go ahead and put that 2" screw in there, and keep everything together. Now it's time to make the Lexan bars that connect the two slides. You want to cut the bars long enough to reach from hole on the slide on the assembly to the hole on the slide of the Recon with at least 1/4" room to spare. I suggest having both slides as far back as they can go for this measurement, because it is imperative that you be able to move things far back enough to have the plunger catch. Now that you know that the bars encompass those two holes, drill the same sized holes in the appropriate places on the bars. See where the two screws are on the bar in the above picture? That's where you're drilling your holes, 'cause that's where the screws go! The 2.5" screw goes all the way through the front (through one bar, through the slide, through the assembly, back out the other side of the assembly, through the other side of the slide, then through the other bar). The 1/2" screws go through the bar and into the slide, but they don't go all the way through ('cause the internals of the functional Recon are in the way), so there's one on either side.
Now here's a pic of the other side. I happened to do most of my work looking at the left side of the gun, but there's no rhyme or reason to which side your nuts are on. So the 2.5" screw gets an acorn nut (because your hands are going to be in that area, and you'd like things to be as smooth as possible there), and the 2" screw gets a normal nut (because anything larger would get in the way of the bar during actual use).
Now the last thing to note are the washers: they are mostly there for spacing, but you want to make sure you have at least one between the bars and the slides so that you can move them around when attaching/detaching the assembly from the blaster. The 2" screw is simple: one between the head and the assembly, one between the assembly and the nut. The 2.5" screw is up to you, and depends on exactly how thick your bars are, but mine goes like this: head, washer, bar, washer, assembly, washer, bar, washer, washer, nut.
And you're done! If you want to take the assembly off, but not completely apart, just take out the 1/2" screws and the 2" screw, then slide the assembly off the rail. Your Recon will still have a couple of holes in it, but it will still function normally without the assembly.
Now it needs a name. The current runnings are: Franken-con, Re-Recon, Re-Recon-con, Shot-con, Decept-Recon, or PaRPARM
#3
Posted 24 July 2009 - 10:47 PM
P.S. I vote for Shot-con
Onto the anvil of war!
He parkours over flat land while yelling tactical orders at no one. Demon Lord is the most legit ballsy nerfer of all time.
#4
Posted 25 July 2009 - 03:29 AM
Solved the Rubik's Cube in 46 seconds
"Nobody understands quantum mechanics" - Richard Feynman
#5
Posted 26 July 2009 - 02:32 AM
As for the name, ParPar makes me chuckle for some reason.
Probably dead by now, or something.
#6
Posted 26 July 2009 - 09:01 AM
#7
Posted 26 July 2009 - 09:51 AM
This really isn't very related to the topic, (the actual shotgun grip) but does the recon have any mods done to
it?
I also second the fact that the only dislike I have to this mod is the fact that you have to salvage another recon
to complete it.
VengefulWaffle BOY, 12 KILLED IN MOUNTAIN PASS BY WILD RACCON, EXPERTS SAY HE ATTEMPTED TO HOLD IT OFF WITH NERF NITEFINDERS
POLICE SAY: ALCOHOL MAY HAVE BEEN INVOLVED
Guess who he was talking about...
#8
Posted 26 July 2009 - 10:47 AM
A.K.A. NarcolepticPenguin on NR
Zmandudesk82: "@Qwear: Nice name. I'm glad to see the NIC being open to people who are... different."
#9
Posted 26 July 2009 - 12:15 PM
This really isn't very related to the topic, (the actual shotgun grip) but does the recon have any mods done to
it?
I also second the fact that the only dislike I have to this mod is the fact that you have to salvage another recon
to complete it.
That particular Recon has its AR removed as well as the wierd little mechanism that prevents clip release. I'm not the kind of modder that needs high performance out of their blaster. My main concerns when modding are "is it easier to use," "does it look cool," and "does it make more noise than before."
As for killing the second Recon, I don't blame you guys. The reason I did this mod was because I had (through a series of interesting events) 2 functional Recons and one broken one (failed attempt at a new breech). I put the spring from the dead Recon in my Longshot. If it helps, look at it as $5 for the clip and darts, and $15 for the spare Recon.
#10
Posted 27 July 2009 - 02:08 AM
Sanding would be your best bet. Tape would add resistance and gloves are too cumbersome.The only downside was the somewhat sharp angles of my Lexan bars, which could be solved either by wearing gloves (like I did), sanding down and smoothing out the corners, or possibly by wrapping grip tape or the like around the bars.
#11
Posted 27 July 2009 - 07:01 AM
Nice work, it seems very functional, and practical. I like. ALOT.
#12
Posted 27 July 2009 - 02:37 PM
#13
Posted 10 August 2009 - 12:07 PM
Edit: Waiting for the banhammer to fall for the guy below me...
Edited by hummer, 12 October 2009 - 07:18 PM.
Onto the anvil of war!
He parkours over flat land while yelling tactical orders at no one. Demon Lord is the most legit ballsy nerfer of all time.
#14
Posted 12 October 2009 - 07:11 PM
#15
Posted 12 October 2009 - 10:13 PM
Edited by jerm78, 12 October 2009 - 10:24 PM.
#16
Posted 12 October 2009 - 10:31 PM
THIS MOD IS COMPLETELY USELESS!!! YOU WASTED A PERFECTLY GOOD RECON IN A MODIFICATION THAT ADDS NOTHING TO THE FUNCTIONALITY OF THE ORIGINAL GUN!!!!!!! CONGRATULATIONS YOU SUCK!!!!!!!!!!!
Unless you are Muttonchops or Bakedtater, There is no such thing as a "PERFECTLY GOOD RECON" so your argument is invalid.
Don
#17
Posted 13 October 2009 - 07:55 AM
THIS MOD IS COMPLETELY USELESS!!! YOU WASTED A PERFECTLY GOOD RECON IN A MODIFICATION THAT ADDS NOTHING TO THE FUNCTIONALITY OF THE ORIGINAL GUN!!!!!!! CONGRATULATIONS YOU SUCK!!!!!!!!!!!
You madea at least three mistakes in your post:
1) You posted in a thread that has been dormant for months without adding anything significant. The mods frown on that, and it is likely to get you on their bad side. You don't want to see that side - it isn't pretty.
2) You didn't think about what you were saying. You said that this adds nothing to the functionality of the original gun, but it does. Many people find that the top-slide cocking action of the Recon and similar blasters (such as the Maverick and the scout) is uncomfortable or otherwise undesirable, and they find that adding a shotgun-style pump action to the blaster is an improvement. (Nerf seems to have realized this - just look at the new Hyperfire blaster).
3) You didn't bother to read the mod itself before posting. You accuse the original poster of having "wasted a perfectly good recon". As the quote below shows, he did no such thing.
Today we're going to make a pretty looking and removable pump-action attachment for the Recon. Others have made the Recon pump-action before, but I've never liked the looks of them, and I had a broken Recon to mess with anyway. This is an advanced mod: read these instructions, but only do the mod if you understand what is going on. A lot of this was done on intuition, and I got a lot of things to fit by sheer luck.
The fourth exciting Nerf War in Fort Wayne, IN.
#18
Posted 13 October 2009 - 02:28 PM
And as for the above post, I have an addition for this guys mistakes.
1. Flaming. No freakin duh.....
2. Uses big words to try and impress us. Makes him look like a..... I won't even go there.
3. The uber duh. NECRO.
I honestly like this mod, and I don't see why this guy is so angry.
EDIT: I spelled addition wrong.
Edited by carlough, 13 October 2009 - 02:29 PM.
#19
Posted 13 October 2009 - 06:02 PM
#21
Posted 14 October 2009 - 03:43 PM
#22
Posted 21 February 2011 - 10:11 AM
Edited by nerfguy47, 23 February 2011 - 04:12 PM.
#23
Posted 22 February 2011 - 07:46 AM
nihil413 on youtube also did a good clean forgrip mod to his here is a link also no recon wasting only front gun of longshot handle
This thread is over a year old and you're post is complete shit. We require proper punctuation and capitalization so that when others read your bullshit, they can tell what your twilight laden brain was trying to communicate.
This is warning alpha and omega. No more warnings. The Code of Conduct is mandatory reading, by the way.
2 user(s) are reading this topic
0 members, 2 guests, 0 anonymous users