Jump to content


Photo

N-strike Clipped Pas

Polycarb trigger p.2 / Need help p. 3

56 replies to this topic

#1 TantumBull

TantumBull

    Member

  • Moderators
  • 1,929 posts

Posted 02 July 2009 - 08:03 PM

Allow me to say one thing before anything else. I understand that AssasinNF beat me to the punch with an Angel breeched PAS. If you review his thread you will see proof posted that I was already mostly done with my mod, and that all ideas for my gun were my own. You may notice some repetition between our mods, most likely because we both had the intelligence to recognize the right way to do certain things. So if anybody besides Zorn (I think it was Zorn who has this right, but it may be Ice9, can't quite remember) gives me shit about my mod not being original than I will politely redirect them to this paragraph.

Edit: Someone thought the above comment about exceptions to saying it isn't original was slamming I9/Zorn. It wasn't. It was meant to be a joke because after AssassinNF came out with his Soulreaper I posted in IRC saying that when my mod came out if anyone thought it wasn't original I'd kill them. Zorn or I9 then said, "I'm going to reply with: This mod isn't original"... or something along those lines. This was meant to be a complete joke, not a slamming.

Now allow me to give credit where credit is due:
ForsakenAngel_24: the majority of this mod is based around his seemingly famous "Angel Breech". I also borrowed some reinforcement methods from his PAS level-2 modification.
Hereticorp: Thank you for your help with spray painting. You may not remember it, but we went back and forth about it through PM's last winter.

Materials:
-9/32" brass
-1/2" brass
-17/32" brass
-9/16" brass
-19/32" brass
-5/8" brass
-Brass strip
-Brass sheet (not necessary if your strips are wide enough, but if they are wide enough, then they will need to be narrowed for certain reinforcements. A got the wider strip to be cost effective.)
-1/2" thinwall PVC (SDR 13.5)
-3/4" thinwall PVC (I imagine that this is also an SDR rather than a SCH, not sure of the number though)
-3/4" to 1/2" PVC reducer
-Rubber-foam gasket (found in plumbing aisle)
-Silicone grease
-Silicone Spray
-Nite Finder shell
-epoxy putty
-Vinyl dye
-Paint of choice
-Sealant of choice
-Coat hanger
-JB weld
-general use epoxy (JB weld will do here, I just didn't want to waste it where normal epoxy would do the trick)
-screwdriver
-DREMEL!!! (absolutely necessary)
-Super glue
-hot glue and gun
-shitty FBR that you don't mind wasting
-electrical tape
-segment of: 1/2" PVC, 3/4" PVC, 1" PVC, 1" PVC Coupler, 1.5" PVC

Because of the density of this write up, it will be broken down into 3 sections: 1) Reinforcements (various methods used, some original and some borrowed); 2) Breech and Barrel Assembly (includes anything that pertains to the loading and acceleration of darts); 3) Body Work and Cosmetics (pistol grip and paint job).


1. Reinforcements
First we'll start with the plunger rod. Grab your 9/32 brass and cut it in half like so (they won't be complete halves because of the thickness of your cutting wheel, which actually works to our advantage as you will soon see).
Posted Image

Cut the halves as shown.
Posted Image

Cut slits like the one's shown and JB Weld the pieces to the plunger rod. The area removed by the dremel to cut the half pipes now comes in handy because of those two ridges that go along opposite sides of the plunger rod.
Posted Image

I had trouble with the brass popping off because I originally used super glue. Besides switching to JB weld, I also cut some silts in the brass at the end so it adhered better.
Posted Image

Apply epoxy putty as shown.
Posted Image
Posted Image

Now glue some brass onto the catch on the plunger. Be sure to sand the top down as so the edge of the brass doesn't catch on the catch.
Posted Image

Finished plunger rod:
Posted Image

Now let's move onto the trigger. Ignore any paint on the trigger in this part.

Apply epoxy putty as shown. DO NOT drill holes and epoxy in staples like I did. The holes weaken it and are what led to mine breaking.
Posted Image

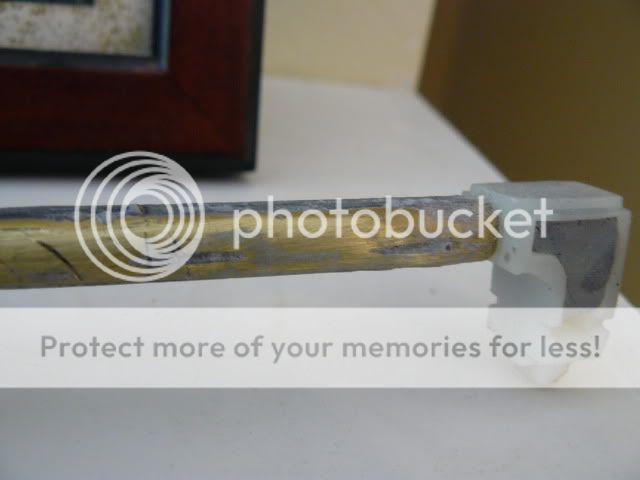
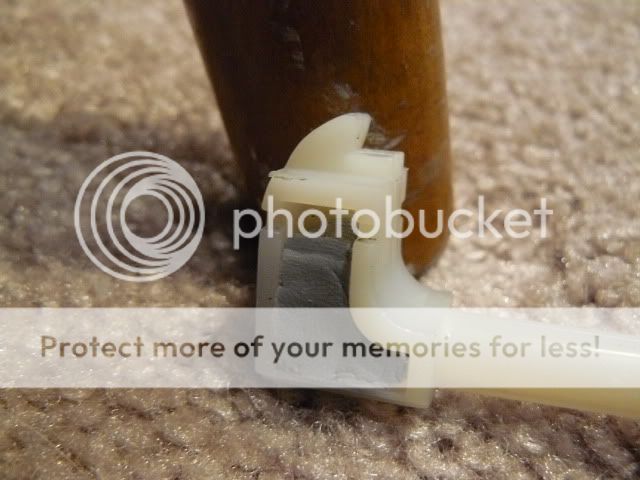
We will return to the trigger shortly. Grab you priming bar and fill it with epoxy putty as shown.
Posted Image

Time to put on a brass strip!
Posted Image

In the following image you can see the brass bent and adhered with super glue. Also cut the priming bar as is shown so that it fits against your newly puttied trigger.
Posted Image

Now we're going to glue in a bent piece of coat hanger. Grind out a space for the coat hanger like in my LS bolt sled reinforcement thread. Epoxy 'er in and sand it down so its flush with the rest of the piece.
Posted Image

Okay, time to go back to the trigger. Cut out some brass into the shape of the catch and include a segment that goes farther down into the trigger. This picture should show you what I mine. Do this on both sides and JB weld the pieces on.
Posted Image

Now super glue on a strip to the front as shown below.
Posted Image

Edited by TantumBull, 08 July 2009 - 09:28 PM.

  • 0

#2 TantumBull

TantumBull

    Member

  • Moderators
  • 1,929 posts

Posted 02 July 2009 - 08:05 PM

Now cut up the gasket as shown. The cut up one is shown in front of the other half of it that hasn’t been diddled by scissors.
Posted Image
Do not adhere this until later. I will address it once we have finished modifying the brown funnel piece.

I’ll just put foam silencing in this part because there’s no other section it fits into.
Posted Image
Posted Image
Posted Image


2. Breech and Barrel Assembly
Glue coat hanger wire to the priming handle. Reinforce with epoxy putty. It’s a bit hard to see in the pic because I forgot to do this step before I painted the blaster.
Posted Image

Take a segment of 5/8 brass the length of the brown funnel piece and wrap it in e-tape so it fits nicely into the brown piece.
Posted Image

Super glue it in and fill the back with hot glue.
Posted Image

Here’s where the gasket you cut earlier comes in. Super glue it on like so.
Posted Image

Now if you did the exact same reinforcements as me, your priming handle will have a 3-5/8” stroke. The whole breech and barrel assembly is based on this number and on being able to successfully chamber a 1.5” stefan.

Let’s do the barrel. Make a half pipe in your 9/16 brass. It should be 2.75” long.
Posted ImageAlso add tightening rings

Now cut out the bolt with the shown dimensions.
Posted Image

Now let’s move to the PVC clip slot. Grab your 3/4” thinwall and put it next to the brown funnel piece Line them up so that the PVC stops where the ridge on the funnel piece would force it to stop. Make a mark where the tip of the funnel piece lines up with the PVC. This will be the beginning of your clip slot. Making the slot work well with a clip takes some trial and error. Just cut less then you think you need to, and go up from there. You’re going to also have to bevel in the edges of the slot or the clip won’t be able to go in. Bevel a bit, and then do a test fit. Keep going until you can get the clip in, but it’s still a snug fit.
Posted Image

Time to finish the bolt. You’re going to want to line up all your brass parts thus far to get a feel for how long you want your 1/2” brass to be. Line up where the half pipe ends on the barrel to where the clip slot ends on the PVC. Line up the end of the bolt to the end of the piece of 5/8” brass nested in the brown funnel piece. Also line the new 1/2” brass piece with that. Cut depending on how far you want your dart pushed into the tightening rings on the barrel. By 1/2" brass ended up being 5-1/8” long.
Posted Image

Glue some segments of 17/32” brass and 9/16” brass to the 1/2” brass to stabilize it in the bolt. I also used e-tape because I was short on segments of 9/16” brass.
Posted Image

Glue it into the bolt (the longer end before the breech slot).
Posted Image
Posted Image

Edited by TantumBull, 02 July 2009 - 09:32 PM.

  • 0

#3 TantumBull

TantumBull

    Member

  • Moderators
  • 1,929 posts

Posted 02 July 2009 - 08:06 PM

Now attach the reduced coupling to the thinwall 3/4” PVC with the clip slot. Stick in some of the SDR 13.5 1/2” PVC. Put the 9/16” barrel next to it so that where the half pipe end lines up with where the clip slot ends. Cut the SDR PVC right at where the 9/16” ends. Ignore the shitty looking clip-slot-piece in the picture. It was my first iteration.
Posted Image

Now we’re going to make the Breech Connection Nub (BCN from now one). Start the BCN with a segment of SCH. 40 PVC. Make sure its wide and long enough to have enough surface area when adhered to the brass.
Posted Image

Now just keep making it larger with various pieces of PVC. The picture is pretty self explanatory.
Posted Image

Now let’s make a way for the BCN to really grip the brass bolt. The only way to do this without using silver solder is to be innovative. Brass that is scraped and has slits cut in it I’ve found will adhere much better to plastic. Don’t forget to rough up the bottom of the BCN and cut slits in it with a knife. So, cut a segment of 5/8” brass that’s the length of your BCN. diddle it with your dremel and sand paper. Contain any rapage to area that the BCN would cover once adhered.
Posted Image

Now cut a slot in the 1/2” SDR 13.5 PVC that will fit the BCN. First determine where the BCN will be adhered to the bolt (I just decided it would go as far forward as possible). The best way to do this is to just mark where the tip of the BCN stops when the bolt is all the way forward (when the back of the bolt is 3-5/8” away from the back of the piece of 5/8” brass nested in the brown funnel piece). For the back of the slot make a mark at the back of the BCN when the bolt is in the closed position (the back of the bolt and the back of the 5/8” brass piece in the brown funnel piece are flush with each other).
Posted Image

Now figure out how the 1/2" PVC will be positioned in the reducer. The best way to do this is to assemble the gun (minus the internals) and then see where the coat hanger passes over the PVC. Once you get the right rotation of the PVC, glue it in place. I used hot glue because I’ve had bad experiences with making things permanent. I suggest you do this to until your done and know everything works.
Posted Image

Once you have the angle of the slot figured out, figure out at what rotation you will glue on the BCN in accordance to the bolt. Do this by making sure that the breech is perfectly aligned in regard to the clip slot. While holding it in that position (I just put a finger over the clip slot, which since at the thinnest part is also a half pipe like the slot in the bolt, kept everything in place) rotate the diddled segment of 5/8” brass so that it fits the BCN slot in the PVC. Then move the bolt and move the 5/8” brass VERTICALLY out of place (don’t swivel to the side), drip on some superglue, and then push it quickly back into position. Then JB WELD (this is a must) the BCN to the 5/8” brass ONCE THE BRASS IS INSERTED. Don’t glue it on if the bolt isn’t in the PVC assembly.
Posted Image

Glue in the 9/16 brass barrel.
Posted Image

Attach the BCN to the coat hanger with epoxy putty.
Posted Image


3. Body Work and Cosmetics
Cut off the stock as shown.
Posted Image

Now cut the bottom part off, being careful to not cut through the screw hole. Also cut up you NF handle as shown.
Posted Image

Now epoxy it on.
Posted Image

Fill in gaps and reinforce with putty. Be sure to sand all the sharp edges smooth.
Posted Image
Posted Image

Now it’s time to paint. This is probably the most essential part of this modification. If you keep the stock colors or put some other realistic paintjob on this gun, then the modification will undoubtedly fail. I’ve ran simulations and this mod failed 30 times out of the 25 trials I ran with the stock paint job. That’s some double fails right there. In other words, MAKE YOUR GUN NOT SO FUCKING REALISTIC!
Posted Image

Edited by TantumBull, 02 July 2009 - 08:10 PM.

  • 0

#4 TantumBull

TantumBull

    Member

  • Moderators
  • 1,929 posts

Posted 02 July 2009 - 08:07 PM

Some Finished Pictures:
Posted Image
Posted Image
Posted Image


Ranges: It’s hitting about 75 to 80 right now, with Slug style stefans. I’m sure at this point its just a dart-barrel fit issue. I could see this getting 100 if you get an optimal dart-barrel fit. I’m not too good at that but I know others do it extremely well. For example, Split can make a nitefinder with the stock firing mech hit 90’ (Split, correct me if I’m wrong, I THINK this is what you said in the chat).

Edited by TantumBull, 02 July 2009 - 08:10 PM.

  • 0

#5 StealthMan

StealthMan

    Member

  • DO NOT TRADE
  • 285 posts

Posted 02 July 2009 - 08:11 PM

Wow. GREAT writeup, and nice NF handle idea.
  • 0
<!--quoteo(post=212906:date=Feb 16 2009, 06:30 PM:name=TantumBull)--><div class='quotetop'>QUOTE(TantumBull @ Feb 16 2009, 06:30 PM) View Post</div><div class='quotemain'><!--quotec-->I'm not ashamed to admit that I have tried to eat my stefans. They just looked so yummy.
<!--QuoteEnd--></div><!--QuoteEEnd-->

NERF<b>STRONG</b> #108

#6 Possemhunter

Possemhunter

    Member

  • Members
  • 138 posts

Posted 02 July 2009 - 08:21 PM

Simply amazing! Are you submitting that to the modification contest?
  • 0

#7 white moonlight

white moonlight

    Member

  • Members
  • 305 posts

Posted 02 July 2009 - 08:43 PM

Great job Tantum.

The paintjob really cleans it up.

Also, holy reinforcements!
  • 0
On his trec to Colonfest...
VengefulWaffle BOY, 12 KILLED IN MOUNTAIN PASS BY WILD RACCON, EXPERTS SAY HE ATTEMPTED TO HOLD IT OFF WITH NERF NITEFINDERS
POLICE SAY: ALCOHOL MAY HAVE BEEN INVOLVED
Guess who he was talking about...

#8 nightfinder

nightfinder

    Member

  • Members
  • 160 posts

Posted 02 July 2009 - 09:10 PM

AssassinNF did this too, Except differently.. The handle is creative, But I don't like it (Seems uncomfortable)
  • 0
NerfGrassHopper
QUOTE
R u gay ur sig makes it look so.. just lokin' for anotha gay nerfer...

#9 TantumBull

TantumBull

    Member

  • Moderators
  • 1,929 posts

Posted 02 July 2009 - 09:12 PM

Wow. GREAT writeup, and nice NF handle idea.

Thank you. 'Tis quite comfortable.

Simply amazing! Are you submitting that to the modification contest?

Thanks, and yes, it's been entered.

Great job Tantum.

The paintjob really cleans it up.

Also, holy reinforcements!

Thanks, this is the first PJ I haven't fucked up. I'm pretty damn bad at cosmetics, so this turning out well was a miracle on its own.

AssassinNF did this too, Except differently.. The handle is creative, But I don't like it (Seems uncomfortable)

You're right, he did. Thanks for reading the first paragraph. And the handle is very comfortable. Definitely a plus over the shitty stock that the gun came with. That stock was terrible and I couldn't fit my hand on it at all.

Edited by TantumBull, 02 July 2009 - 09:16 PM.

  • 0

#10 wingd man

wingd man

    Member

  • Members
  • 514 posts

Posted 02 July 2009 - 09:28 PM

Hot damn. This is the best write-up I've seen since hereticorp's longshot mod. Have you tried the sand paper around a sharpie technique to improve the grip as well? It works wonders to those old square grips.
  • 0

#11 Captain

Captain

    Member

  • Members
  • 814 posts

Posted 02 July 2009 - 09:29 PM

You reinforced the shit out of that. I love the wonky color scheme. Overall, this is awesome.
  • 0
I don't care what anyone else says, Atom Blasters are fucking awesome.

#12 umpshaplapa

umpshaplapa

    Member

  • Members
  • 636 posts

Posted 02 July 2009 - 09:31 PM

Thanks, this is the first PJ I haven't fucked up. I'm pretty damn bad at cosmetics, so this turning out well was a miracle on its own.

Haha, I know how you feel. I do pretty much the same thing as you. Two colors, only taping nice smooth lines.

This mod is fucking ridiculous! Major props on actually completing it! The metal connecting the priming handle to the "BCN" looks like it could bend. I know that the forces on it aren't actually that strong, since your pulling on it when priming the gun, but does it feel sturdy enough?
  • 0
QUOTE(Talio @ Jun 29 2009, 01:50 PM) View Post

i got a black belt in noob banning in 2004.


#13 TantumBull

TantumBull

    Member

  • Moderators
  • 1,929 posts

Posted 02 July 2009 - 09:39 PM

Hot damn. This is the best write-up I've seen since hereticorp's longshot mod. Have you tried the sand paper around a sharpie technique to improve the grip as well? It works wonders to those old square grips.

Thank you very much. I didn't do exactly that, but I did sand down the brown remainder of the PAS handel so it was almost flush with the NF handle. The small gap was filled with epoxy putty and then sanded.

You reinforced the shit out of that. I love the wonky color scheme. Overall, this is awesome.

Thank a bunch, man.

Thanks, this is the first PJ I haven't fucked up. I'm pretty damn bad at cosmetics, so this turning out well was a miracle on its own.

Haha, I know how you feel. I do pretty much the same thing as you. Two colors, only taping nice smooth lines.

This mod is fucking ridiculous! Major props on actually completing it! The metal connecting the priming handle to the "BCN" looks like it could bend. I know that the forces on it aren't actually that strong, since your pulling on it when priming the gun, but does it feel sturdy enough?

Thanks, man. I'm kinda scared about the same thing with the coat hanger rod. And there are actually some semi-strong forces on it while priming the gun. I didn't so a good job of cleaning up my breech cuts so there's definately some resistance when opening and closing the breech. Plus a lot of the bolt has to move over the tightening rings in the 9/16 brass barrel, which doesn't help matters.

Edited by TantumBull, 02 July 2009 - 09:40 PM.

  • 0

#14 ilzot

ilzot

    Member

  • Members
  • 286 posts

Posted 02 July 2009 - 10:24 PM

Awesome, AWESOME job.

Imagine a Raider drum mag on this beast.

Can you say diddle in a plastic shell?

Nice job man. I probably won't do this with my PAS because it isn't really my style, but I'll be following your reinforcements.
  • 0
QUOTE(Vinnie D. @ Feb 1 2010, 05:28 AM) View Post

... to be able to get a better burst or sustained fire, rather than blowing the whole load at once.


#15 Salmon

Salmon

    Member

  • Members
  • 447 posts

Posted 02 July 2009 - 11:23 PM

Awesome, I love the new grip, though the shape of the NF handle doesn't quite fit with the plainness of the rest of the gun.
And the paintjob is absolutely garish... just the way I like 'em. Major plus.

Edited by Salmon, 02 July 2009 - 11:24 PM.

  • 0
Welcome to I-dont-care-isburg, population: me.
We're located in I-Don't-Give-a-Damn County, in scenic Shut-the-Hell-Up-achussets.
Maybe you're familiar with our annual charity drive where we ask for shit, and no one gives any.

#16 AssassinNF

AssassinNF

    Member

  • Members
  • 904 posts

Posted 03 July 2009 - 03:53 AM

Awesome.

Anyone who gives you crap about originality can go fuck themselves.
  • 0

Probably dead by now, or something.


#17 Hi Yah

Hi Yah

    Member

  • Members
  • 294 posts

Posted 03 July 2009 - 07:06 AM

Great mod, and a clear writeup. I personnaly love how you reinforced the fuck out of it!
  • 0
The yellow balls are also slightly smaller in diameter than the green ones.

#18 TantumBull

TantumBull

    Member

  • Moderators
  • 1,929 posts

Posted 03 July 2009 - 12:02 PM

Awesome, AWESOME job.

Imagine a Raider drum mag on this beast.

Can you say diddle in a plastic shell?

Nice job man. I probably won't do this with my PAS because it isn't really my style, but I'll be following your reinforcements.

Thank you. Yeah, I just need the ROF because of my inability to hit targets. :(

Awesome, I love the new grip, though the shape of the NF handle doesn't quite fit with the plainness of the rest of the gun.
And the paintjob is absolutely garish... just the way I like 'em. Major plus.

Thanks. And your definitely right, I noticed that as well. The PAS has no designs on it whatsoever and then there's the NF handle with all the ridges and shit. I probably could have filled parts of it with epoxy putty, but ah well.

Awesome.

Anyone who gives you crap about originality can go fuck themselves.

Thanks, man. I especially appreciate that coming from you, the guy who posted the first one of these. And thanks for being real cool about letting me put this into the mod contest. I really, really appreciate it.

Great mod, and a clear writeup. I personnaly love how you reinforced the fuck out of it!

Thank you, kind sir.

Edited by TantumBull, 03 July 2009 - 12:02 PM.

  • 0

#19 italianhandgun

italianhandgun

    Member

  • Members
  • 19 posts

Posted 03 July 2009 - 12:07 PM

First off I would like to complement you on how fucking badass that looks. Secondly, major props on going through with it after ANF posted his. Lastly, unlike ANF you posted a write-up which makes you more eligible for the mod contest (Sorry ANF, but its true).
  • 0
QUOTE
violaters of the CoC should be forced to retype the entire CoC, word for word, without any errors (wich will then FORCE them to use grammar).

Oh the irony.

#20 Soothsayer

Soothsayer

    Member

  • Members
  • 663 posts

Posted 03 July 2009 - 12:12 PM

I could give a shit less about the clip, the reinforcement techniques you used are insane, man. Fuckin' kudos to the max.
  • 0

yeah I'm that guy who made that cool thing with the cool paint.


#21 Renegademilitia15

Renegademilitia15

    Member

  • Members
  • 516 posts

Posted 03 July 2009 - 12:42 PM

Nice dude, that looks especially sexy.

I can't wait to see it in action. :(
  • 0
Singled RFS
FA_24's response to Ice's back pain thread:
QUOTE

I used to have that problem until I got circumcised. 15 pounds later I was able to stand up straight.

#22 TantumBull

TantumBull

    Member

  • Moderators
  • 1,929 posts

Posted 03 July 2009 - 12:49 PM

First off I would like to complement you on how fucking badass that looks. Secondly, major props on going through with it after ANF posted his. Lastly, unlike ANF you posted a write-up which makes you more eligible for the mod contest (Sorry ANF, but its true).

Thank you, dude.

I could give a shit less about the clip, the reinforcement techniques you used are insane, man. Fuckin' kudos to the max.

Thanks. You know the funny thing is, despite the reinforcements, my trigger just broke. But I did most of the reinforcements after the first break (this is the second break now). So I kind of saw it coming. I just posted a WTB.

Nice dude, that looks especially sexy.

I can't wait to see it in action. :(

Thanks. Provided someone can send me a trigger before the war, it'll be there.
  • 0

#23 AssassinNF

AssassinNF

    Member

  • Members
  • 904 posts

Posted 03 July 2009 - 01:17 PM

Awesome.

Anyone who gives you crap about originality can go fuck themselves.

Thanks, man. I especially appreciate that coming from you, the guy who posted the first one of these. And thanks for being real cool about letting me put this into the mod contest. I really, really appreciate it.

No problem at all. Props on actually doing a writeup.

Good luck in the contest!

First off I would like to complement you on how fucking badass that looks. Secondly, major props on going through with it after ANF posted his. Lastly, unlike ANF you posted a write-up which makes you more eligible for the mod contest (Sorry ANF, but its true).

It doesn't make him more eligible, it makes him eligible period. :lol: There's no way anyone can win this contest without a writeup, and after all the different versions I went through to get mine to work, a writeup would be damn near impossible for me.

I really regret not doing a writeup for the creamsicle... :(
  • 0

Probably dead by now, or something.


#24 CoasterDynamix757

CoasterDynamix757

    Member

  • Members
  • 390 posts

Posted 03 July 2009 - 01:37 PM

Good Job, good luck in the contest.
Nice use of brass on the reinforcements.
  • 0
Is it fear or courage that compels you?

Coaster's Everything Thread.

#25 TantumBull

TantumBull

    Member

  • Moderators
  • 1,929 posts

Posted 03 July 2009 - 02:48 PM

I really regret not doing a writeup for the creamsicle... :(

Dude, but you should still enter the firefly turret write-up. And I could really see that winnning, as it's simple, most people could pull it off, but it's ingenious all the same.

Good Job, good luck in the contest.
Nice use of brass on the reinforcements.

Thanks, I'll need it.
  • 0


1 user(s) are reading this topic

0 members, 1 guests, 0 anonymous users