Jump to content


Photo

Homemade Pressure Release Valves

McMaster part #s on second page

22 replies to this topic

#1 Zorns Lemma

Zorns Lemma

    Sir Scrt

  • Moderators
  • 1,277 posts

Posted 23 February 2009 - 10:26 PM

Newest version: http://nerfhaven.com...ndpost&p=223500

Based off of Ice9's hornet blast button.

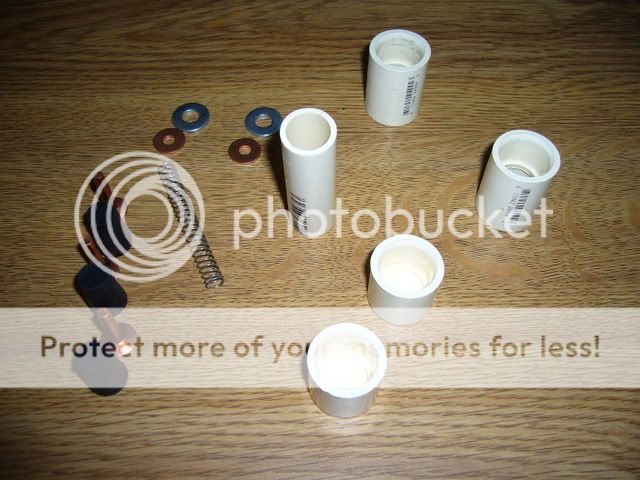
Start with:
Posted Image

End with:

Posted Image

Materials:

3x #9 3/4" copper stud
3x 1/2" top diam rubber stopper
2x #8 copper burr
2x 1/2" OD flat washer
2x 1/2" CPVC endcap
2x 1/2" CPVC coupler
1x 1/2" CPVC scrap tubing
1x spring (ACE #3)
(not pictured)
4x 1/8x1/4" vinyl tubing pieces

Start by cutting the end caps and couplers in half. For the couplers, cut 1/4 of it off of each end:
Posted Image
Posted Image

Superglue a burr to a washer, rounded side of the burr to the flat side of the washer. Center the burr on the washer:
Posted Image

Drop a burr+washer into each coupler, burr side down. The washer should catch on the ring inside of the coupler, holding the burr perfectly centered (length-wise and cross-sectionally) in the coupler. Goop around the washer:
Posted Image
Posted Image
These couplers form "walls." Rubber stoppers will seal against the flat side of the burr, forming a triggered check valve.

Take your scrap of CPVC and cut it into 3 sections. Put these aside, or into the couplers/endcaps (as you can see in some of the pictures) depending on the scenario. I generally left them in, and took them out only if they would get in the way of assembly.

Take an endcap and drill a hole in it. Assemble the beginnings of a blast button:
Posted Image
Posted Image

While you wait for your glue of choice to finish curing, stick CPVC into couplers and drill holes for the tubing. Be mindful of which segment of CPVC corresponds to which chamber. A quick schematic is [(endcap)(CPVC)(coupler|washer|burr][coupler)(CPVC)(coupler|washer|burr][coupler)(CPVC)(endcap)]. () denote parts. [] mark off chambers. Here's a picture of half of two chambers with tubing:
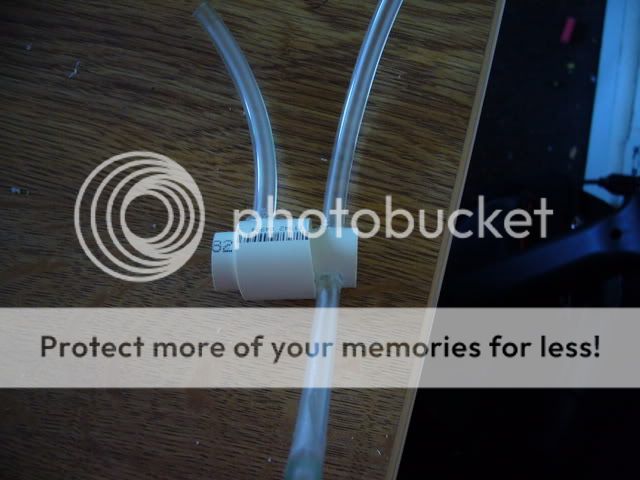
Posted Image

Here's where it gets tricky. Take the endcap with the triggered check valve installed, and attach it to a coupler. The flat side of the burr should face away from the trigger. Depress the trigger 1/3 of the way, and then somehow measure the distance from the end of the stopper on the first trigger to the flat side of the burr in the coupler. I did it by inserting a stud and spring backwards, pushing it to the trigger, holding in place with my finger, depressing the trigger and pushing my finger holding the stud back, removing the first half, and then marking the end of the stud. Then I measure that, and cut that distance from the top of the stud, plus a small amount to account for overlap between stud and stopper. There is probably a much easier way to do this (like a small triangular-prism ruler), but this is what I thought of at the time with the materials I had:
Posted Image
Posted Image
Posted Image

Edited by Zorn's Lemma, 27 July 2009 - 02:43 AM.

  • 0
"In short, the same knowledge that underlies the ability to produce correct judgement is also the knowledge that underlies the ability to recognize correct judgement. To lack the former is to be deficient in the latter."
Kruger and Dunning (1999)

#2 Zorns Lemma

Zorns Lemma

    Sir Scrt

  • Moderators
  • 1,277 posts

Posted 23 February 2009 - 10:27 PM

Note that in the pictures of the stud in the coupler, the stud is backwards. When assembling the triggered check valves inside the couplers, the flat side of the stud should be on the washer side, so that the stopper can seal against the burr. Also, depending on the lengths of CPVC you are using to bridge between endcaps and couplers, you may need to cut a section off of the stopper in the first endcap trigger.

With the stud cut to the right length, assemble another trigger check valve inside the CPVC coupler. Put this together with the original endcap trigger:
Posted Image

Repeat the process to measure the length of stud needed for the third triggered check valve. This is what I came up with:
Posted Image
The stud for trigger #2 is about 1/2 to 2/3 of trigger #1, depending on the length of the compressed return spring. Ideally, if we had internal return springs (next version) it would be exactly 2/3. The stud for trigger #3 is 1/3 of trigger #1 more or less, as the return springs get small as we go down.

From here, it should be obvious what comes next. Here are some more fabrication pictures:

Posted Image
From left to right: chamber #3, trigger #3, and half of chamber #2; half of chamber #2, trigger #2, half of chamber #1; half of chamber #1, trigger #1

Posted Image
Everything dissassembled. I originally put the tubing in with hot glue just to position it and see how things fit together. Final assembly is done with superglue for strength, followed by goop for sealant.

Posted Image
Final ring of goop around the end of chamber #3.

Again, in all her glory:
Posted Image
You will notice the prolific amounts of goop everywhere.

Edited by Zorn's Lemma, 23 February 2009 - 10:43 PM.

  • 0
"In short, the same knowledge that underlies the ability to produce correct judgement is also the knowledge that underlies the ability to recognize correct judgement. To lack the former is to be deficient in the latter."
Kruger and Dunning (1999)

#3 nerfboi

nerfboi

    Member

  • Members
  • 858 posts

Posted 23 February 2009 - 11:47 PM

WOW. I gotta hand it to ya'. Nice job man. I will definitely be trying this. Good job man!
  • 0
We Ride together, we die together, Bad boys for life.

#4 TantumBull

TantumBull

    Member

  • Moderators
  • 1,929 posts

Posted 23 February 2009 - 11:48 PM

Oh my god! Yes! You win! You need to start selling these if they work well. Which bring me to a question...

Does it work well? Any leaks?
  • 0

#5 Draconis

Draconis

    I am not Lord Draconical

  • Members
  • 2,712 posts

Posted 24 February 2009 - 12:17 AM

I think goop will be fine for sealing leaks, but for really adhering the CPVC sections, you need to use PVC or CPVC cement. I wouldn't pressurize it otherwise. However, I'm excited that you were able to get it all assembled. I've been meaning to, but I have so many projects... Good job!
  • 0
[15:51] <+Noodle> titties
[15:51] <+Rhadamanthys> titties
[15:51] <+jakejagan> titties
[15:51] <+Lucian> boobs
[15:51] <+Gears> titties
[15:51] <@Draconis> Titties.
[15:52] <+Noodle> why is this so hard?

#6 umpshaplapa

umpshaplapa

    Member

  • Members
  • 636 posts

Posted 24 February 2009 - 12:38 AM

I second the cement suggestion. I would deffinantly(sp?) buy these if you sell 'em.
  • 0
QUOTE(Talio @ Jun 29 2009, 01:50 PM) View Post

i got a black belt in noob banning in 2004.


#7 Anson at HK

Anson at HK

    Member

  • Members
  • 2 posts

Posted 24 February 2009 - 04:24 AM

Can you fill up the tank 2 and 3? It seems that the rubber stopper of tank 2 and 3 will stop air that you pumped in.
  • 0

#8 Ice Nine

Ice Nine

    Prince Dangus

  • Administrators
  • 1,460 posts

Posted 24 February 2009 - 08:30 AM

Can you fill up the tank 2 and 3? It seems that the rubber stopper of tank 2 and 3 will stop air that you pumped in.


The system works exactly like a SMDTG trigger in that pressurization of the first tank (and firing chamber) will open the rubber stopper to number two, which will then open the stopper to number three. You can think of them as independent check valves.
  • 0

Unholy Three: DUPLUM SCRTA, DUPLUM PROBLEMA (2009)

But Zeke guns tend to be like proofs by contradiction

Theoretically solid but actually non-constructive

Rnbw Cln


#9 Zorns Lemma

Zorns Lemma

    Sir Scrt

  • Moderators
  • 1,277 posts

Posted 24 February 2009 - 01:57 PM

Now that the goop is essentially cured, I've been able to fully test it, with interesting results.

The trigger works, but when hooked up to 3 tanks, the first tank acquires a higher pressure than the second, which in turn has a higher pressure than the third.

I will attempt to solve this with another iteration that had weaker springs and larger trigger spacings, but the overall design will probably end up being bigger to make sure everything works perfectly. In retrospect, I should've started with a larger design, and minimized it on the second iteration. :/

Consider the current design a proof of concept then.
  • 0
"In short, the same knowledge that underlies the ability to produce correct judgement is also the knowledge that underlies the ability to recognize correct judgement. To lack the former is to be deficient in the latter."
Kruger and Dunning (1999)

#10 Zorns Lemma

Zorns Lemma

    Sir Scrt

  • Moderators
  • 1,277 posts

Posted 24 February 2009 - 09:46 PM

I just finished reassembling the trigger after busting it open. There were two areas that weren't optimal: top trigger seal and spacing between stopper and trigger. I doubled up on return springs for the top trigger, removed a coil from the bottom ones, and shaved off some rubber.

Put it back together with loctite (taking it apart was annoyingly difficult, as the goop didn't solidly adhere to anything but itself, and shrinks upon curing, leaving me to pry off rings of elasticy stickiness) and hot glue for airtightness. Did some preliminary testing with an AT2k pump and a check valve, to make sure air was flowing/not flowing in the right dirrections at different levels of trigger pull, and everything looks good.

Now I just have to wait for the goop to finally dry. In the meantime, I'll figure out how to make a simpler system.
  • 0
"In short, the same knowledge that underlies the ability to produce correct judgement is also the knowledge that underlies the ability to recognize correct judgement. To lack the former is to be deficient in the latter."
Kruger and Dunning (1999)

#11 Galaxy613

Galaxy613

    Member

  • Members
  • 999 posts

Posted 24 February 2009 - 09:55 PM

Awesome job, and I enjoy reading your reports. <_<
  • 0
[Former Caretaker of the Guru Mk2]

#12 Zorns Lemma

Zorns Lemma

    Sir Scrt

  • Moderators
  • 1,277 posts

Posted 04 April 2009 - 11:24 PM

version 2.1

Same concept as 2.0, but done better and smaller:
Posted Image
Posted Image
Posted Image
Posted Image

The only thing that can't be gotten from these pictures and the write up in the first posts is that I replaced the burr with a neoprene washer (1/2" OD, 3/16" ID). Also, do not use superglue as your adhesive, as it fucks up rubber.

3.0 to come tomorrow, and will be on a different design. It will also accommodate 4 shots.

Edited by Zorn's Lemma, 05 April 2009 - 11:58 PM.

  • 0
"In short, the same knowledge that underlies the ability to produce correct judgement is also the knowledge that underlies the ability to recognize correct judgement. To lack the former is to be deficient in the latter."
Kruger and Dunning (1999)

#13 iMod1

iMod1

    Member

  • Members
  • 117 posts

Posted 04 April 2009 - 11:31 PM

Excellent! I cannot wait for the next update. Incredible job; I WILL be building one of these.
-iMod
  • 0
A computer once beat me at chess, but after that it was no match for me at kick boxing.
_______________
The Phoenix | Foam Universe

#14 TantumBull

TantumBull

    Member

  • Moderators
  • 1,929 posts

Posted 05 April 2009 - 08:54 PM

And I thought the first one was compact! EXCELLENT job! Have you overcome that problem you had with 1.0 where the first tank was more powerful than the second and the second more powerful than the third?
  • 0

#15 Zorns Lemma

Zorns Lemma

    Sir Scrt

  • Moderators
  • 1,277 posts

Posted 05 April 2009 - 11:55 PM

That problem was due to not enough movement (what I call tolerance) of the valves and leaks. In the first version of 2.1, I got the chambers to pressurize correctly, but the top valve leaked, so I'd only be firing tanks 2 and 3 (but they worked fine). In the second version of 2.1, I fixed the top valve, so everything seemed to pressurized fine. However, in testing, the top tank I used had a leak. In trying to fix the leak, I broke the At2k pump I was using. (Funny store about that, ask Ice9 or I on the chat). The pump wouldn't be fixed for at least a day, and I wanted to work on 3.0, and due to a lack of connectors, had to scrap this one. It now is sitting around as a 2-step.

Short answer: No idea.
Long answer: No, but if I didn't fuck up anywhere in fixing the problems from 2.1.1 in building 2.1.2 and the preliminary testing of 2.1.2 is accurate, then yes.
Really long answer: If 3.0 works, then do that instead of this.
  • 0
"In short, the same knowledge that underlies the ability to produce correct judgement is also the knowledge that underlies the ability to recognize correct judgement. To lack the former is to be deficient in the latter."
Kruger and Dunning (1999)

#16 rork

rork

    Member

  • Members
  • 1,008 posts

Posted 06 April 2009 - 12:11 AM

I'm going to be attempting a 2-stage version of this reasonably soon; I need to find smaller plugs. I would think that a 2-stage trigger would be quite a lot easier than the 3-stage version. Also: can you say, "homemade splitfire"?
  • 0
<a href="http://nerfhaven.com...howtopic=20296" target="_blank">SNAPbow Mk. V</a>
<a href="http://nerfhaven.com...howtopic=20409" target="_blank">Make it pump-action</a>

#17 Ice Nine

Ice Nine

    Prince Dangus

  • Administrators
  • 1,460 posts

Posted 06 April 2009 - 12:15 AM

I'm going to be attempting a 2-stage version of this reasonably soon; I need to find smaller plugs. I would think that a 2-stage trigger would be quite a lot easier than the 3-stage version. Also: can you say, "homemade splitfire"?


Not to derail the thread here, but I have good news and I have bad news.

The good news: I built a homemade backpressure tank that sealed perfectly.

The bad news: The stopper section was a little too loose; the backpresssure trigger would suck out all the air and the stopper would remain jammed against the sealing end of the tank.

This seems like an easy issue to fix.

I've been watching Zorn work with these triggers in the past, and the one he is currently building is most assuredly the most refined and thought-out version. I would be surprised if it didn't work perfectly.
  • 0

Unholy Three: DUPLUM SCRTA, DUPLUM PROBLEMA (2009)

But Zeke guns tend to be like proofs by contradiction

Theoretically solid but actually non-constructive

Rnbw Cln


#18 venom213

venom213

    Member

  • Validating
  • 1,294 posts

Posted 06 April 2009 - 05:24 PM

I'm going to be attempting a 2-stage version of this reasonably soon; I need to find smaller plugs. I would think that a 2-stage trigger would be quite a lot easier than the 3-stage version. Also: can you say, "homemade splitfire"?

Damn you Rork! That's exactly what I've been doing all this work with backpressure tanks for! It's funny, because right when I was about to really get going on my homemade splitfire, I got an actual SF from my friend for like $5. If you can make it 100% homemade, that would be amazing. Mine is going to use hornet tanks, but everything else is planned to be homemade.

I am very happy to see the design advancing. I planned to use barbed connectors on my homemade trigger too, but I stopped working on that design after I saw the first version of this. I got the parts I need for this a while ago, but I'm going to wait until the third version is posted so I can use the design modifications.
  • 0

#19 diamondbacknf1626

diamondbacknf1626

    Member

  • Members
  • 835 posts

Posted 06 April 2009 - 05:42 PM

I'm going to be attempting a 2-stage version of this reasonably soon; I need to find smaller plugs. I would think that a 2-stage trigger would be quite a lot easier than the 3-stage version. Also: can you say, "homemade splitfire"?

Damn you Rork! That's exactly what I've been doing all this work with backpressure tanks for! It's funny, because right when I was about to really get going on my homemade splitfire, I got an actual SF from my friend for like $5. If you can make it 100% homemade, that would be amazing. Mine is going to use hornet tanks, but everything else is planned to be homemade.

I am very happy to see the design advancing. I planned to use barbed connectors on my homemade trigger too, but I stopped working on that design after I saw the first version of this. I got the parts I need for this a while ago, but I'm going to wait until the third version is posted so I can use the design modifications.


Man, my friend is going to be furious with you. He has been scheming this, telling me about it for the past month. I've been waiting to see someone come up with something like it. I personally own a splitfire, and they're great. If someone could make a 100% home-made analog to it, that would be incredible.
  • 0
QUOTE(TxNerfer @ Nov 13 2010, 12:42 PM) View Post

Hey...I got a crazy idea: how about you stop all that sigging stuff? It's not even my thread and it annoys me.

#20 Zorns Lemma

Zorns Lemma

    Sir Scrt

  • Moderators
  • 1,277 posts

Posted 13 April 2009 - 09:58 PM

4-step time!

Posted Image
Posted Image

Materials:
-4x 3/16" ID 1/2" OD neoprene washers
-4x steel washers
-4x 1/2" top diameter rubber stoppers
-2x #6 screw 3"
-1/2 of a 1/2" CPVC endcap
-1x CPVC segment
-springs

First, some math:
Posted Image
Posted Image
These were to determine the maximum amount of "button push" distance I could squeeze out of each stage, given the length of screw I had and counting in spring length at max deflection and loss due to width of the washers and embedding the screw into the stopper. If you're not stupid like
me, you'll buy 2 of the #6 screws and thus have lots of room (of course, the final product won't be as compact, but you don't have to do as much math either).

Final calculations (measured in cm because fuck inches):
-Hole depth of .35 in rubber stoppers
-Button push distance of .25
-Loss of .75 per segment
-1.875, 2.125, 1.625, and 1.375 lengths for segments 1,2,3,4 respectively

Construction:

I suggest reading the writeup on the first page, as well as Ice9's blast button writeup, to get a good sense of how this works. Once you have the concept down, construction is fairly simple (but tedious to do). Pictures will probably explain better than words.

1. Slap the washers onto the washers.
Posted Image

2. Cut your screw(s). Do not precut the CPVC at this point
Posted Image

3a. Put screw pieces into rubber stoppers
b. Put springs on the steel side of the doublewasher. Spring length for the bottom of each chamber should be length of useable screw segment (total length - loss) plus movement distance (.25 for me) plus a little extra to help ensure good seal.
3ab*. If you kept the screw head for the top one, like I did, make sure you feed it through a washer first. (Pictures 2 and 3, on the right, top row).
c. Shove a spring onto an endcap to seal the final chamber. Note: You do not see this in the pictures. I initially used a leftover burr/washer combo with a segment of rubber stopper glued on as an endpiece (Pictures 2 center and 3, on the right, bottom row) but that didn't work.
Posted Image
Posted Image
Posted Image
Last one shows each section of stopper/screw with half it's accompanying top piece (the one it seals against) below it. On the far right is the bottom piece for the last chamber and the complete top piece for the first chamber.

4. Assemble the trigger. Endcap -> CPVC segment long enough to allow full movment of the valve plug and still apply some small preload to ensure good seal -> stopper/screw -> top piece -> cpvc -> stopper -> top piece -> etc.
While cutting the CPVC, take a dremel to it to ensure flat ends, and also drill a hole for tubing. The top CPVC segment for the chamber should have 2 holes, one for the tank, and one for the pump.
Posted Image
Posted Image
Glue the chambers together with some strong glues (I find goop doesn't have good holding strength).

5. Seal everything with goop. The more the better.
Posted Image
Posted Image

In the video, I pump it and then bring each tank to the camera (don't have a proper camcorder) and fire it, in an attempt to have the sound trigger on the microphone. If you can't hear it, turn the volume up.
Also, you will notice me pressing down on the trigger setup. This is because I used shitty ace construction adhesive (great for darts, bad for everything else) and I wanted to test max pressure so as I took the setup to higher and higher pressures, the trigger separated between chambers 2 and 3. Then I remembered to do a video. :/

Also, the background music is Ice9's "German diddle techno"

Edited by Zorn's Lemma, 13 April 2009 - 10:01 PM.

  • 0
"In short, the same knowledge that underlies the ability to produce correct judgement is also the knowledge that underlies the ability to recognize correct judgement. To lack the former is to be deficient in the latter."
Kruger and Dunning (1999)

#21 Ice Nine

Ice Nine

    Prince Dangus

  • Administrators
  • 1,460 posts

Posted 13 April 2009 - 10:03 PM

In the video, I pump it and then bring each tank to the camera (don't have a proper camcorder) and fire it, in an attempt to have the sound trigger on the microphone. If you can't hear it, turn the volume up.
Also, you will notice me pressing down on the trigger setup. This is because I used shitty ace construction adhesive (great for darts, bad for everything else) and I wanted to test max pressure so as I took the setup to higher and higher pressures, the trigger separated between chambers 2 and 3. Then I remembered to do a video. :/

Also, the background music is Ice9's "German rape techno"


There are other videos that I took of Zorn using this that he didn't upload wherein none of my music is playing in the background. The four step trigger worked beautifully until Zorn blew it apart.

As for those curious as to what's playing in the background, I described it as "German rape techno" since that's the only part that came through. It's actually the Soulwax remix of MGMT's Kids. If I'm honest I should've described it as a Belgian remix of American rape techno.

Edited by Ice Nine, 13 April 2009 - 10:05 PM.

  • 0

Unholy Three: DUPLUM SCRTA, DUPLUM PROBLEMA (2009)

But Zeke guns tend to be like proofs by contradiction

Theoretically solid but actually non-constructive

Rnbw Cln


#22 Zorns Lemma

Zorns Lemma

    Sir Scrt

  • Moderators
  • 1,277 posts

Posted 16 April 2009 - 07:37 PM

Posted Image

3.1 ditches the rubber stoppers and uses nylon spacers to help center everything, increasing consistency.
  • 0
"In short, the same knowledge that underlies the ability to produce correct judgement is also the knowledge that underlies the ability to recognize correct judgement. To lack the former is to be deficient in the latter."
Kruger and Dunning (1999)

#23 Zorns Lemma

Zorns Lemma

    Sir Scrt

  • Moderators
  • 1,277 posts

Posted 27 July 2009 - 02:19 AM

I made some design changes and made what is v3.2 a long time ago. It is mainly a refinement of the v3.1 using bulk-order parts because I was starting to get tired of going to the hardware store and buying pieces individually.

I do not have any completed pictures, but this design is what is used in the triggers I have made for diamondbacknf and koree (and maybe other people, I really can't remember, but these guys I do because there were shipping issues /tangent). I do have unassembled parts somewhere which I will take a picture of tomorrow and put up.

The concept is still the same as the 3.0 series. The body of the chambers is built out of CPVC. The triggered check valves are made from threaded rod + a rubber washer + nut, and seal up against a rubber washer connected to a steel washer. The spring rests on the steel washer and pushes up against the plug part of the button/plug combo (the v1/v2 had the spring push against the button part). That is, the springs reside in the chambers, rather than on top of the chambers. If you've seen all the iterations, you'll know what I'm talking about.

Now for the main point of this post, McMaster parts for Venom:

9657K82 1 Pack Steel Compression Spring, Music Wire, 10" Length, 1/4" Od, .022" Wire Dia
94708A311 1 Pack Neoprene-bonded Galv Steel Sealing Washer, No. 10 Screw Size, 5/8" Od
90130A011 1 Pack Epdm Rubber Washer, No. 10 Screw Size, 3/8" Od, .093" Thick
93665A310 1 Pack Nylon Fully Threaded Stud, Off-white, 10-32 Thread, 3/4" Length
90480A195 2 Packs Zinc-plated Steel Machine Screw Hex Nut, 10-32 Thread Size, 3/8" Width, 1/8" Height

You will also need barbed fittings and tubing. Construction is fairly simple. Thread a nut onto the threaded rod, then push a rubber washer onto it. Glue the thing together. Take the bonded washers, and bore out the ID so the threaded rod can fit through. You can use 8-32 or 6-32 threaded rods instead (with corresponding washer) and save on this step, but I couldn't find those in small sizes (8-32 for example, comes in 24" or 6' lengths). Then you'll also want to cut out the rubber along the rim such that the rubber will sit inside the CPVC and it is steel that contacts the edge. Again, pictures will be up tomorrow, and I hope that dbnf will take pictures of his.

Edit: Oh and if it isn't obvious, you cut the wire to the desired length. Unless you're building an 8" tall trigger...

Edited by Zorn's Lemma, 27 July 2009 - 02:23 AM.

  • 0
"In short, the same knowledge that underlies the ability to produce correct judgement is also the knowledge that underlies the ability to recognize correct judgement. To lack the former is to be deficient in the latter."
Kruger and Dunning (1999)


1 user(s) are reading this topic

0 members, 1 guests, 0 anonymous users